 Eats365 Products
 Merchant Guide
 Modules
 Membership
 Integrations
 Hardware
 Staff Operations
 Roles & Permissions
 Payments
 Reports
 What’s New
 Release Notes
 Troubleshooting
 Simulators
 Glossary
 Troubleshooter
 System Status
Roles and Permissions
Table of Contents
Set up and manage Staff List
Learn how to create a Staff List and assign roles to your staff on the Eats365 POS or on the Merchant Portal.
A Staff List is a directory that includes the names and information of all staff members in the restaurant. The Staff List is also where you can assign roles to your staff, and where staff members can change their account passcode and login PIN for the POS.
In this article, you’ll learn how to add a staff member to the Staff List and how to manage your Staff List.
Create a staff profile
Creating staff profiles allows you to manage your staff’s roles and permissions.
To add a staff member to your Staff List, follow the steps below:
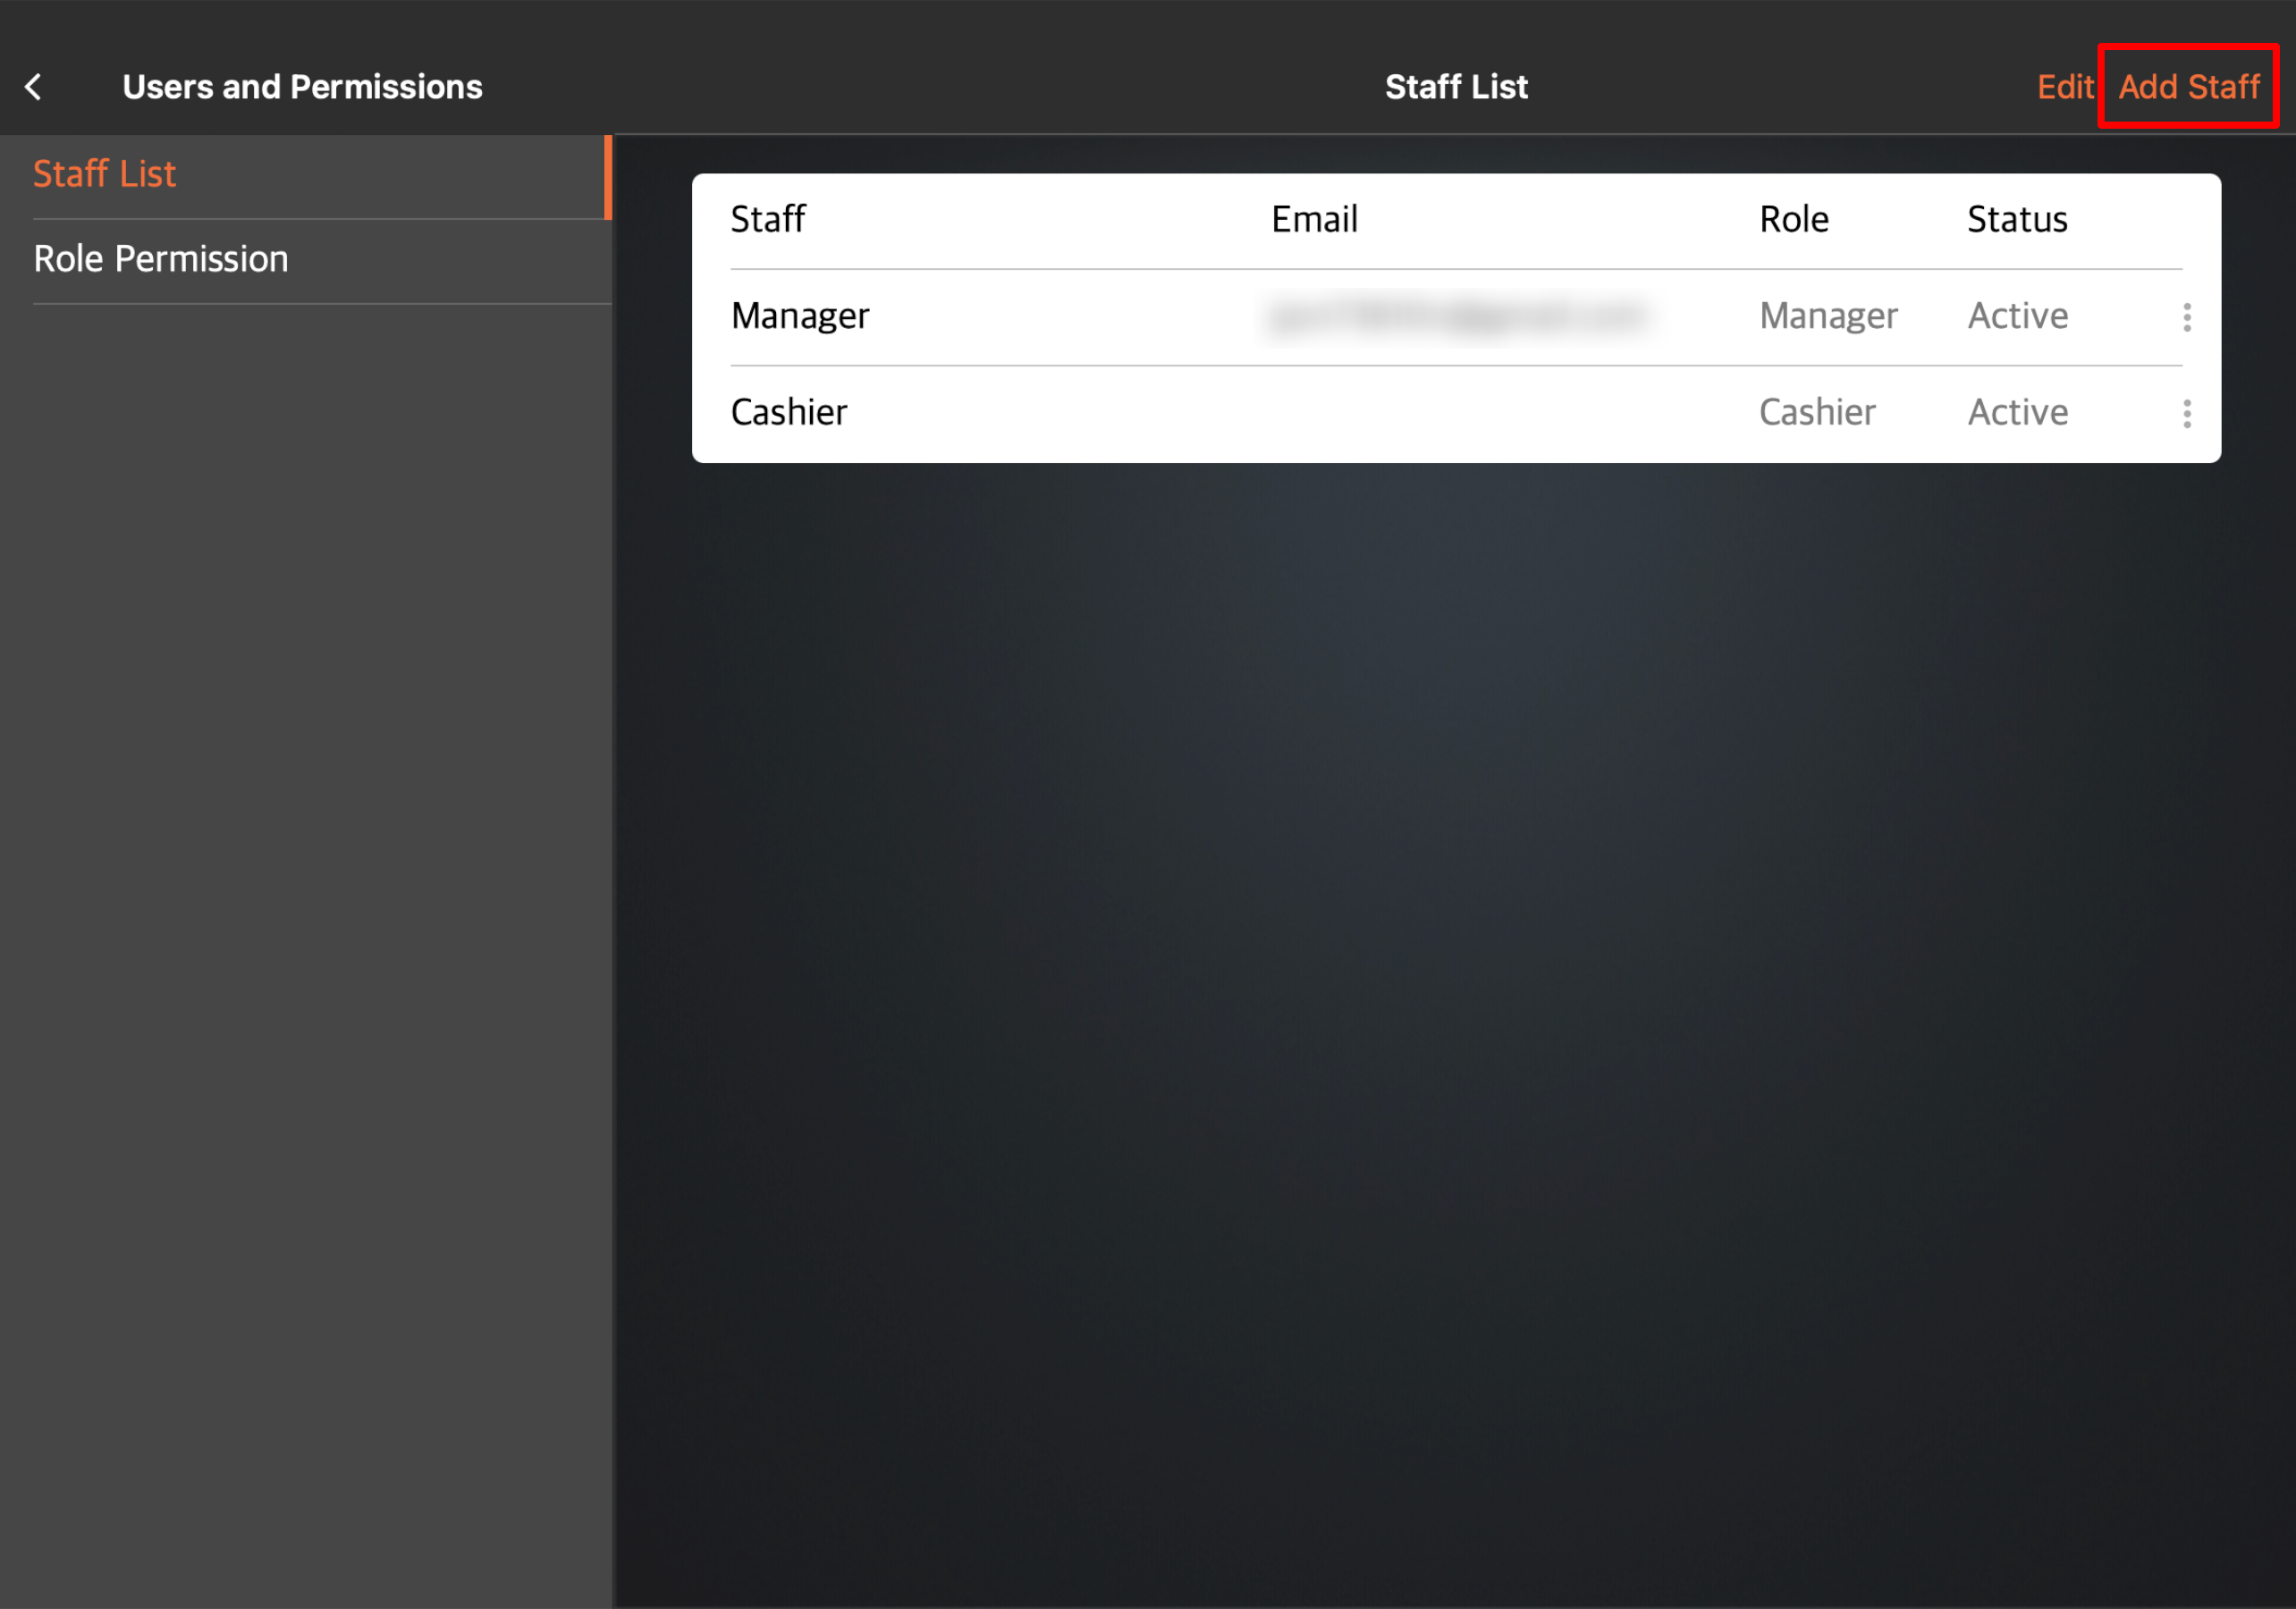
Eats365 POS
- Log in to the Eats365 POS.
- At the top left, tap Settings
 .
. - Under "Staff," tap Users and Permissions. Then, select Staff List.
- At the top right, tap Add Staff.
- Enter your staff member’s information.
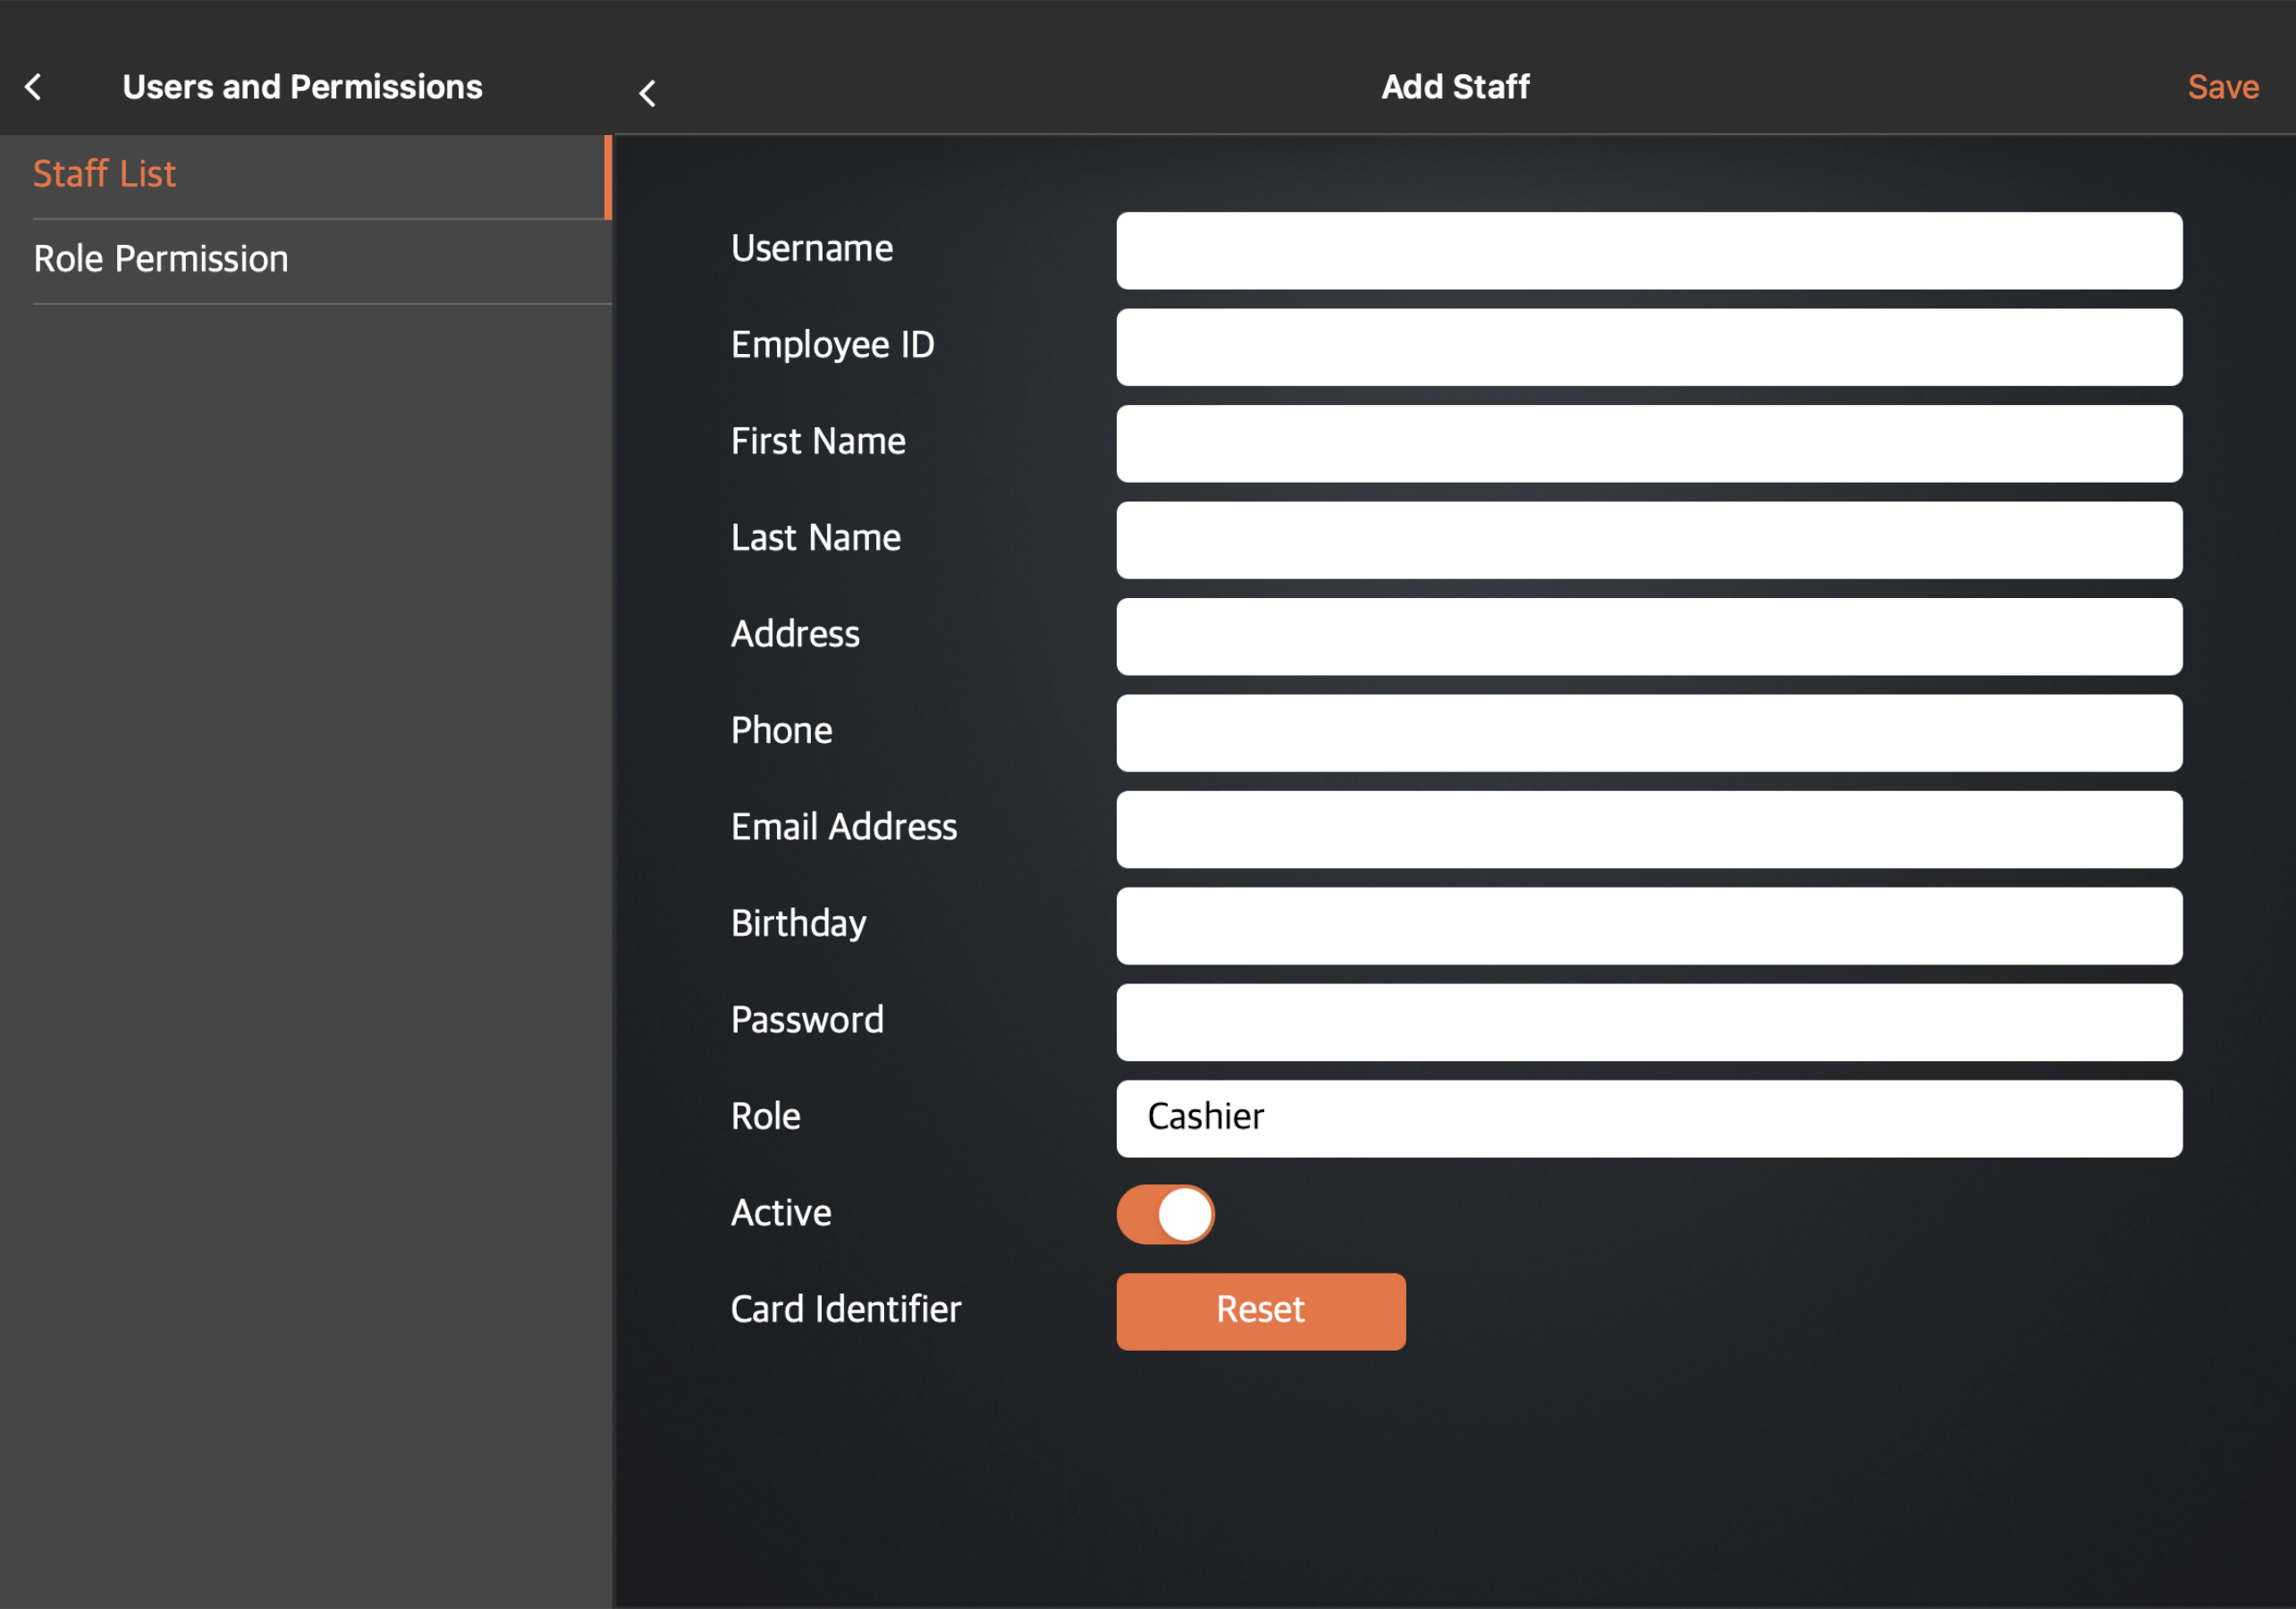
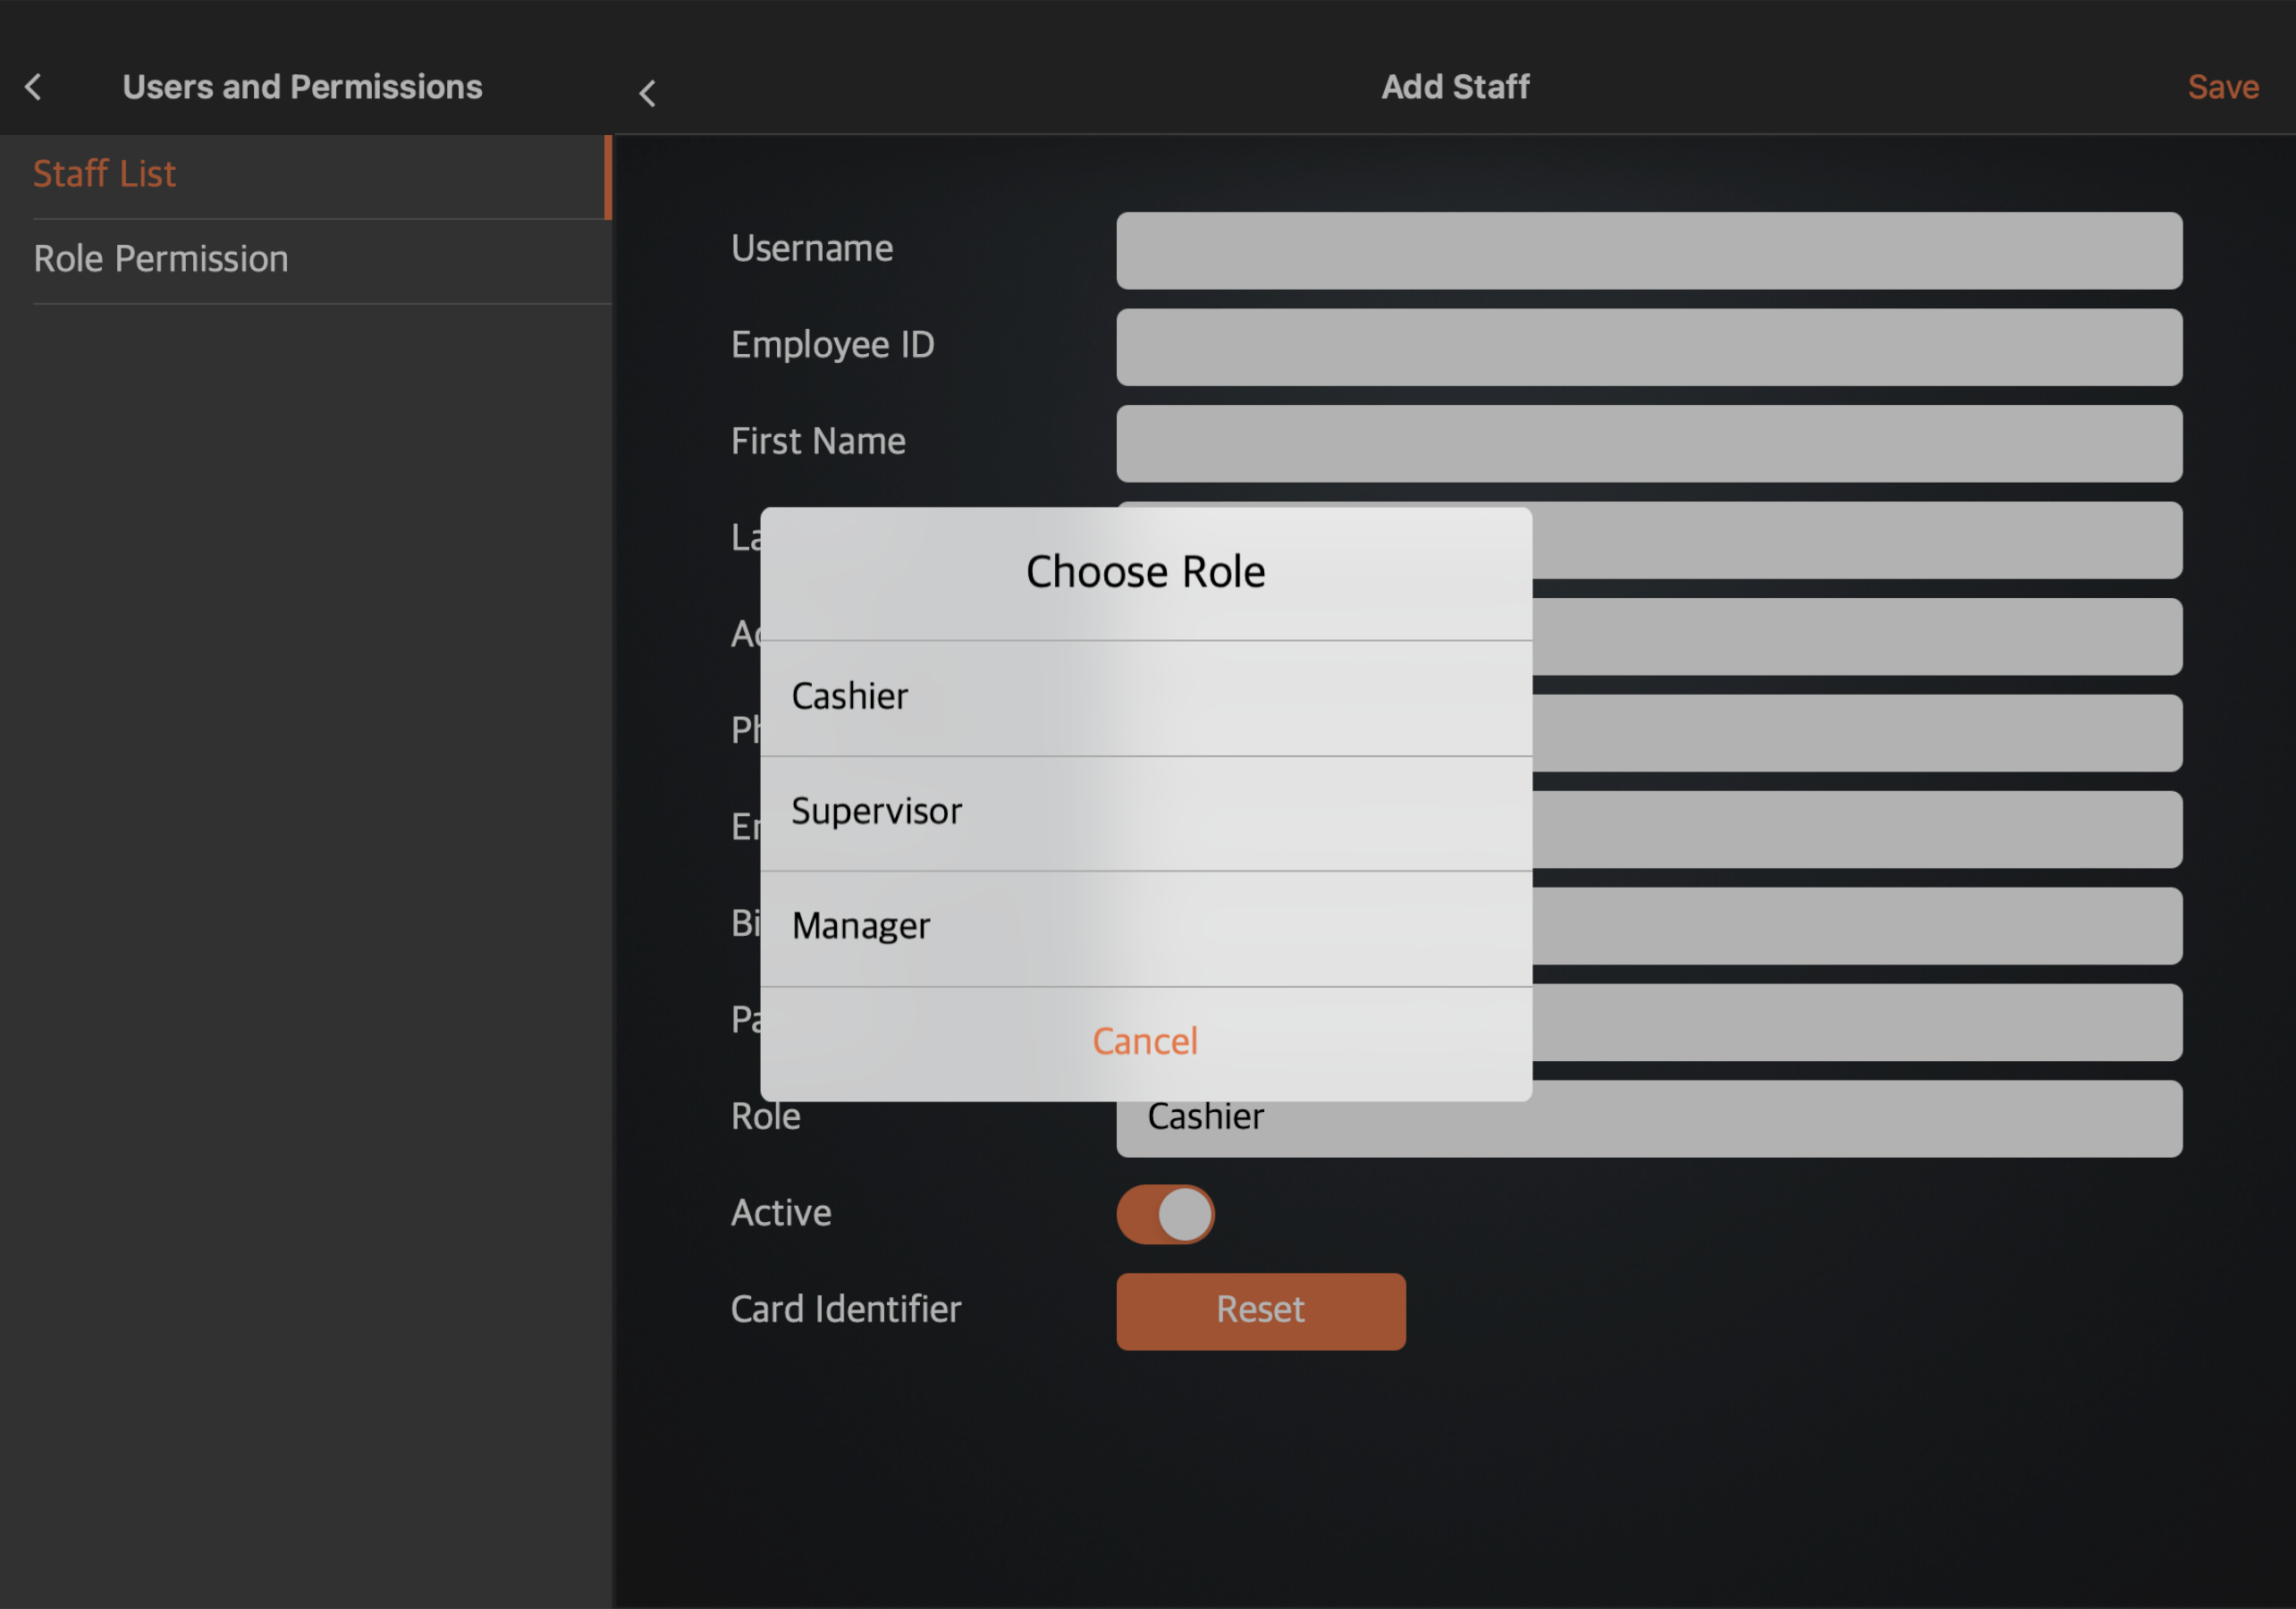
- Select a role for your staff member.
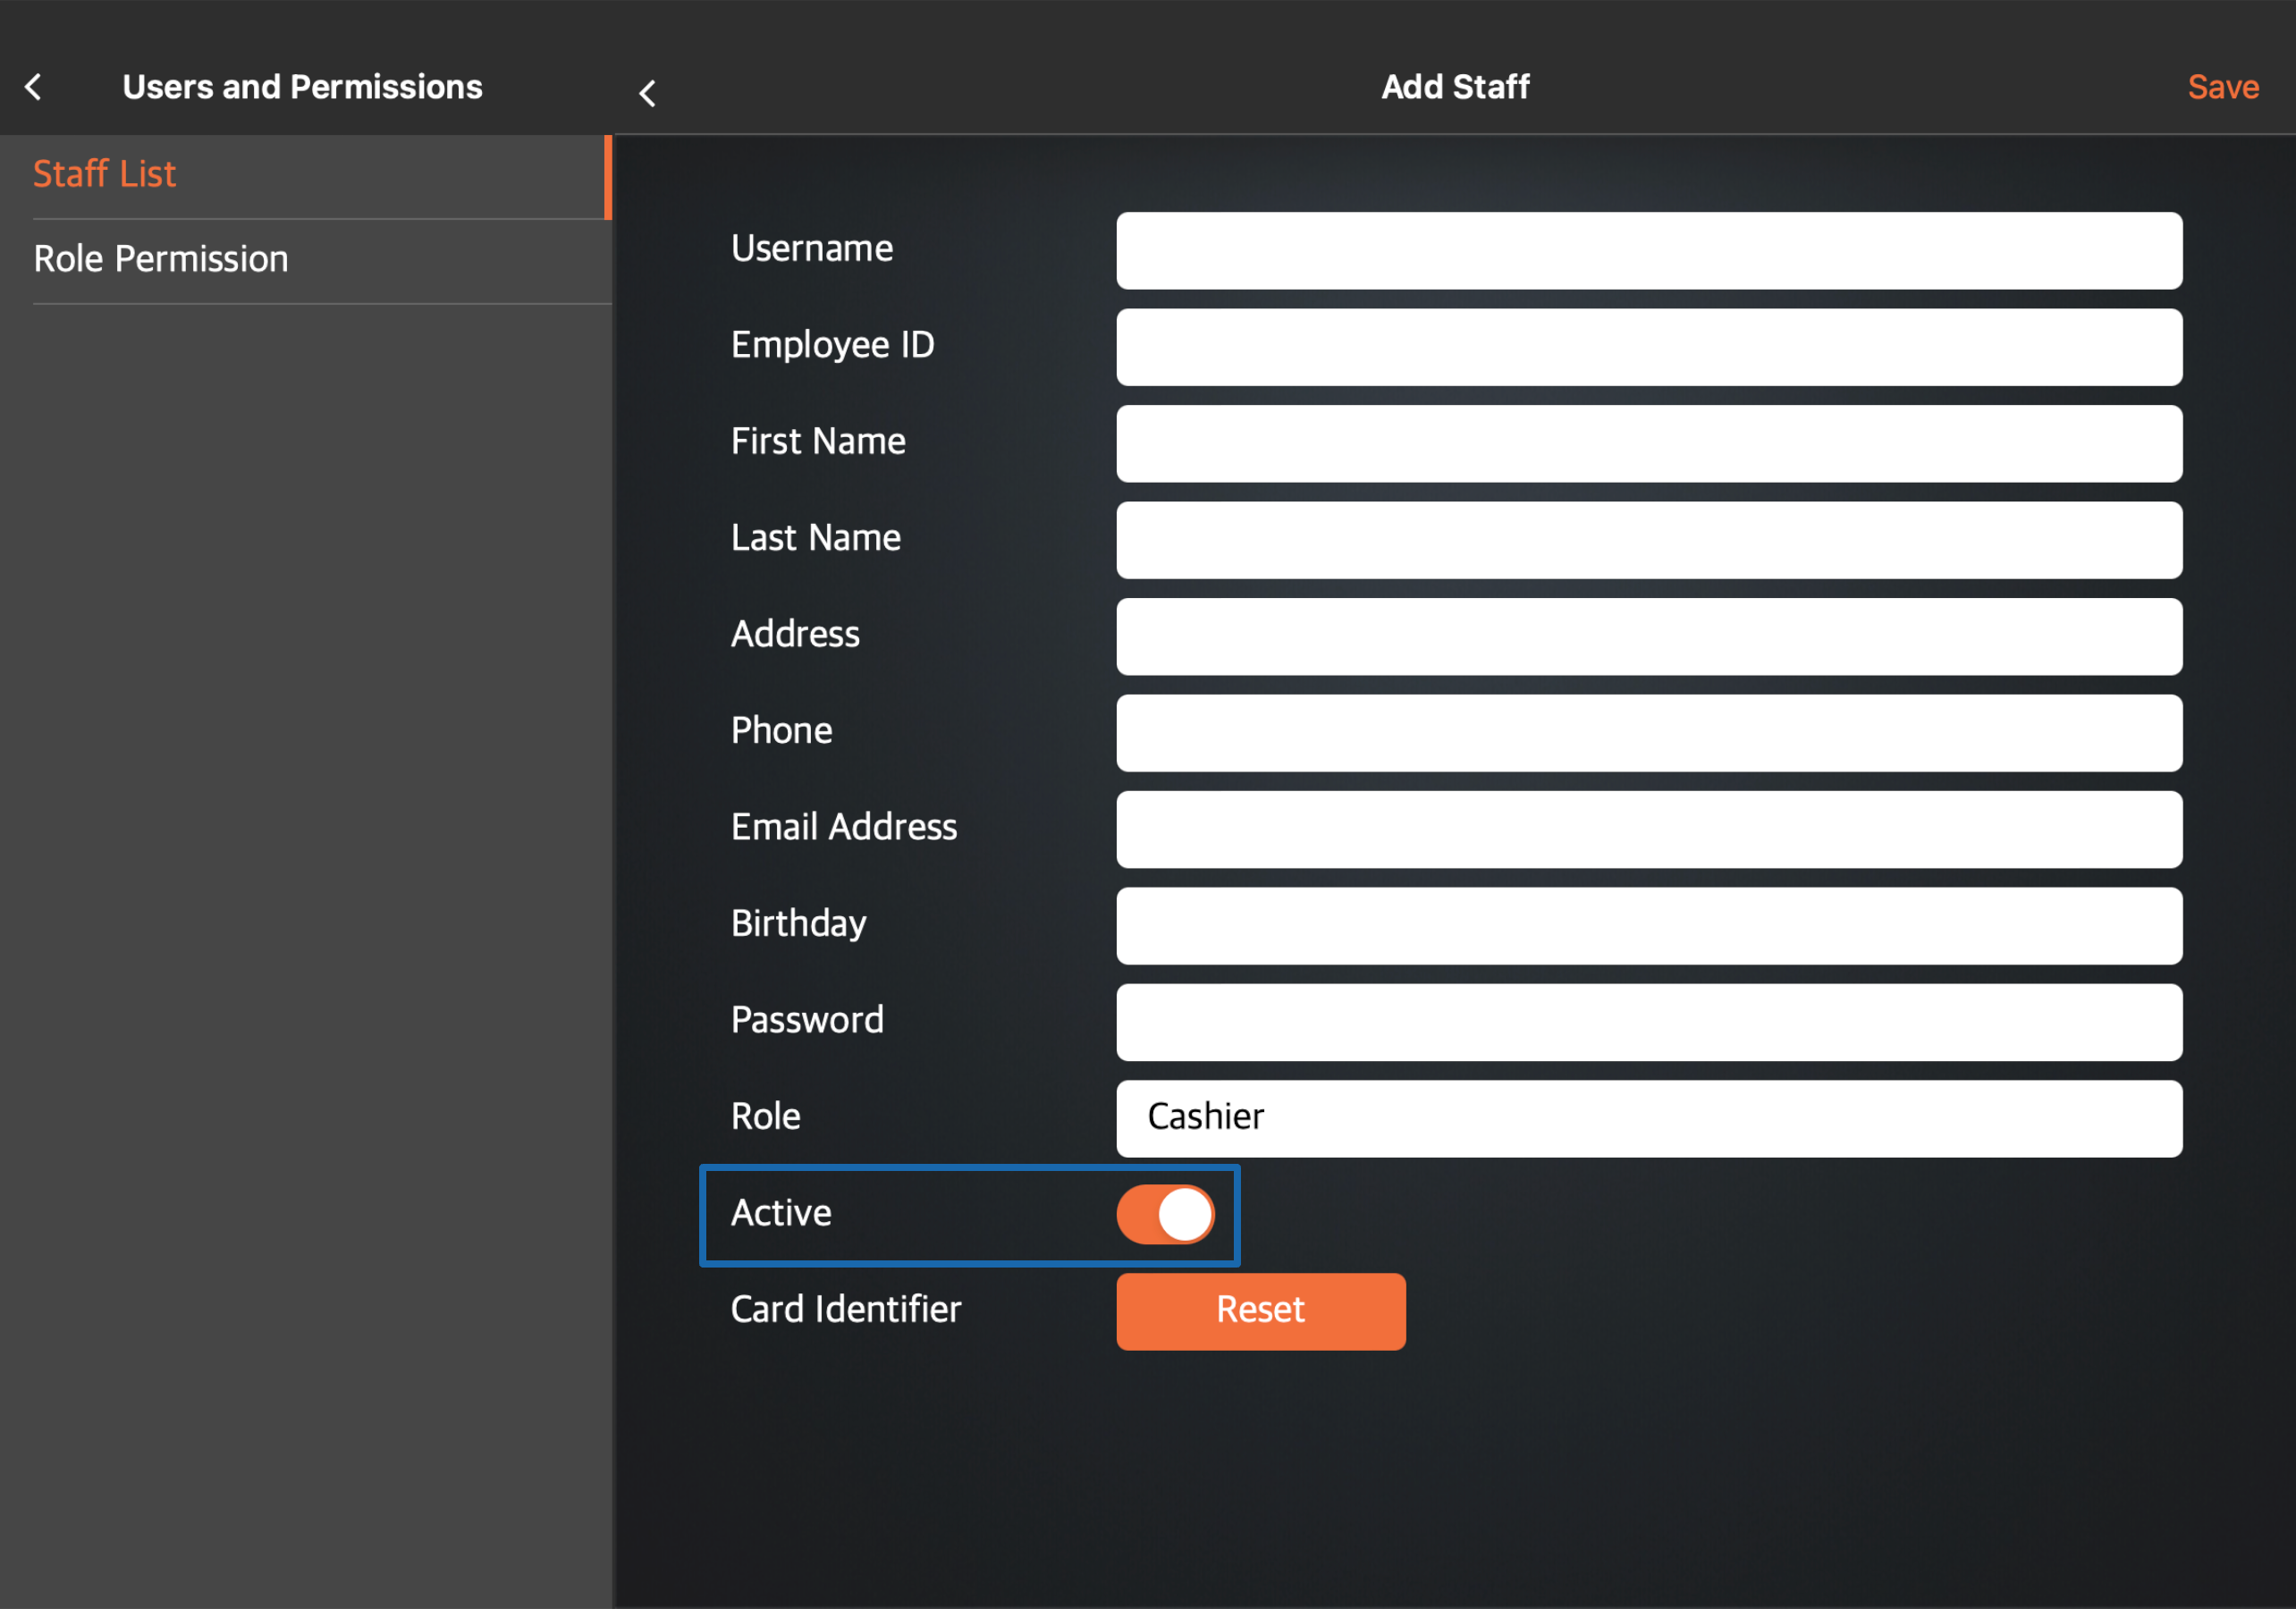
- To grant your staff member access to the POS, turn on Active
 .
.
- (Optional) To allow your staff member to use their staff card when logging in to the POS, tap Reset next to "Card Identifier." Then, tap the staff card on the RFID machine or scan the code on the staff card using the barcode scanner.

Note: Make sure you’ve added your staff member’s staff card number on the Merchant Portal before you proceed with this step. - At the top right, tap Save to confirm.
Merchant Portal (Classic Theme)
- Log in to the Merchant Portal.
- On the left panel, click on Staff. Then, select Staff List.
- At the top right, click on +Add Staff.
- Enter your staff’s information.
Within the Staff List, you can select which tool you want your staff to have access to. You can set up your staff’s access to the POS or the Merchant Portal.
Set up access to the POS
To set up your staff member’s access to the POS, follow the steps to create a Staff List and continue with the steps below:
- Enable POS access
 . The POS Account tab appears at the top.
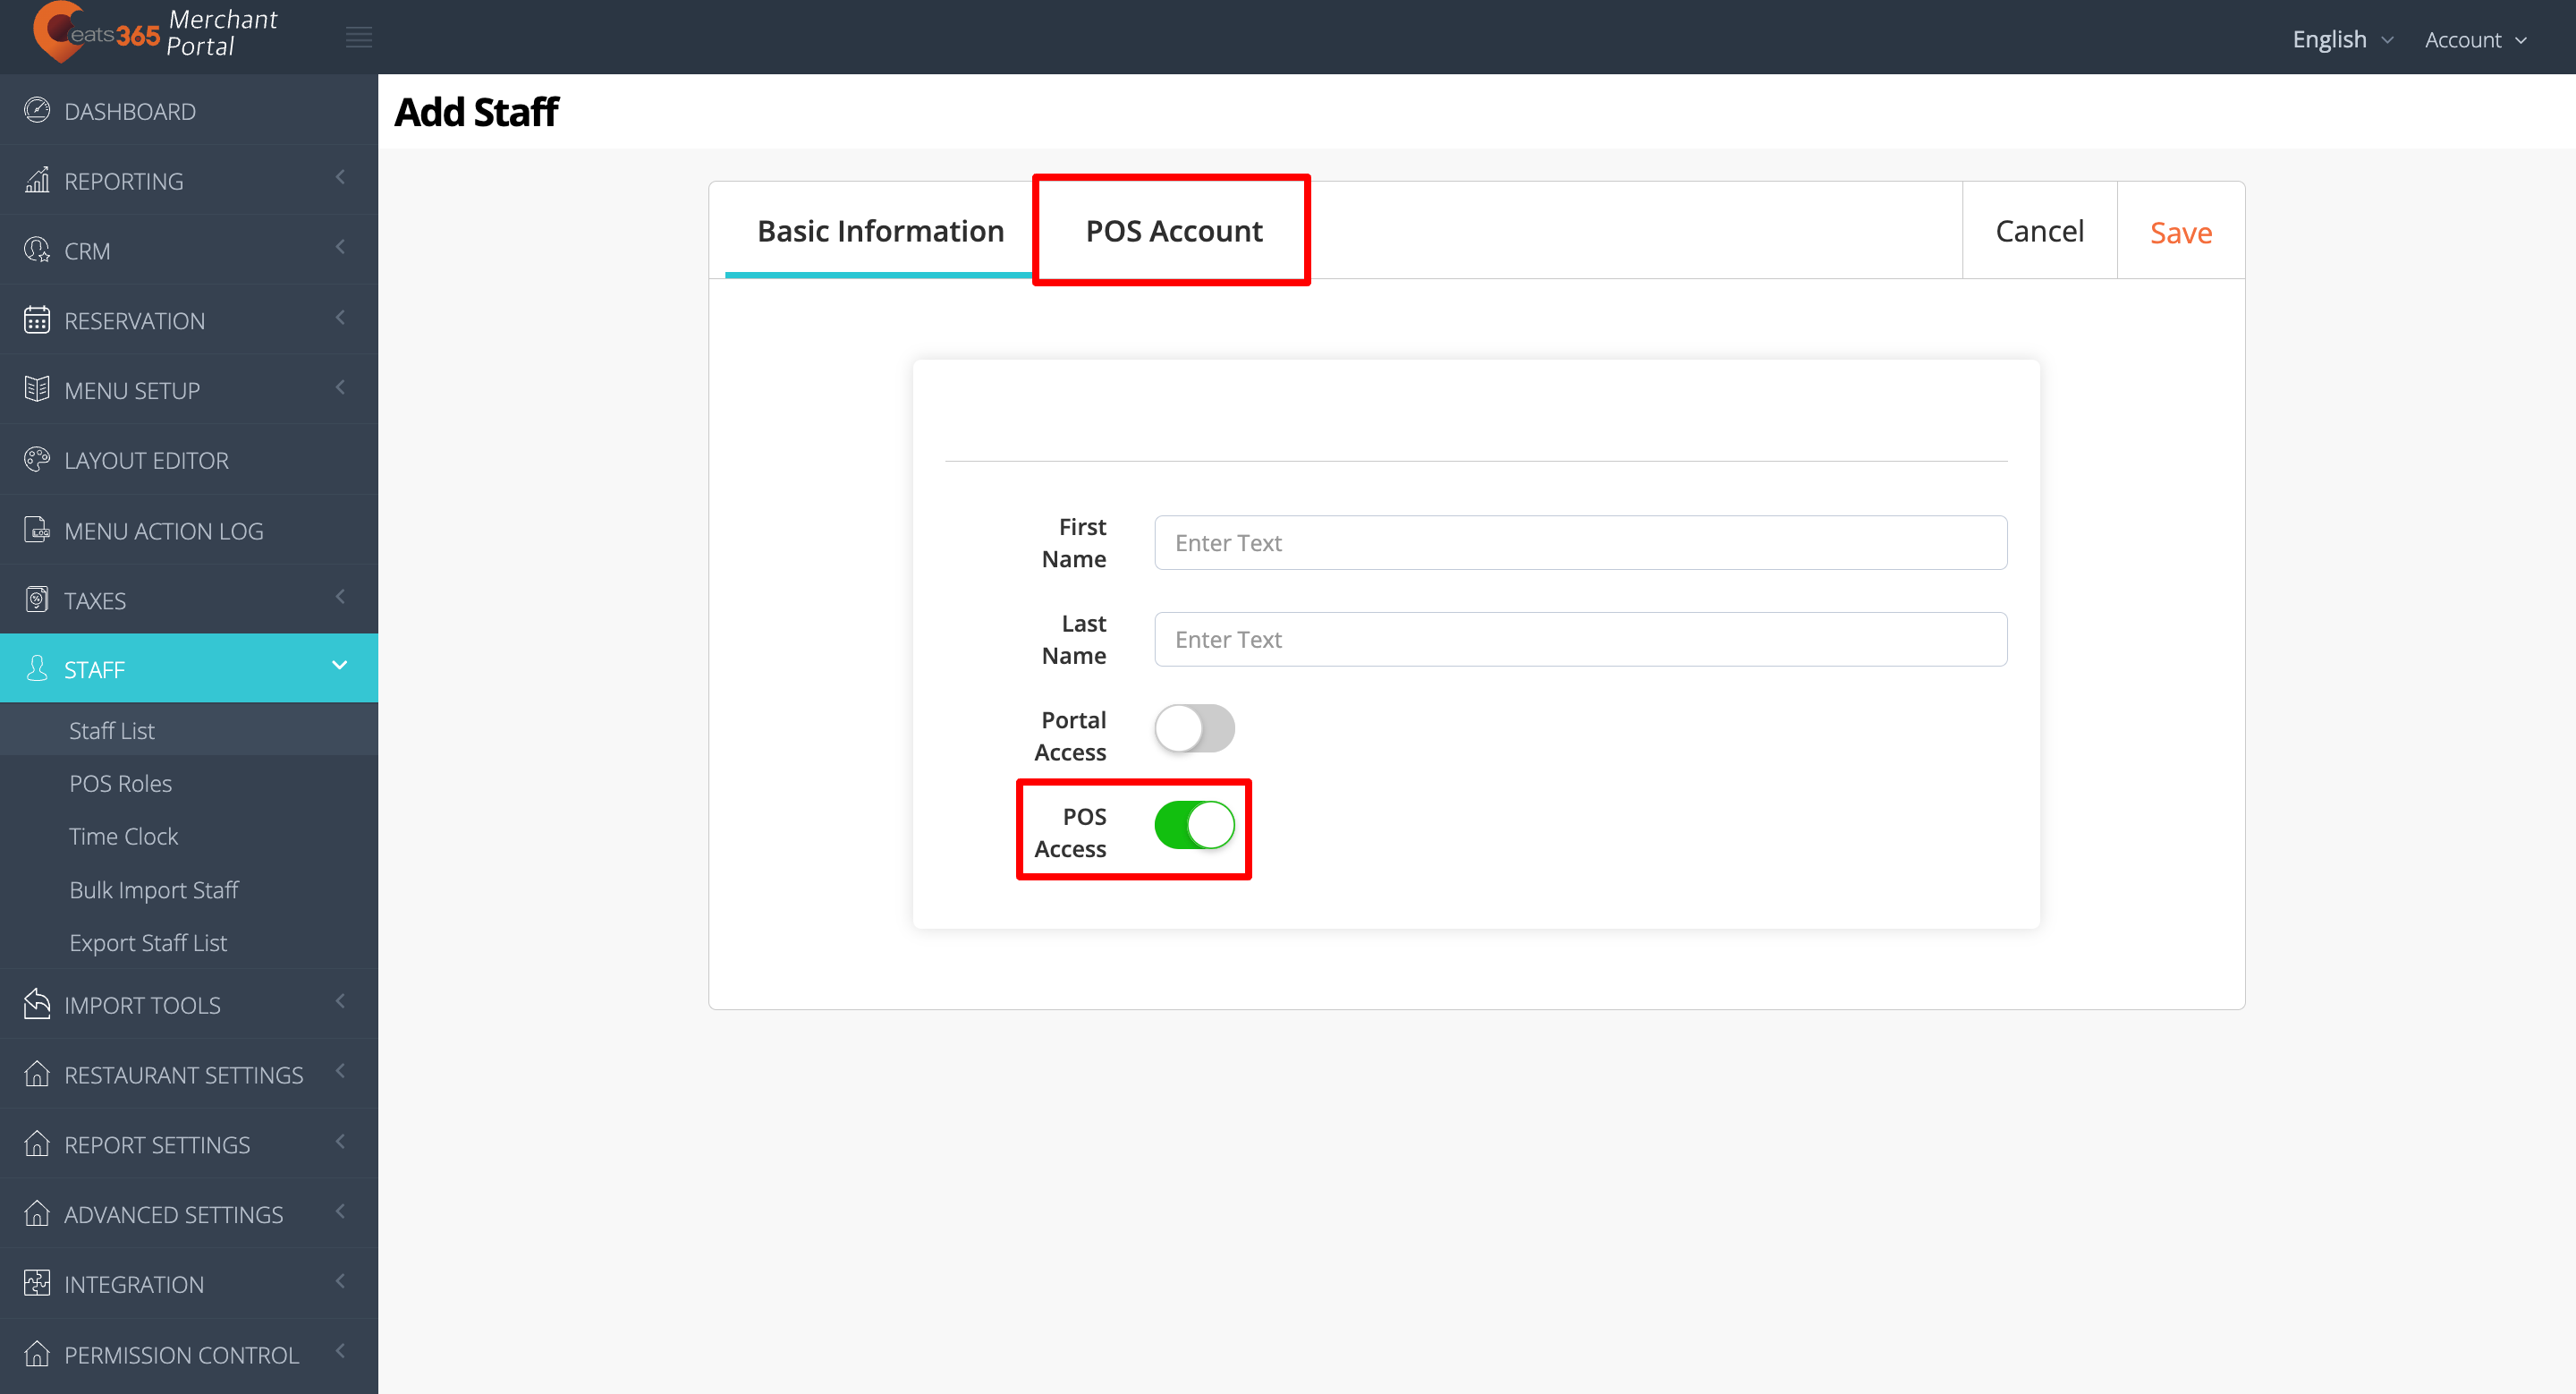
- To set up your staff member’s POS account, click on the POS Account tab. Then, enter the staff member’s login details.
- (Optional) If you issue staff cards to your staff, enter the Staff Card Number.
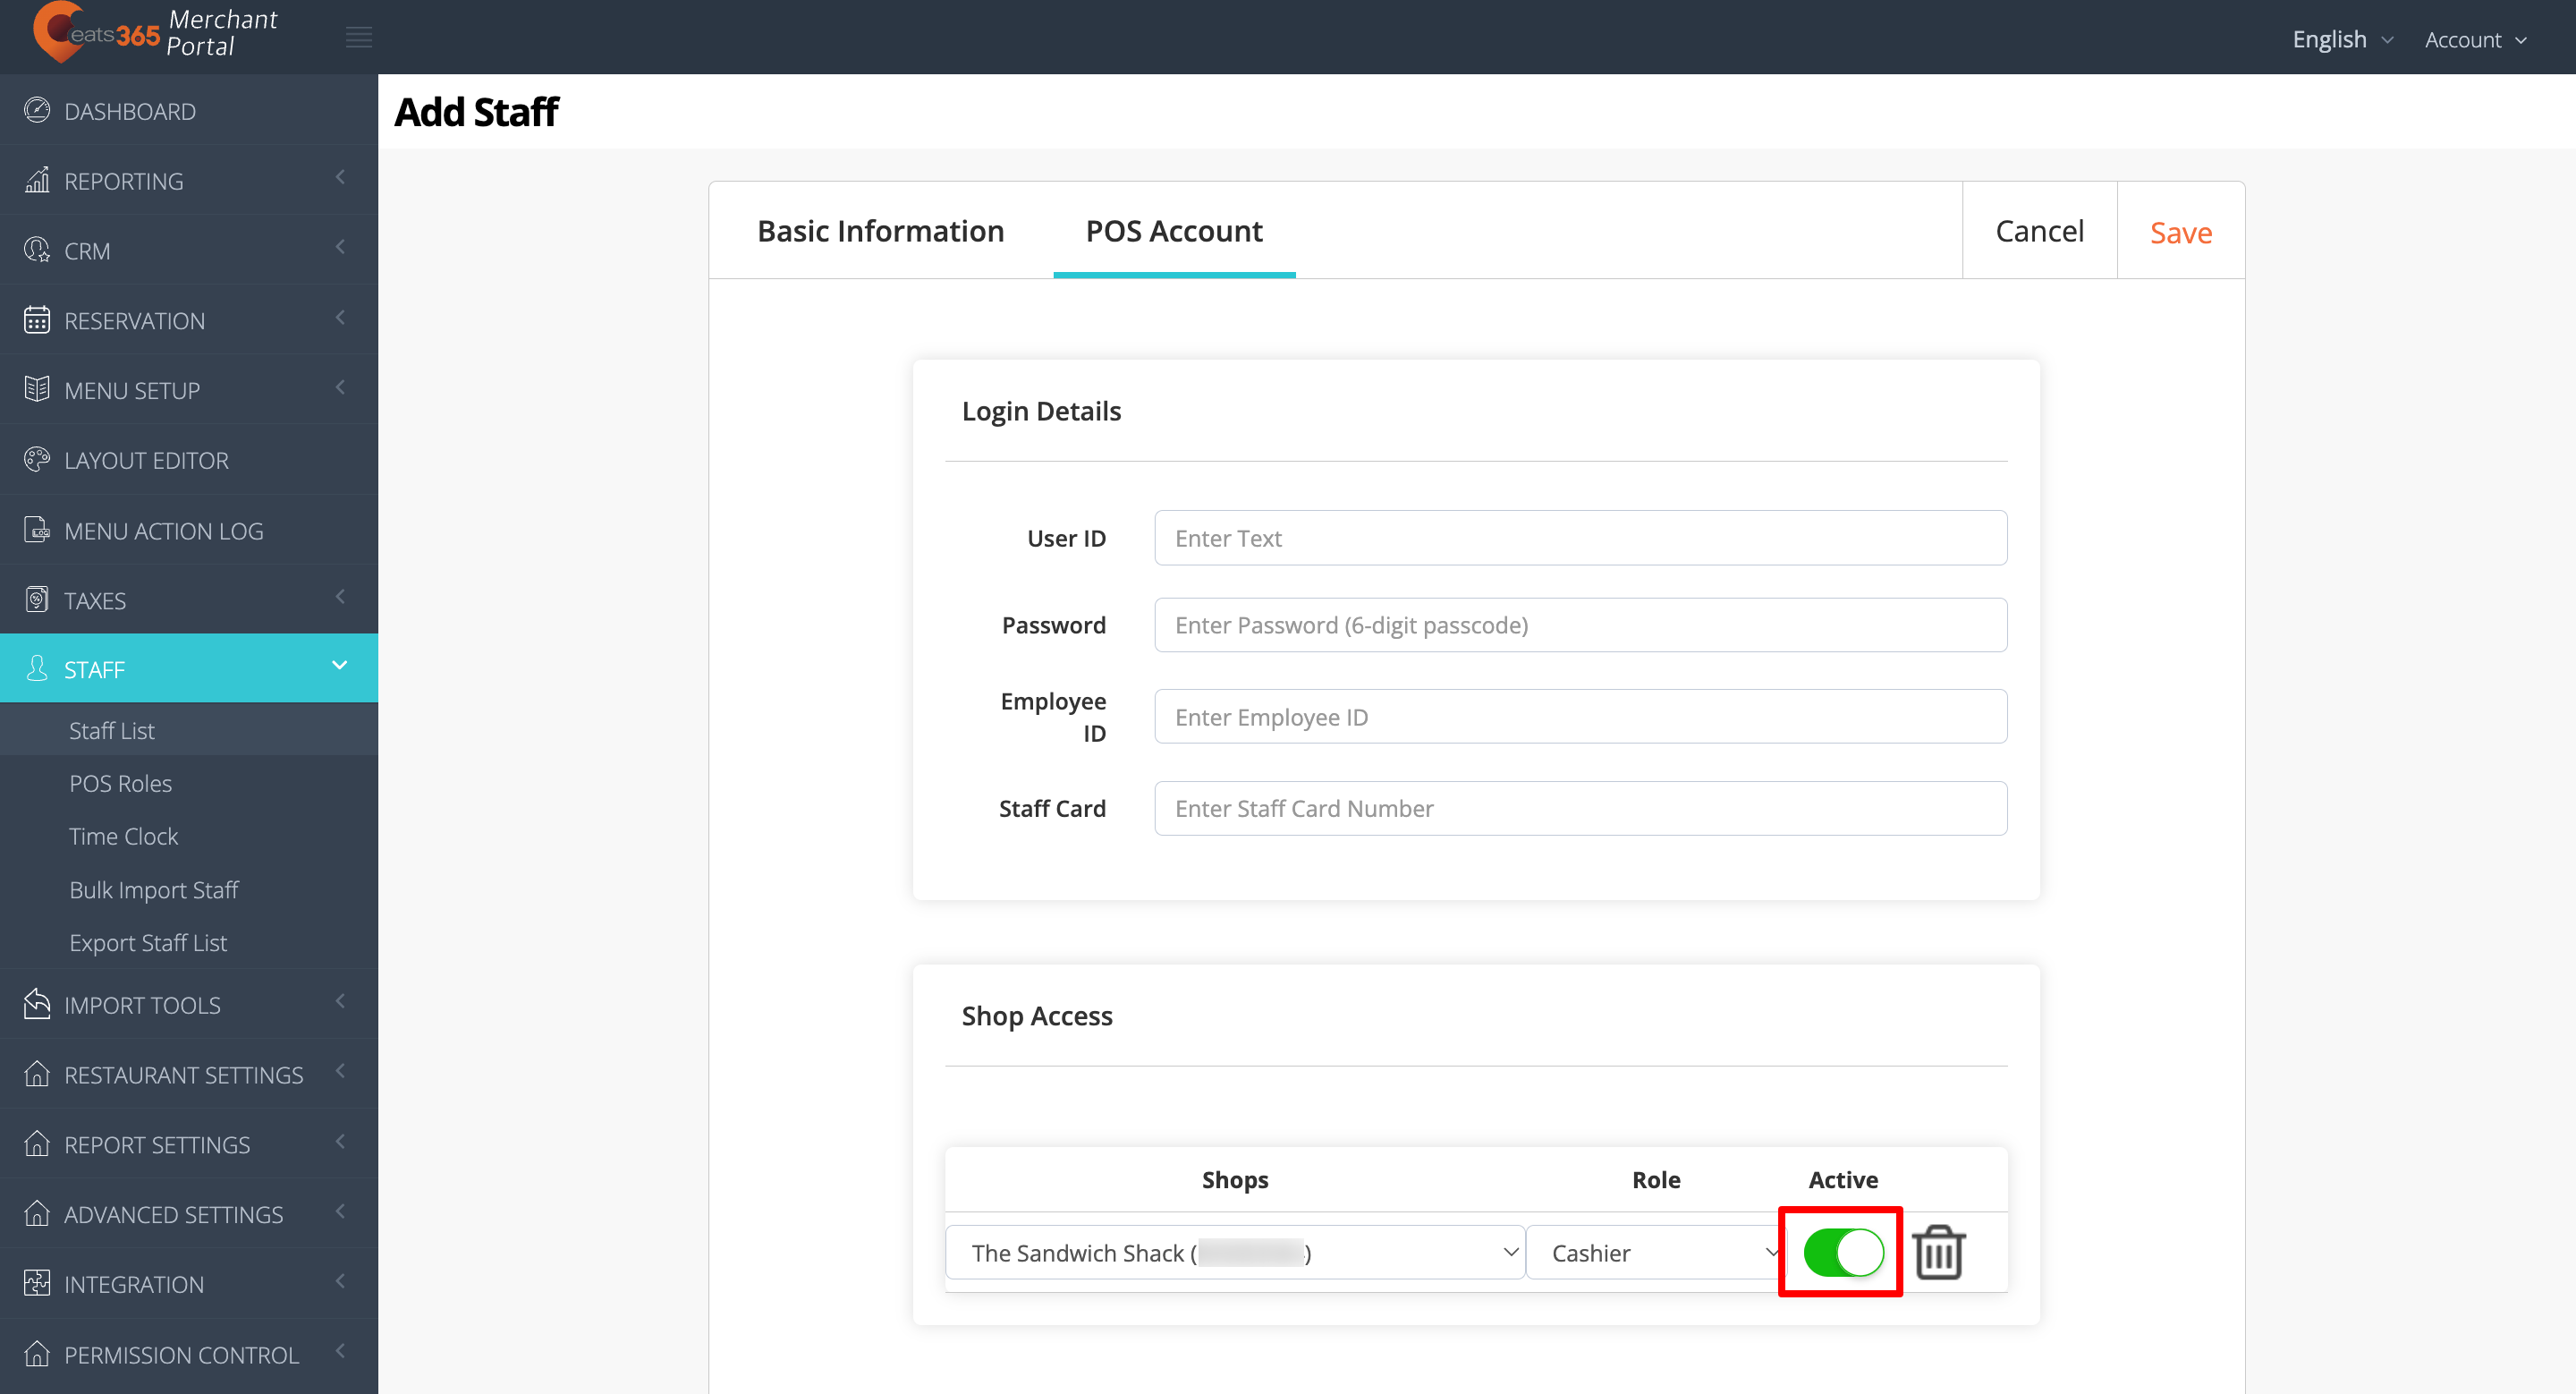
Note: Once added, staff can use their staff card to log in to the POS. - Under "Shop Access," select the shop where the staff is located and assign a role for your staff.
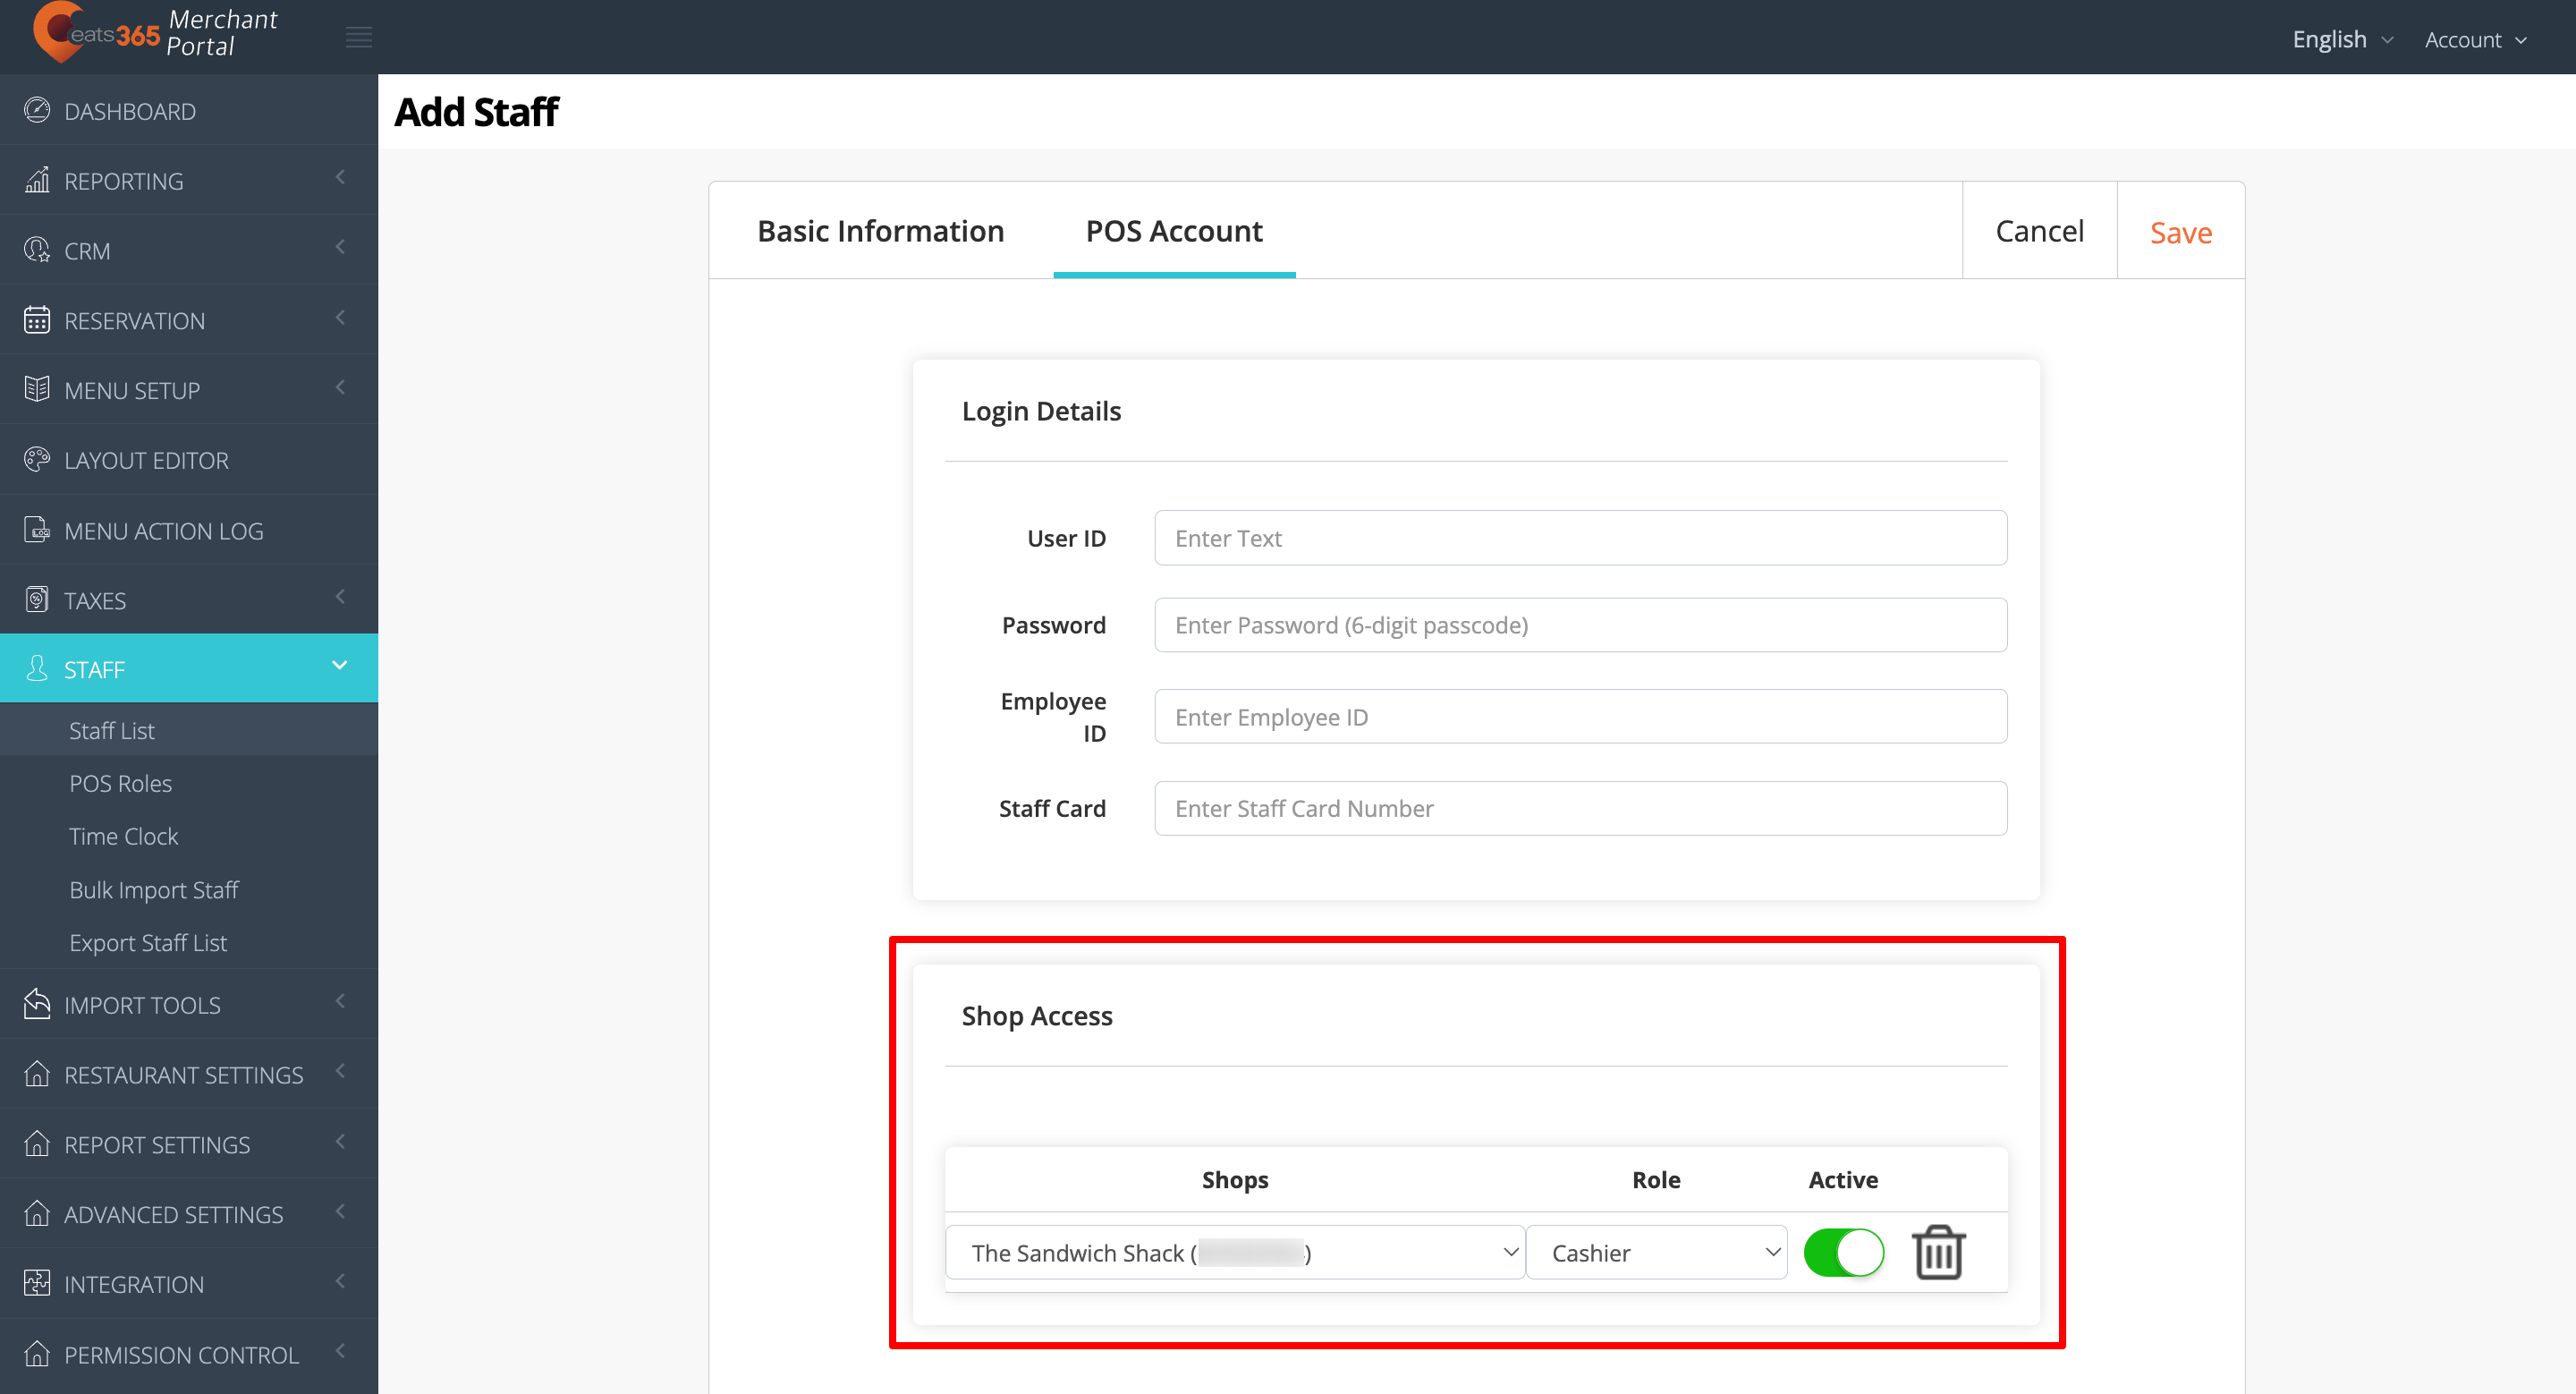
- To complete granting access to the POS, turn on Active .
- At the top right, click on Save to confirm.
(Optional) Set up access to the Merchant Portal
To set up your staff’s access to the Merchant Portal, follow the steps to create a Staff List and continue with the steps below:
- Allow Portal access . The Portal Account tab appears at the top.
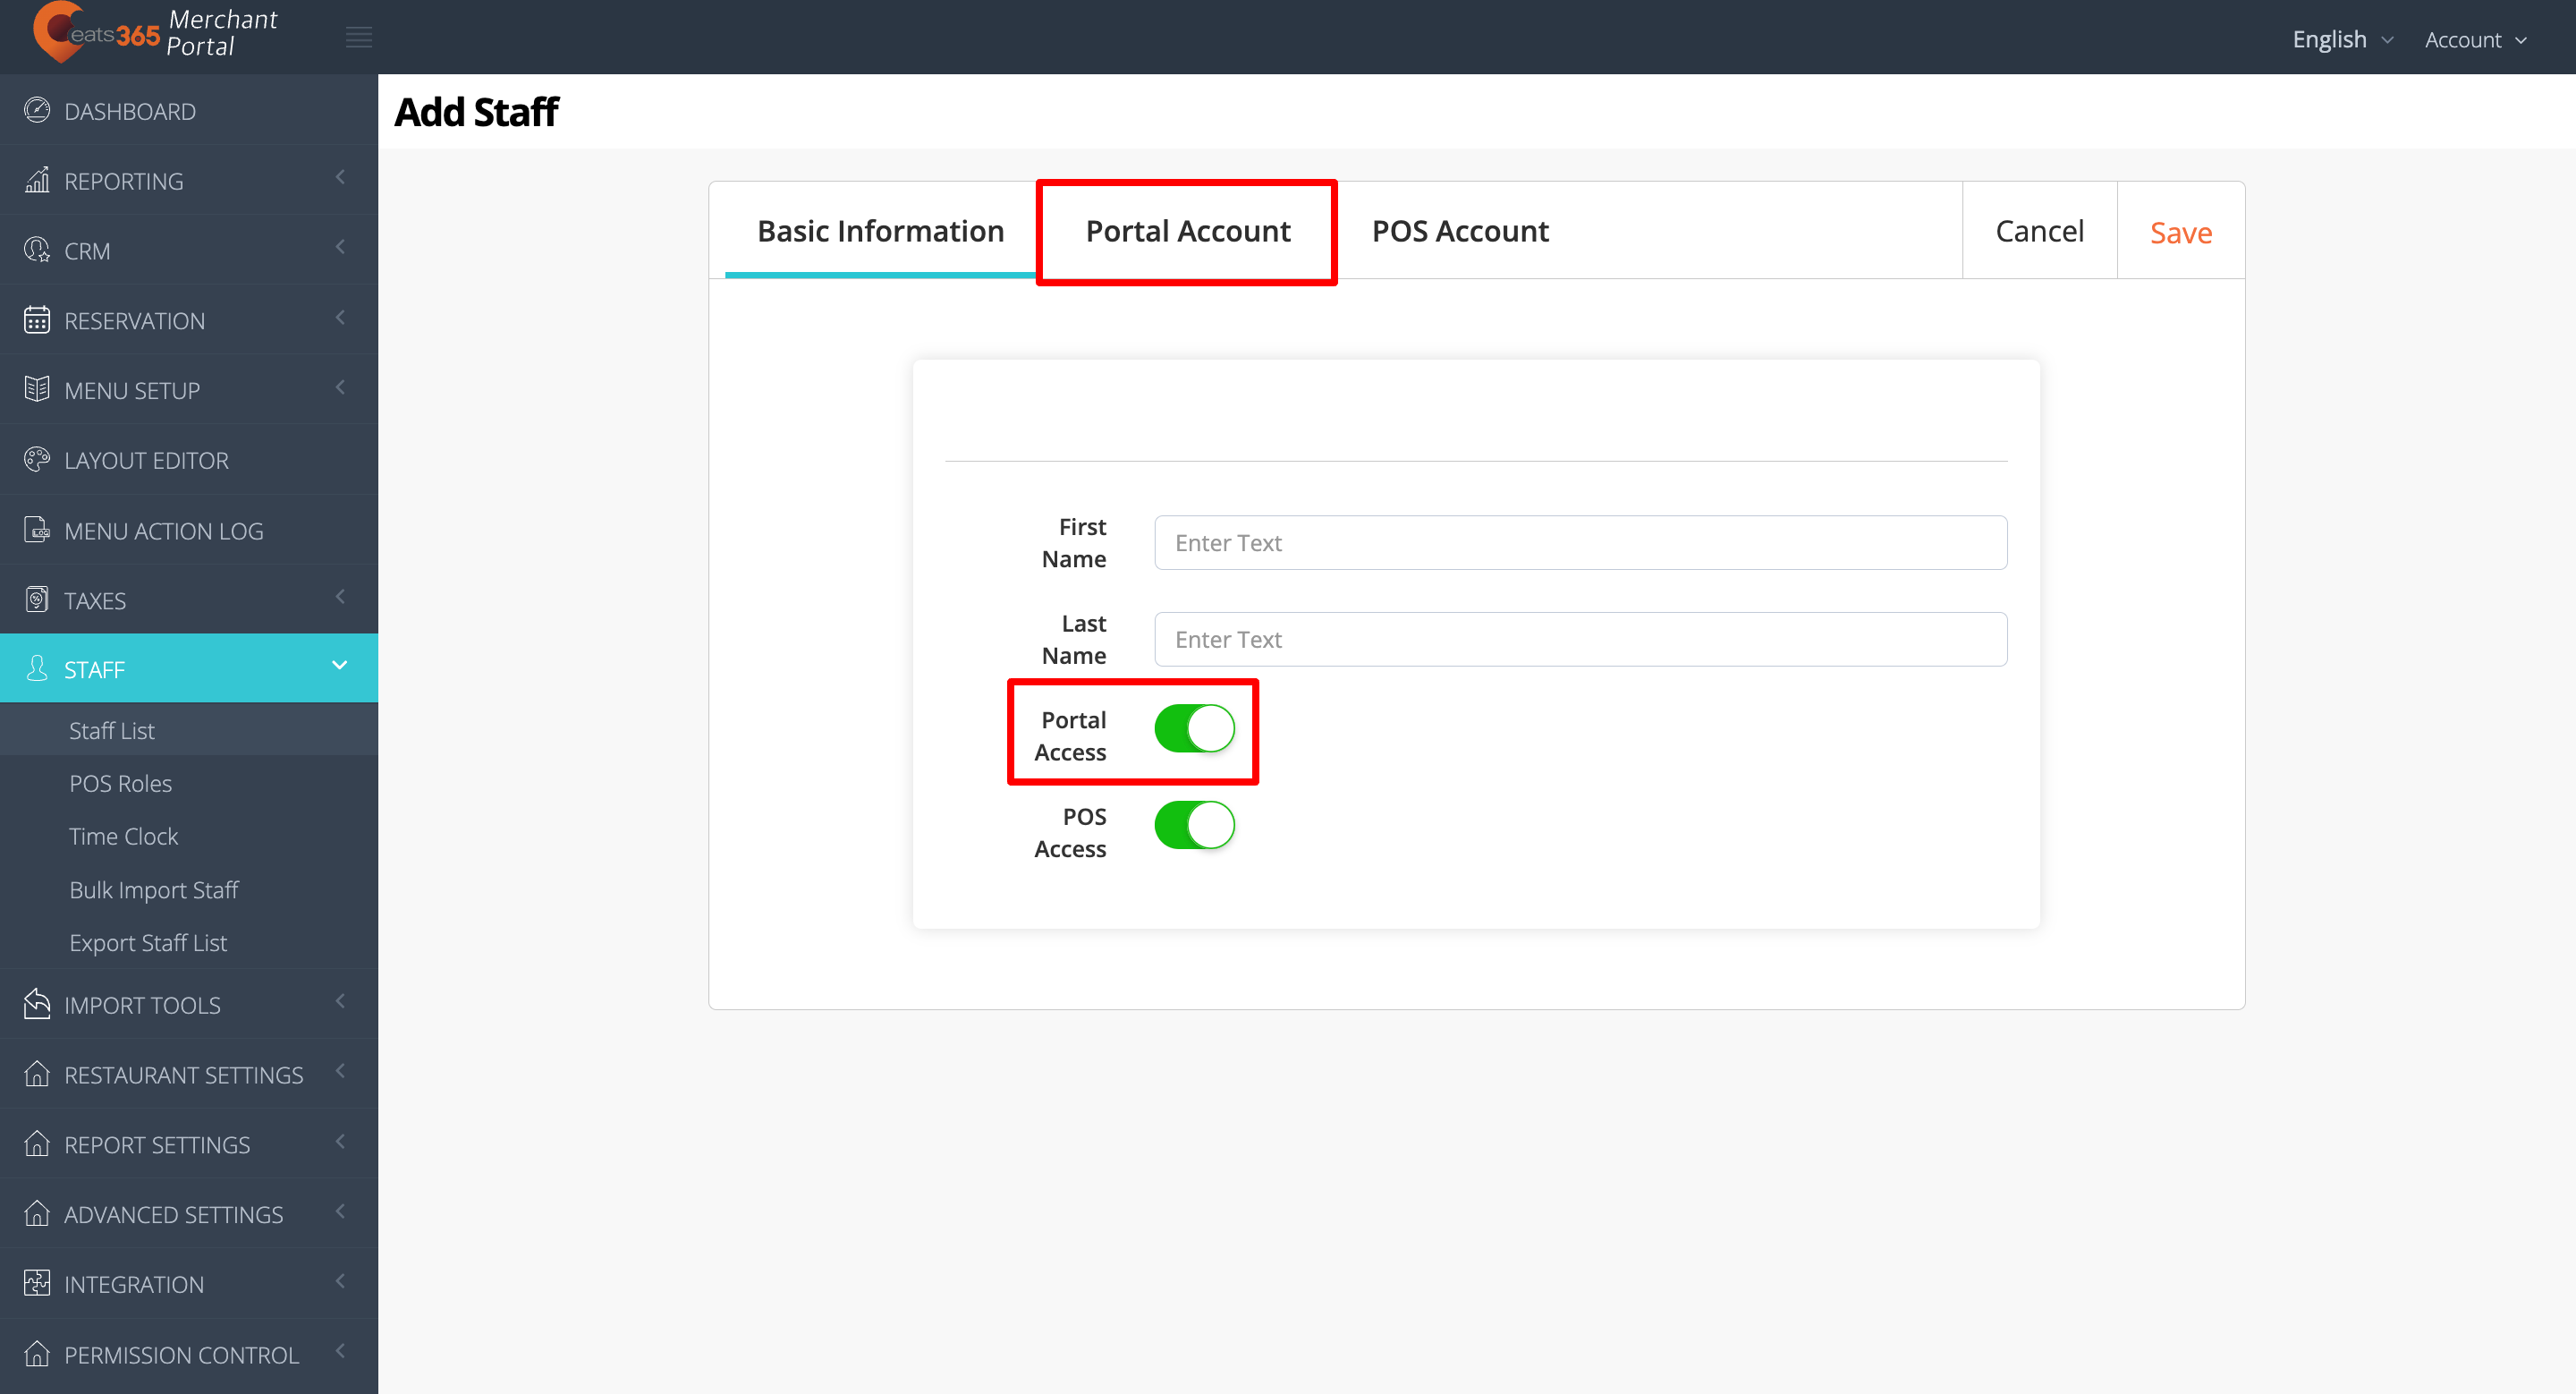
- To set up your staff’s Portal account, click on the Portal Account tab.
- Under "Role," assign a Merchant Portalrole for your staff. Depending on your Portal access, you’ll find different options available:
- Merchant level - Merchant Admin, Merchant Staff
- Group level - Merchant Admin, Merchant Staff, Group Admin
- Organization level - Merchant Admin, Merchant Staff, Group Admin, Organization Admin
- Send an invitation to your staff to complete the Portal account setup.
Note: The invitation is sent only after all the changes have been saved.- Enter your staff’s email address.
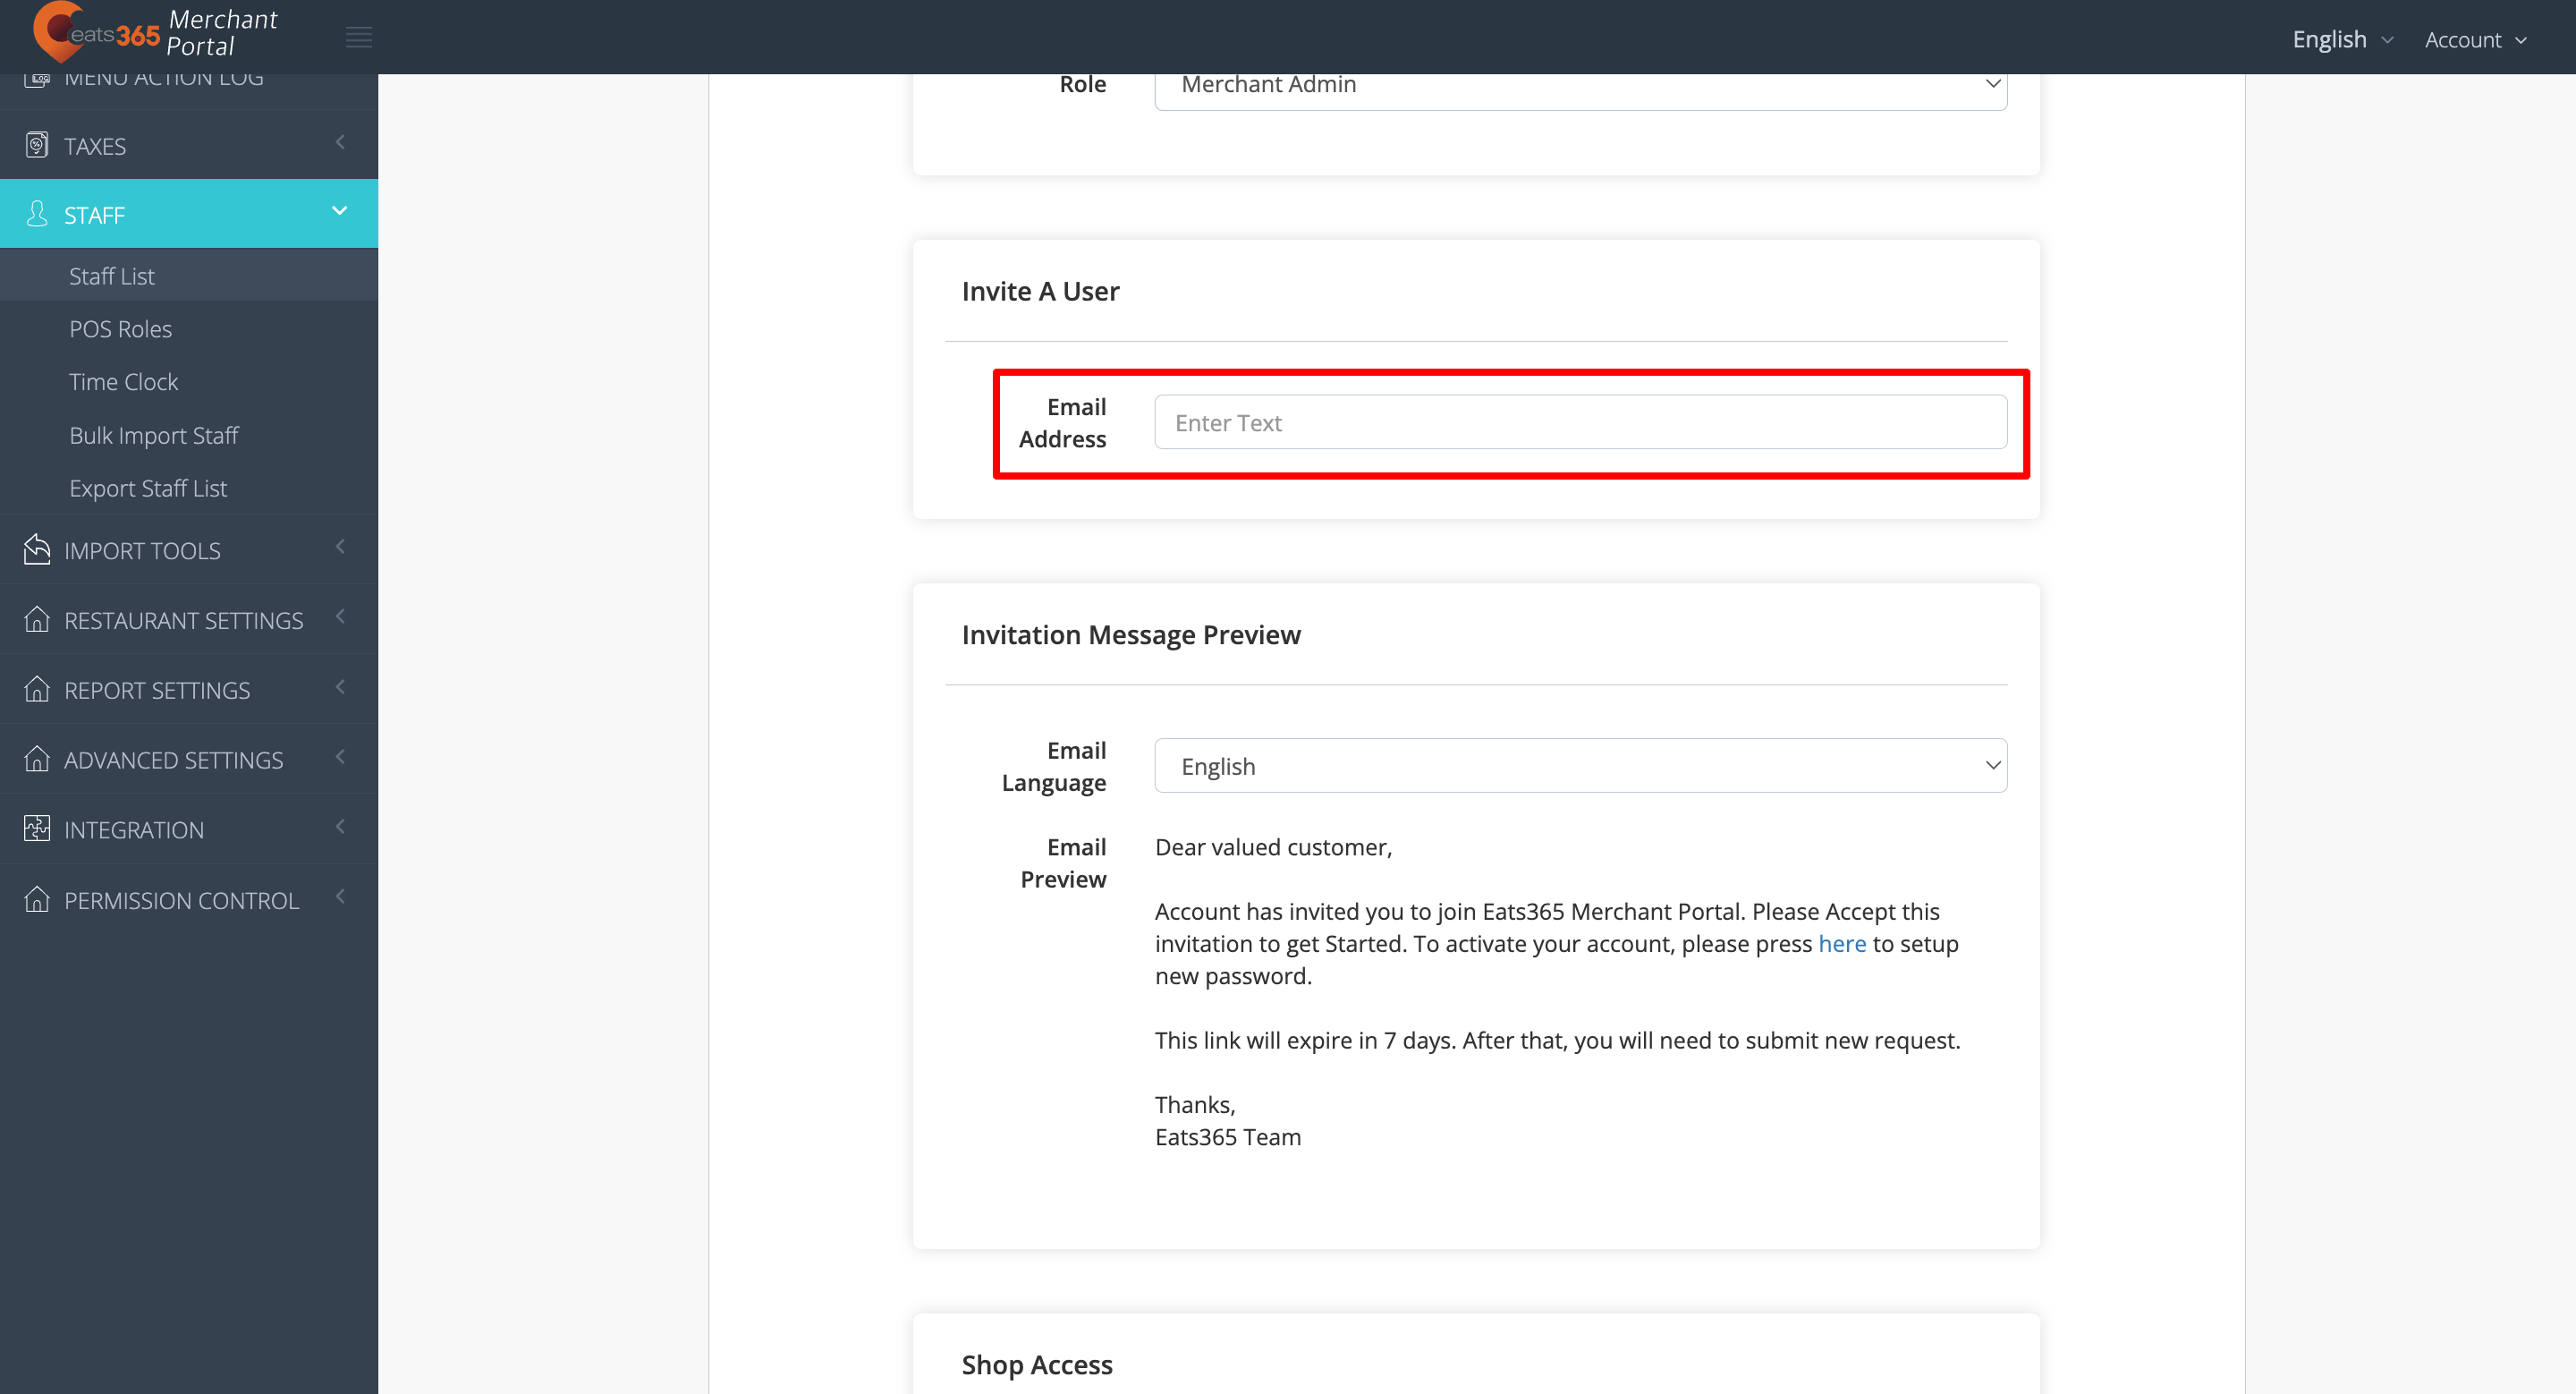
- Choose an email language.
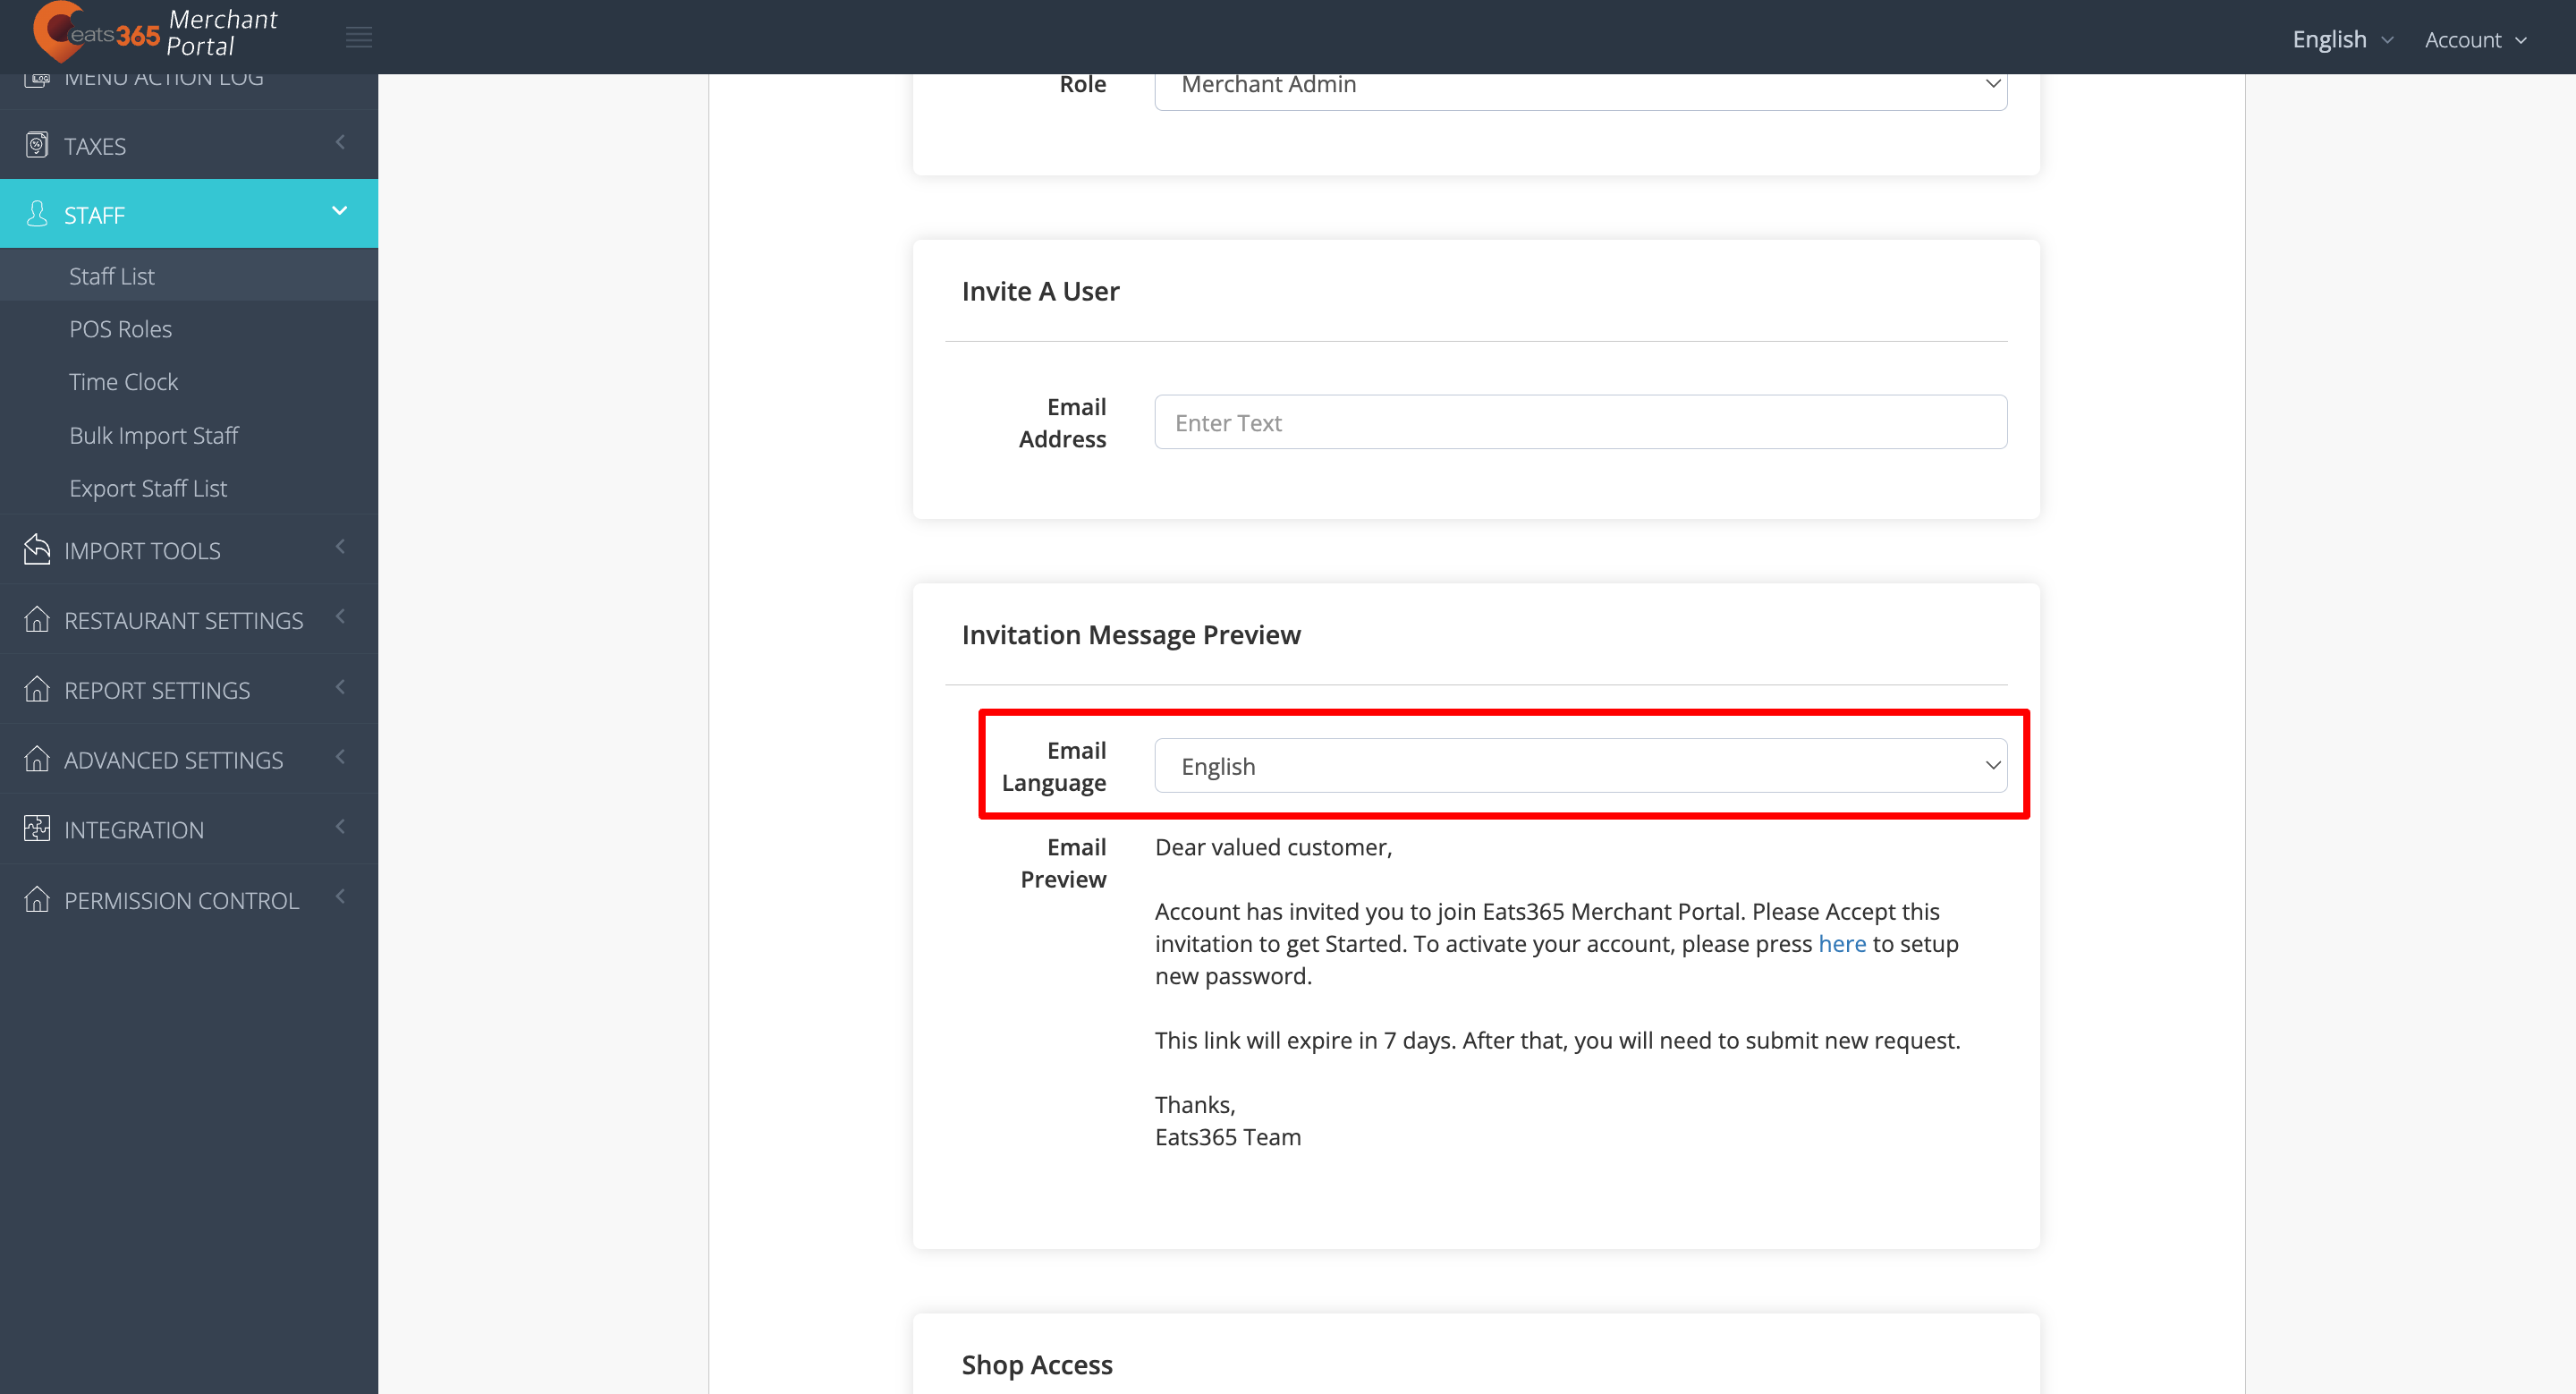
- Enter your staff’s email address.
- Under "Shop Access," select which shop information the staff can view and manage in the Portal.
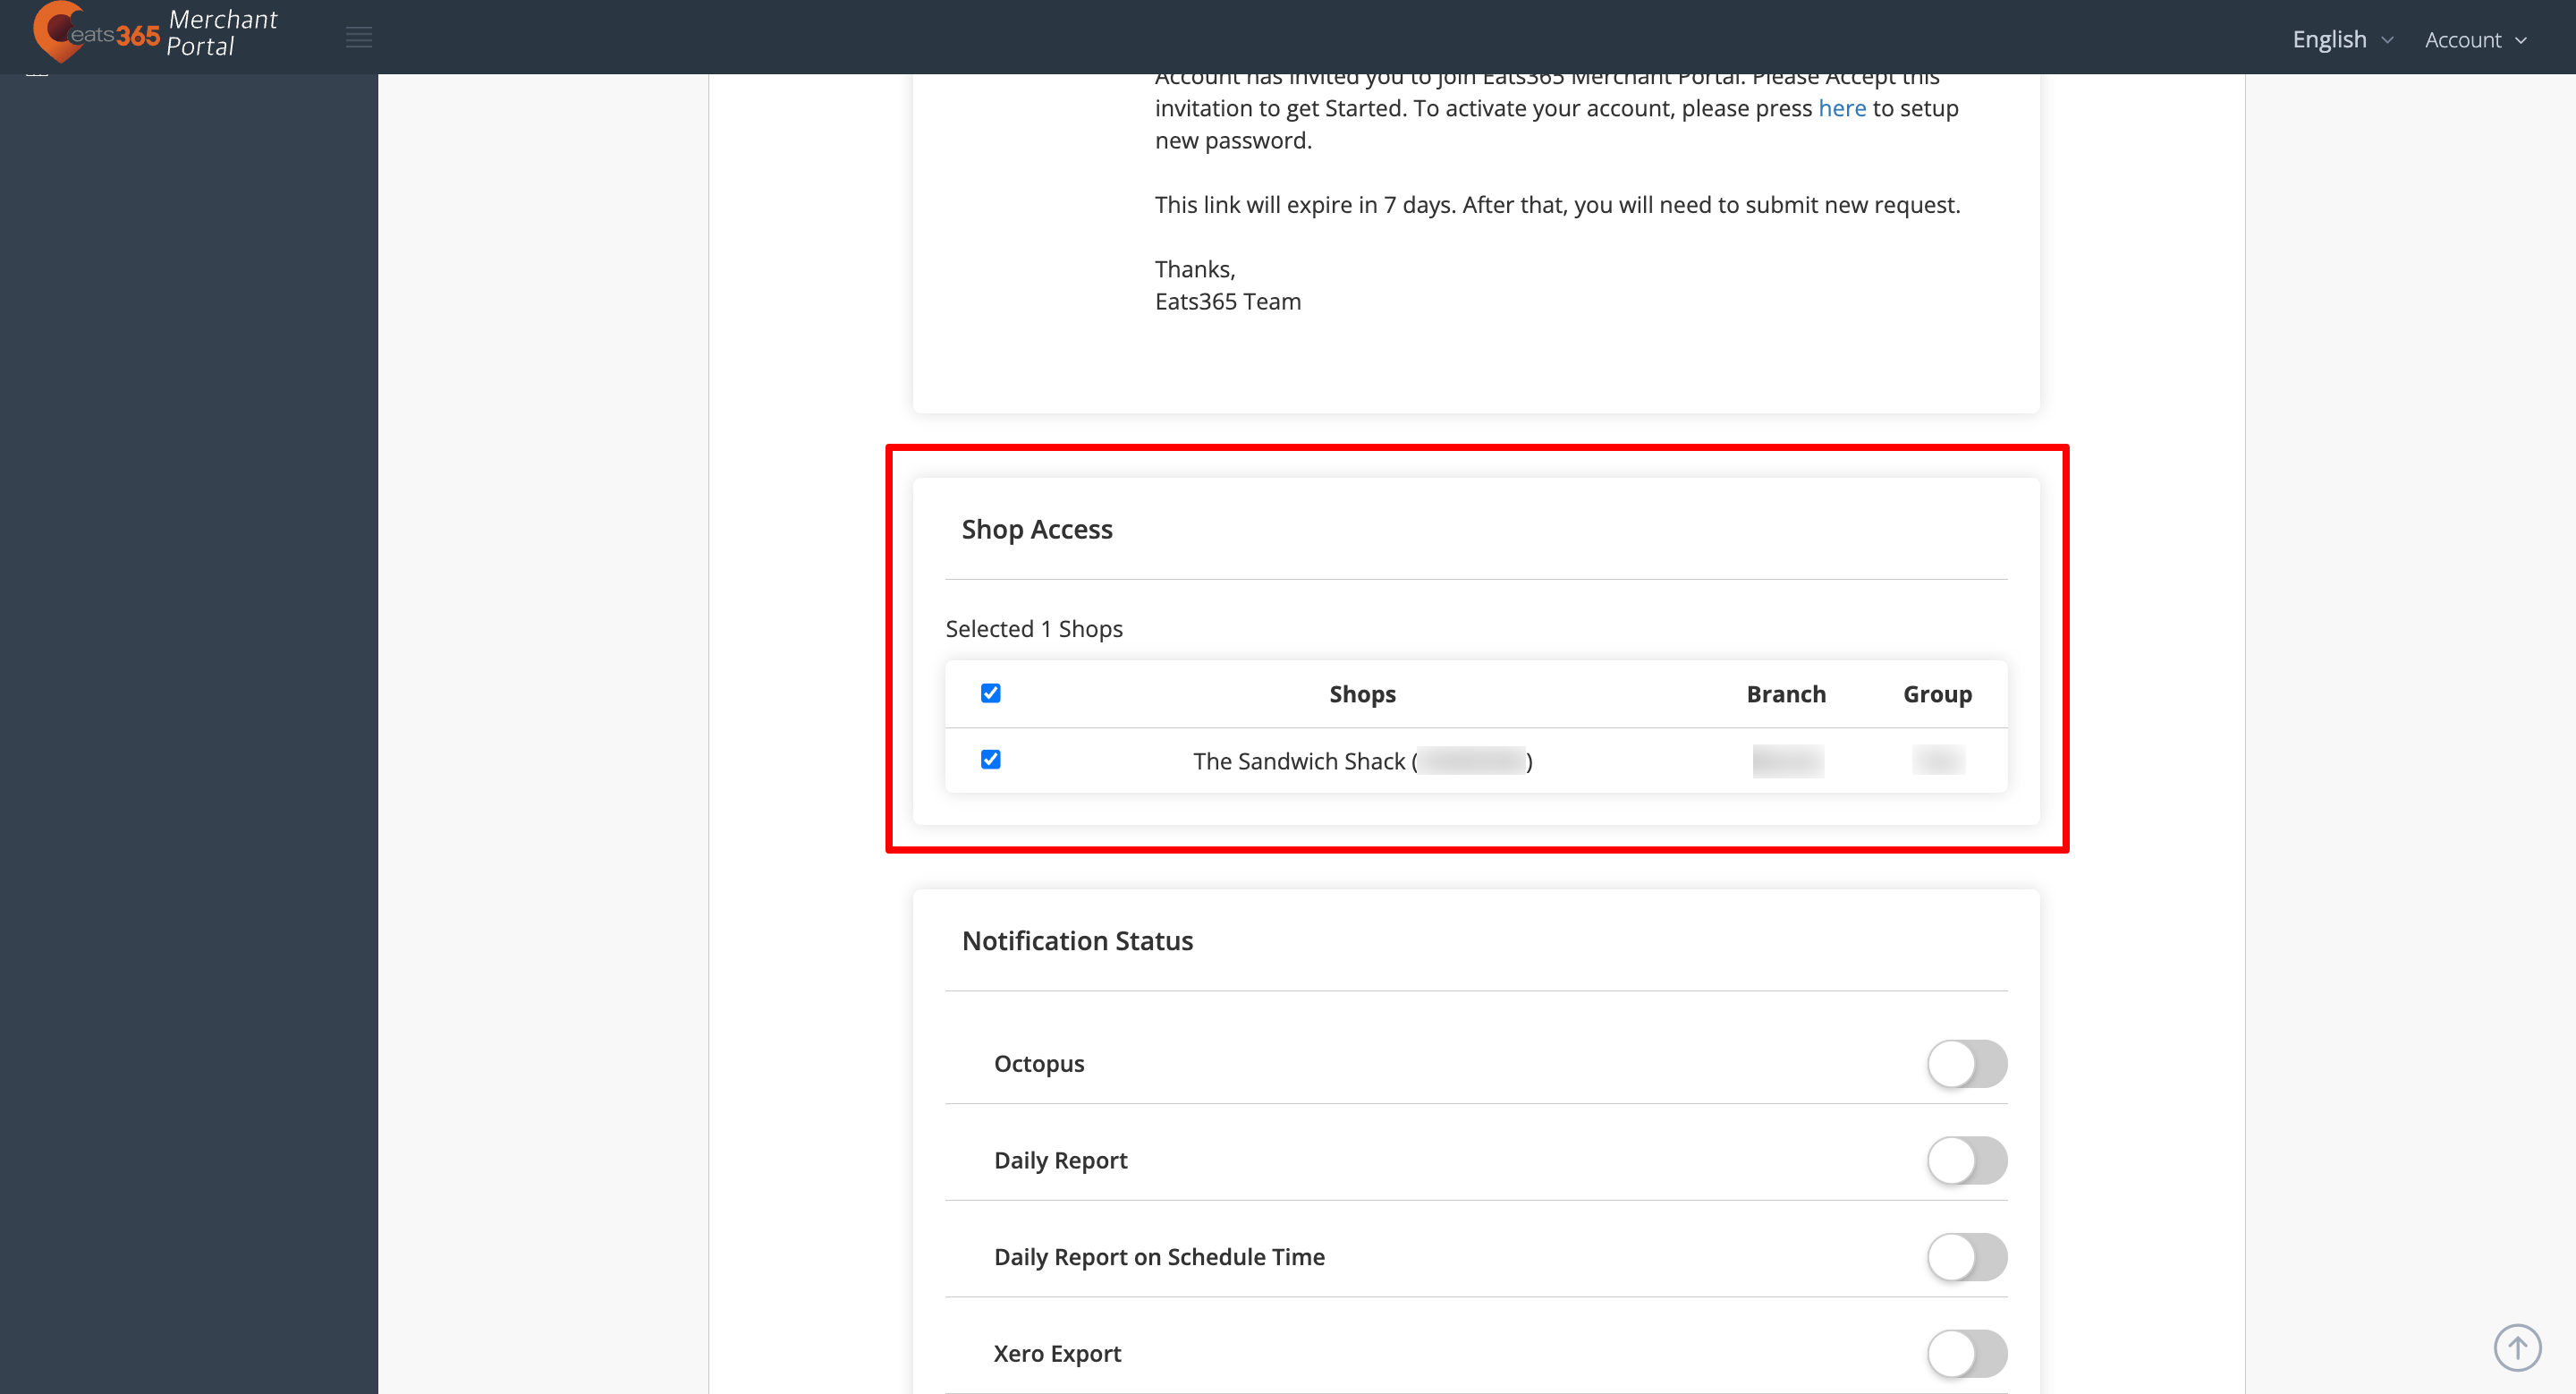
- (Optional) Under "Notification Status," select which notifications you want your staff to receive. Refer to Receive restaurant reports from Eats365 to learn more.
- At the top right, click on Save to confirm.
List of Permissions
Use the table below to compare the different permissions available to a Merchant Staff, Merchant Admin, Group Admin, and Organization Admin.
Reporting
| Settings | Merchant Staff | Merchant Admin | Group Admin | Organization Admin |
| Overview | View | View | View | View |
| Sales Summary | View, Export | View, Export | View, Export | View, Export |
| Daily Closing Report | View, Export | View, Export | View, Export | View, Export |
| Export to XERO | Export | Export | Export | Export |
| Shift Report | View, Export | View, Export | View, Export | View, Export |
| Transaction Report | View | View | View | View |
| View transaction details | View | View | View | View |
| Export transaction summary | Export | Export | Export | Export |
| Export transaction details | Export | Export | Export | Export |
| Hourly Sales Report | View, Export | View, Export | View, Export | View, Export |
| Sales By Period | View, Export | View, Export | View, Export | View, Export |
| Sales By Item | View, Export | View, Export | View, Export | View, Export |
| Returns Report | View, Export | View, Export | View, Export | View, Export |
| Pay In and Payout | View, Export | View, Export | View, Export | View, Export |
| Sales By Product Type | View, Export | View, Export | View, Export | View, Export |
| Discount Report | View, Export | View, Export | View, Export | View, Export |
| Incoming Customers Analysis | View, Export | View, Export | View, Export | View, Export |
| Queuing Statistics | View | View | View | View |
| Reconciliation Report | View, Export | View, Export | View, Export | View, Export |
| Item Sold Report | View, Export | View, Export | View, Export | View, Export |
| Void Report | View, Export | View, Export | View, Export | View, Export |
| General Ledger Report | View, Export | View, Export | View, Export | View, Export |
| Invoice Report | View, Export | View, Export | View, Export | View, Export |
| Item Preparation Time Report | View, Export | View, Export | View, Export | View, Export |
| Staff Performance Report | View, Export | View, Export | View, Export | |
| Abnormal Payment Report | View, Export | View, Export | View, Export | |
| Delivery Fee Report | View, Export | View, Export | View, Export | |
| Operation Report | View, Export | View, Export | ||
| Custom Report | Export | Export | Export | |
| Thailand Tax Invoice Report | View, Export | View, Export | View, Export | |
| Weekly Sales Report | View, Export | View, Export | View, Export | |
| Sales Summary Report | View, Export | View, Export | ||
| Item Audit Trail Report | View | View | ||
| Void Item Report | View, Export | View, Export |
Inventory
| Settings | Merchant Staff | Merchant Admin | Group Admin | Organization Admin |
| Inventory | Edit | Edit | Edit | Edit |
| Inventory Adjustment Report | View | View | View |
CRM
| Settings | Merchant Staff | Merchant Admin | Group Admin | Organization Admin |
| Dashboard | View | View | View | View |
| Customer List | View | View | View | View |
| Customer Detail | View, Add, Edit | View, Add, Edit | View, Add, Edit | View, Add, Edit |
| Import Customer List | Add | Add | Add | |
| Export Customer List | View | View | ||
| Custom Member Fields | ||||
| Member Plan | View, Add, Edit, Delete | View, Add, Edit, Delete | ||
| Liability Item | View, Add, Edit, Delete | View, Add, Edit, Delete | ||
| Points Spending Rules | View, Add, Edit, Delete | View, Add, Edit, Delete | ||
| Points Earning Rules | View, Add, Edit, Delete | View, Add, Edit, Delete |
Menu Setup
| Settings | Merchant Staff | Merchant Admin | Group Admin | Organization Admin |
Modifier Preset |
View, Edit | View, Add, Edit, Delete |
View, Add, Edit, Delete |
View, Add, Edit, Delete |
Item |
View, Edit | View, Add, Edit, Delete |
View, Add, Edit, Delete |
View, Add, Edit, Delete |
Product Type |
View, Edit | View, Add, Edit, Delete |
View, Add, Edit, Delete |
View, Add, Edit, Delete |
Category |
View, Edit | View, Add, Edit, Delete |
View, Add, Edit, Delete |
View, Add, Edit, Delete |
Custom Menu |
View, Edit | View, Add, Edit, Delete |
View, Add, Edit, Delete |
View, Add, Edit, Delete |
Kitchen Station |
View, Edit | View, Add, Edit, Delete |
View, Add, Edit, Delete |
View, Add, Edit, Delete |
Special Request Quick Keys |
View, Edit | View, Add, Edit, Delete |
View, Add, Edit, Delete |
View, Add, Edit, Delete |
| Menu Template | View, Add, Edit, Delete | View, Add, Edit, Delete | ||
Menu Action Log |
View | View | View | |
Pickup Station |
View, Add, Edit, Delete | View, Add, Edit, Delete | View, Add, Edit, Delete | View, Add, Edit, Delete |
Discount |
View, Add, Edit, Delete | View, Add, Edit, Delete | View, Add, Edit, Delete | |
Tier Price |
View, Add, Edit, Delete | View, Add, Edit, Delete | View, Add, Edit, Delete | |
Period Rule |
View, Add, Edit, Delete | View, Add, Edit, Delete | View, Add, Edit, Delete | |
Membership Plan Rule |
View, Add, Edit, Delete | View, Add, Edit, Delete | View, Add, Edit, Delete | |
Custom Rule |
View, Add, Edit, Delete | View, Add, Edit, Delete | View, Add, Edit, Delete | |
Pricing Rule Group |
View, Add, Edit, Delete | View, Add, Edit, Delete | View, Add, Edit, Delete | |
Tag |
View, Edit | View, Add, Edit, Delete |
View, Add, Edit, Delete |
View, Add, Edit, Delete |
Tag Type |
View, Edit | View, Add, Edit, Delete |
View, Add, Edit, Delete |
View, Add, Edit, Delete |
All You Can Eat Menu |
View, Edit | View, Add, Edit, Delete |
View, Add, Edit, Delete |
View, Add, Edit, Delete |
| Bulk Import | View, Upload | View, Upload | View, Upload |
Taxes
| Settings | Merchant Staff | Merchant Admin | Group Admin | Organization Admin |
| Tax Group | View | View, Edit |
View, Edit |
View, Edit |
| Tax Type | View | View, Edit |
View, Edit |
View, Edit |
Staff
| Settings | Merchant Staff | Merchant Admin | Group Admin | Organization Admin |
| Staff List | View, Add, Edit, Delete, Export |
View, Add, Edit, Delete, Export |
View, Add, Edit, Delete, Export |
|
| Time Clock | View, Edit | View, Edit | View, Edit | |
| Export time clock record | View | View | View | |
| Staff Group Roles and Permissions | View, Add, Edit, Delete | View, Add, Edit, Delete | View, Add, Edit, Delete |
Shop Management
| Settings | Merchant Staff | Merchant Admin | Group Admin | Organization Admin |
| Manage Shop Hierarchy | Add, Edit | Add, Edit |
Restaurant Settings
| Settings | Merchant Staff | Merchant Admin | Group Admin | Organization Admin |
Basic Information |
View, Edit | View, Edit | View, Edit | |
Payment Settings |
View, Edit | View, Edit | View, Edit | |
Media Group |
View, Edit | View, Edit | View, Edit | |
Dine-In |
View, Edit | View, Edit | View, Edit | |
Takeout |
View, Edit | View, Edit | View, Edit | |
Queuing |
View, Edit | View, Edit | View, Edit | |
Printing |
View, Edit | View, Edit | View, Edit | |
Rounding |
View, Edit | View, Edit | View, Edit | |
System Preferences |
View, Edit | View, Edit | View, Edit | |
| Edit Device Detail | Edit | Edit | Edit | |
Other Device |
View, Edit | View, Edit | View, Edit | |
Table Mapping |
View, Edit | View, Edit | View, Edit | |
Online Ordering Setting |
View, Edit | View, Edit | View, Edit | |
Table Map Setup |
View, Edit | View, Edit | View, Edit |
Currency Exchange Rate
| Settings | Merchant Staff | Merchant Admin | Group Admin | Organization Admin |
| Currency Exchange Rate | Edit | Edit |
Integration
| Settings | Merchant Staff | Merchant Admin | Group Admin | Organization Admin |
| Xero Integration | View, Add, Edit, Delete |
View, Add, Edit, Delete |
View, Add, Edit, Delete |
|
| FMH | View, Edit | View, Edit | View, Edit | |
| SMS Notification | View, Edit | View, Edit | View, Edit | |
| Lalamove | View, Edit | View, Edit | View, Edit |
Gift Card
| Settings | Merchant Staff | Merchant Admin | Group Admin | Organization Admin |
| Setting | View | View | ||
| Vendor | View, Add, Edit, Delete | View, Add, Edit, Delete |
Organization Settings
| Settings | Merchant Staff | Merchant Admin | Group Admin | Organization Admin |
| Date Group Preset (Organization) | View, Add, Edit, Delete | |||
| Sales Categories (Organization) | View, Add, Edit, Delete |
Group Settings
| Settings | Merchant Staff | Merchant Admin | Group Admin | Organization Admin |
| Date Group Preset (Group) | View, Add, Edit, Delete | View, Add, Edit, Delete | ||
| Sales Categories (Group) | View, Add, Edit, Delete | View, Add, Edit, Delete |
Permission Control
| Settings | Merchant Staff | Merchant Admin | Group Admin | Organization Admin |
| Pending Request Permission | View, Add, Edit, Delete | View, Add, Edit, Delete | View, Add, Edit, Delete | |
| Permission Control | View, Edit, Delete | View, Edit, Delete | View, Edit, Delete |
Discount Coupon
| Settings | Merchant Staff | Merchant Admin | Group Admin | Organization Admin |
| Setting | View | View |
Reservation
| Settings | Merchant Staff | Merchant Admin | Group Admin | Organization Admin |
| General | View, Edit | View, Edit | View, Edit | |
| Regular Capacity | View, Edit | View, Edit | View, Edit | |
| Seating Preference | View, Edit | View, Edit | View, Edit | |
| Special Capacity | View, Edit | View, Edit | View, Edit |
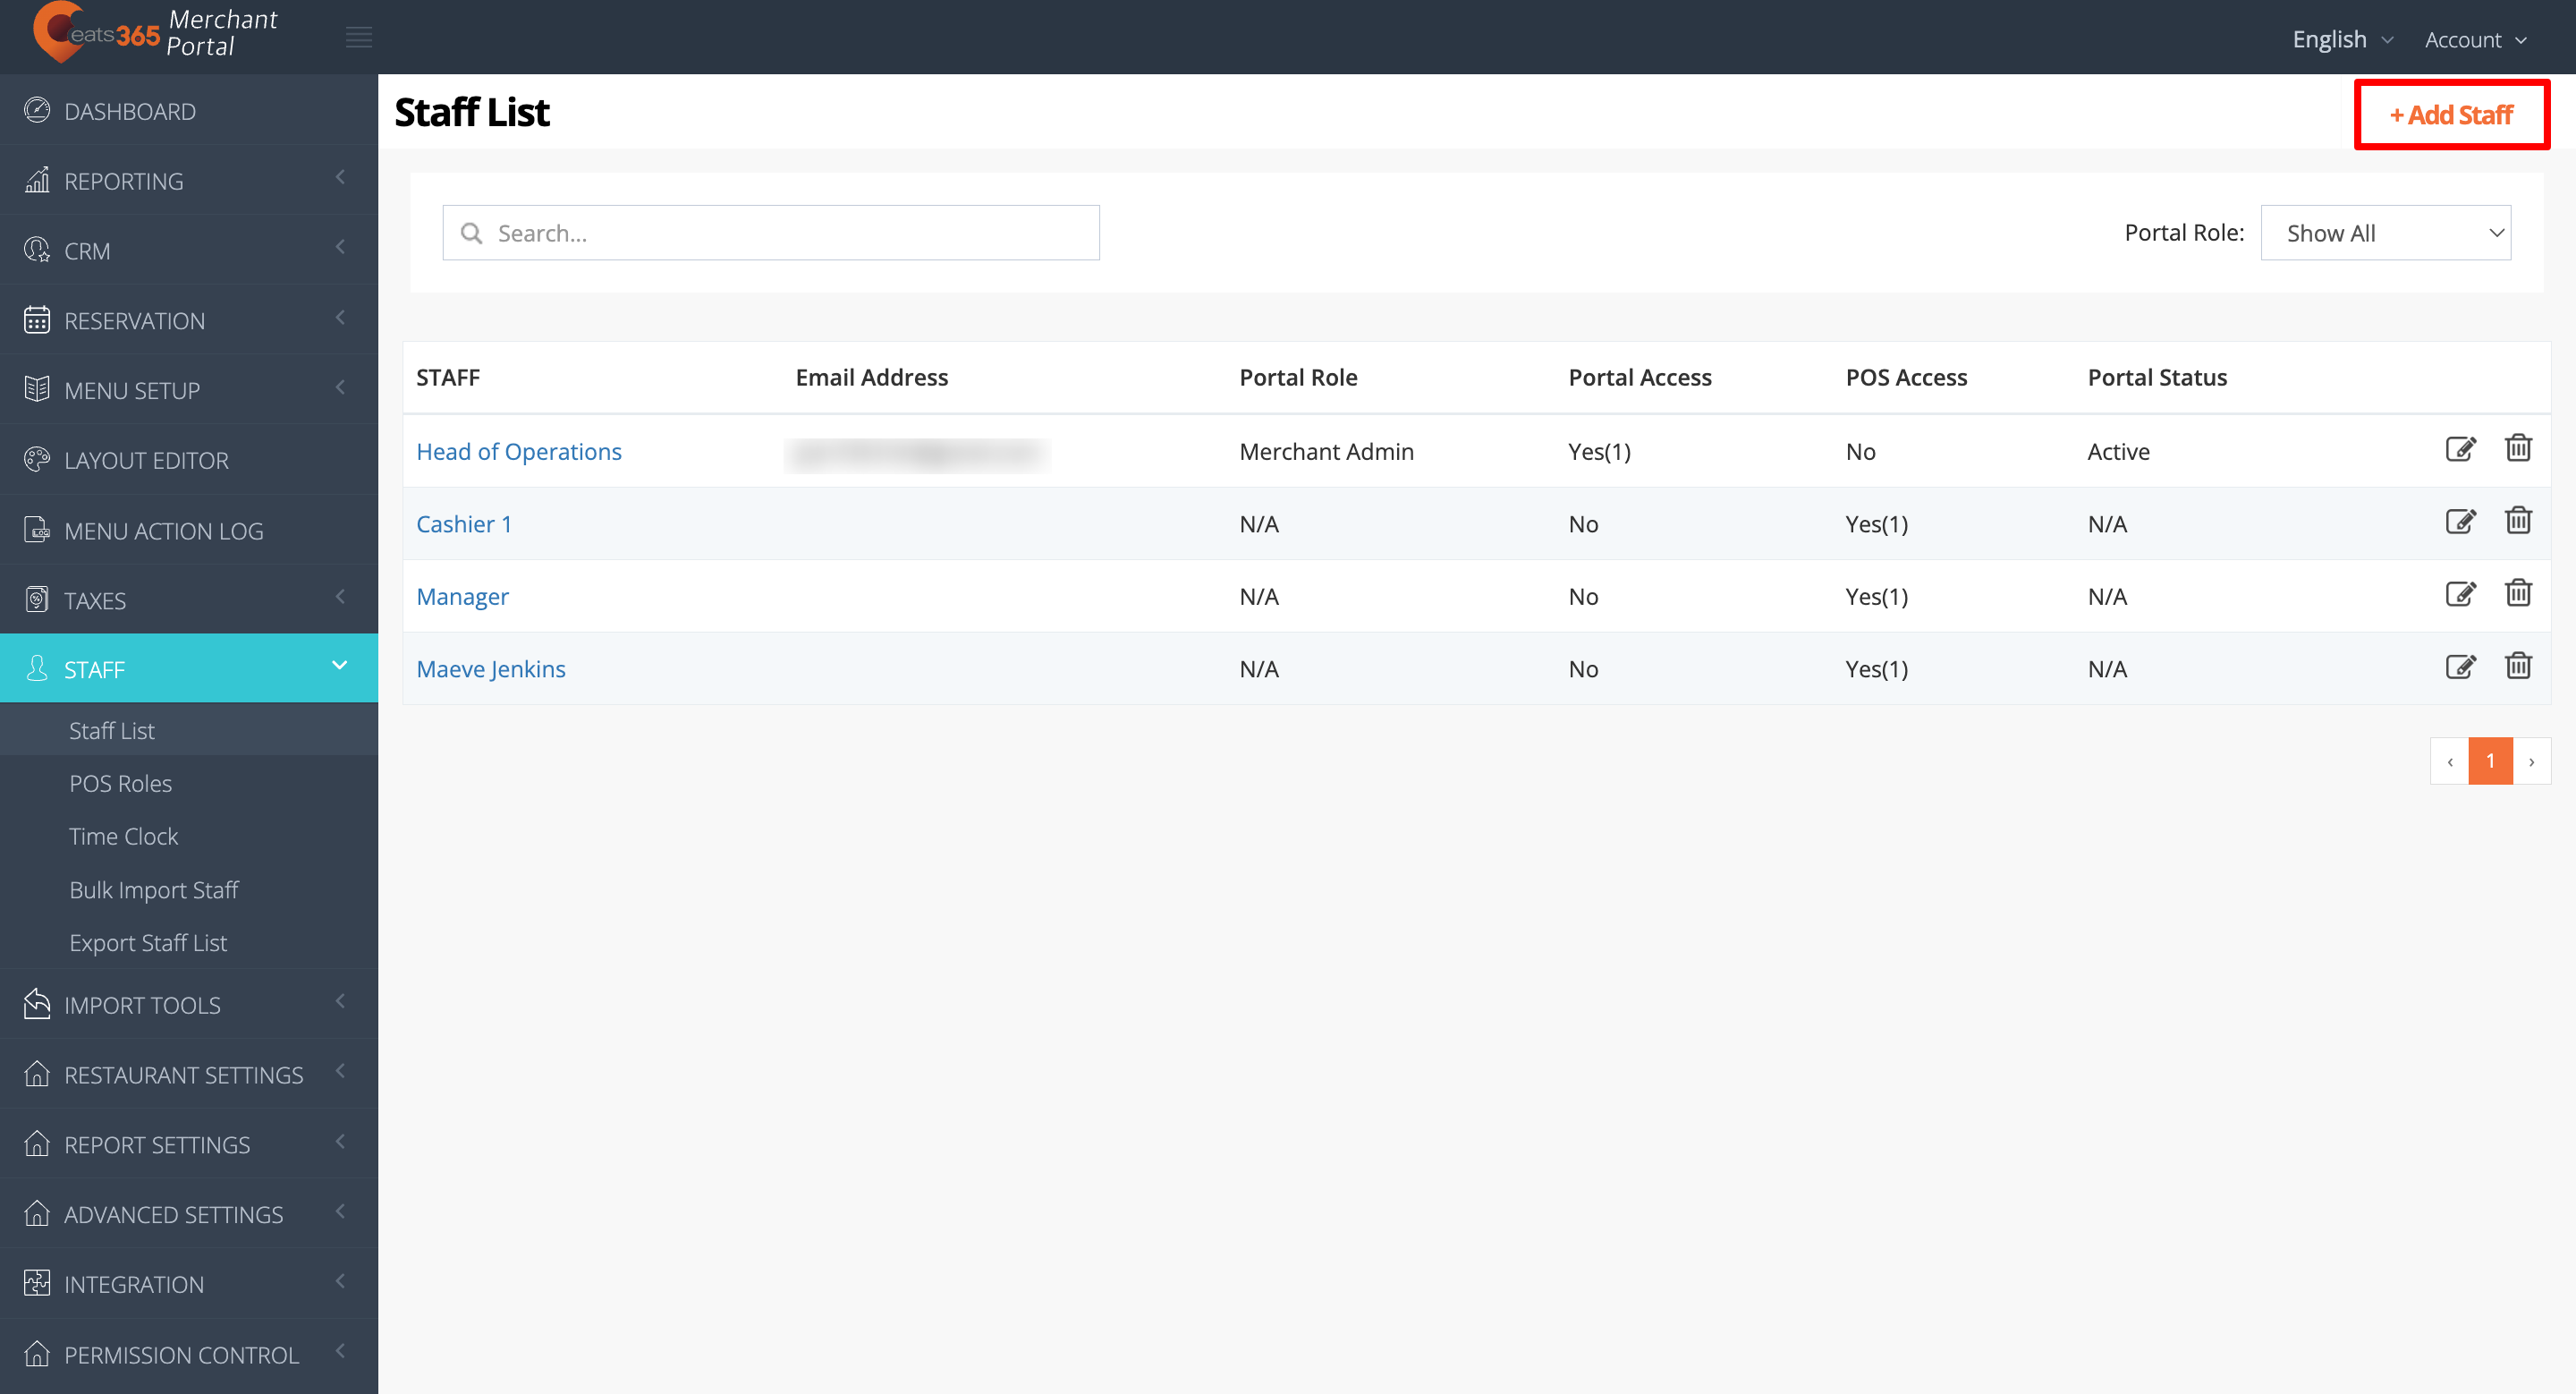
Merchant Portal 2.0
- Log in to the Merchant Portal.
- On the left panel, click on Staff. Then, select Staff List.
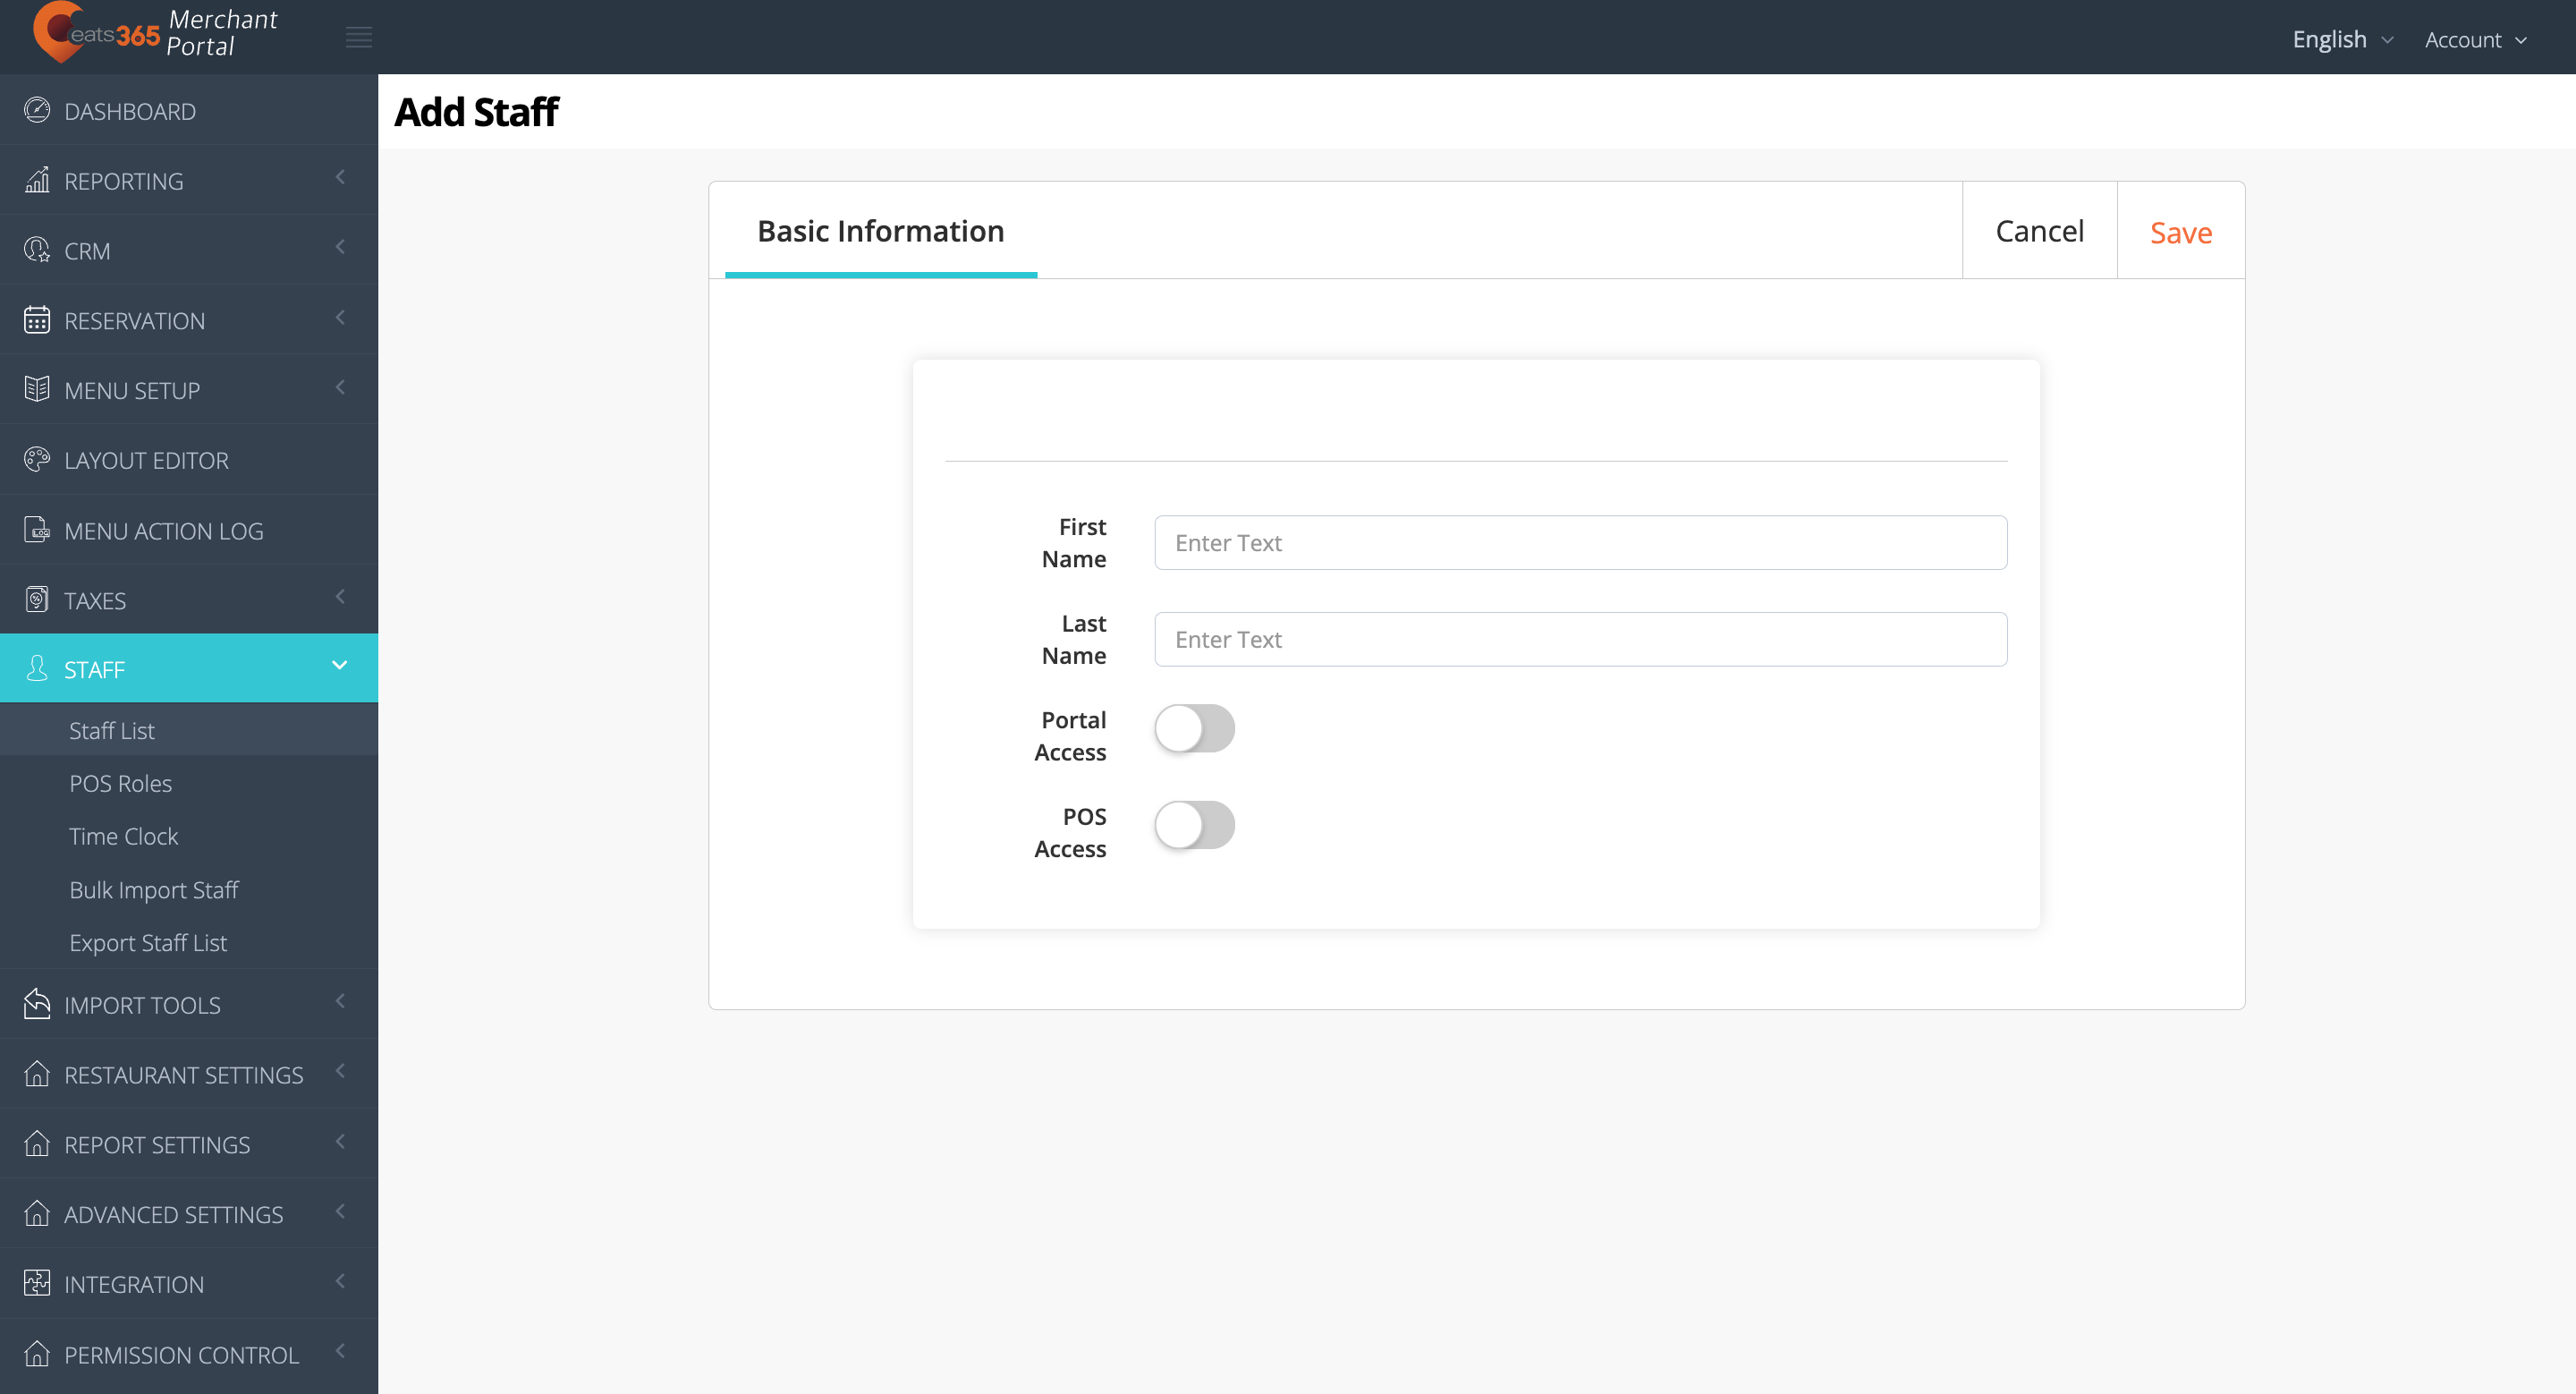
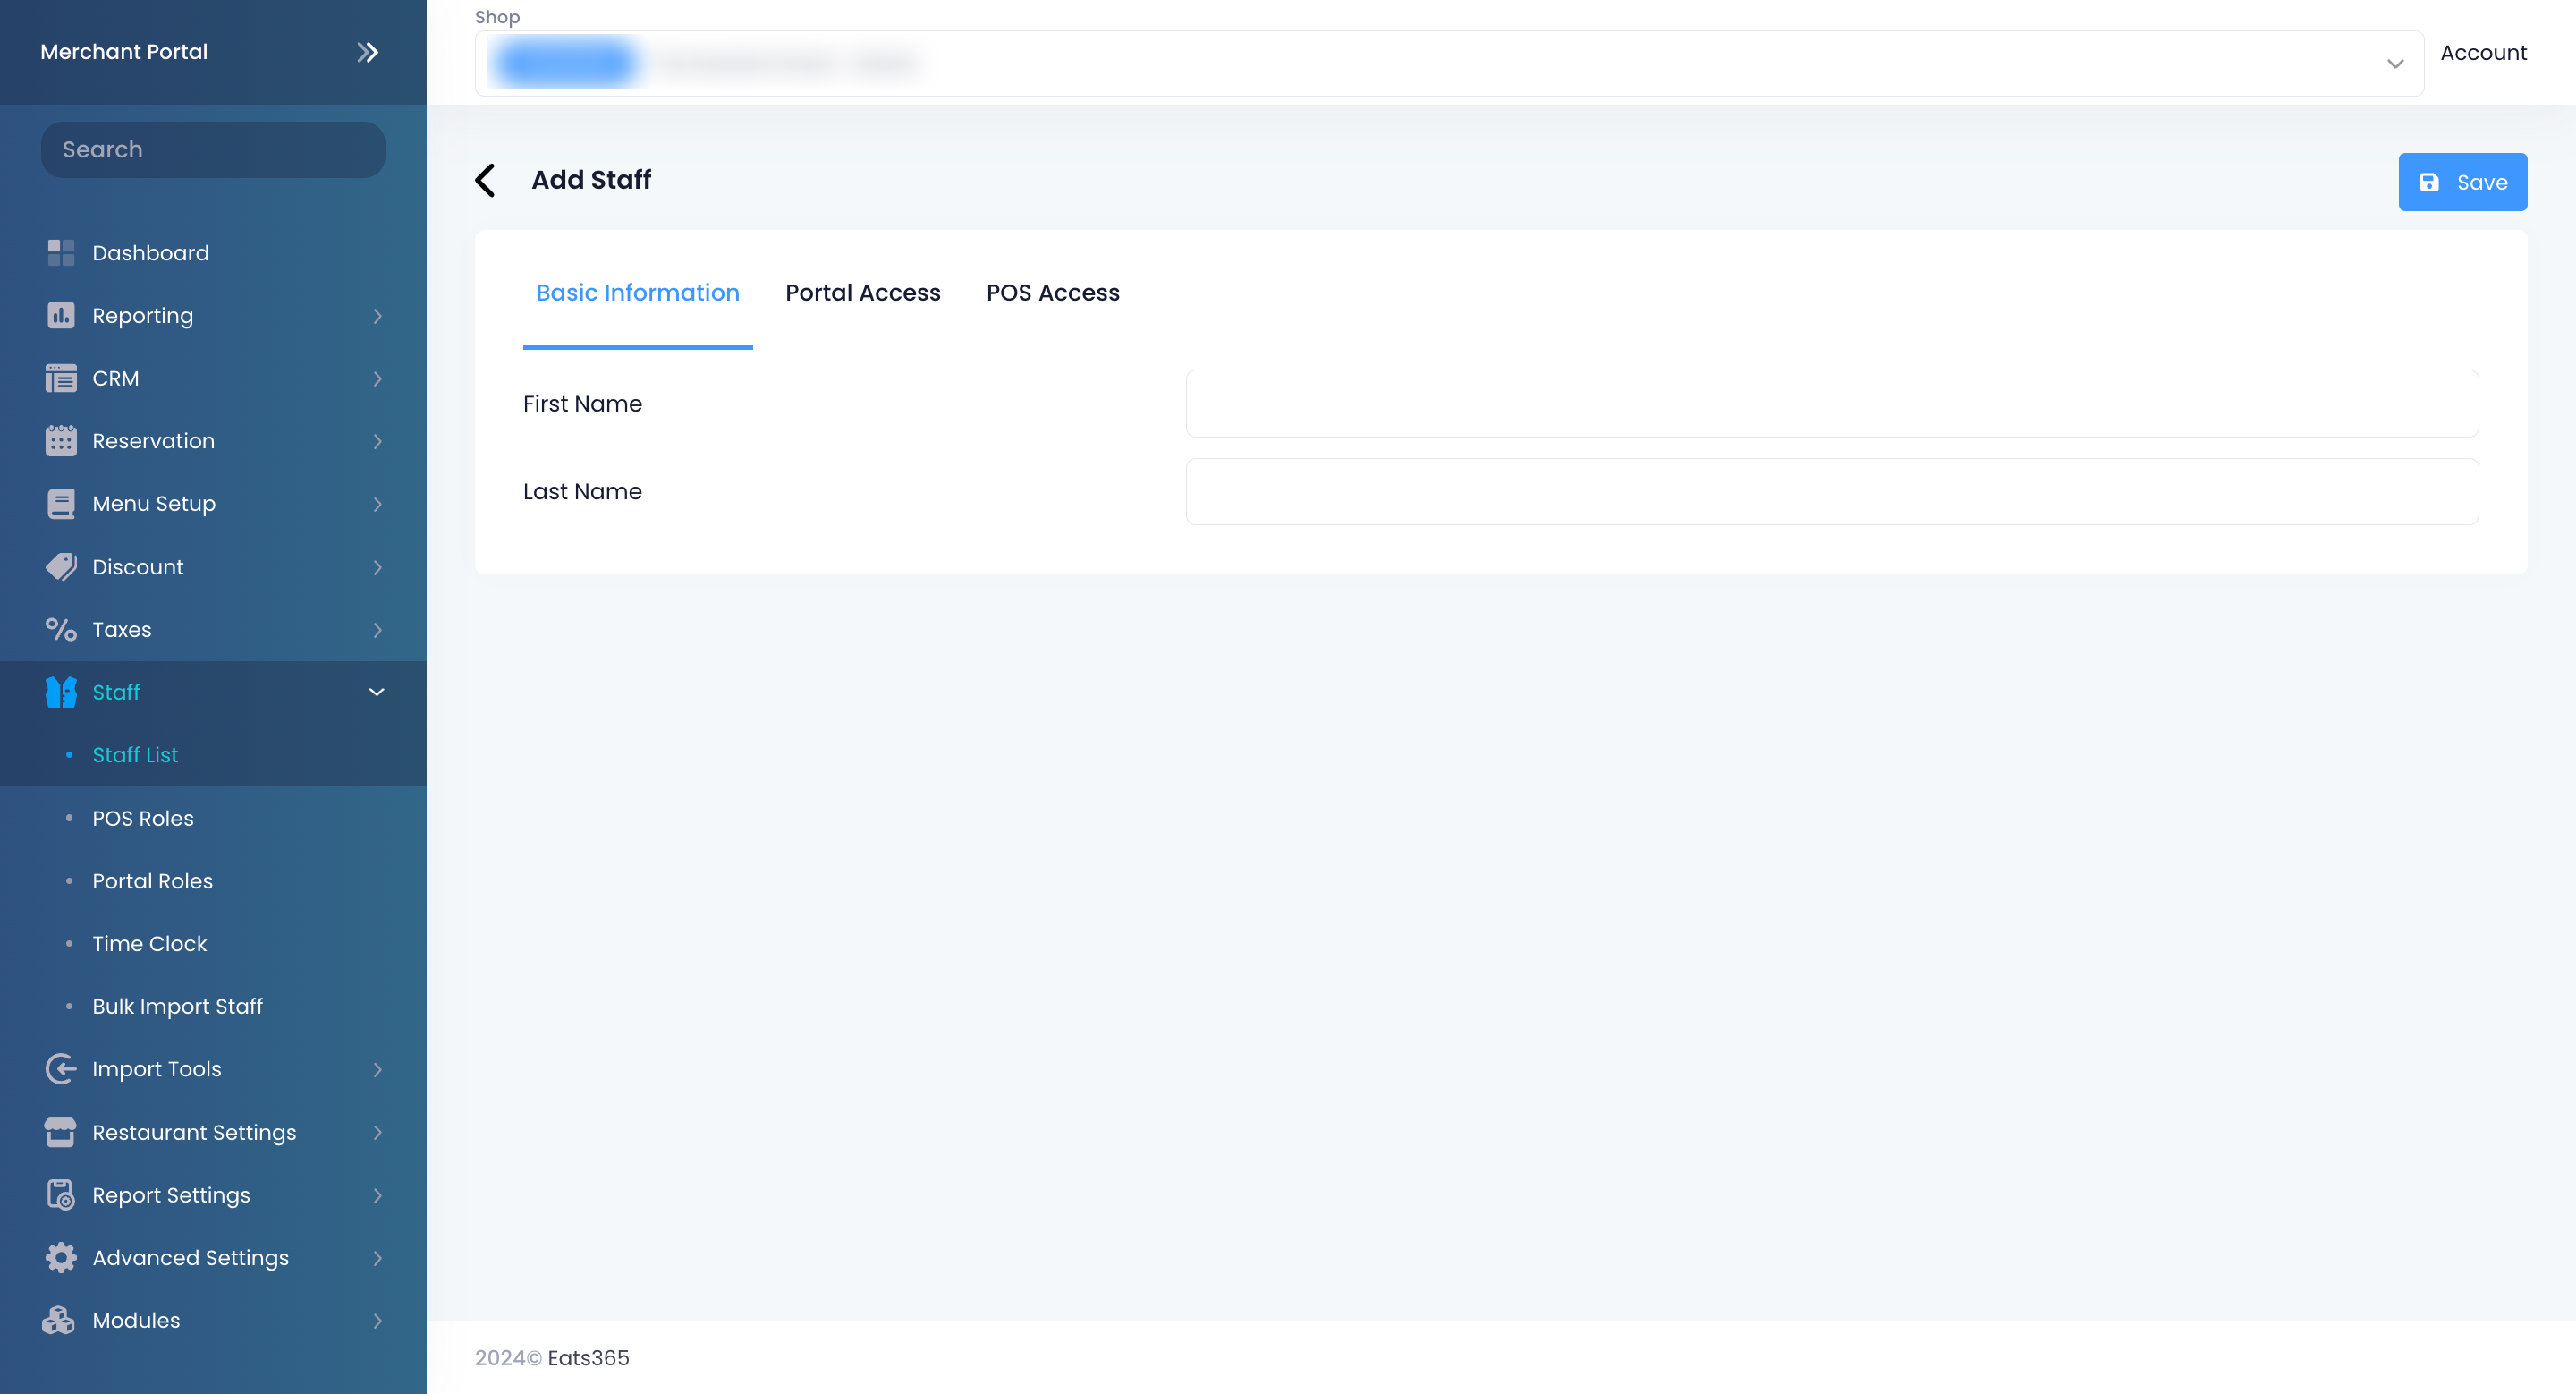
- At the top right, click on + Add Staff.
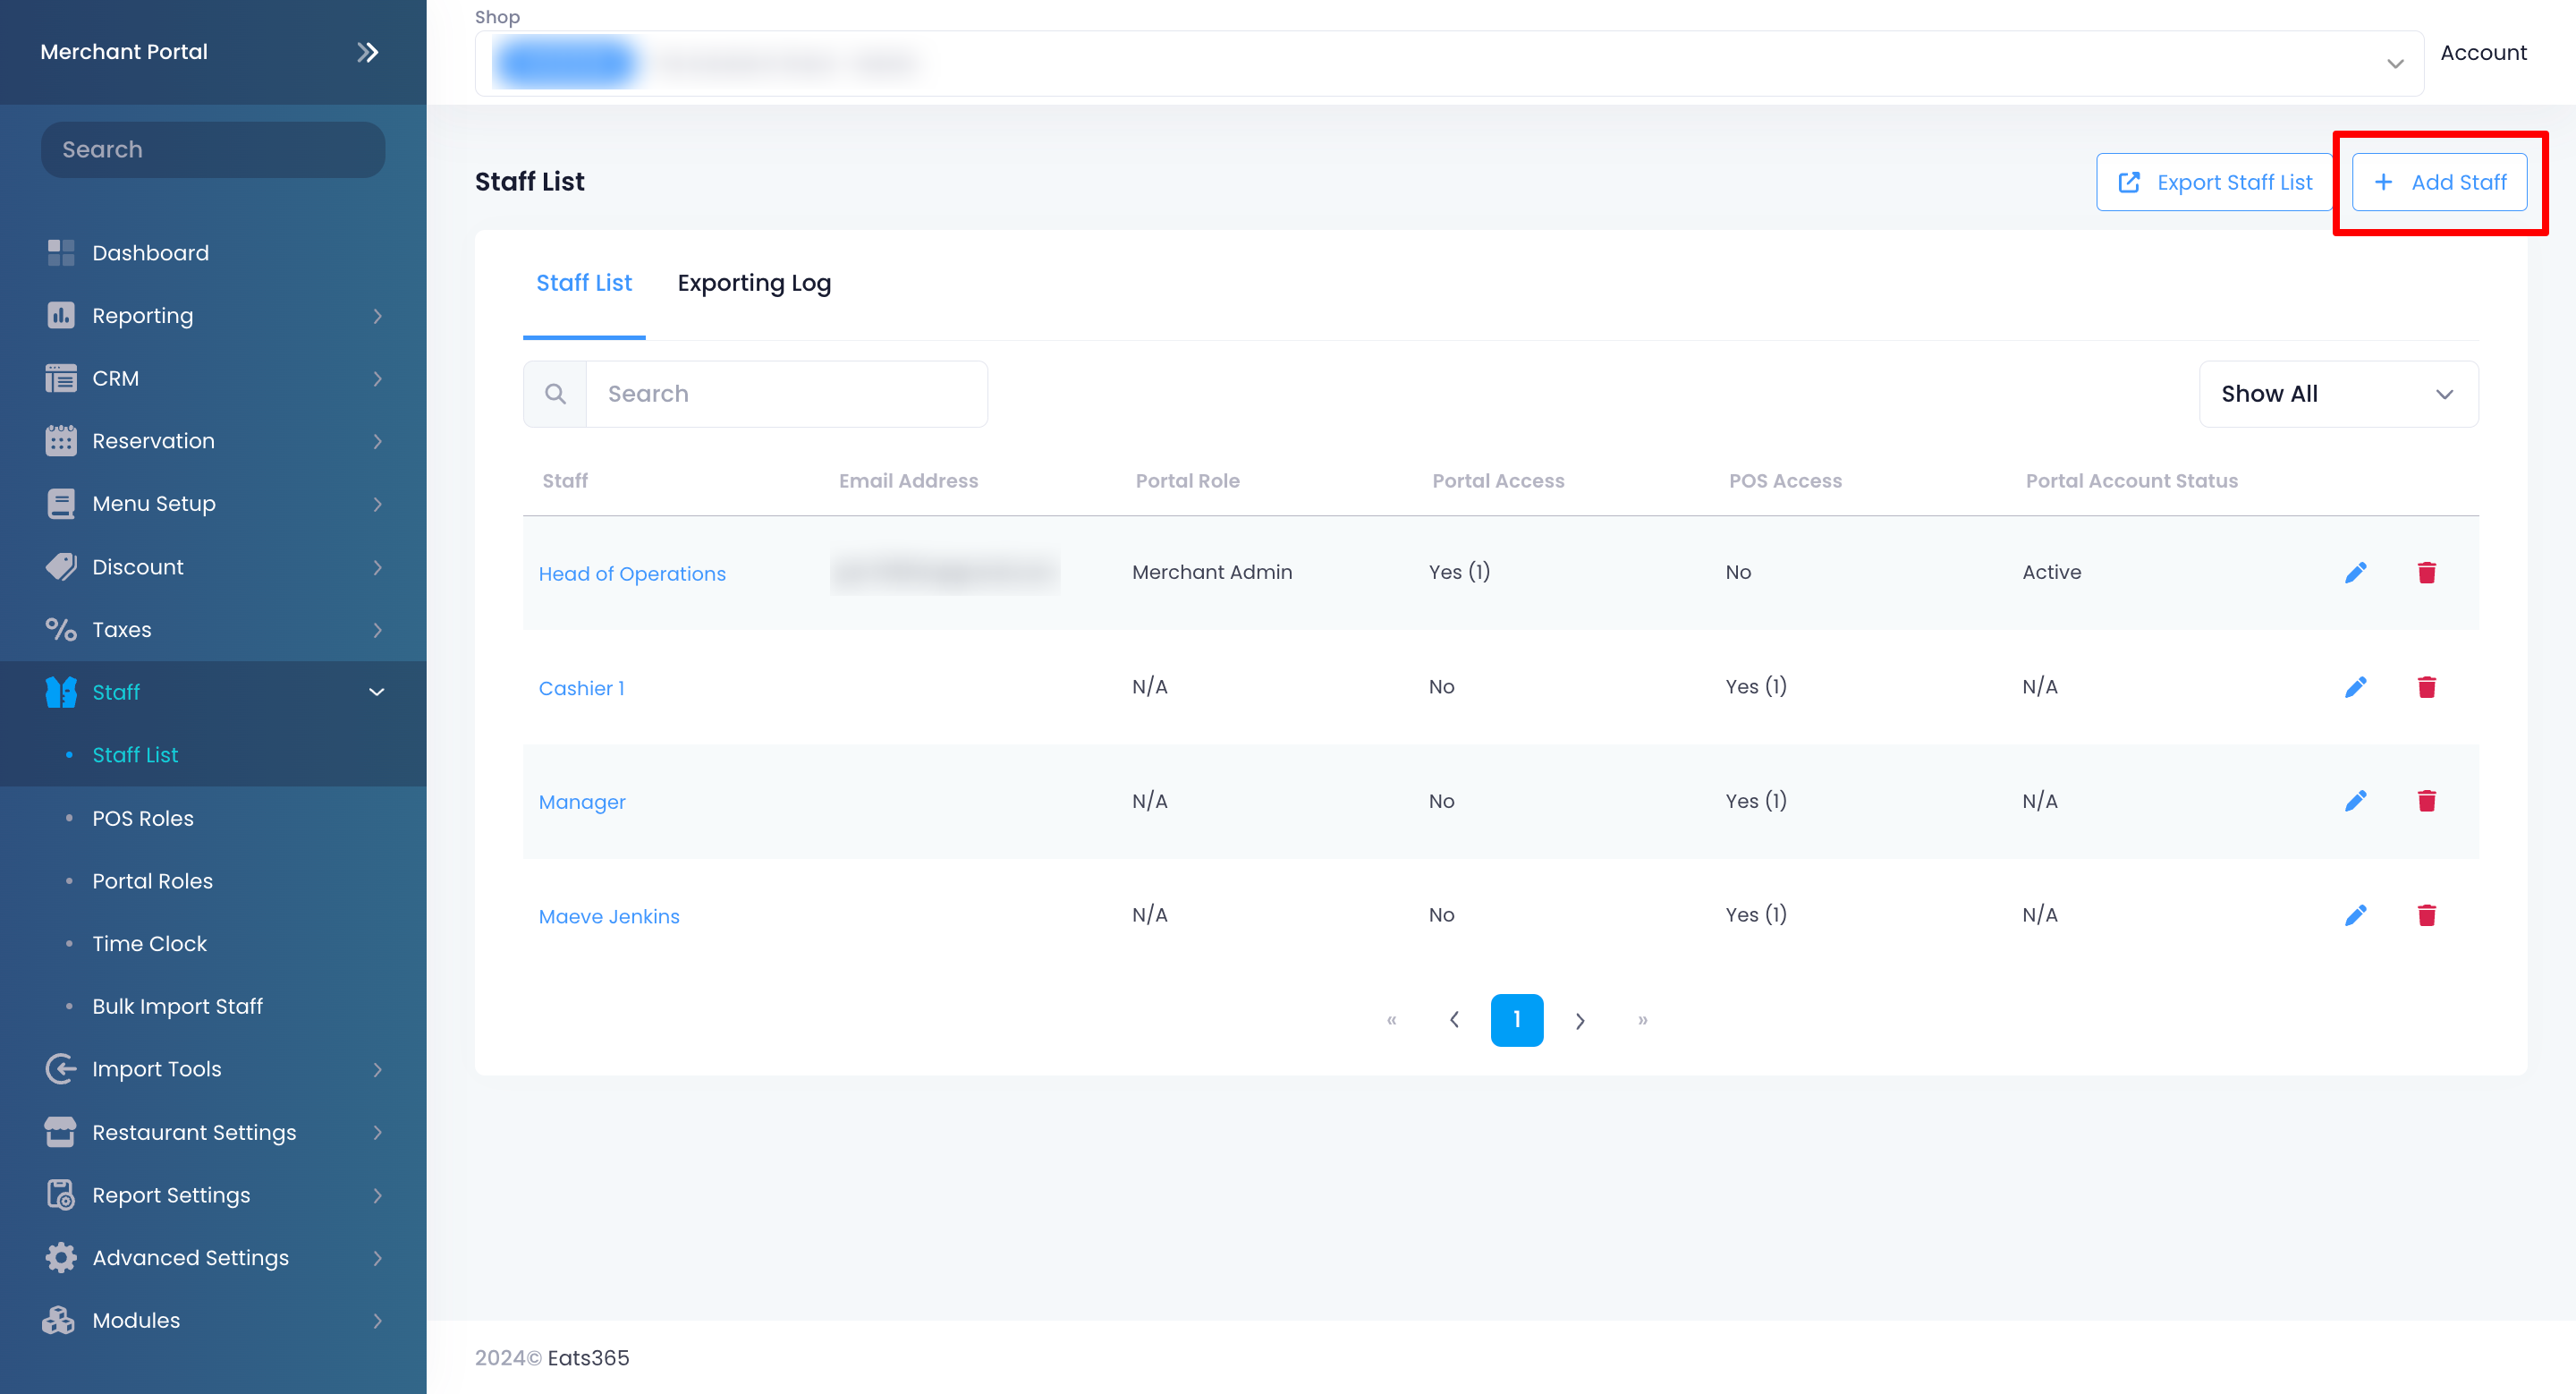
- Enter your staff’s information.
Within the Staff List, you can select which tool you want your staff to have access to. You can set up your staff’s access to the POS or the Merchant Portal.
Set up access to the POS
To set up your staff member’s access to the POS, follow the steps to create a Staff List and continue with the steps below:
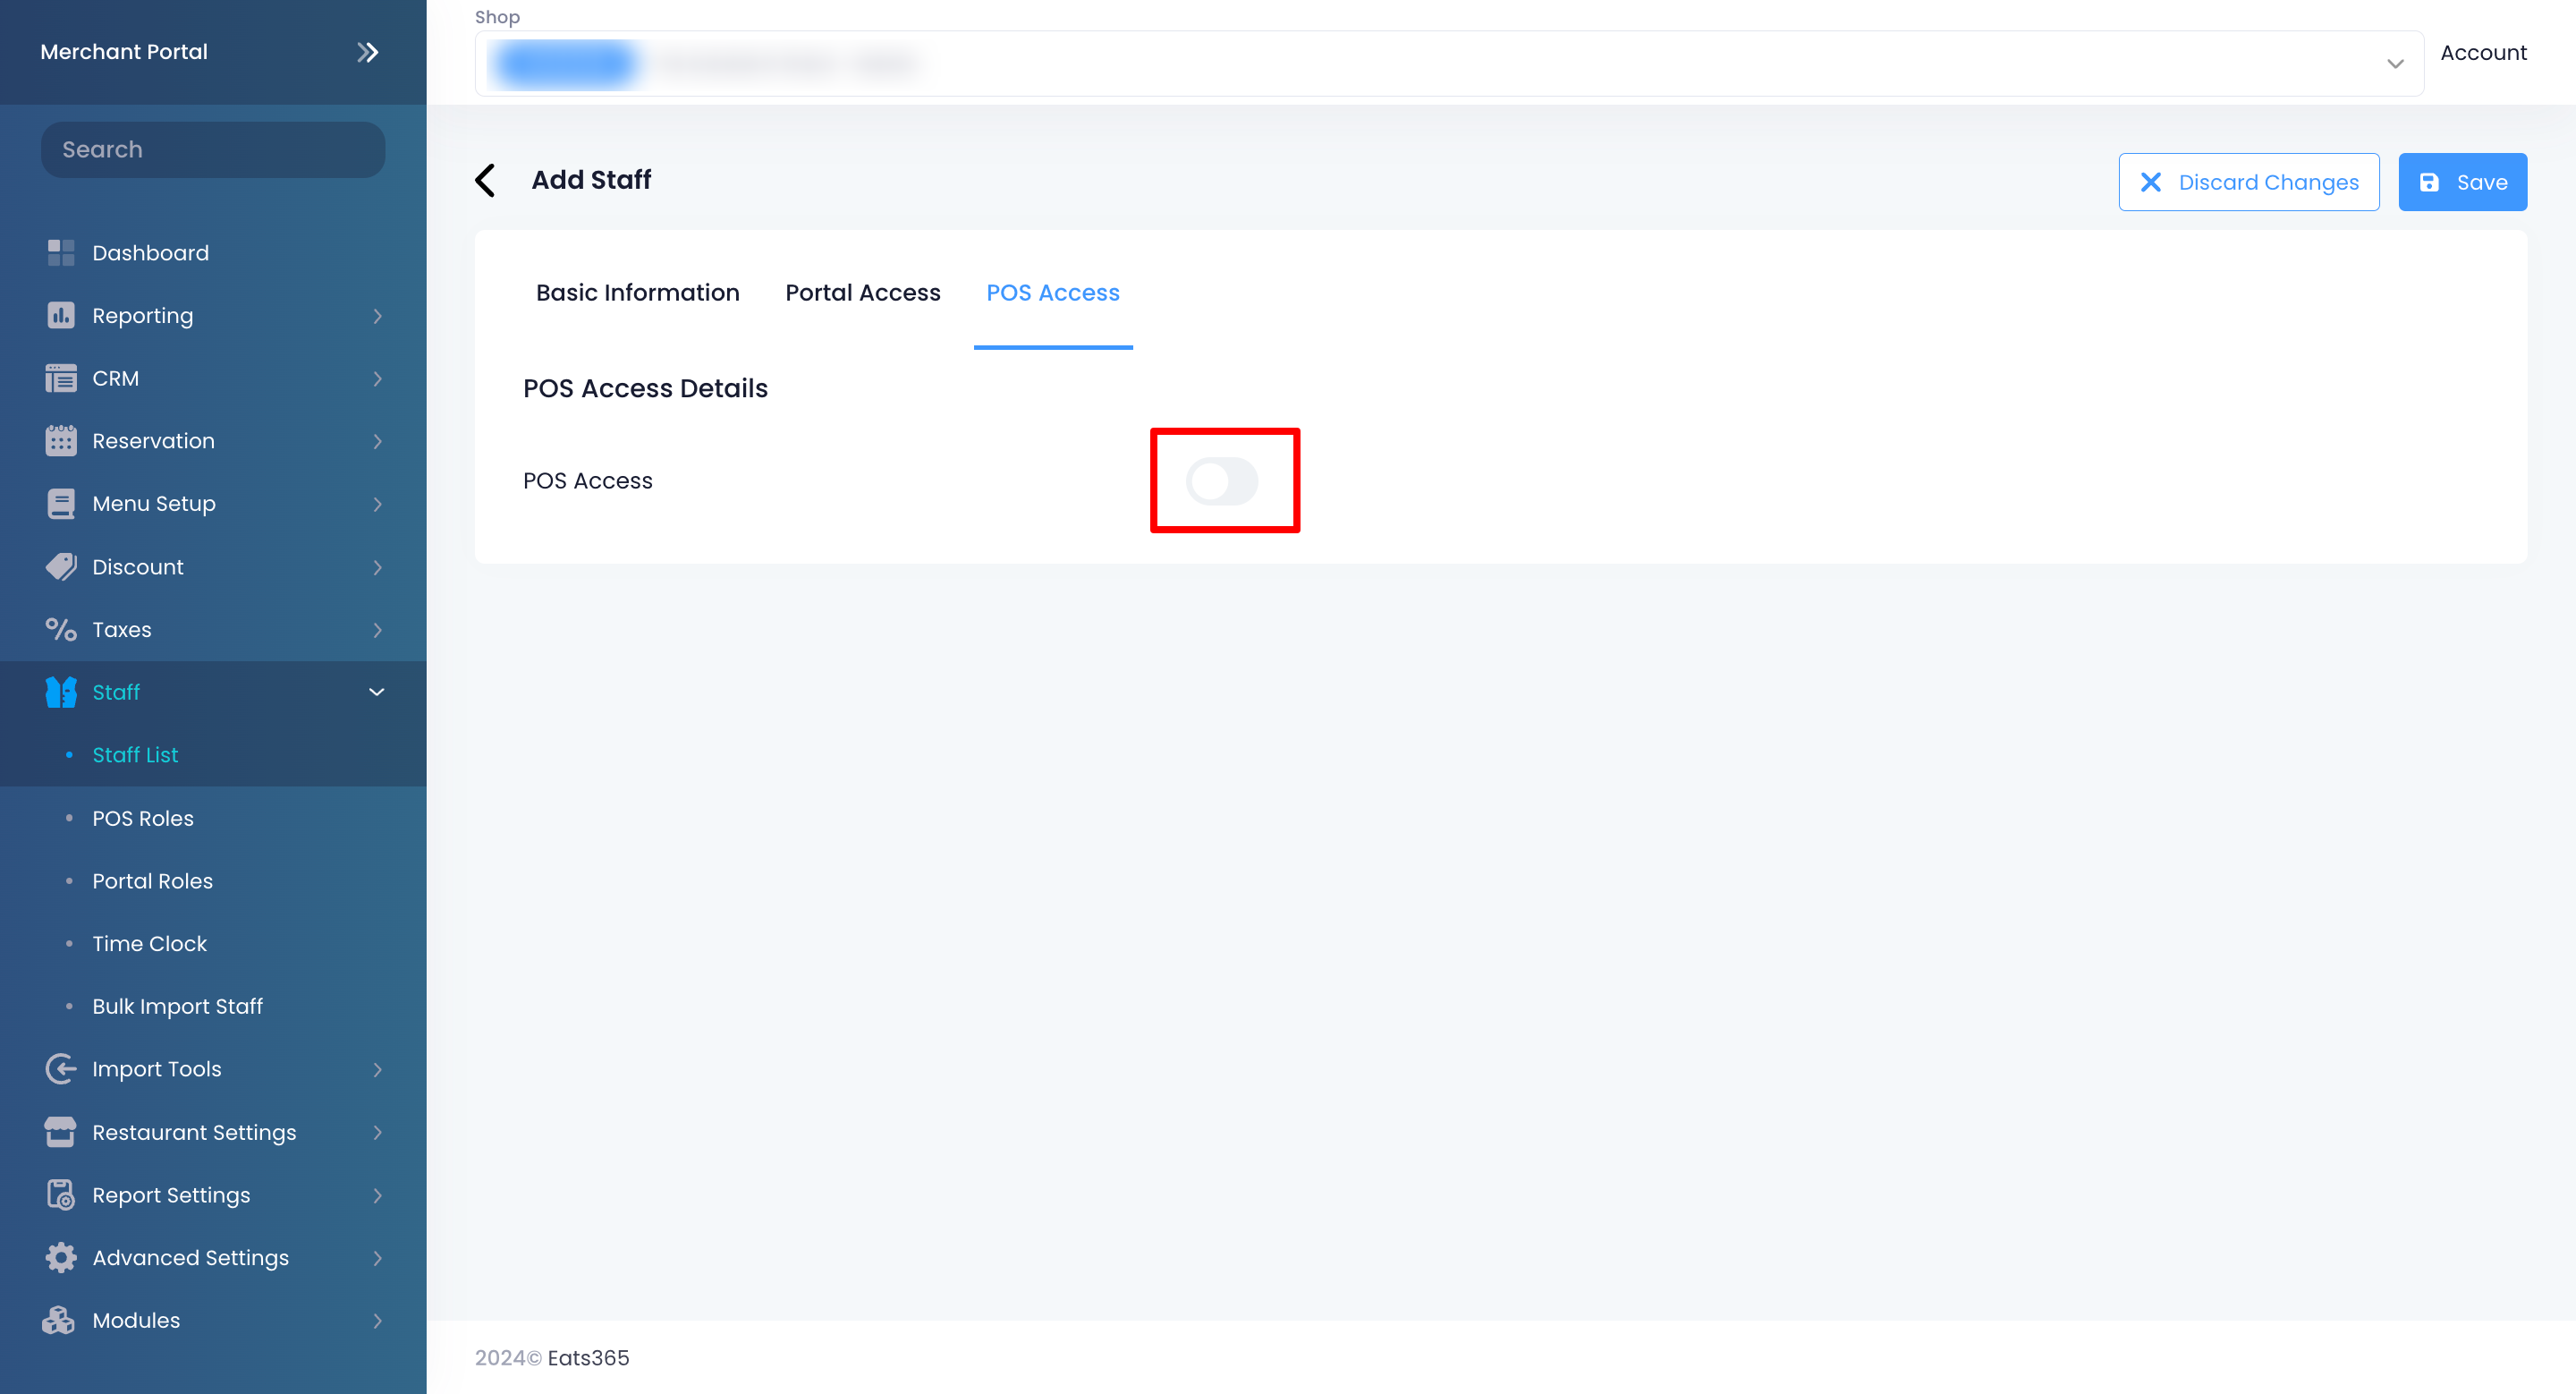
- Click on the POS Access tab. Then, enable POS Access
 .
.
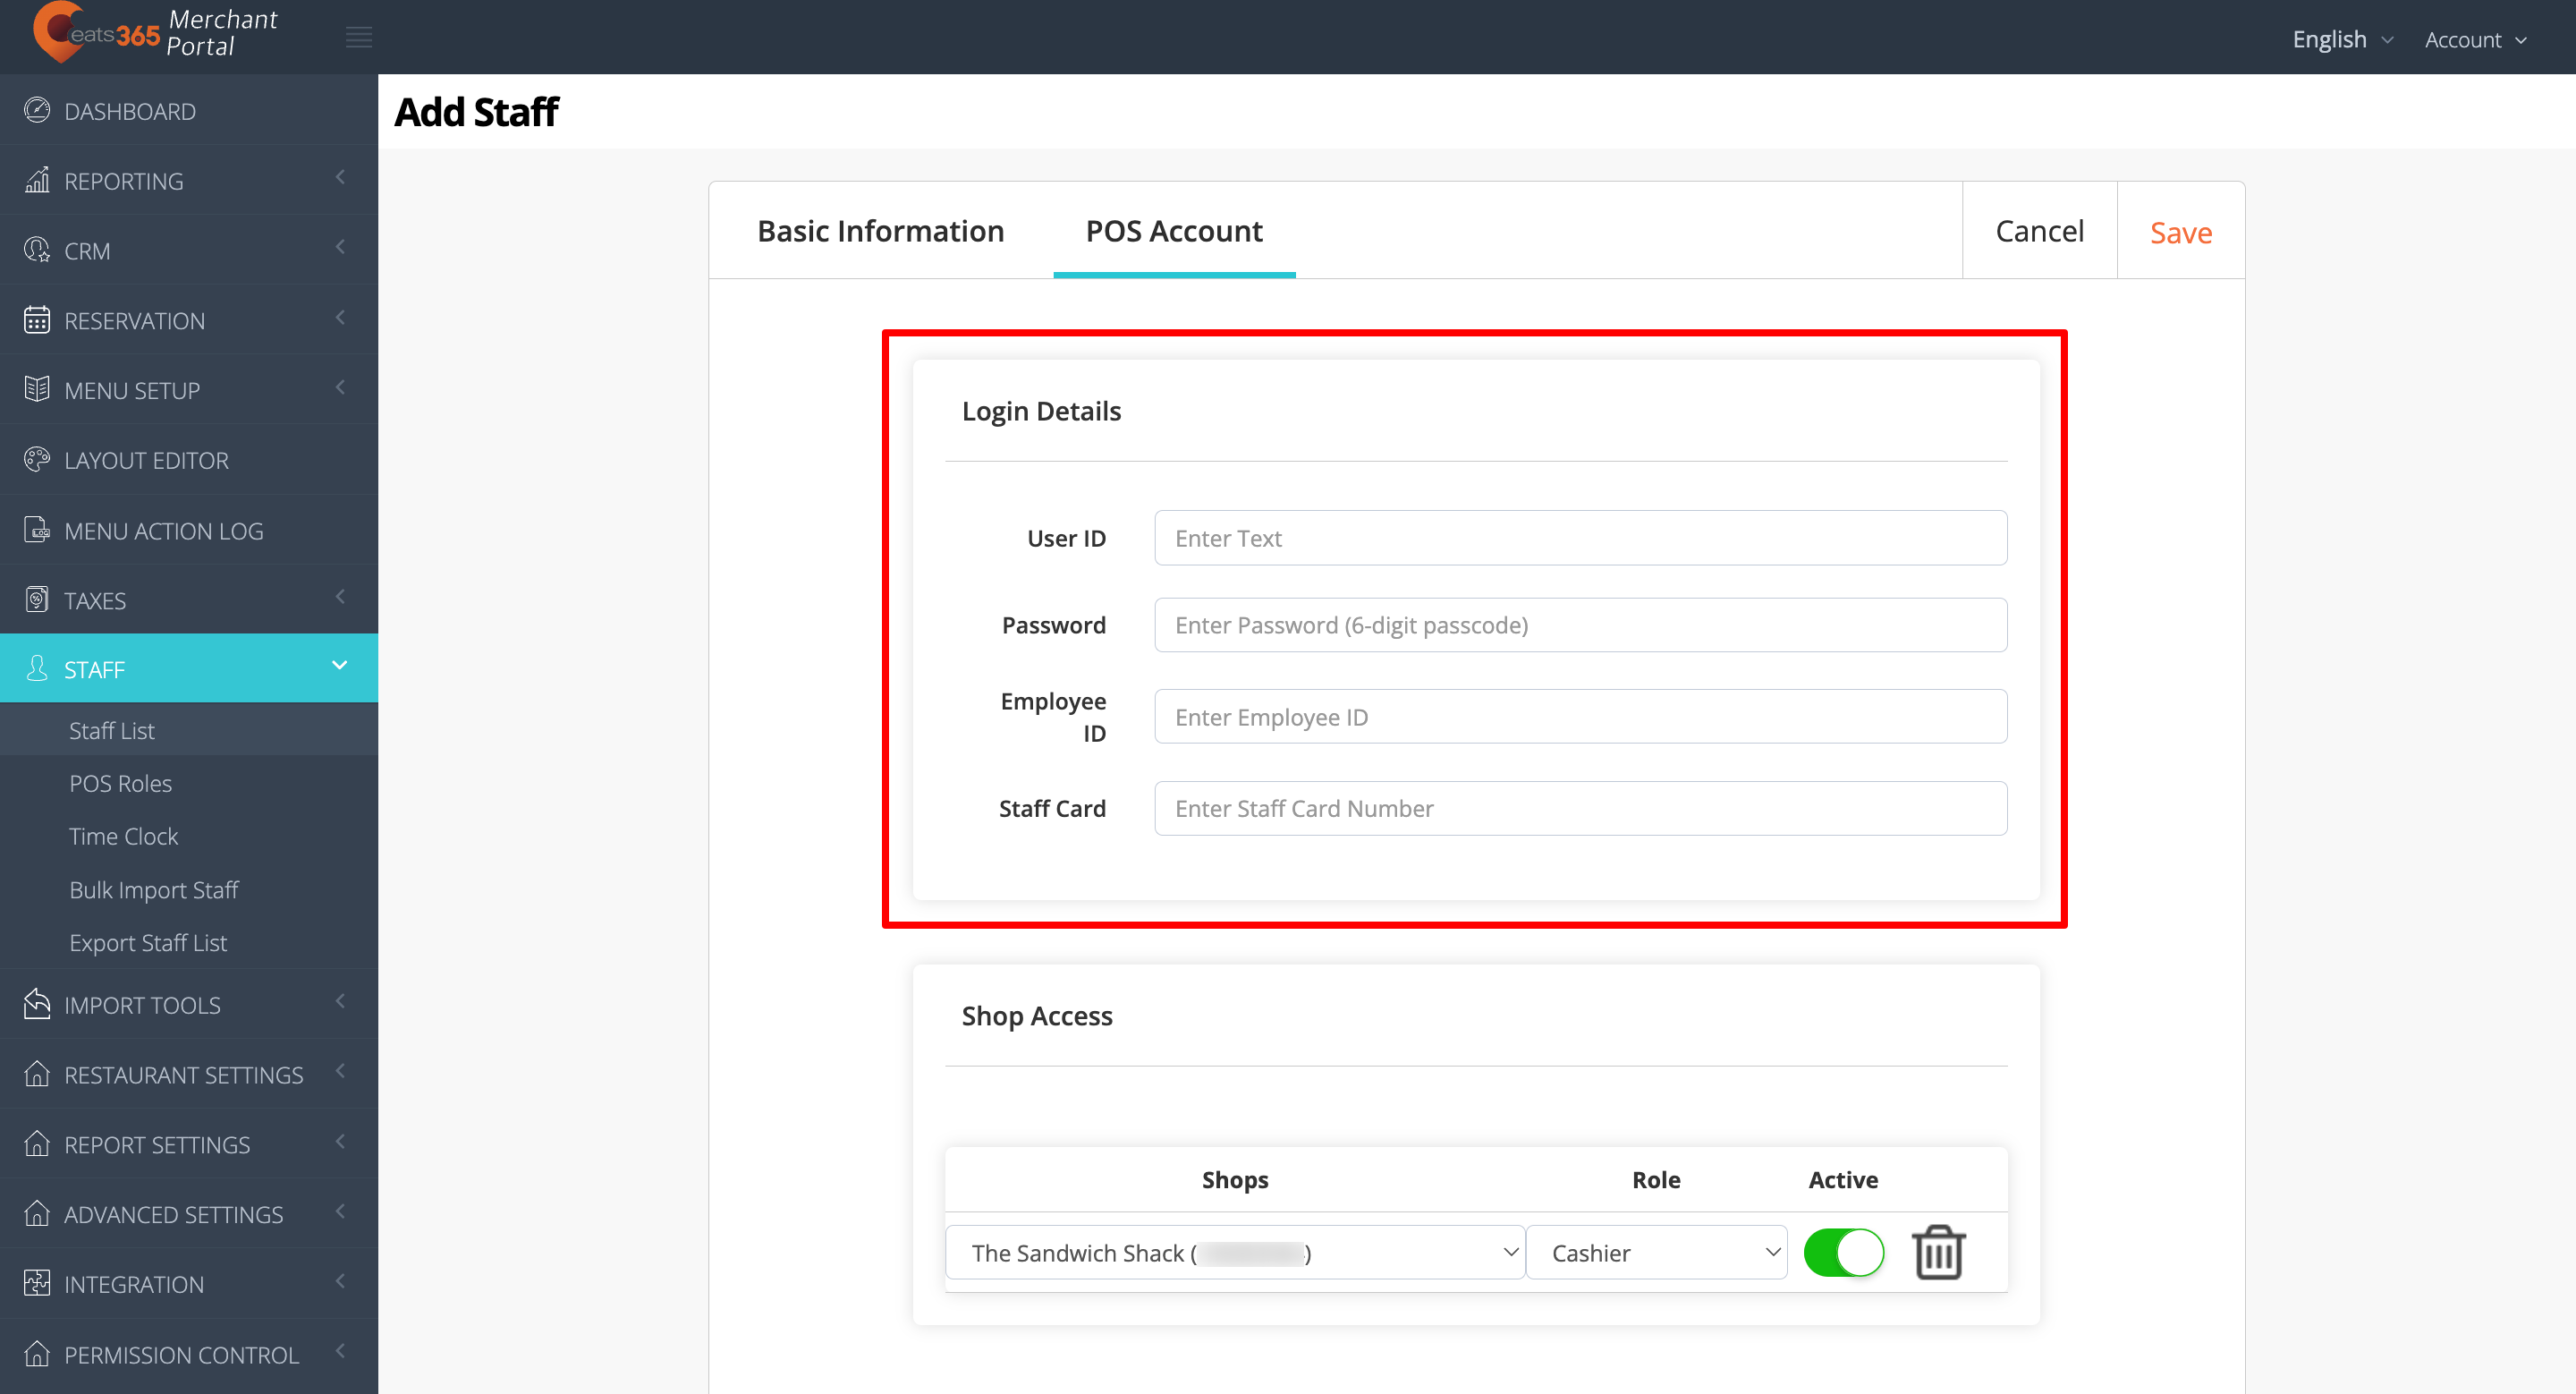
- To set up your staff member’s POS account, under "POS Access Details," enter the staff member’s login details.
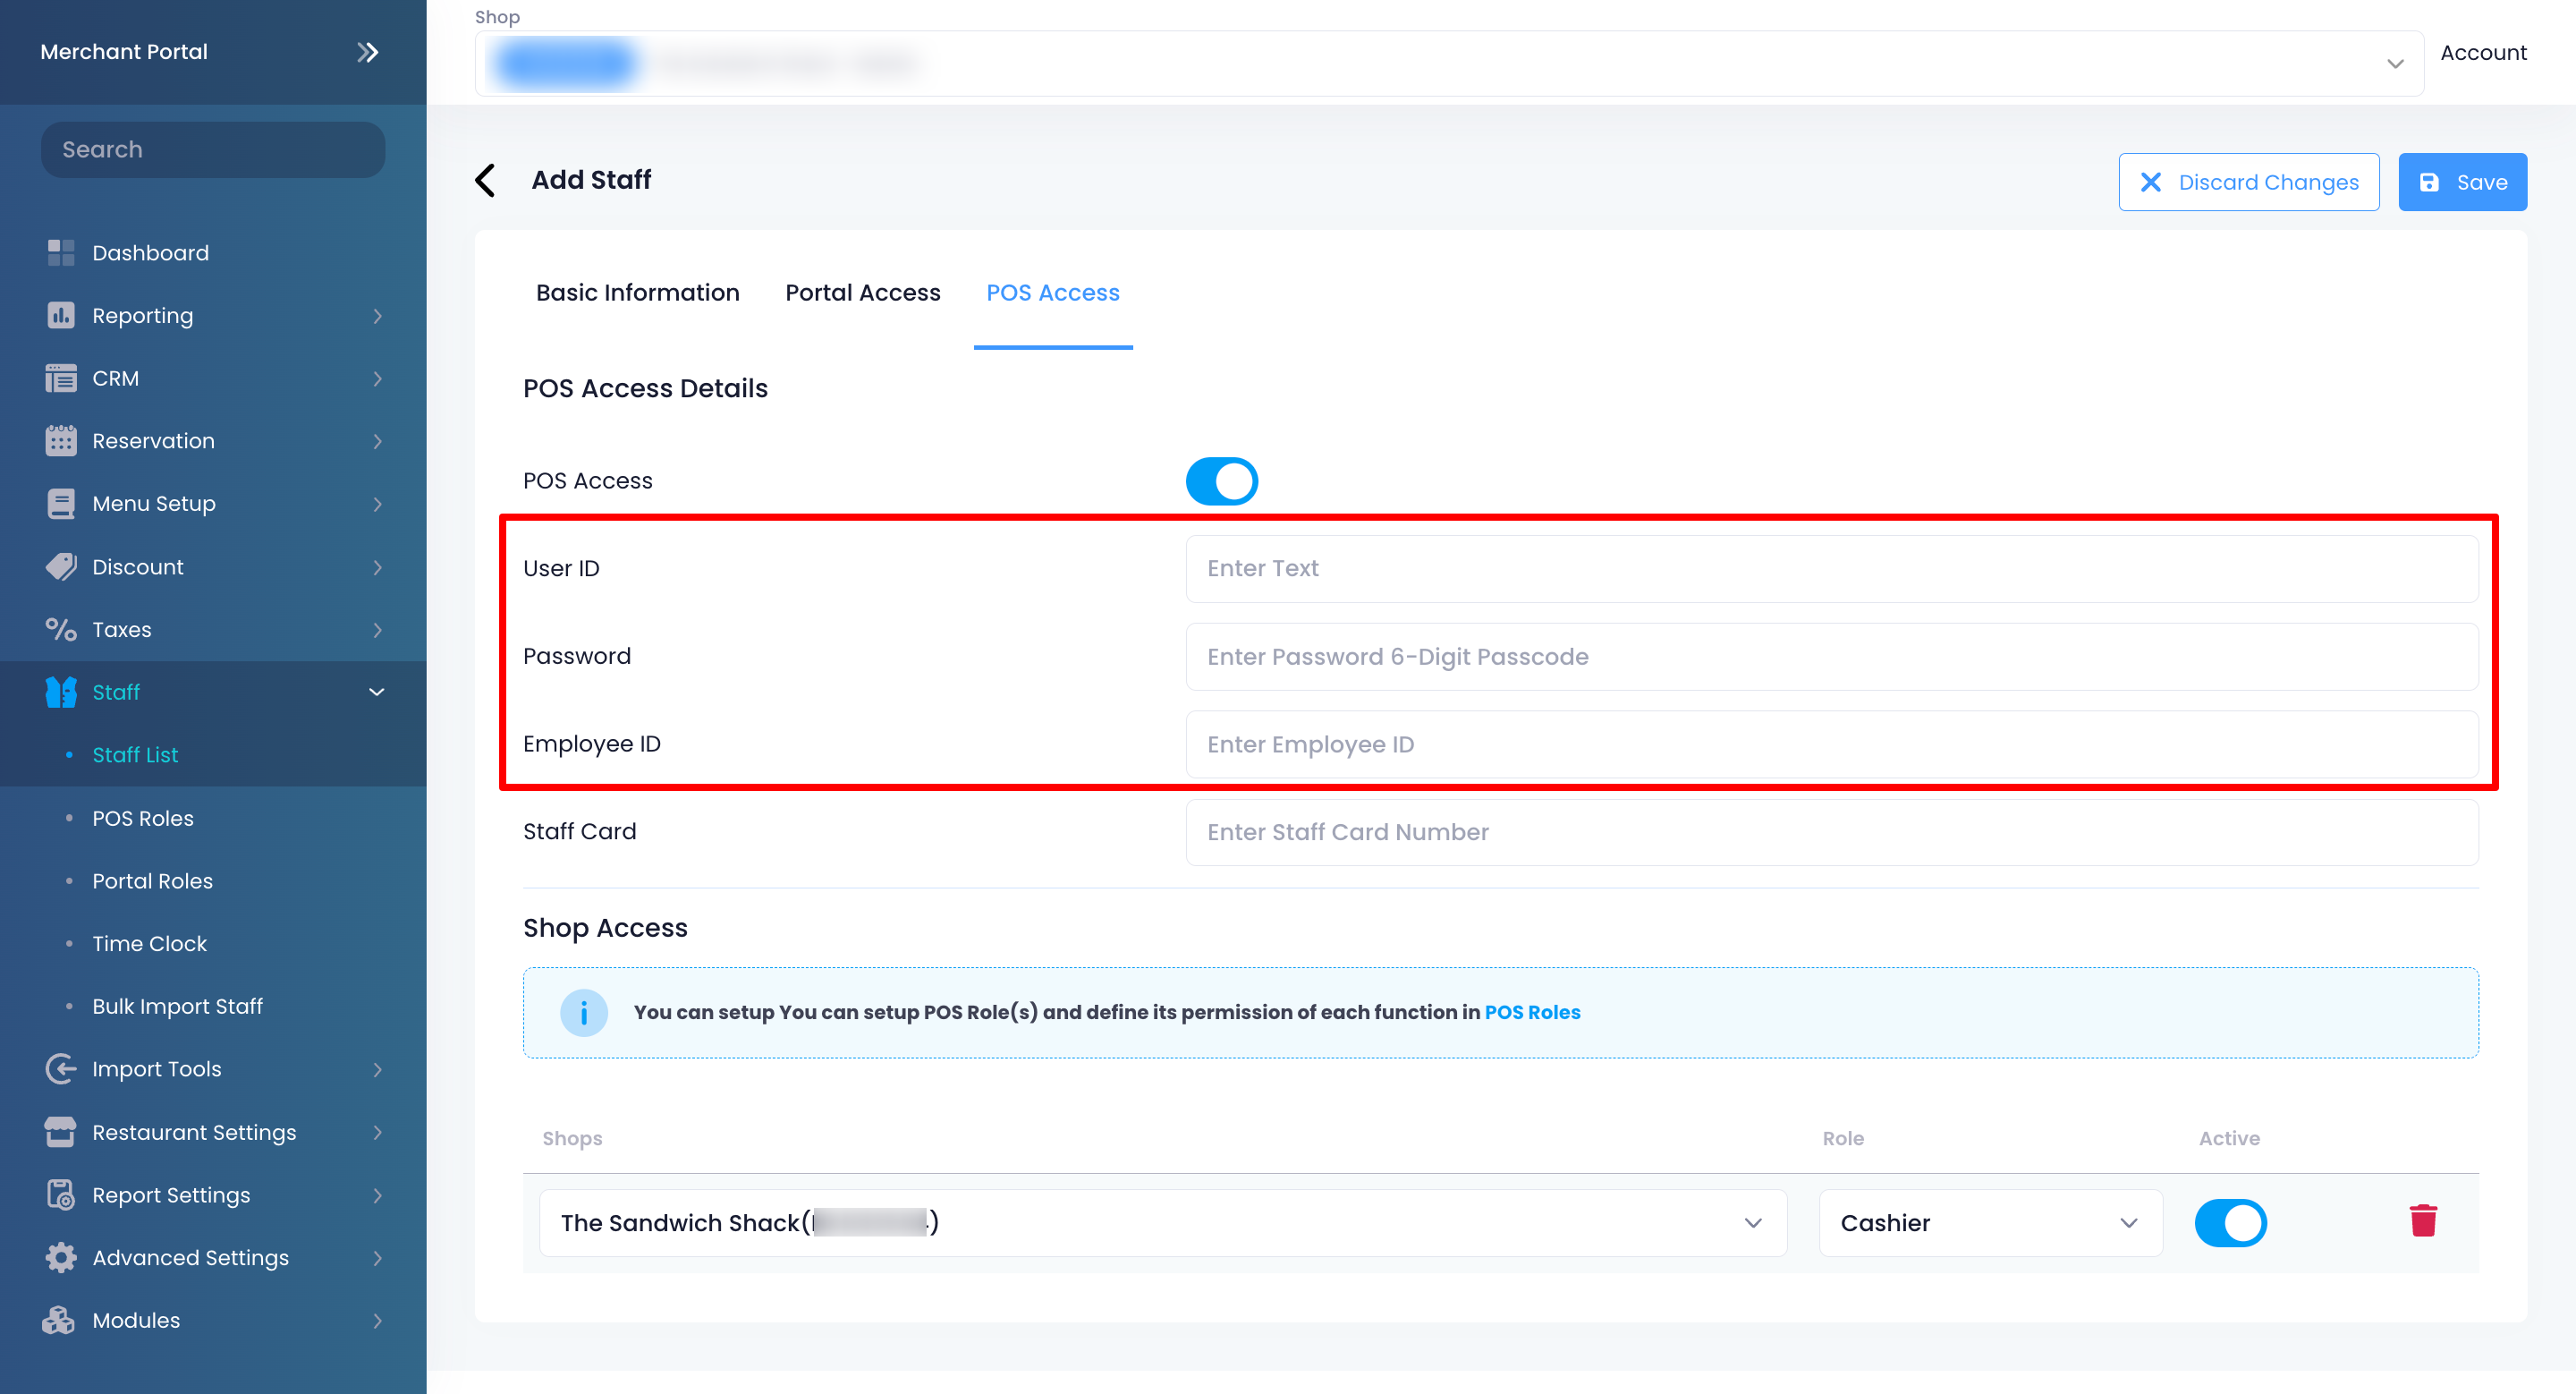
- (Optional) If you issue staff cards to your staff, enter the Staff Card Number.
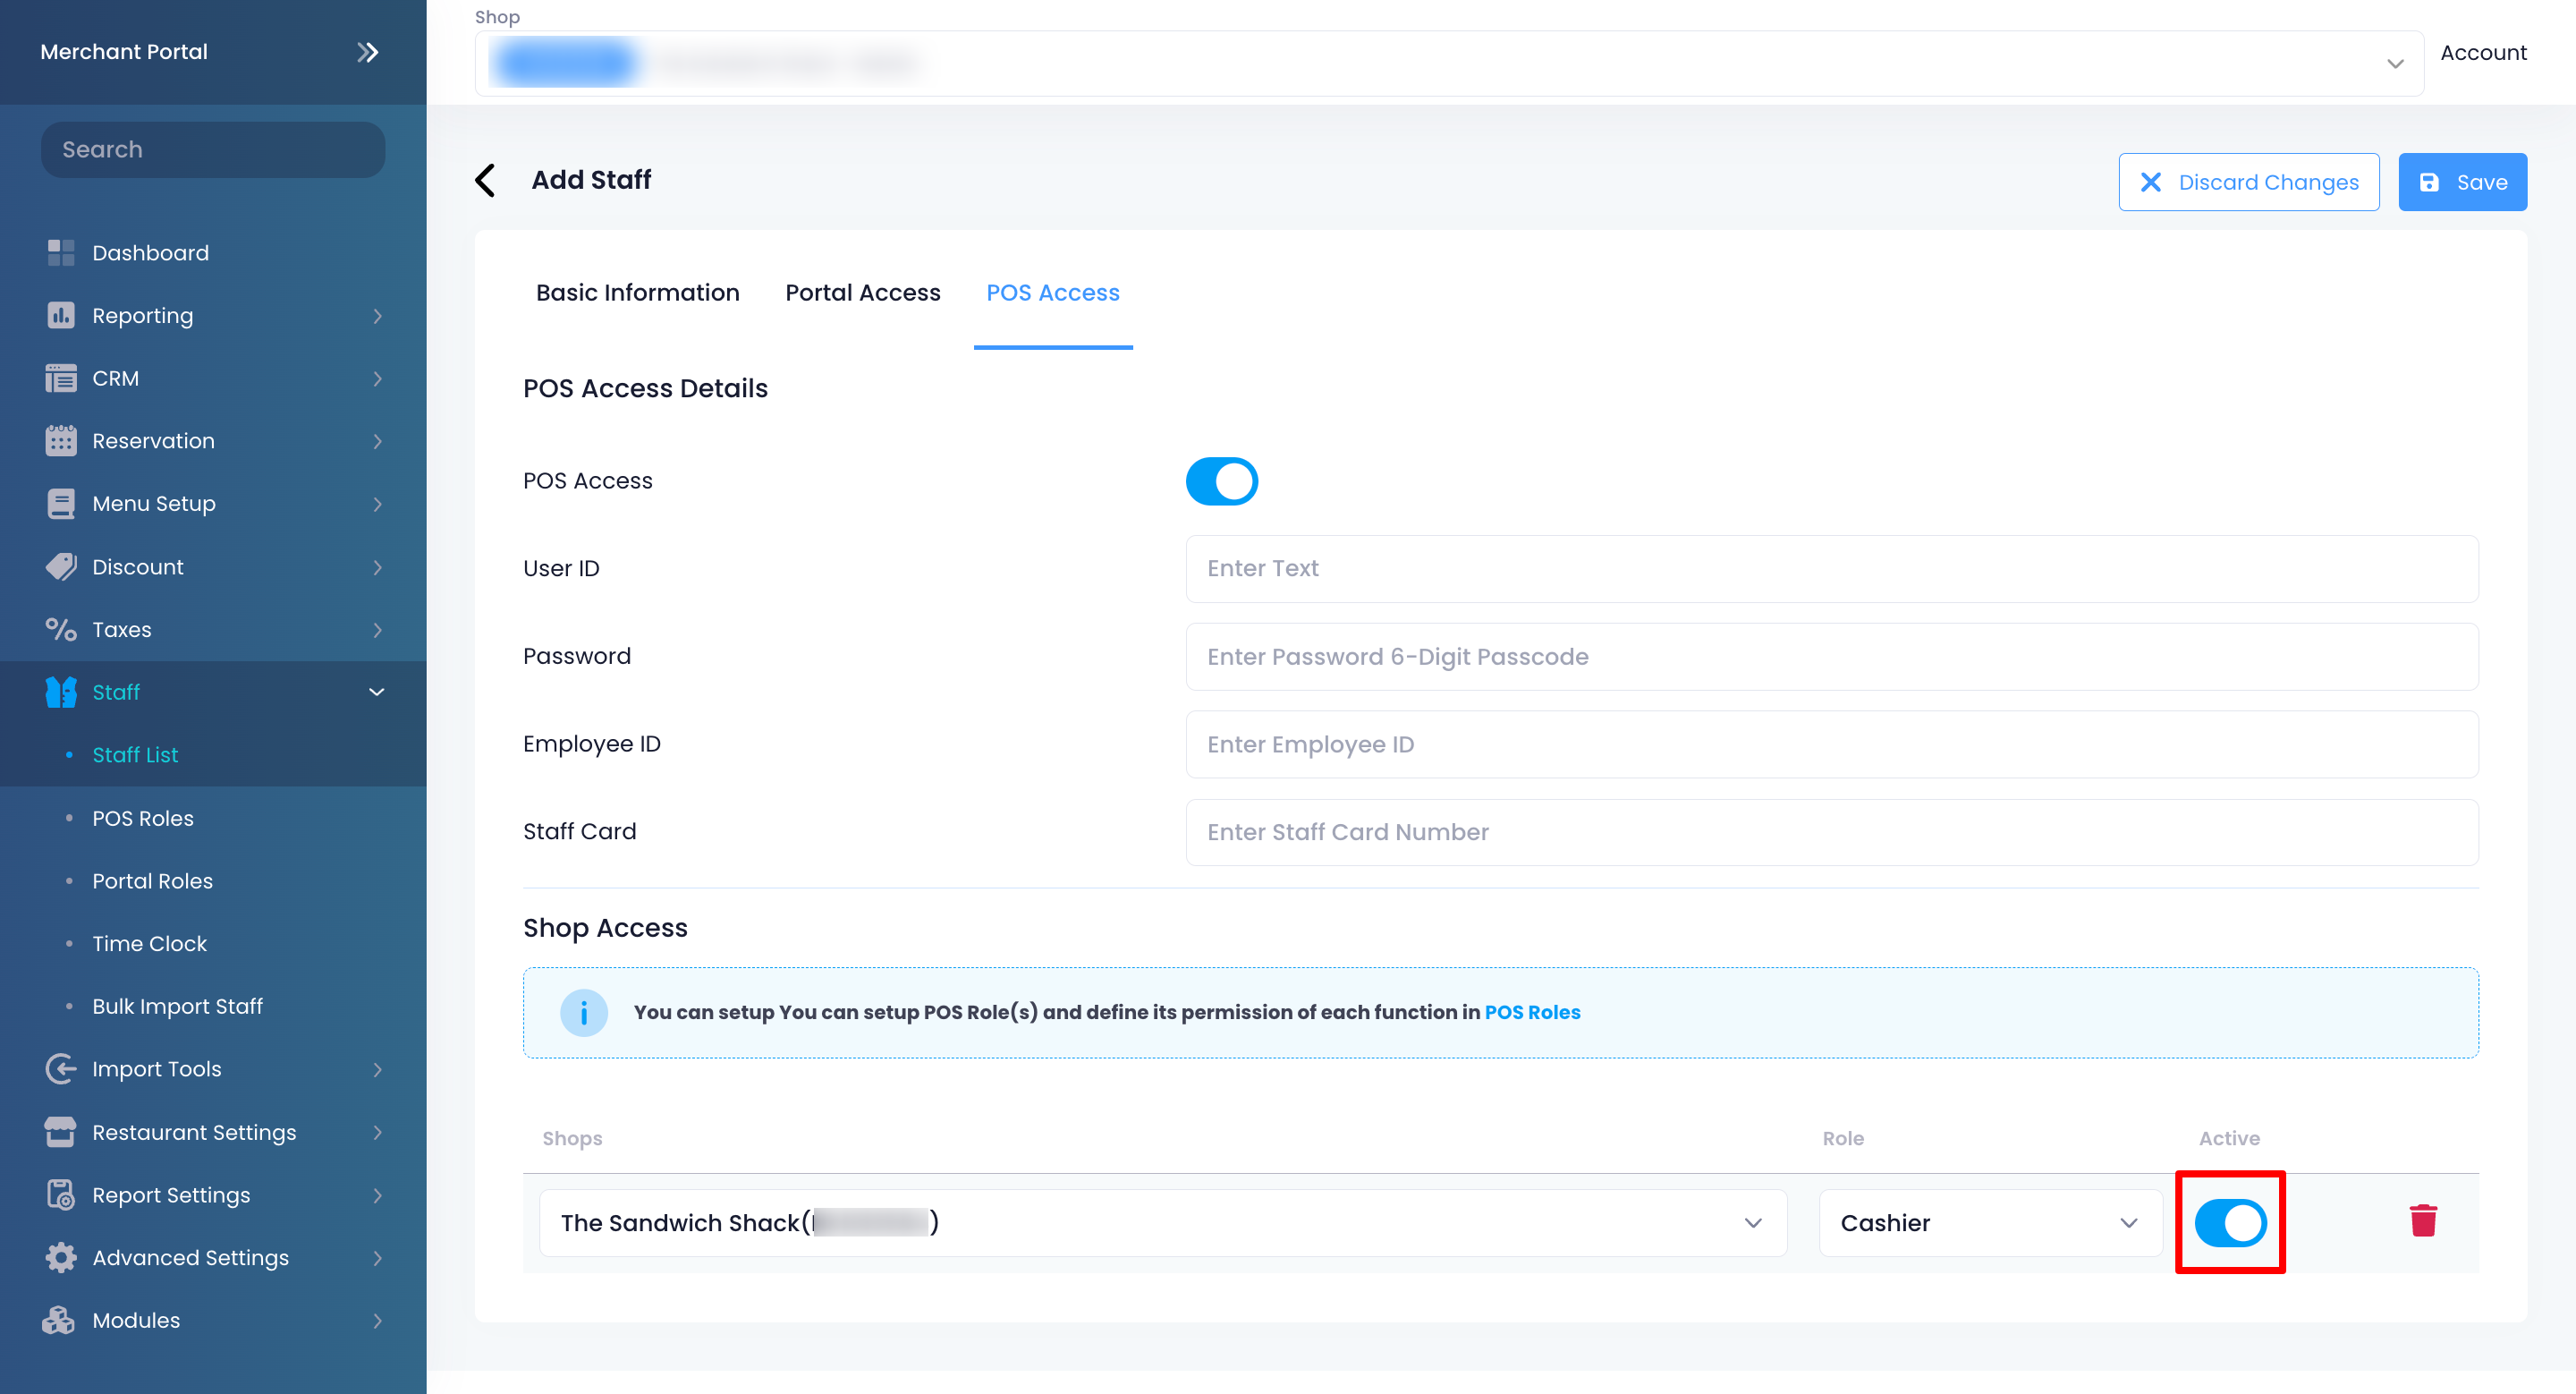
Note: Once added, staff can use their staff card to log in to the POS. - Under "Shop Access," select the shop where the staff is located and assign a role for your staff.
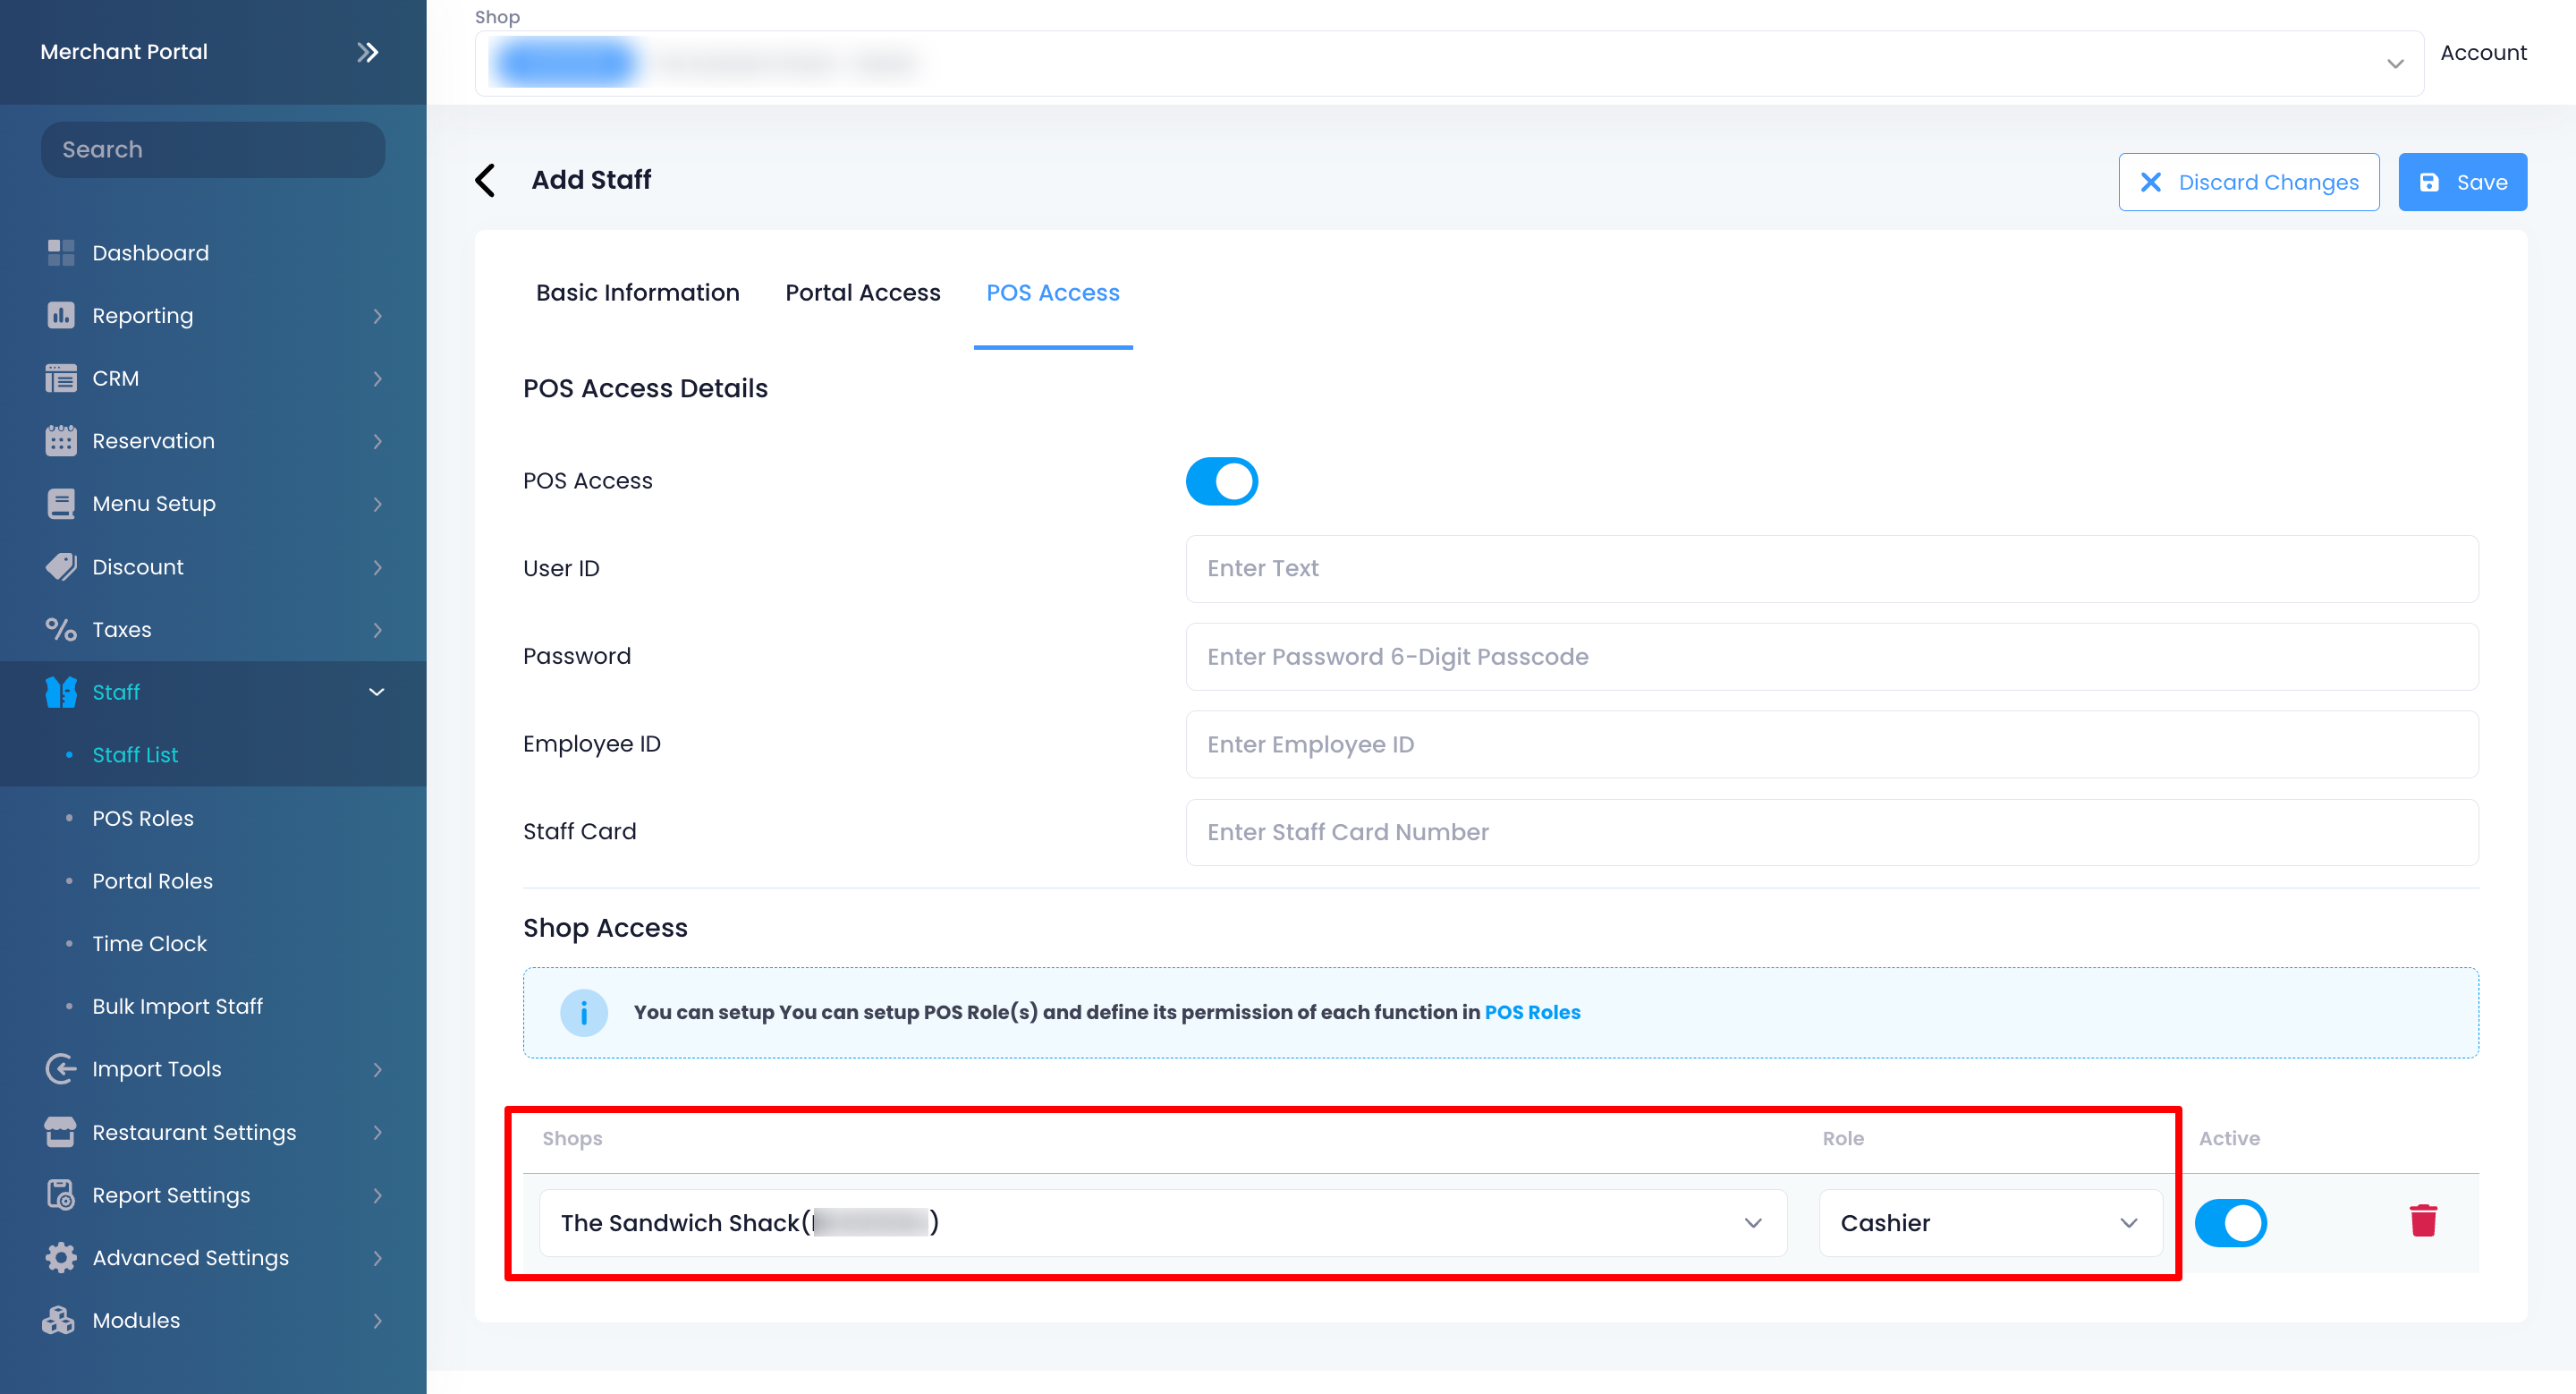
- To complete granting access to the POS, turn on Active .
- If your restaurant allows logging in to the POS using PIN, under “Sign In and Clock In/Out with PIN,” enter the staff member’s login PIN.
 Note: If the PIN is already taken, you must choose a different PIN for the staff member.
 - At the top right, click on Save to confirm.
(Optional) Set up access to the Merchant Portal
To set up your staff’s access to the Merchant Portal, follow the steps to create a Staff List and continue with the steps below:
- Click on the Portal Access tab. Then, allow Portal Access .
- Merchant level - Merchant Admin, Merchant Staff
- Group level - Merchant Admin, Merchant Staff, Group Admin
- .Organization level - Merchant Admin, Merchant Staff, Group Admin, Organization Admin
- Select the restaurant group which the staff belongs to, if applicable. Otherwise, you may select the default option All.
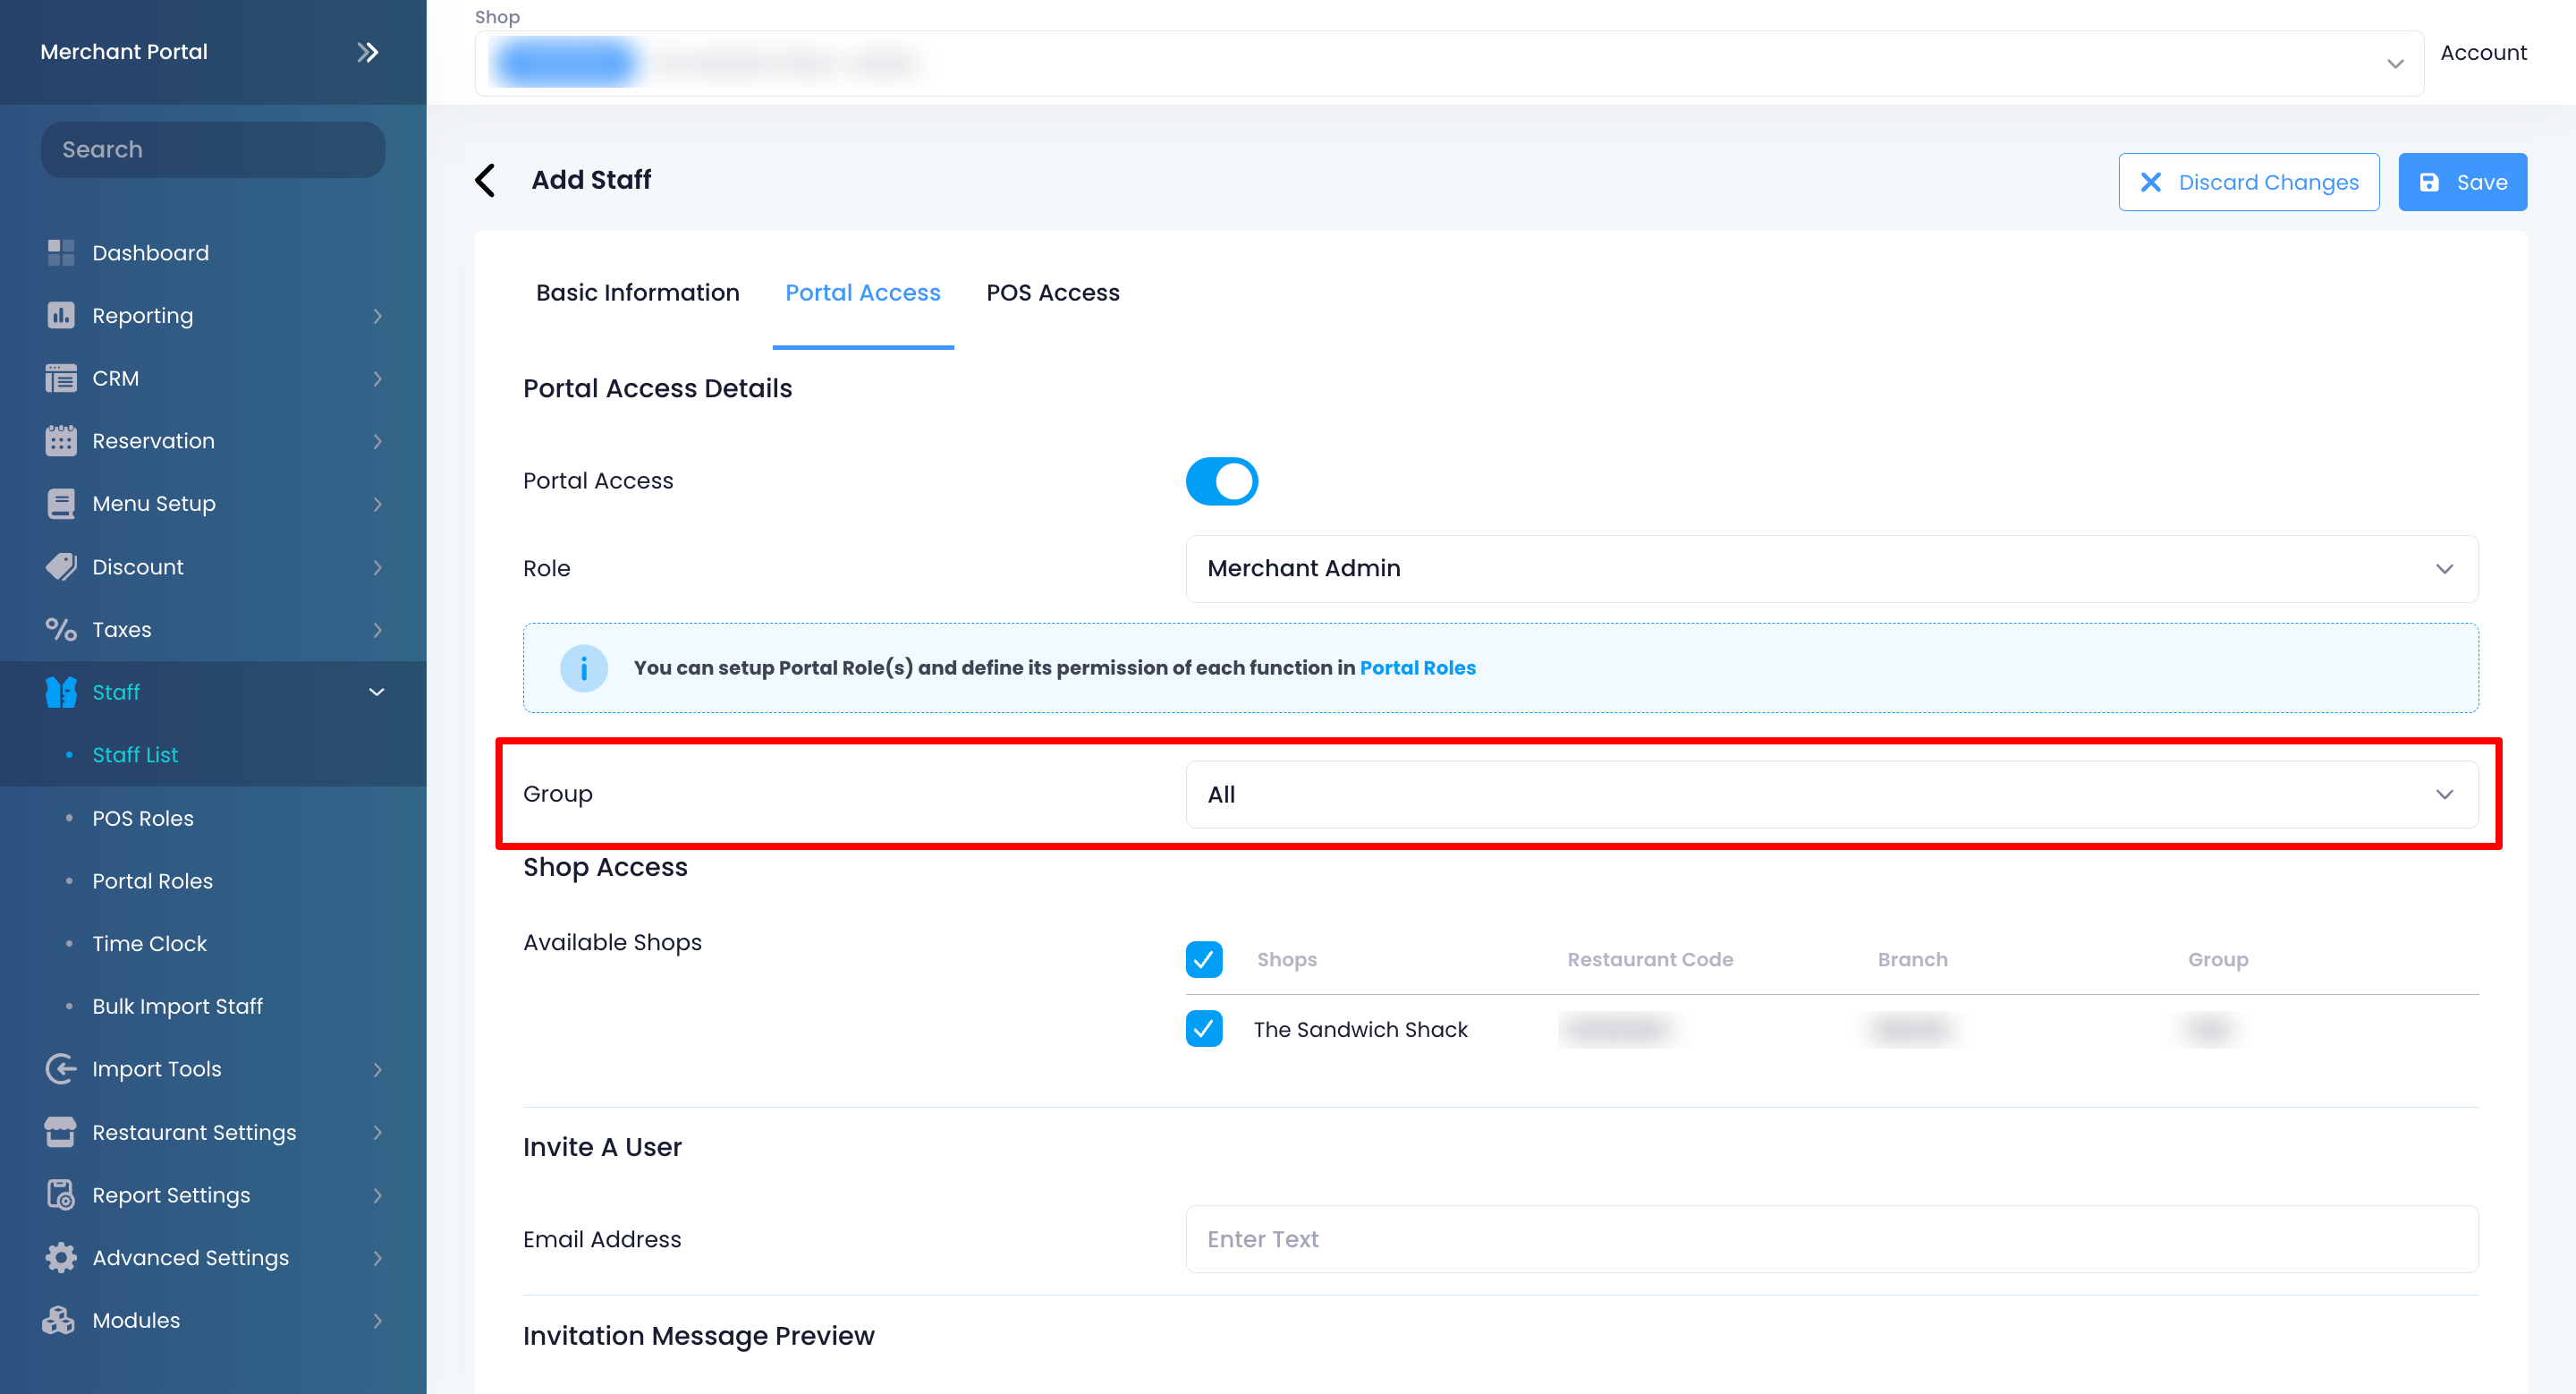
- Under "Shop Access," select which shop information the staff can view and manage in the Portal.
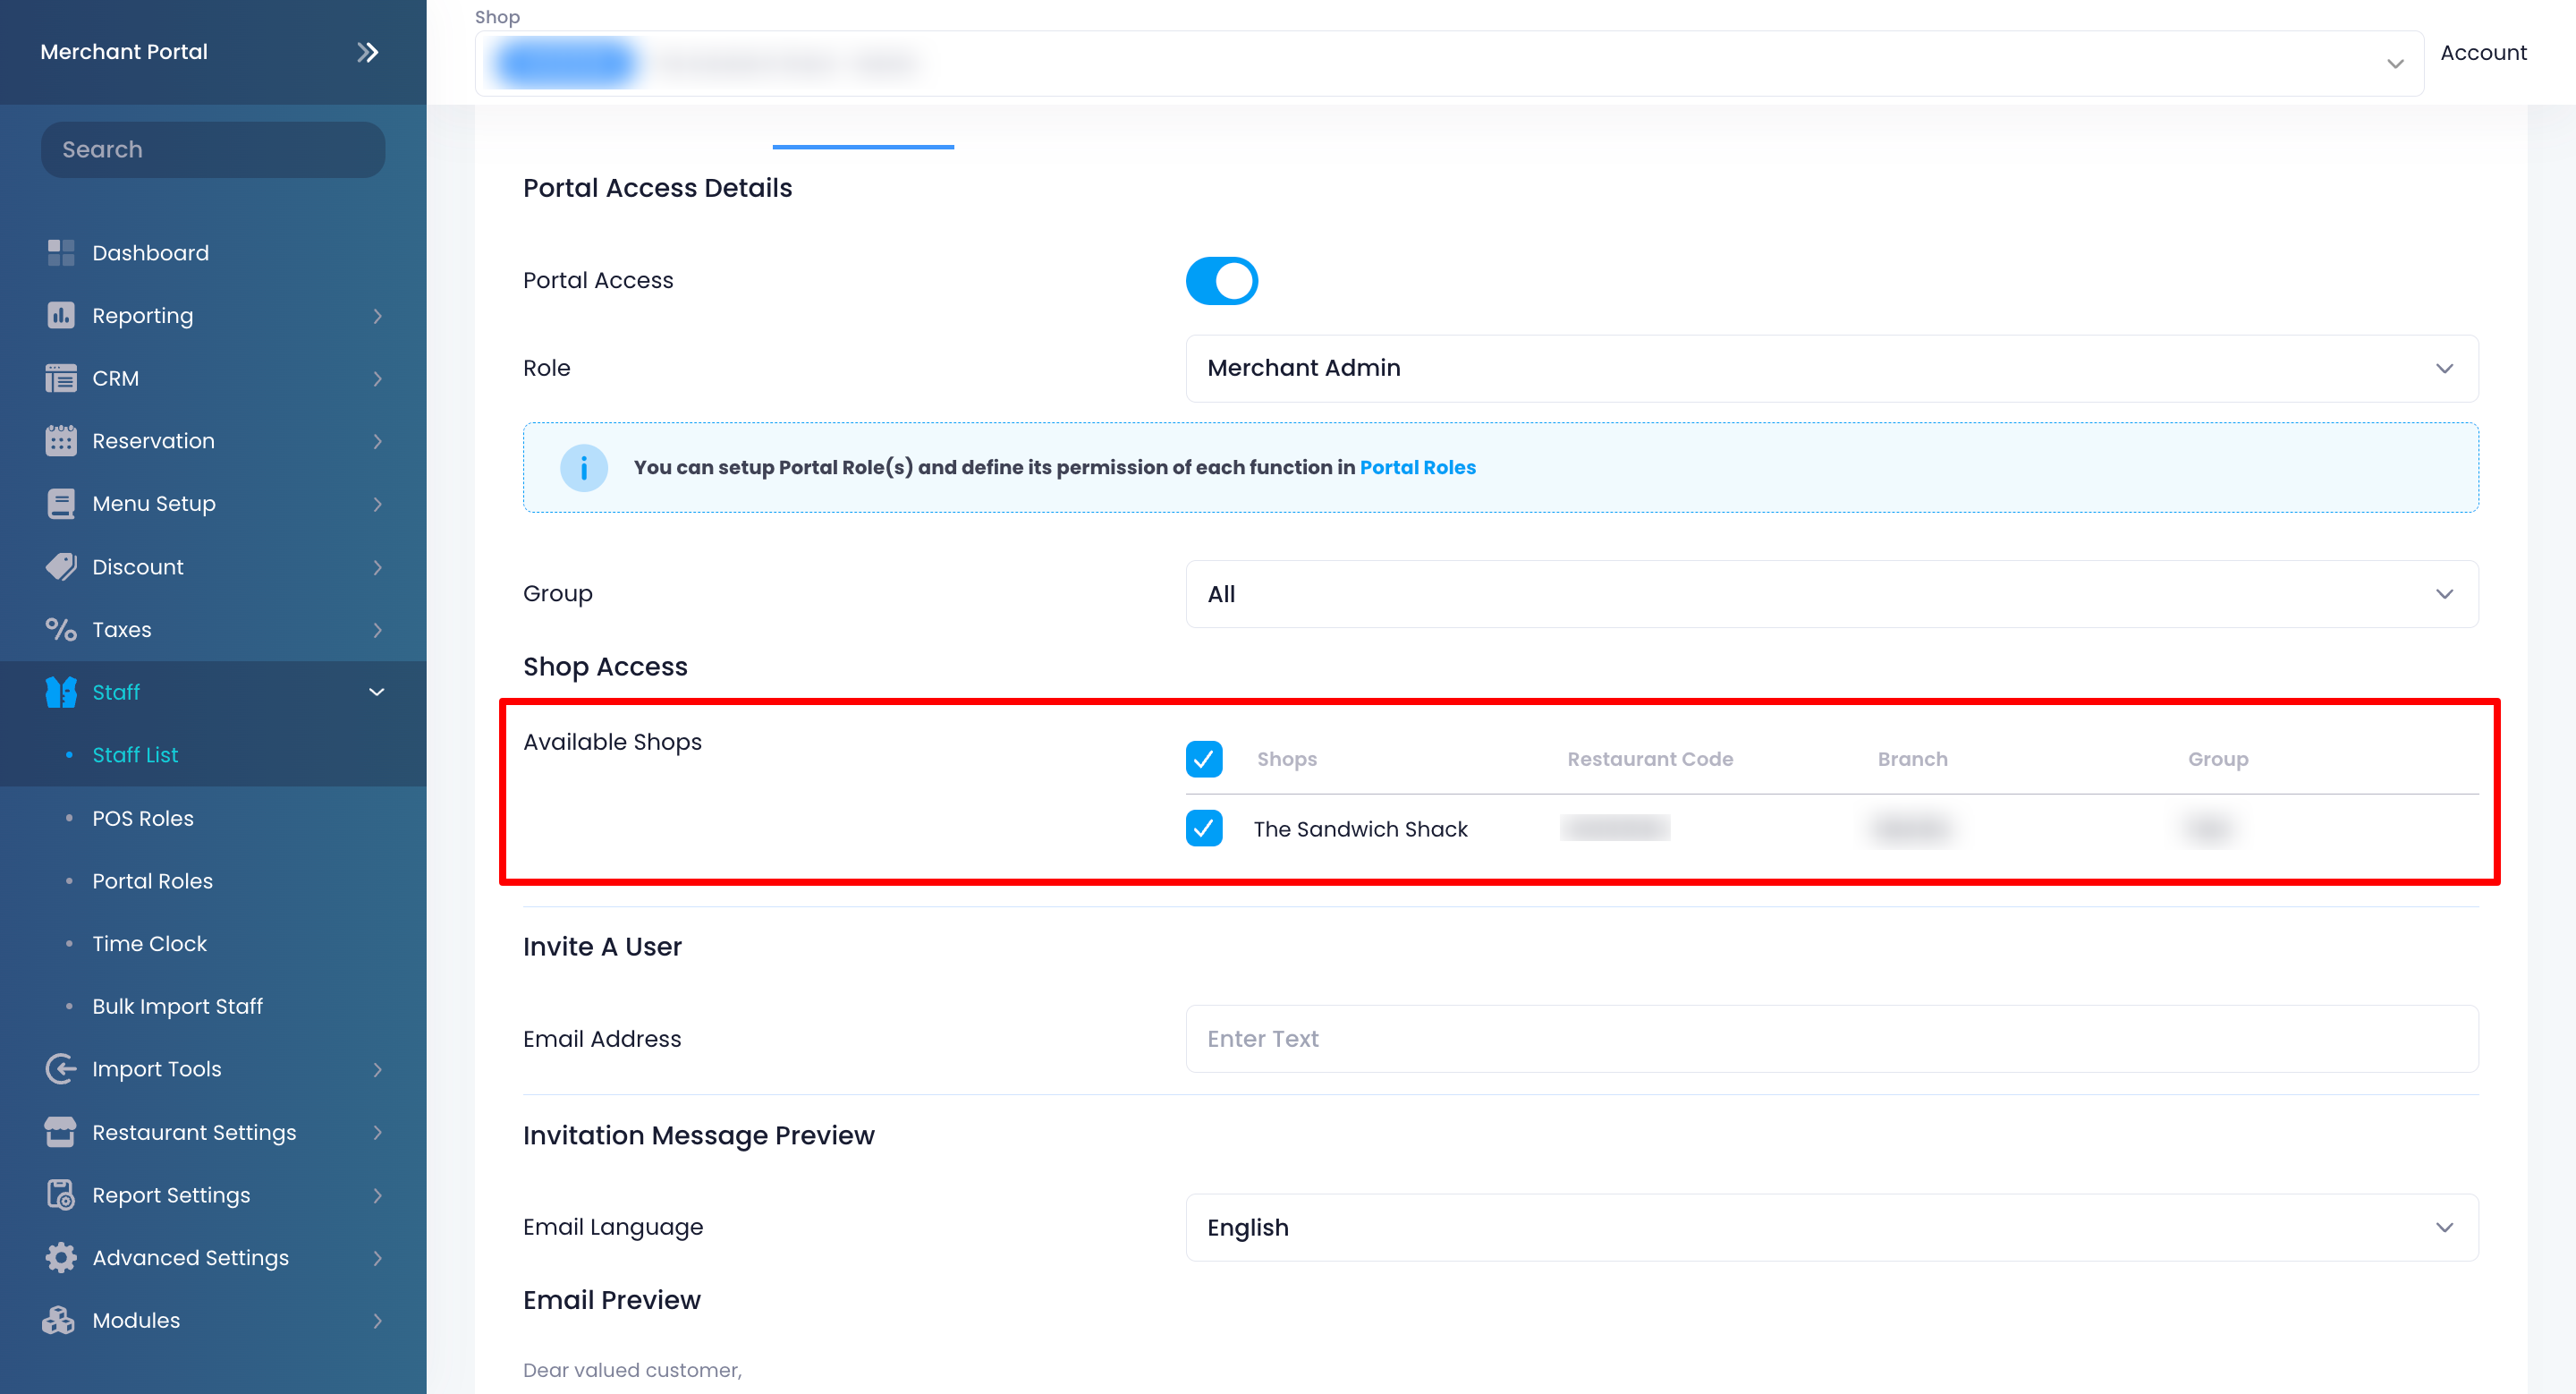
- Send an invitation to your staff to complete the Portal account setup.
Note: The invitation is sent only after all the changes have been saved.- Enter your staff’s email address.
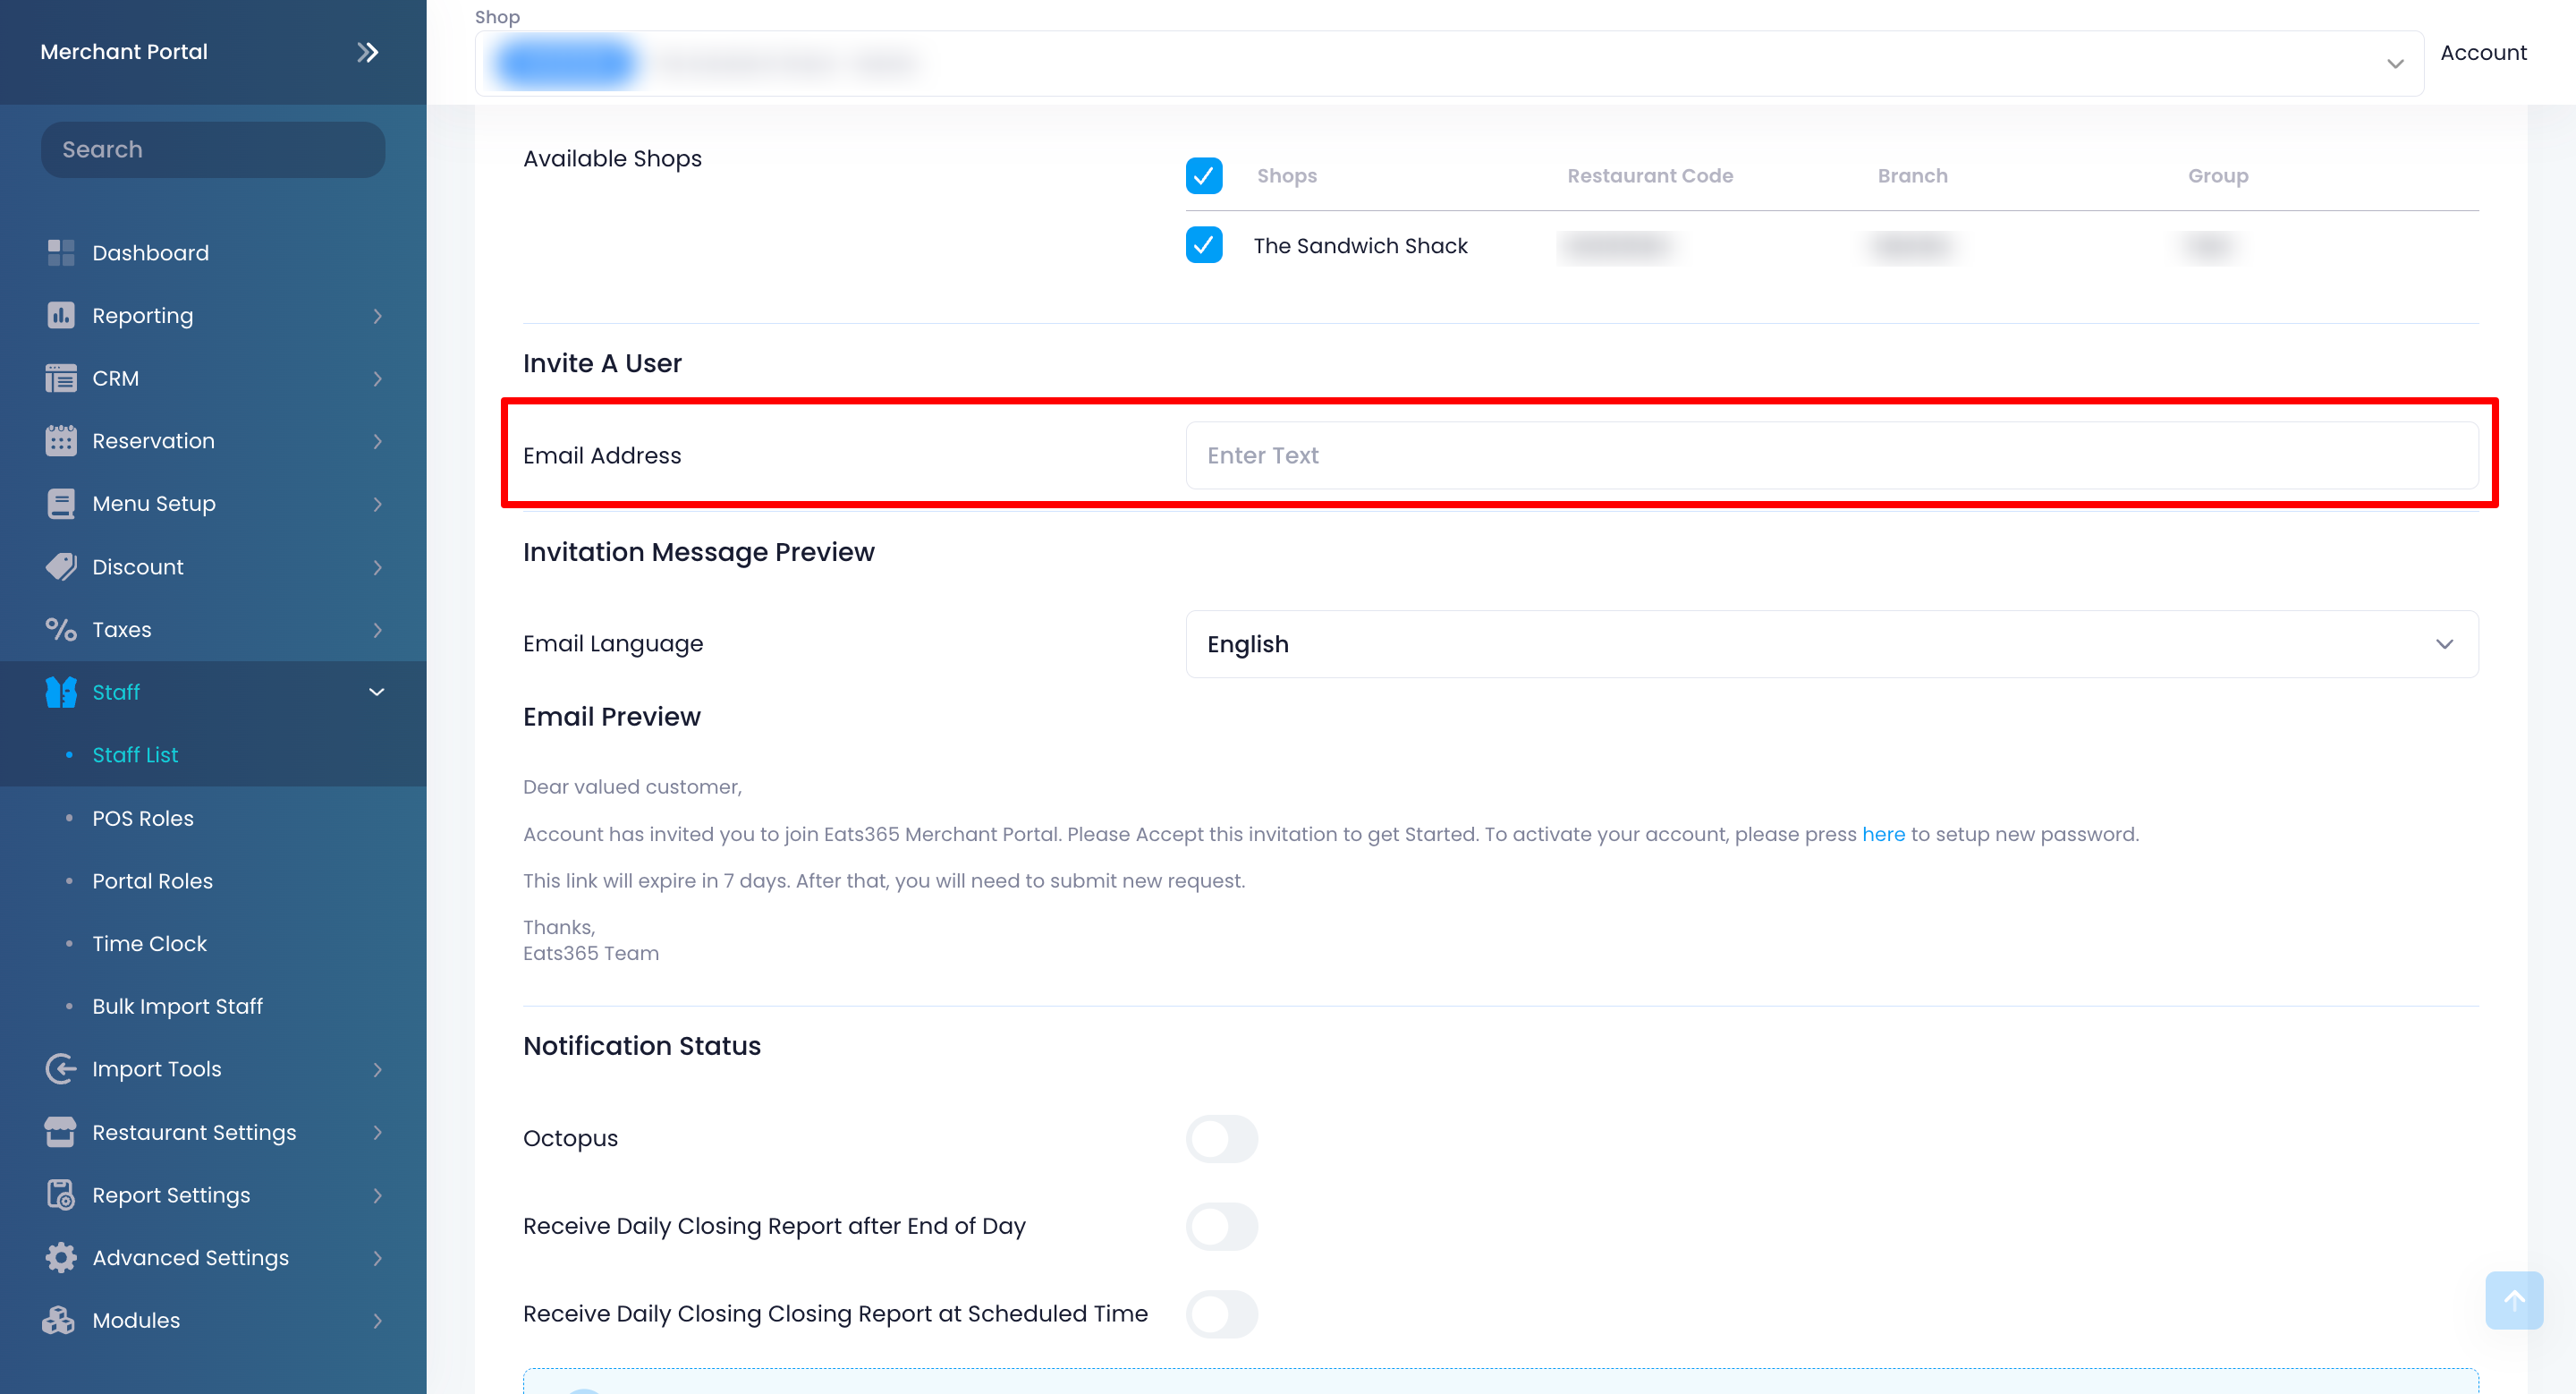
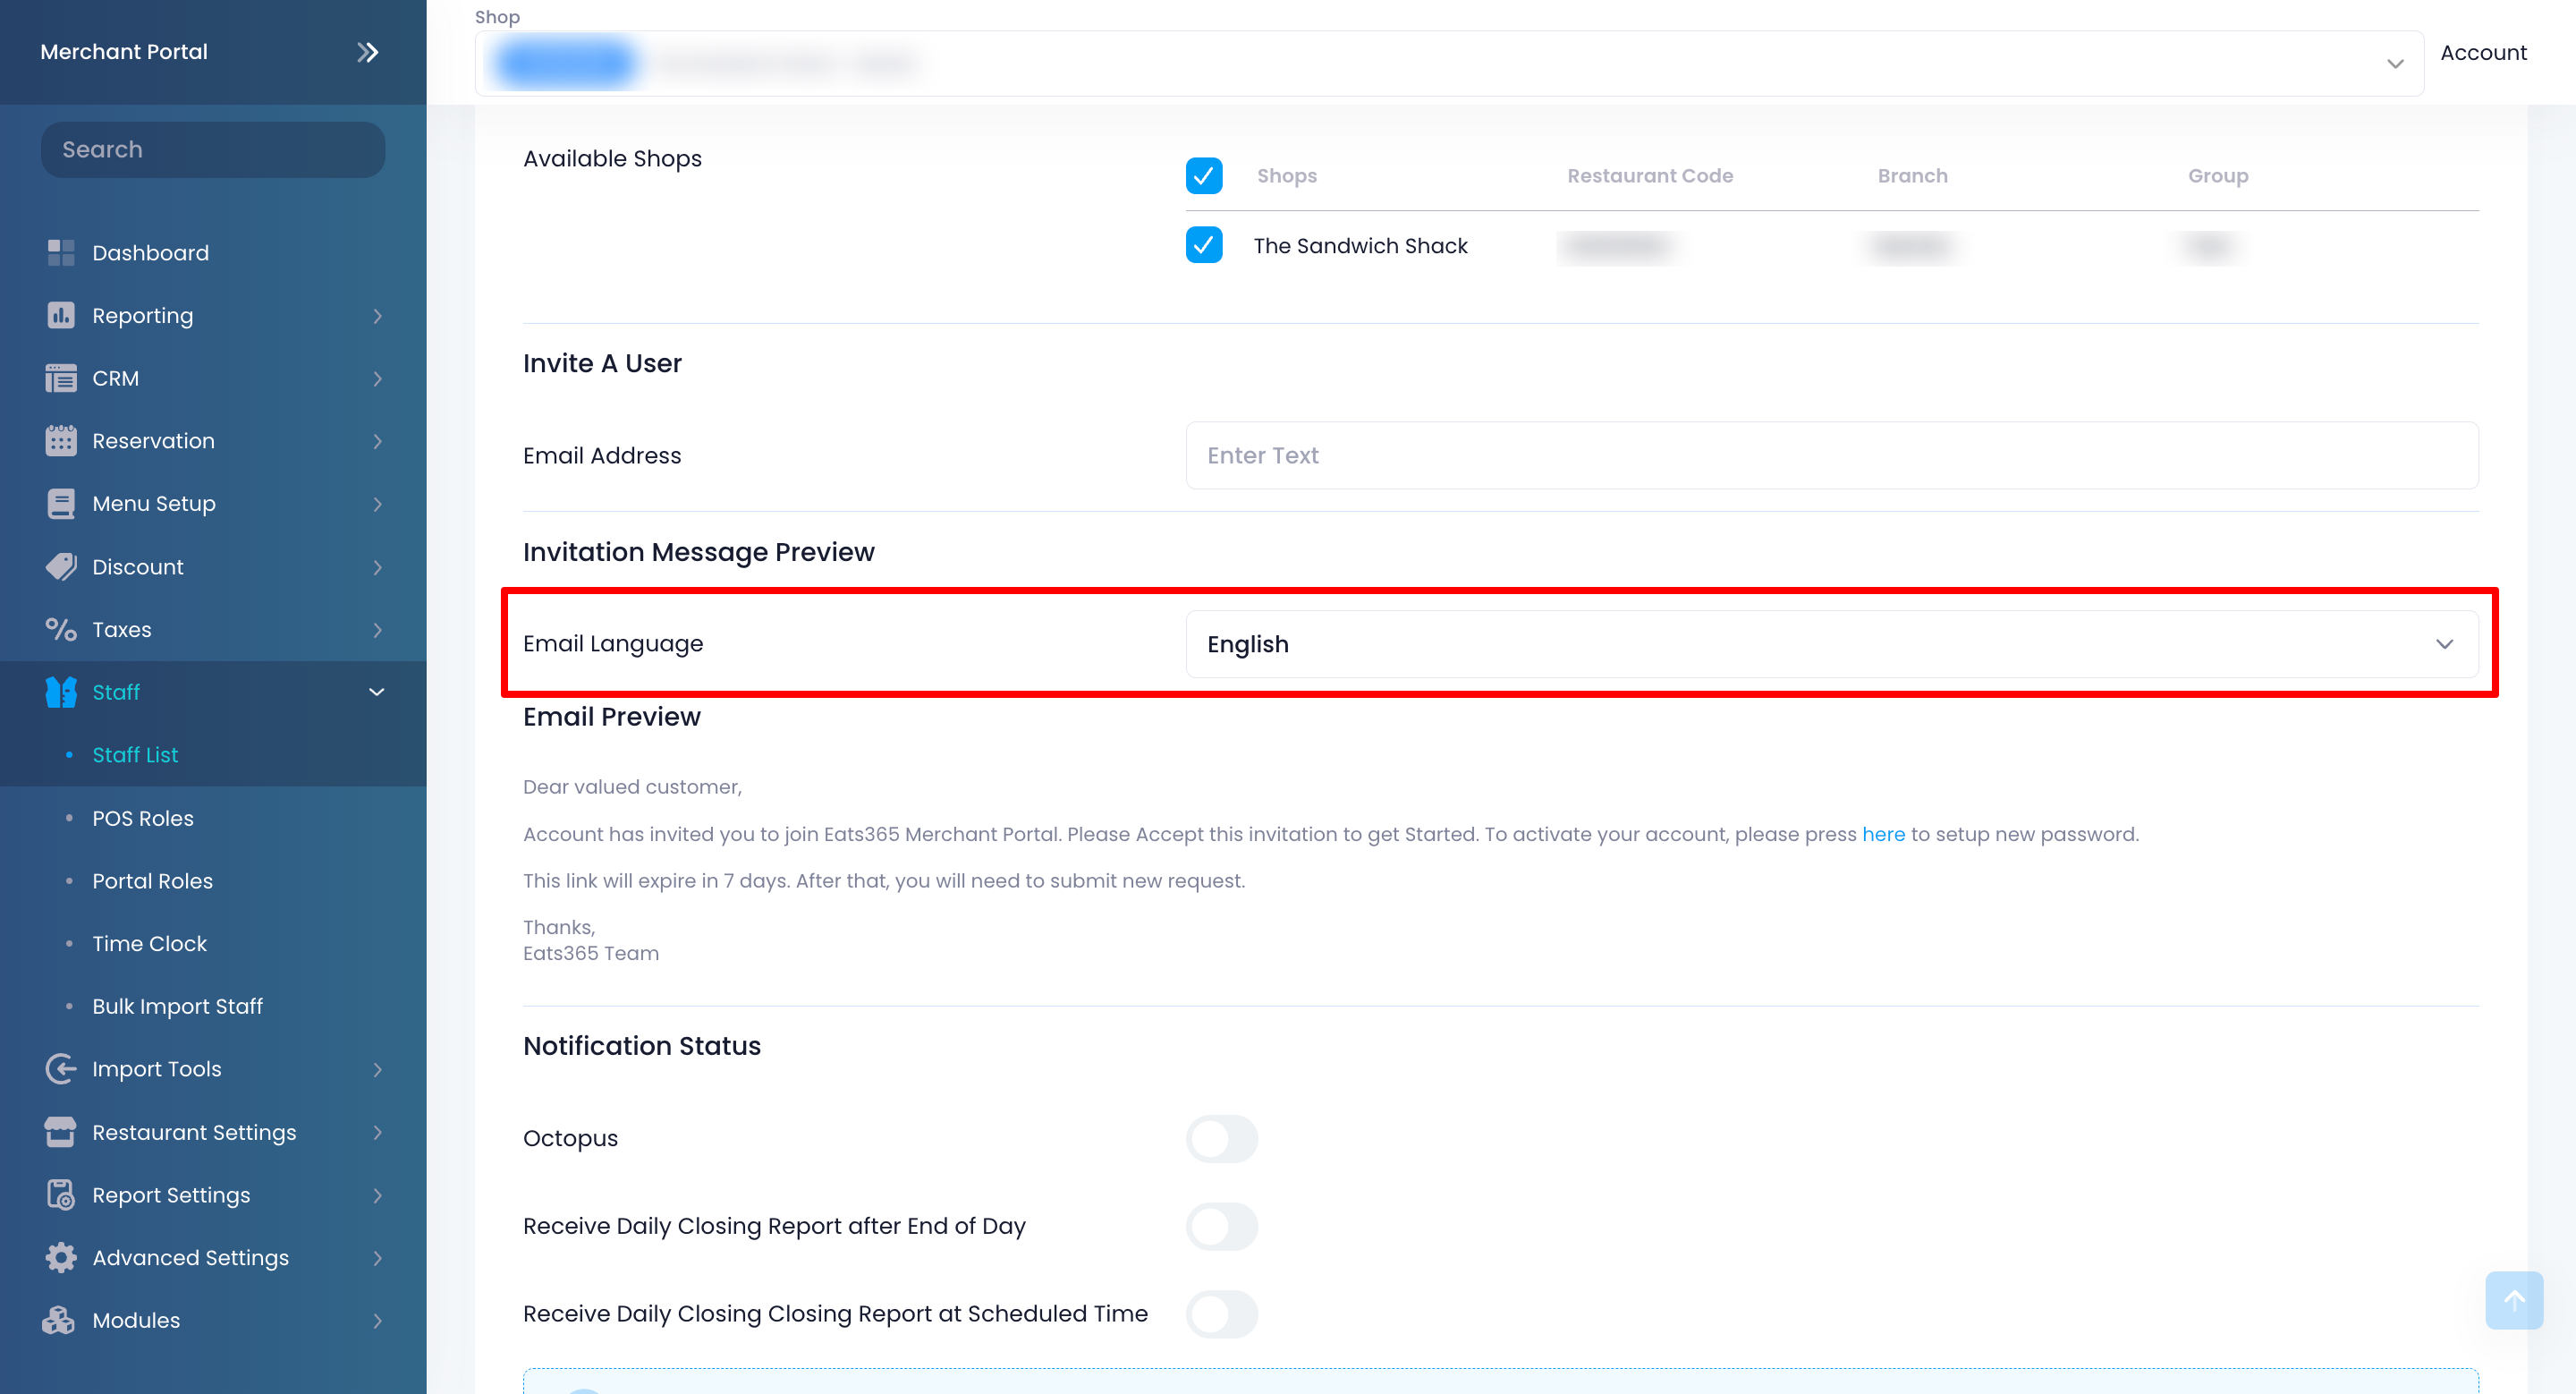
- Choose an email language.
- Enter your staff’s email address.
- (Optional) Under "Notification Status," select which notifications you want your staff to receive. Refer to Receive restaurant reports from Eats365 to learn more.
- At the top right, click on Save to confirm.
List of Permissions
Use the table below to compare the different permissions available to a Merchant Staff, Merchant Admin, Group Admin, and Organization Admin.
Reporting
| Settings | Merchant Staff | Merchant Admin | Group Admin | Organization Admin |
| Overview | View | View | View | View |
| Sales Summary | View, Export | View, Export | View, Export | View, Export |
| Daily Closing Report | View, Export | View, Export | View, Export | View, Export |
| Export to XERO | Export | Export | Export | Export |
| Shift Report | View, Export | View, Export | View, Export | View, Export |
| Transaction Report | View | View | View | View |
| View transaction details | View | View | View | View |
| Export transaction summary | Export | Export | Export | Export |
| Export transaction details | Export | Export | Export | Export |
| Hourly Sales Report | View, Export | View, Export | View, Export | View, Export |
| Sales By Period | View, Export | View, Export | View, Export | View, Export |
| Sales By Item | View, Export | View, Export | View, Export | View, Export |
| Returns Report | View, Export | View, Export | View, Export | View, Export |
| Pay In and Payout | View, Export | View, Export | View, Export | View, Export |
| Sales By Product Type | View, Export | View, Export | View, Export | View, Export |
| Discount Report | View, Export | View, Export | View, Export | View, Export |
| Incoming Customers Analysis | View, Export | View, Export | View, Export | View, Export |
| Queuing Statistics | View | View | View | View |
| Reconciliation Report | View, Export | View, Export | View, Export | View, Export |
| Item Sold Report | View, Export | View, Export | View, Export | View, Export |
| Void Report | View, Export | View, Export | View, Export | View, Export |
| Sales by Sales Category | View, Export | View, Export | View, Export | View, Export |
| Invoice Report | View, Export | View, Export | View, Export | View, Export |
| Item Preparation Time Report | View, Export | View, Export | View, Export | View, Export |
| Staff Performance Report | View, Export | View, Export | View, Export | |
| On-premise Payment Abnormal Report | View, Export | View, Export | View, Export | |
| Delivery Fee Report | View, Export | View, Export | View, Export | |
| Operation Report | View, Export | View, Export | ||
| Custom Report | Export | Export | Export | |
| Thailand Tax Invoice Report | View, Export | View, Export | View, Export | |
| Weekly Sales Report | View, Export | View, Export | View, Export | |
| Sales Summary Report by Shops | View, Export | View, Export | ||
| Item Audit Trail Report | View, Export | View, Export | View, Export | |
| Void Items Report |
View, Export |
View, Export | View, Export |
Inventory
| Settings | Merchant Staff | Merchant Admin | Group Admin | Organization Admin |
| Inventory | Edit | Edit | Edit | Edit |
| Inventory Adjustment Report | View | View | View |
CRM
| Settings | Merchant Staff | Merchant Admin | Group Admin | Organization Admin |
| Dashboard | View | View | View | View |
| Customer List | View | View | View | View |
| Customer Detail | View, Add, Edit | View, Add, Edit | View, Add, Edit | View, Add, Edit |
| Import Customer List | Add | Add | Add | |
| Export Customer List | View | View | ||
| Custom Member Fields | Add, Edit | Add, Edit | ||
| Member Plan | View, Add, Edit, Delete | View, Add, Edit, Delete | ||
| Liability Item | View, Add, Edit, Delete | View, Add, Edit, Delete | ||
| Points Spending Rules | View, Add, Edit, Delete | View, Add, Edit, Delete | ||
| Points Earning Rules | View, Add, Edit, Delete | View, Add, Edit, Delete |
Menu Setup
| Settings | Merchant Staff | Merchant Admin | Group Admin | Organization Admin |
Modifier Preset |
View, Edit | View, Add, Edit, Delete |
View, Add, Edit, Delete |
View, Add, Edit, Delete |
Item |
View, Edit | View, Add, Edit, Delete |
View, Add, Edit, Delete |
View, Add, Edit, Delete |
Product Type |
View, Edit | View, Add, Edit, Delete |
View, Add, Edit, Delete |
View, Add, Edit, Delete |
Category |
View, Edit | View, Add, Edit, Delete |
View, Add, Edit, Delete |
View, Add, Edit, Delete |
Custom Menu |
View, Edit | View, Add, Edit, Delete |
View, Add, Edit, Delete |
View, Add, Edit, Delete |
Kitchen Station |
View, Edit | View, Add, Edit, Delete |
View, Add, Edit, Delete |
View, Add, Edit, Delete |
Special Request Quick Keys |
View, Edit | View, Add, Edit, Delete |
View, Add, Edit, Delete |
View, Add, Edit, Delete |
| Menu Template | View, Add, Edit, Delete | View, Add, Edit, Delete | ||
Menu Action Log |
View | View | View | |
Pickup Station |
View, Add, Edit, Delete | View, Add, Edit, Delete | View, Add, Edit, Delete | View, Add, Edit, Delete |
Tier Price |
View, Add, Edit, Delete | View, Add, Edit, Delete | View, Add, Edit, Delete | |
Period Rule |
View, Add, Edit, Delete | View, Add, Edit, Delete | View, Add, Edit, Delete | |
Membership Plan Rule |
View, Add, Edit, Delete | View, Add, Edit, Delete | View, Add, Edit, Delete | |
Custom Rule |
View, Add, Edit, Delete | View, Add, Edit, Delete | View, Add, Edit, Delete | |
Pricing Rule Group |
View, Add, Edit, Delete | View, Add, Edit, Delete | View, Add, Edit, Delete | |
Menu Tag |
View, Edit | View, Add, Edit, Delete |
View, Add, Edit, Delete |
View, Add, Edit, Delete |
Menu Tag Type |
View, Edit | View, Add, Edit, Delete |
View, Add, Edit, Delete |
View, Add, Edit, Delete |
All You Can Eat Menu |
View, Edit | View, Add, Edit, Delete |
View, Add, Edit, Delete |
View, Add, Edit, Delete |
Taxes
| Settings | Merchant Staff | Merchant Admin | Group Admin | Organization Admin |
| Tax Group | View | View, Edit |
View, Edit |
View, Edit |
| Tax Type | View | View, Edit |
View, Edit |
View, Edit |
Staff
| Settings | Merchant Staff | Merchant Admin | Group Admin | Organization Admin |
| Staff List | View, Add, Edit, Delete, Export |
View, Add, Edit, Delete, Export |
View, Add, Edit, Delete, Export |
|
| Time Clock | View, Edit | View, Edit | View, Edit | |
| Staff Group Roles and Permissions | View, Add, Edit, Delete | View, Add, Edit, Delete | View, Add, Edit, Delete |
Discount
| Settings | Merchant Staff | Merchant Admin | Group Admin | Organization Admin |
| General Setting and Manage Discount |
View, Add, Edit, Delete |
View, Add, Edit, Delete |
View, Add, Edit, Delete |
|
| Non-stackable Discount |
View, Add, Edit, Delete |
View, Add, Edit, Delete |
View, Add, Edit, Delete |
Shop Management
| Settings | Merchant Staff | Merchant Admin | Group Admin | Organization Admin |
| Manage Shop Hierarchy | Add, Edit | Add, Edit |
Menu Setup (Bulk Import)
|
Settings |
Merchant Staff |
Merchant Admin |
Group Admin |
Organization Admin |
| Bulk Import For Single Item |
View, Upload | View, Upload |
View, Upload |
|
| Bulk Import For Product Name |
View, Upload |
View, Upload |
View, Upload |
|
| Bulk Import For Product Description |
View, Upload |
View, Upload |
View, Upload |
|
| Bulk Import For Discount Quantity |
View, Upload |
View, Upload |
View, Upload |
|
| Bulk Import For Menu Tag |
View, Upload |
View, Upload |
View, Upload |
|
| Bulk Import for Product Tier Pricing |
View, Upload |
View, Upload |
View, Upload |
Restaurant Settings
| Settings | Merchant Staff | Merchant Admin | Group Admin | Organization Admin |
Basic Information |
View, Edit | View, Edit | View, Edit | |
Payment Settings |
View, Edit | View, Edit | View, Edit | |
Media Group |
View, Edit | View, Edit | View, Edit | |
Dine-In |
View, Edit | View, Edit | View, Edit | |
Takeout |
View, Edit | View, Edit | View, Edit | |
| Catering |
View, Edit |
View, Edit |
View, Edit |
|
Queuing |
View, Edit | View, Edit | View, Edit | |
Printing |
View, Edit | View, Edit | View, Edit | |
Rounding |
View, Edit | View, Edit | View, Edit | |
System Preferences |
View, Edit | View, Edit | View, Edit | |
| Edit Device Detail | Edit | Edit | Edit | |
Modules Settings |
View, Edit | View, Edit | View, Edit | |
Table Mapping |
View, Edit | View, Edit | View, Edit | |
Online Ordering Setting |
View, Edit | View, Edit | View, Edit | |
Table Map Setup |
View, Edit | View, Edit | View, Edit | |
| Surcharge | View, Add, Edit, Delete | View, Add, Edit, Delete |
View, Add, Edit, Delete |
Currency Exchange Rate
| Settings | Merchant Staff | Merchant Admin | Group Admin | Organization Admin |
| Currency Exchange Rate | Edit | Edit |
Integration
| Settings | Merchant Staff | Merchant Admin | Group Admin | Organization Admin |
| Xero Integration | View, Add, Edit, Delete |
View, Add, Edit, Delete |
View, Add, Edit, Delete |
|
| FMH | View, Edit | View, Edit | View, Edit | |
| SMS Notification | View, Edit | View, Edit | View, Edit | |
| Lalamove | View, Edit | View, Edit | View, Edit |
Gift Card
| Settings | Merchant Staff | Merchant Admin | Group Admin | Organization Admin |
| Setting | View | View | ||
| Account | View, Add, Edit, Delete |
View, Add, Edit, Delete |
||
| Campaign | View, Add, Edit, Delete |
View, Add, Edit, Delete |
||
| Shop Group | View, Add, Edit, Delete |
View, Add, Edit, Delete |
||
| Vendor | View, Add, Edit, Delete | View, Add, Edit, Delete |
Organization Settings
| Settings | Merchant Staff | Merchant Admin | Group Admin | Organization Admin |
| Date Group Preset (Organization) | View, Add, Edit, Delete | |||
| Sales Categories (Organization) | View, Add, Edit, Delete |
Group Settings
| Settings | Merchant Staff | Merchant Admin | Group Admin | Organization Admin |
| Date Group Preset (Group) | View, Add, Edit, Delete | View, Add, Edit, Delete | ||
| Sales Categories (Group) | View, Add, Edit, Delete | View, Add, Edit, Delete |
Permission Control
| Settings | Merchant Staff | Merchant Admin | Group Admin | Organization Admin |
| Pending Request Permission | View, Add, Edit, Delete | View, Add, Edit, Delete | View, Add, Edit, Delete | |
| Permission Control | View, Edit, Delete | View, Edit, Delete | View, Edit, Delete |
Discount Coupon
| Settings | Merchant Staff | Merchant Admin | Group Admin | Organization Admin |
| Setting | View | View |
Reservation
| Settings | Merchant Staff | Merchant Admin | Group Admin | Organization Admin |
| General | View, Edit | View, Edit | View, Edit | |
| Regular Capacity | View, Edit | View, Edit | View, Edit | |
| Seating Preference | View, Edit | View, Edit | View, Edit | |
| Special Capacity | View, Edit | View, Edit | View, Edit | |
| Online Reservation | View, Edit |
View, Edit |
View, Edit |
Manage Staff List
Edit Staff List
To update your staff member’s information on the Staff List, follow the steps below:
Eats365 POS
- Log in to the Eats365 POS.
- At the top left, tap Settings .
- Under "Staff," tap Users and Permissions. Then, select Staff List.
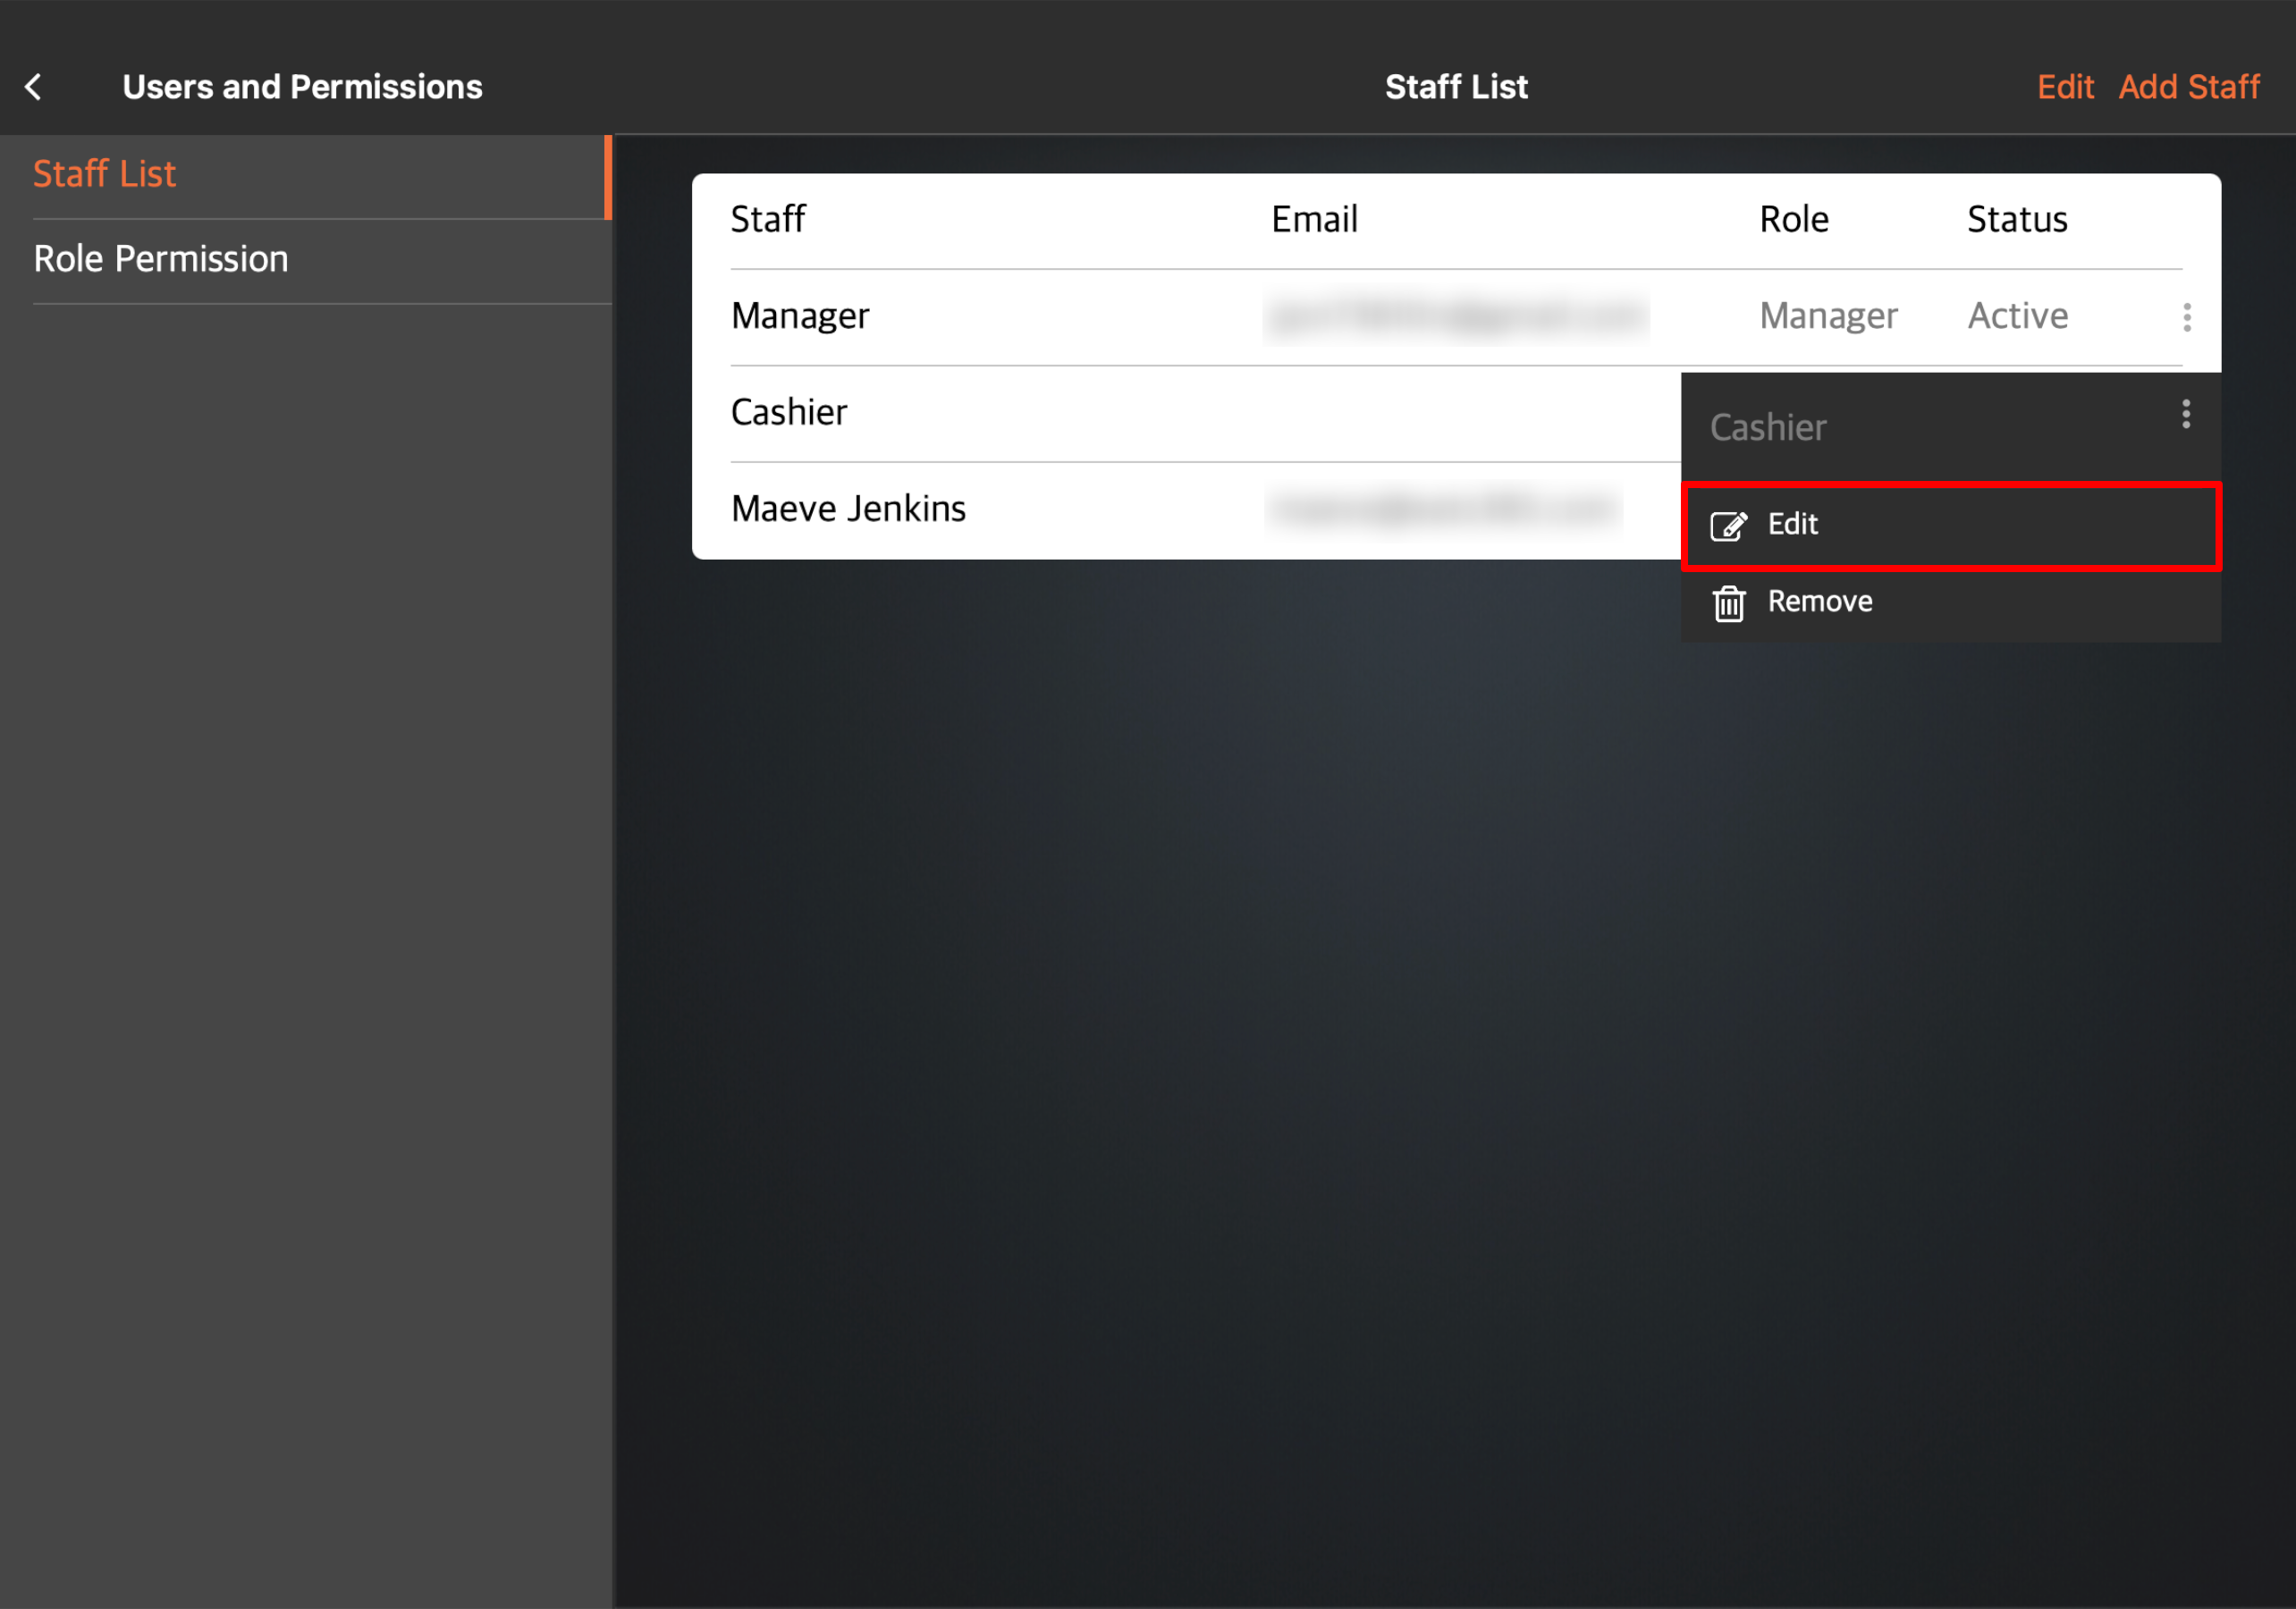
- Select the name of the staff member that you want to update the information. Tap the three-dot menu
 , then tap Edit
  .
.
- Update your staff member’s information.
- At the top right, tap Update to confirm.
Merchant Portal (Classic Theme)
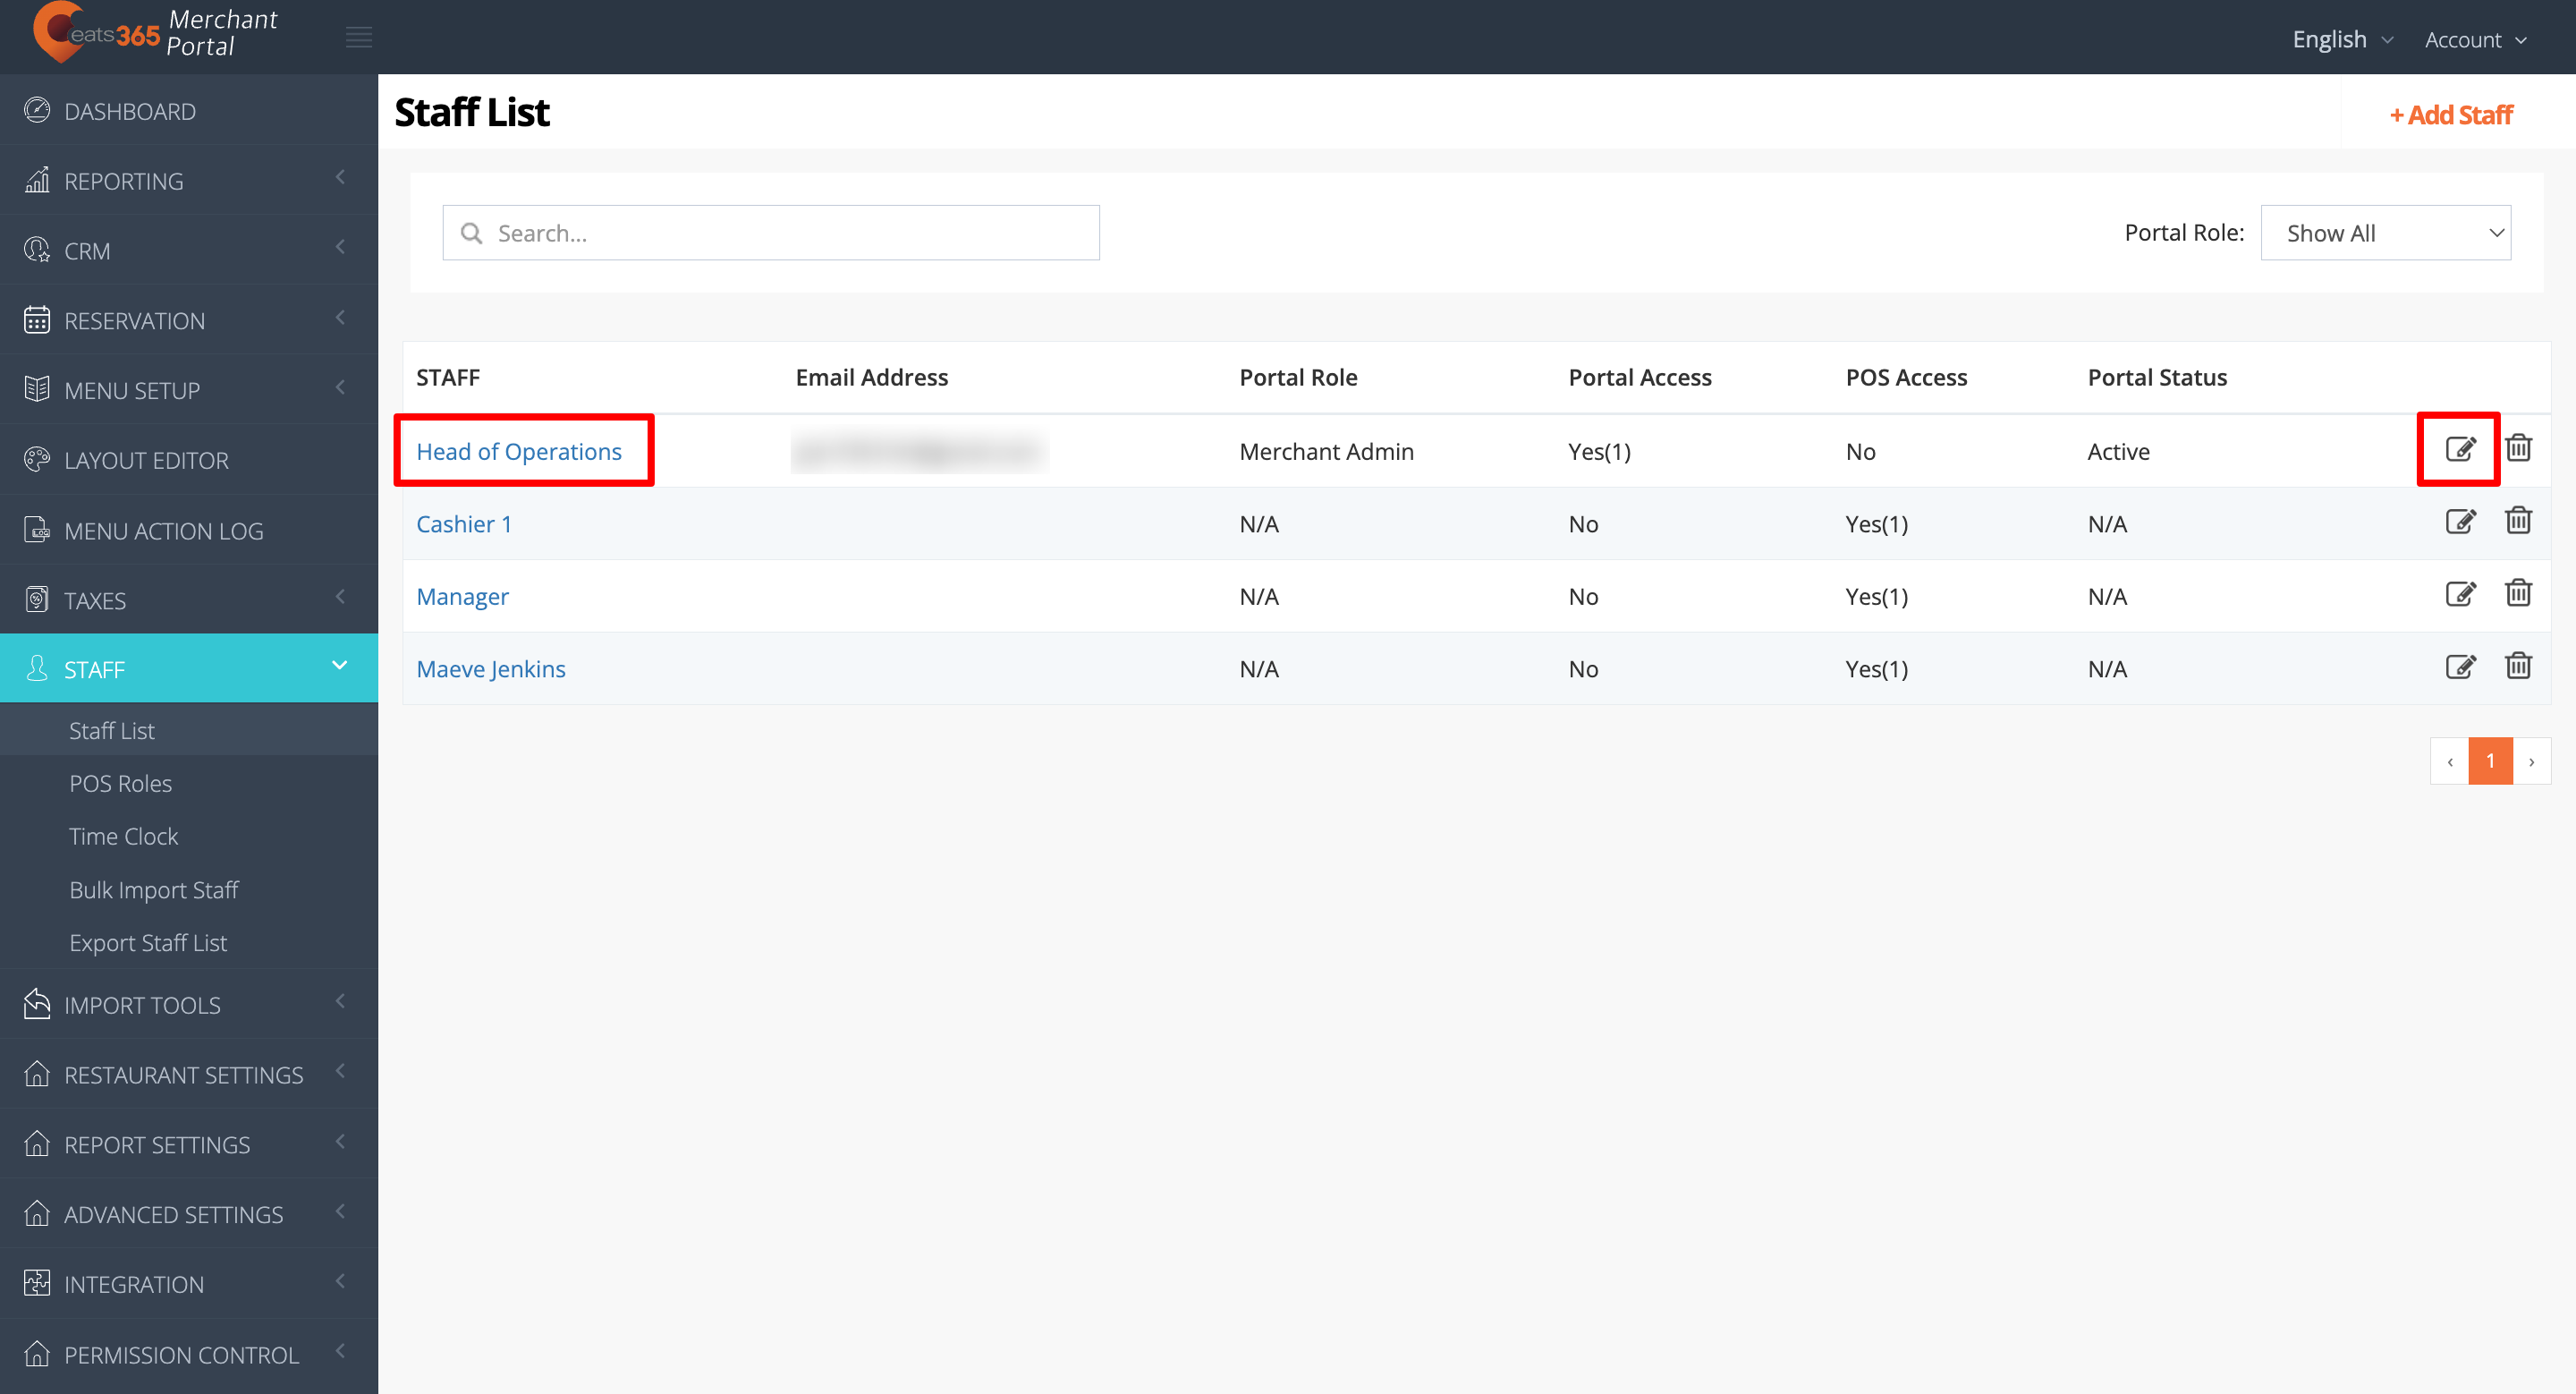
- Log in to the Merchant Portal.
- On the left panel, click on Staff. Then, select Staff List.
- Click on the name of the staff that you want to update the information. Alternatively, next to the staff’s name, you can click on Edit .
- Update your staff’s information.
- At the top right, click on Save to confirm.
Merchant Portal 2.0
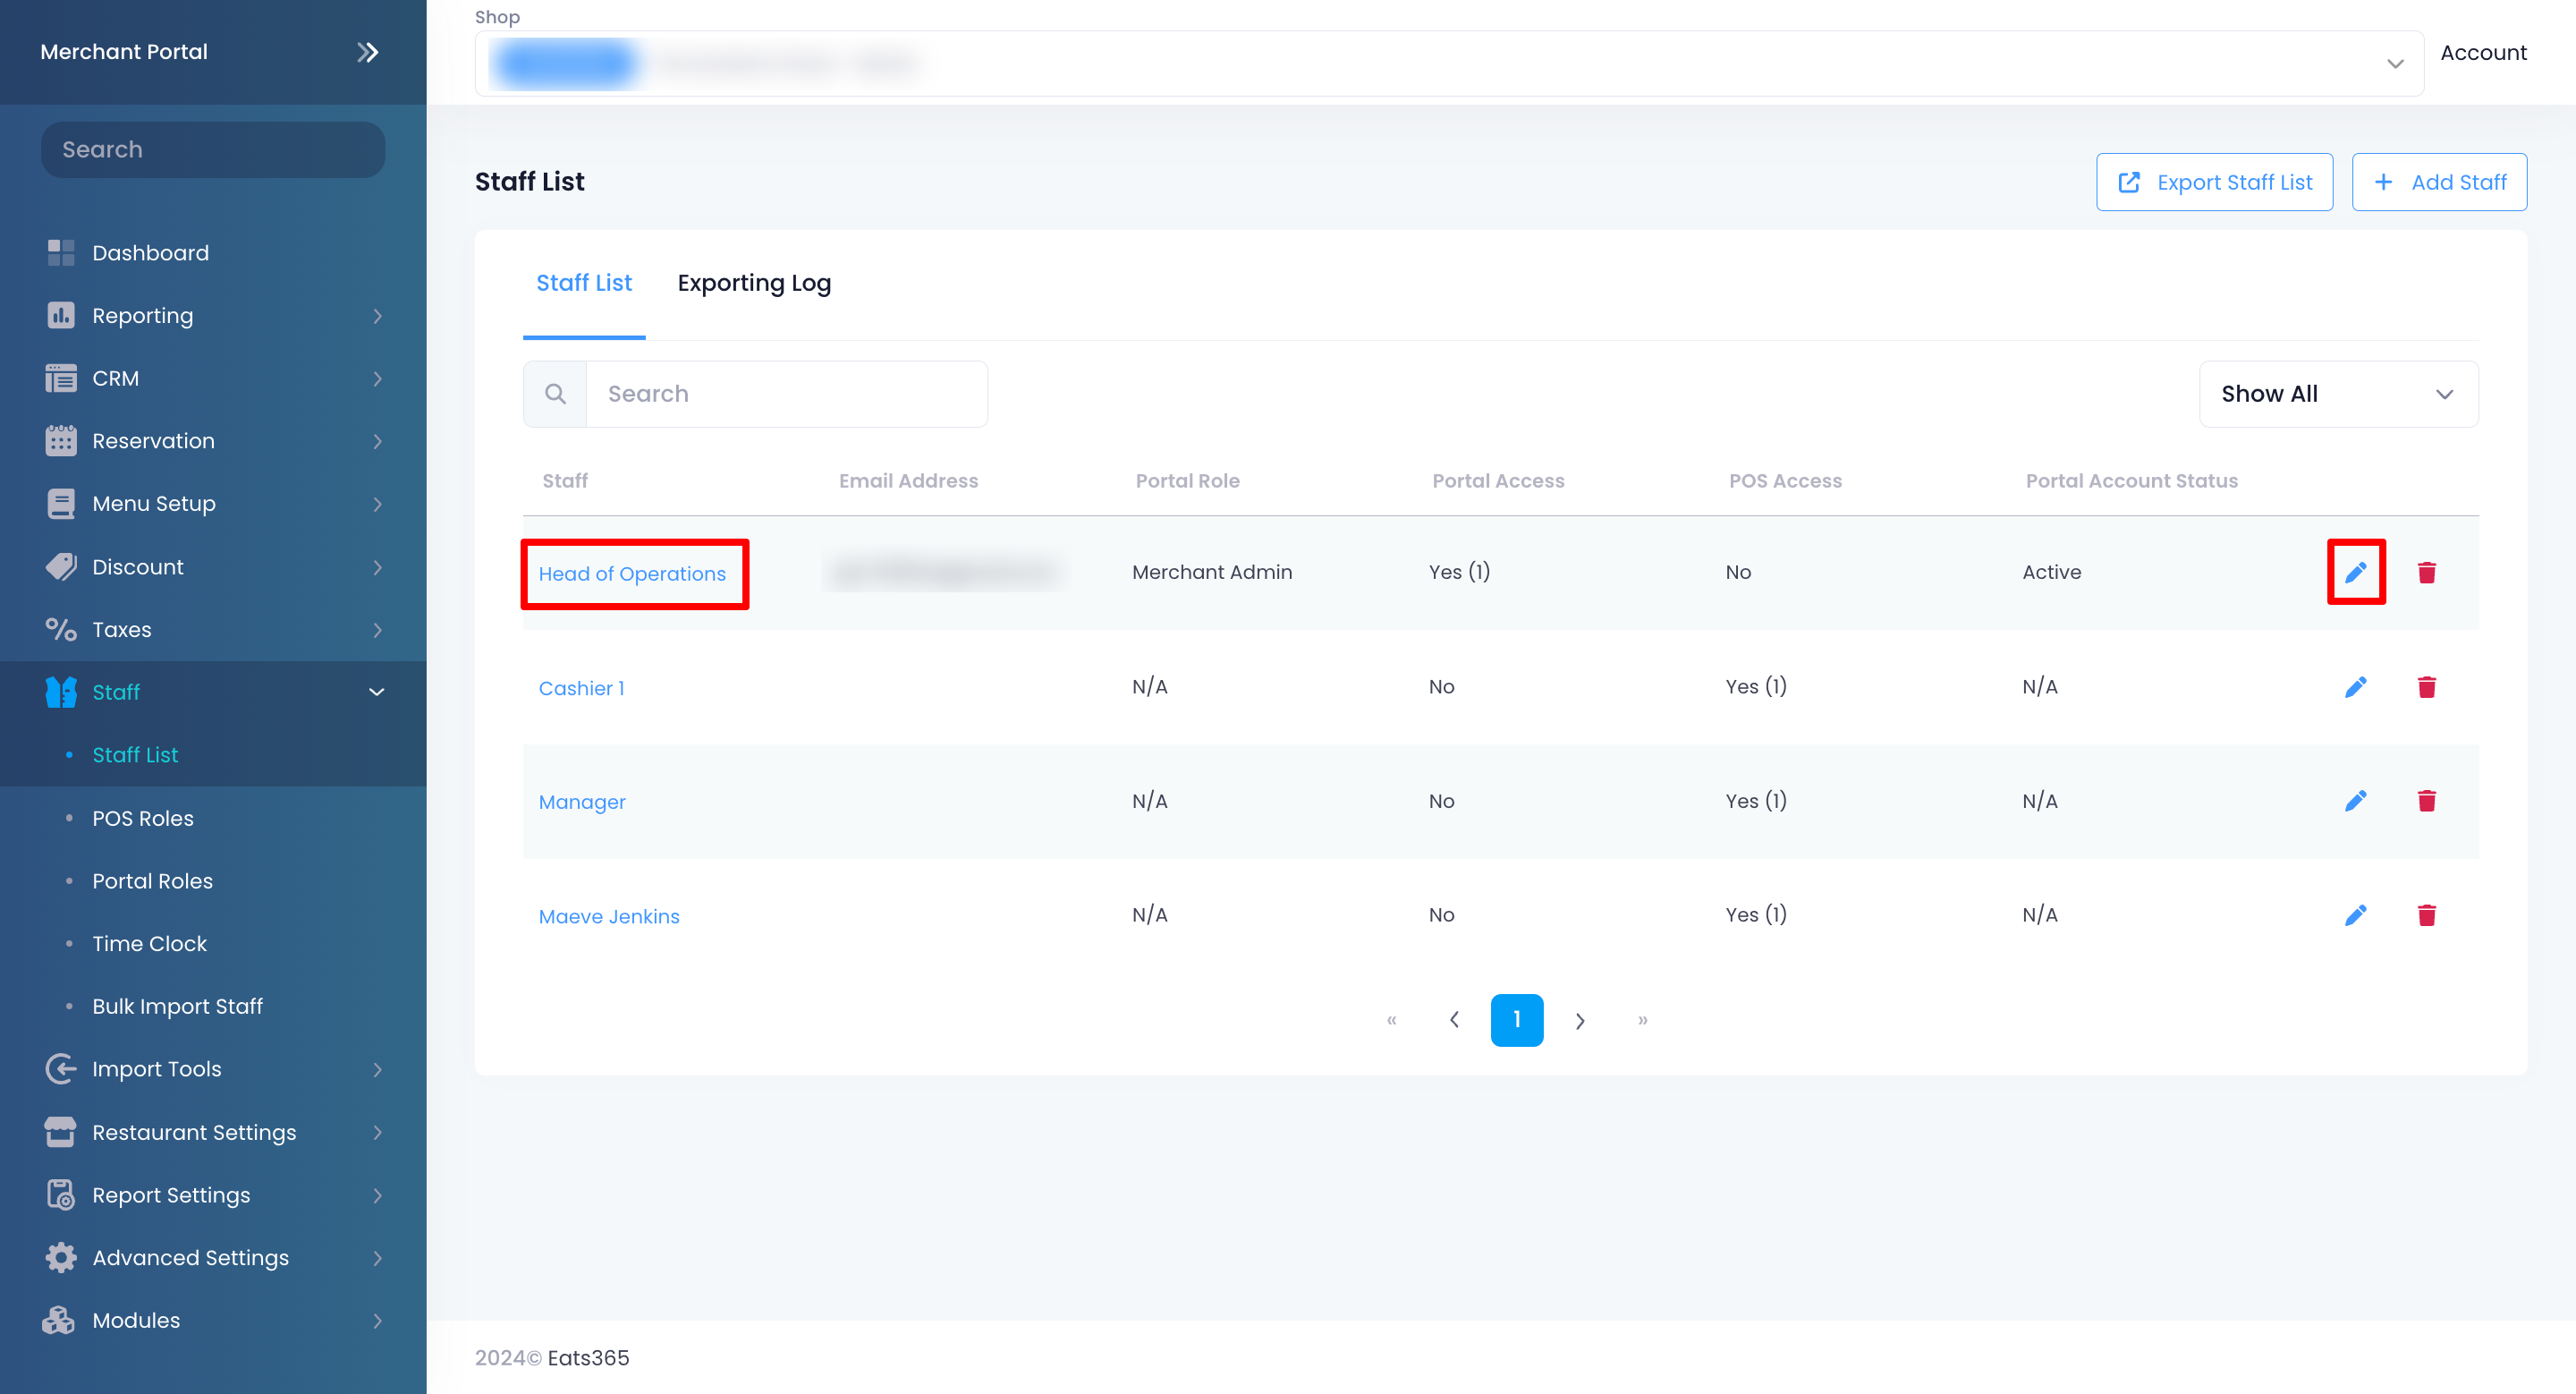
- Log in to the Merchant Portal.
- On the left panel, click on Staff. Then, select Staff List.
- Click on the name of the staff that you want to update the information. Alternatively, next to the staff’s name, you can click on Edit
 .
.
- Update your staff’s information.
- At the top right, click on Save to confirm.
Remove a staff from the Staff List
To remove a staff member from the Staff List, follow the steps below:
Eats365 POS
- Log in to the Eats365 POS.
- At the top left, tap Settings .
- Under "Staff," tap Users and Permissions. Then, select Staff List.
- Select the name of the staff member that you want to remove from the list. Tap the three-dot menu , then tap Remove
 .
.
- Tap Delete to confirm.
Merchant Portal (Classic Theme)
- Log in to the Merchant Portal.
- On the left panel, click on Staff. Then, select Staff List.
- Next to the staff’s name that you want to remove from the list, click on Delete . A prompt appears to confirm if you want to delete the staff from the list.
- Click on OK to confirm.
Merchant Portal 2.0
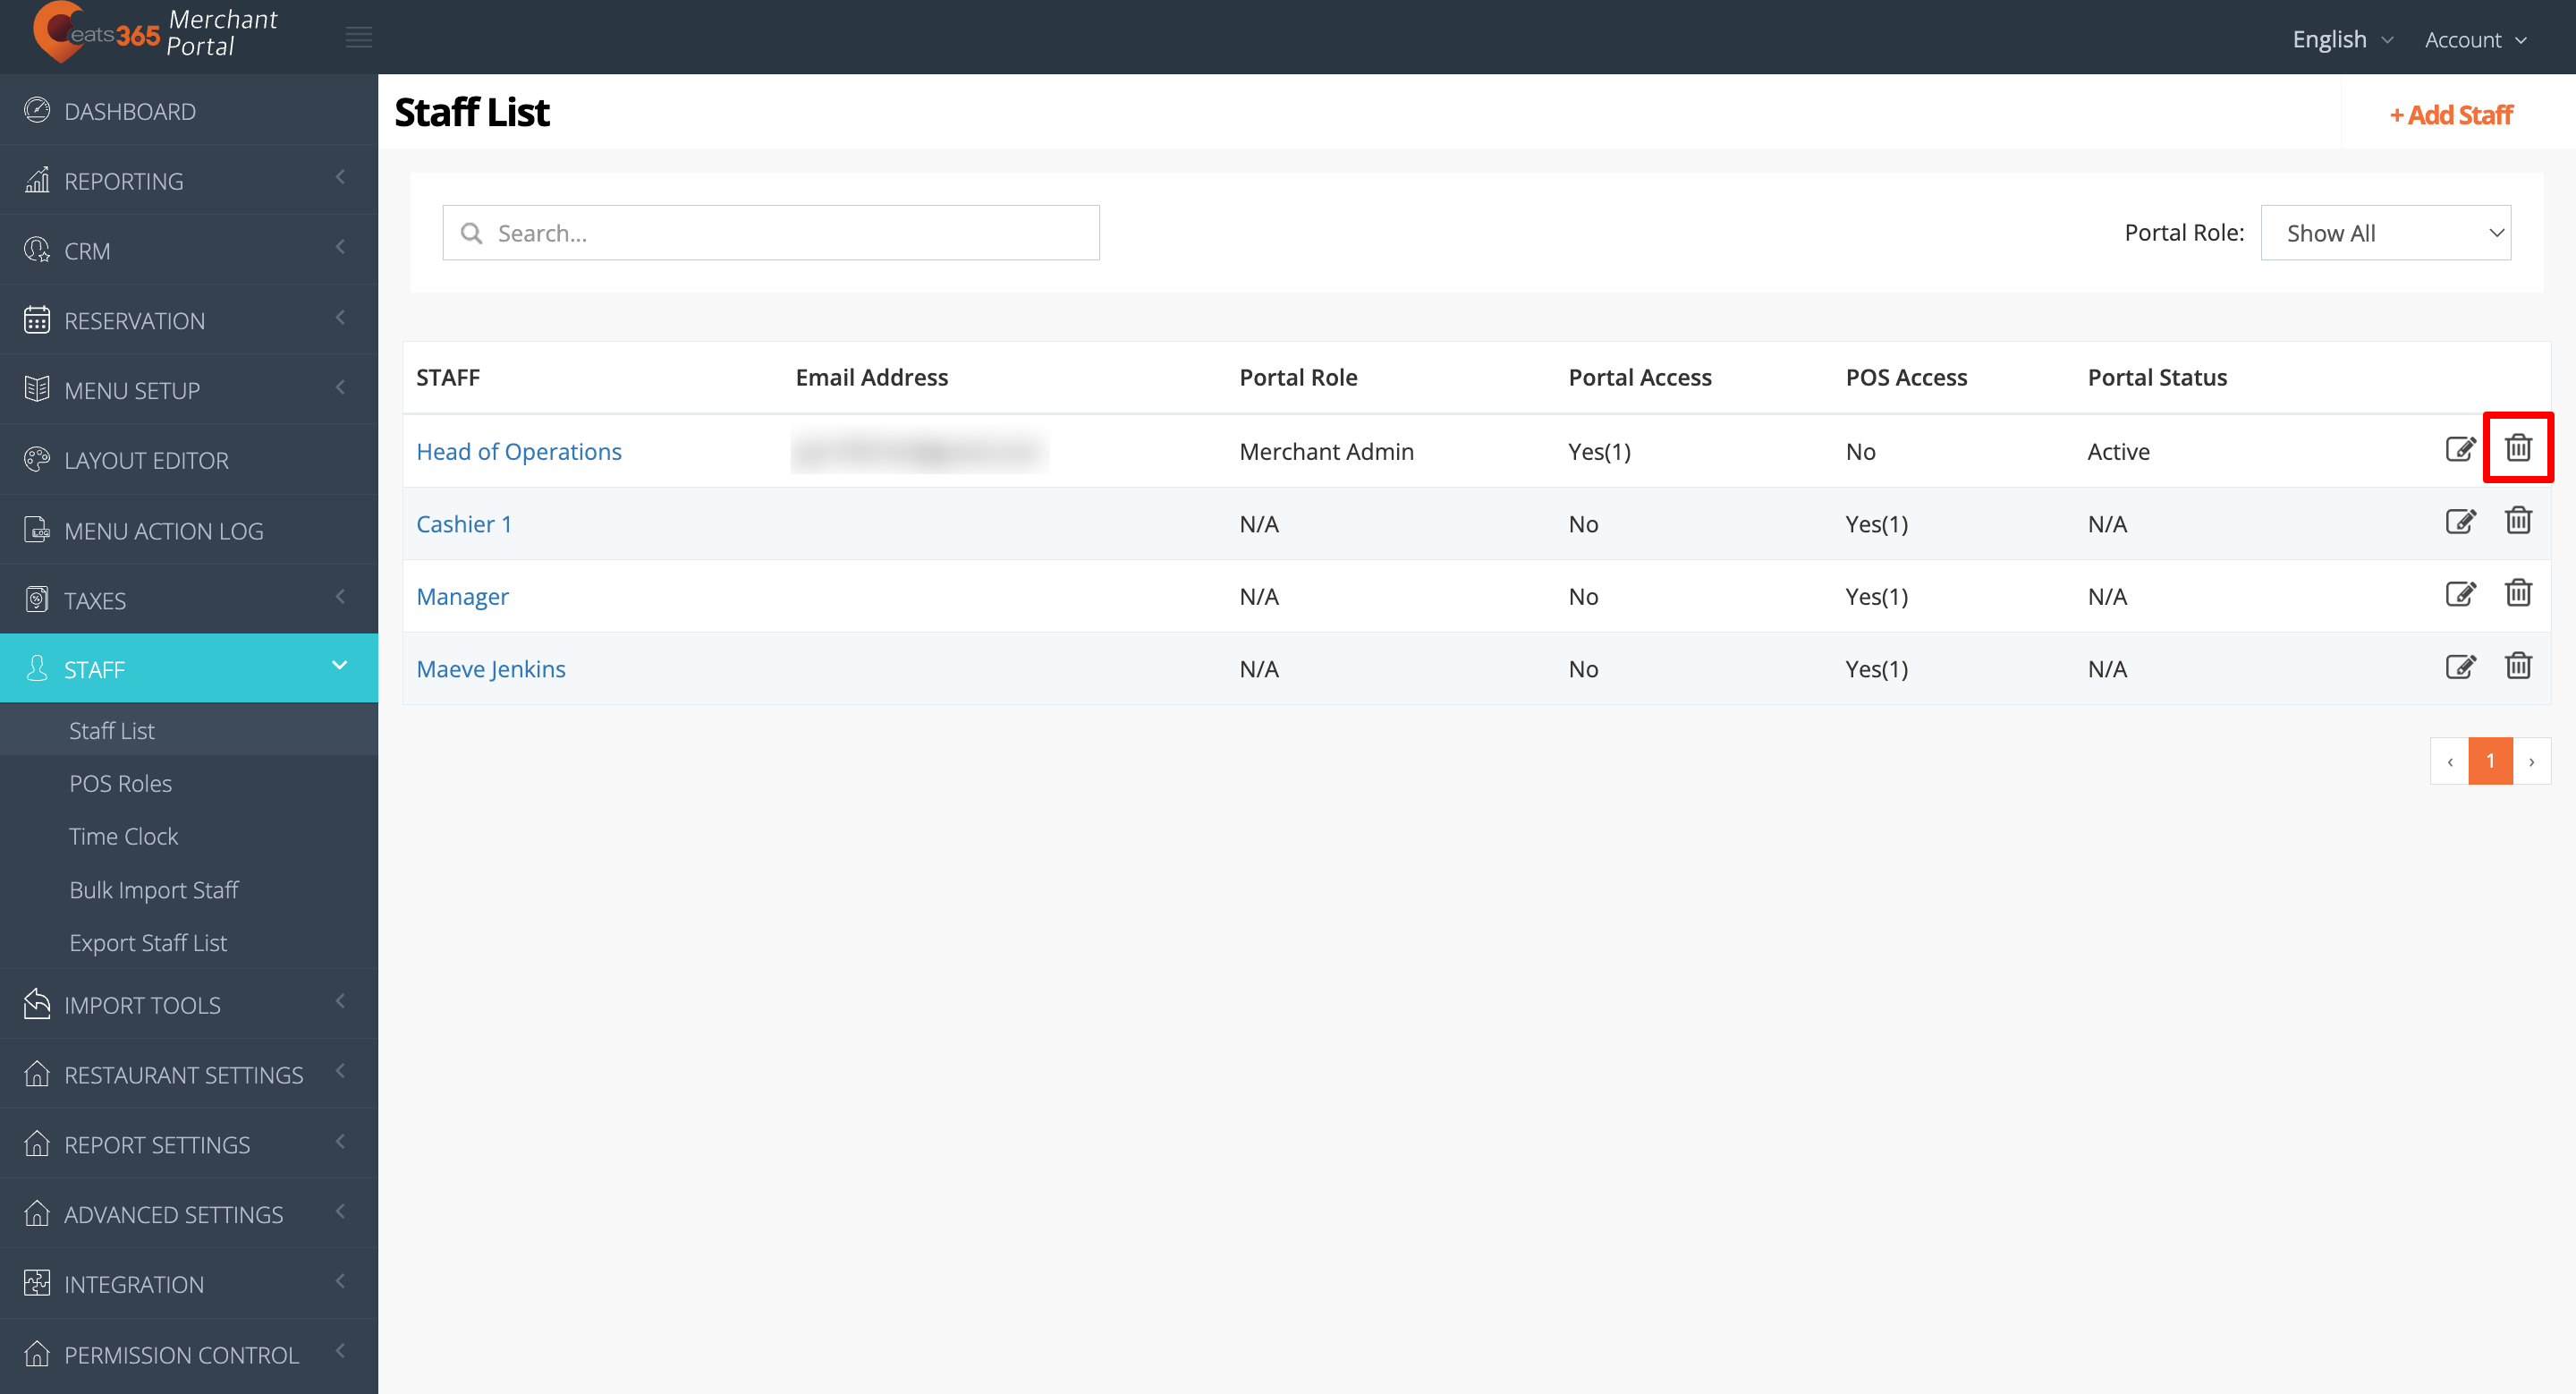
- Log in to the Merchant Portal.
- On the left panel, click on Staff. Then, select Staff List.
- Next to the staff’s name that you want to remove from the list, click on Delete
 . A prompt appears to confirm if you want to delete the staff from the list.
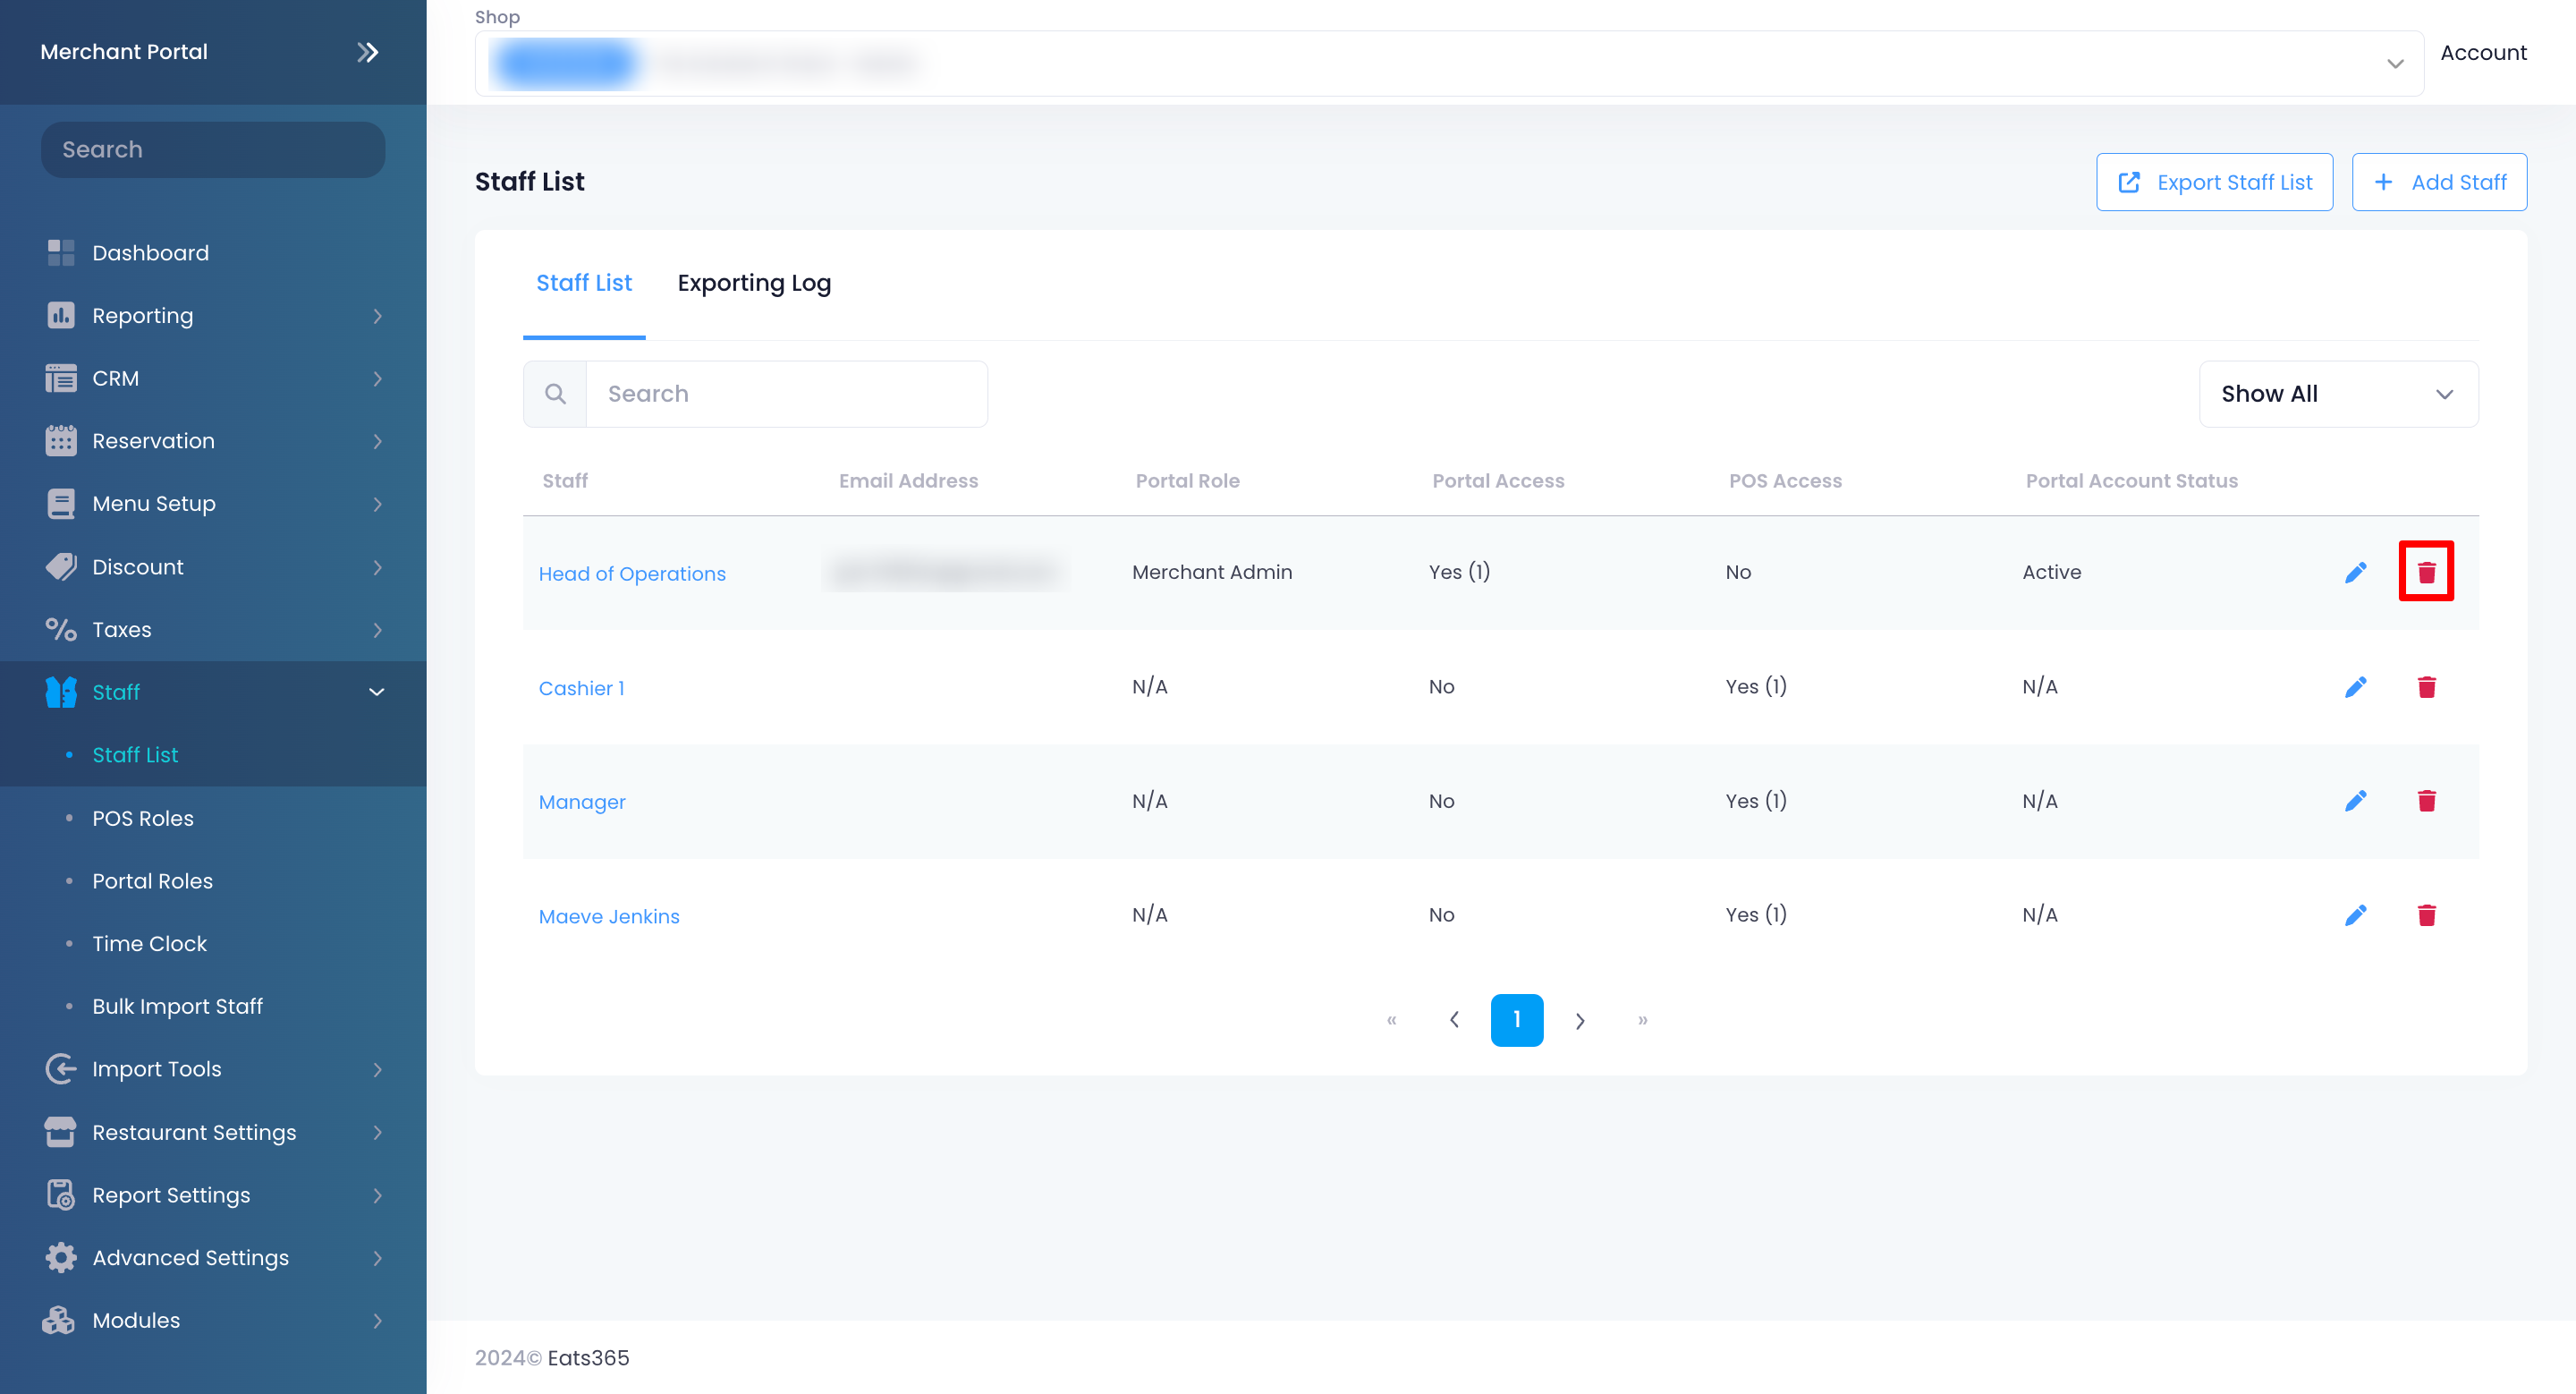
- Click on Confirm to delete.