Integrations
All Product
Table of Contents
Set up GTO Report
Learn how to set up your GTO report settings to generate accurate reports based on your restaurant’s location.
The GTO Report settings allow you to automatically generate and receive hourly or daily sales reports depending on your restaurant’s needs. These reports will be transmitted to your landlord’s server and the information included will depend on the information provided in the settings.
In this article, you’ll learn how to set up a GTO report depending on the mall where your restaurant is located.
Set up GTO report
To set up a GTO report, follow the steps below:
Singapore
| Report type | Where it applies |
| DCS - Hourly POS Report (version 1.0) | 313@Somerset |
| DCS - Hourly POS Report (version 1.7) | Millenia Walk |
| DCS - Daily (version 2.7) |
|
Malaysia
| Report Type | Where it applies |
| KLCC |
|
| KL East Mall | KL East Mall |
GTO Report types
DCS - Hourly POS Report (version 1.0)
- Log in to the Merchant Portal.
- On the left panel, click on Integration. Then, click on GTO Report.
- Turn on Enable
 .
.
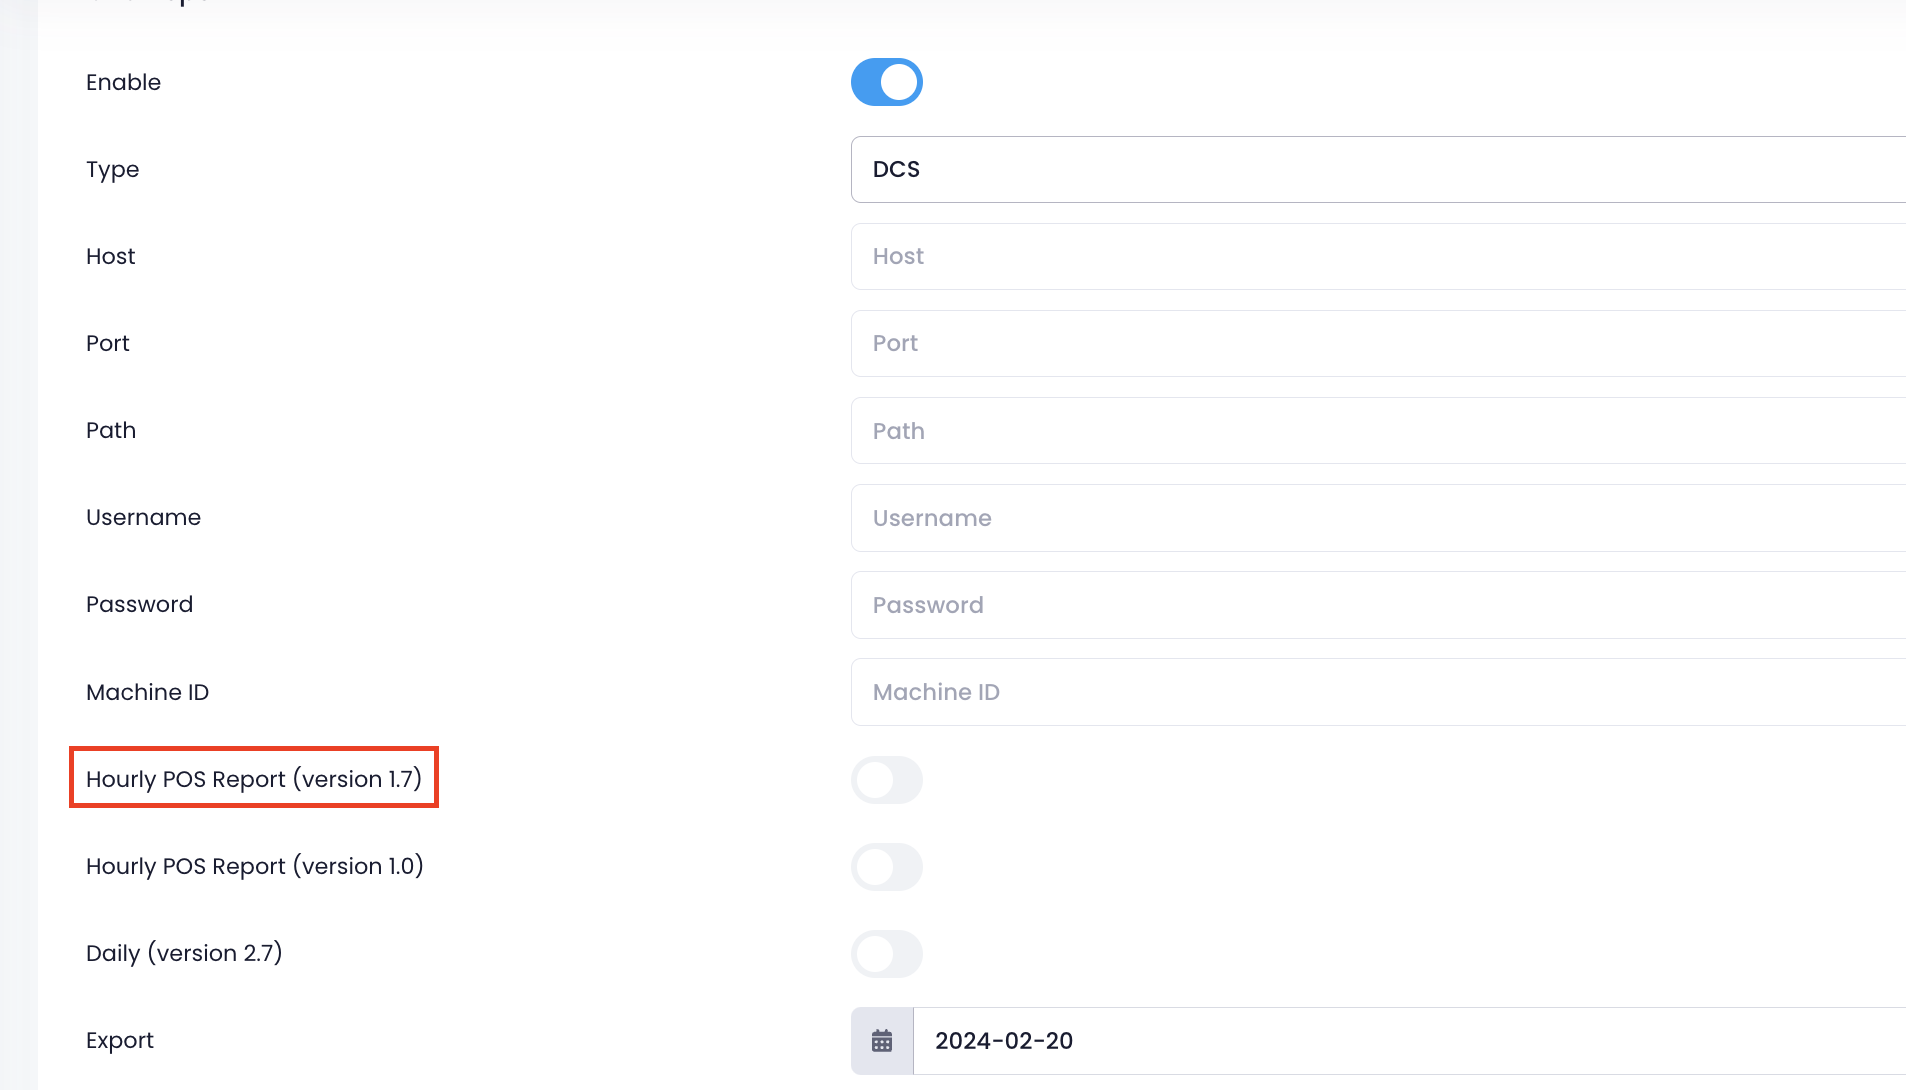
- Next to Type, select DCS.
- Enter your server information which includes the Host, Port, and Path.
- Enter your server username and password.
- Enter your server’s Machine ID.
- Turn on Hourly POS Report (version 1.0) .

- (Optional) Next to Export, select the date of the sales report that you want to export. Then, click on Export.
Tip: The sales report will be automatically generated and sent to your associated server after performing End of Day. However, you can always go back and export previous sales reports from this setting. - Click on Save to confirm.
DCS - Hourly POS Report (version 1.7)
- Log in to the Merchant Portal.
- On the left panel, click on Integration. Then, click on GTO Report.
- Turn on Enable .
- Next to Type, select DCS.
- Enter your server information which includes the Host, Port, and Path.
- Enter your server username and password.
- Enter your server’s Machine ID.
- Turn on Hourly POS Report (version 1.7) .
- Enter your tendercodes. You can enter the following codes:
- NETS code
- Visa Code
- Master Card Code
- AMEX Code
-
Voucher Code
Tip: The Tender Code is the same code you assigned to your tenders from the Tender settings. Add the tender code to recognize them as the same tender.
- (Optional) Next to Export, select the date of the sales report that you want to export. Then, click on Export.
Tip: The sales report will be automatically generated and sent to your associated server after performing End of Day. However, you can always go back and export previous sales reports from this setting. - Click on Save to confirm.
DCS - Daily (version 2.7)
- Log in to the Merchant Portal.
- On the left panel, click on Integration. Then, click on GTO Report.
- Turn on Enable .
- Next to Type, select DCS.
- Enter your server information which includes the Host, Port, and Path.
- Enter your server username and password.
- Enter your server’s Machine ID.
- Turn on Daily (version 2.7) .
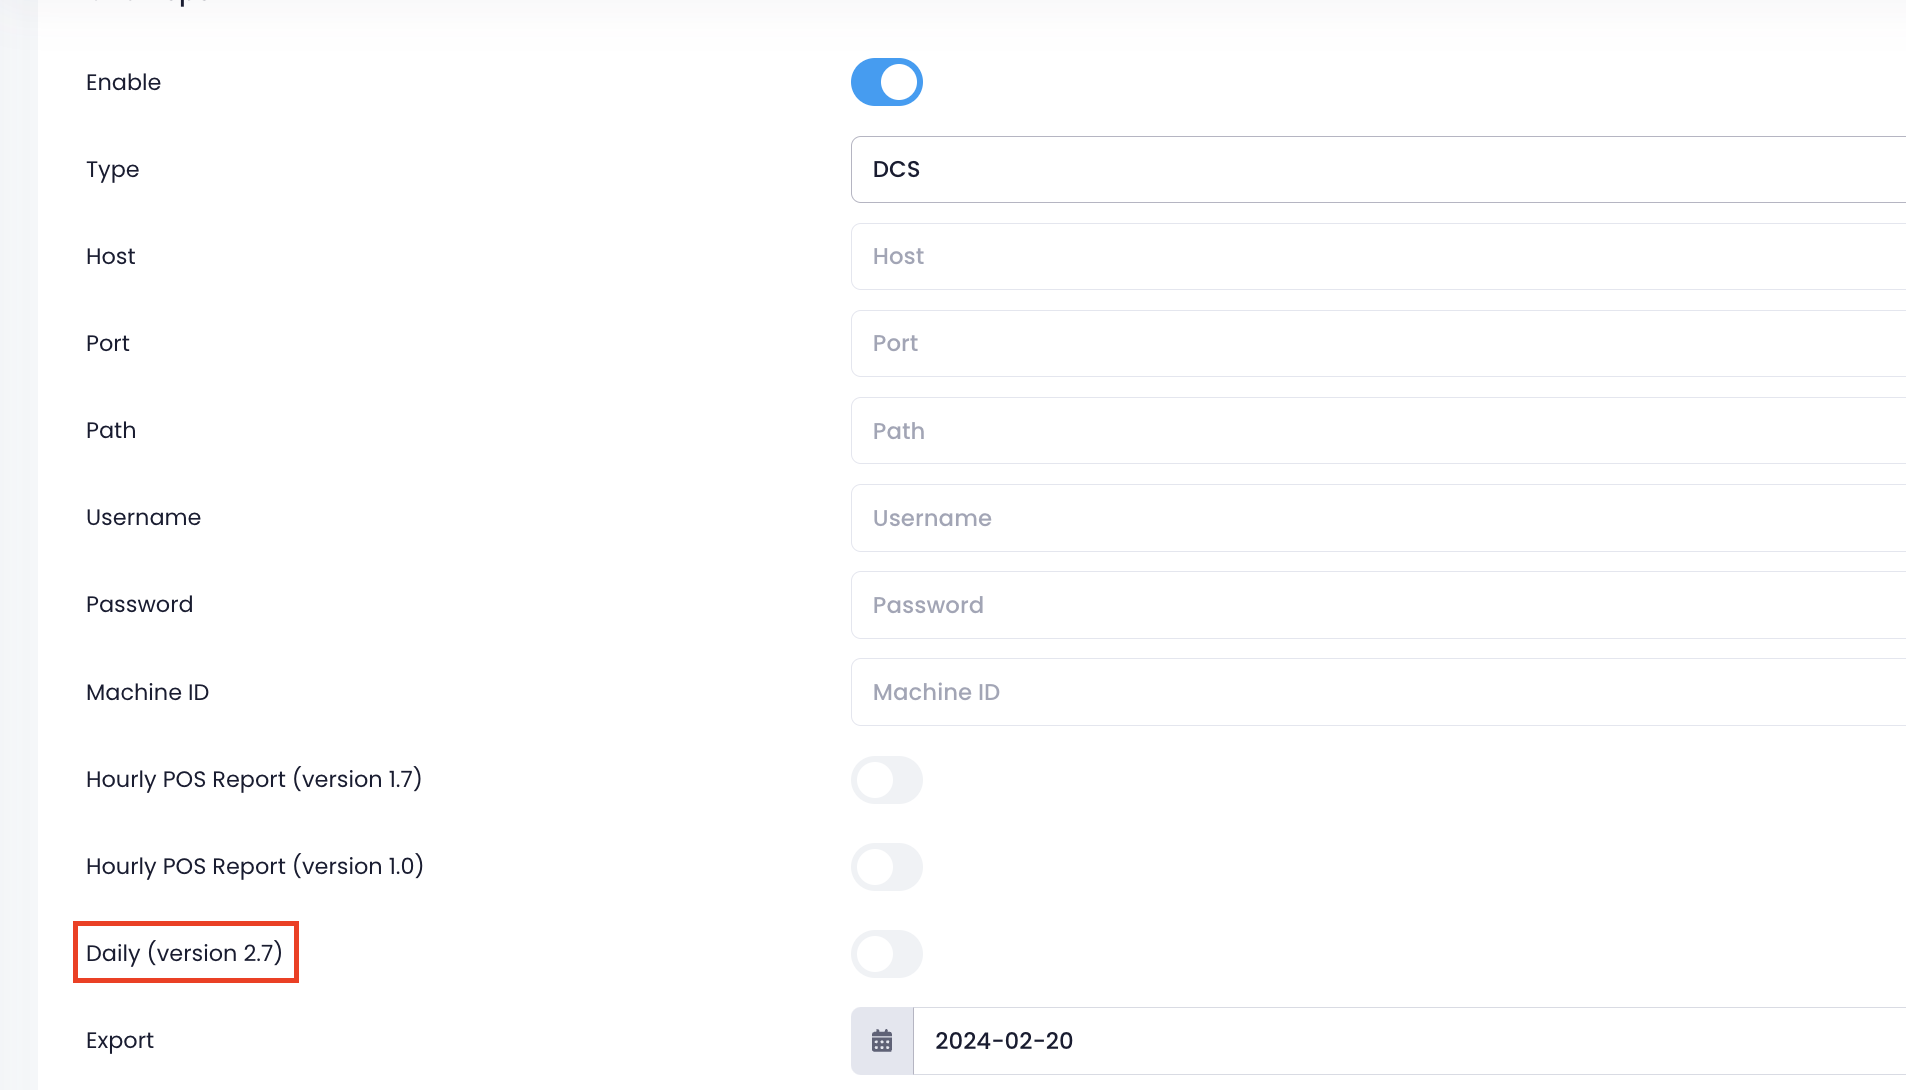
- (Optional) Next to Export, select the date of the sales report that you want to export. Then, click on Export.
Tip: The sales report will be automatically generated and sent to your associated server after performing End of Day. However, you can always go back and export previous sales reports from this setting. - Click on Save to confirm.
DTS
- Log in to the Merchant Portal.
- On the left panel, click on Integration. Then, click on GTO Report.
- Turn on Enable .
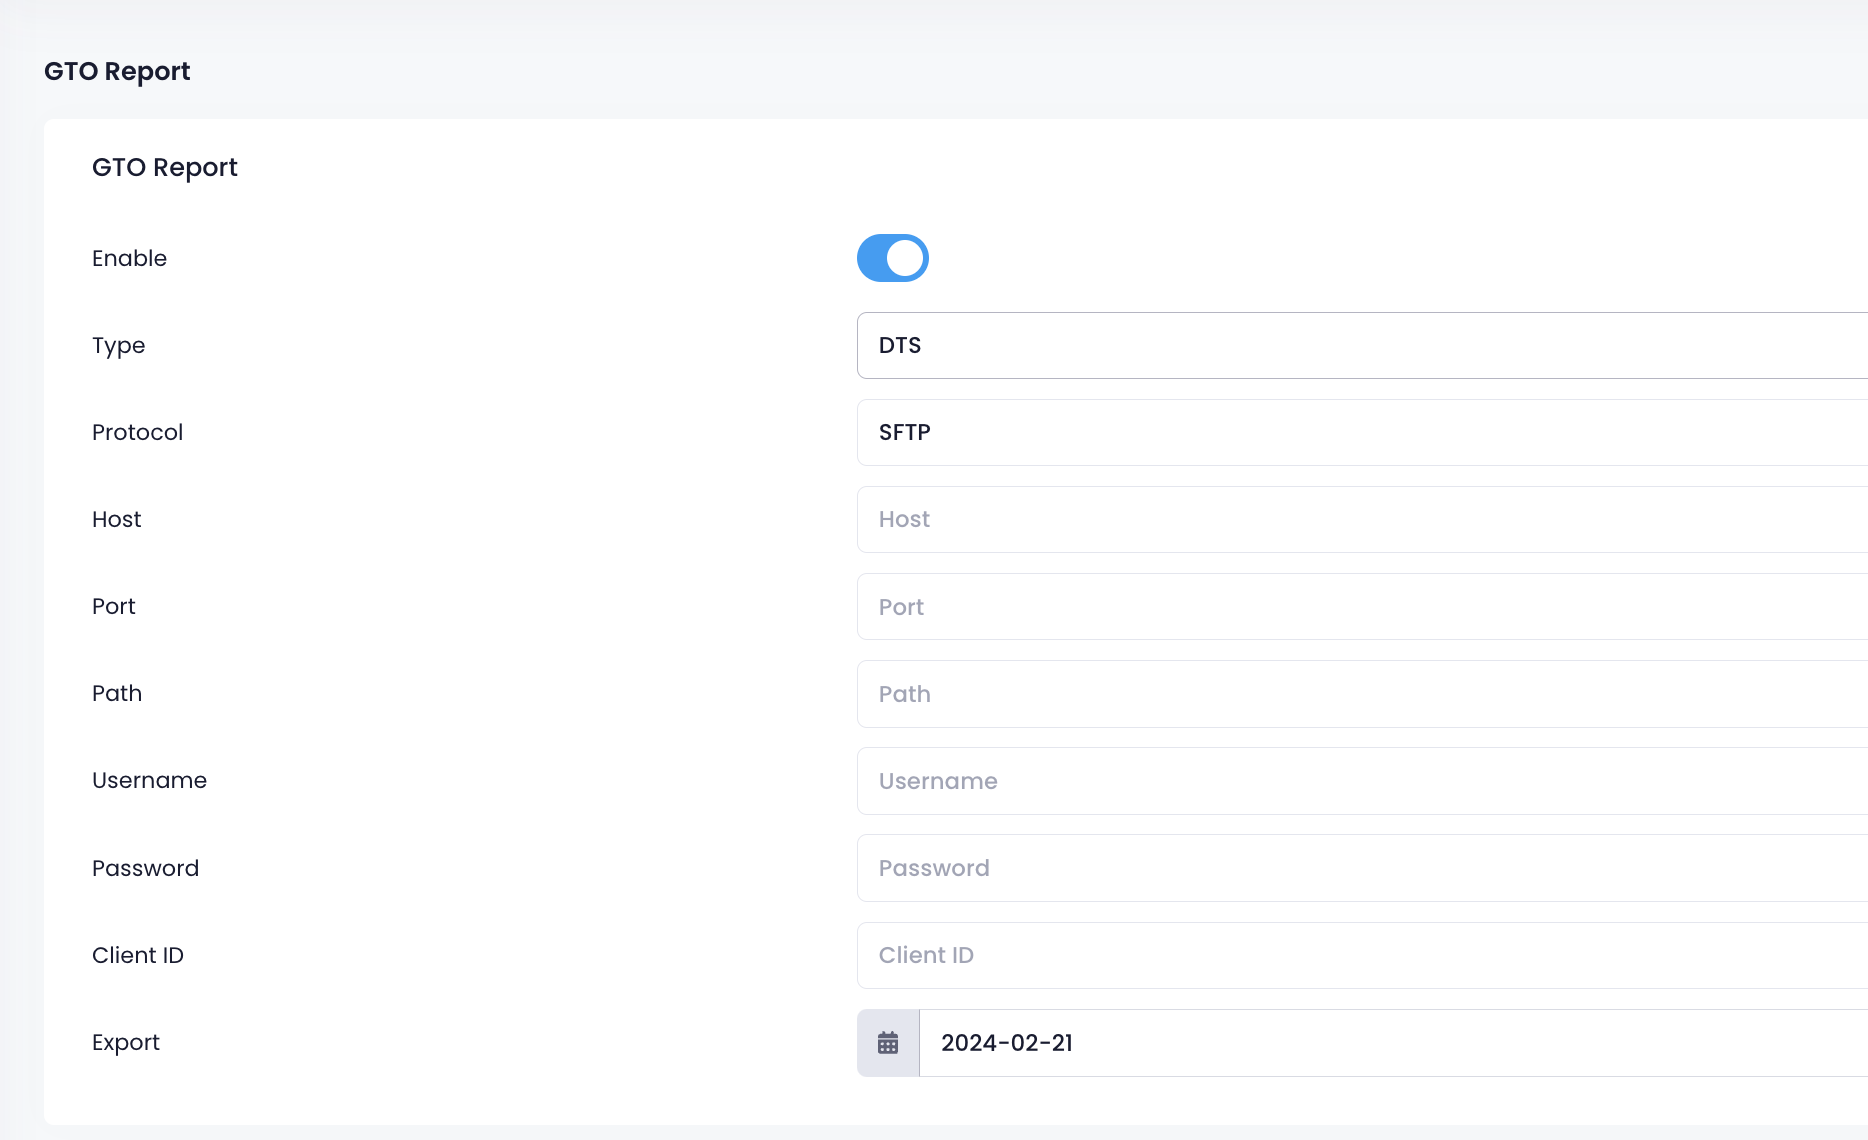
- Next to Type, select DTS.
- Select the network protocol type.
- Enter your server information which includes the Host, Port, and Path.
- Enter your server username and password.
- Enter your server’s Client ID.
- Turn on Daily (version 2.7) .
- (Optional) Next to Export, select the date of the sales report that you want to export. Then, click on Export.
Tip: The sales report will be automatically generated and sent to your associated server after performing End of Day. However, you can always go back and export previous sales reports from this setting. - Click on Save to confirm.
EuroStop Mall
- Log in to the Merchant Portal.
- On the left panel, click on Integration. Then, click on GTO Report.
- Turn on Enable .
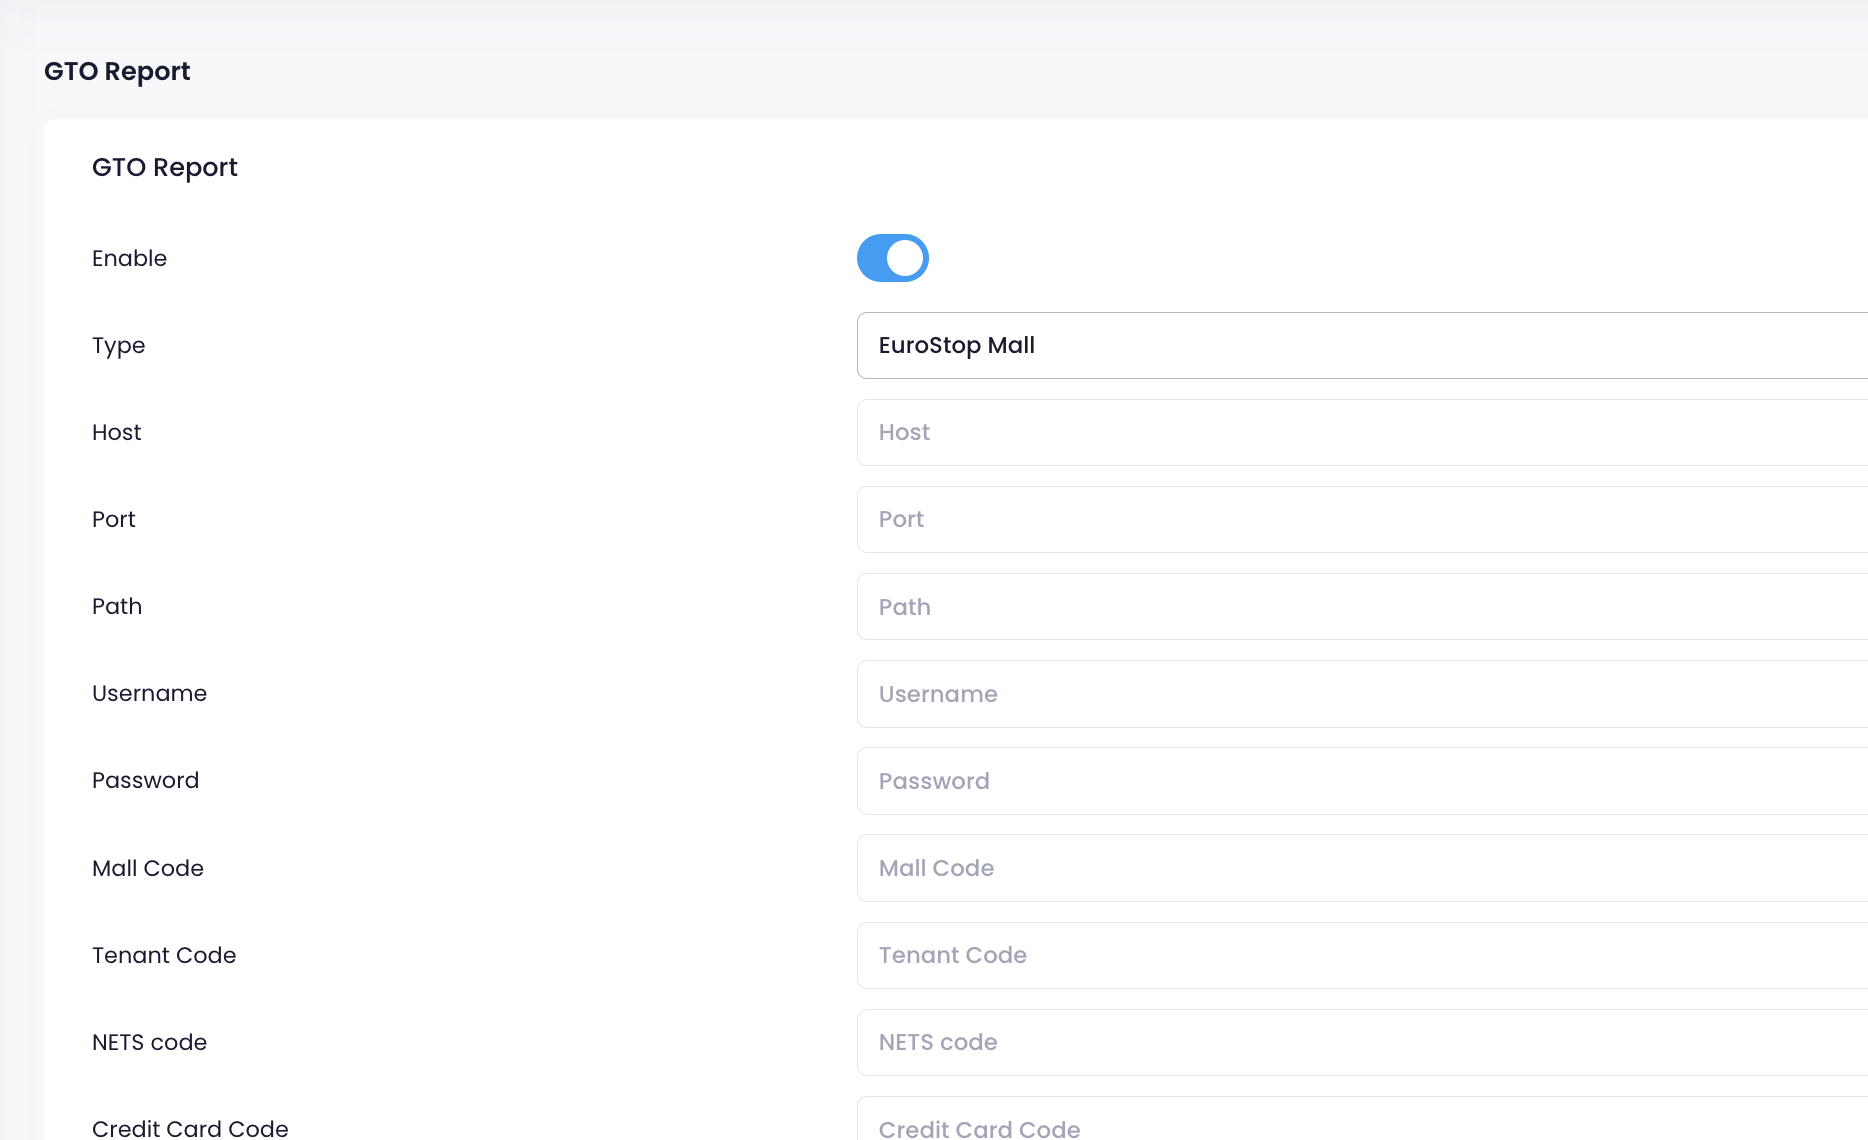
- Next to Type, select EuroStop Mall.
- Enter your server information which includes the Host, Port, and Path.
- Enter your server username and password.
- Enter your landlord’s mall code.
- Enter your tenant code.
- Enter your tendercodes. You can enter the following codes:
- NETS code
- Credit Card Code
- Debit Card Code
- Mall Voucher Code
- Cheque Code
-
Other Vouchers Code
Tip: The Tender Code is the same code you assigned to your tenders from the Tender settings. Add the tender code to recognize them as the same tender.
- (Optional) Next to Export, select the date of the sales report that you want to export. Then, click on Export.
Tip: The sales report will be automatically generated and sent to your associated server after performing End of Day. However, you can always go back and export previous sales reports from this setting. - Click on Save to confirm.
Eurostop HDB
- Log in to the Merchant Portal.
- On the left panel, click on Integration. Then, click on GTO Report.
- Turn on Enable .
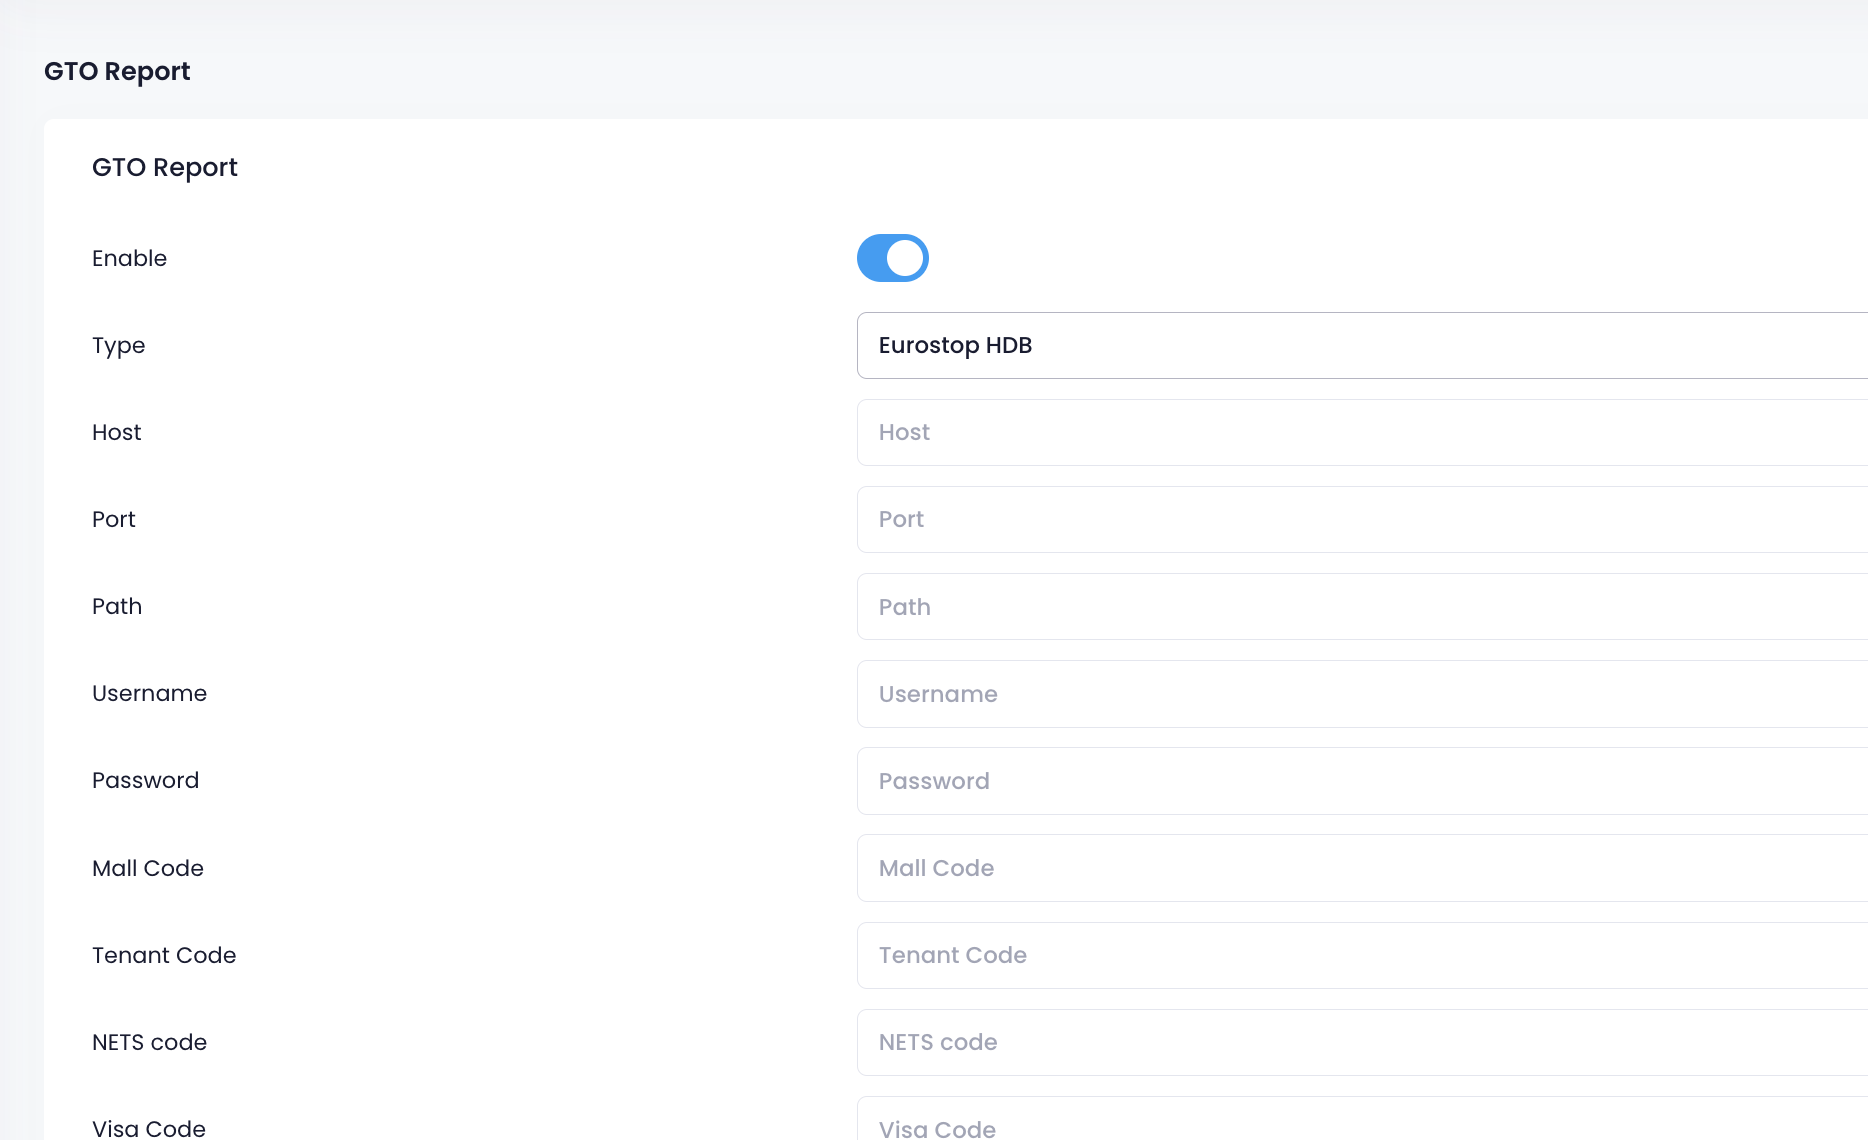
- Next to Type, select Eurostop HDB.
- Enter your server information which includes the Host, Port, and Path.
- Enter your server username and password.
- Enter your landlord’s mall code.
- Enter your tenant code.
- Enter your tendercodes. You can enter the following codes:
- NETS code
- Visa Code
- Master Card Code
- AMEX Code
- Voucher Code
- Grab Pay Code
- Fave Pay Code
- PayNow / PayLah / Pay Anyone Code
- Apple Pay /Google Pay / Samsung Pay Code
-
Payment by Other Digital Payment Method Modes Code
Tip: The Tender Code is the same code you assigned to your tenders from the Tender settings. Add the tender code to recognize them as the same tender.
- (Optional) Next to Export, select the date of the sales report that you want to export. Then, click on Export.
Tip: The sales report will be automatically generated and sent to your associated server after performing End of Day. However, you can always go back and export previous sales reports from this setting. - Click on Save to confirm.
KLCC
- Log in to the Merchant Portal.
- On the left panel, click on Integration. Then, click on GTO Report.
- Turn on Enable .

- Next to Type, select KLCC.
- Enter your server information which includes the Host, Port, and Path.
- Enter your server username and password.
- Enter your server’s Machine ID.
- Enter your tendercodes. You can enter the following codes:
- TNG Code
- VISA Code
- Master Card Code
- AMEX Code
-
Voucher Code
Tip: The Tender Code is the same code you assigned to your tenders from the Tender settings. Add the tender code to recognize them as the same tender.
- (Optional) Next to Export, select the date of the sales report that you want to export. Then, click on Export.
Tip: The sales report will be automatically generated and sent to your associated server after performing End of Day. However, you can always go back and export previous sales reports from this setting. - Click on Save to confirm.
KL East Mall
- Log in to the Merchant Portal.
- On the left panel, click on Integration. Then, click on GTO Report.
- Turn on Enable .
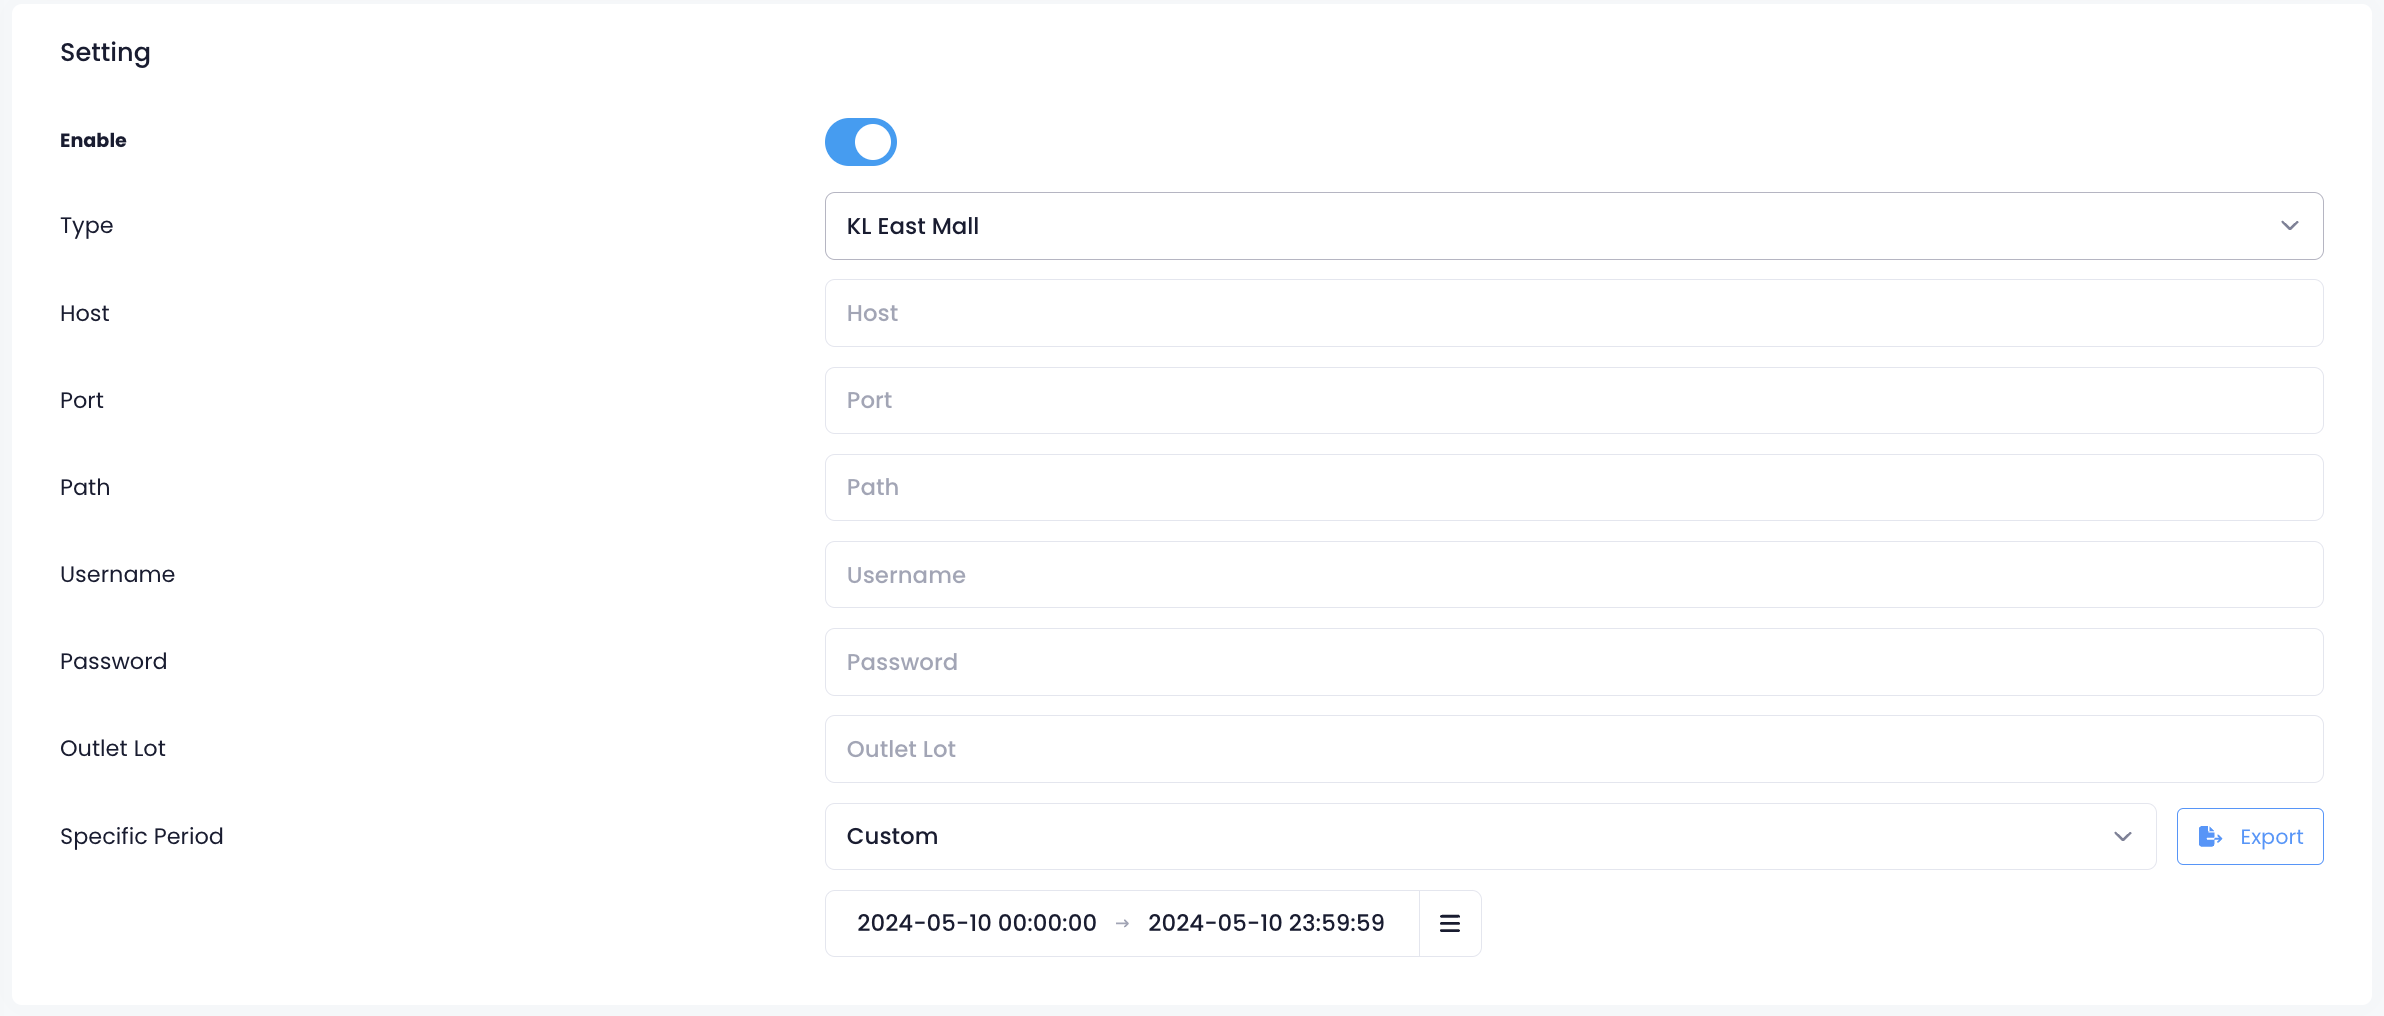
- Next to Type, select KL East Mall.
- Enter your server information which includes the Host, Port, and Path.
- Enter your server username and password.
- Enter your server’s Outlet Lot.
- (Optional) Next to Export, select the date of the sales report that you want to export. Then, click on Export.
Tip: The sales report will be automatically generated and sent to your associated server after performing End of Day. However, you can always go back and export previous sales reports from this setting. - Click on Save to confirm.