Printer setup
Table of Contents
Configure a receipt printer for tables
Learn how to configure a receipt printer to automatically print receipts for specific tables.
When orders are placed on the POS, the customer receipt automatically prints from the paired receipt printer. For orders placed through other Eats365 Modules (such as the mPOS, PhotoMenu, or Scan to Order feature), you can customize receipt printing using the Table Partitions function. This allows you to specify which printer handles customer receipts and the types of receipts each printer supports.
In this article, you’ll learn how to assign a receipt printer to a table and set the printer’s supported printing types.
Practical example
Setup
In this example, you have two of the following::
- POS devices
- Printers
- PhotoMenu Devices
- Tables
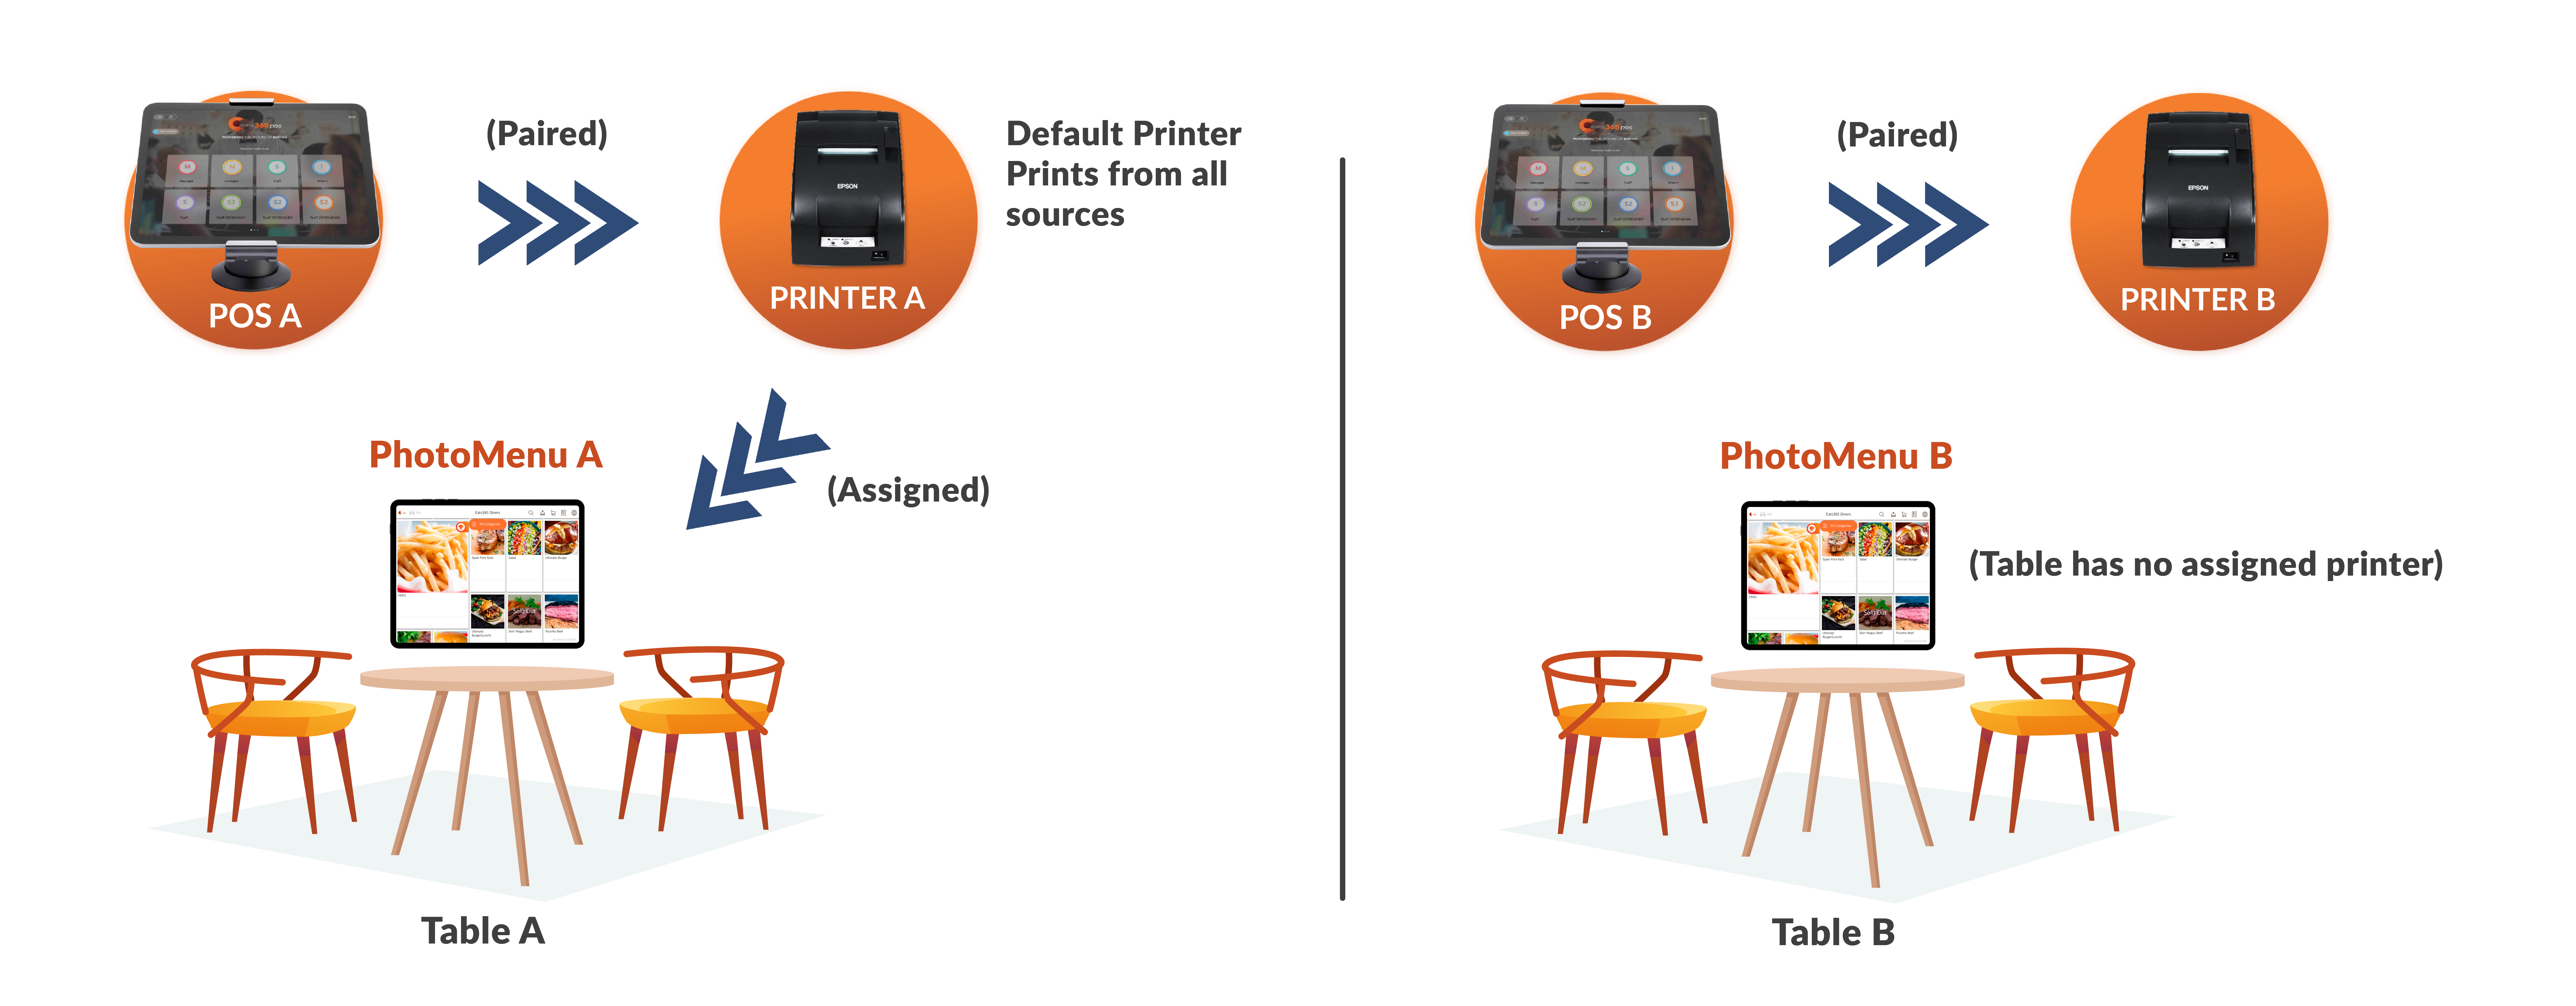 Setup 1:
- POS A is paired with Printer A.
- Printer A is the system’s default printer.
- Printer A is assigned to Table A.
- PhotoMenu A is stationed at Table A.
- Bill/Receipt is set as the only supported printing type for Printer A.
- Printer A is set to print orders from all sources.
Setup 2:
- POS B is paired with Printer B.
- No printer is currently assigned to Table B.
- PhotoMenu B is stationed at Table B.
- Bill/Receipt is set as the only supported printing type for Printer B.
- Printer B is set to print order from all sources.
Expected result
Result for Setup 1:
- If a print job from PhotoMenu A comes in, Printer A will accomplish the print job since Printer A is assigned to Table A and PhotoMenu A is stationed at Table A.
- Printer A will only print bills and receipts.
- Printer A will print orders made from both the POS and the PhotoMenu.
Result for Setup 2:
- If a print job is made from PhotoMenu B, and given that there’s no printer assigned to Table B, the default printer will accomplish the print job. In this case, Printer A is set as the default printer and will accomplish the print job made from PhotoMenu B.
- Printer B will only print bills and receipts.
- Printer B will print orders made from both the POS and the PhotoMenu.
Assign a printer to a specific table
To configure the corresponding receipt printer for a table, follow the steps below:
Eats365 POS
- Log in to the Eats365 POS.
- At the top left, tap Settings
 .
. - Under General, tap Printer Setup, then choose a connected printer.
- At the top, tap on the Table Partitions tab and select the tables where you want this printer to print customer receipts for.
- To select all tables, place a check mark beside the Select all tables in this area option.
- Tap Save to confirm.
Merchant Portal (Classic Theme)
- Log in to the Merchant Portal.
- On the left panel, click on Restaurant Settings. Then, click on Printer List.
- Next to the printer that you want to configure, click on View.
Note: You must pair a printer to the Eats365 POS first to be able to configure the printer on the Merchant Portal. To connect a printer to the POS, refer to Scan and pair a printer. - Click on the Table Partition tab.
- Next to the table where you want to print customer receipts, click on the toggle
 to assign the printer to the table.
 - To select all tables, click on the toggle next to Select All .
- Click on Save to confirm.
Merchant Portal 2.0
- Log in to the Merchant Portal.
- On the left panel, click on Restaurant Settings. Then, click on Printer List.
- Next to the printer that you want to configure, click on View.
Note: You must pair a printer to the Eats365 POS first to be able to configure the printer on the Merchant Portal. To connect a printer to the POS, refer to Scan and pair a printer. - Click on the Table Partition tab.
- Next to the table where you want to print customer receipts, click on the toggle
 to assign the printer to the table.
 - To select all tables, click on the toggle next to Select All .
- Click on Save to confirm.
Once configured, the assigned printer will handle customer receipt printing for the selected tables. Orders from tables not specified under the Table Partitions tab will automatically print from the default printer. For more information, refer to the “Specify the supported printing types of a printer” section below.
Specify the supported printing types of a printer
To manually choose the supported printing types of a printer, follow the steps below:
Eats365 POS
- Log in to the Eats365 POS.
- At the top left, tap Settings .
- Under General, tap Printer Setup, then choose a connected printer.
- Under Supported Orders, turn on Print Order from All Sources
 to print all supported orders regardless of source. Turn this setting off
  if you want to configure the printer to print different tickets depending on the source.
 - Under Supported Printing Types, choose from the following types that you’d like your printer to perform. To configure the printer to print bills and receipts, place a check mark beside Bill/Receipt.
- At the top right, tap Save to confirm.
Merchant Portal (Classic Theme)
- Log in to the Merchant Portal.
- On the left panel, click on Restaurant Settings. Then, click on Printer List.
- Next to the printer that you want to configure, click on View.
Note: You must pair a printer to the Eats365 POS first to be able to configure the printer on the Merchant Portal. To connect a printer to the POS, refer to Scan and pair a printer. - Under Supported Orders, select the order source that the printer can print. You can chooseeither:
- Print Order from All Sources - Print all supported orders regardless of source.
- Print general orders and user app/website’s orders separately - Configure the printer to print different ticket types depending on the source.
- Under Supported Printing Types, choose from the following types that you’d like your printer to perform. To configure the printer to print bills and receipts, place a check mark beside Bill/Receipt.
- At the top right, click on Save to confirm.
Merchant Portal 2.0
- Log in to the Merchant Portal.
- On the left panel, click on Restaurant Settings. Then, click on Printing.
- Click on Printer List.
- Next to the printer that you want to configure, click on View.
Note: You must pair a printer to the Eats365 POS first to be able to configure the printer on the Merchant Portal. To connect a printer to the POS, refer to Scan and pair a printer. - Under Supported Orders, select the order source that the printer can print. You can chooseeither:
- Print Order from All Sources - Print all supported orders regardless of source.
- Print general orders and user app or website’s orders separately - Configure the printer to print different ticket types depending on the source.
- Under Supported Printing Types, choose from the following types that you’d like your printer to perform. To configure the printer to print bills and receipts, place a check mark beside Bill/Receipt.
- At the top right, click on Save to confirm.
Once you’ve specified the supported printing types of the printer, the printer will then only accomplish a print job if it’s of a supported printing type.