All

Contact Us

If you still have questions or prefer to get help directly from an agent, please submit a request.
We’ll get back to you as soon as possible.

Please fill out the contact form below and we will reply as soon as possible.

    Login
English (US)
English (US)
Mandarin
Cantonese
  • Home

Hardware

All Product

Contact Us

If you still have questions or prefer to get help directly from an agent, please submit a request.
We’ll get back to you as soon as possible.

Please fill out the contact form below and we will reply as soon as possible.

      • List of compatible devices
      • Hardware Setup
      • Connect an iPad to a network
    • Network
        • Types of internet networks
    • POS System
        • Power on your Eats365 POS system
        • Set up and install the Eats365 POS app
    • Printer setup
        • Scan and pair a printer
        • Set up a Virtual Printer
        • Configure receipt printer with cash drawer
        • Configure kitchen printers for each kitchen station
        • Manage receipt printing settings
        • Configure printer to print expeditor tickets
        • Configure a receipt printer to print a Shift Report
        • Configure printing preferences for tables
        • Customize the Receipt Template
        • Manage Kitchen Ticket printing settings
        • Customize the Ticket Template
        • Customize the Label Template
        • Manage Expeditor Ticket printing and template settings
        • Manage Order Ticket printing and template settings
        • Manage Item Ticket printing settings
    • Barcode Configuration
        • Set up Embedded Barcodes

Table of Contents

Hardware Setup

Learn how to prepare the hardware you’ll need for your restaurant to use Eats365 POS.

To prepare your restaurant for using Eats365 Core and Expansion Modules, it is important to have the correct hardware setup to ensure efficient communication across all connected devices. There are a number of configuration options that you can use depending on your restaurant’s scale and needs. This article will guide you through the basic hardware, covering networking and cross-device connectivity.

What you need to get started

  • A stable internet connection with at least 10 Mbps download and 5 Mbps upload speeds
  • A modem
  • A router
  • Network cables to connect your devices to the same network
  • A compatible iPad unit secured to an iPad stand
  • iPad Ethernet adapter (for wired connection)
    Note: You can choose to use Wi-Fi and connect the iPad to the router wirelessly, however, it’s recommended to use an iPad Ethernet adapter to ensure that the POS terminal gets consistent connection to the router.
  • Compatible printers that can print Receipts and Kitchen Tickets
  • A cash drawer and its included cables
Delete

Tip: Depending on your restaurant’s size, Network Switches may be required to accommodate multiple hard-wired devices within the same local network. Alternatively, restaurants that prefer wireless connections may need multiple access points to ensure robust Wi-Fi performance and broader signal coverage.

The diagram below shows the basic setup for the network and hardware.

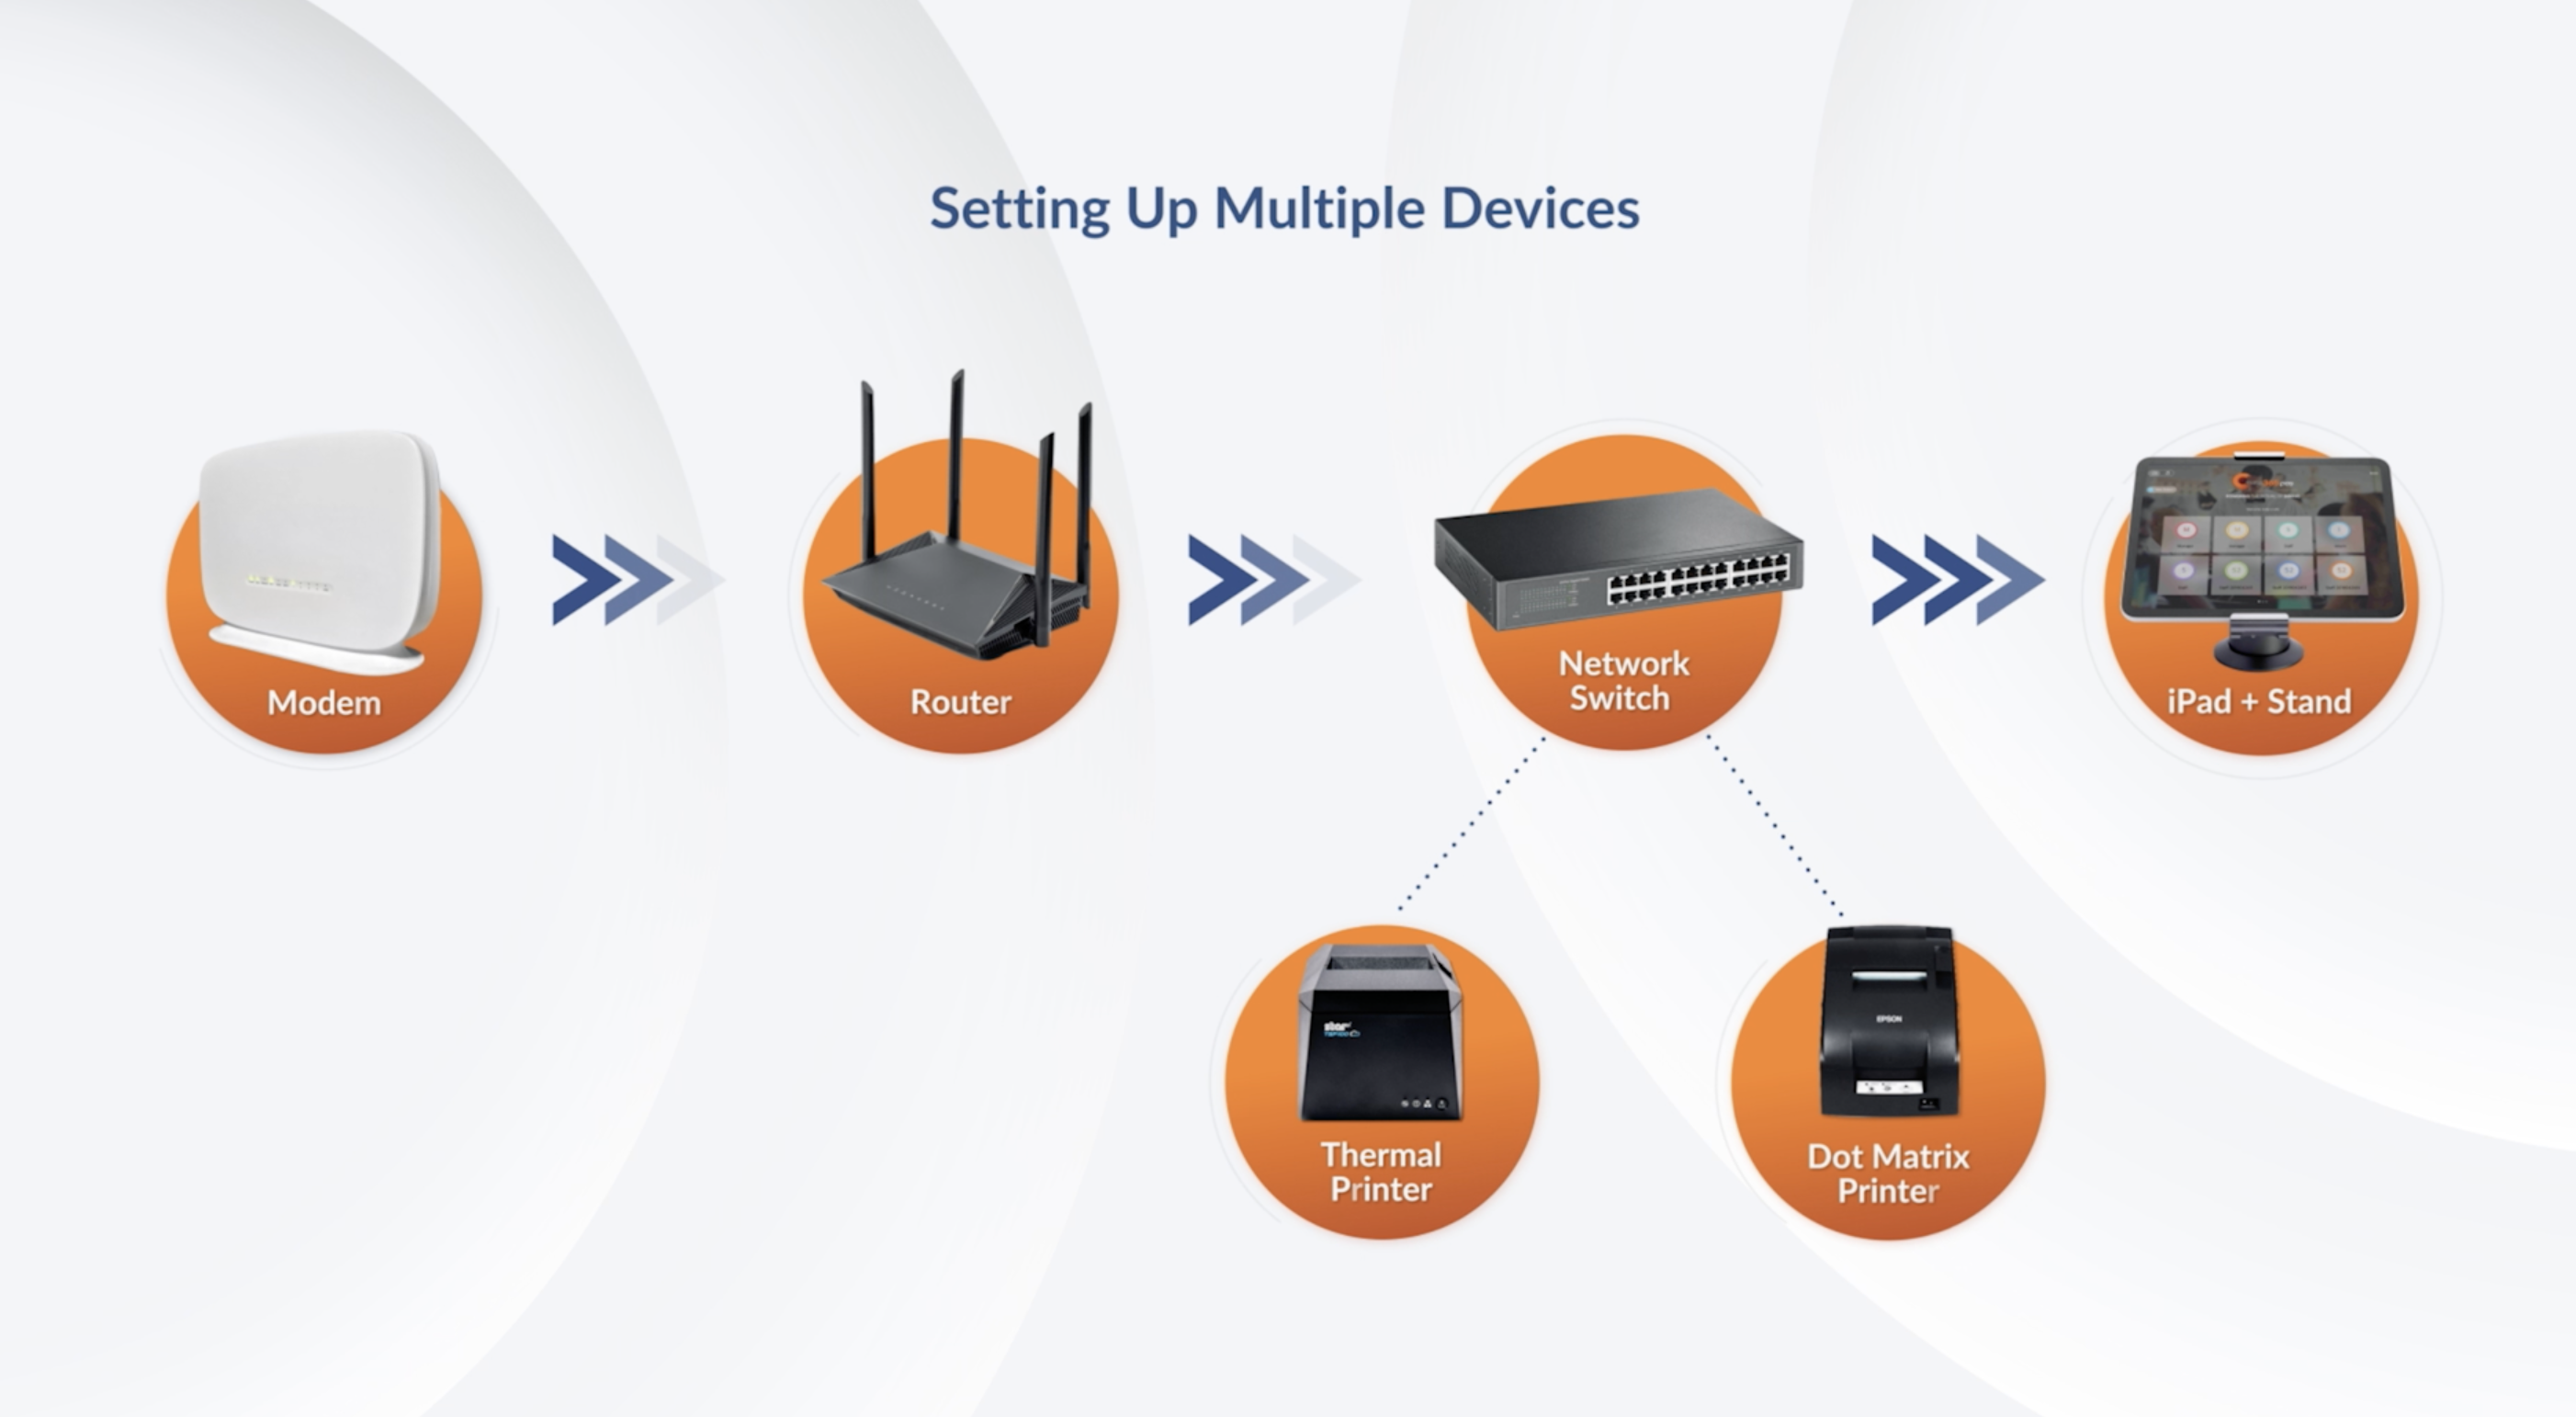
Connect your devices

To connect your devices to the same router, follow the steps below:
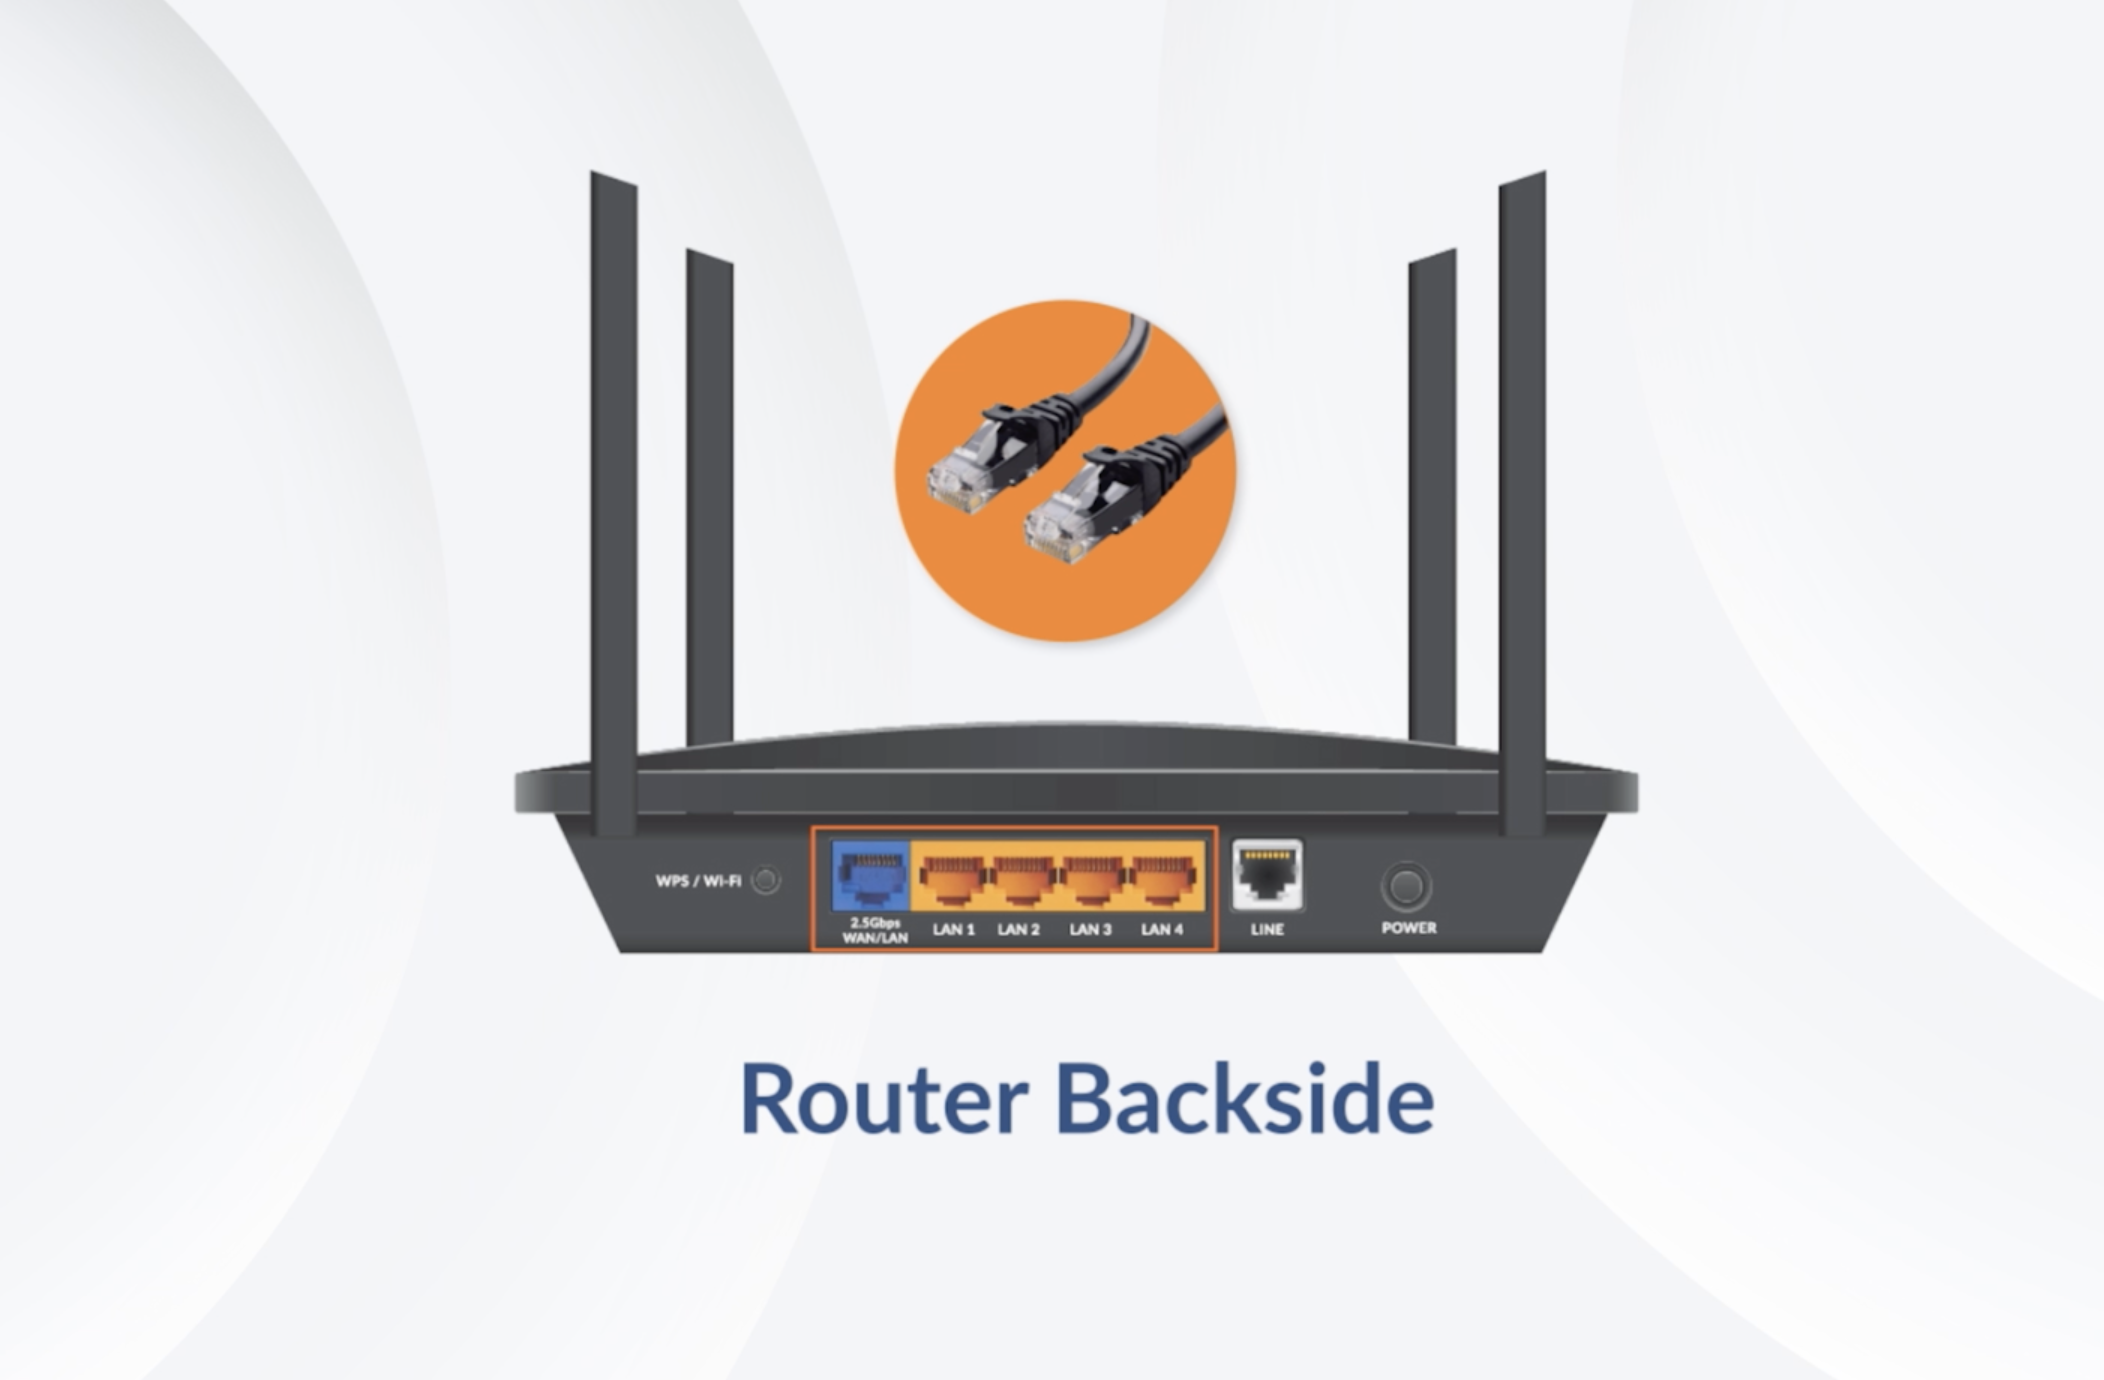
1. Set up router

Connect an Ethernet cable to the WAN or Internet port of your router. Then, connect the other end to the WAN or Internet port of the modem that was provided by your Internet Service Provider (ISP).


2. Create a Local Network

Wired connection

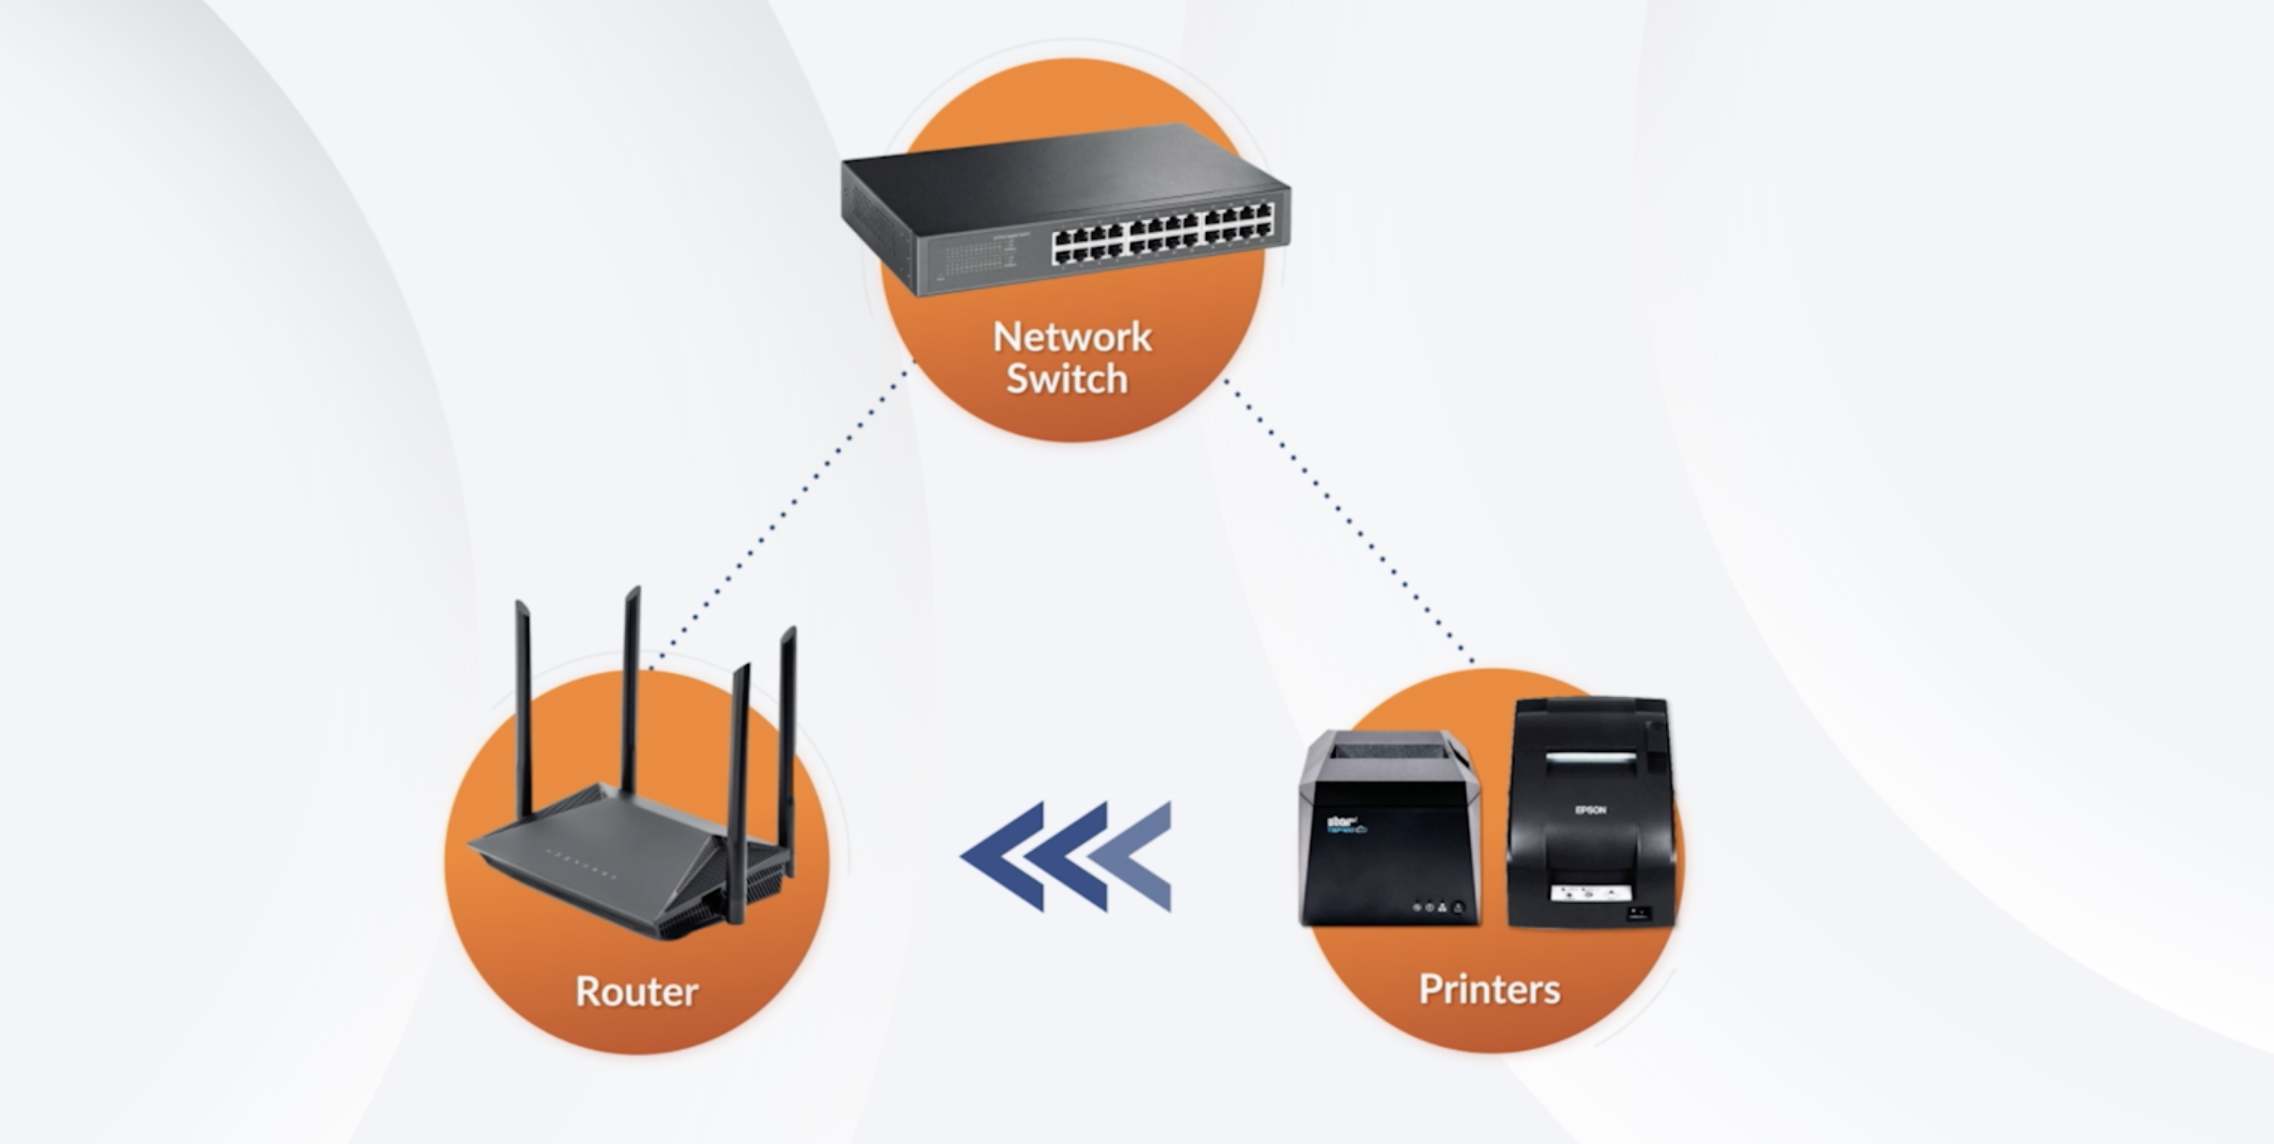
Ensure that there are sufficient Ethernet ports on your router to connect iPads, printers, and other supported connected devices. 

Additional Ports

Connect a Network Switch to the router using an Ethernet cable. 


Delete

Note: A standard router typically has a limited number of Ethernet ports. Network switches allow you to expand the number of Ethernet ports, enabling you to connect multiple devices and remain in the same local network.

Wireless connection

To connect devices wirelessly, you must have a supported Wi-Fi router. Some ISPs may provide all-in-one devices that would allow you to connect your devices to the Wi-Fi using the device provided by your ISP.

Delete

Important:

  • Wi-Fi Routers must be Wi-Fi 5 (802.11 ac) and up.
  • Larger establishments may require additional wireless access points to ensure robust Wi-Fi performance and broader signal coverage.
Delete

3. Connect an iPad to the router

The Eats365 POS on your iPad can work on both wireless and wired Ethernet connections. For further instructions, refer to Connect an iPad to the network.

iPad stand

If the POS is a stationary device, it’s recommended to use an iPad stand with your iPad for both convenience and functionality. For recommended iPad stands, refer to iPad Point of Sale & Secure Stands.
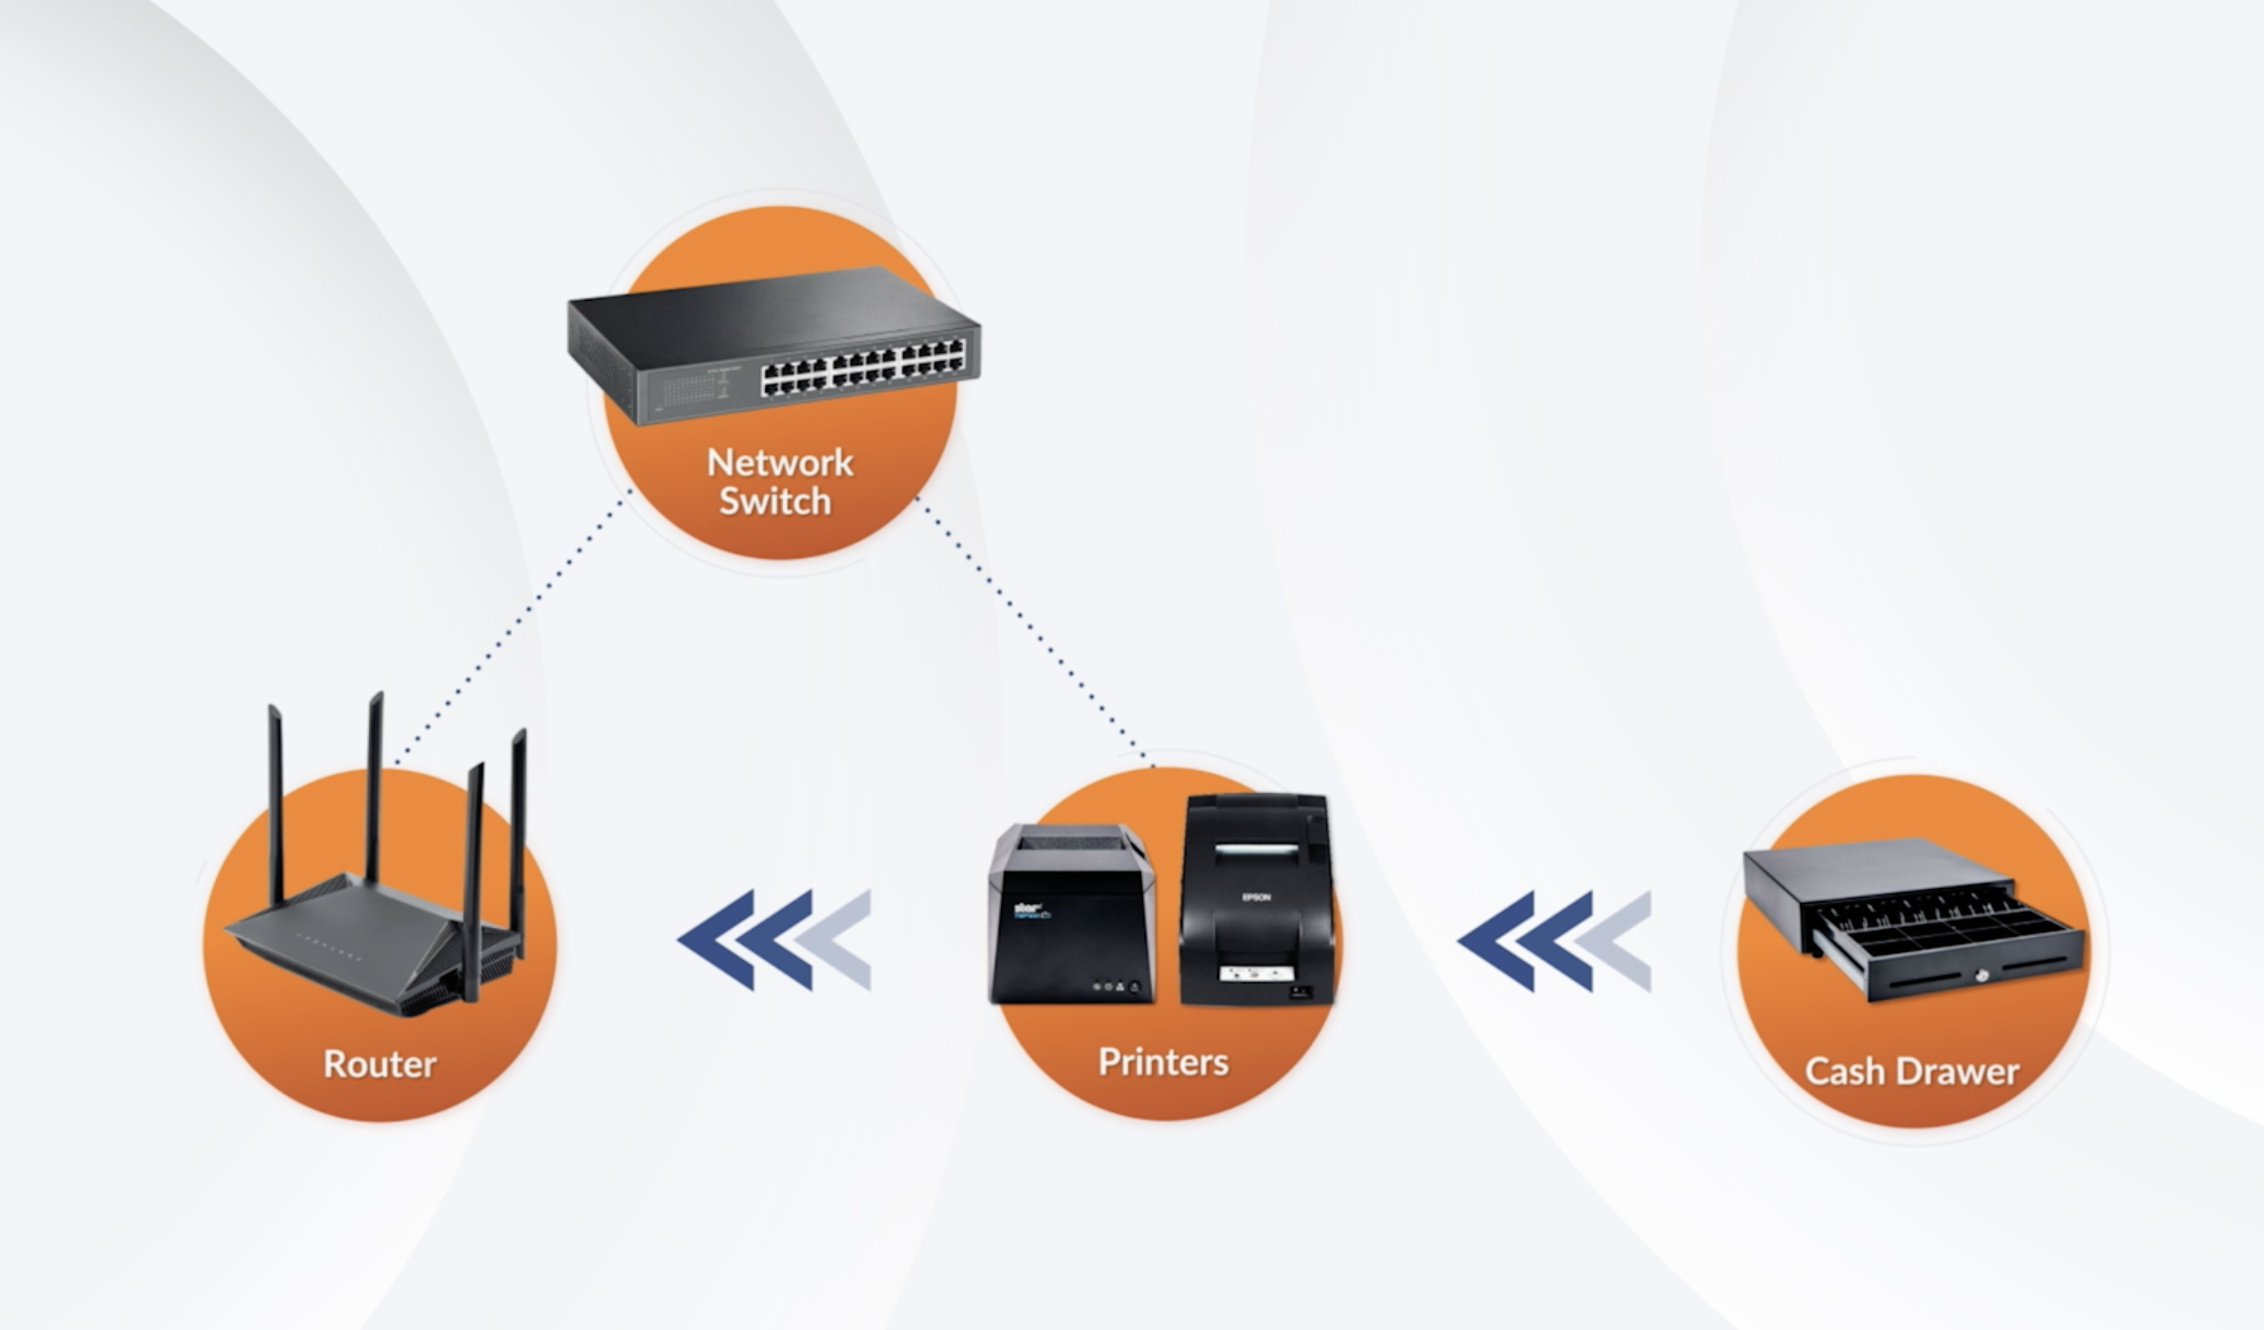

Delete

4. Set up a printer

Connect your printer to the router or network switch using an Ethernet cable. 


Delete

Tip: It’s recommended to have at least one printer to print receipts and one another to manage kitchen tickets.

Once your printer is set up and connected to the network, pair the printer to the POS. For further instructions, refer to Scan and pair a printer.

Configure printer preferences

You can set your printer to handle multiple jobs. For a list of different printer configurations, refer to the list below:

  • Configure a receipt printer with cash drawer
  • Configure a receipt printer for tables
  • Configure a receipt printer to print Shift Report
  • Configure Kitchen Printers for each Kitchen Station
  • Configure Kitchen Printer to print expeditor list
Delete

5. Connect a cash drawer to a receipt printer

Connect the cash drawer to the receipt printer using the cable that came with the cash drawer.


Once the POS is set up and the cash drawer is connected to the printer, you can set the cash drawer to automatically open whenever a cash payment is made. For further instructions, refer to Scan and pair a printer.

Delete
set up hardware connect devices connect to wifi router network connect cash drawer to internet internet connection basic setup

Was this article helpful?

Yes
No
Give feedback about this article

Related Articles

  • Connect an iPad to a network
  • List of compatible devices
  • Scan and pair a printer
  • Set up and install the Eats365 POS app
            • Products
              • POS
              • mPOS
              • Eats365 Biz
              • Eats365 Marketplace
              • Branded Online Store
              • Kitchen Display System
              • Expedite Display
              • Scan-to-Order (BYOD)
              • Self-Service Kiosk
              • PhotoMenu
              • Queue Kiosk
              • Dynamic Digital Menu
              • Queue Display
              • Pickup Display
              • Customer Facing Display
            • Solutions
              • Online Ordering
              • Contactless Dining
              • Front of House
              • Guest Retention
              • Back of House
              • Back Office (Store End)
              • Multi-brand/Location Management (Enterprise)
              • Paperless Operation Experience
              • Payment
            • Restaurant Types
              • Quick Service Restaurant
              • Full Service Restaurant
              • Bars
              • Food Court
              • Cloud Kitchen
              • Food Retail
              • Self-service Restaurant
              • Enterprise
              • All-You-Can Eat (Buffet)
            • Resources
              • Eats365 Knowledge Base
              • Blog
              • Supported Hardware
            • Company
              • About Us
              • Success Stories
              • Referrals
            • Get In Touch
            • Contact Us
              • Eats365, Inc.
              • Sales info@eats365.com
              • Support support@eats365.com
        • Contact Us
          • Eats365, Inc.
          • info@eats365.com
          • www.eats365pos.com
        • Get In Touch
          • Apple Mobility Partner
            twitter facebook eats365 linkedin
        • eats365
          © 2023 Eats365 Incorporated. All rights reserved.

Knowledge Base Software powered by Helpjuice

Expand