 Eats365 Products
 Merchant Guide
 Modules
 Membership
 Integrations
 Hardware
 Staff Operations
 Roles & Permissions
 Payments
 Reports
 What’s New
 Release Notes
 Troubleshooting
 Simulators
 Glossary
 Troubleshooter
 System Status
Barcode Configuration
Table of Contents
Set up Embedded Barcodes
Learn how to set, embed, and use barcodes with the Eats365 POS.
An "Embedded Barcode" is a scannable label that contains the barcode’s pre-set information. Embedded barcodes can be generated with a Label Printing Scale, which weighs items and prints out barcodes containing details about the item’s price or quantity.
The information encoded within a barcode determines the final price of an item. For example, you can set an item to be priced by weight, so that when the barcode is scanned, the price will automatically be calculated based on the item’s weight. When embedded barcodes are scanned, the POS adds the corresponding item to the order automatically.
Embedded Barcodes are most applicable to restaurants that offer items with variable prices. For example, if your restaurant offers fresh seafood that’s priced by weight, having Embedded Barcodes will allow you to have an individual barcode for each seafood item that contains the necessary information to calculate the price of the item during order-taking.
In this article, you’ll learn the components of a barcode and how to set up Embedded Barcodes.
Embedded Barcode information
Type
Eats365 supports the following Embedded Barcode types:
- EAN-13 - Contains 13 digits. The first two digits can be 02 or 20.
- UPC-A - Contains 12 digits. The first digit is 2.
Structure
EAN-13 and UPC-A Embedded Barcodes use the following layouts:
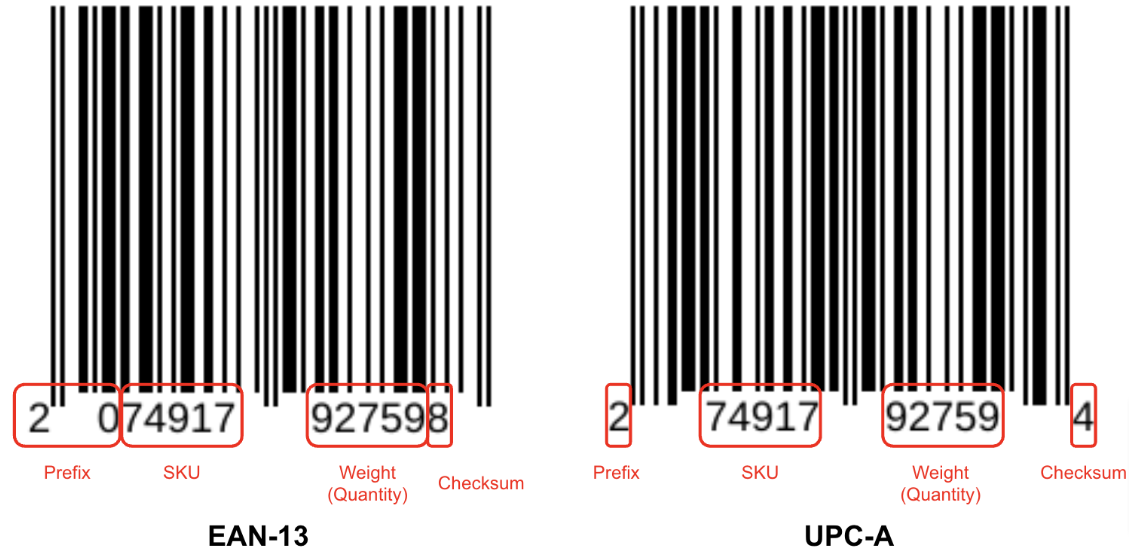
- Prefix determines the type of barcode.
-
Stock Keeping Unit (SKU) is the unique number that is assigned to menu items.
Tip: For instructions on how to assign an SKU to a menu item, refer to Set up and manage a Single Item. - Weight (Quantity) is the weight in grams or quantity amount generated by a Label Printing Scale.
- Checksum is a system-generated number that validates a barcode’s integrity.
Before you begin
To properly use Embedded Barcodes, make sure to assign the correct permissions to the appropriate roles and configure menu items with the preferred pricing methods.
Grant staff permissions
To allow Embedded Barcodes for specific roles, follow the steps below:
Eats365 POS
- Log in to the Eats365 POS.
- At the top left, tap Settings
 .
. - Under "Users and Permissions," tap Role Permission, then select the role that you’d like to allow to manage embedded barcodes for the POS.

- Under "Settings Permission," turn on Barcode Configuration
 .
.
- At the top right, tap Update to confirm.
Merchant Portal (Classic Theme)
- Log in to the Merchant Portal.
- On the left panel, click on Staff. Then, select POS Roles.
- Next to the role that you want to edit, click on Edit
 .
. - Under "Setting Permission," turn on Embedded Barcode
 .
. - At the bottom, click on Save to confirm.
Merchant Portal 2.0
- Log in to the Merchant Portal.
- On the left panel, click on Staff. Then, select POS Roles.
- Click on the role that you want to edit. Alternatively, next to the role that you want to edit, you can click on Edit
 .
.
- Under "Setting Permission," turn on Barcode Configuration
 .
.
- Click on Save to confirm.
Configure an item’s pricing method
To set a menu item’s price by weight or by unit price, follow the steps below:
Eats365 POS
- Log in to the Eats365 POS.
- At the top left, tap Settings .
- Under "General," tap Menu Setup. Then, tap Item.
- To modify an existing menu item, tap a menu item that you’d like to modify. To create a new menu item, at the top right, tap Add Item.

- In the "General" tab, ensure that the menu item follows a 5-digit minimum Product Code (SKU).

- Under "Availability & Price," tap the Pricing Method drop-down menu. Then, choose from the following Embedded Barcode options:
-
Priced by embedded barcode (weight)

- Set the Unit of Measurement, followed by its base value.
- Set the Unit Price for Dine-In and Takeout.
Note: The price you set determines the base price that the POS will use to calculate the final price of an item based on its weight. For example, you can set the price by weight to $10 for 1kg. If the item reaches 2kg, then the final item price would be $20.
-
Priced by embedded barcode (price)

- Set the Unit of Measurement, followed by its base value.
- Set the Unit Price for Dine-In and Takeout.
Note:- The price you set determines the base price that the POS will use to calculate the weight of an item. When price by barcode (amount) is selected, you’ll be prompted to enter the item price on the POS. For example, you can set the price of the item to $10 for 1kg. If you enter the item price as $100, the POS will show the item weight as 10kg.
- If you leave Unit Price
 off, the Unit of Measurement and Unit Price won’t show on the order.
-
Priced by embedded barcode (weight)
- If you’re modifying an existing menu item, at the top right, tap Update to confirm. If you’re creating a new menu item, at the top right, tap Save to confirm.
Merchant Portal (Classic Theme)
- Log in to the Merchant Portal.
- On the left panel, click on Menu Setup.
- Select Item, then select Dine-in & Takeout or Catering.
- To modify an existing menu item, next to the item you’d like to edit, click on Edit . To create a new menu item, at the top right, click on + Single Item.
- In the "General" tab, ensure that the menu item follows a 5-digit minimum Product Code (SKU).
- Under "Availability & Price," click on the Pricing Method drop-down menu. Then, choose from the following Embedded Barcode options:
-
By Barcode (Weight)
- Next to "UoM," set the Unit of Measurement, followed by its base value.
- Set the Unit Price for Dine-In and Takeout.
Note: The price you set determines the base price that the POS will use to calculate the final price of an item based on its weight. For example, you can set the price by weight to $10 for 1kg. If the item reaches 2kg, then the final item price would be $20.
-
By Barcode (Amount)
- Next to "UoM," set the Unit of Measurement, followed by its base value.
- Set the Unit Price for Dine-In and Takeout.
Note:- The price you set determines the base price that the POS will use to calculate the weight of an item. When price by barcode (amount) is selected, you’ll be prompted to enter the item price on the POS. For example, you can set the price of the item to $10 for 1kg. If you enter the item price as $100, the POS will show the item weight as 10kg.
- If you leave Unit Price off, the Unit of Measurement and Unit Price won’t show on the order.
-
By Barcode (Weight)
- At the top right, click on Save to confirm.
Merchant Portal 2.0
- Log in to the Merchant Portal.
- On the left panel, click on Menu Setup, then select Item.
- To modify an existing menu item, next to the item you’d like to edit, click on Edit
 . To create a new menu item, at the top right, click on + Single Item.
- In the "General" tab, ensure that the menu item follows a 5-digit minimum Product Code (SKU).

- Under "Availability & Price," click on the Pricing Method drop-down menu. Then, choose from the following Embedded Barcode options:
-
By Barcode (Weight)

- Next to "UoM," set the Unit of Measurement, followed by its base value.
- Set the Unit Price for Dine-In and Takeout.
Note: The price you set determines the base price that the POS will use to calculate the final price of an item based on its weight. For example, you can set the price by weight to $10 for 1kg. If the item reaches 2kg, then the final item price would be $20.
-
By Barcode (Amount)

- Next to "UoM," set the Unit of Measurement, followed by its base value.
- Set the Unit Price for Dine-In and Takeout.
Note:- The price you set determines the base price that the POS will use to calculate the weight of an item. When price by barcode (amount) is selected, you’ll be prompted to enter the item price on the POS. For example, you can set the price of the item to $10 for 1kg. If you enter the item price as $100, the POS will show the item weight as 10kg.
- If you leave Unit Price off, the Unit of Measurement and Unit Price won’t show on the order.
-
By Barcode (Weight)
- At the top right, click on Save to confirm.
Enable Embedded Barcodes
To enable Embedded Barcodes, follow the steps below:
Eats365 POS
- Log in to the Eats365 POS.
- At the top left, tap Settings .
- Under "Advanced Settings," tap Barcode Configuration. Then, turn on Enable Embedded Barcode .

- Based on your restaurant operations, you can enable the following Embedded Barcode options:
 Note: You can skip configuring an Embedded Barcode option if it doesn’t apply to your restaurant.
- Embedded Barcode in Weight
- Embedded Barcode in Price
- If the Label Printing Scale generates barcodes that include Delimiters, turn on Has delimiter .
 Note: Some Label Printing Scales use delimiters when generating barcodes. Delimiters disregard the first numerical value for Weight (Quantity). Refer to the Label Printing Scale’s settings or contact the manufacturer to confirm if delimiters are being used. For example, weight with the value 19502 can be represented by:
- Without delimiter: 19502
- With delimiter: 9502
- Choose the rounding method by tapping on the Round to the Nearest drop-down menu. The rounding method moves the decimal point to the left. For example, the options to Round to the Nearest:

- 1 = 19,502
- 0.1 = 1,950.2
- 0.01 = 195.02
- 0.001 = 19.502
Note: The 0.001 rounding option is only available for Embedded Barcode in Weight.
- Tap Back
 to return to the previous screen.
- At the top right, tap Save to confirm.
Merchant Portal 2.0
- Log in to the Merchant Portal.
- On the left panel, click on Advanced Settings, then select Barcode Configuration.
- Enable Embedded Barcode .

- Based on your restaurant operations, you can enable the following Embedded Barcode options:
 Note: You can skip configuring an Embedded Barcode option if it doesn’t apply to your restaurant.
- Embedded Barcode (Weight)
- Embedded Barcode (Price)
- If the Label Printing Scale generates barcodes that include Delimiters, turn on Has delimiter .
 Note: Some Label Printing Scales use delimiters when generating barcodes. Delimiters disregard the first numerical value for Weight (Quantity). Refer to the Label Printing Scale’s settings or contact the manufacturer to confirm if delimiters are being used. For example, weight with the value 19502 can be represented by:
- Without delimiter: 19502
- With delimiter: 9502
- Choose the rounding method by tapping on the Round to the Nearest drop-down. The rounding method moves the decimal point to the left. For example, the options to Round to the Nearest:

- 1 = 19,502
- 0.1 = 1,950.2
- 0.01 = 195.02
- 0.001 = 19.502
Note: The 0.001 rounding option is only available for Embedded Barcode in Weight.
- At the top right, click on Save to confirm.
Once Embedded Barcodes have been configured, you can scan the barcodes to add their corresponding items to an order.
Scan embedded barcodes on the POS
To add items to an order using embedded barcodes, on the order-taking screen, scan the item’s barcode using the barcode scanner that’s connected to the POS. Depending on your configured Embedded Barcode settings, you may need to put additional information such as the weight of the ordered item. Once the item is successfully recognized through the barcode, it should be added to the order.