 Eats365 Products
 Merchant Guide
 Modules
 Membership
 Integrations
 Hardware
 Staff Operations
 Roles & Permissions
 Payments
 Reports
 What’s New
 Release Notes
 Troubleshooting
 Simulators
 Glossary
 Troubleshooter
 System Status
Menu Setup
Table of Contents
Set up and manage a Single Item (Full Service)
Learn how to create and manage single items for Full Service restaurants on the Eats365 POS or on the Merchant Portal.
“Single Items” refer to the individual items that you offer on your menu. These single items can be listed on the menu as “à la carte” items, or can be combined with other single items to create combo options.
In this article, you’ll learn how to create and manage single items for dine-in and takeout orders on the Eats365 POS and the Merchant Portal.
Add a single item
To create an item, follow the steps below:
Eats365 POS
- Log in to the Eats365 POS.
-
At the top left, tap Settings
 .
.
- Under "General," tap Menu Setup, then select Item.
-
At the top right, tap Add Item.

-
Select Single Item as the "Item Type."
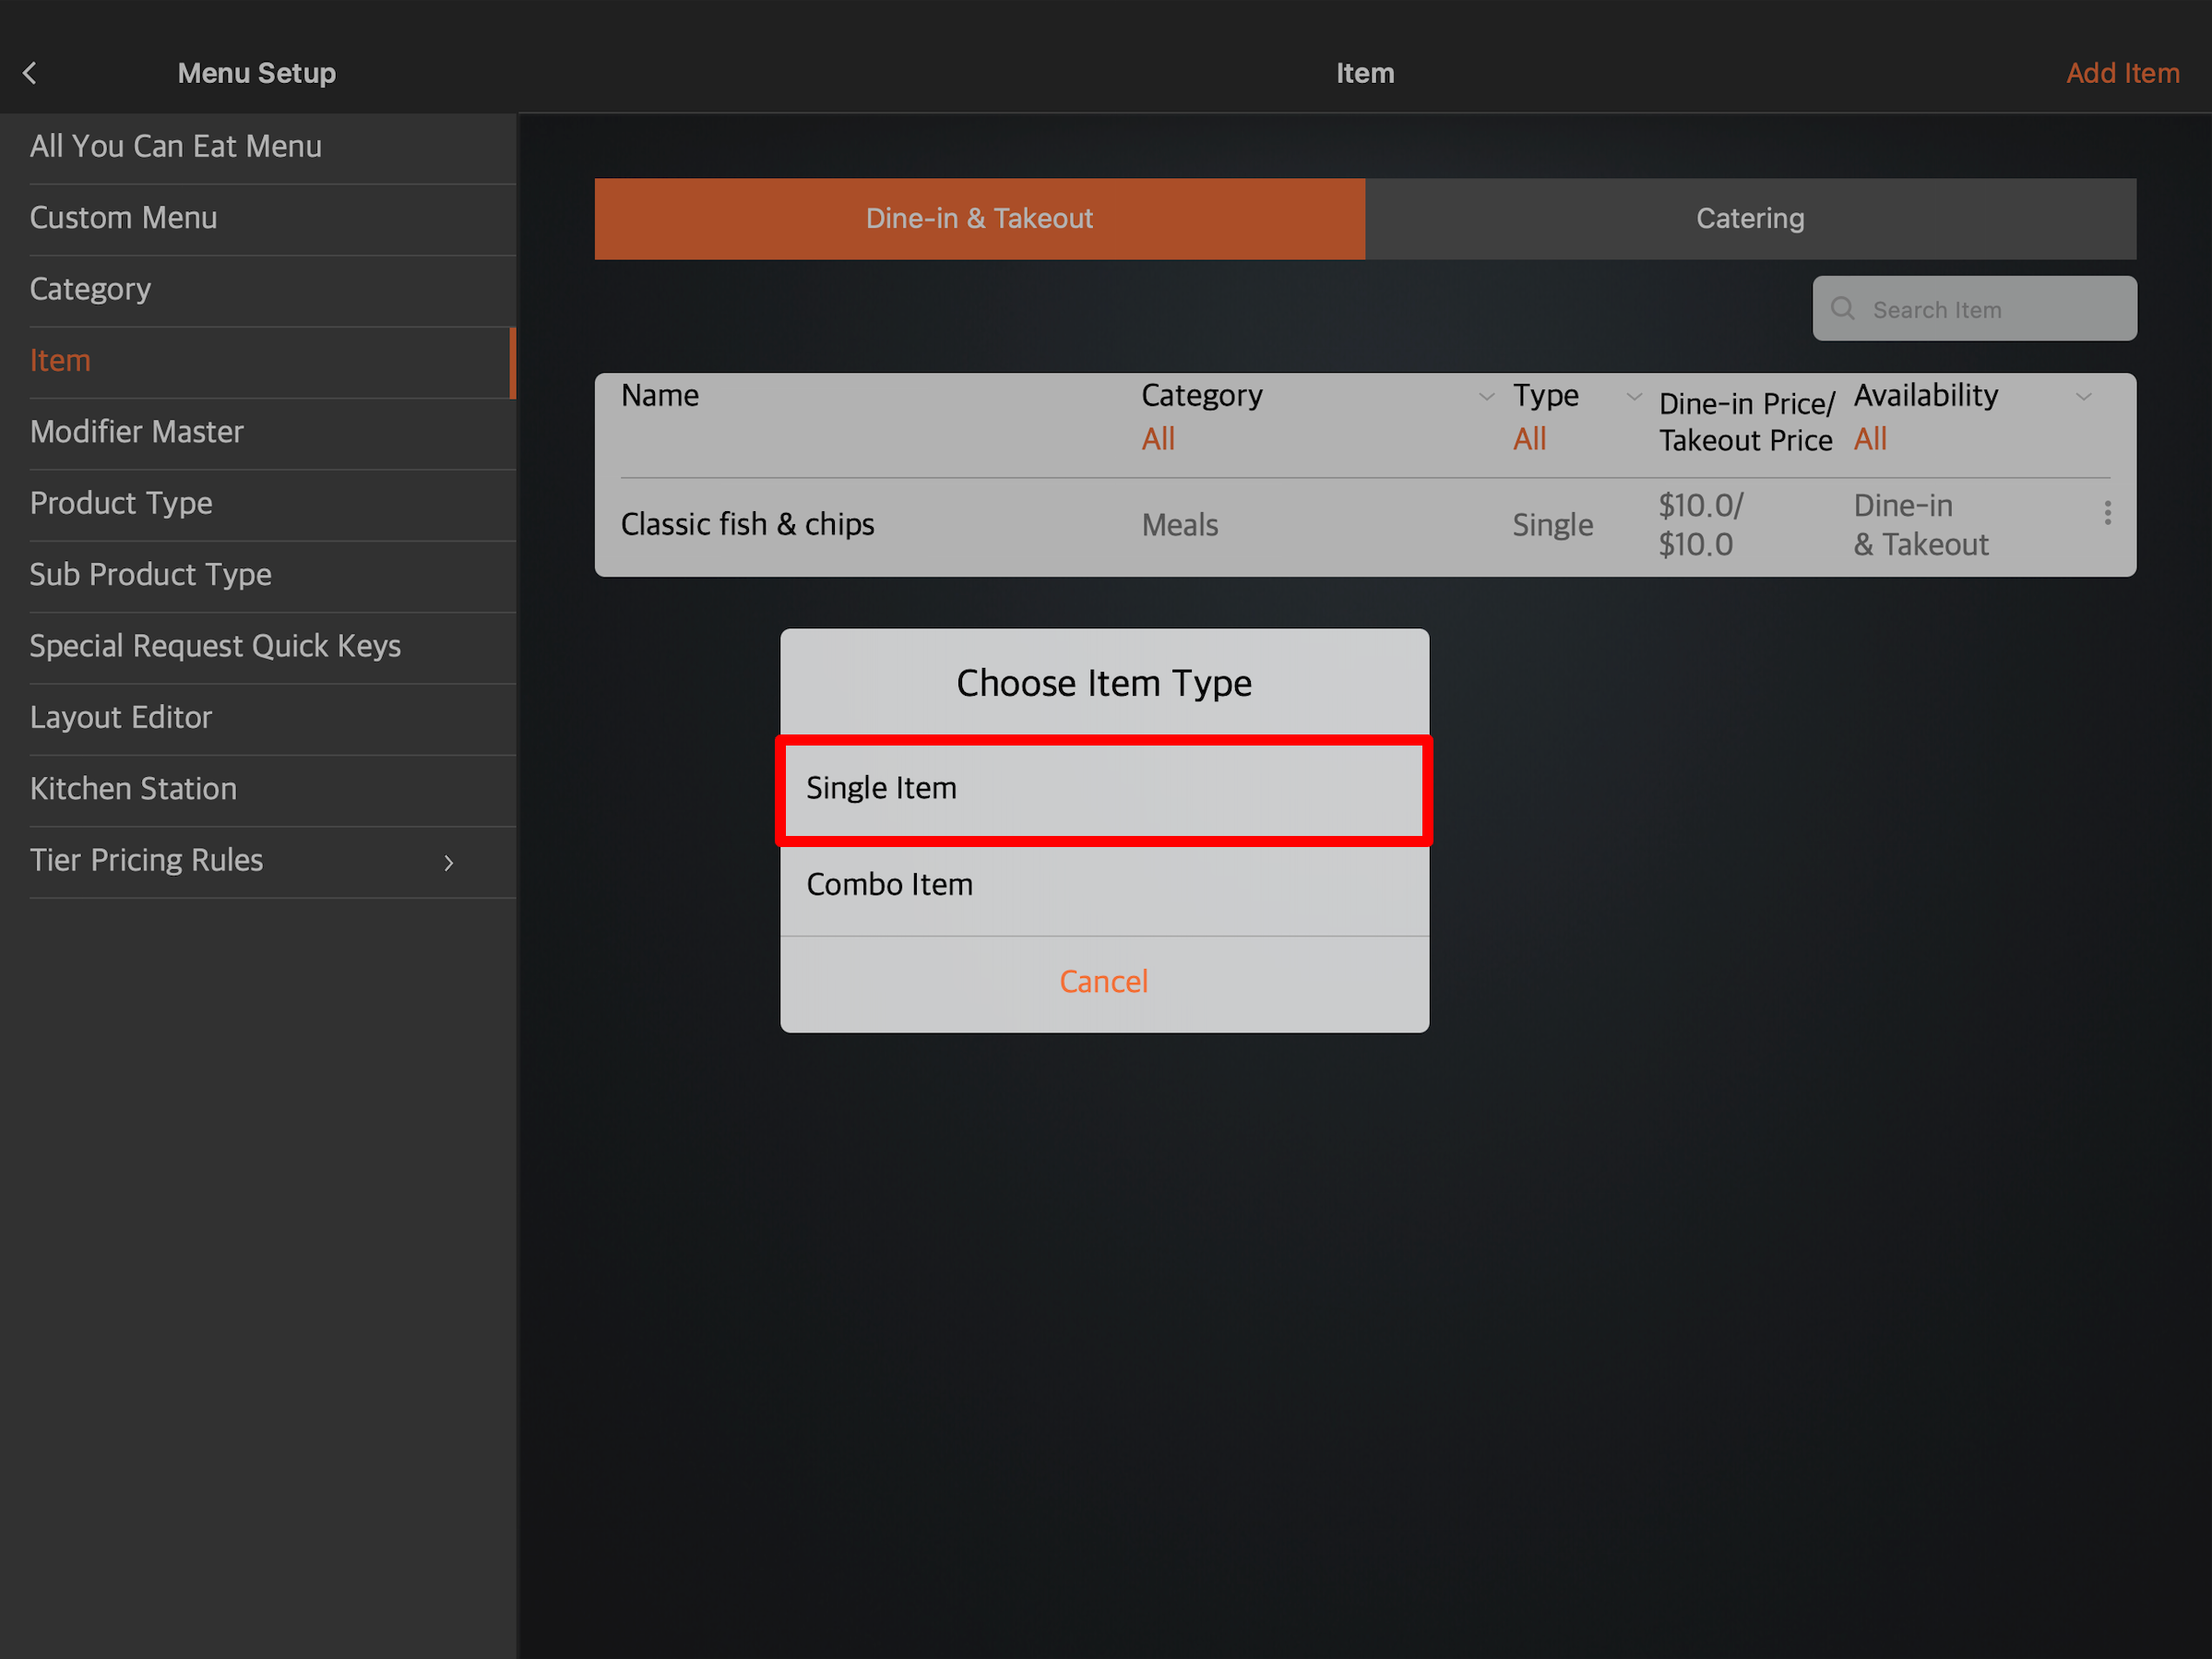
- Enter the single item’s information and configure your preferred settings.
- At the top right, tap Save to confirm.
You can add the single item’s information or change these settings on the POS:
General
Upload image
Upload an image of the item.
Language
Set the language for the menu item.

Type
Select the type of item that you want to create. To create a single item, select Single Item.
Name
Enter the item name.
Description (Optional)
Add a description of the item.
Simplified Name
Create a simplified name for the item. Simplified names are used when printing on kitchen tickets.
Product Type
Select the product type to which the item belongs.
Sub Product Type
Select the sub product type to which the item belongs.
Tax Group
Add a tax group to the item.
Category
Select the category to which the item belongs.
Course
Select the course to which the item belongs.
Product Code (SKU)
Assign a specific product code to the item. The product code is generally used for system integrations such as for ERP and Inventory System integrations. System reports can also group items from different restaurant branches with the same product code as the same item for consolidated analysis.
Item Code
Assign a specific item code to the item. The item code can be used to add the item to an order.
Item Barcode
Add the item’s barcode. When an item has a Global Trade Item Number (GTIN) item barcode on its packaging, input the value of that barcode in this setting.
Reporting ID
Assign a specific reporting ID to the item. This allows the system to group items with same reporting ID as the same item for consolidated analysis.
Excluded from Discount
Enable this setting to restrict applying any discount to this item.
Waive Service Charge
Enable this setting to restrict applying service charge to this item by default.
Exempt Order Surcharge
Enable this setting to restrict applying surcharge to this item by default.
All You Can Eat Menu Item
Enable this setting to make the item only appear when the POS is in “All You Can Eat Mode.”
Non Sales Item
Enable this setting to include non-sales items in various reports under the “Non Sales Summary” section.
Available Date
Select the start and end date for the availability of the item.
Dining Type
Select the dining type where the item becomes available.
Available for
Select if you want the item to be available for dine-in, takeout, or both.
Next Operation Period Pre-Order
Enable this setting to make the item available for next operation period pre-order.
Pricing Method
Choose how you want the item to be priced. You can choose from the following pricing methods:
-
Fixed Price - This is the most common pricing method, where you set a specific price for an item. For example, a cup of coffee might be priced at $3.00, or a slice of pizza at $4.50. This option is suitable for items with consistent pricing.

-
Priced in Shop - This option allows for greater flexibility, enabling your staff to manually enter the price of an item during the order process. This is useful for items with variable pricing, such as seasonal ingredients like fruits or seafood like lobsters.

-
Priced by embedded barcode (weight) - This option is suitable for items sold by weight, such as meats, cheeses, or bulk goods. The system calculates the final price by multiplying the item’s weight by a predefined “Unit Price”. For example, if deli meat is priced at $15 per kilogram, a customer purchasing 0.75 kg would be charged $11.25.

-
Priced by embedded barcode (price) - This option is suitable for items with embedded barcodes that contain price information. The system calculates the final price by dividing the “Item Amount” encoded in the barcode by the “Unit Price.” This is commonly used for pre-packaged items with variable quantities, such as a bag of apples where the price is determined by the number of apples in the bag.

List Price
Set how much you want to sell the item. You can set different prices for dine-in and takeout.
Tier Prices
Adjust the price of your menu items depending on set conditions such as the time, day, membership plans, or third-party delivery integrations. For more information, refer to Set up and manage Tier Pricing Rules.
Include in Combo Items
Select the combo option where you want the item to be included.
DeleteAdditional Details
Cost
Add the cost of the item’s raw materials.
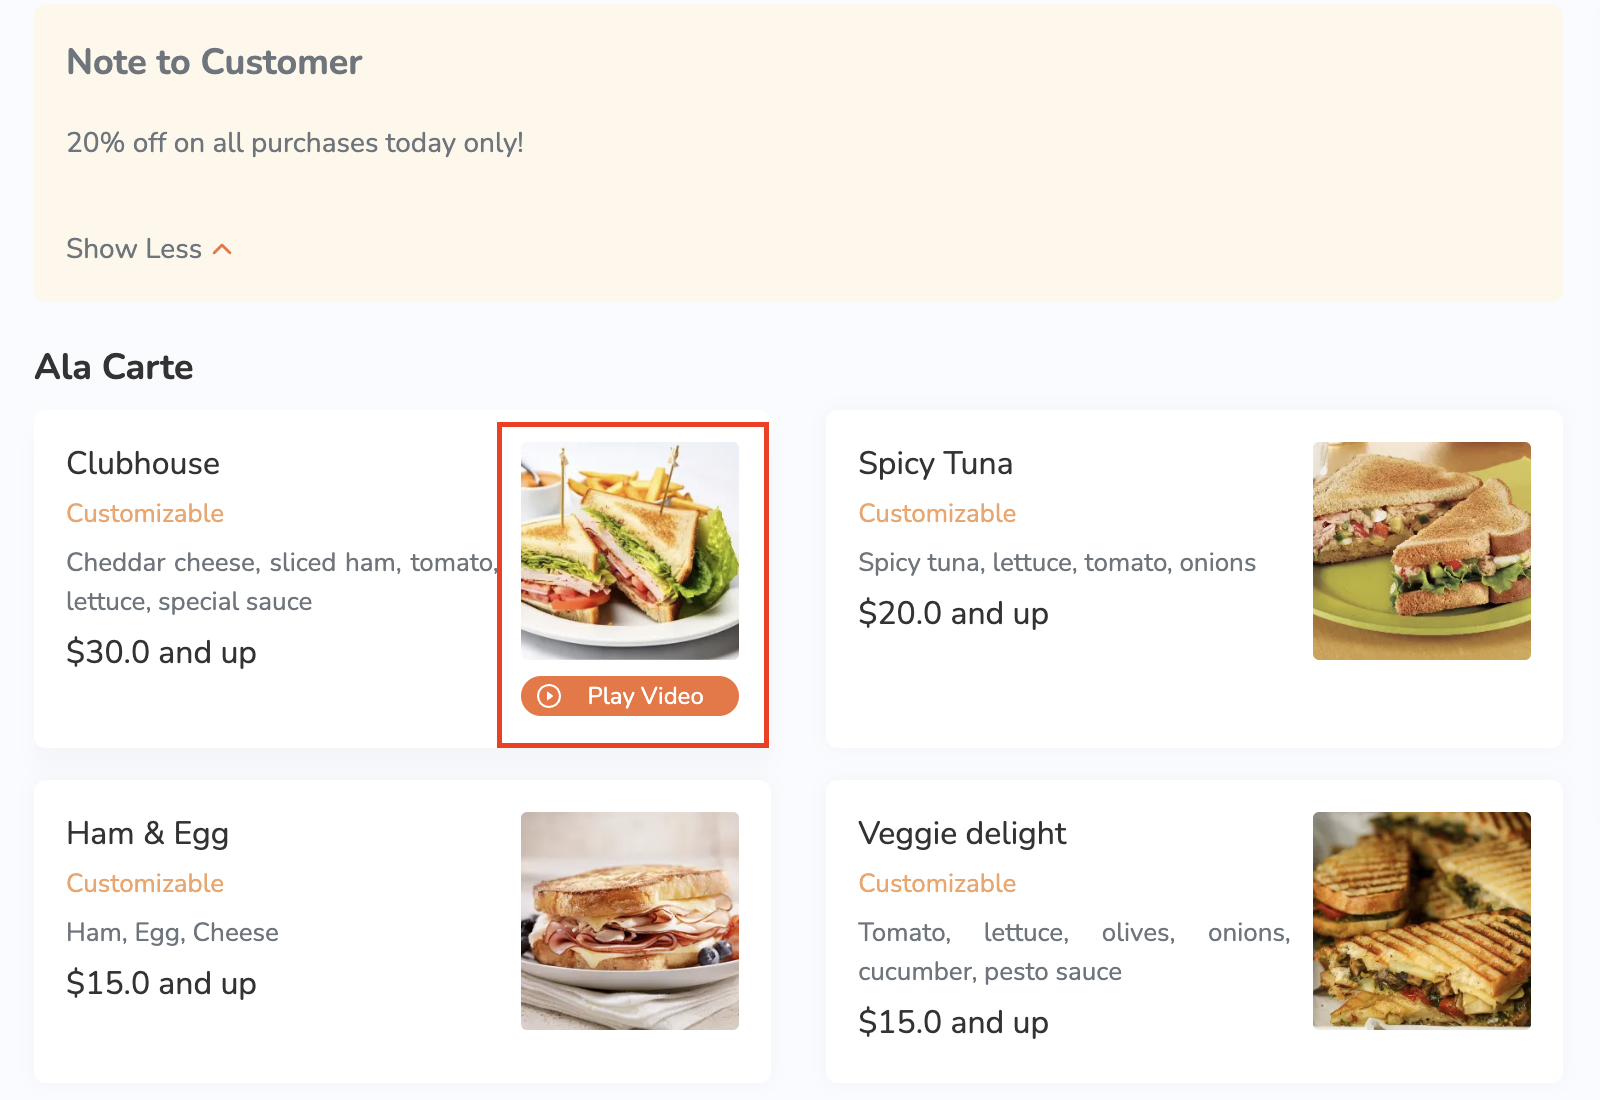
Recommended
Select Yes to make the item appear as a promoted item on various Eats365 modules.
Inventory Tracking
Enable this setting to limit the number of items to be sold. The item appears as “Sold Out” in the POS when the item quantity reaches zero.
Print to Kitchen
Select Yes to print the item on the printer located in the kitchen station you set.
Kitchen Station
Assign the item to a kitchen station. This setting determines which kitchen printer the item gets printed on.
Category’s Permission
View the permissions set on the category where the item is assigned.
Access Permission
Enable or disable access from applications.
Website Permission
Enable or disable access to the following service types from the Branded Online Store.
- Dine-In
- Takeout
- Delivery
Role Access Permission
Enable or disable item access for different staff roles.
DeleteMerchant Portal 2.0
- Log in to the Merchant Portal.
- On the left panel, click on Menu Setup, then select Item.
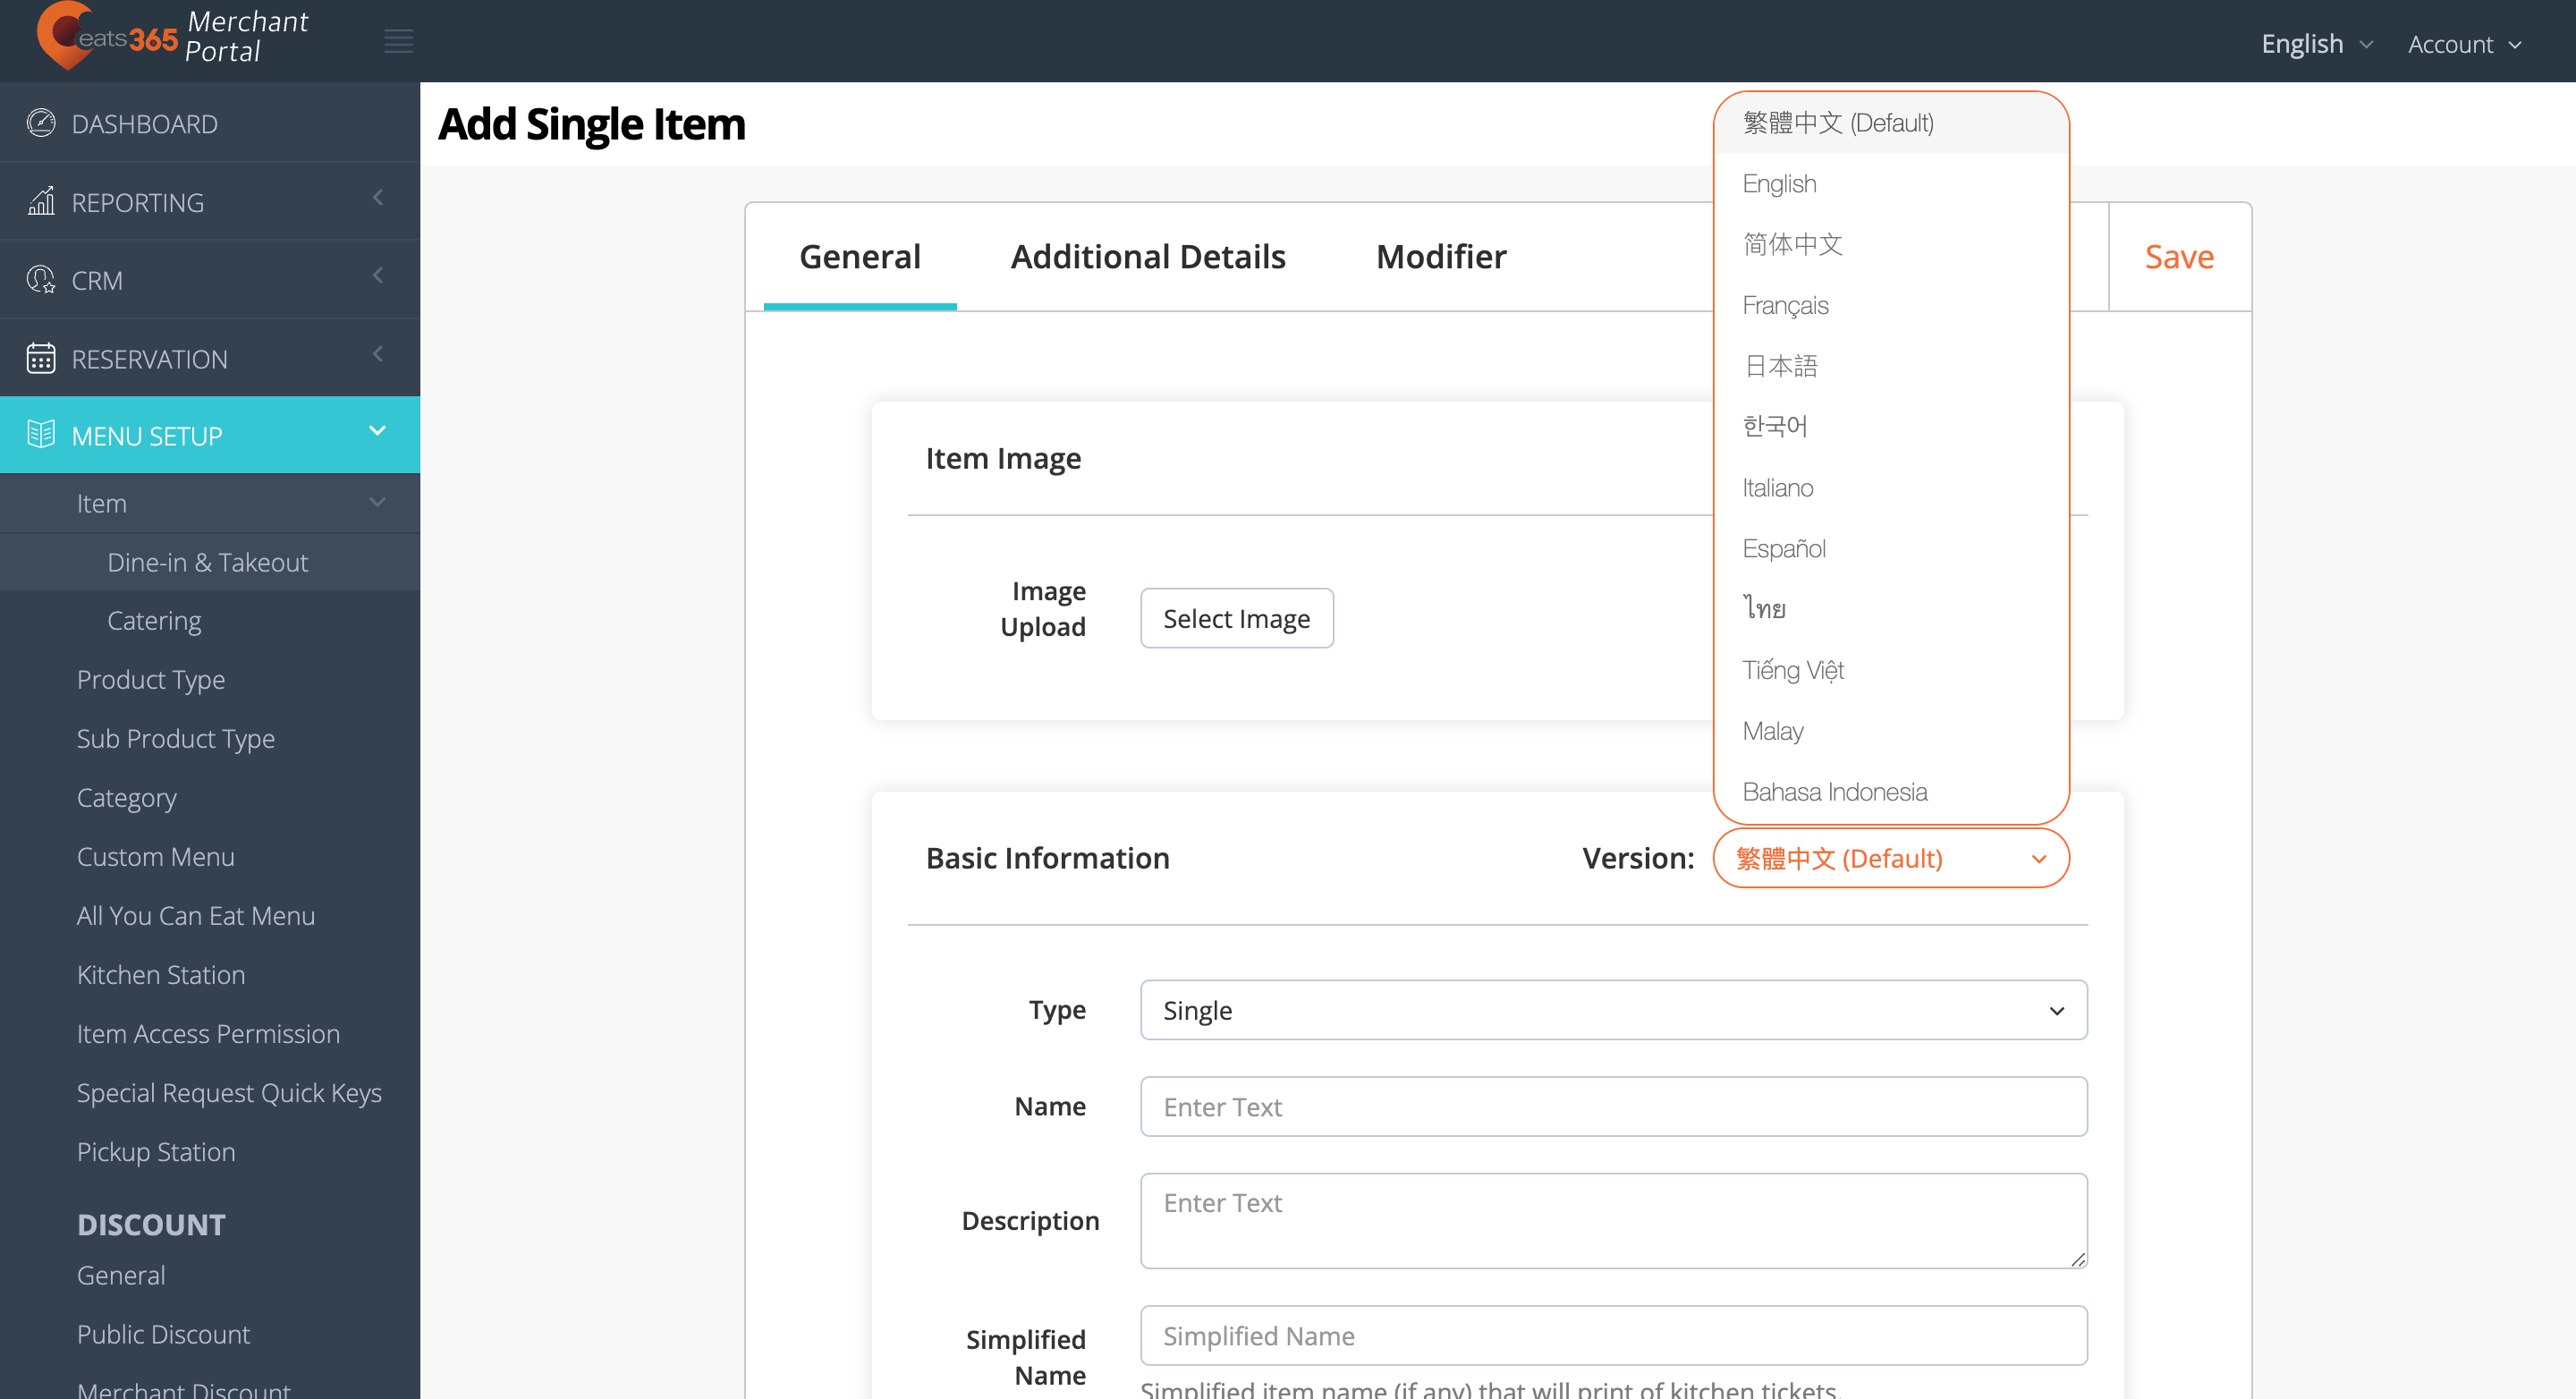
- At the top right, click on +Single Item.

- Enter the single item’s information and configure your preferred settings.
- At the top right, click on Save to confirm.
You can add the single item’s information or change these settings on the Merchant Portal:
General
Item image
Upload an image of the item.
Item Details Page Media
Upload multiple images or a video that will appear on the branded online store.
Type
Select the type of item that you want to create. To create a single item, select Single Item.
Name
Enter the item name per language.
Description
Enter the item description per language.
Simplified Name
Create a simplified name for the item. Simplified names are used when printing kitchen tickets.
Product Type
Select the product type to which the item belongs.
Sub Product Type
Select the sub product type to which the item belongs.
Tax Group
Add a tax group to the item.
Category
Select the category to which the item belongs.
Course
Select the course to which the item belongs.
Product Code (SKU)
Assign a specific product code to the item. The product code is generally used for system integrations such as for ERP and Inventory System integrations. System reports can also group items from different restaurant branches with the same product code as the same item for consolidated analysis.
Item Barcode
Add the item’s barcode. When an item has a Global Trade Item Number (GTIN) item barcode on its packaging, input the value of that barcode in this setting.
Item Code
Assign a specific item code to the item. The item code can be used to add the item to an order.
Item Code (Reporting)
Set a specific reporting ID to the item. This allows the system to group items with same reporting ID as the same item for consolidated analysis.
Exclude from Discount
When turned on, you won’t be able to apply any discount to the item.
Exempt Service Charge
When turned on, service charge won't apply to the item by default.
Exempt Order Surcharge
Enable this setting to restrict applying surcharge to this item by default.
Available Date
Select the Start and End date for the availability of the item.
Available For
Select if you want the Item to be available for Dine-In, Takeout, or both.
All You Can Eat Menu Item
Enable this setting to make the item only appear when the POS is in “All You Can Eat Mode.”
Non Sales
Enable this setting to include non-sales items in various reports under the “Non Sales Summary” section.
Next Operation Period Pre-Order
Enable this setting to make the item available for next operation period pre-order.
Pricing Method
Choose how you want the item to be priced. You can choose from the following pricing methods:
-
Fixed Price - This is the most common pricing method, where you set a specific price for an item. For example, a cup of coffee might be priced at $3.00, or a slice of pizza at $4.50. This option is suitable for items with consistent pricing.
-
Priced in Shop - This option allows for greater flexibility, enabling your staff to manually enter the price of an item during the order process. This is useful for items with variable pricing, such as seasonal ingredients like fruits or seafood like lobsters.
-
By Barcode (weight) - This option is suitable for items sold by weight, such as meats, cheeses, or bulk goods. The system calculates the final price by multiplying the item’s weight by a predefined “Unit Price”. For example, if deli meat is priced at $15 per kilogram, a customer purchasing 0.75 kg would be charged $11.25.
-
By Barcode (amount) - This option is suitable for items with embedded barcodes that contain price information. The system calculates the final price by dividing the “Item Amount” encoded in the barcode by the “Unit Price.” This is commonly used for pre-packaged items with variable quantities, such as a bag of apples where the price is determined by the number of apples in the bag.
List Price
Set how much you want to sell the item. You can set different prices for dine-in and takeout.
Price Tier
Adjust the price of your menu items depending on set conditions such as the time, day, membership plans, or third-party delivery integrations. For more information, refer to Set up and manage Tier Pricing Rules.
Include in Combo Items
Select the combo option where you want the item to be included.
DeleteAdditional Details
Cost
Add the cost of the item’s raw materials.
Recommended
Select Yes to make the item appear as a promoted item on various Eats365 modules.
Inventory Tracking
Select Yes to limit the number of Items sold. The item appears as "Sold Out" in the POS when the quantity of the item reaches zero.
Print to Kitchen
Select Yes to print the item on the printer located in the kitchen station you set.
Kitchen Station
Select which kitchen station you want the item to go to. This setting determines which kitchen printer the item gets printed on.
Print Item Ticket
Select Yes to print an item ticket on the Self Order Kiosk (Android).
Tag
Add a Menu Tag to the item to label menu items and highlight specific attributes.
Application Access Permission
Enable or disable access from applications.
Online Ordering Permissions
Enable or disable access to the following service types from the Branded Online Store.
- Dine-In
- Pickup
- Delivery
Role Access Permission
Enable or disable item access for different staff roles.
Member Plan Exclusive
Enable this setting to make the item available exclusively to customers who are members of a specific plan.
To do this, turn on Exclusive to Specific Member Plans  and select the member plan required to purchase the item. For third-party CRM setups, click on Add New and enter the "3rd Party CRM Member Plan Code."
Modifier
To add modifiers to the item, refer to the article on how to Set up and manage Modifiers.
DeleteMerchant Portal (Classic Theme)
- Log in to the Merchant Portal.
- On the left panel, click on Menu Setup, then select Item.
- At the top right, click on +Single Item.

- Select the Item language.
 Note: You must enter a default name for the Single Item. The name becomes available in the language the POS app is using. For multi-language menus, after selecting a default language, click on the language drop-down list and select your preferred language. Then, enter the alternate name in that language.
 - Enter the Single Item’s information and configure your preferred settings.
- At the top right, click on Save to confirm.
You can add the Single Item’s information or change these settings on the Merchant Portal:
General
Item image
Upload an image of the Item.
Language
Set the language for the menu item.
Type
Select if you want the Item to be a Single Item or a Combo Item.
Name
Enter the item name.
Description
Add a description of the Item.
Simplified Name
This setting allows you to create a simplified name for the item. Simplified names are used when printing on kitchen tickets.
Product Type
Select the Product Type to which the Item belongs.
Sub Product Type
Select the Sub Product Type to which the Item belongs.
Tax Group
This setting allows you to add a Tax Group to the item.
Category
Select the Category to which the item belongs.
Course
Select the Course to which the item belongs.
Product Code (SKU)
Set a specific Product Code to the item. The Product Code is generally used for system integrations such as for ERP and Inventory System integrations. System reports can also group items from different restaurant branches with the same Product Code as the same item for consolidated analysis.
Item Code
Set a specific Item Code to the item. The Item Code can be used to add the item to an order.
Item Barcode
Add the item’s barcode. When an item has a Global Trade Item Number (GTIN) item barcode on its packaging, input the value of that barcode here.
Item Code (Reporting)
Set a specific reporting ID to the item. This allows the system to group items with same reporting ID as the same item for consolidated analysis.
Exclude from Discount
When turned on, you won’t be able to apply any discount to the item.
Exempt Service Charge
When turned on, service charge won't apply to the item by default.
Exempt Order Surcharge
Enable this setting to restrict applying surcharge to this item by default.
Available Date
Select the Start and End date for the availability of the item.
Available For
Select if you want the item to be available for Dine-in, Takeout, or both.
All You Can Eat Menu Item
When turned on, the Item only appears in All You Can Eat Mode.
Non-Sale
When enabled, the selected Item will be included in the Non Sales Summary report.
Next Operation Period Pre-Order
When turned on, the item will be available for next operation period pre-order.
Pricing Method
Choose how you want the item to be priced. You can choose from the following pricing methods:
- Fixed Price - Set a fixed price to the item.
- Priced in Shop - When enabled, a staff member enters the item price manually.
- Priced by embedded barcode (weight) - Set the price based on the item weight. The price is calculated as Unit Price multiplied by Weight.
- Priced by embedded barcode (price) - Set the price based on the item amount. The price is calculated as Item Amount divided by Unit Price.
List Price
Set how much you want to sell the item. You can set different prices for Dine-in and Takeout.
Tier Prices
Adjust the price of your menu items depending on set conditions such as the time, day, membership plans, or third-party delivery integrations. For more information, refer to Set up and manage Tier Pricing Rules.
Include in Combo Items
Select the combo option where you want the item to be included.
DeleteAdditional Details
Cost
Add the cost of the item’s raw materials.
Recommended
Select Yes to make the item appear as a promoted item on various Modules.
Inventory Tracking
Select Yes to limit the number of items sold. The item appears as Sold Out in the POS when the quantity of the item reaches zero.
Print to Kitchen
Select Yes to print the item on the printer located in the Kitchen Station you set.
Kitchen Station
Select which Kitchen Station you want the item to go to. This setting determines which kitchen printer the item gets printed on.
Tag
Add a Menu Tag to the item to label menu items and highlight specific attributes.
DeleteRoles and Permissions
Role Access Permission
Turn on or off access for different staff roles.
Application Access Permission
Turn on or off access from applications.
Website Permissions
 to show Website Permission.
Turn on or off Dine-in, Pickup, and Delivery access from the website.
DeleteModifier
To add modifiers to the item, refer to the article on how to Set up and manage Modifiers.
DeleteManage single items
Edit a single item
To modify a single item, follow the steps below:
Eats365 POS
- Log in to the Eats365 POS.
- At the top left, tap Settings .
- Under "General," tap Menu Setup, then select Item.
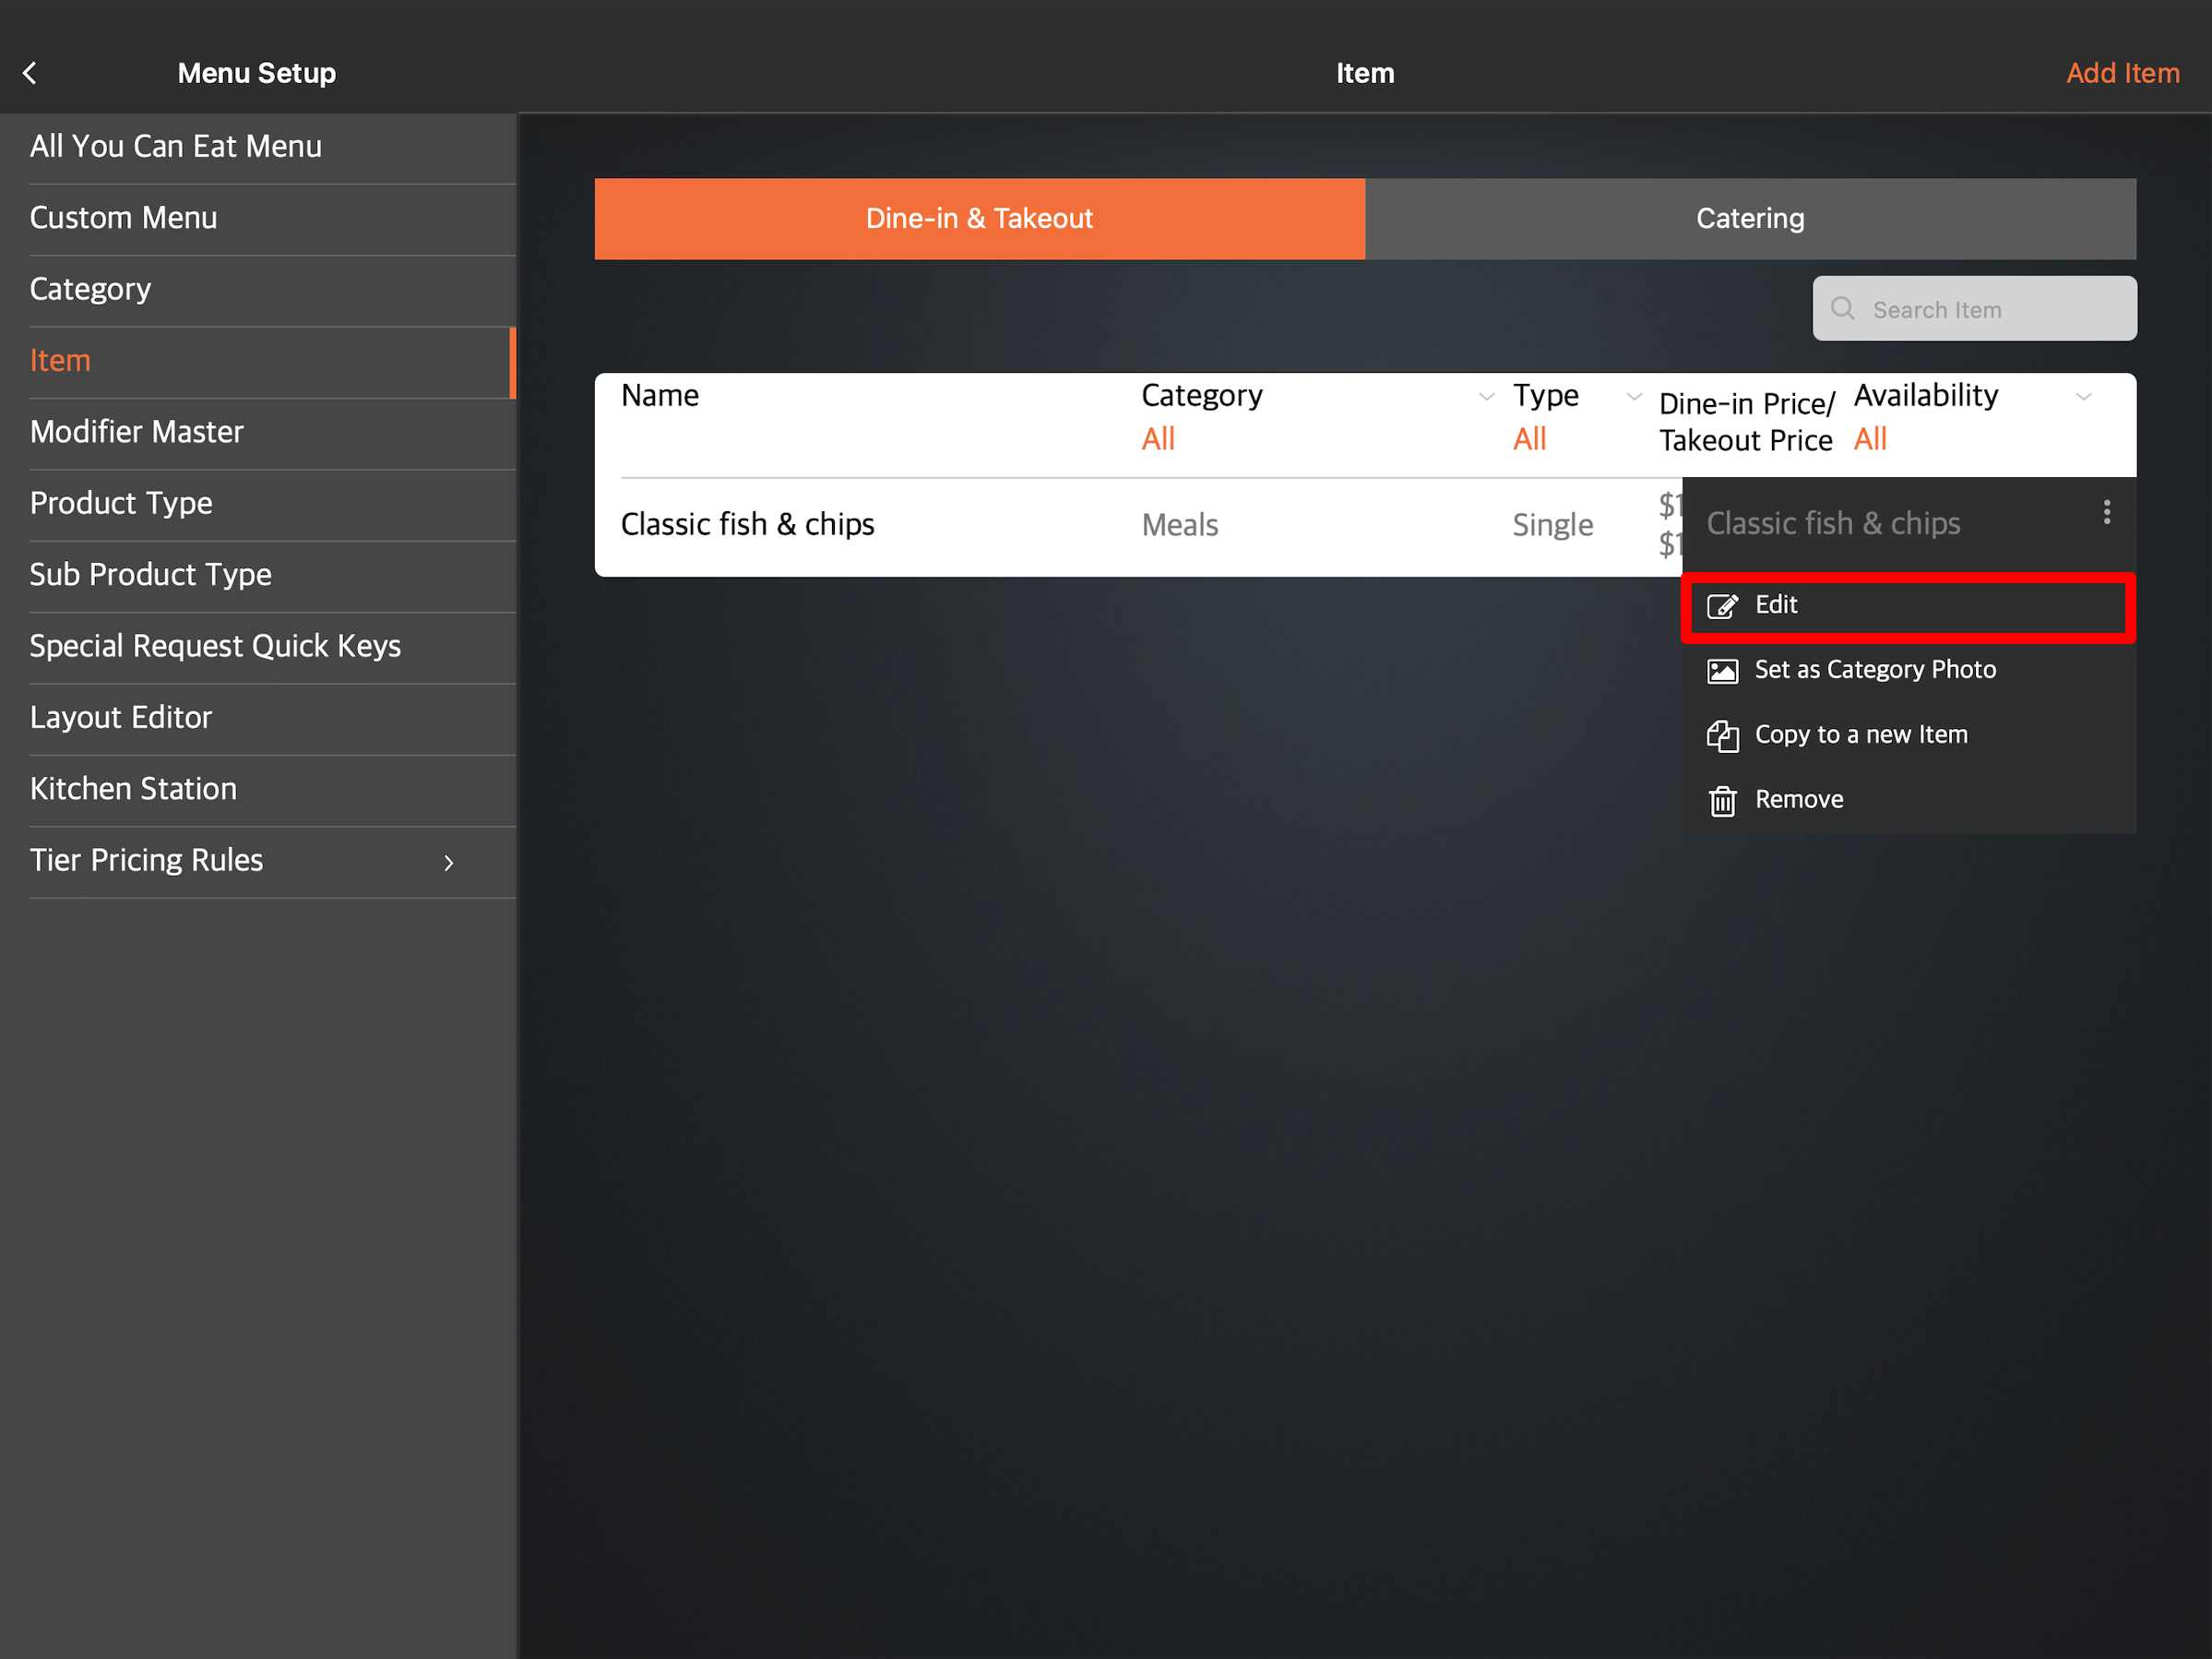
- Tap the item that you want to edit. You can also tap the three-dot menu
 , then tap Edit
  .
.
- Update the single item.
- At the top right, tap Update to confirm.
Merchant Portal 2.0
- Log in to the Merchant Portal.
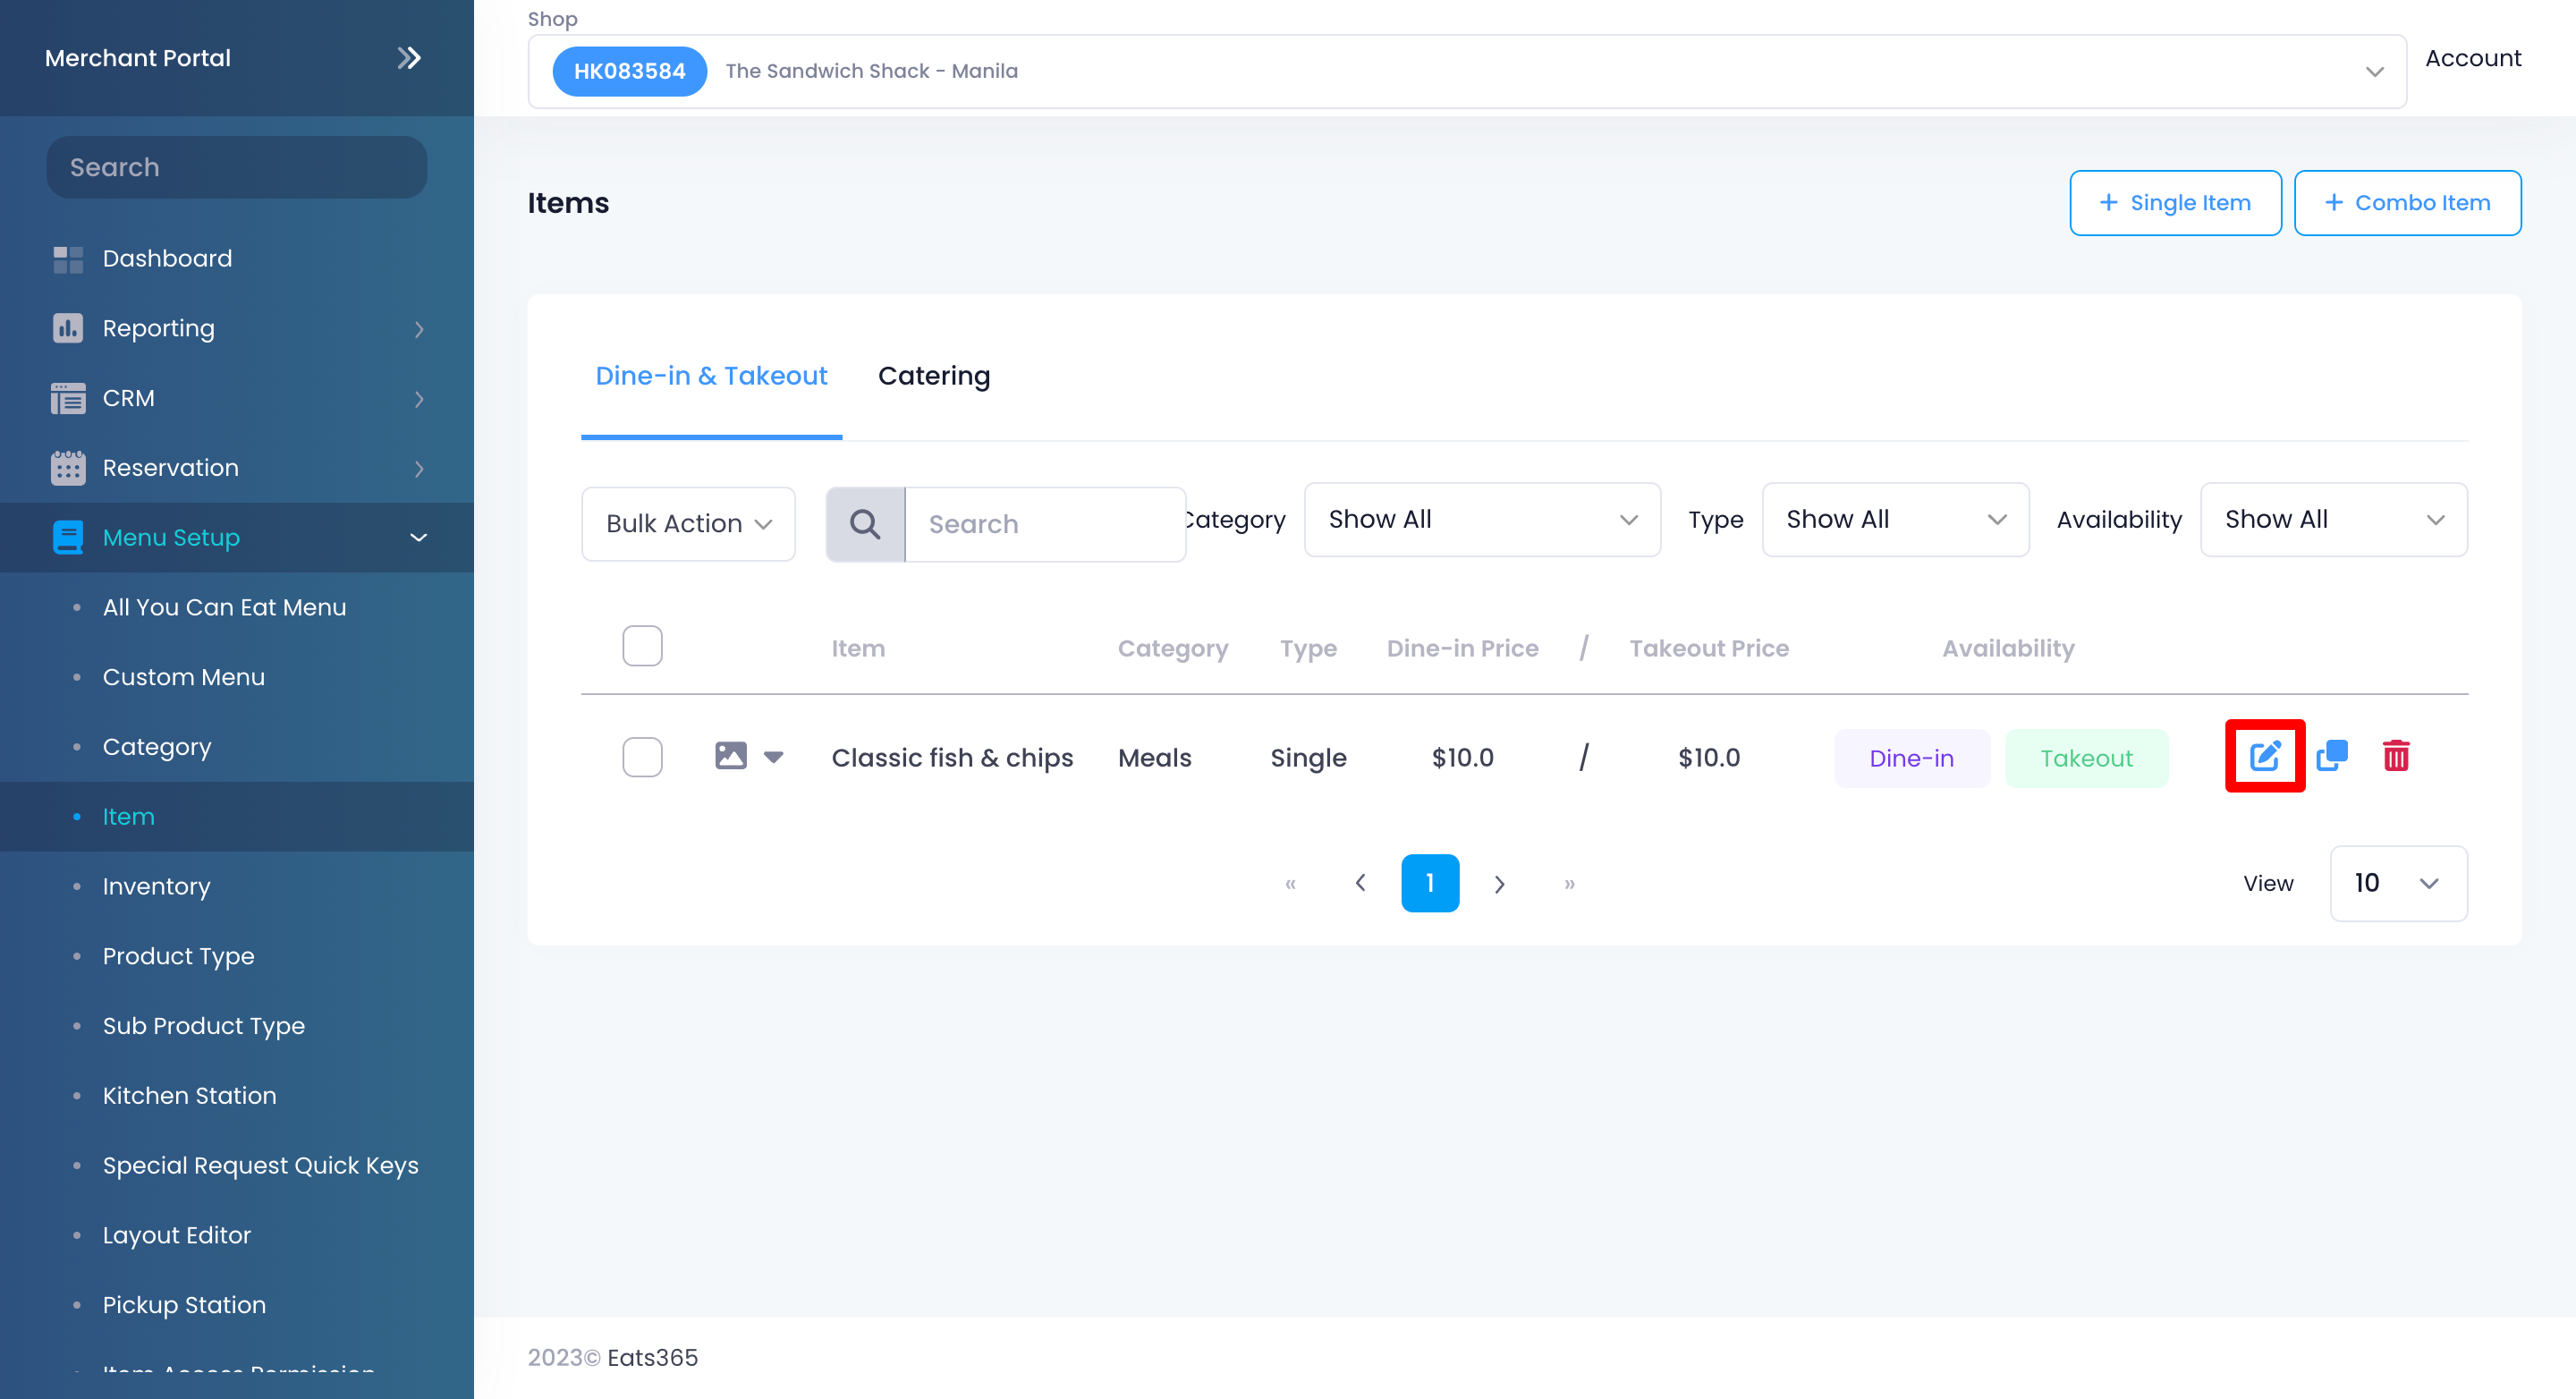
- On the left panel, click on Menu Setup, then select Item.
- Next to the item that you want to edit, click on Edit
 .
.
- Update the single item.
- At the top right, click on Save to confirm.
Merchant Portal (Classic Theme)
- Log in to the Merchant Portal.
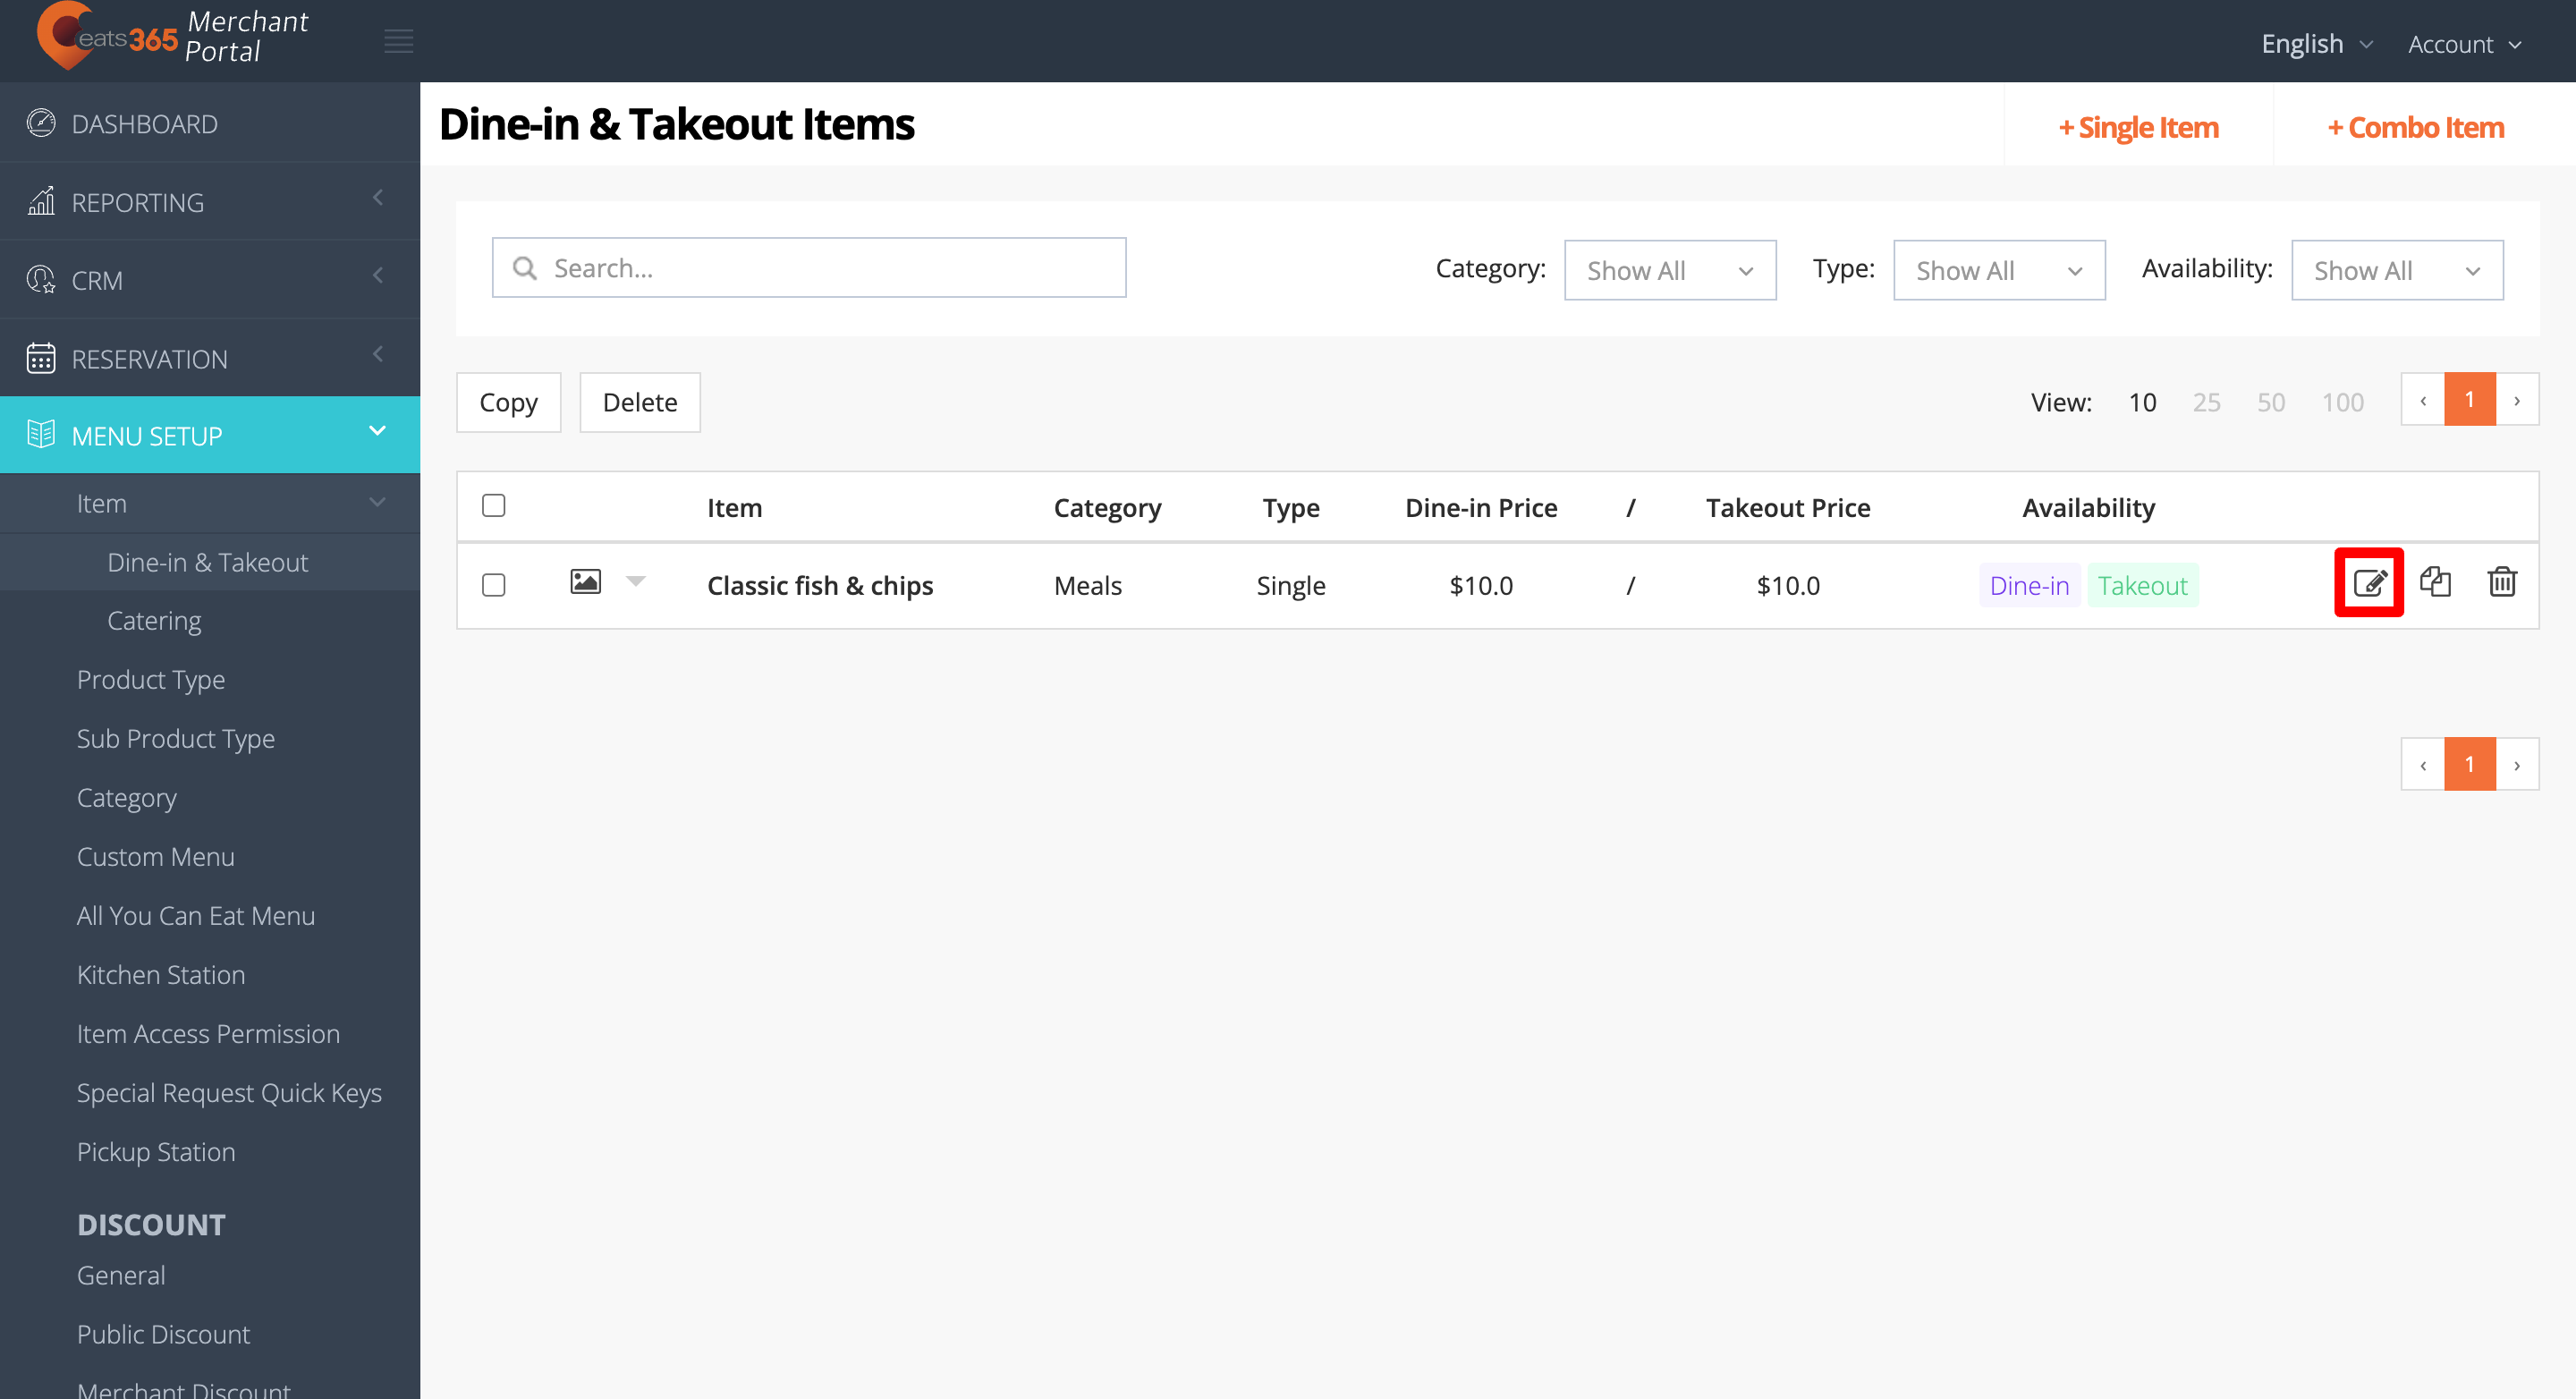
- On the left panel, click on Menu Setup, then select Item.
- Next to the item that you want to edit, click on Edit.
- Update the Single Item.
- At the top right, click on Save to confirm.
Delete a single item
To remove a single item, follow the steps below:
Eats365 POS
- Log in to the Eats365 POS.
- At the top left, tap Settings .
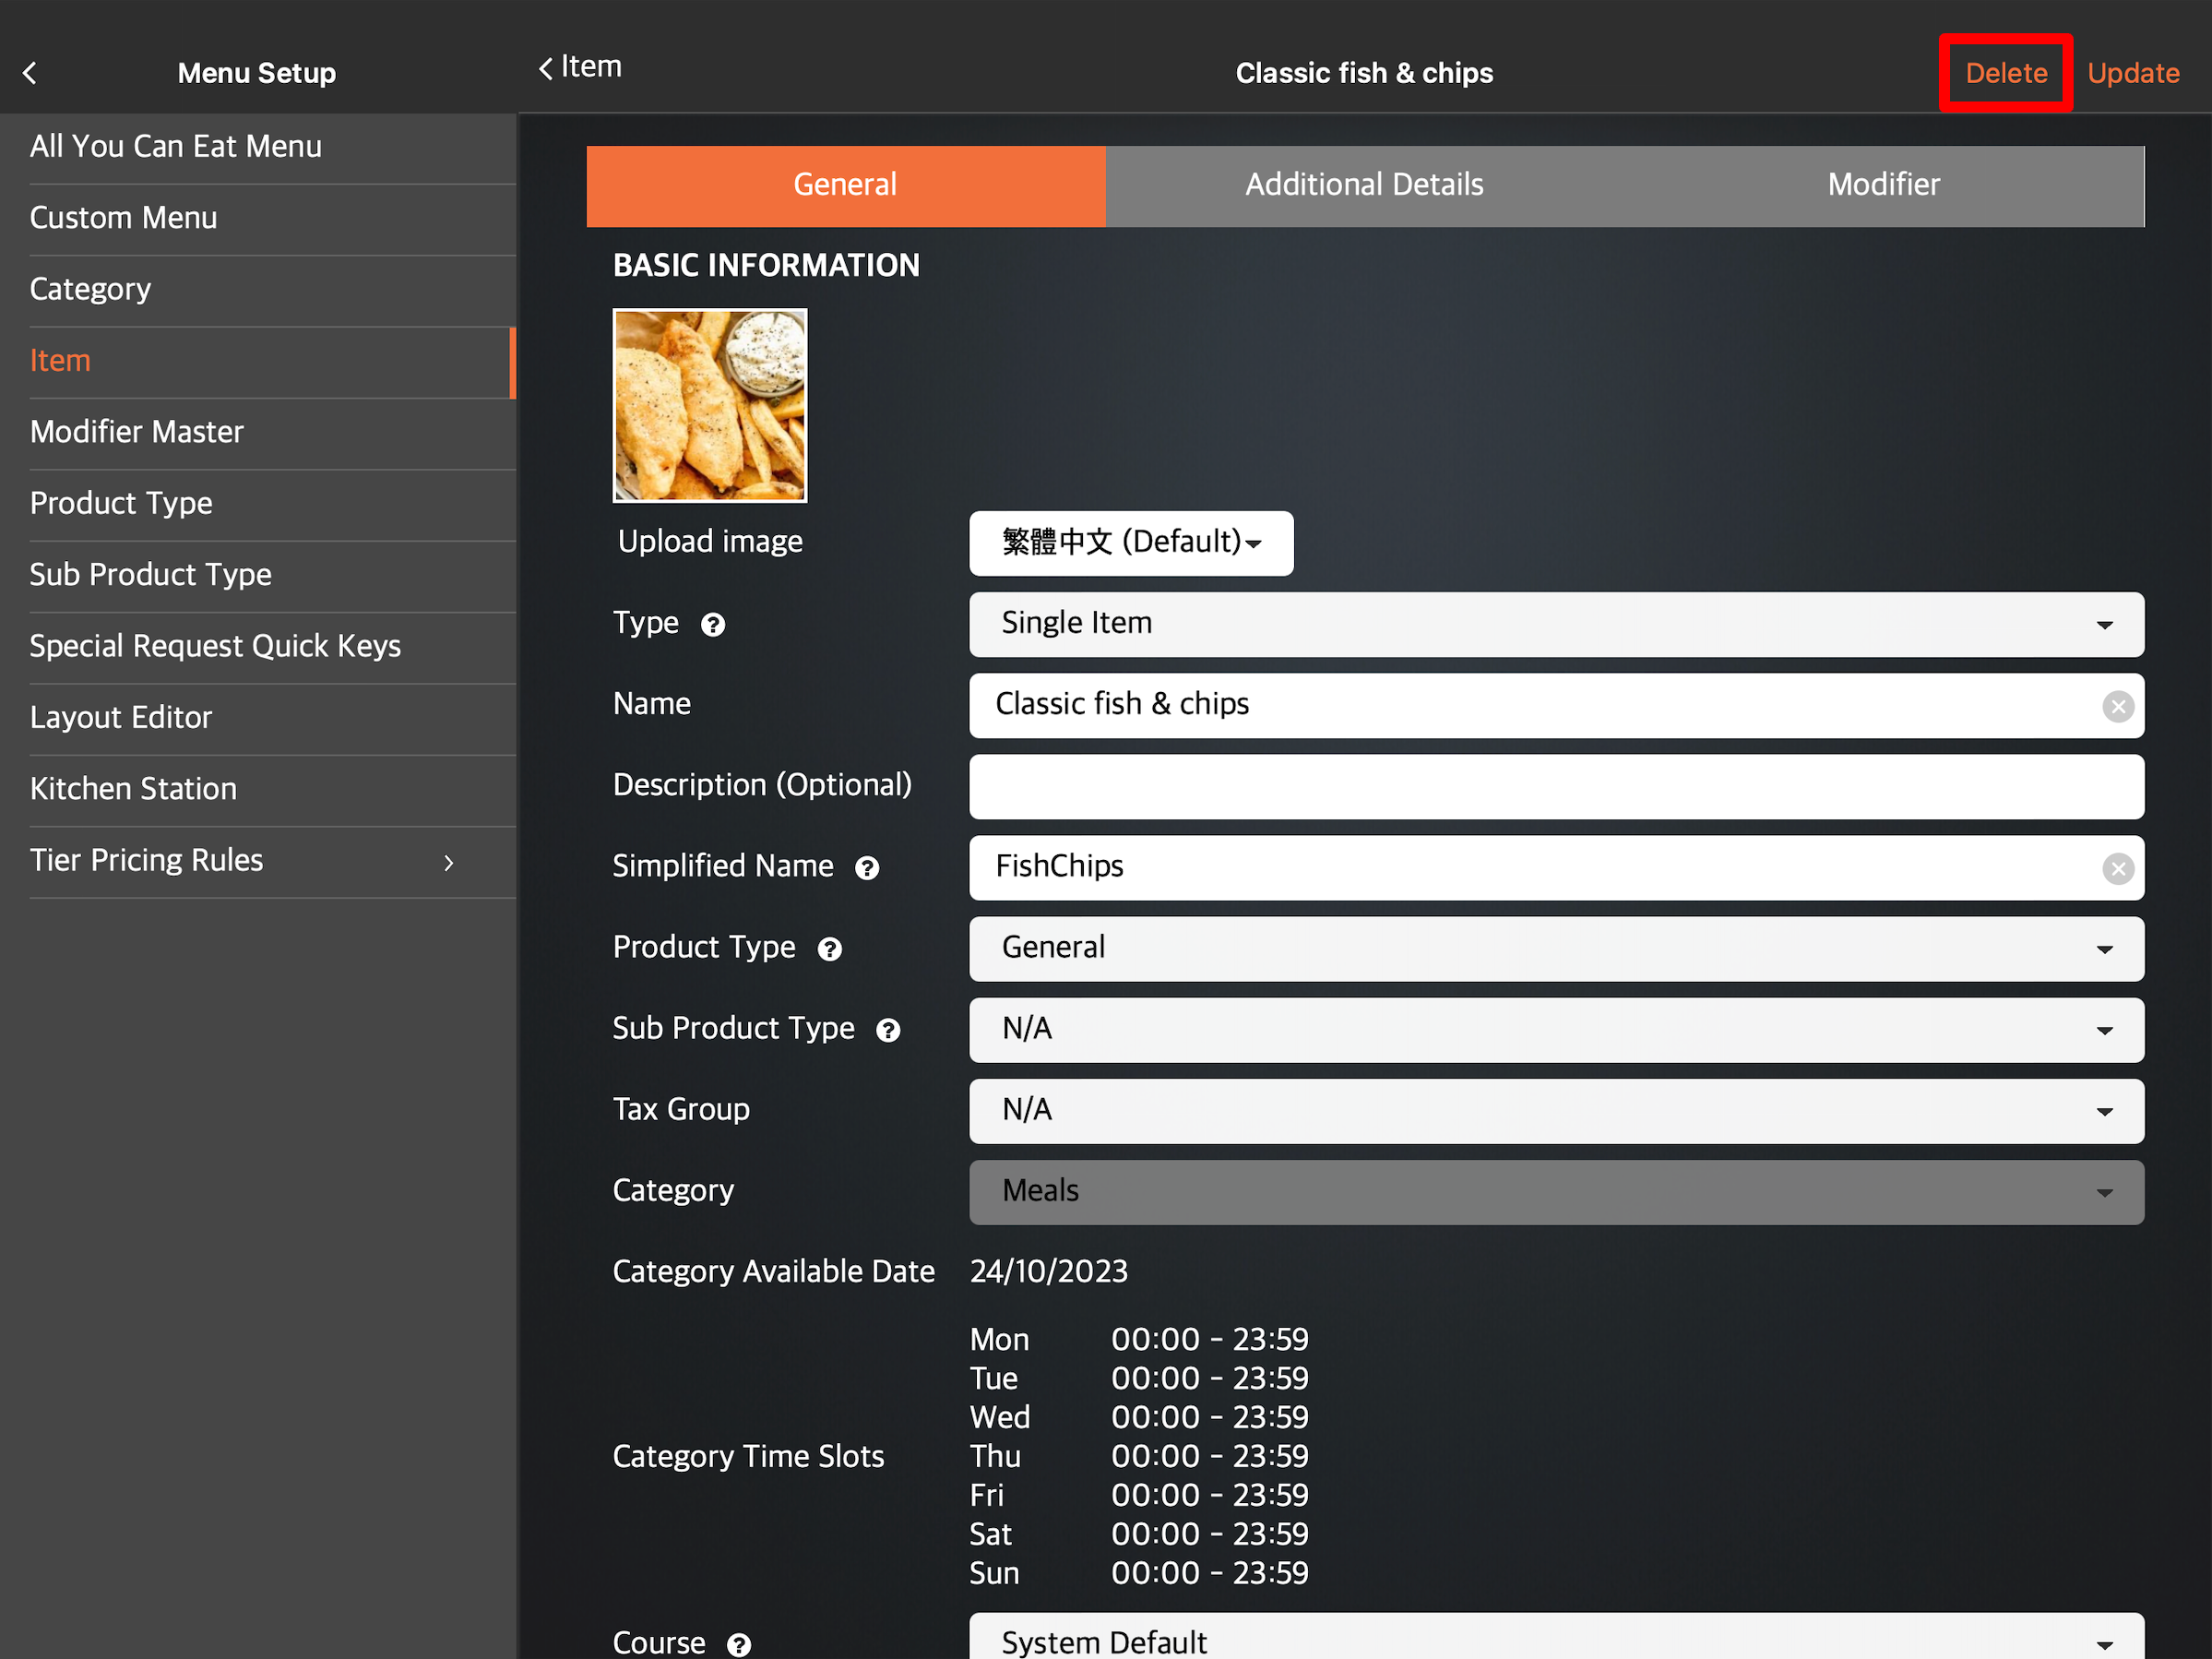
- Under "General," tap Menu Setup, then select Item.
- There are two ways to delete an Item:
- Tap the item that you want to delete. At the top right, tap Delete. A prompt appears if you want to remove the item.
- Tap the three-dot menu , then tap Remove
 . A prompt appears if you want to remove the item.
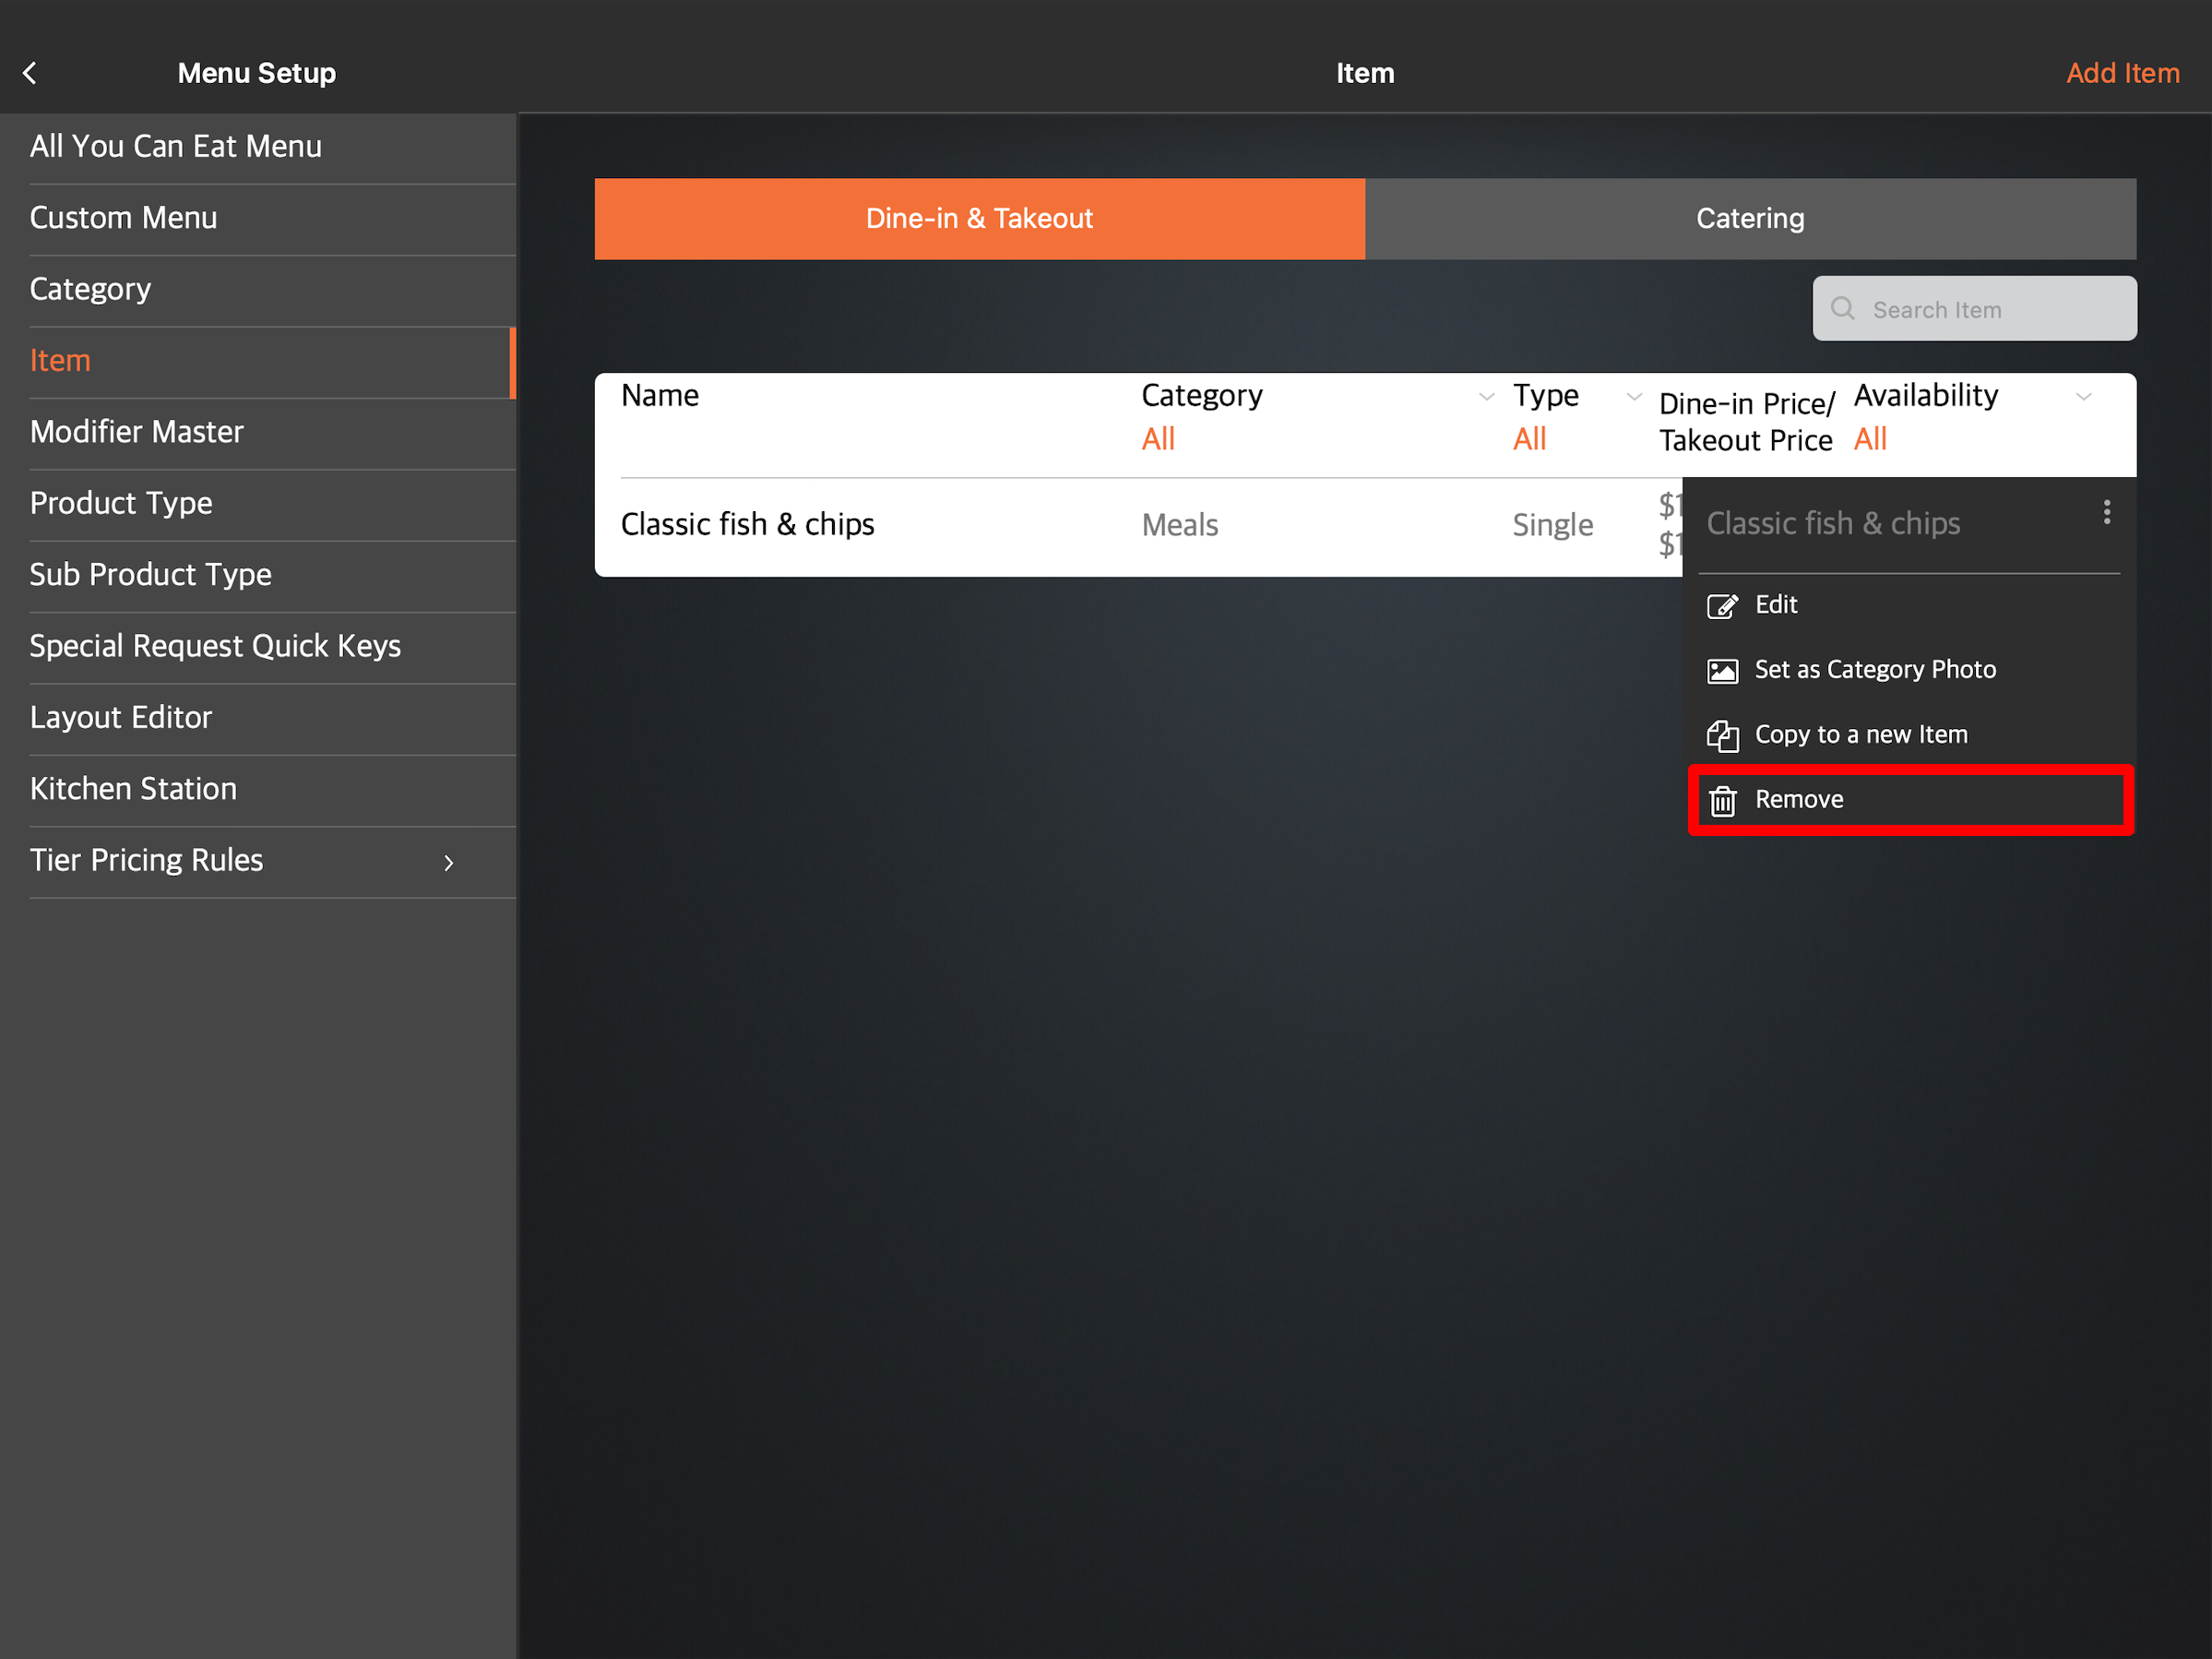
- Tap the item that you want to delete. At the top right, tap Delete. A prompt appears if you want to remove the item.
- Tap Delete to confirm.
Merchant Portal 2.0
- Log in to the Merchant Portal.
- On the left panel, click on Menu Setup, then select Item.
- Next to the item that you want to delete, click on Delete
 .
.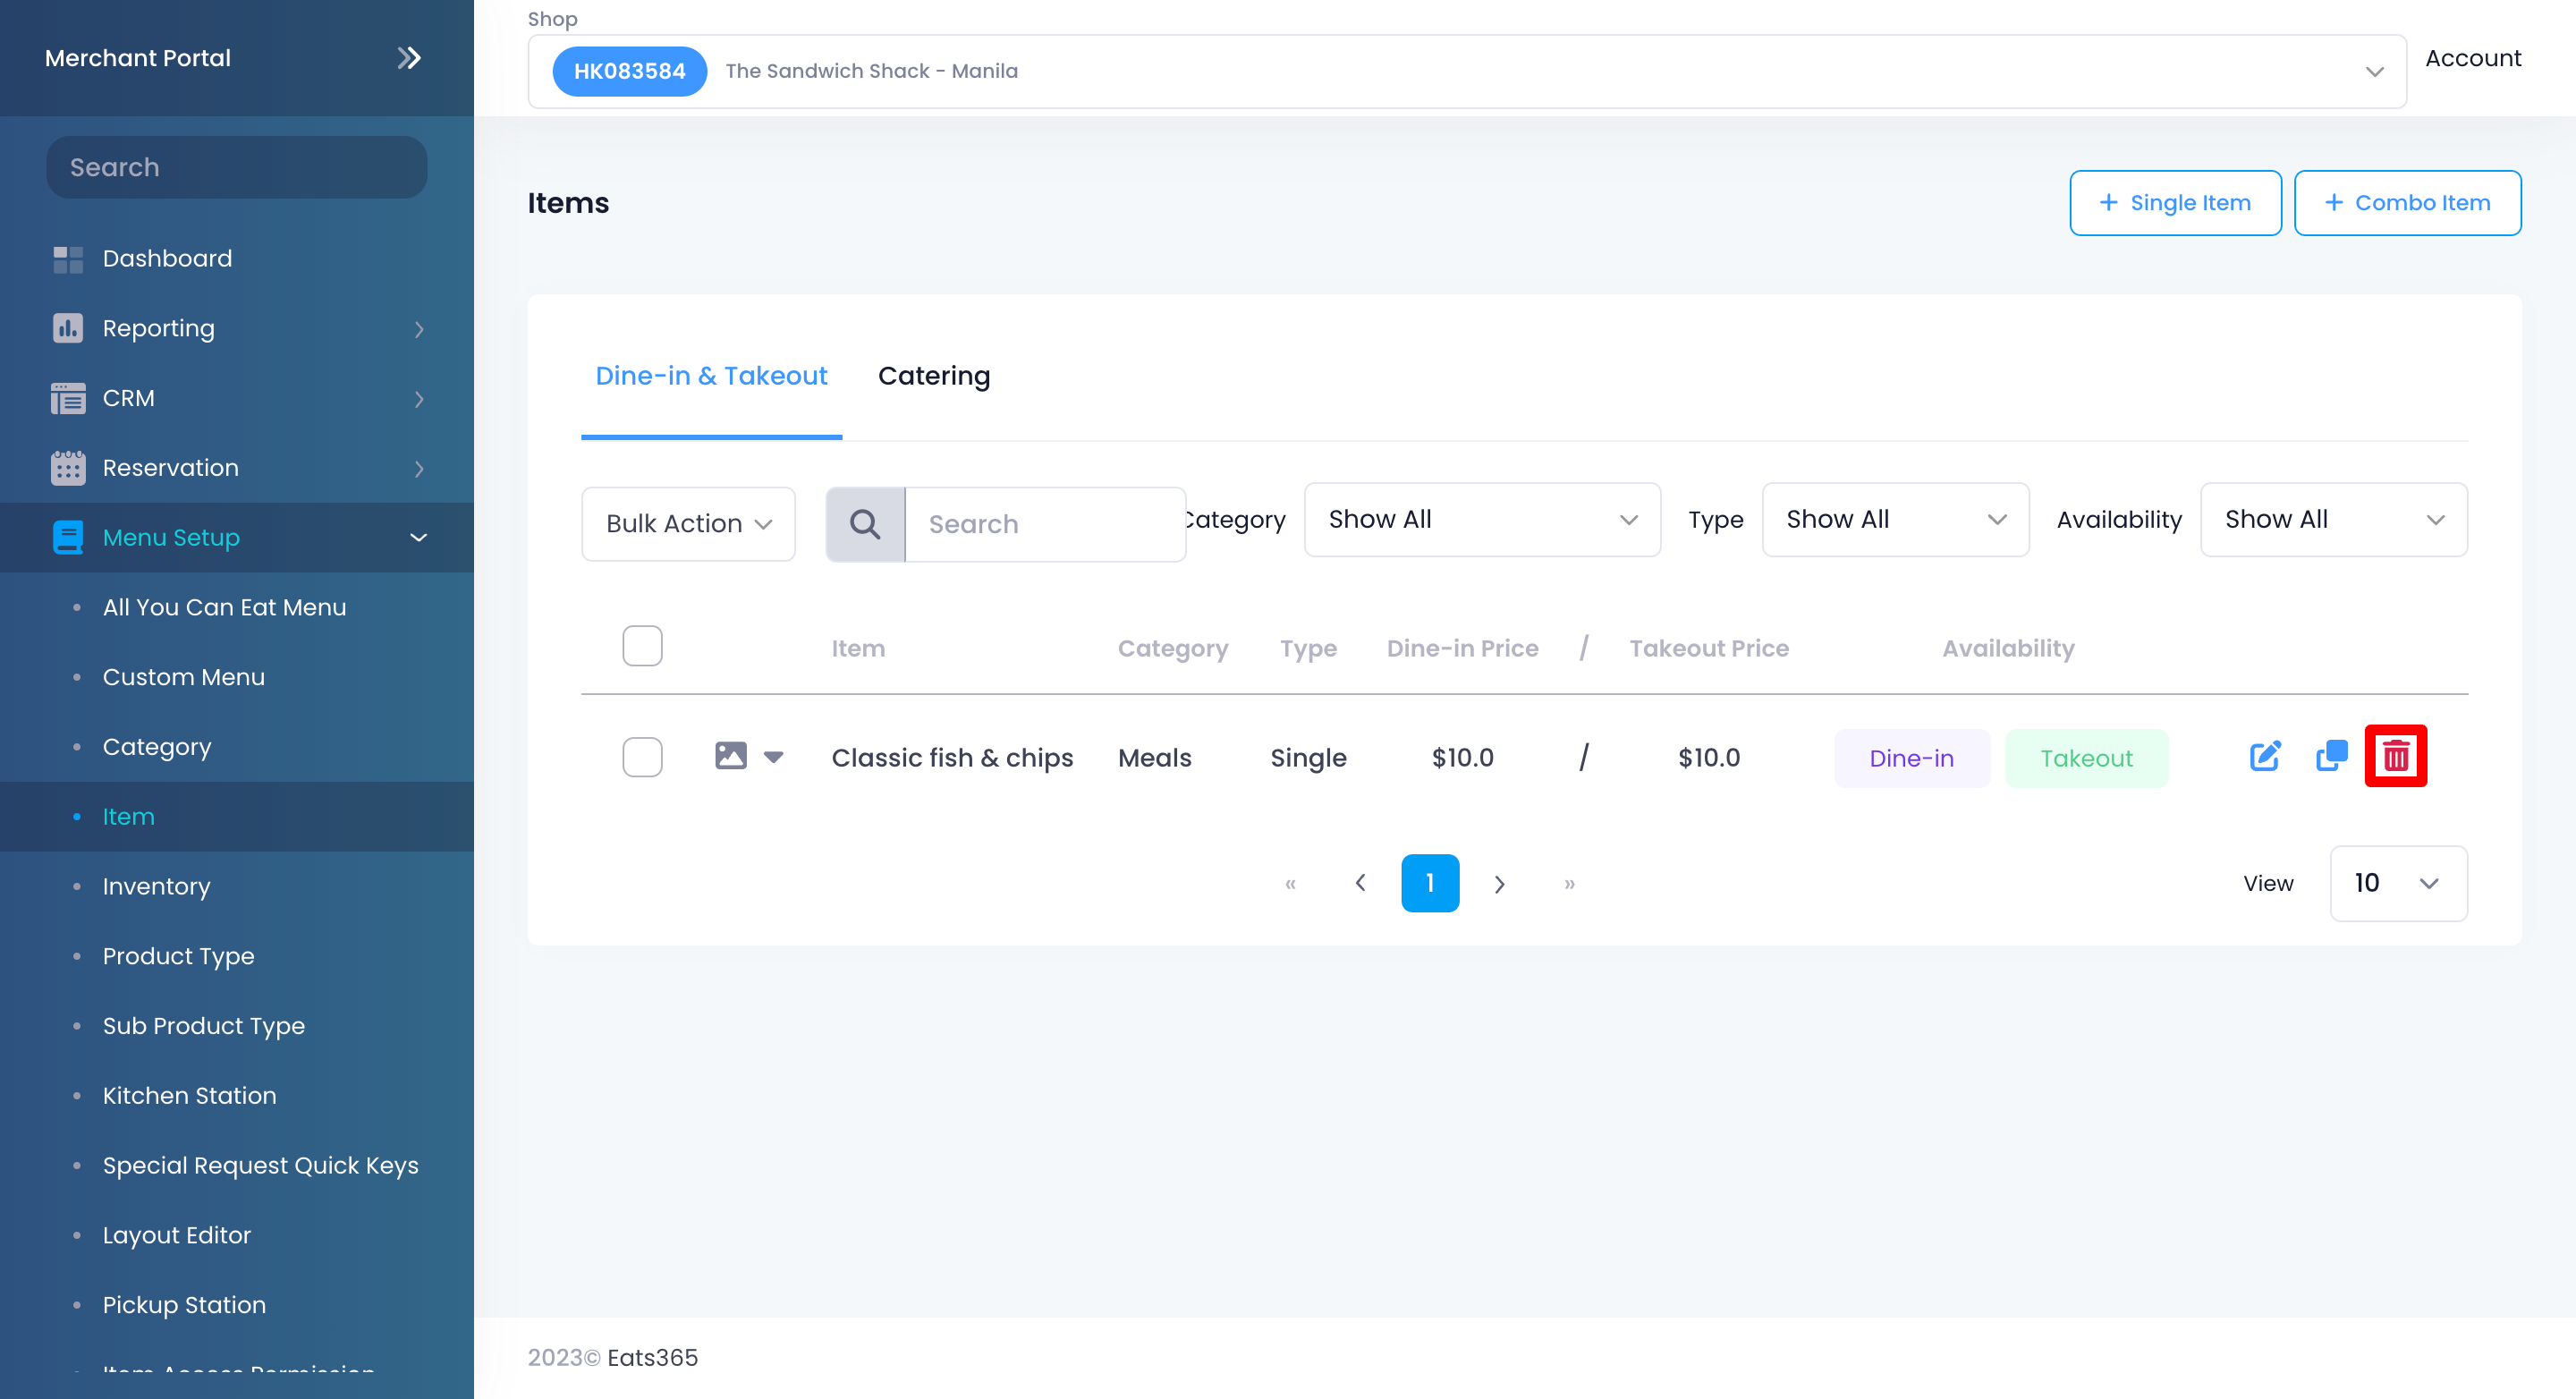
- Click on Confirm to delete.
Merchant Portal (Classic Theme)
- Log in to the Merchant Portal.
- On the left panel, click on Menu Setup, then select Item.
- Next to the item that you want to delete, click on Delete. A prompt appears to confirm if you want to delete the Item.
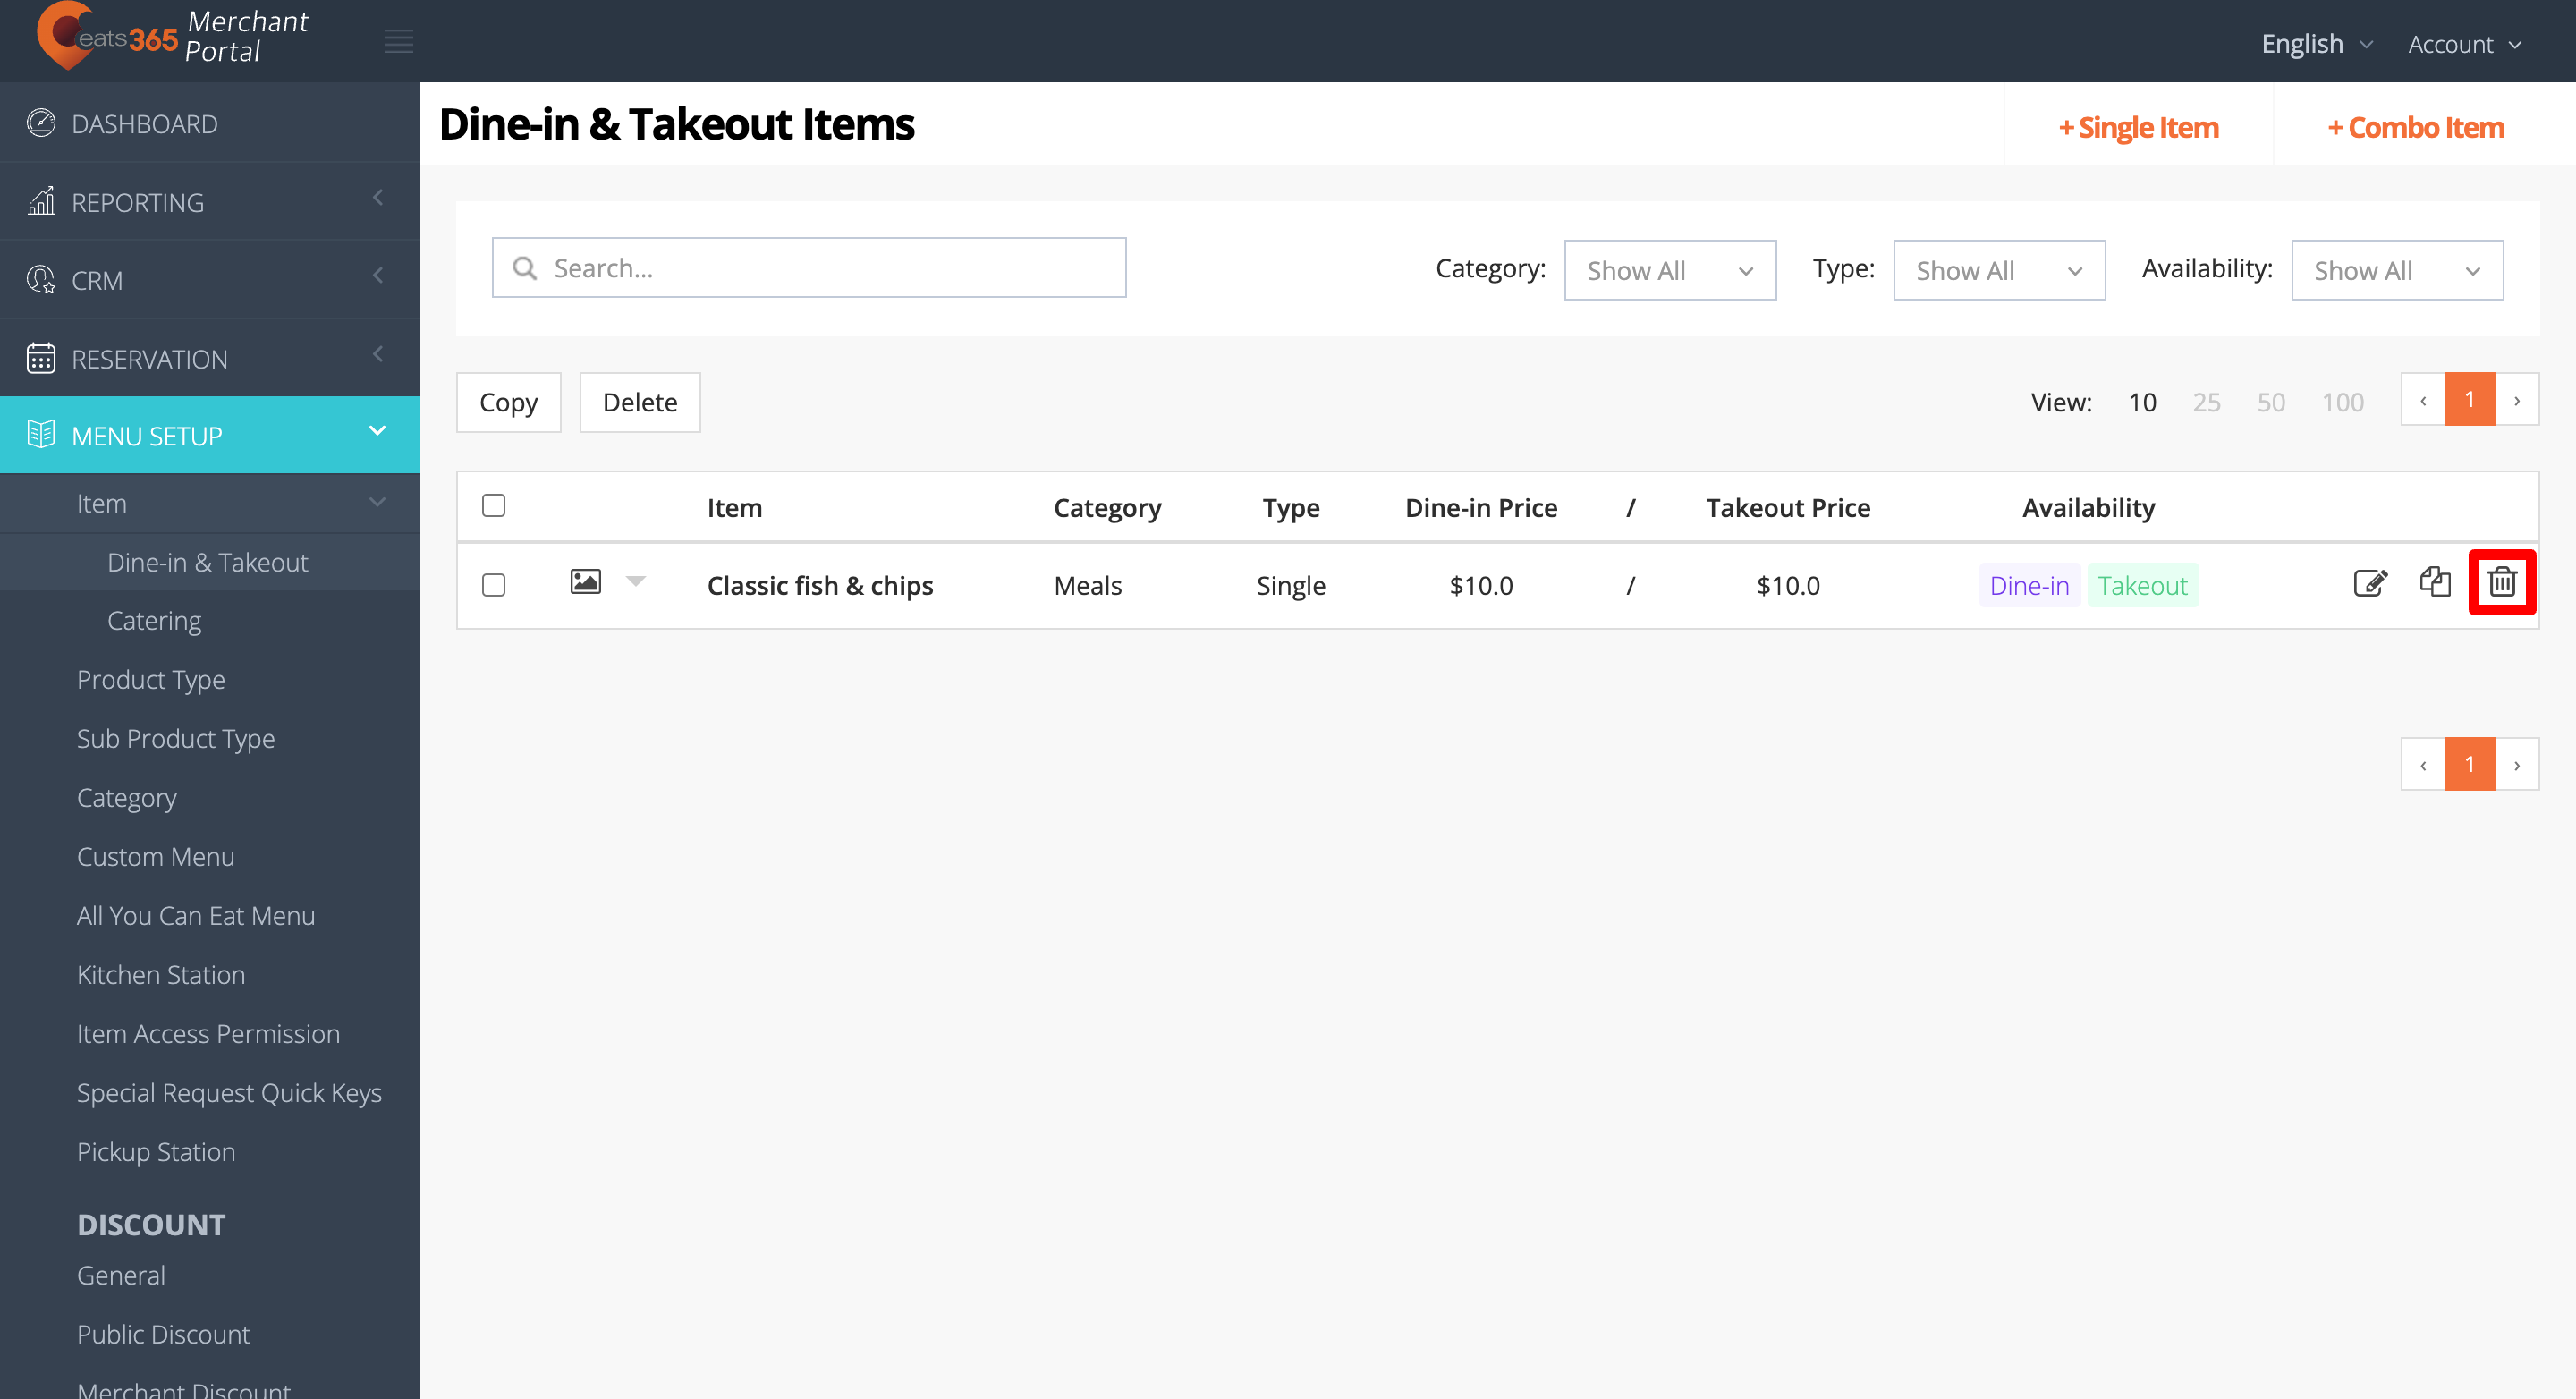
- Click on Confirm to delete.
Delete multiple single items
To remove multiple single items simultaneously, follow the steps below:
Merchant Portal 2.0
- Log in to the Merchant Portal.
- On the left panel, click on Menu Setup, then select Item.
- Next to the items that you want to delete, click on the check box
 .
.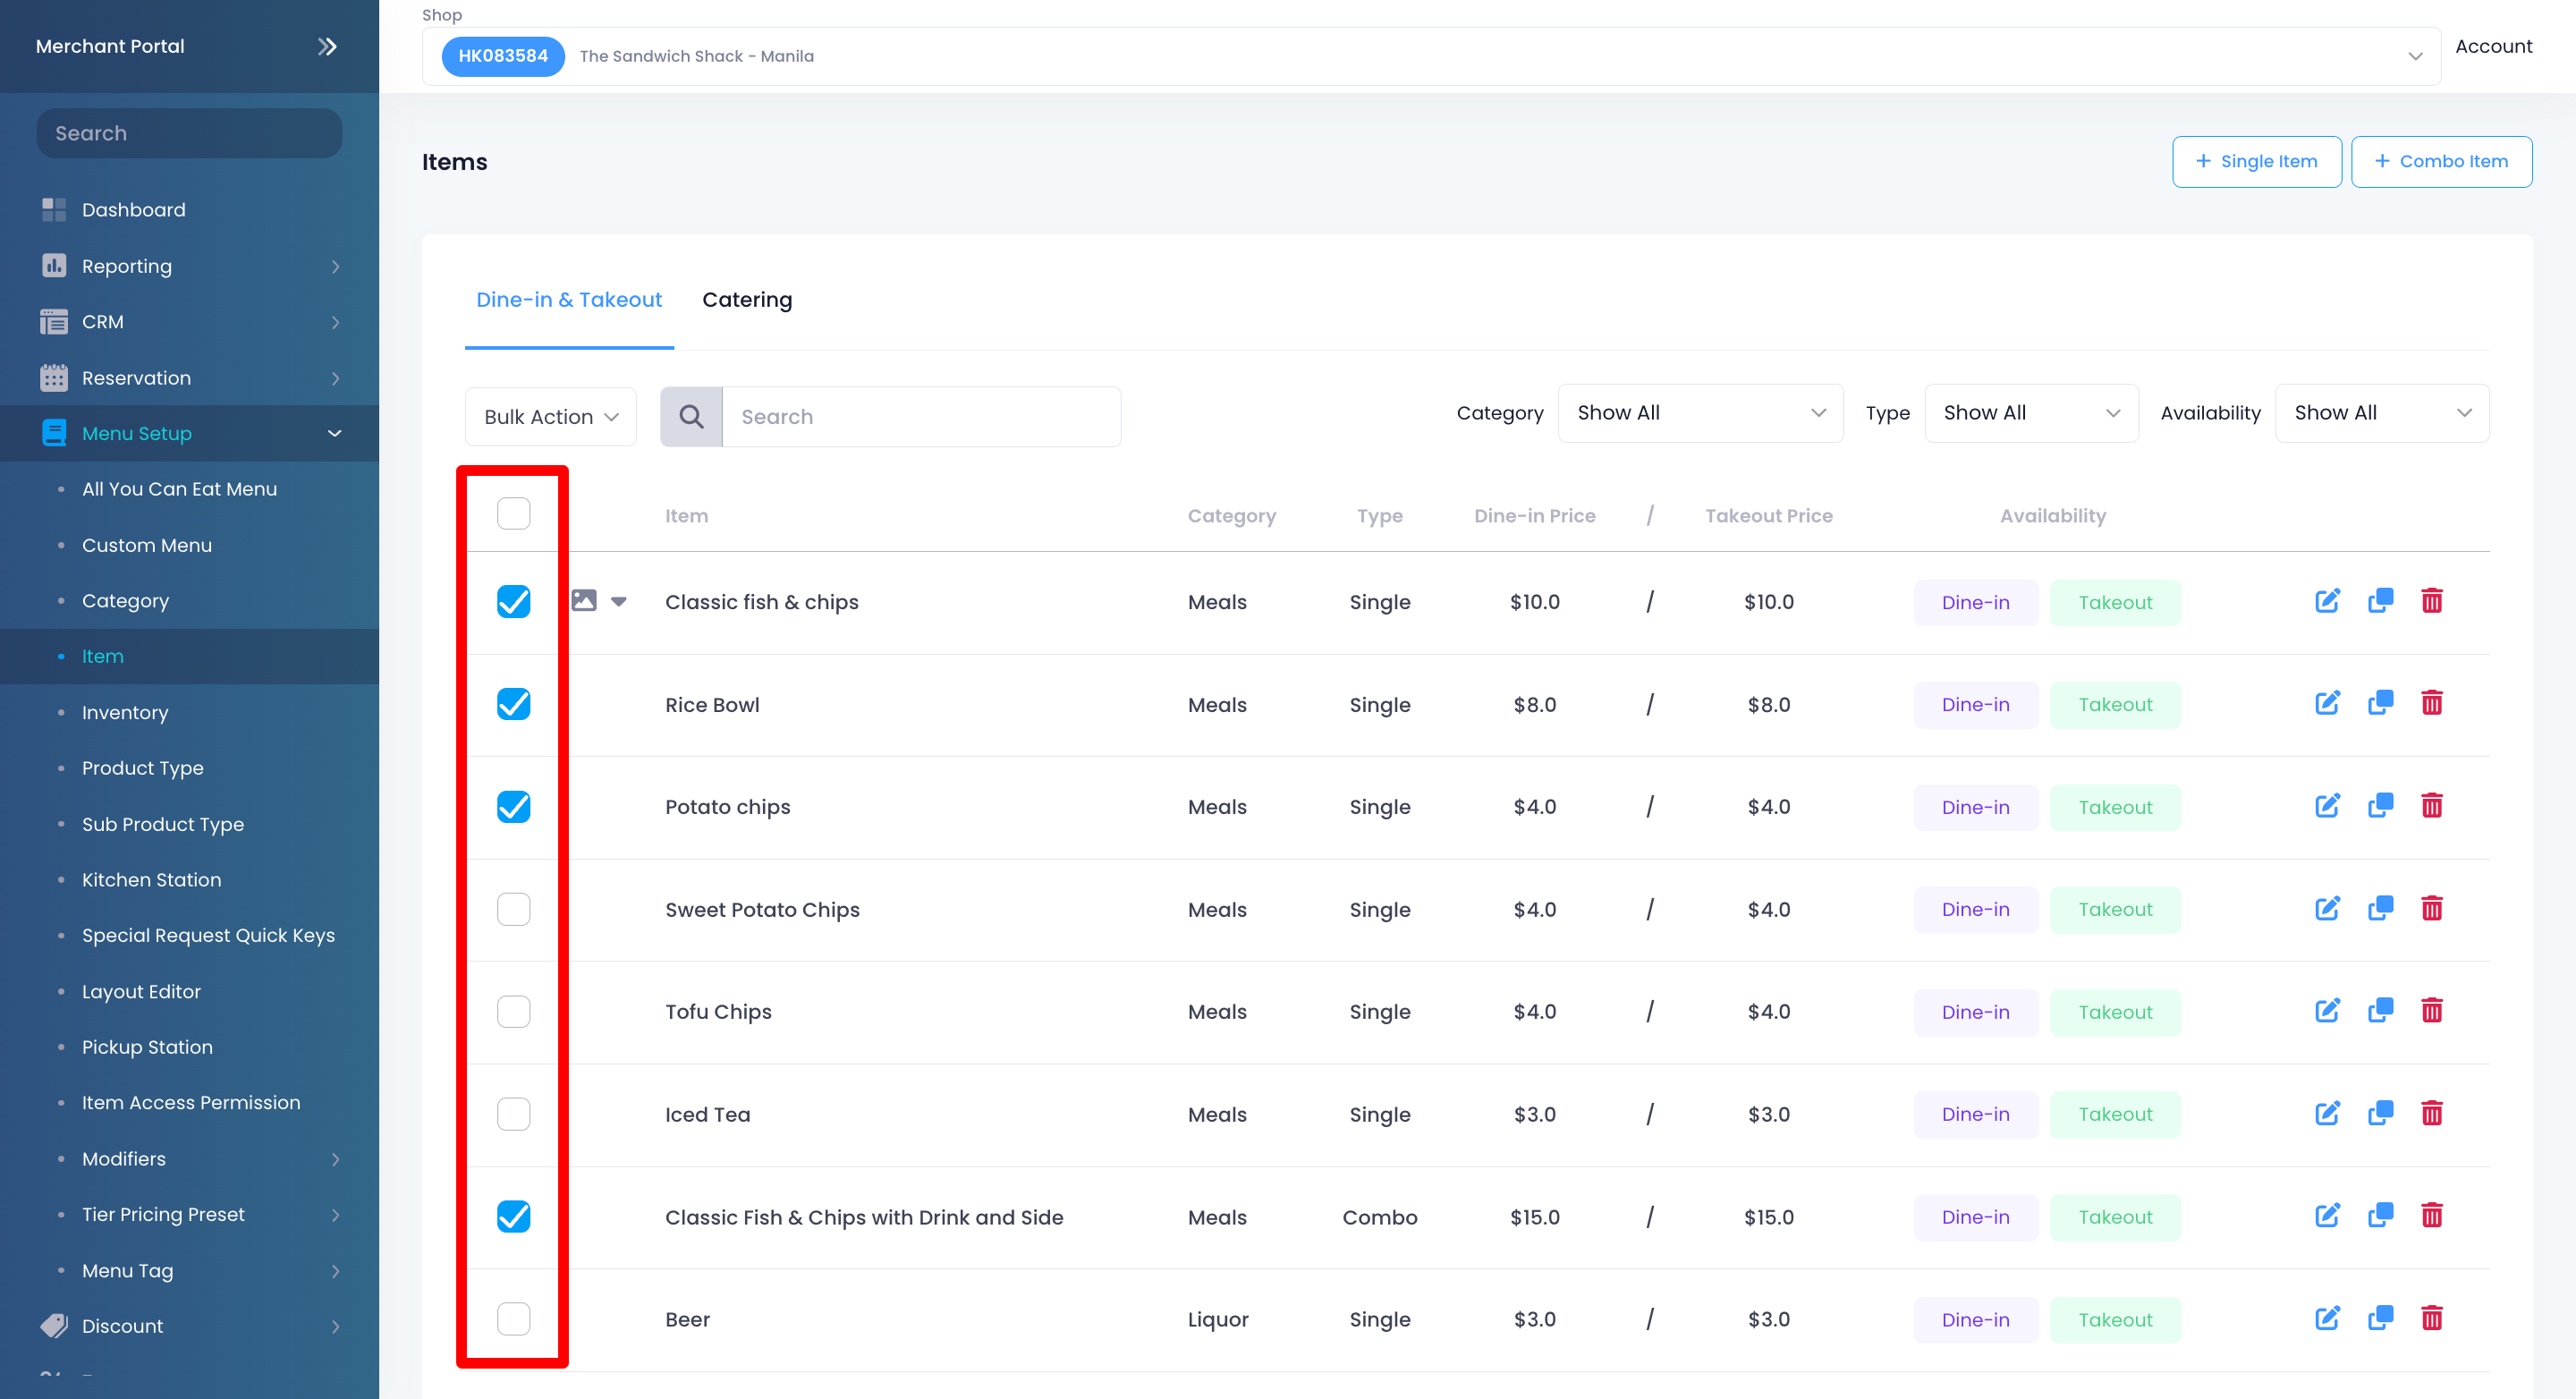
- At the top of the items, click on Bulk Action and choose Delete.
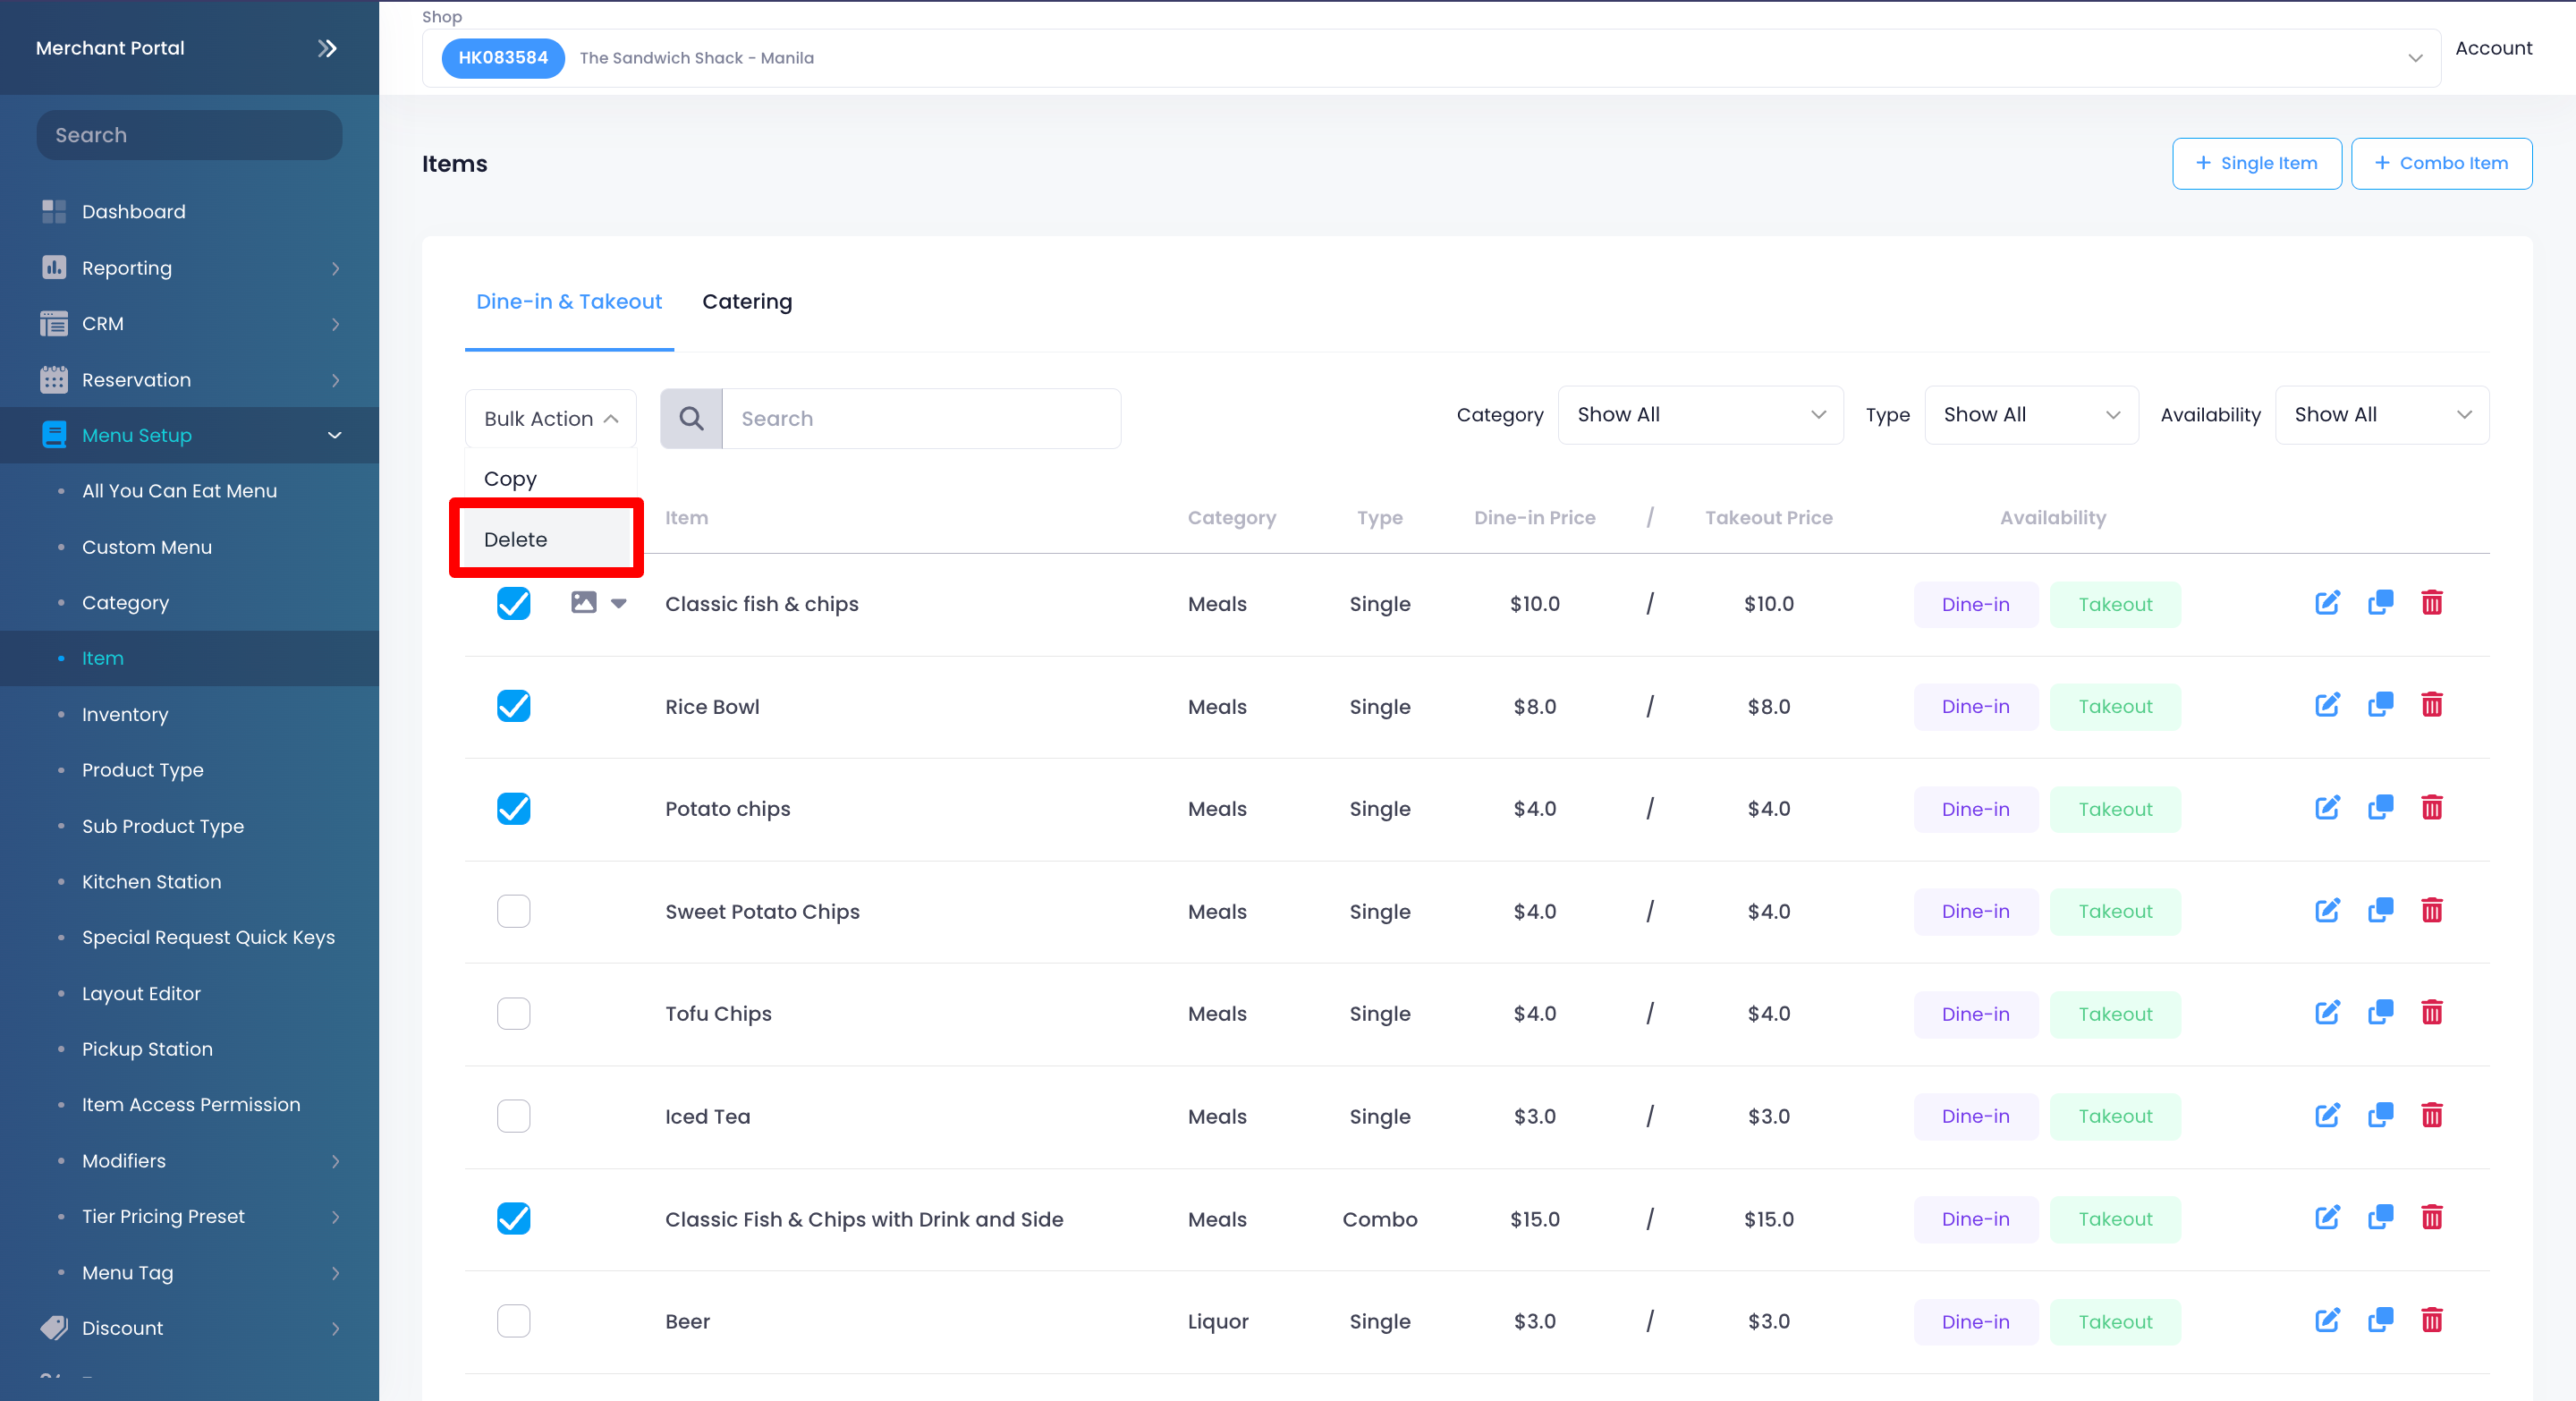
- Click on Confirm to delete the Items.
Merchant Portal (Classic Theme)
- Log in to the Merchant Portal.
- On the left panel, click on Menu Setup, then select Item.
- Next to the items that you want to delete, click on the check box.
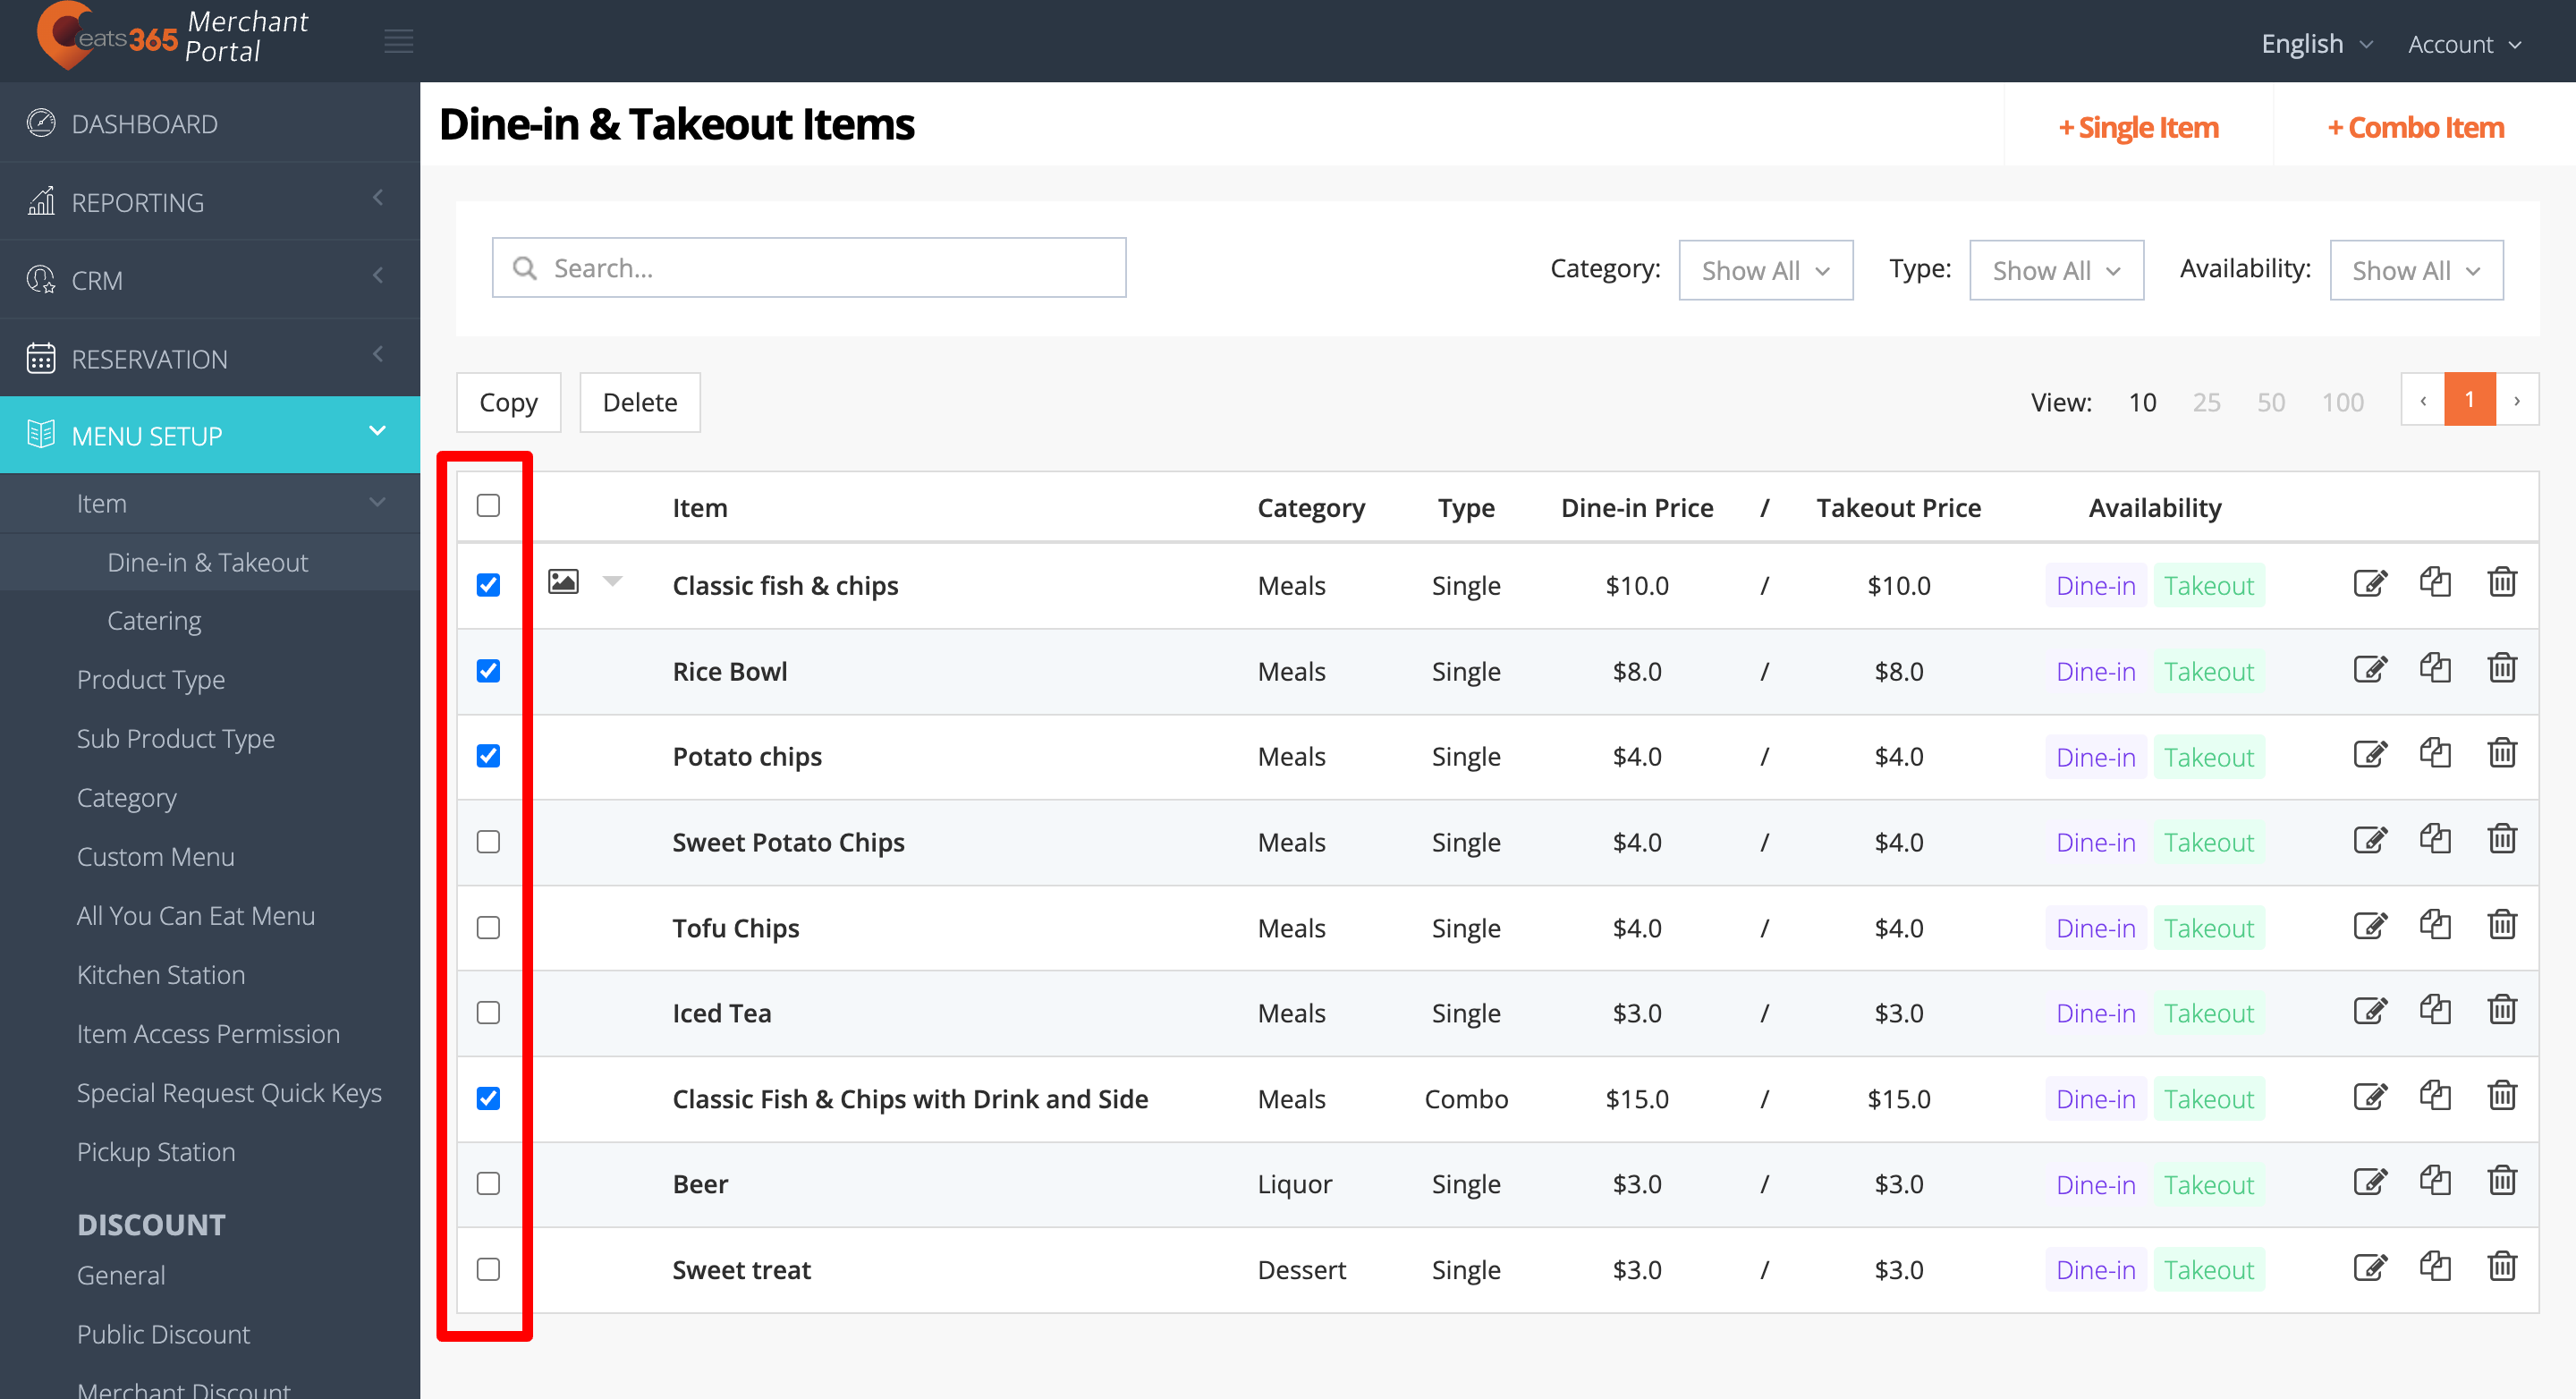
- At the top of the items, click on Delete. A prompt appears to confirm if you want to delete the items.
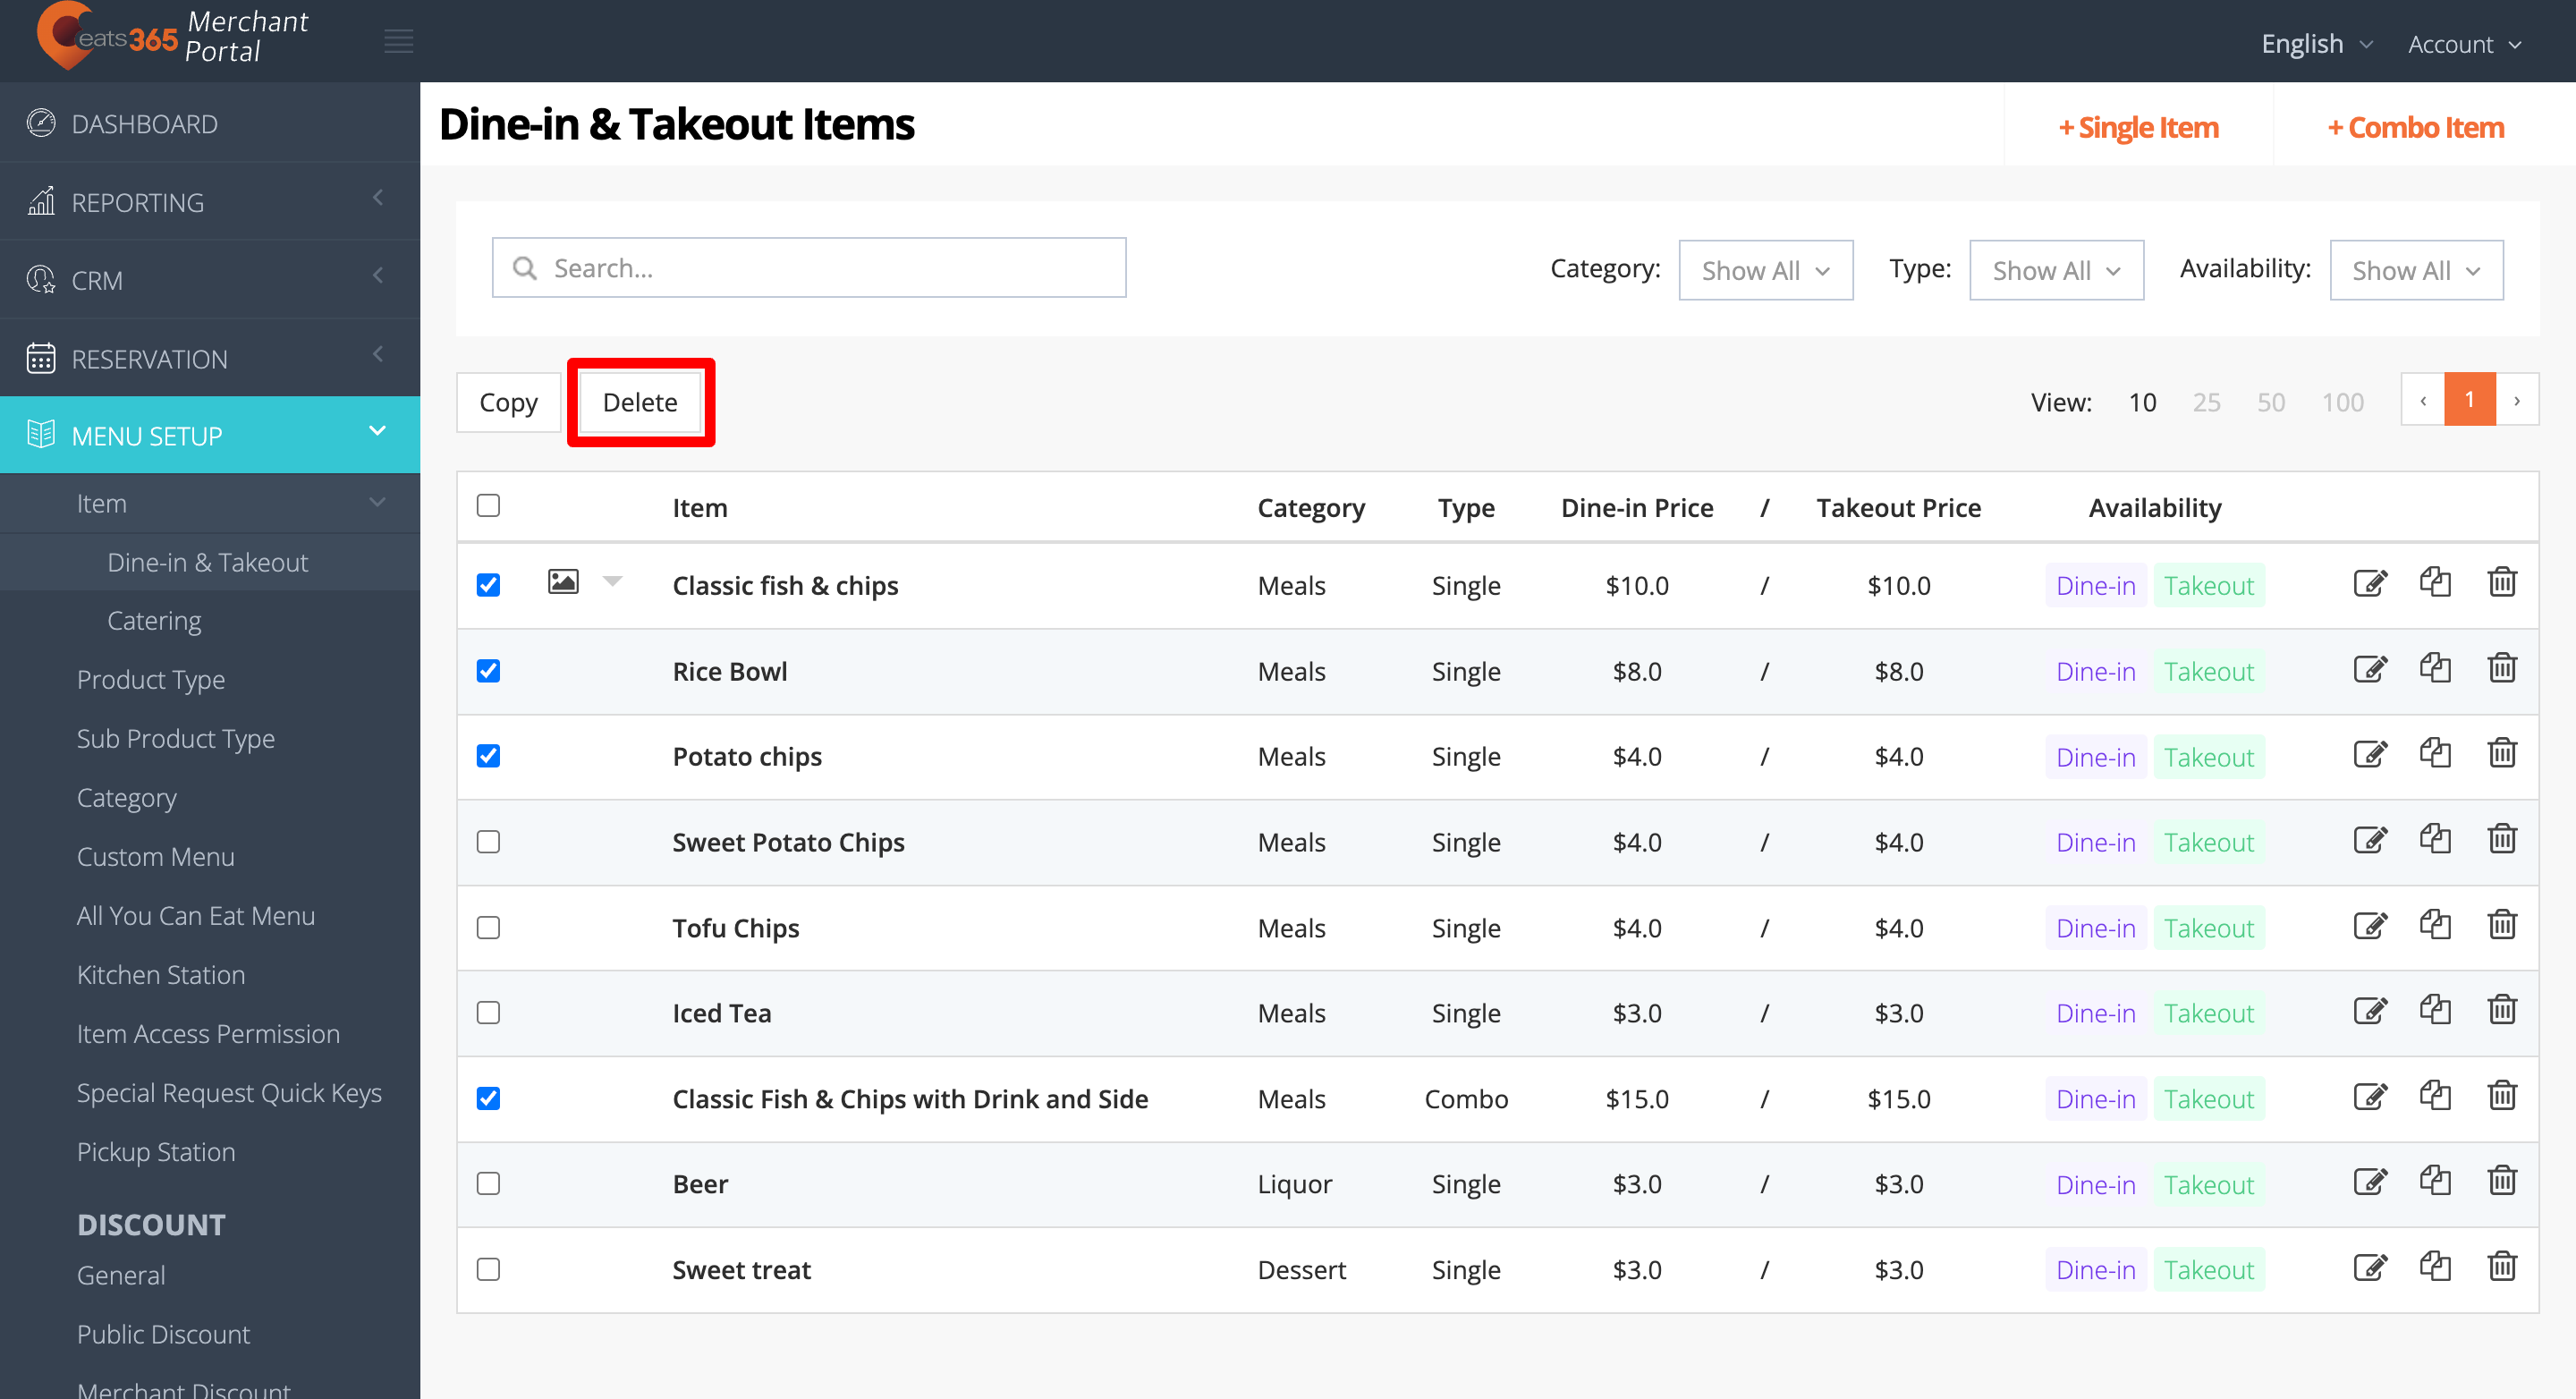
- Click on Confirm to delete the items.
Reorder items
To rearrange your menu items’ sequence, follow the steps below:
Eats365 POS
- Log in to the Eats365 POS.
- At the top left, tap Settings .
- Under "General," tap Menu Setup, then select Item.
- Tap the "Category" filter and select the category with the items that you want to reorder.
- Next to the item that you want to move, tap and hold Reorder
 . Then, drag the item in the order that you want it to appear.
Merchant Portal 2.0
- Log in to the Merchant Portal.
- On the left panel, click on Menu Setup, then select Item.
- Click on the "Category" filter and select the category with the items that you want to reorder.
- Next to the item that you want to move, click and hold Reorder . Then, drag the item in the order that you want it to appear.
Merchant Portal (Classic Theme)
- Log in to the Merchant Portal.
- On the left panel, click on Menu Setup, then select Item.
- Click on the "Category" filter and select the category with the items that you want to reorder.
- Next to the item that you want to move, click and hold Reorder . Then, drag the item in the order that you want it to appear.
Create a copy of an Item
Duplicating an item allows you to perform the following actions:
- Move the item to a different category. You won’t be able to do so unless you create a copy of the item. Once an item has been saved under a category, you won’t be able to change it from the Item page.
- Customize the item before adding it to a combo option.
To create a copy of an item, follow the steps below:
Eats365 POS
- Log in to the Eats365 POS.
-
At the top left, tap Settings .
- Under "General," tap Menu Setup, then select Item.
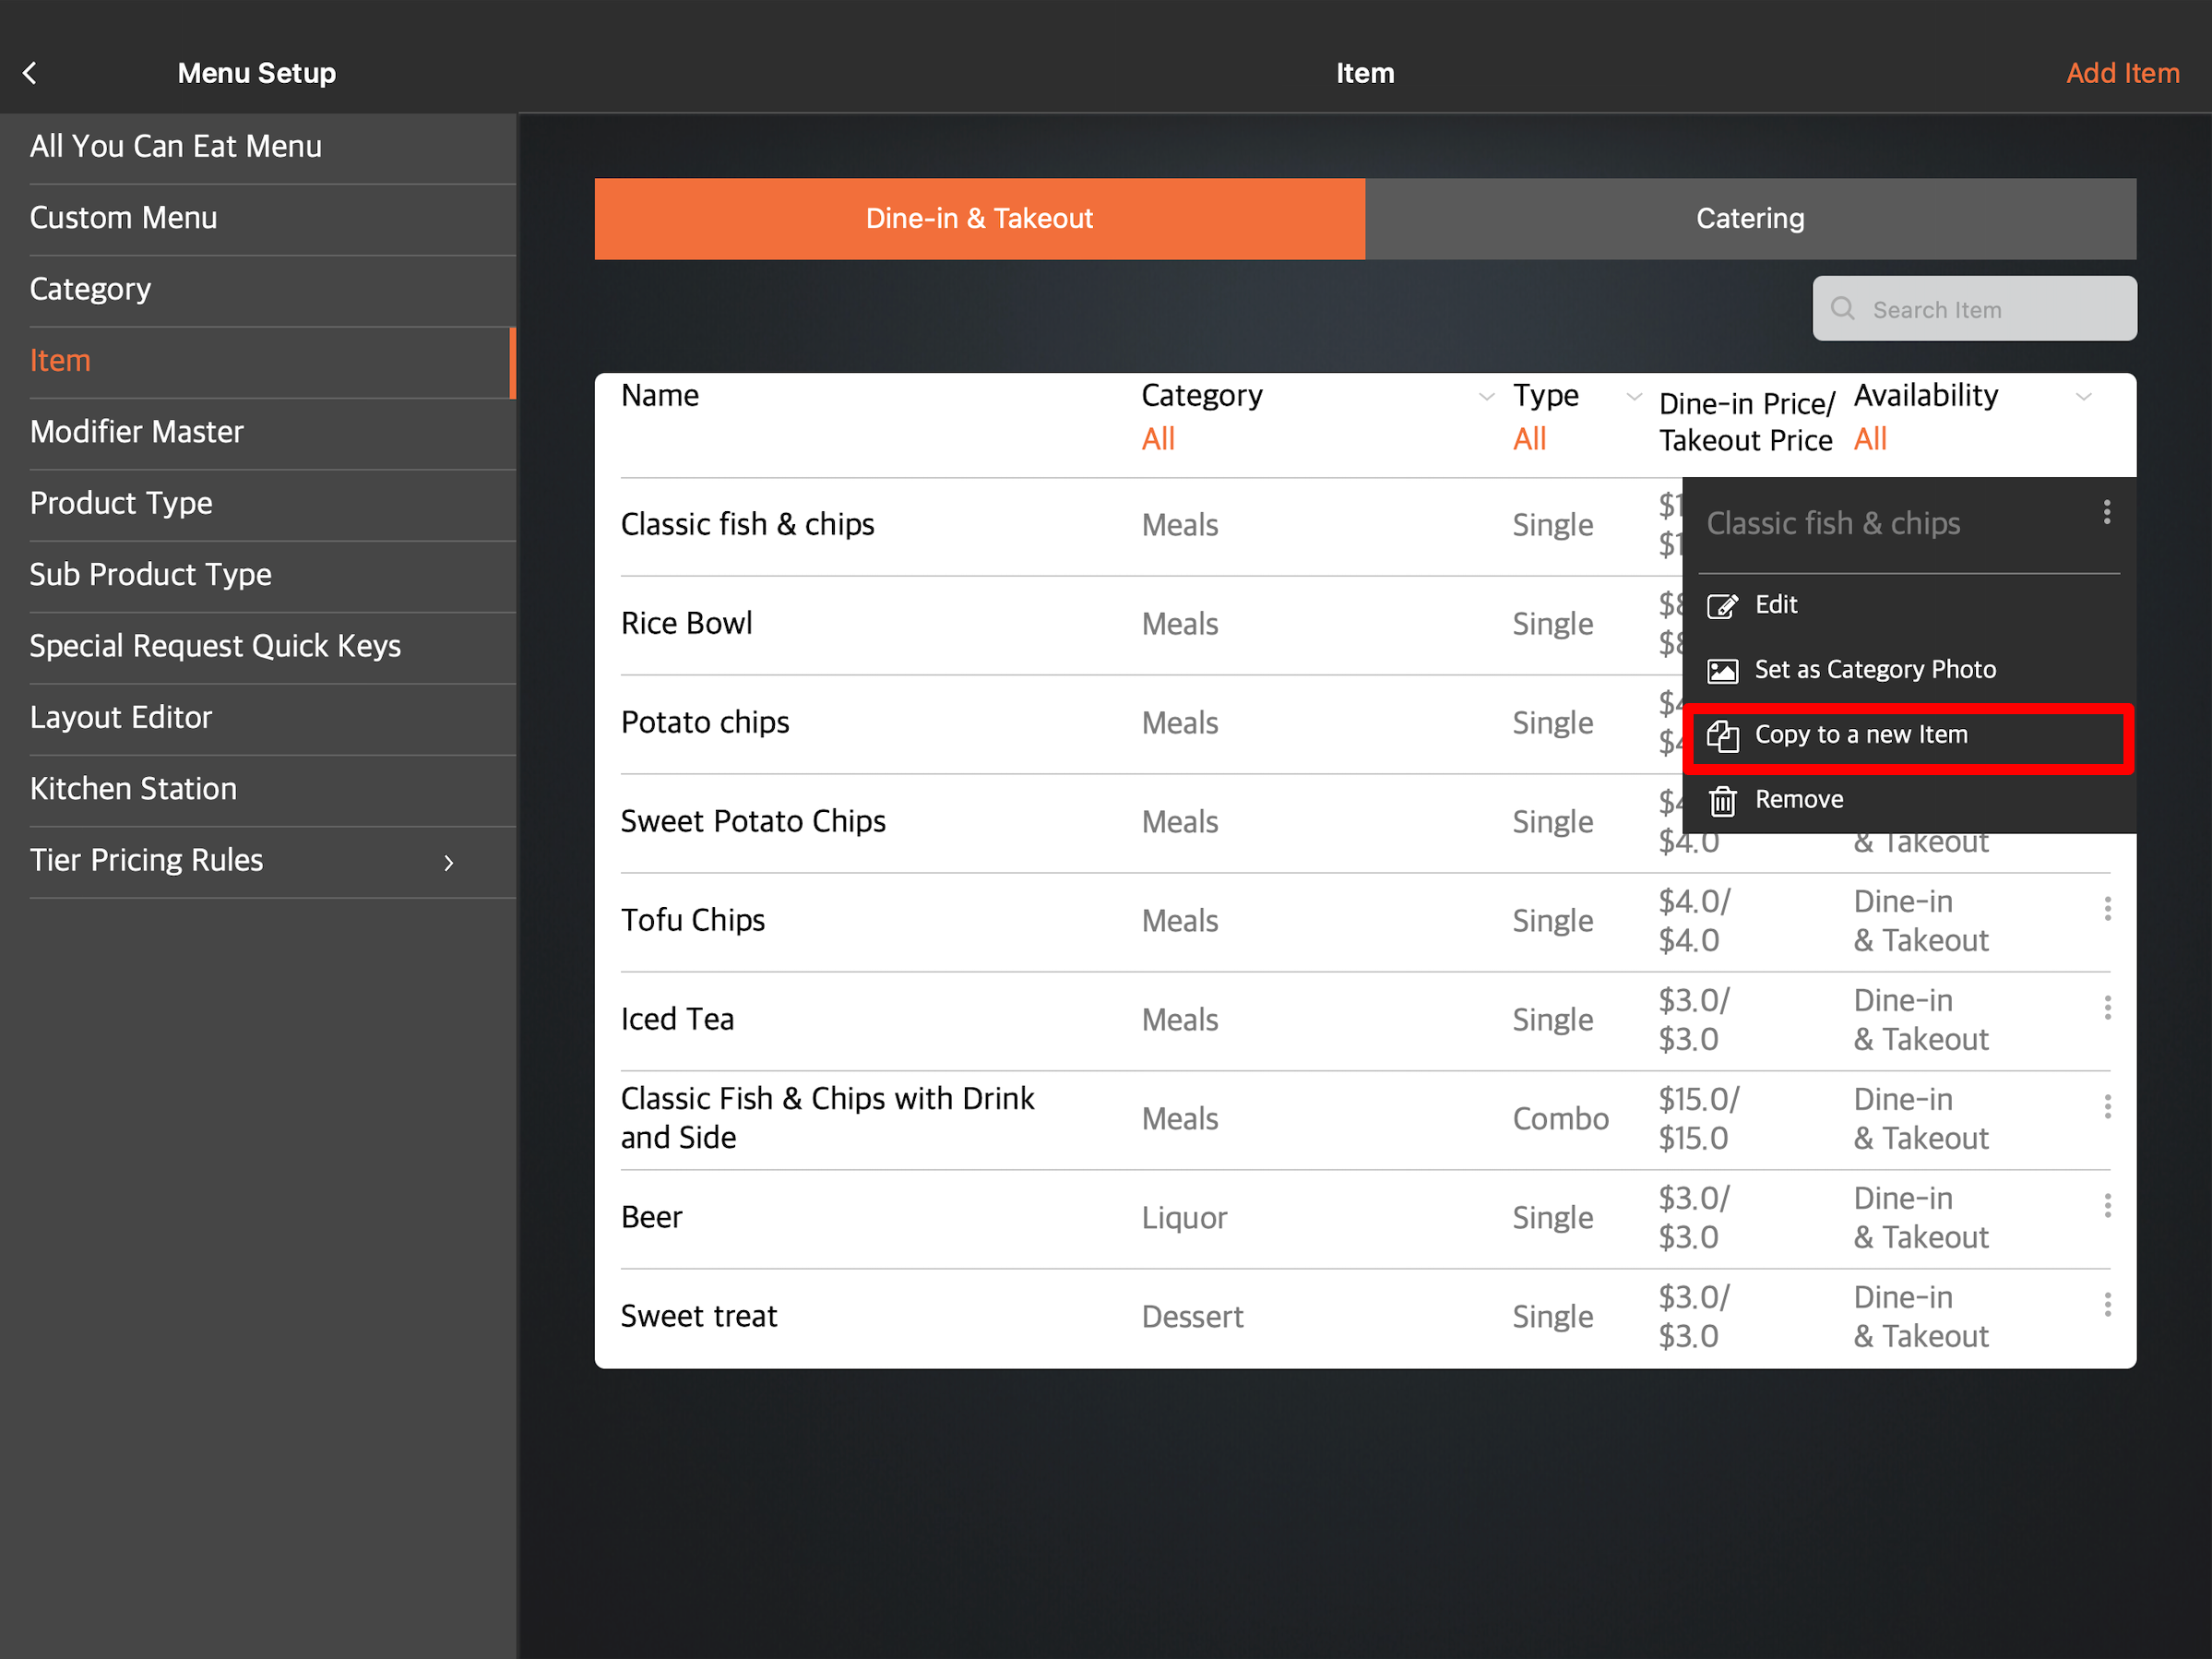
-
Next to the item you want to copy, tap the three-dot menu . Then, tap Copy to a new item
 .
.
-
Make your changes, if you have any.
Note: Make sure to update the item’s "Product Code" and "Item Code." An item’s product code and item code should be unique and should not have any duplicates. - At the top right, tap Save to confirm.
Merchant Portal 2.0
- Log in to the Merchant Portal.
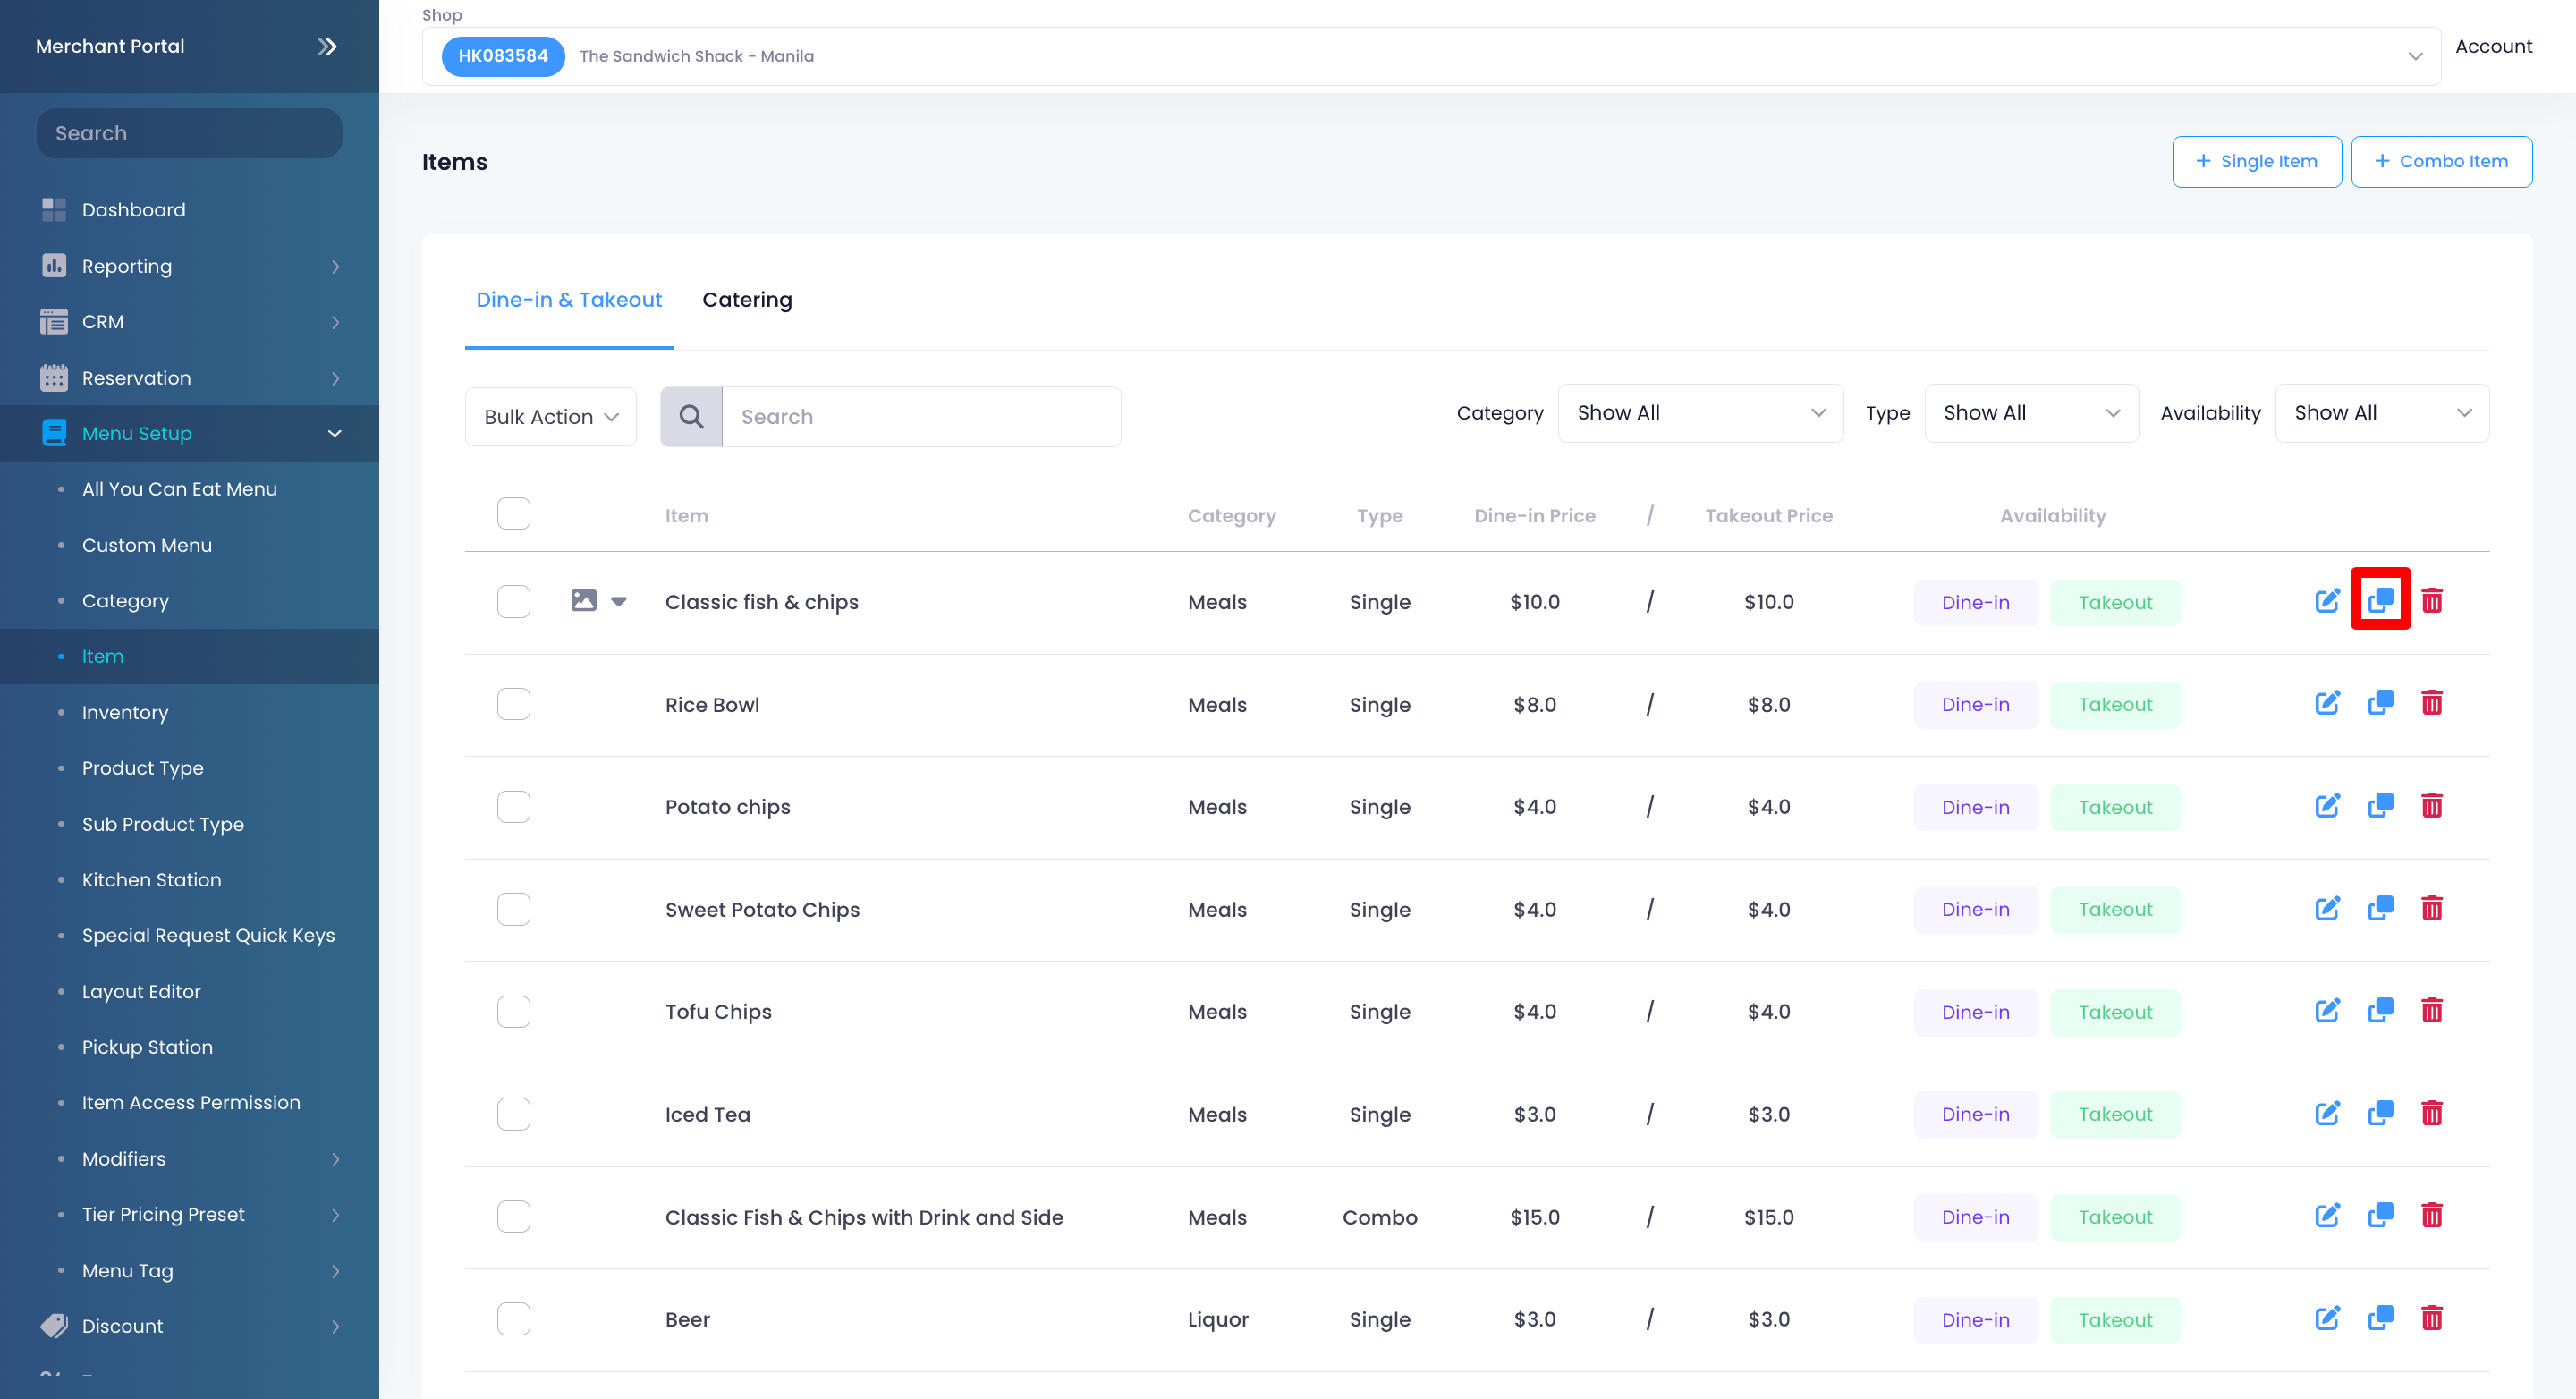
- On the left panel, click on Menu Setup, then select Item.
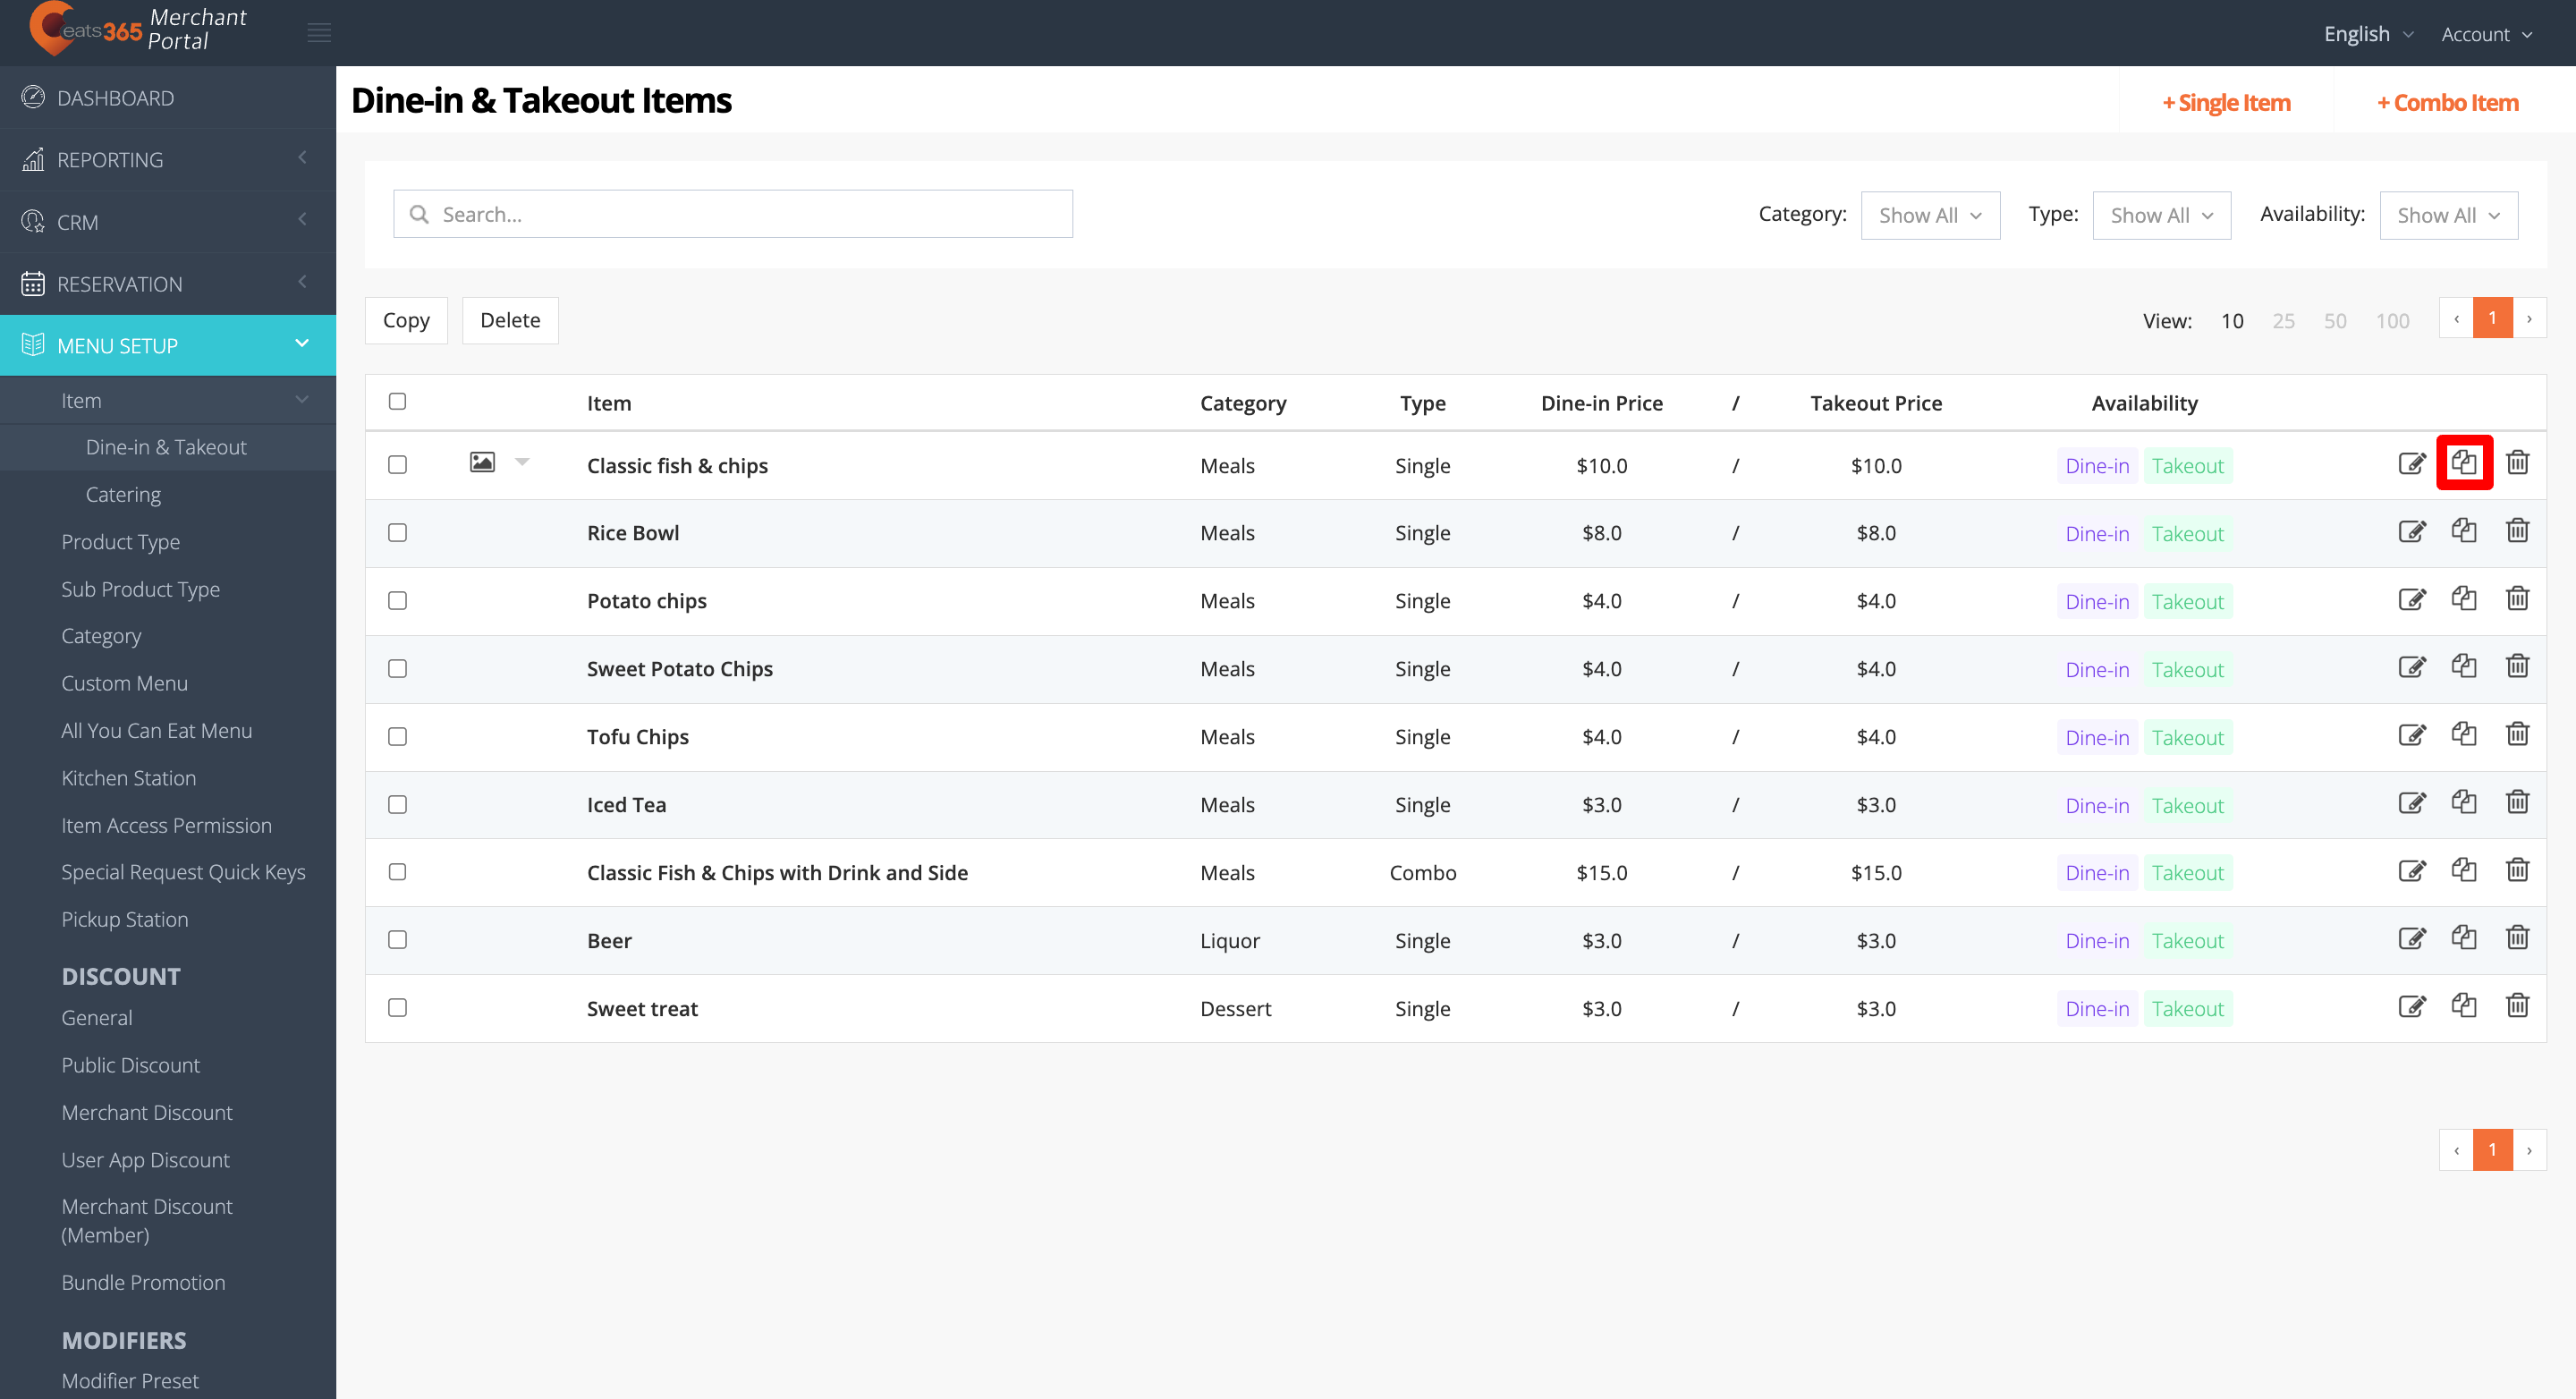
- On the item that you want to copy, click on Copy
 .
.
- Make your changes, if you have any.
Note: Make sure to update the item’s "Product Code" and "Item Code." An item’s product code and item code should be unique and should not have any duplicates. - At the top right, click on Save to confirm.
Merchant Portal (Classic Theme)
- Log in to the Merchant Portal.
- On the left panel, click on Menu Setup, then select Item.
- Select the item that you want to copy. Then, click on Copy.
- Make your changes, if you have any.
Note: Make sure to update the item’s "Product Code" and "Item Code." An item’s product code and item code should be unique and should not have any duplicates. - At the top right, click on Save to confirm.
Create a copy of multiple items
When you create a copy of multiple items, you can configure the settings of different items simultaneously. These settings include “Item Category,” “Availability,” and “Roles and Permissions.”
To create a copy of multiple items, follow the steps below:
Merchant Portal 2.0
- Log in to the Merchant Portal.
- On the left panel, click on Menu Setup, then select Item.
- Next to the items that you want to copy, click on the check box.
- At the top of the items, click on Bulk Action and choose Copy.
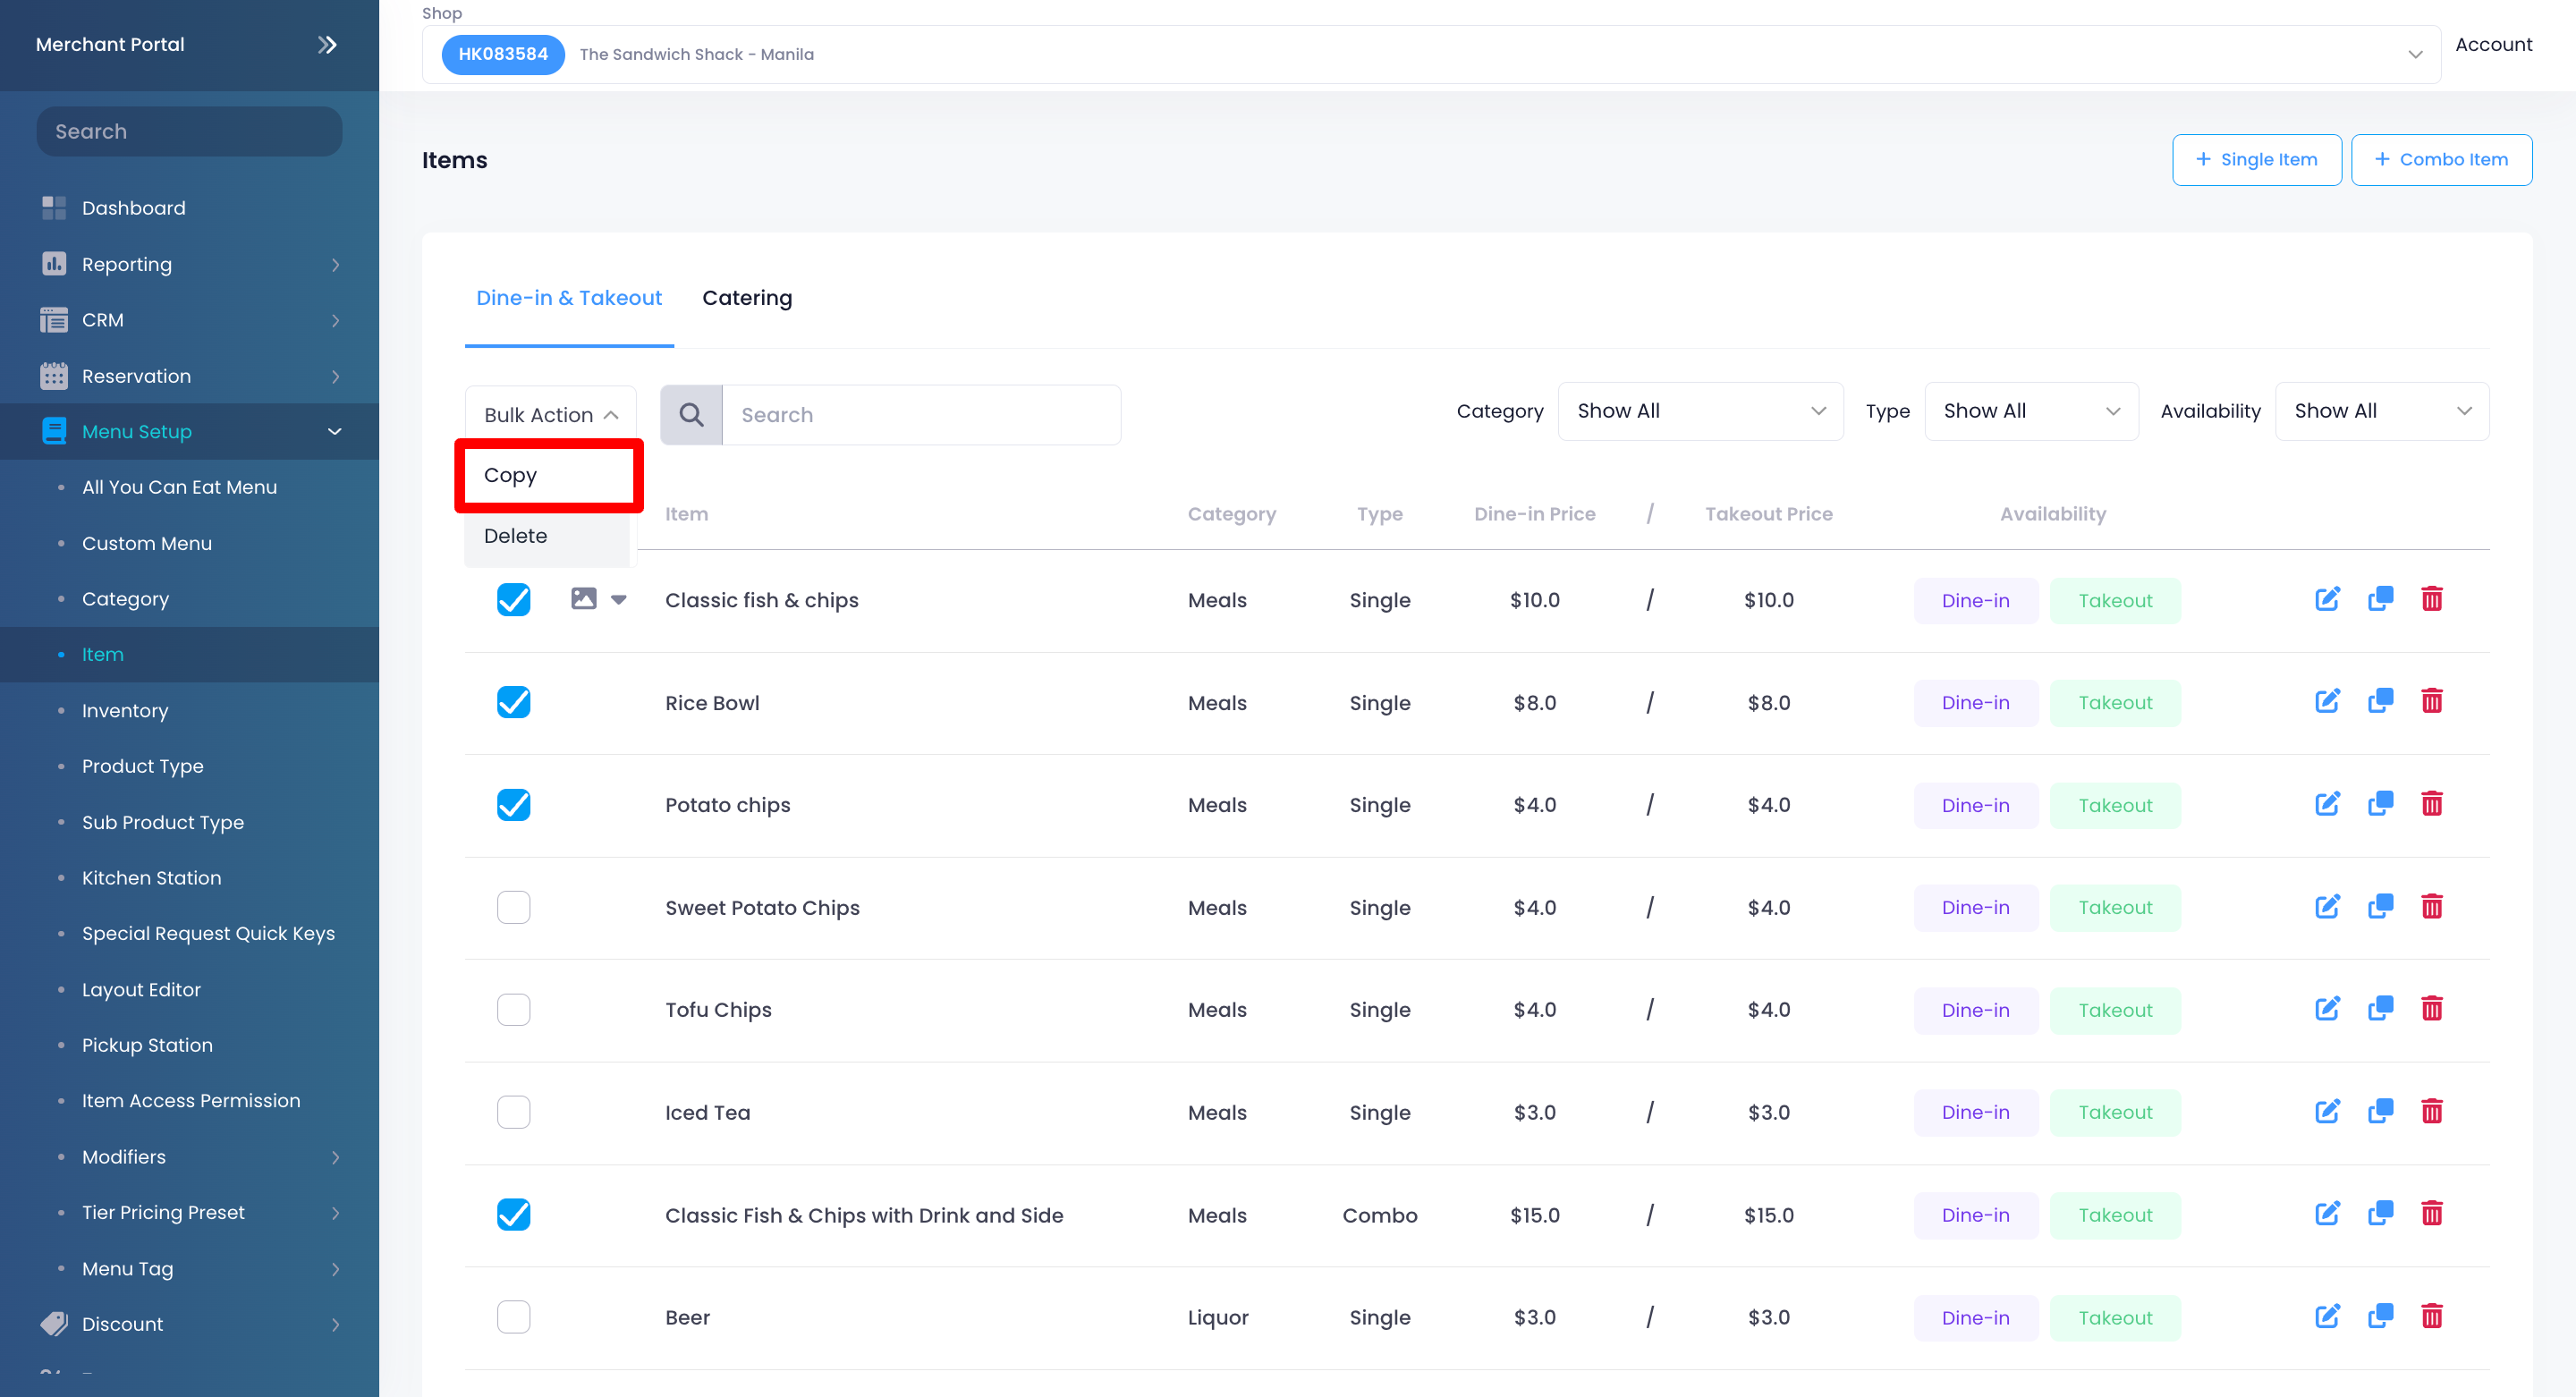
- Choose the settings you’d like to retain.
- At the top right, click on Copy.
Merchant Portal (Classic Theme)
- Log in to the Merchant Portal.
- On the left panel, click on Menu Setup, then select Item.
- Next to the items that you want to copy, click on the check box.
- At the top of the items, click on Copy.
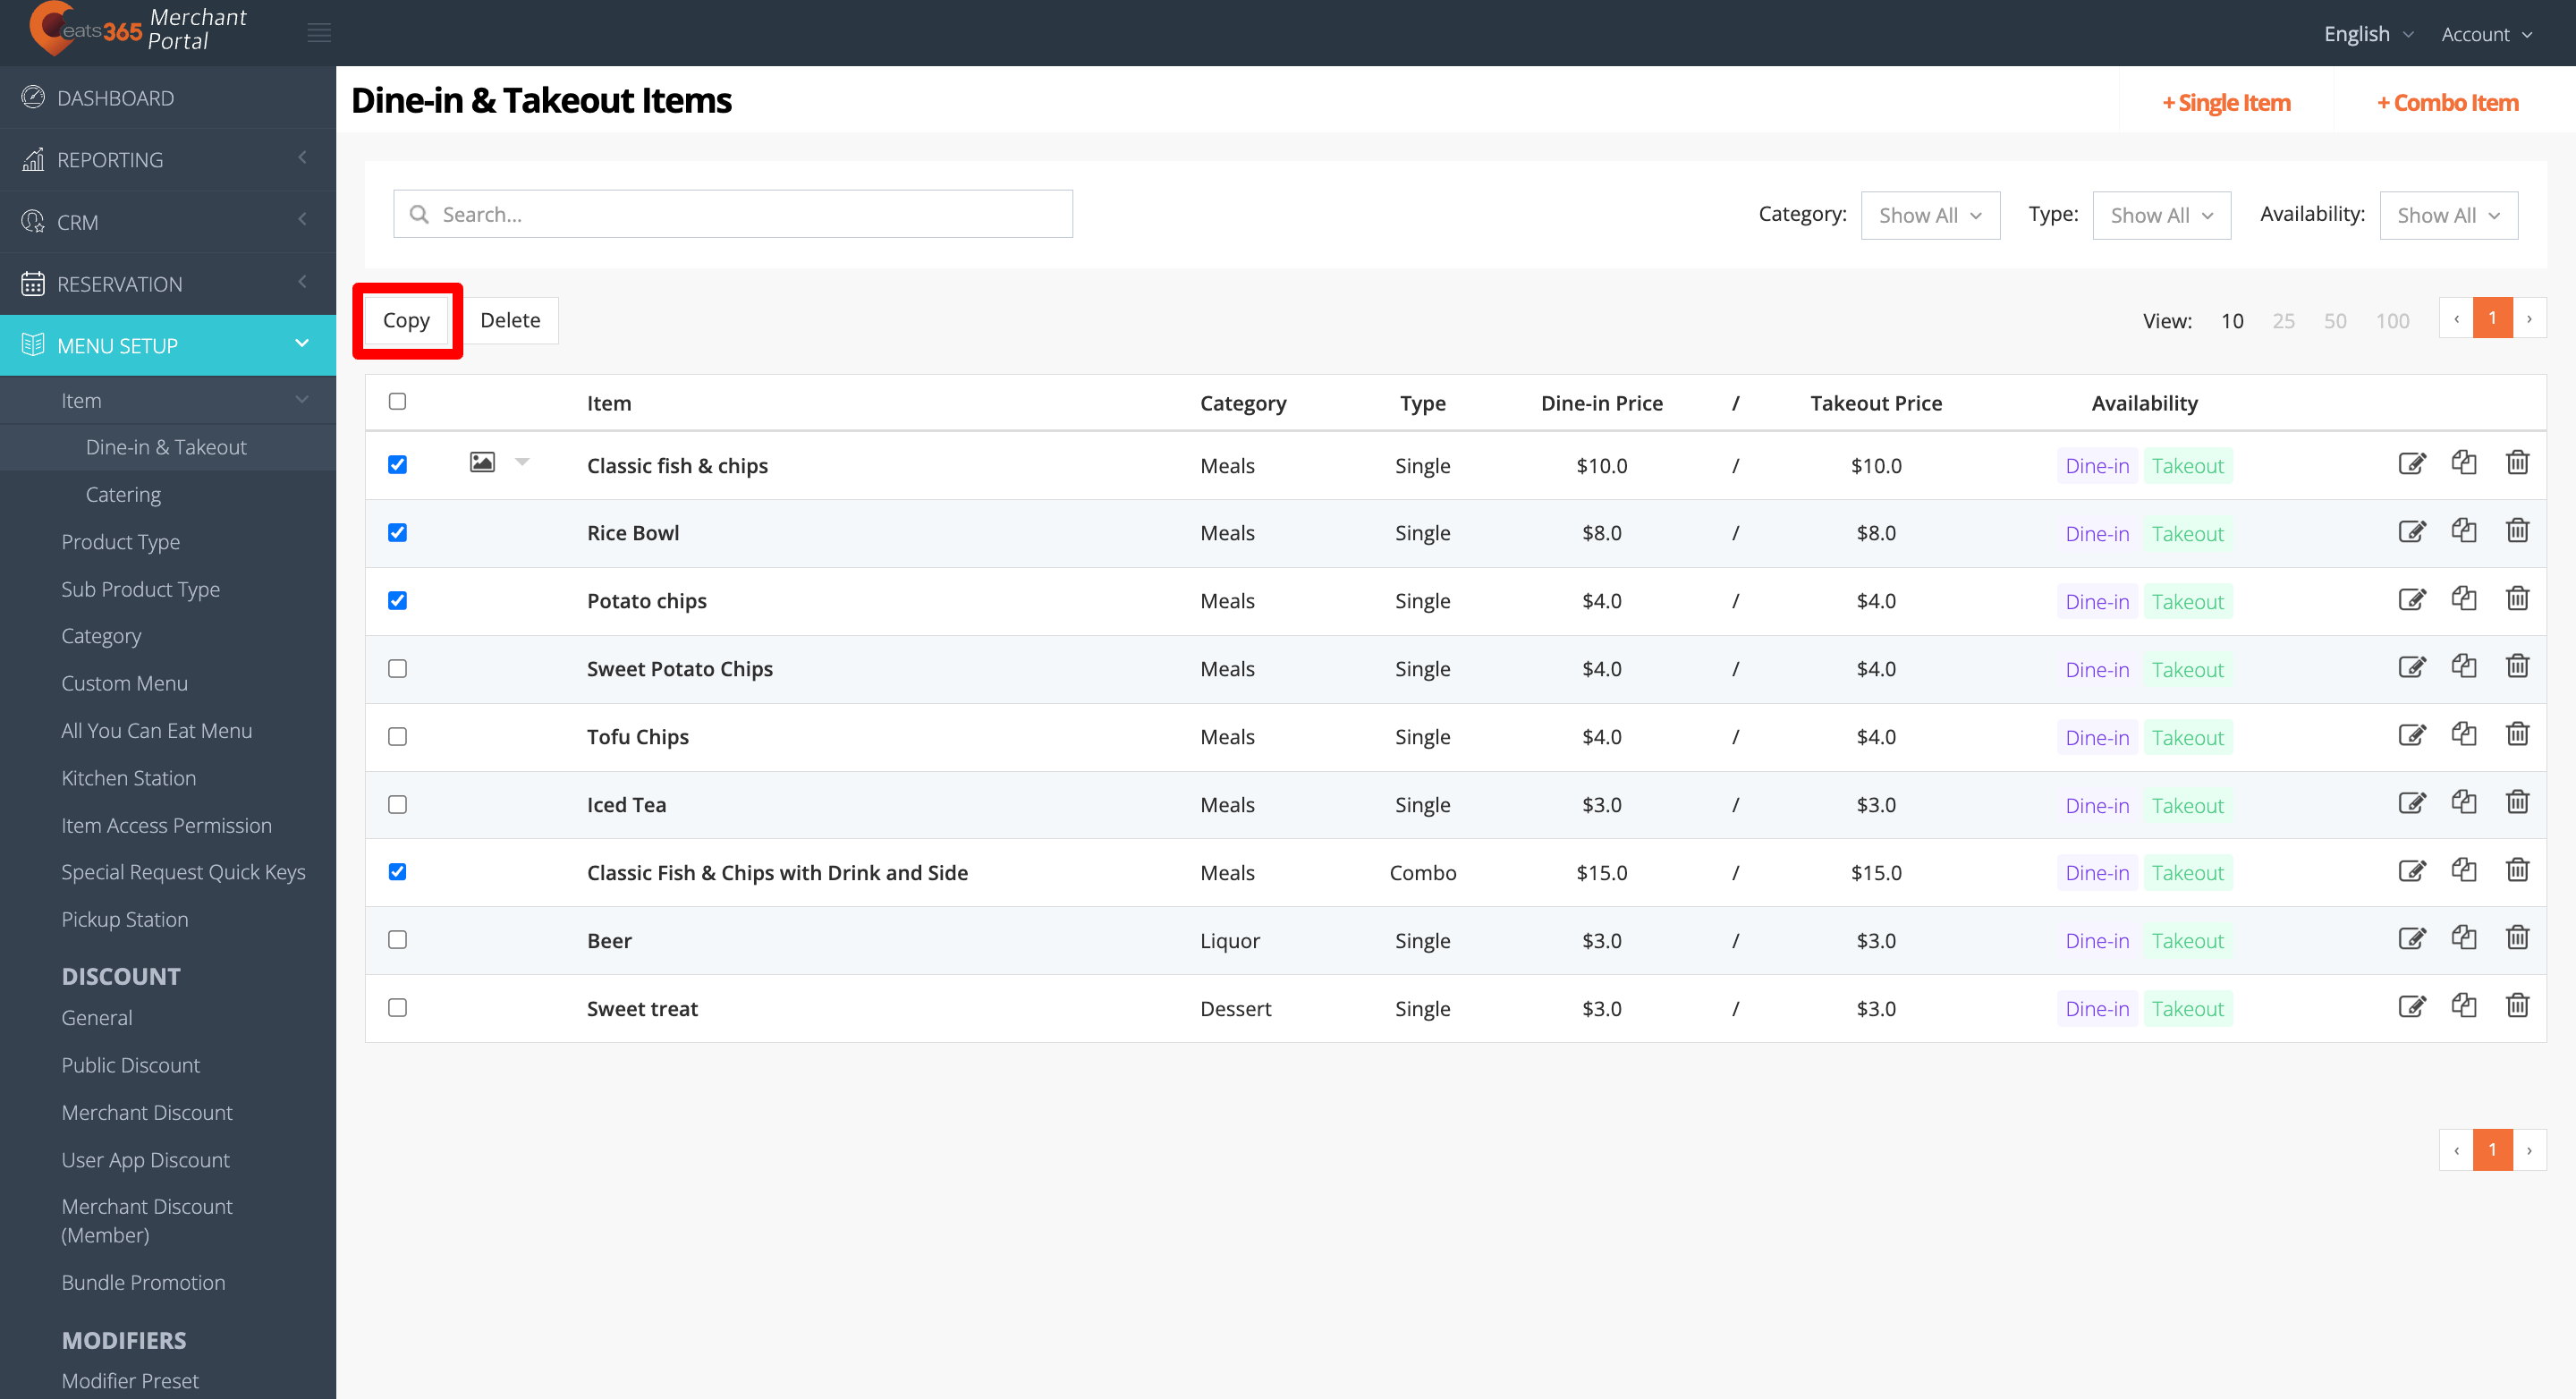
- Choose the settings you’d like to retain.
- At the top right, click on Copy to confirm.