Printer setup
Table of Contents
Customize the Label Template
Learn how to configure Label Template settings in the Eats365 POS or the Merchant Portal to customize printed receipt appearance.
You can configure the Label Template settings to add or remove information that you’d like to display on the label once it’s printed.
In this article, you’ll learn about Label Template settings and how to change them on the Eats365 POS or the Merchant Portal.
Configure the Label Template
To customize the Label Template, follow the steps below:
Eats365 POS
- Log in to the Eats365 POS.
- At the top left, tap Settings
 .
. - Under "Settings," tap Printing, then select Label Template.

- Choose an option to change based on your preferences.

- At the top right, tap Save to confirm.
Merchant Portal (Classic Theme)
- Log in to the Merchant Portal.
- On the left panel, click on Restaurant Settings. Then, click on Printing.
- At the top, click on the Label Templatetab.
Tip: You can click on the left and right arrow buttons to search for the Label Template tab. - Choose an option to change based on your preferences.
- At the top right, click on Save to confirm.
Merchant Portal 2.0
- Log in to the Merchant Portal.
- On the left panel, click on Restaurant Settings.
- Click on Printing. Then, select Label Settings.

- Choose an option to change based on your preferences.

- At the top right, tap Save to confirm.
Label Template options
You can change the following options in the Label Template settings:
Eats365 POS
General Label Template settings
Print Dine-in Label
Prints a label for dine-in orders.
Print Takeout Label
Prints a label for takeout orders.
DeleteLabel Setting
Language
Sets the default language of printed labels.
Label Theme
Choose between the following options:
| Theme 1 | Theme 2 |
 |
 |
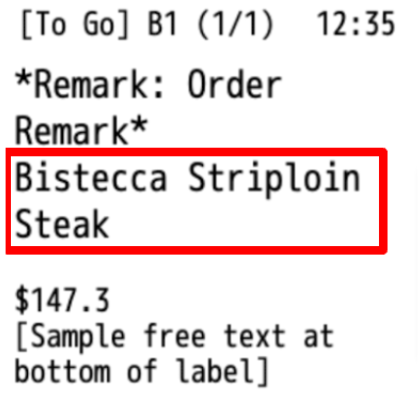
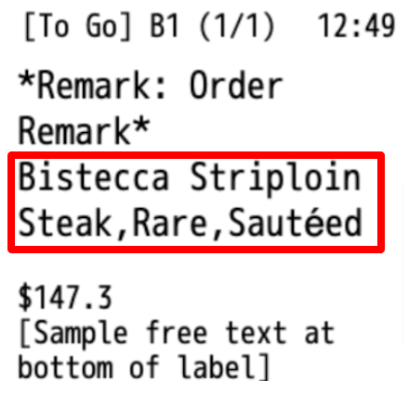
Modifier Layout
Choose between the following options:
| By Line | Continuous |
 |
 |
Font Size
Sets the Label’s font size. Choose from the following options:
- Small
- Medium
- Large
- Extra Large
- Double Extra Large
Print Dine-in Indicator on Label
Displays a “Dine-in” indicator on the label.
Print Takeout Indicator on Label
Displays a “Takeout” indicator on the label.
Print Check Name
Prints the check name on the label. The order number is displayed if there is no check name in the order.
Print Takeout Online Indicator on Label
Displays a “Takeout” indicator for online orders on the label.
Print Dine-in Online Indicator on Label
Displays a “Dine-in” indicator for online orders on the label.
Follow Printing Setting of Combo Options
Follows the "Separate Kitchen Ticket" choice for Combo Items.
Print Combo Item Name
Prints the combo item name.
Print Cutlery Request
Displays the customer’s cutlery request.
Print Item Special Request
Displays customers’ special requests on the label.
Page Number Denominator Definition
Sets the page count on printed labels. You can choose from the following options:
-
Total items in this Order for this Printer: The page count on labels will reflect only the number of items assigned to that specific printer.
- Example: If an order has five items, but only two are assigned to a particular printer, that printer will print two labels with a page count of “1/2” and “2/2.” Other printers will handle the remaining items and their labels will reflect their respective item counts.

- Example: If an order has five items, but only two are assigned to a particular printer, that printer will print two labels with a page count of “1/2” and “2/2.” Other printers will handle the remaining items and their labels will reflect their respective item counts.
-
Total items in this Order: The page count on labels will reflect the total number of items in the entire order, regardless if multiple printers handle the items.
- Example: If an order has four items and only one is assigned to a particular printer, that printer will print one label with a page count of “1/4”. All other printers in the order will show the appropriate page number and total count on their labels (examples: “2/4", “3/4,” “4/4”).

- Example: If an order has four items and only one is assigned to a particular printer, that printer will print one label with a page count of “1/4”. All other printers in the order will show the appropriate page number and total count on their labels (examples: “2/4", “3/4,” “4/4”).
Print Order Remarks on Label
Displays order remarks on the label.
Print Delivery Time
Displays the time of delivery on the label.
Print Pickup Time
Displays the time of pickup on the label.
Print Price on Label
Displays the item’s price on the label.
Print Delivery Platform Name
Displays the delivery platform’s name on the label.
Print Delivery Platform Order Number
Displays the delivery platform order number on the label.
Print Simplified Name
Prints a menu item's simplified name instead of the full Item name.
Free Text at Bottom of Label
Allows you to enter a message that appears at the bottom of the label.
DeleteGeneral Label Setting
Customize the dimensions and margins using the following settings:
General Label Setting
Adjusts the dimensions for the following:
- Label Size (mm)
- Gap Size (inches)
- Top Margin (mm)
- Bottom Margin (mm)
- Left Margin (mm)
- Right Margin (mm)
- Fixed Label Height
Star Label Setting
Turn on Fixed Label Height  to get the option to define the Label Size (mm).
Merchant Portal (Classic Theme)
For your convenience, the majority of options are already described based on their actual purpose. For example, the option Print Delivery Time prints the delivery time. The option Print Price on Label prints the price on the label, and so on. You can toggle these settings on  or off
  .
.
In some cases, some options may require different input or have unique behaviors. Refer to the settings below for more information:
Printing Language
Sets the default language of printed labels.
Modifier Layout
Choose between the following options:
| By Line | Continuous |
|
|
Label Theme
Choose between the following options:
| Theme 1 | Theme 2 |
|
|
Font Size
Sets the Label’s font size. Choose from the following options:
- Small
- Medium
- Large
- Extra Large
- Double Extra Large
Dine-In Indicator Type
Sets the Dine-In Indicator Type. Choose from the following options:
- Default
- Table Number
Follow Separate Ticket Setting in Combo Options
Follows the Separate Kitchen Ticket choice for Combo Items.
Print Simplified Name
Prints a menu item's simplified name instead of the full Item name.
Free Text at Bottom of Label
Allows you to enter a message that appears at the bottom of the label.
General Label Setting
Adjusts the dimensions for the following:
- Label Size for Width (mm)
- Gap Size (inches)
- Top Margin (mm)
- Bottom Margin (mm)
- Left Margin (mm)
- Right Margin (mm)
Merchant Portal 2.0
General Label Template settings
Print Dine-in Label
Prints a label for dine-in orders.
Print Takeout Label
Prints a label for takeout orders.
Print Combo Item Name
Prints the combo item name.
Print Simplified Name
Prints a menu item's simplified name instead of the full Item name.
DeleteLabel Setting
Printing Language
Sets the default language of printed labels.
Dimensions
- Label Size (mm) W
- Label Size (mm) H
- Gap Size (inches)
- Top Margin (mm)
- Bottom Margin (mm)
- Left Margin (mm)
- Right Margin (mm)
Modifier Layout
Choose between the following options:
| By Line | Continuous |
|
|
Font Size
Sets the Label’s font size. Choose from the following options:
- Small
- Medium
- Large
- Extra Large
- Double Extra Large
Label Theme
Choose between the following options:
| Theme 1 | Theme 2 |
|
|
Print Dine-in Indicator on Label
Displays a “Dine-in” indicator on the label.
Print Takeout Indicator on Label
Displays a “Takeout” indicator on the label.
Print Takeout Online Indicator on Label
Displays a “Takeout” indicator for online orders on the label.
Print Dine-in Online Indicator on Label
Displays a “Dine-in” indicator for online orders on the label.
Print Order Remarks
Displays order remarks on the label.
Page Number Denominator Definition
Sets the page count on printed labels. You can choose from the following options:
-
Total items in this Order for this Printer: The page count on labels will reflect only the number of items assigned to that specific printer.
- Example: If an order has five items, but only two are assigned to a particular printer, that printer will print two labels with a page count of “1/2” and “2/2.” Other printers will handle the remaining items and their labels will reflect their respective item counts.
- Example: If an order has five items, but only two are assigned to a particular printer, that printer will print two labels with a page count of “1/2” and “2/2.” Other printers will handle the remaining items and their labels will reflect their respective item counts.
-
Total items in this Order: The page count on labels will reflect the total number of items in the entire order, regardless if multiple printers handle the items.
- Example: If an order has four items and only one is assigned to a particular printer, that printer will print one label with a page count of “1/4”. All other printers in the order will show the appropriate page number and total count on their labels (examples: “2/4", “3/4,” “4/4”)..
- Example: If an order has four items and only one is assigned to a particular printer, that printer will print one label with a page count of “1/4”. All other printers in the order will show the appropriate page number and total count on their labels (examples: “2/4", “3/4,” “4/4”).
Print Price on Label
Displays the item’s price on the label.
Follow Separate Ticket Setting in Combo Options
Prints combo options on separate labels.
Print Cutlery Remarks
Displays the customer’s cutlery request.
Print Identical Modifiers Combined
Combines identical modifiers as a single entry on the receipt.
Delete