 Eats365 Products
 Merchant Guide
 Modules
 Membership
 Integrations
 Hardware
 Staff Operations
 Roles & Permissions
 Payments
 Reports
 What’s New
 Release Notes
 Troubleshooting
 Simulators
 Glossary
 Troubleshooter
 System Status
Printer setup
Table of Contents
Scan and pair a printer
Learn how to or and delete a printer on the Eats365 POS or the Merchant Portal.
Printers create physical copies of various documents, such as receipts, job orders, checks, reports, and more.
In this article, you’ll learn how to add and delete a printer on the Eats365 POS and the Merchant Portal.
Add a printer
To scan and pair a printer, follow the steps below:
Eats365 POS
- Make sure to turn on the printer and connect it to the same network as the POS.
- Log in to the Eats365 POS.
- At the top left, tap Settings
 .
. - To detect any supported printers in the same network, under "General," tap Printer Setup. Then, select Scan printers. All newly detected printers appear on the left panel along with the "New" indicator below the printer name.

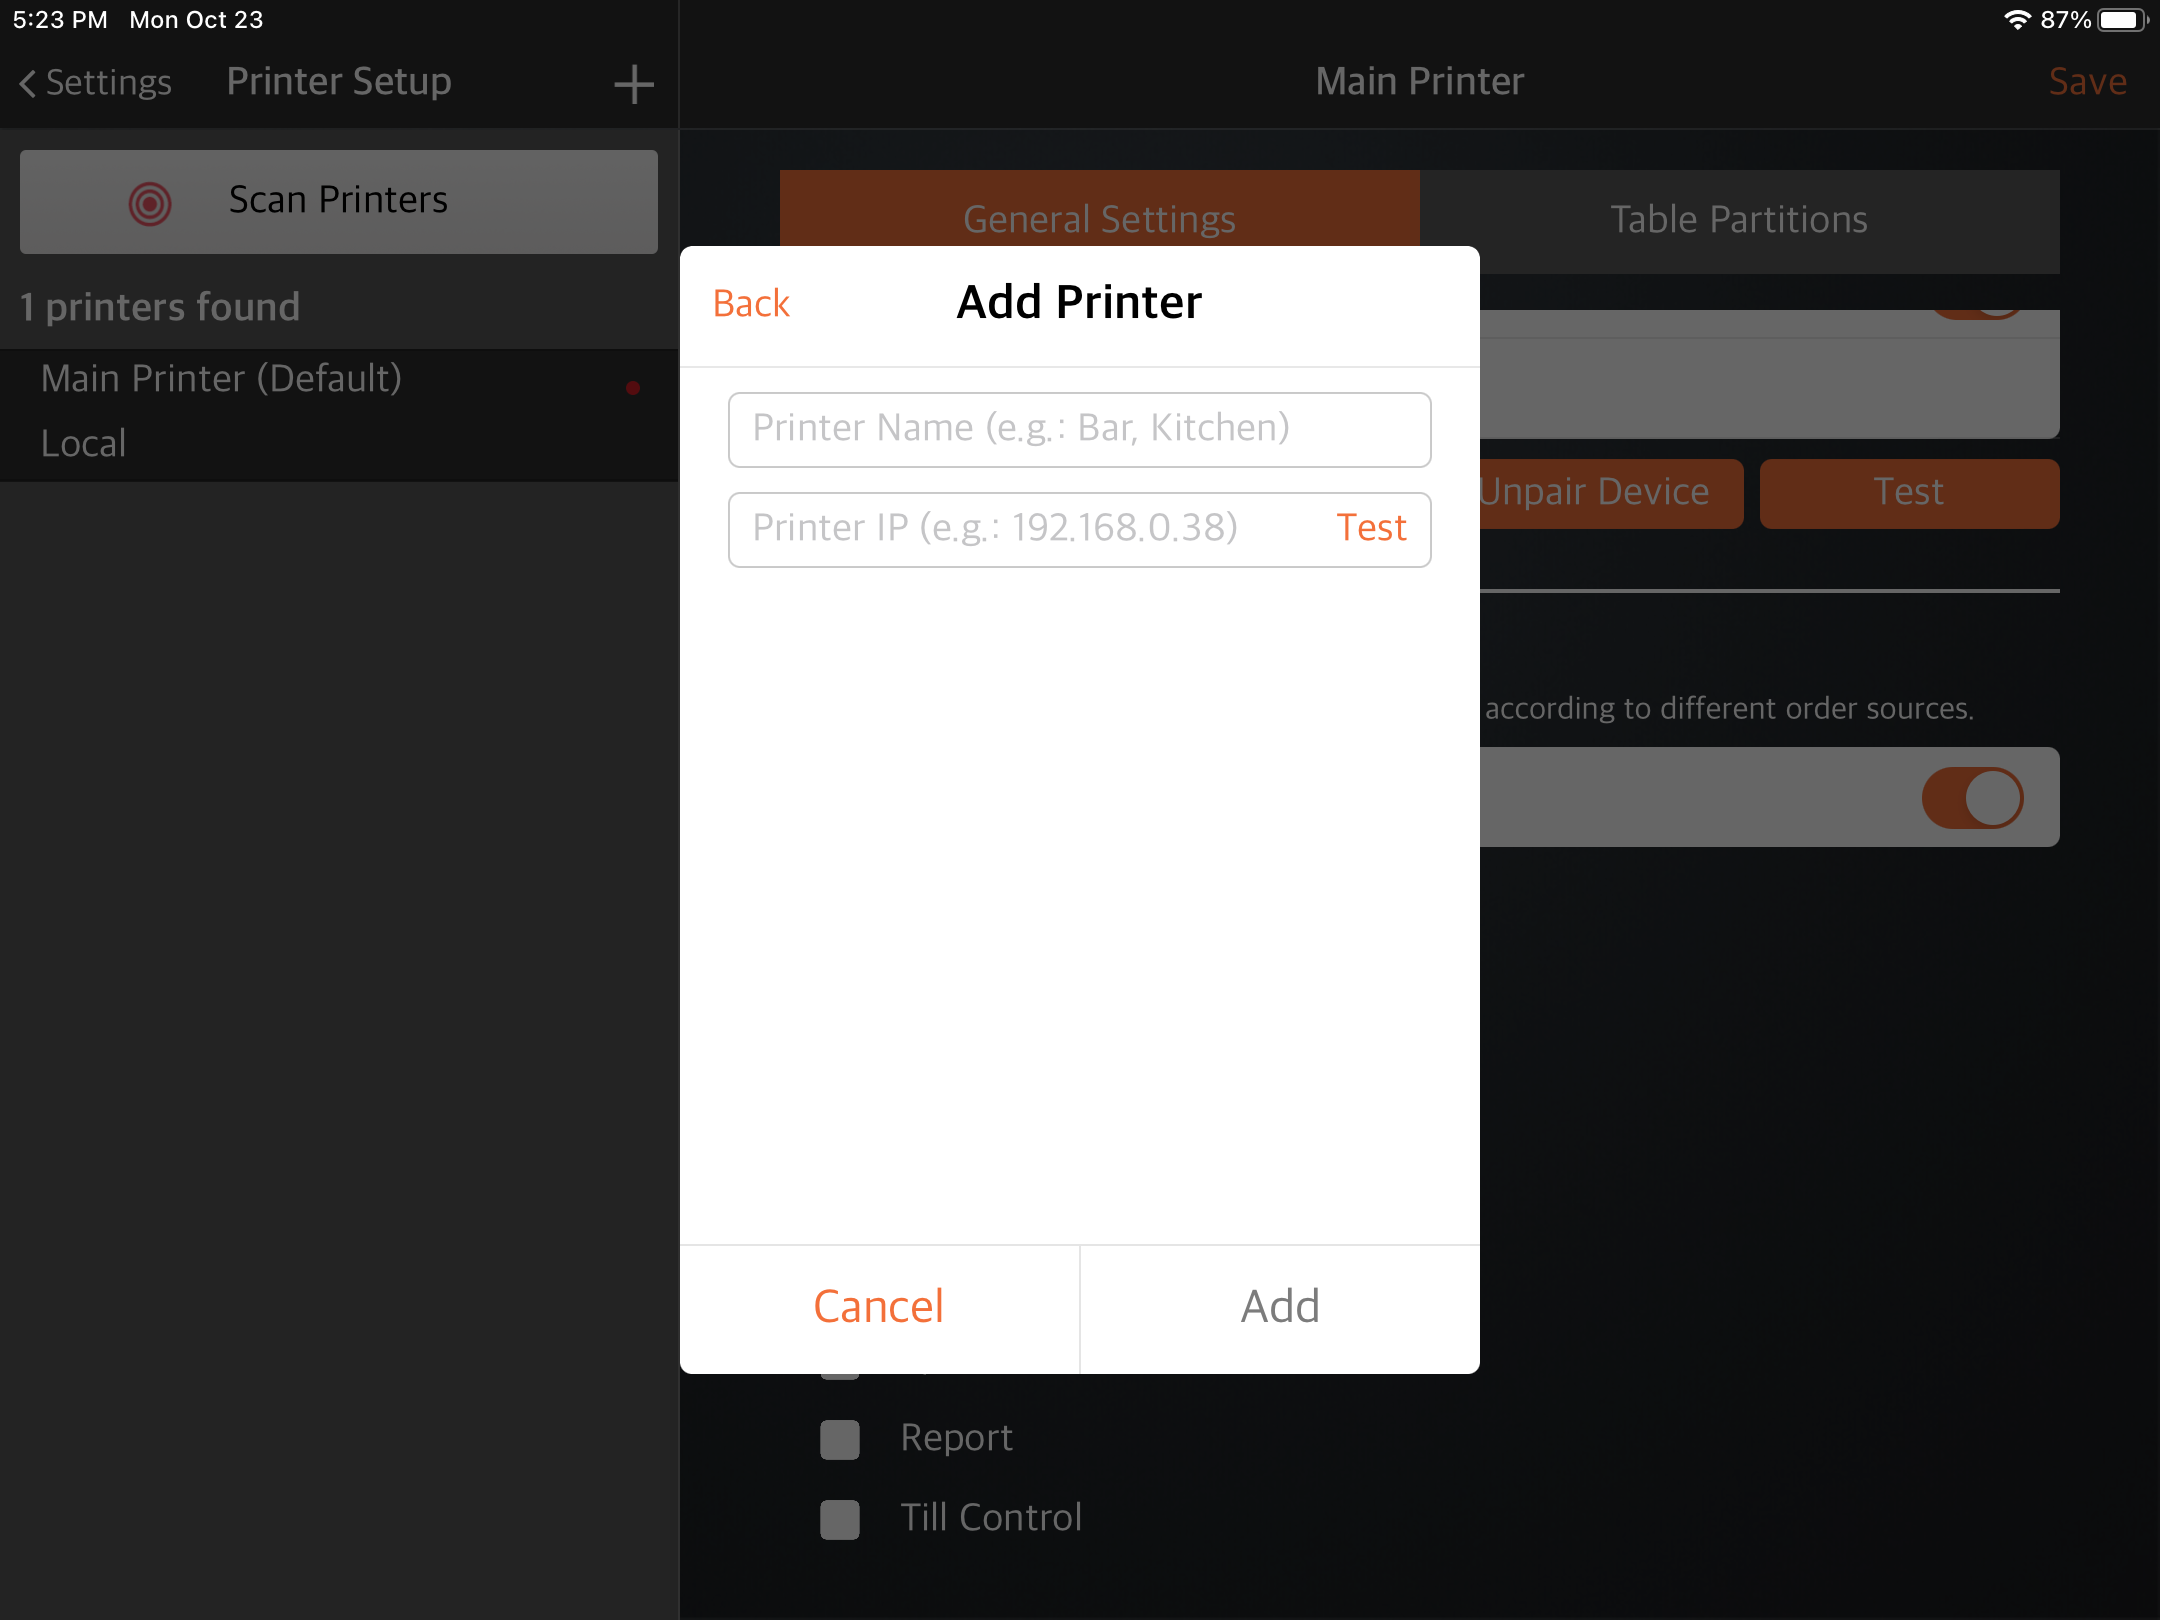
- To add printers manually, tap
 . Then, select the type of printer you want to add.
- Enter a name for the printer to make it easily identifiable. Then, enter the printer’s IP address.
Tip: If you don't have the printer's IP address available, refer to your printer's user manual or contact the printer's manufacturer. - Tap Test to verify if you’ve connected to the correct printer. A test slip is printed on the selected printer to help you confirm that the correct printer is paired.
- Configure the printer’s settings based on your preferences.
Important: The settings may vary depending on the printer type and printer model. - To connect the printer to the POS, tap Pair Device.

Merchant Portal 2.0
- Log in to the Merchant Portal.
- On the left panel, click on Restaurant Settings.
- Click on Printer List.
- At the top right, click on Add Printer.
- Enter the printer’s details.
 Important: The required details may vary depending on the printer type and printer model.
 - Click on Save to confirm.
Configure printer preferences
To configure your printer, follow the steps below:
Eats365 POS
- Log in to the Eats365 POS.
- At the top left, tap Settings .
- To detect any supported printers in the same network, under General, tap Printer Setup.
- Select the printer that you want to configure. To identify if you’ve chosen the correct printer, tap Test. The corresponding printer prints a test slip.
- Once you’ve identified the correct printer, you may change its available settings. Printer settings vary depending on the printer type. Refer to the "Printer settings per printer type" section below to learn the settings you might encounter with each printer type.
- Tap Save to complete the setup.
Printer settings per printer type
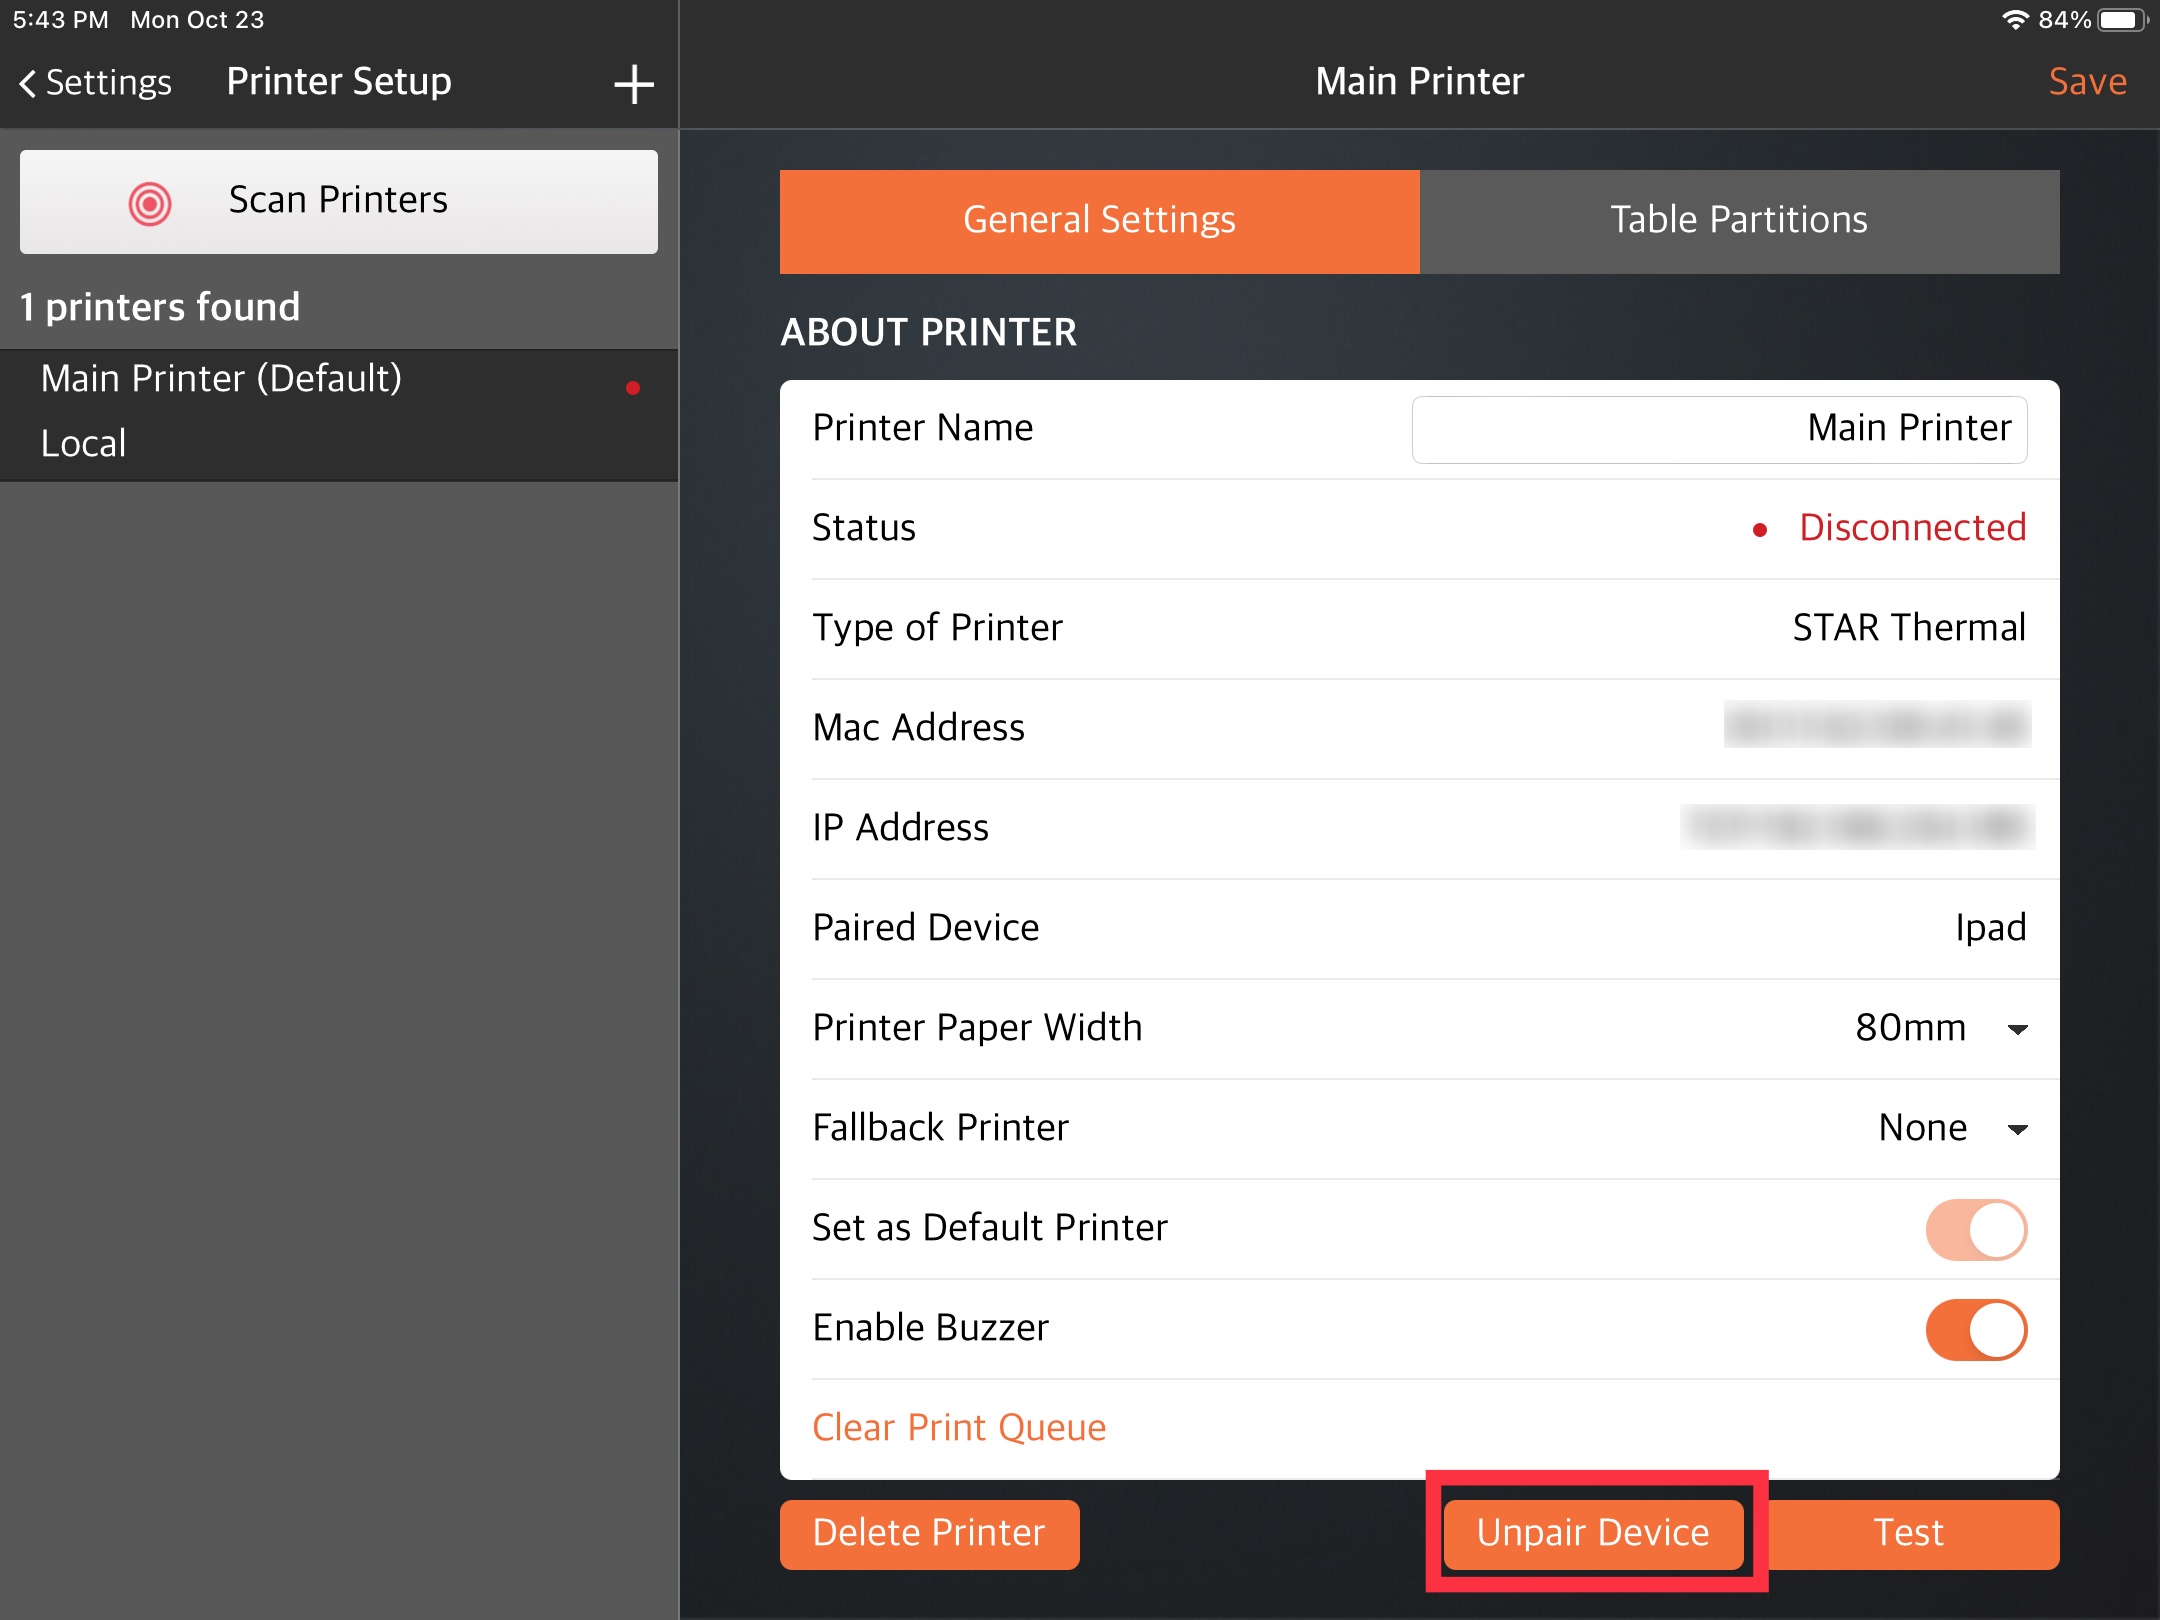
Thermal printer

- Printer name: Enter a name to identify the printer.
-
Printer details
- Status (Connection between POS and printer)
- Type of Printer
- Mac Address
- IP Address
- Paired Device (The restaurant currently paired)
- Printer Paper Width: Enter the paper width of the receipt paper you're using.
- Width Resolution: Sets the printing margin. If you're using a receipt printer with 80mm paper width, it's recommended to use 576 px. This ensures the receipt is centered on the paper.
- Print Language: Select the printer's language.
- Fallback Printer: If you have multiple printers, select the secondary printer that will perform the printing if the current printer fails to print.
-
(Optional) Set as Default Printer: Enable
 this setting to set the printer as the default printer.
Note: Enabling this feature prints the customer’s receipts from orders made on other apps, such as mPOS and Photo Menu, from tables that aren’t specified under the "Table Partitions" tab. -
(Optional) Enable Buzzer: If you have an external buzzer connected to your printer and want to be notified when a new receipt prints, enable the Enable Buzzer .
Important: If you're using a Star printer, enable the ticket types you want to enable the buzzer function.
- Clear Print Queue: Tap this option to reset the print queue for the selected printer.
-
Supported Printing Types
Tip: Enable Print Order from All Sourcesto include all supported printing types.- Bill/Receipt - Designates the printer to print Dine-in, Takeout, and Catering order receipts. To configure the receipt printer further, refer to Printing settings.
- Order Ticket - Designates the printer to print a list of menu items that have been ordered from a specific table.
- Kitchen Ticket - Designates the printer to print kitchen tickets based on the Kitchen Station selected.
- Expeditor Ticket - Designates the printer to print the expeditor list.
- Queue Ticket - Designates the printer to print queue tickets.
- Report - Designates the printer to print a Shift Report and a Daily Closing Report.
- Till Control - Opens the cash drawer automatically when a check is settled using any tender with the "Open Till" option enabled.
- (Optional) Table Partitions: Allows you to choose which tables you want the printer to print for. At the top, click on the Table Partitions tab. Select the tables that you want to include. You can also choose Select all table(s) in this area to highlight all tables at once.
Dot Matrix

- Printer name: Enter a name to identify the printer.
-
Printer details
- Status (Connection between POS and printer)
- Type of Printer
- Mac Address
- IP Address
- Print Language: Select the printer's language.
- Reduce Delay Time for Print Jobs of Same Order: Enable this setting to configure the printer to only move to the next print job once the current one has been completed. This is to avoid print jobs from being overridden when a new one comes in the queue in restaurant setups where multiple POS terminals use the same printer.
- Fallback Printer: If you have multiple printers, select the secondary printer that will perform the printing if the current printer fails to print.
- Clear Print Queue: Tap this option to reset the print queue for the selected printer.
-
Supported Printing Types
Tip: Enable Print Order from All Sourcesto include all supported printing types.- Bill/Receipt - Designates the printer to print Dine-in, Takeout, and Catering order receipts. To configure the receipt printer further, refer to Printing settings.
- Order Ticket - Designates the printer to print a list of menu items that have been ordered from a specific table.
- Kitchen Ticket - Designates the printer to print kitchen tickets based on the Kitchen Station selected.
- Expeditor Ticket - Designates the printer to print the expeditor list.
- Report - Designates the printer to print a Shift Report and a Daily Closing Report.
- Till Control - Opens the cash drawer automatically when a check is settled using any tender with the "Open Till" option enabled.
Label

- Printer name: Enter a name to identify the printer.
-
Printer details
- Status (Connection between POS and printer)
- Type of Printer
- IP Address
-
Use Default Built-in Font: Enable this setting to use the printer's default font.
- Paired Device: Displays the restaurant currently paired with the printer.
- Enable Debug Mode: Enable this setting to send diagnostics data from the printer.
-
Print Speed: Determines the printing turnaround time. The higher the setting, the faster the printing. During peak hours, you can select a higher setting, such as "7," to achieve the fastest possible printing turnaround.
Note: This option applies to GoDex label printers. - Clear Print Queue: Tap this option to reset the print queue for the selected printer.
-
Supported Printing Types
- Kitchen Ticket - Designates the printer to print kitchen tickets based on the Kitchen Station selected.
Virtual Printer
To learn how to configure a Virtual Printer with the Eats365 system, refer to Set up a Virtual Printer.
DeleteMerchant Portal (Classic)
- Log in to the Merchant Portal.
- On the left panel, click on Restaurant Settings.
- Click on Printer List.
- Next to the printer that you want to configure, click on View.
- Configure the printer's available settings. Printer settings vary depending on the printer type. Refer to the "Printer settings per printer type" section below to learn the settings you might encounter with each printer type.
- Click on Save to confirm.
Printer settings per printer type
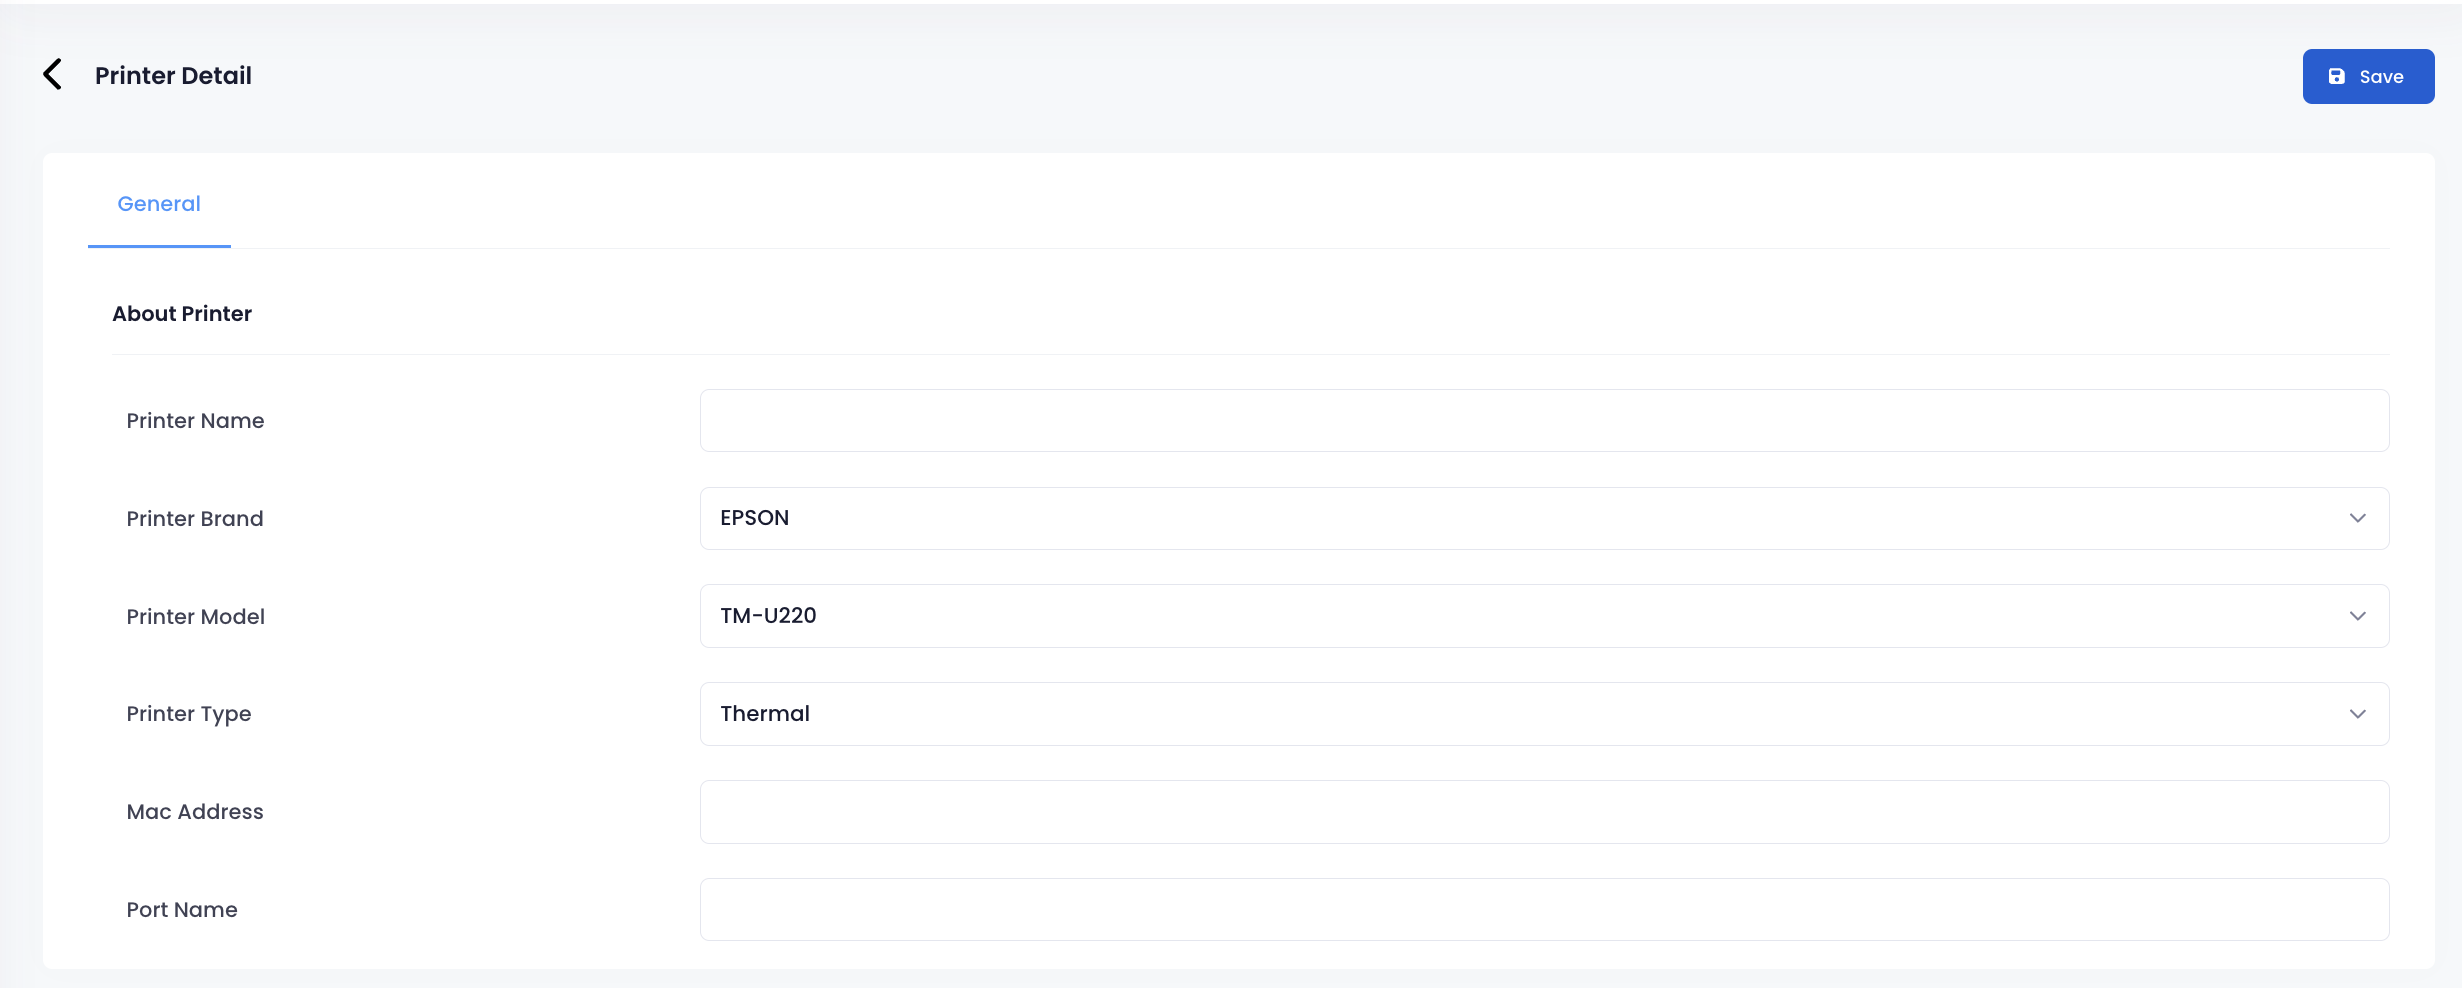
Thermal
- Printer name: Enter a name to identify the printer.
-
Printer details
- Printer Brand
- Printer Model
- Status (Connection between POS and printer)
- Paired Device (The restaurant currently paired)
- Printer Type
- Mac Address
- Port Name
-
(Optional) As Default Printer: Enable
 this setting to set the printer as the default printer.
Note: Enabling this feature prints the customer’s receipts from orders made on other apps, such as mPOS and Photo Menu, from tables that aren’t specified under the "Table Partitions" tab. - Printer Paper Width: Enter the paper width of the receipt paper you're using.
- Fallback Printer: If you have multiple printers, select the secondary printer that will perform the printing if the current printer fails to print.
- Image Alignment: Sets the alignment of the restaurant logo when printed.
-
Supported Orders
- Print Order from All Sources - Print all supported orders regardless of source.
- Print general orders and user app or website’s orders separately - Configure the printer to print different ticket types depending on the source.
-
Supported Printing Types
- Bill/Receipt - Designates the printer to print Dine-in, Takeout, and Catering order receipts. To configure the receipt printer further, refer to Printing settings.
- Order Ticket - Designates the printer to print a list of menu items that have been ordered from a specific table.
- Kitchen Ticket - Designates the printer to print kitchen tickets based on the Kitchen Station selected.
- Expeditor Ticket - Designates the printer to print the expeditor list.
- Queue Ticket - Designates the printer to print queue tickets.
- Report - Designates the printer to print a Shift Report and a Daily Closing Report.
- Till Control - Opens the cash drawer automatically when a check is settled using any tender with the "Open Till" option enabled.
-
(Optional) Table Partitions: Allows you to choose which tables you want the printer to print for. At the top, click on the Table Partitions tab. Select the tables that you want to include. You can also choose Select all to highlight all tables at once.
Dot Matrix
- Printer name: Enter a name to identify the printer.
-
Printer details
- Printer Brand
- Printer Model
- Status (Connection between POS and printer)
- Printer Type
- Mac Address
- Port Name
-
(Optional) As Default Printer: Enable this setting to set the printer as the default printer.
Note: Enabling this feature prints the customer’s receipts from orders made on other apps, such as mPOS and Photo Menu, from tables that aren’t specified under the "Table Partitions" tab. - Fallback Printer: If you have multiple printers, select the secondary printer that will perform the printing if the current printer fails to print.
-
Supported Orders
- Print Order from All Sources - Print all supported orders regardless of source.
- Print general orders and user app or website’s orders separately - Configure the printer to print different ticket types depending on the source.
-
Supported Printing Types
- Bill/Receipt - Designates the printer to print Dine-in, Takeout, and Catering order receipts. To configure the receipt printer further, refer to Printing settings.
- Order Ticket - Designates the printer to print a list of menu items that have been ordered from a specific table.
- Kitchen Ticket - Designates the printer to print kitchen tickets based on the Kitchen Station selected.
- Expeditor Ticket - Designates the printer to print the expeditor list.
- Report - Designates the printer to print a Shift Report and a Daily Closing Report.
- Till Control - Opens the cash drawer automatically when a check is settled using any tender with the "Open Till" option enabled.
Label
- Printer name: Enter a name to identify the printer.
-
Printer details
- Printer Brand
- Printer Model
- Status (Connection between POS and printer)
- Paired Device (The restaurant currently paired)
- Printer Type
- Mac Address
- Port Name
-
(Optional) As Default Printer: Enable this setting to set the printer as the default printer.
- Printer Paper Width: Enter the paper width of the receipt paper you're using.
- Fallback Printer: If you have multiple printers, select the secondary printer that will perform the printing if the current printer fails to print.
- Image Alignment: Sets the alignment of the restaurant logo when printed.
-
Supported Orders
- Print Order from All Sources - Print all supported orders regardless of source.
- Print general orders and user app or website’s orders separately - Configure the printer to print different ticket types depending on the source.
-
Supported Printing Types
- Bill/Receipt - Designates the printer to print Dine-in, Takeout, and Catering order receipts. To configure the receipt printer further, refer to Printing settings.
- Order Ticket - Designates the printer to print a list of menu items that have been ordered from a specific table.
- Kitchen Ticket - Designates the printer to print kitchen tickets based on the Kitchen Station selected.
- Expeditor Ticket - Designates the printer to print the expeditor list.
- Queue Ticket - Designates the printer to print queue tickets.
- Report - Designates the printer to print a Shift Report and a Daily Closing Report.
- Till Control - Opens the cash drawer automatically when a check is settled using any tender with the "Open Till" option enabled.
-
(Optional) Table Partitions: Allows you to choose which tables you want the printer to print for. At the top, click on the Table Partitions tab. Select the tables that you want to include. You can also select Select all to select all tables at once.
Virtual Printer
To learn how to configure a Virtual Printer with the Eats365 POS system, refer to Set up a Virtual Printer.
DeleteMerchant Portal 2.0
- Log in to the Merchant Portal.
- On the left panel, click on Restaurant Settings.
- Click on Printer List.
- Next to the printer that you want to configure, click on View.
- You can configure the printer's available settings. Printer settings vary depending on the printer type. Refer to the "Printer settings per printer type" section below to learn the settings you might encounter with each printer type.
- Click on Save to confirm.
Printer settings per printer type
Thermal

- Printer name: Enter a name to identify the printer.
-
Printer details
- Printer Brand
- Printer Model
- Status (Connection between POS and printer)
- Paired Device (The restaurant currently paired)
- Printer Type
- Mac Address
- Port Name
-
(Optional) As Default Printer: Enable
 this setting to set the printer as the default printer.
Note: Enabling this feature prints the customer’s receipts from orders made on other apps, such as mPOS and Photo Menu, from tables that aren’t specified under the "Table Partitions" tab. - Printer Paper Width: Enter the paper width of the receipt paper you're using.
- Width Resolution: Sets the printing margin. If you're using a receipt printer with 80mm paper width, it's recommended to use 576 px. This ensures the receipt is centered on the paper.
- Fallback Printer: If you have multiple printers, select the secondary printer that will perform the printing if the current printer fails to print.
- Image Alignment: Sets the alignment of the restaurant logo when printed.
-
Supported Orders
- Print Order from All Sources - Print all supported orders regardless of source.
- Print general orders and user app or website’s orders separately - Configure the printer to print different ticket types depending on the source.
-
Supported Printing Types
- Bill/Receipt - Designates the printer to print Dine-in, Takeout, and Catering order receipts. To configure the receipt printer further, refer to Printing settings.
- Order Ticket - Designates the printer to print a list of menu items that have been ordered from a specific table.
- Kitchen Ticket - Designates the printer to print kitchen tickets based on the Kitchen Station selected.
- Expeditor Ticket - Designates the printer to print the expeditor list.
- Queue Ticket - Designates the printer to print queue tickets.
- Report - Designates the printer to print a Shift Report and a Daily Closing Report.
- Till Control - Opens the cash drawer automatically when a check is settled using any tender with the "Open Till" option enabled.
-
(Optional) Table Partitions: Allows you to choose which tables you want the printer to print for. At the top, click on the Table Partitions tab. Select the tables that you want to include. You can also choose Select all to highlight all tables at once.
Dot Matrix

- Printer name: Enter a name to identify the printer.
-
Printer details
- Printer Brand
- Printer Model
- Status (Connection between POS and printer)
- Paired Device (The restaurant currently paired)
- Printer Type
- Mac Address
- Port Name
-
(Optional) As Default Printer: Enable this setting to set the printer as the default printer.
Note: Enabling this feature prints the customer’s receipts from orders made on other apps, such as mPOS and Photo Menu, from tables that aren’t specified under the "Table Partitions" tab. - Fallback Printer: If you have multiple printers, select the secondary printer that will perform the printing if the current printer fails to print.
-
Reduce Delay Time for Print Jobs of Same Order: Enable this setting to configure the printer to only move to the next print job once the current one has been completed. This is to avoid print jobs from being overridden when a new one comes in the queue in restaurant setups where multiple POS terminals use the same printer.
Note: This option applies to Epson Dot Matrix printers. -
Supported Orders
- Print Order from All Sources - Print all supported orders regardless of source.
- Print general orders and user app or website’s orders separately - Configure the printer to print different ticket types depending on the source.
-
Supported Printing Types
- Bill/Receipt - Designates the printer to print Dine-in, Takeout, and Catering order receipts. To configure the receipt printer further, refer to Printing settings.
- Order Ticket - Designates the printer to print a list of menu items that have been ordered from a specific table.
- Kitchen Ticket - Designates the printer to print kitchen tickets based on the Kitchen Station selected.
- Expeditor Ticket - Designates the printer to print the expeditor list.
- Report - Designates the printer to print a Shift Report and a Daily Closing Report.
- Till Control - Opens the cash drawer automatically when a check is settled using any tender with the "Open Till" option enabled.
Label

- Printer name: Enter a name to identify the printer.
-
Printer details
- Printer Brand
- Printer Model
- Status (Connection between POS and printer)
- Paired Device (The restaurant currently paired)
- Printer Type
- Mac Address
- Port Name
-
(Optional) As Default Printer: Enable this setting to set the printer as the default printer.
Note: Enabling this feature prints the customer’s receipts from orders made on other apps, such as mPOS and Photo Menu, from tables that aren’t specified under the "Table Partitions" tab. - Printer Paper Width: Enter the paper width of the receipt paper you're using.
- Fallback Printer: If you have multiple printers, select the secondary printer that will perform the printing if the current printer fails to print.
- Image Alignment: Sets the alignment of the restaurant logo when printed.
-
Supported Orders
- Print Order from All Sources - Print all supported orders regardless of source.
- Print general orders and user app or website’s orders separately - Configure the printer to print different ticket types depending on the source.
-
Supported Printing Types
- Bill/Receipt - Designates the printer to print Dine-in, Takeout, and Catering order receipts. To configure the receipt printer further, refer to Printing settings.
- Order Ticket - Designates the printer to print a list of menu items that have been ordered from a specific table.
- Kitchen Ticket - Designates the printer to print kitchen tickets based on the Kitchen Station selected.
- Expeditor Ticket - Designates the printer to print the expeditor list.
- Queue Ticket - Designates the printer to print queue tickets.
- Report - Designates the printer to print a Shift Report and a Daily Closing Report.
- Till Control - Opens the cash drawer automatically when a check is settled using any tender with the "Open Till" option enabled.
-
(Optional) Table Partitions: Allows you to choose which tables you want the printer to print for. At the top, click on the Table Partitions tab. Select the tables that you want to include. You can also choose Select all to highlight all tables at once.
Virtual Printer
To learn how to configure a Virtual Printer with the Eats365 POS system, refer to Set up a Virtual Printer.
DeleteUnpair a printer
To unpair a printer, follow the steps below:
- Log in to the Eats365 POS.
- At the top left, tap Settings .
- Under "General," tap Printer Setup.
- Choose the printer that you want to delete.
- At the bottom, tap Unpair Device.
Once the device is unpaired, you'll no longer be able to print receipts and tickets on the selected printer.
Delete a printer
To remove a printer, follow the steps below:
- Log in to the Eats365 POS.
- At the top left, tap Settings .
- Under "General," tap Printer Setup.
- Choose a printer that you want to delete.
- At the bottom, tap Delete Printer.
