 Eats365 Products
 Merchant Guide
 Modules
 Membership
 Integrations
 Hardware
 Staff Operations
 Roles & Permissions
 Payments
 Reports
 What’s New
 Release Notes
 Troubleshooting
 Simulators
 Glossary
 Troubleshooter
 System Status
Membership
Table of Contents
Manage member points and credits
Learn how to check and manage membership points and credits on the Eats365 POS and the Merchant Portal.
When a customer signs up for a restaurant’s membership program, they may also enroll for a specific plan. These plans often allow customers to earn points for discounts on their orders or to purchase credits that can be used for payment. For more information about membership plans, refer to Create and manage membership plans.
In this article, you’ll learn how to manage member’s points and credits.
Manage accumulated points
Accumulated Points refer to the total number of points a customer earned after purchasing a membership plan. These points can potentially be used to upgrade or downgrade the member’s plan to a different tier.
Check Accumulated Points
From the membership page, you can check the number of accumulated points earned by a member.
To check the member’s accumulated points, follow the steps below:
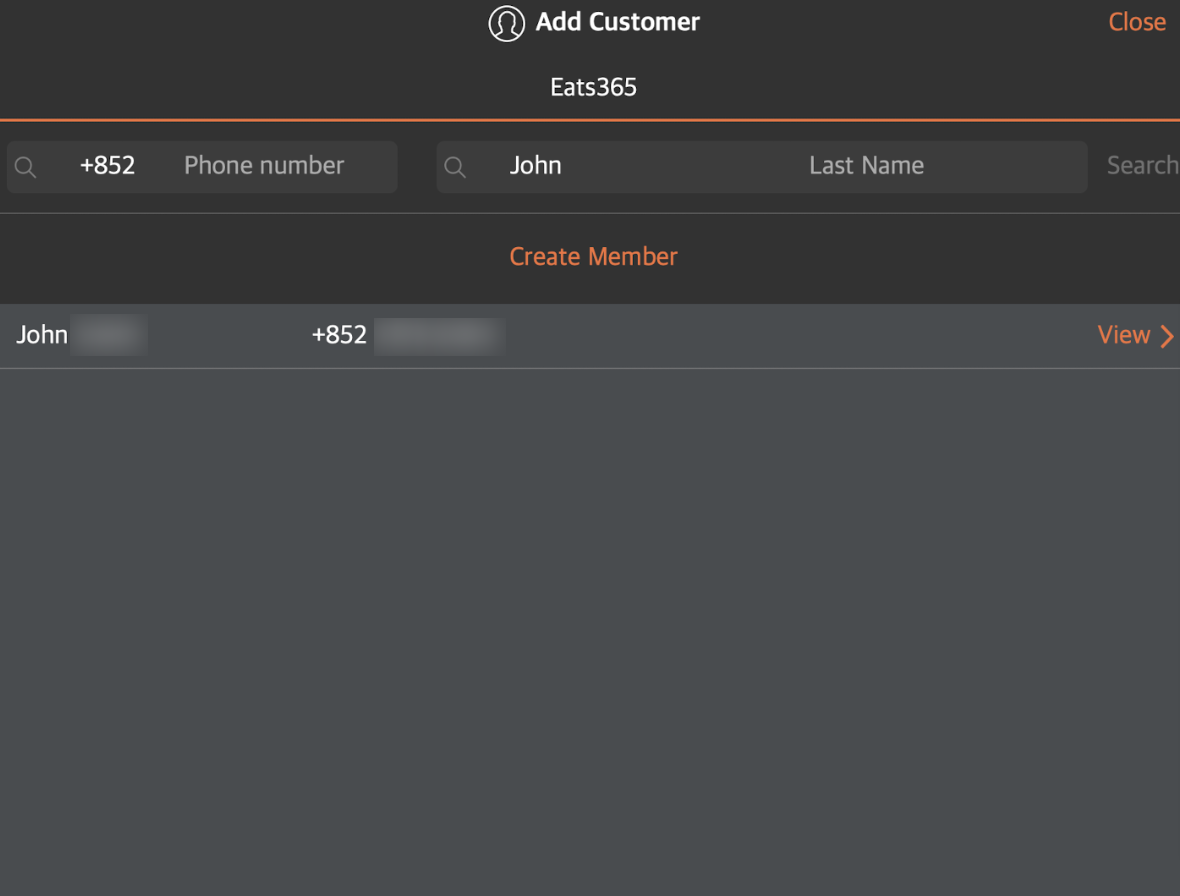
Eats365 POS
- Log in to the Eats365 POS.
- At the top right, tap Member
 .
.
- Enter the phone number, first name, or last name of the member. Then, tap Search.

- Select the member from the list. If you search using the member's phone number, the screen will go directly to their profile.
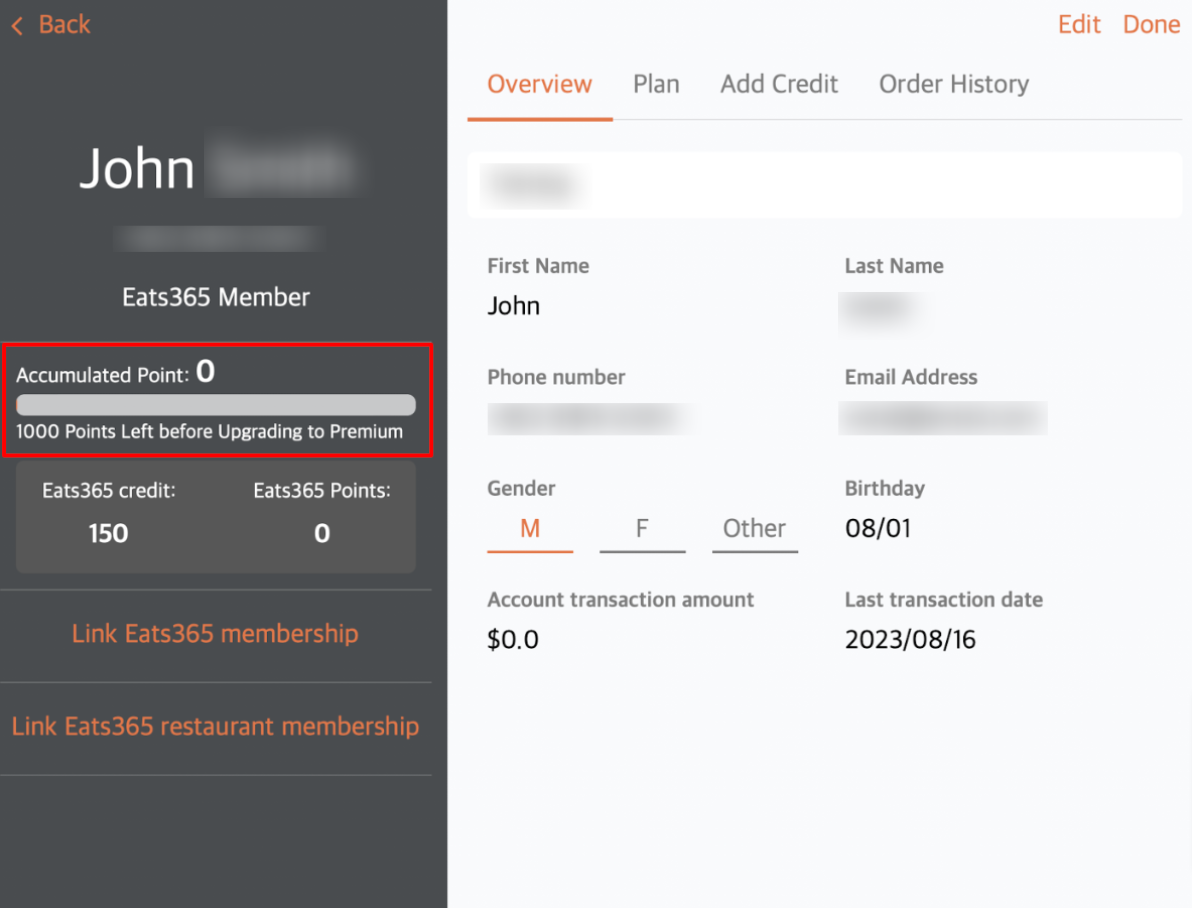
In the "Overview" tab, you’ll find the total accumulated points of the member and the number of points needed to upgrade to a higher membership plan.
Merchant Portal (Classic Theme)
- Log in to the Merchant Portal.
- On the left panel, click on CRM. Then select, Customer List.
- Select the member from the list.
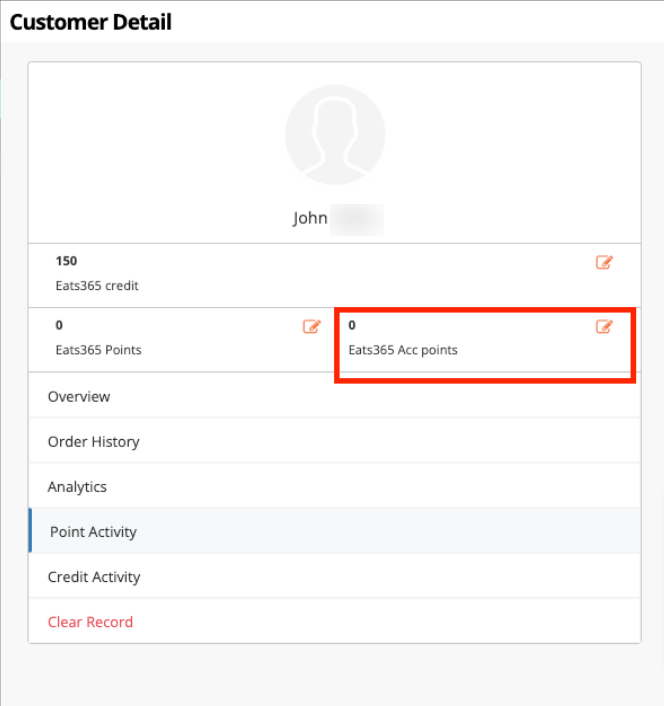
On the "Customer Detail" page, you’ll find the member’s accumulated points listed under "Accumulated Points."
Merchant Portal 2.0
- Log in to the Merchant Portal.
- On the left panel, click on CRM. Then select, Customer List.
- Select the member from the list.

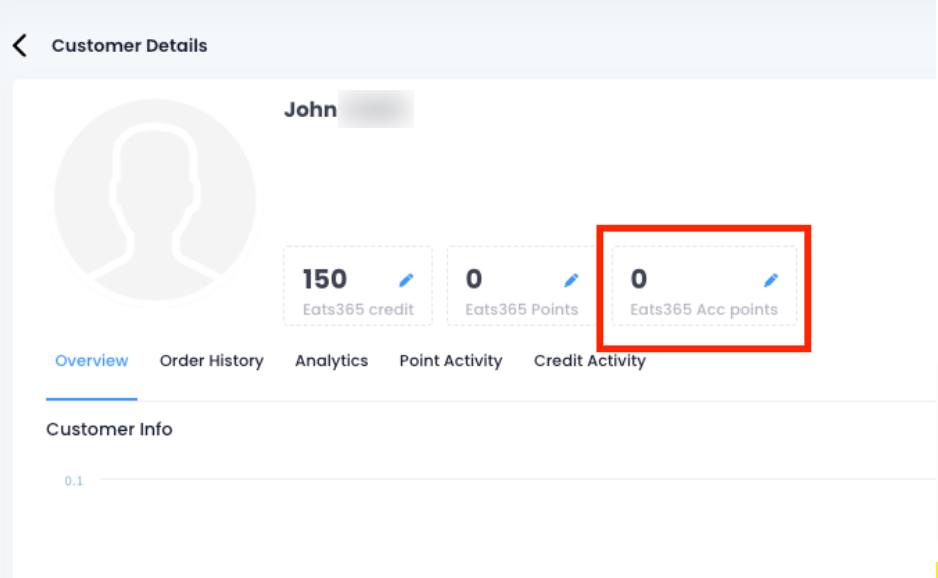
On the "Customer Detail" page, you’ll find the member’s accumulated points listed under "Accumulated Points."
Edit Accumulated points
To add or deduct from the total accumulated points, follow the steps below:
Merchant Portal (Classic Theme)
- Log in to the Merchant Portal.
- On the left panel, click on CRM. Then, select Customer List.
- Select the member from the list.
- Next to "Accumulated Points," click on Edit
 .
.
Note: Depending on the name you set for accumulated points, the accumulated points name varies. - Next to "Action," select the action that you want to apply to the member’s accumulated points.
- Select Add to add more points to the member’s accumulated points balance.
- Select Deduct to remove points from the member’s accumulated points balance.
- Enter the amount that you want to add or deduct from the total accumulated points.
- Enter the reason for modifying the member’s accumulated points balance.
- Click on Apply to confirm.
Merchant Portal 2.0
- Log in to the Merchant Portal.
- On the left panel, click on CRM. Then, select Customer List.
- Select the member from the list.
- Next to "Accumulated Points," click on Edit
 .
. Note: Depending on the name you set for accumulated points, the accumulated points name varies.
 - Next to "Rule Name," select the action that you want to apply to the member’s accumulated points.

- Select Add to add more points to the member’s accumulated points balance.
- Select Deduct to remove points from the member’s accumulated points balance.
- Enter the amount that you want to add or deduct from the total accumulated points.

- Enter the reason for modifying the member’s accumulated points balance.

- Click on Save to confirm.
Manage member points
Member Points refer to the number of points that the customer can spend. Points spent can be used to apply discounts to orders.
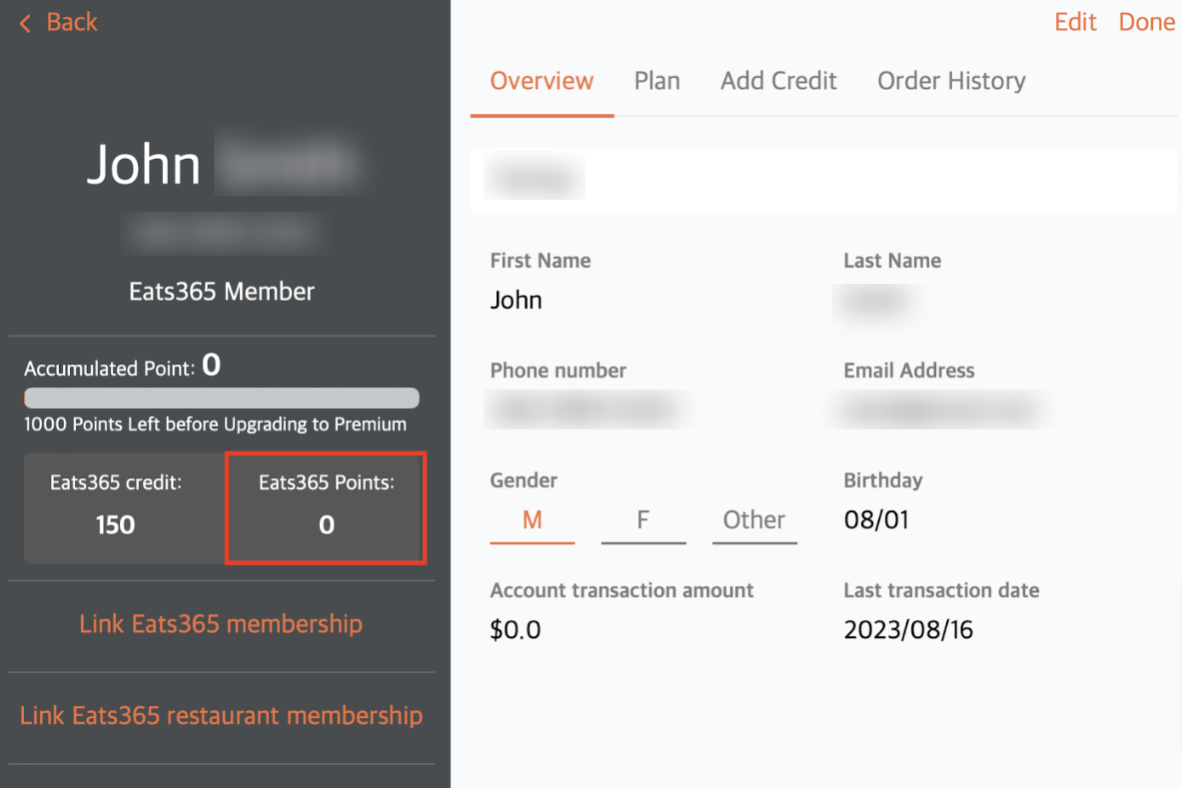
Check member points
To check member points, follow the steps below:
Eats356 POS
- Log in to the Eats365 POS.
- At the top right, tap Member.
- Enter the phone number, first name, or last name of the member. Then, tap Search.
- Select the member. If you search using the member's phone number, the screen will go directly to their profile.
In the "Overview" tab, you’ll find the member’s total points listed under "Point Balance."
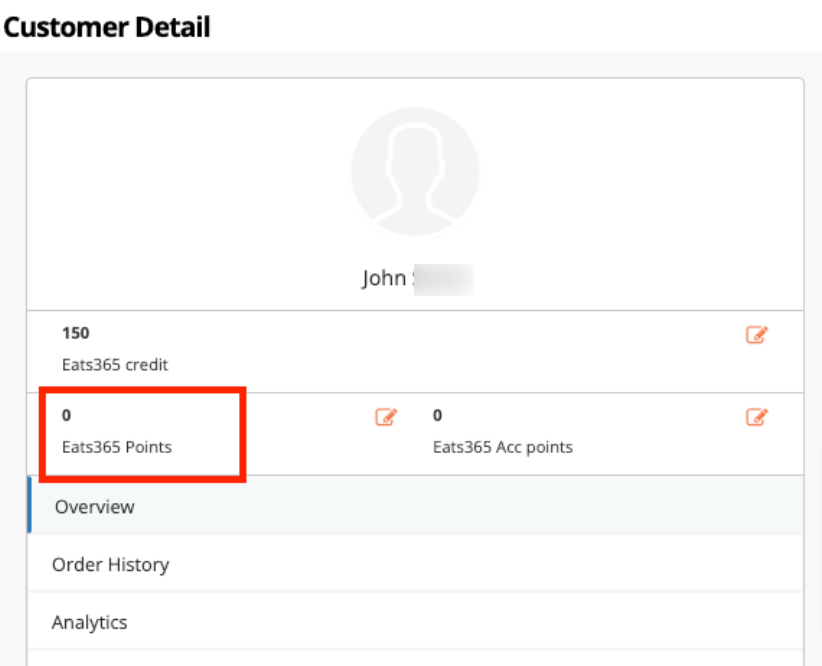
Merchant Portal (Classic Theme)
- Log in to the Merchant Portal.
- On the left panel, click on CRM. Then select, Customer List.
- Select the member from the list.
On the "Customer Detail" page, you’ll find the member’s points listed under "Point Balance."
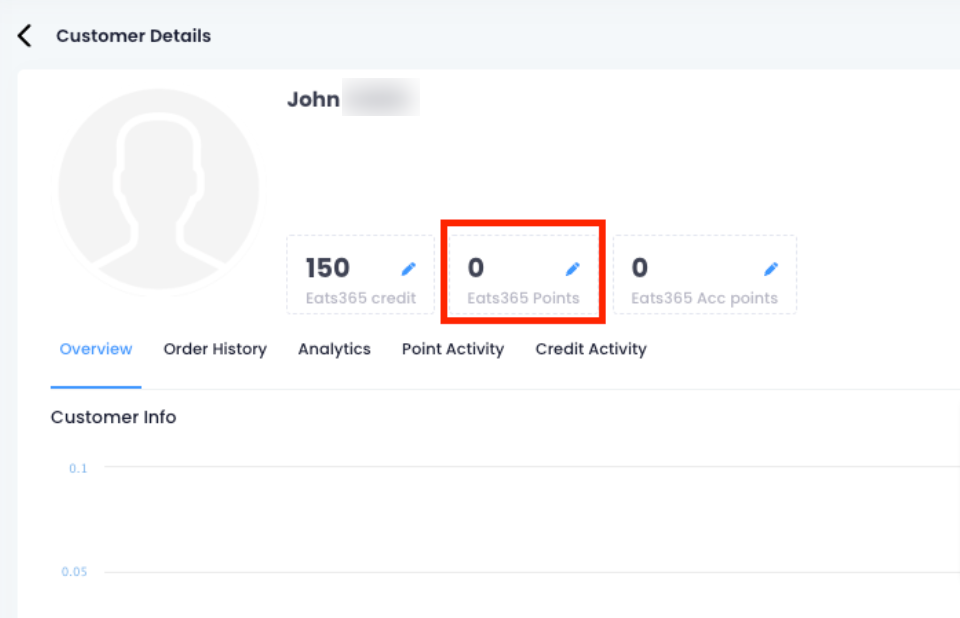
Merchant Portal 2.0
- Log in to the Merchant Portal.
- On the left panel, click on CRM. Then select, Customer List.
- Select the member from the list.
On the "Customer Detail" page, you’ll find the member’s points listed under "Point Balance."
Edit member points
To add or deduct from the member’s point balance, follow the steps below:
Merchant Portal (Classic Theme)
- Log in to the Merchant Portal.
- On the left panel, click on CRM. Then, select Customer List.
- Select the member from the list.
- Next to "Point Balance," click on Edit .
Note: Depending on the name you set for point balance, the member points name varies. - Next to "Action," select the action that you want to apply to the member’s points.
- Select Add to add more points to the member’s points balance.
- Select Deduct to remove points from the member’s points balance.
- Enter the amount that you want to add or deduct from the member’s points.
Note: Adding member points won’t affect the member’s accumulated points. - If you’re adding points, next to "Expiry," select how you want the points to expire.
- Duration (months) - Enter the number of months when the added points will expire. For example, if you enter “2,” the added points will expire after two months.
- Expiry Date - Select the date when the added points will expire.
- Never
- Enter the reason for modifying the member’s points balance.
- Click on Apply to confirm.
Merchant Portal 2.0
- Log in to the Merchant Portal.
- On the left panel, click on CRM. Then, select Customer List.
- Select the member from the list.
- Next to "Point Balance," click on Edit .
 Note: Depending on the name you set for point balance, the member points name varies.
 - Next to "Rule Name," select the action that you want to apply to the member’s points.

- Select Add to add more points to the member’s points balance.
- Select Deduct to remove points from the member’s points balance.
- Enter the amount that you want to add or deduct from the member’s points.
 Note: Adding member points won’t affect the member’s accumulated points.
 - If you’re adding points, next to "Expiry," select how you want the points to expire.

- Duration (months) - Enter the number of months when the added points will expire. For example, if you enter “2,” the added points will expire after two months.
- Expiry Date - Select the date when the added points will expire.
- Never
- Enter the reason for modifying the member’s points balance.

- Click on Save to confirm.
Manage member credit balance
Credits are virtual funds that customers can use to pay for their orders. Credits can be topped up to add more funds to the customer’s credit balance. For more information about credits, refer to Set up and manage Top-up Credit Item.
Check member credit balance
You can check the member’s credit balance from the membership page, upon payment, or on the Merchant Portal.
To check a member’s credit balance, follow the steps below:
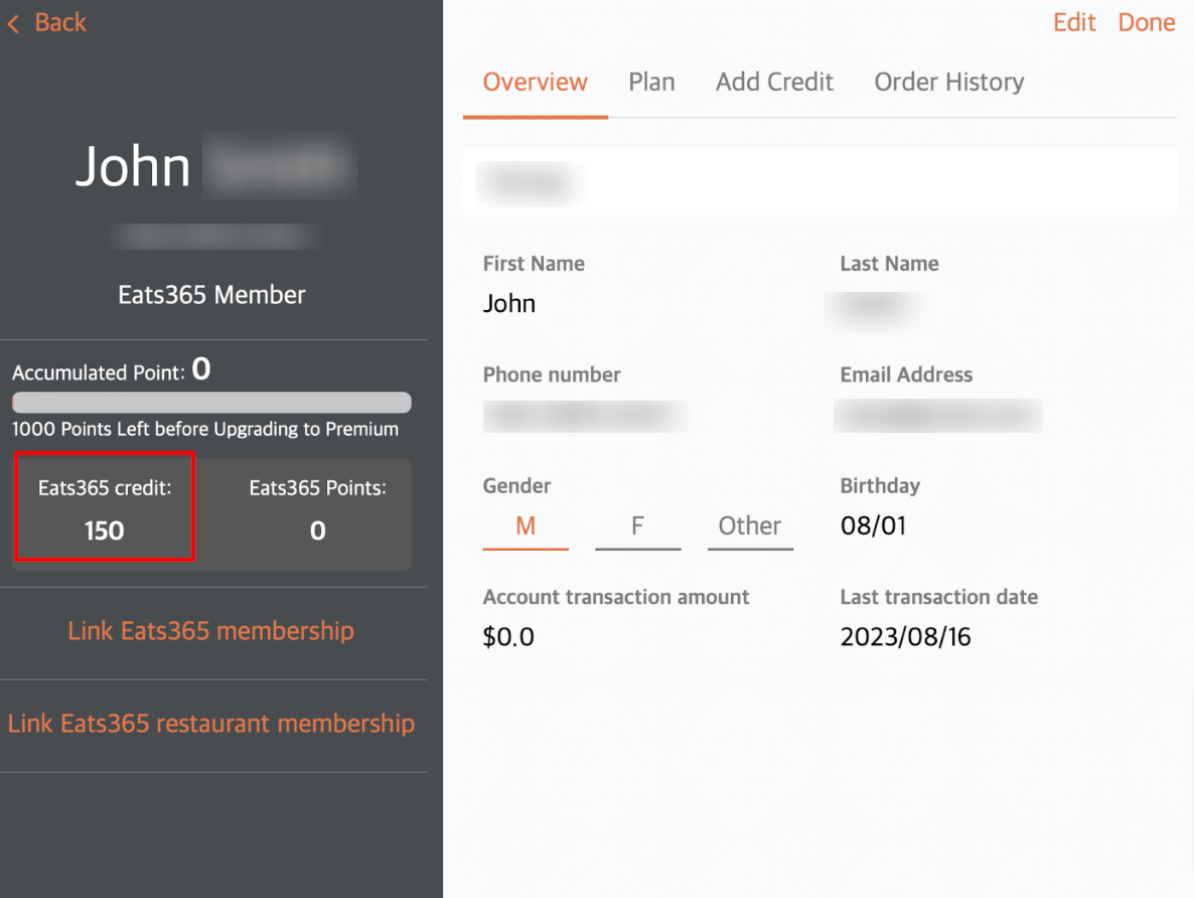
Eats365 POS
Membership
- Log in to the Eats365 POS.
- At the top right, tap Member.
- Search for the member’s account.
In the "Overview" tab, you’ll find the member’s total credit balance listed under "Credit."
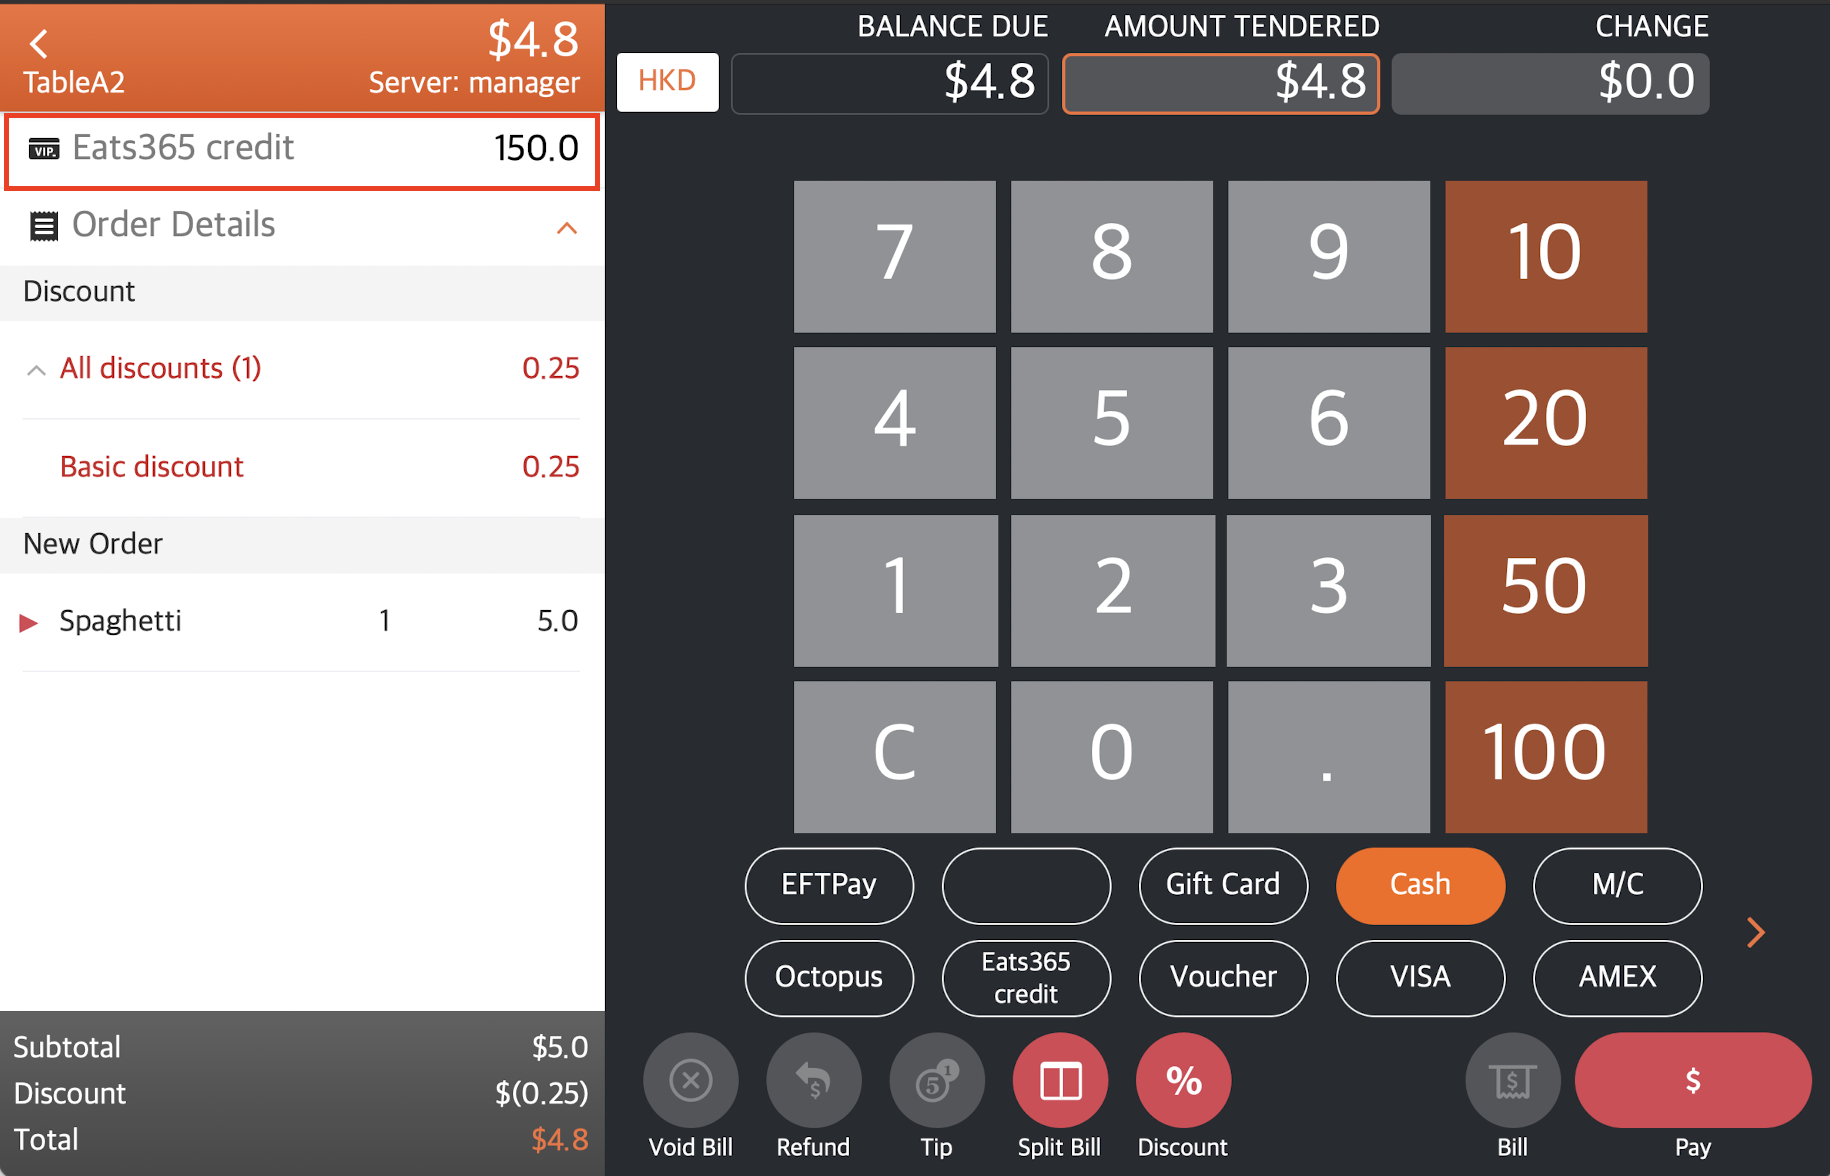
Payment
To check the member’s credit balance on the payment page, from the member’s order, tap Pay. At the top left of the payment page, you’ll find the member’s credit balance listed before the order details.
Merchant Portal (Classic Theme)
- Log in to the Merchant Portal.
- On the left panel, click on CRM. Then select, Customer List.
- Select the member from the list.
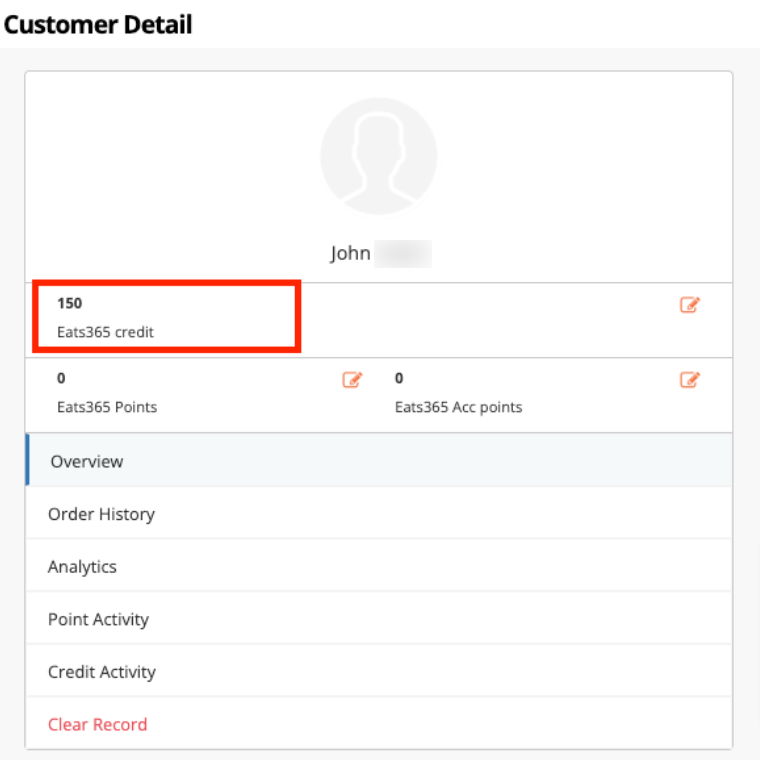
On the "Customer Detail" page, you’ll find the member’s total credit balance listed under "Credit."
Merchant Portal 2.0
- Log in to the Merchant Portal.
- On the left panel, click on CRM. Then select, Customer List.
- Select the member from the list.
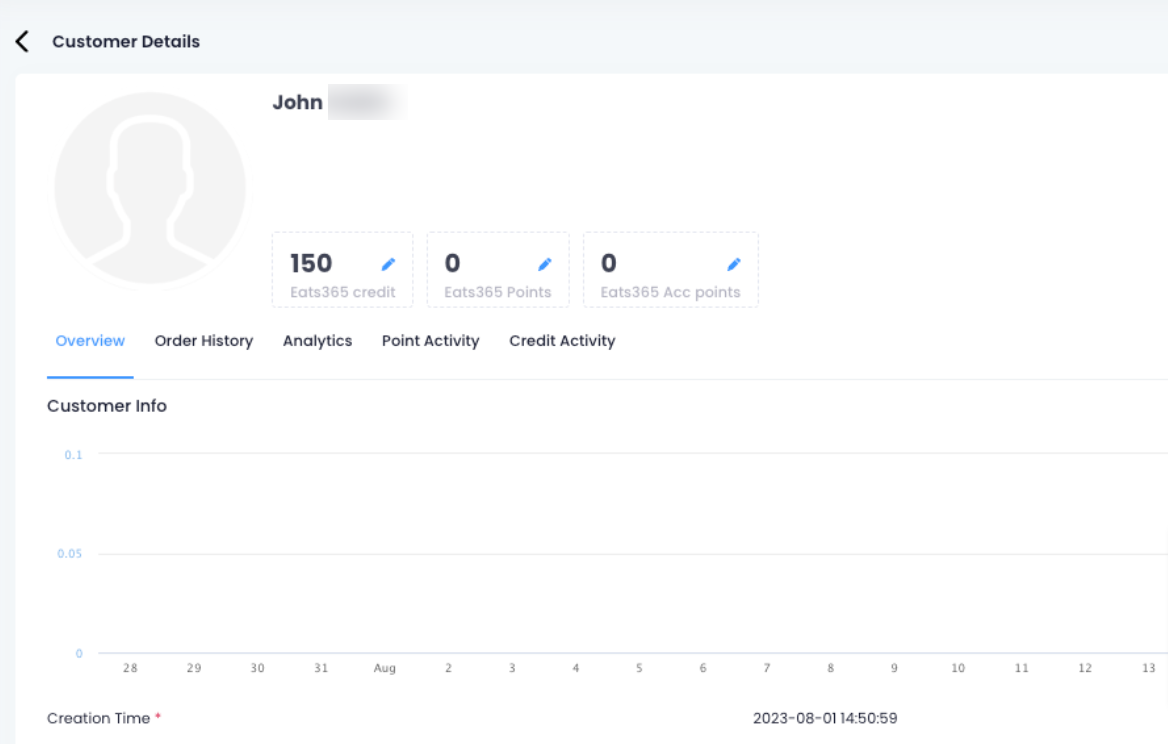
On the "Customer Detail" page, you’ll find the member’s total credit balance listed under "Credit."
Edit credit balance
To add or deduct from the member’s credit balance, follow the steps below:
Merchant Portal (Classic Theme)
- Log in to the Merchant Portal.
- On the left panel, click on CRM. Then, select Customer List.
- Select the member from the list.
- Next to "Credit," click on Edit .
Note: Depending on the name you set for the credit balance, the credit balance name varies. - Next to "Action," select the action that you want to apply to the member’s credit balance.
- Select Add to add more credits to the member’s total balance.
- Select Deduct to remove credits from the member’s total balance.
- Enter the amount that you want to add or deduct from the credit balance.
- Enter the reason for modifying the member’s credit balance.
- Click on Apply to confirm.
Merchant Portal 2.0
- Log in to the Merchant Portal.
- On the left panel, click on CRM. Then, select Customer List.
- Select the member from the list.
- Next to "Credit," click on Edit .
 Note: Depending on the name you set for the credit balance, the credit balance name varies.
 - Next to "Rule Name," select the action that you want to apply to the member’s credit balance.

- Select Add to add more credits to the member’s total balance.
- Select Deduct to remove credits from the member’s total balance.
- Enter the amount that you want to add or deduct from the credit balance.

- Enter the reason for modifying the member’s credit balance.

- Click on Save to confirm.