 Eats365 Products
 Merchant Guide
 Modules
 Membership
 Integrations
 Hardware
 Staff Operations
 Roles & Permissions
 Payments
 Reports
 What’s New
 Release Notes
 Troubleshooting
 Simulators
 Glossary
 Troubleshooter
 System Status
Sales report
Table of Contents
View and manage Sales Report
Learn how to get different types of Sales Reports on the Merchant Portal.
The Merchant Portal allows you to generate various Sales reports to keep track of sales, customer transactions, staff performance, and more.
In this article, you’ll learn about the different Sales Reports that you can generate from the Merchant Portal and learn about how to view, print, and export a Sales Report.
Manage Sales Report
View Sales Report
To view your Sales Report, follow the steps below:
Merchant Portal (Classic Theme)
- Log in to the Merchant Portal.
- On the left panel, click on Reporting.
- Under Sales, select the type of Sales Report that you want to view.
- Select the date range that you wish to include in the report.
- Click on Submit to retrieve the records.
Once the Sales Report is generated, you can choose to print the report or export the report in Excel.
DeleteMerchant Portal 2.0
- Log in to the Merchant Portal.
- On the left panel, click on Reporting.
- Select the type of Sales report that you want to view.
- Select the date range that you wish to include in the report.
- Click on Submit to retrieve the records.
Once the Sales Report is generated, you can choose to print the report or export the report in Excel.
DeletePrint Sales Report
To print a Sales Report, click on Print. Then, select the printer where you want to print the report. Click on Print.
Export Sales Report
To export a Sales Report, click on Export. An Excel file of the report gets downloaded on your computer. Open the file to view your exported Sales Report.
Sales Report types
Merchant Portal (Classic Theme)
Hourly Sales Report
The Hourly Sales Report shows a Chart View and a Table View of all transactions and Net Sales made per hour. You may customize the Table View report to include other details such as:
- Total amount tendered
- Net Sales (in percent)
- Transaction count (in percent)
- Number of customers
- Average Sales
- Quantity
- Quantity (in percent)
To customize the Table View, click on Settings  . Then, select the details that you want to add to the Table View.
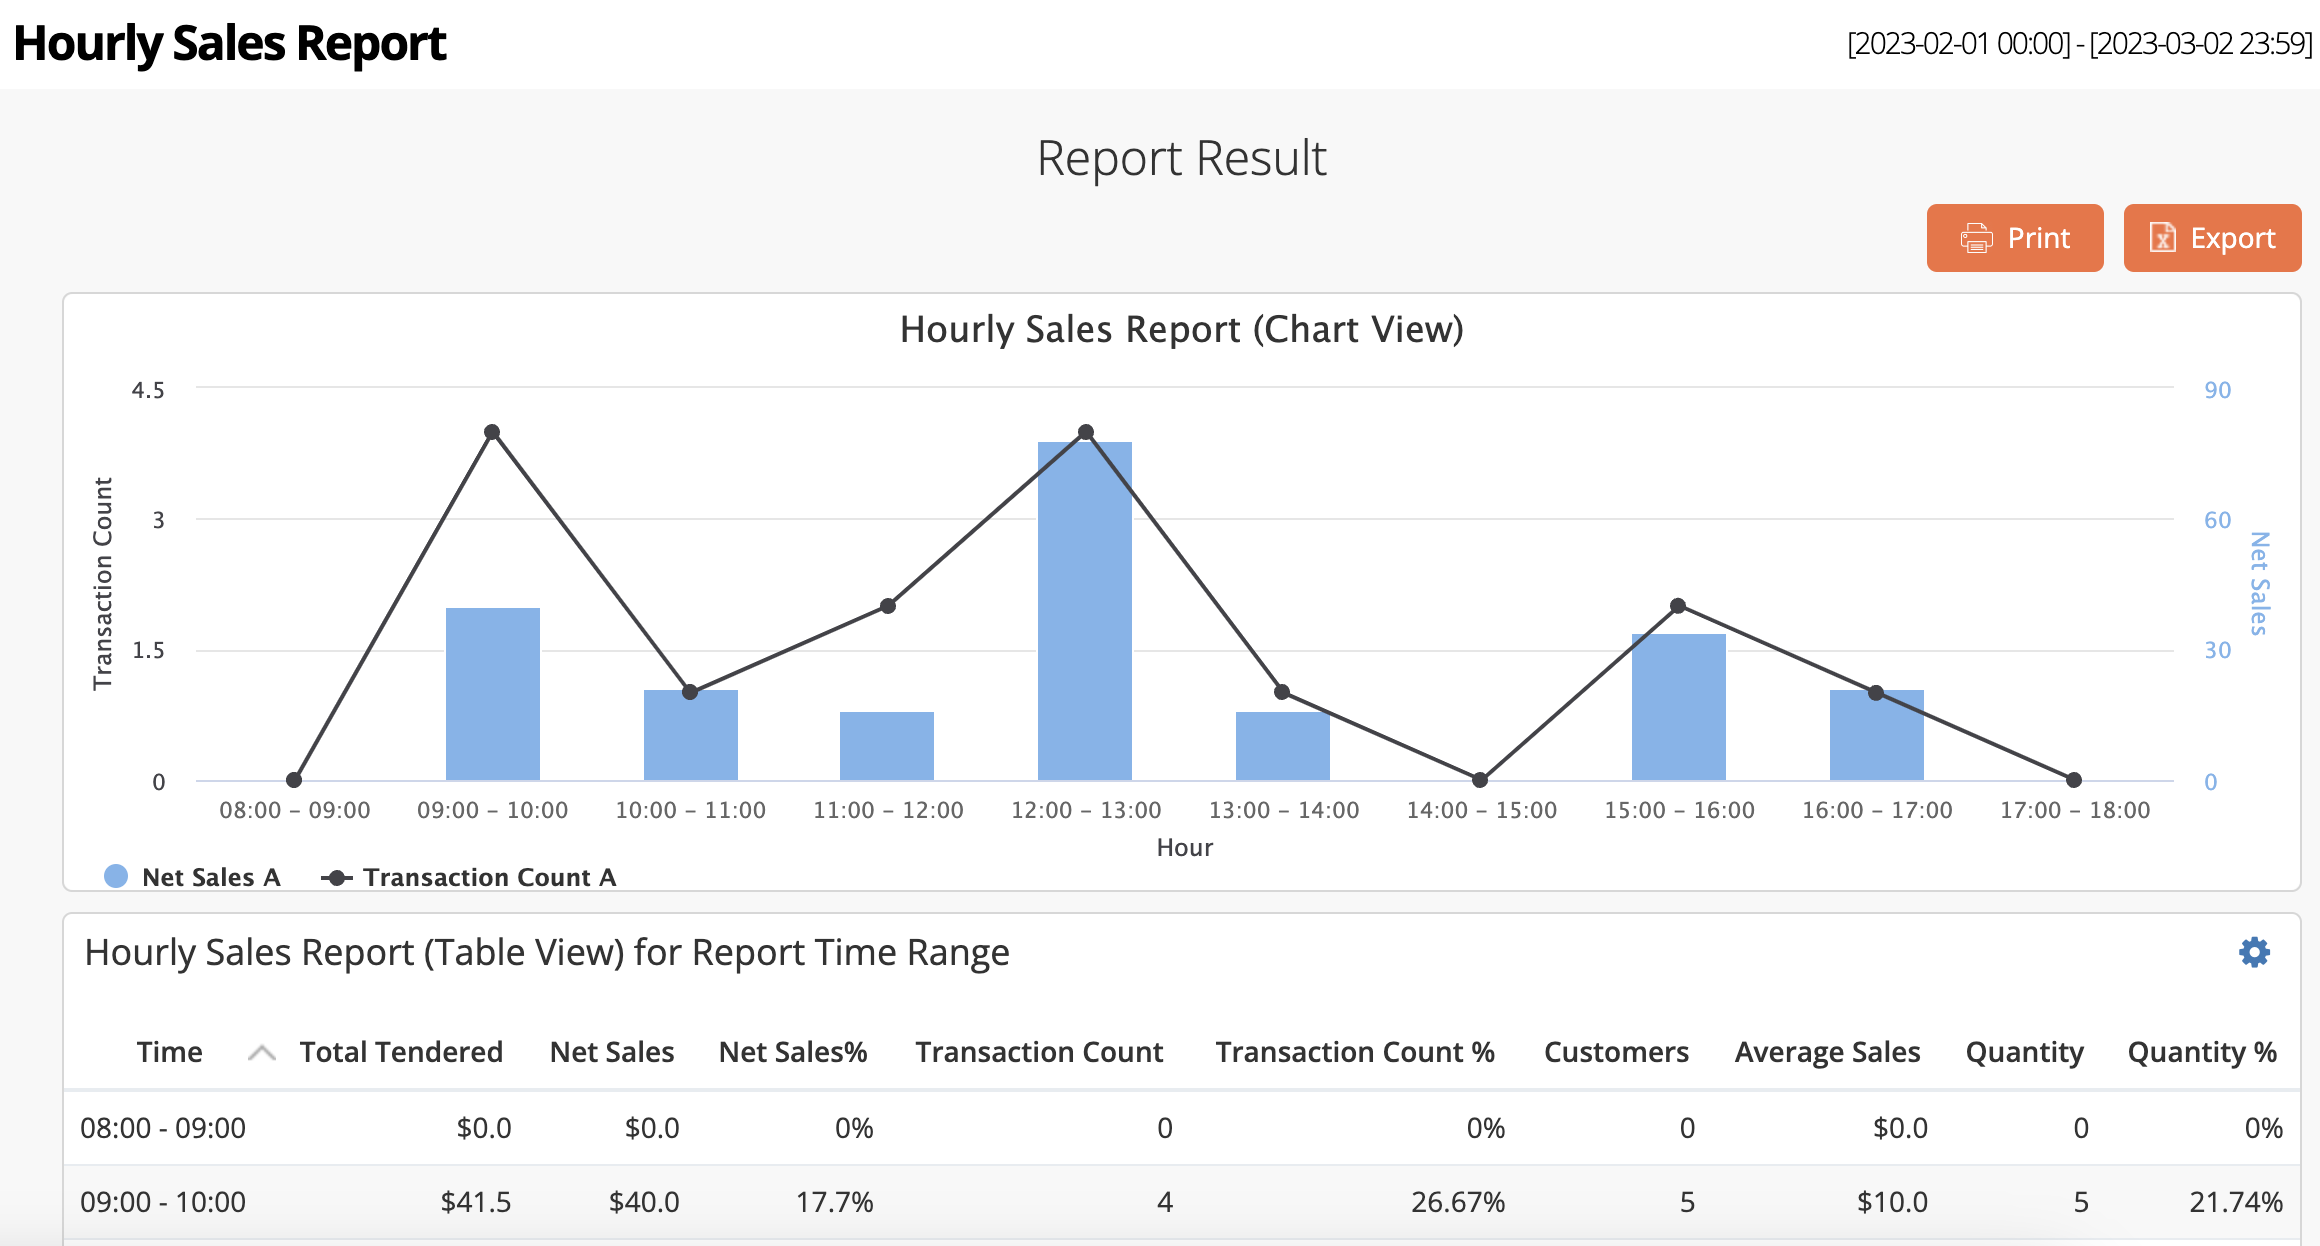
Compare time range
You can also get a comparison of Sales performance for the same hours during different days. To do this, follow the steps below:
- Log in to the Merchant Portal.
- On the left panel, click on Reporting.
- Under Sales, select Hourly Sales Report.
- Select the date range that you wish to include in the report.
- Next to Compare Time Range, click on the checkbox.
- Select the date range that you want to compare.
- (Optional) Click on Advanced Filtering. Then, select a Service Type.
- Click on Submit to retrieve the records.
Weekly Sales Report
The Weekly Sales Report shows a summary of all transactions and Net Sales made during the week.
Compare with last year
You can also get a week-on-week comparison of Sales performance for the previous year. To do this, follow the steps below:
- Log in to the Merchant Portal.
- On the left panel, click on Reporting.
- Under Sales, select Weekly Sales Report.
- Select the date range that you wish to include in the report.
- Next to Compare with Last Year, click on the checkbox.
- Select the date range that you want to compare.
- (Optional) Click on Advanced Filtering. Then, select a Service Type.
- Click on Submit to retrieve the records.
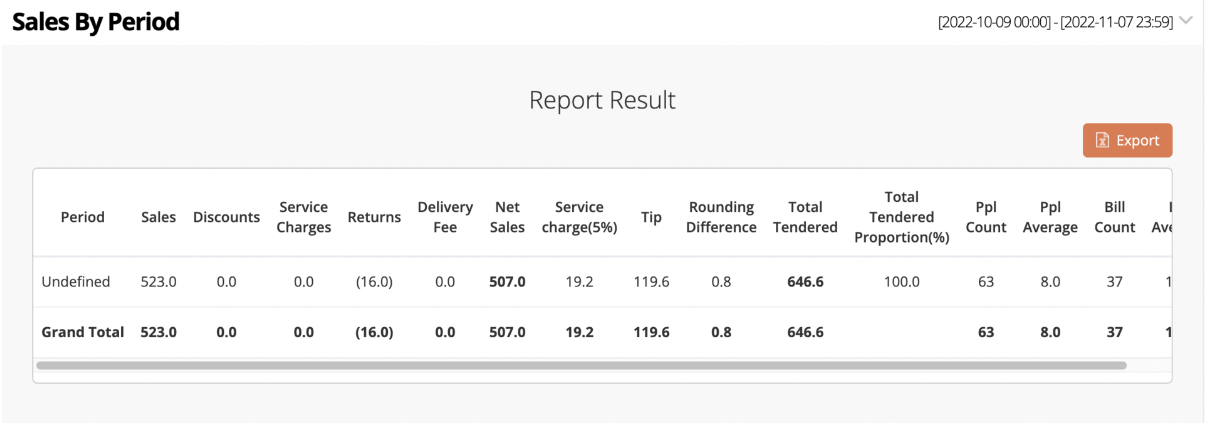
Sales By Period
The Sales By Period report shows a summary of all Sales during a selected period, as defined by a restaurant’s operation hours. To establish the restaurant’s operation hours, navigate to the left panel and click on Restaurant Settings, then click on Basic Information. Add a period under Operation Hours (by Period).
Sales By Item
The Sales By Item report shows a summary of all Sales categorized by Item over a selected period of time.
Compare time range
You can also compare Sales By Item performance on different days. To do this, follow the steps below:
- Log in to the Merchant Portal.
- On the left panel, click on Reporting.
- Under Sales, select Sales By Item.
- Select the base time range that you wish to include in the report.
- Next to Compare Time Range, click on the checkbox.
- Select the time range that you want to compare.
Note: The number of days selected in the Base Time Range must be the same as Compare Time Range. For example, if you selected the last 30 days for the Base Time Range, the Compare Time Range should be 30 days too. - (Optional) Click on Advanced Filtering. You can filter the following information:
- Time Period
- Service Type
- Patron Size
- Filter by Custom Menu
- Category
- Click on Submit to retrieve the records.
General Ledger Report
The General Ledger Report shows a summary of transactions by Sales Category over a selected period of time. The report includes a quick view of the number of Items sold and the total amount of Sales.
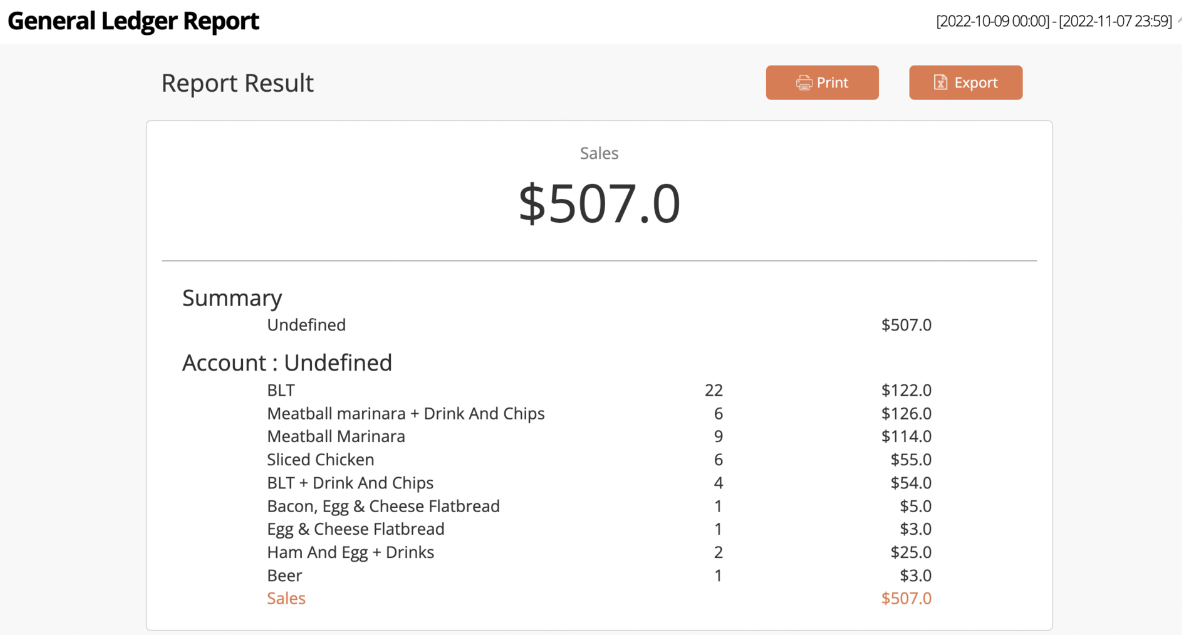
Note: An Undefined tag means that a Sales Category hasn’t been created. To create a Sales Category, a Sales Category must first be set up on an organization level. Then, you can follow the steps below:
- Log in to the Merchant Portal.
- On the left panel, click on Menu Setup.
- Click on Item.
- Next to the Item that you want to add to a Sales Category, click on Edit
 .
. - Scroll down to Sales Categories. Then, click on Add New.
Returns Report
The Returns Report shows a summary of all voided paid transactions over a selected period of time.
To learn more about the Returns Report, refer to View and manage Void and Returns Report
DeleteVoid Report
The Void Report shows a summary of all canceled unpaid orders over a selected period of time.
To learn more about the Void Report, refer to View and manage Void and Returns Report.
DeletePay In and Payout
The Pay In and Payout report shows a summary of all Pay In, Payout, Drop, and Purchase transactions processed on the POS over a selected period of time.
DeleteSales By Product Type
The Sales By Product Type report shows a summary of all Sales categorized by Product Type over a selected period of time.
DeleteDiscount Report
The Discount Report shows a summary of discounts processed over a selected period of time. The Report result categorizes the Discount Report into two types: Discount Report by Types and Discount Report by Staff.
DeleteIncoming Customers Analysis
The Incoming Customers Analysis shows a summary of the number of incoming customers, categorized by day and by party size. The Report Result shows the report in Chart View and by Percentage.
Queuing Statistics
The Queuing Statistics shows the statistics for the number of tickets issued versus the number of tickets seated over a selected period of time.
Item Preparation Time Report
The Item Preparation Time Report shows a summary of the preparation time for all transactions processed on the POS over a selected period of time. The Report Result includes the following information:
- Item name
- Category
- Quantity
- Order number
- Service Type
- POS send time
- Kitchen Display System (KDS) completion time
- Expedite completion time
- Average time on KDS
- Average time on Expedite
- Average total kitchen time
Reconciliation Report
The Reconciliation Report shows a summary of all sales and transactions on the POS over a selected period of time, categorized by Tender type.
DeleteItem Sold Report
The Item Sold Report shows a summary of all Items sold over a selected period of time. The Report Result details the quantity sold per item and, if available, the number of times a modifier and an option have been chosen.
DeleteAbnormal Payment Report
Any payment transaction that encounters errors are automatically logged. If there are no errors, this section shows up as No Data.
DeleteStaff Performance Report
The Staff Performance Report shows a summary of all sales and transactions processed by a staff member. The Report Result includes the following information:
- Date of transaction
- Total number of transactions per day
- Total sales
- Tender details
Merchant Portal 2.0
Sales
Hourly Sales Report
The Hourly Sales Report shows a Chart View and a Table View of all transactions and Net Sales made per hour. You may customize the Table View report to include other details such as:
- Total amount tendered
- Net Sales (in percent)
- Transaction count (in percent)
- Number of customers
- Average Sales
- Quantity
- Quantity (in percent)
Compare time range
You can also get a comparison of Sales performance for the same hours during different days. To do this, follow the steps below:
- Log in to the Merchant Portal.
- On the left panel, click on Reporting.
- Click on Sales, then select Hourly Sales Report.
- Select the date range that you wish to include in the report.
- To compare time range, click on Compare With then select the date range.
- Click on Submit to retrieve the records.
Weekly Sales Report
The Weekly Sales Report shows a summary of all transactions and Net Sales made during the week.
Compare with last year
You can also get a week-on-week comparison of Sales performance for the previous year. To do this, follow the steps below:
- Log in to the Merchant Portal.
- On the left panel, click on Reporting.
- Click on Sales, then select Weekly Sales Report.
- Select the date range that you want to compare.
- Toggle on Compare with Last Year
 .
. - Click on Submit to retrieve the records.
Sales By Period
The Sales By Period report shows a summary of all Sales during a selected period, as defined by a restaurant’s operation hours. To establish the restaurant’s operation hours, navigate to the left panel and click on Restaurant Settings, then click on Basic Information and select Restaurant Information. Add a period under Reporting Periods.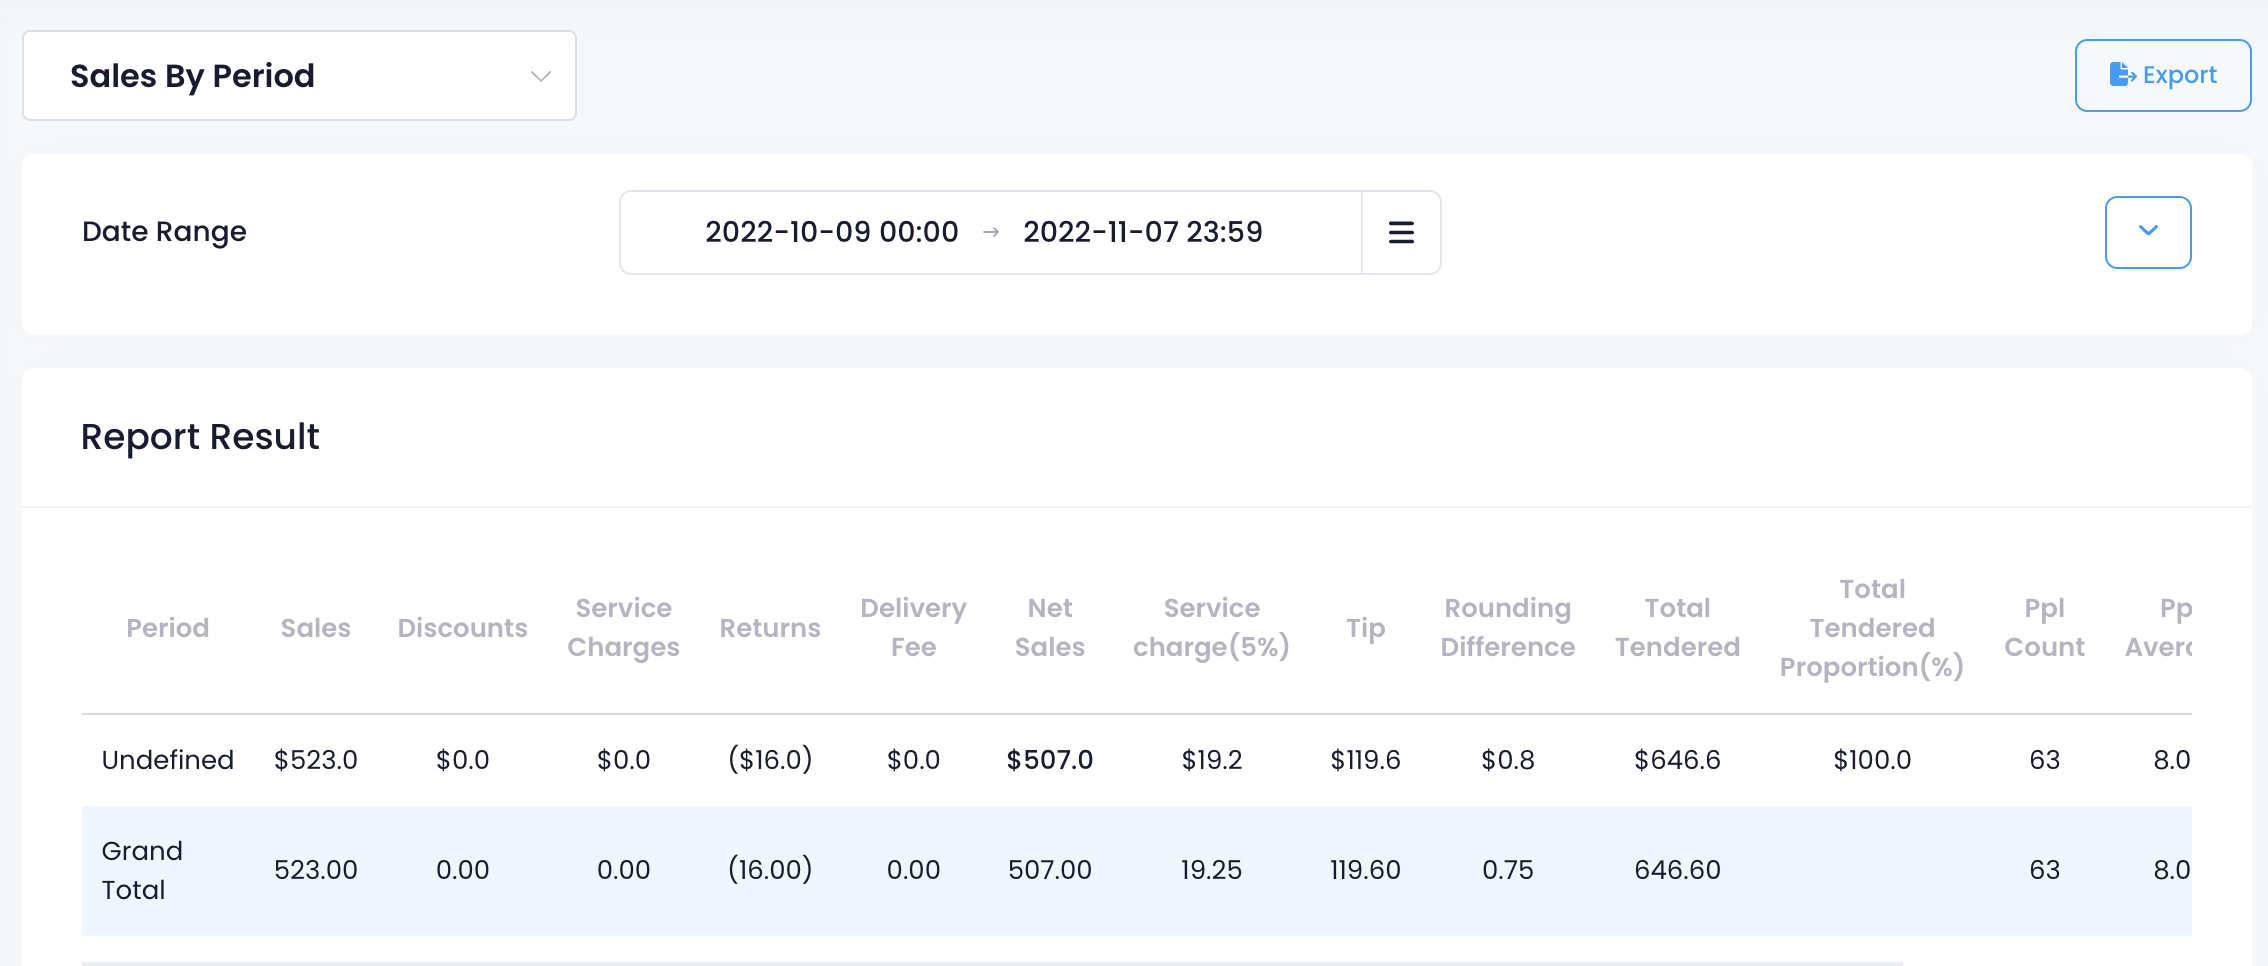
Sales By Item
The Sales By Item report shows a summary of all Sales categorized by Item over a selected period of time.
Compare time range
You can also compare Sales By Item performance on different days. To do this, follow the steps below:
- Log in to the Merchant Portal.
- On the left panel, click on Reporting.
- Click on Sales, select Sales By Item.
- Select the time range that you wish to include in the report.
- To compare time range, click on Compare With then select the date range.
- Click on Submit to retrieve the records.
Sales by Sales Category
The Sales by Sales Category report shows a summary of transactions by Sales Category over a selected period of time. The report includes a quick view of the number of Items sold and the total amount of Sales.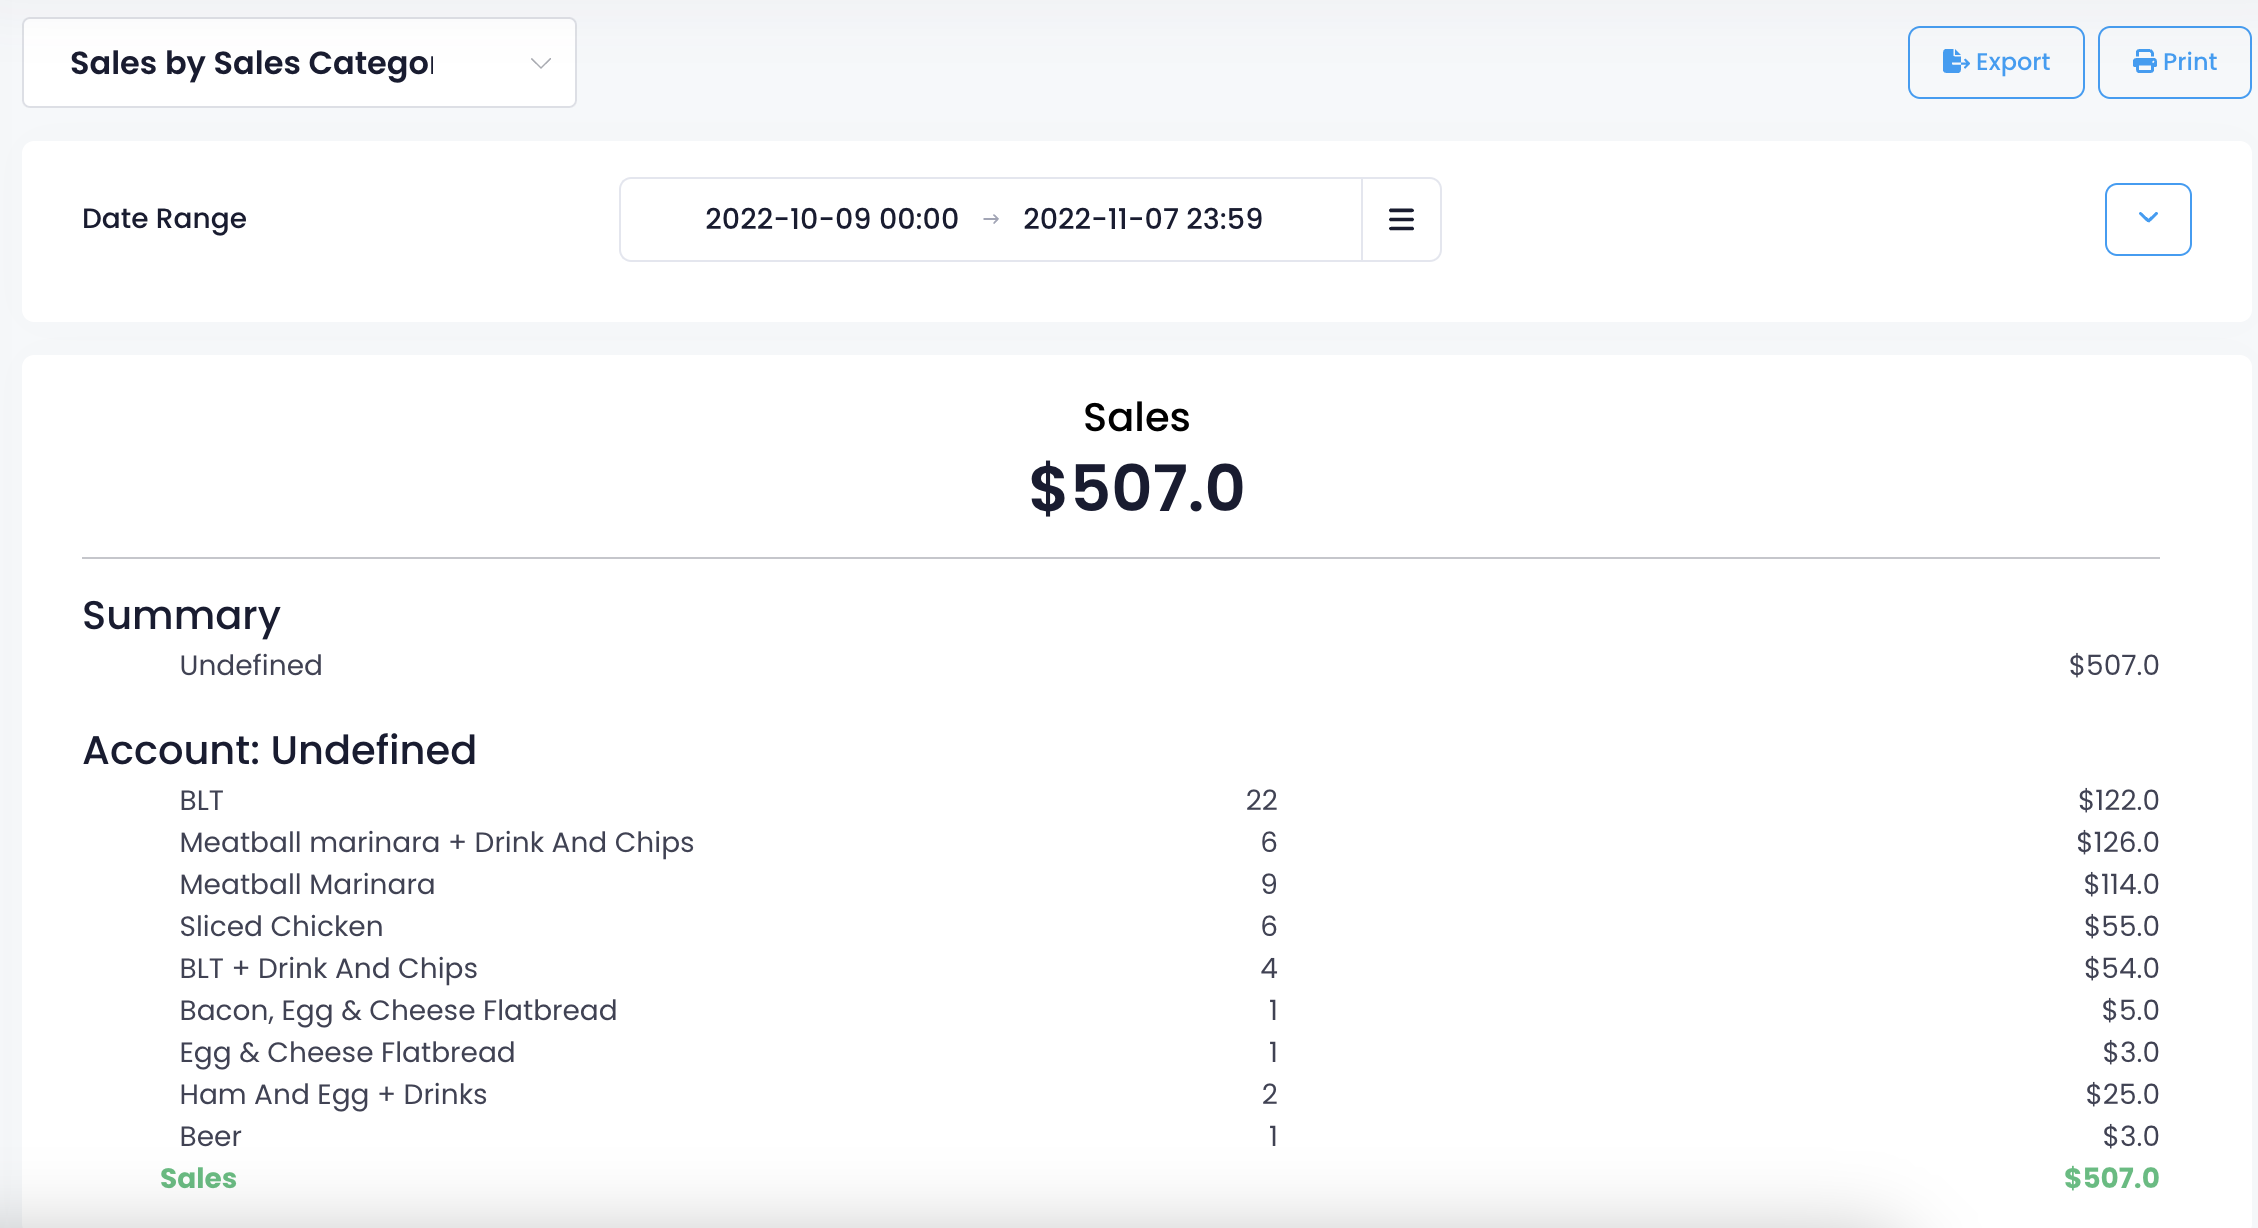
Note: An Undefined tag means that a Sales Category hasn’t been created. To create a Sales Category, a Sales Category must first be set up on an organization level. Then, you can follow the steps below:
- Log in to the Merchant Portal.
- On the left panel, click on Menu Setup.
- Click on Item.
- Next to the Item that you want to add to a Sales Category, click on Edit
 .
. - Scroll down to Sales Categories. Then, click on Add New.
Sales By Product Type
The Sales By Product Type report shows a summary of all Sales categorized by Product Type over a selected period of time.
DeleteItem Sold Report
The Item Sold Report shows a summary of all Items sold over a selected period of time. The Report Result details the quantity sold per item and, if available, the number of times a modifier and an option have been chosen.
DeleteAudit Trail
Void Items Report
The Void Items Report shows a summary of all canceled unpaid items over a selected period of time.
To learn more about the Void Items Report, refer to View and manage Void and Returns Report.
DeleteVoid Report
The Void Report shows a summary of all canceled unpaid orders over a selected period of time.
To learn more about the Void Report, refer to View and manage Void and Returns Report.
DeleteReturns Report
The Returns Report shows a summary of all voided paid transactions over a selected period of time.
To learn more about the Returns Report, refer to View and manage Void and Returns Report.
DeleteTop-up Credit Refund Report
The Top-up Credit Refund Report shows a summary of refunded and voided Top-up Credits over a selected period of time. The Top-up Credit Refund Report includes the following information:
- Order number
- Staff member who processed the return
- Return/Void reason (if available)
- Processing time
- Processing date
- Returned amount
Operation
Discount Report
The Discount Report shows a summary of discounts processed over a selected period of time. The Report result categorizes the Discount Report into two types: Discount Report by Types and Discount Report by Staff.
DeleteIncoming Customers Analysis
The Incoming Customers Analysis shows a summary of the number of incoming customers, categorized by day and by party size. The Report Result shows the report in Chart View and by Percentage.
Pay In and Payout
The Pay In and Payout report shows a summary of all Pay In, Payout, Drop, and Purchase transactions processed on the POS over a selected period of time.
DeleteQueuing Statistics
The Queuing Statistics shows the statistics for the number of tickets issued versus the number of tickets seated over a selected period of time.
Item Preparation Time Report
The Item Preparation Time Report shows a summary of the preparation time for all transactions processed on the POS over a selected period of time. The Report Result includes the following information:
- Item name
- Category
- Quantity
- Order number
- Service Type
- POS send time
- Kitchen Display System (KDS) completion time
- Expedite completion time
- Average time on KDS
- Average time on Expedite
- Average total kitchen time
Reconciliation Report
The Reconciliation Report shows a summary of all sales and transactions on the POS over a selected period of time, categorized by Tender type.
DeleteOnline Payment Report
The Online Payment Report shows a summary of all sales and transactions processed through an online payment gateway connected to the POS.
DeleteOn-premise Payment Abnormal Report
Any payment transaction that encounters errors are automatically logged. If there are no errors, this section shows up as No Data.
DeleteStaff Performance Report
The Staff Performance Report shows a summary of all sales and transactions processed by a staff member. The Report Result includes the following information:
- Date of transaction
- Total number of transactions per day
- Total sales
- Tender details