All

Contact Us

If you still have questions or prefer to get help directly from an agent, please submit a request.
We’ll get back to you as soon as possible.

Please fill out the contact form below and we will reply as soon as possible.

    Login
English (US)
English (US)
Mandarin
Cantonese
  • Home
  • Modules

PhotoMenu

All Product

Contact Us

If you still have questions or prefer to get help directly from an agent, please submit a request.
We’ll get back to you as soon as possible.

Please fill out the contact form below and we will reply as soon as possible.

    • mPOS
        • Set up and install mPOS
        • Configure mPOS settings
        • Manage orders in the mPOS app
        • Manage tables in the mPOS app
    • PhotoMenu
        • Set up and install PhotoMenu
        • Configure PhotoMenu settings
        • Place orders on the PhotoMenu
        • Set up PhotoMenu as a mobile or stationary eMenu
        • Use Service Call on PhotoMenu
    • Ticket Kiosk
        • Set up and install Queue Ticket Kiosk
        • Issue queuing tickets from the Queue Ticket Kiosk
        • Configure Queue Ticket Kiosk settings
    • eSignage
        • Set up and install eSignage
        • Configure eSignage settings
    • Kitchen Display System
        • Set up and install Kitchen Display System
        • Configure Kitchen Display System settings
        • Manage orders on the Kitchen Display System
    • Customer Facing Display
        • Set up and install Customer Facing Display
        • Configure Customer Facing Display settings
    • Expedite Display
        • Set up and install Expedite Display
        • Configure Expedite Display settings
        • Perform basic expedite operations
    • Eats365 Biz and Biz Lite
        • Set up and install Eats365 Biz and Eats365 Biz Lite
        • Configure Eats365 Biz settings
        • Manage online orders on the Eats365 Biz Lite
        • Reset Eats365 Biz
        • Compare Eats365 Biz and Eats365 Biz Lite
        • Configure Eats365 Biz Lite settings
        • Place and manage orders on the Eats365 Biz
    • Self Order Kiosk
        • Set up and install Self Order Kiosk
        • Place an order on Self Order Kiosk
        • Configure Self Order Kiosk (iOS) settings
        • Set Kivo as the Self Order Kiosk default screen
        • Configure Self Order Kiosk (Android) settings
        • Process a payment return on the Self Order Kiosk
    • Pay Station
        • Set up and install Pay Station
        • Pay using Pay Station
        • Configure Pay Station settings
    • Dynamic Digital Menu
        • Manage the menu on the Dynamic Digital Menu
    • Branded Online Store
        • Manage Branded Online Store preferences
        • Set up SMS Notification
        • Book a reservation using restaurant website
        • Change password on the branded online store
        • Place orders on the branded online store
        • Delete an account on the branded online store
        • Log in and log out of the branded online store
        • Sign up on the branded online store
        • Manage orders on the branded online store
        • Set up a Delivery Address Book on the branded online store
        • Secure member credit payment on the branded online store
        • Pay using member credits on the branded online store
        • Purchase member credit using the branded online store​
        • Join a restaurant's loyalty program

Table of Contents

Set up PhotoMenu as a mobile or stationary eMenu

Learn how to use the PhotoMenu in stationary or mobile mode.

You can set up the PhotoMenu to be a fixed stationary unit on your tables where customers can self order, or hand out the PhotoMenu to customers as a mobile eMenu. 

In this article, you’ll learn about the difference between a mobile eMenu and a stationary eMenu, as well as, learn how to set up your PhotoMenu in your desired eMenu mode.

Stationary eMenu

When the PhotoMenu is in stationary mode, the device where the PhotoMenu is installed is fixed to a table. You can then set up the PhotoMenu to only process orders from the table where it’s assigned. 

To set up a stationary PhotoMenu, follow the steps below: 

  1. Install the PhotoMenu on an iPad. 
    Note: You may skip this step if you’ve already installed the SelfServ app.
  2. Pair the PhotoMenu with the Eats365 POS. 
    Note: You may skip this step if you’ve already paired the devices.
  3. Secure the iPad to its designated table.
  4. Assign a fixed table number to the PhotoMenu.
    Note: When a table number is assigned to a PhotoMenu, you won’t be able to use the PhotoMenu to place orders from another table.
    1. Log in to the Eats365 POS.
    2. At the top left, tap Settings .
    3. Under "General," tap Device Pairing. Then, tap Photo Menu.
    4. Under "Paired Device," tap the paired PhotoMenu device.
    5. Turn on Fixed Table Number .
    6. Under "Table Number," specify which table should the PhotoMenu be assigned.
      Note: If you have Table Sharing turned on, you won’t be able to turn on this setting. To turn off Table Sharing, refer to Set up Dine-In settings.
    7. At the top right, tap Save.
  5. On the iPad, open the SelfServ app.
  6. Enter the party size. 
    Note: The party size you enter would be the default party size for the table. To change the party size, tap the Restaurant Name six times. Then, enter the passcode. If you haven’t set up a passcode for the PhotoMenu, the default passcode is "000000." To change the passcode, refer to Configure PhotoMenu settings.
  7. Tap OK to confirm.

Once you confirm the table number and party size, you are redirected to the PhotoMenu Start screen. The PhotoMenu is now ready to take customers’ orders. After the customer pays their bill, the PhotoMenu resets and should be ready for the next order.

Mobile eMenu

A mobile eMenu allows you to hand out to customers an iPad with the PhotoMenu installed. Unlike a Stationary eMenu, a mobile eMenu isn’t affixed to a specific table, so it can be used by any table to place orders. 

To set up a mobile eMenu, follow the steps below: 

  1. Install the PhotoMenu on an iPad. 
    Note: You may skip this step if you’ve already installed the SelfServ app.
  2. Pair the PhotoMenu with the Eats365 POS. 
    Note: You may skip this step if you’ve already paired the devices.
  3. On the iPad, open the SelfServ app.
  4. Enter the table number and party size.
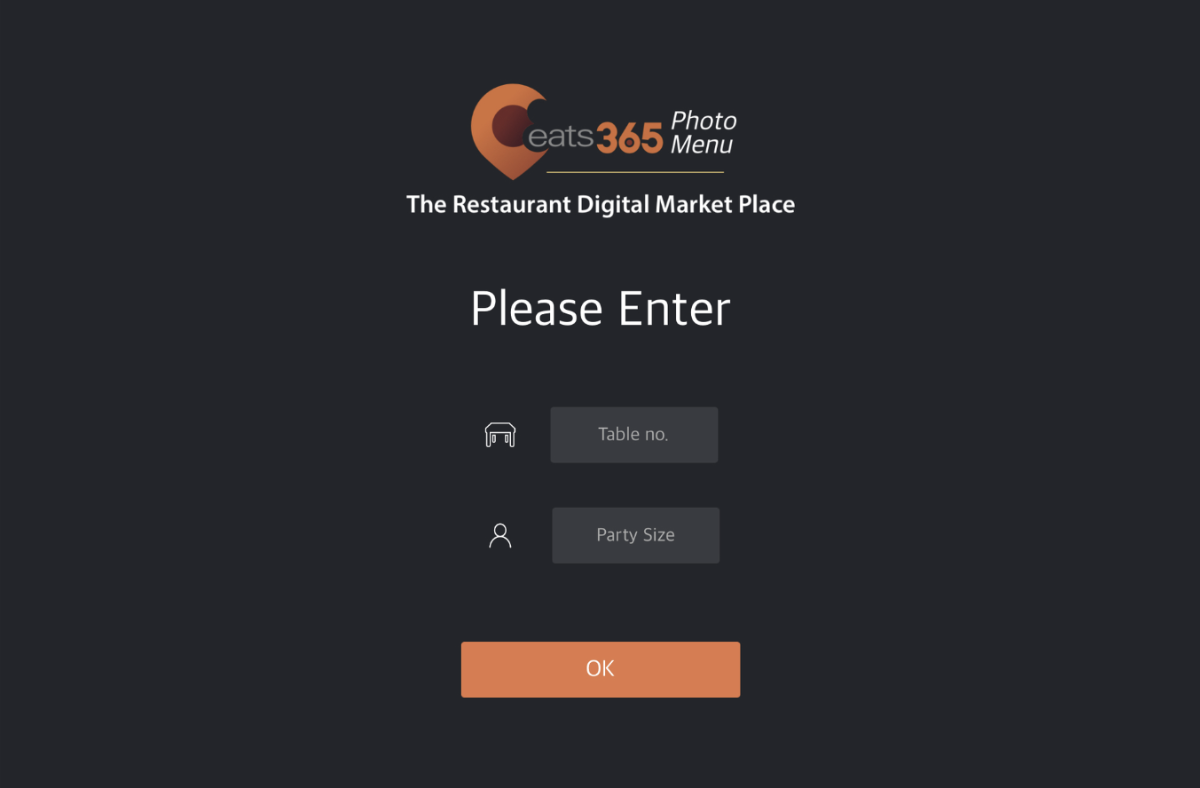
  5. Tap OK to confirm.

Once you confirm the table number and party size, you are redirected to the PhotoMenu Start screen. The PhotoMenu is now ready to take customers’ orders. You can hand out the eMenu to the customer, so they can browse and add orders on their own.

After the customer places their order and checks their bill, you can then go back to the table number and party size screen to reset the PhotoMenu for the next order. To go back to the table number and party size screen, tap the Restaurant Name six times. Then, enter the passcode.

Delete

Tip: If you haven’t set up a passcode for the PhotoMenu, the default passcode is 000000. To change the passcode, refer to Configure PhotoMenu settings.

To learn more on how to place orders, refer to Place orders on the PhotoMenu.

emenu photomenu mobile emenu stationary emenu selfserv

Was this article helpful?

Yes
No
Give feedback about this article

Related Articles

  • Place orders on the PhotoMenu
  • Manage new orders
            • Products
              • POS
              • mPOS
              • Eats365 Biz
              • Eats365 Marketplace
              • Branded Online Store
              • Kitchen Display System
              • Expedite Display
              • Scan-to-Order (BYOD)
              • Self-Service Kiosk
              • PhotoMenu
              • Queue Kiosk
              • Dynamic Digital Menu
              • Queue Display
              • Pickup Display
              • Customer Facing Display
            • Solutions
              • Online Ordering
              • Contactless Dining
              • Front of House
              • Guest Retention
              • Back of House
              • Back Office (Store End)
              • Multi-brand/Location Management (Enterprise)
              • Paperless Operation Experience
              • Payment
            • Restaurant Types
              • Quick Service Restaurant
              • Full Service Restaurant
              • Bars
              • Food Court
              • Cloud Kitchen
              • Food Retail
              • Self-service Restaurant
              • Enterprise
              • All-You-Can Eat (Buffet)
            • Resources
              • Eats365 Knowledge Base
              • Blog
              • Supported Hardware
            • Company
              • About Us
              • Success Stories
              • Referrals
            • Get In Touch
            • Contact Us
              • Eats365, Inc.
              • Sales info@eats365.com
              • Support support@eats365.com
        • Contact Us
          • Eats365, Inc.
          • info@eats365.com
          • www.eats365pos.com
        • Get In Touch
          • Apple Mobility Partner
            twitter facebook eats365 linkedin
        • eats365
          © 2023 Eats365 Incorporated. All rights reserved.

Knowledge Base Software powered by Helpjuice

Expand