Eats365 Products
 Merchant Guide
 Modules
 Membership
 Integrations
 Hardware
 Staff Operations
 Roles & Permissions
 Payments
 Reports
 What’s New
 Release Notes
 Troubleshooting
 Simulators
 Glossary
 Troubleshooter
 System Status
- mPOS
- FAQs on the mPOS
- Set up and install mPOS
- Configure mPOS settings
- Manage orders in the mPOS app
- Manage tables in the mPOS app
- Process QR Code payments on the mPOS
- Print receipts and QR codes from the mPOS
- Manage self-checkout orders on the mPOS
- Set up a printer on the mPOS
- Add a member to an order using mPOS
- Integrate JKOPay (街口支付) with the mPOS
- Integrate LINE Pay with the mPOS
- Issue a tax invoice on the mPOS (Taiwan)
- PhotoMenu
- Ticket Kiosk
- eSignage
- Kitchen Display System
- Customer Facing Display
- Expedite Display
- Eats365 Biz and Biz Lite
- FAQs on Eats365 Biz and Biz Lite
- Set up and install Eats365 Biz and Eats365 Biz Lite
- Configure Eats365 Biz settings
- Manage orders on the Eats365 Biz
- Reset Eats365 Biz
- Compare Eats365 Biz and Eats365 Biz Lite
- Place orders on the Eats365 Biz
- Set up and manage integrated payments for Eats365 Biz
- Issue a tax invoice on Eats365 Biz (Taiwan)
- Process payments on the Eats365 Biz
- Integrate KPay with the Eats365 Biz
- Process KPay payments on the Eats365 Biz
- Process Alipay payments on the Eats365 Biz
- Integrate 365pay with the Eats365 Biz
- Process 365pay payments on the Eats365 Biz
- Self Order Kiosk
- FAQs on the Self Order Kiosk
- Set up and install Self Order Kiosk
- Place an order on Self Order Kiosk
- Configure Self Order Kiosk (iOS) settings
- Configure Self Order Kiosk (Android) settings
- Process a payment return on the Self Order Kiosk
- Set up Eats365 CRM on the Self Order Kiosk (Android)
- Use membership points and credits on the Self Order Kiosk (Android)
- Process Octopus payment on the Self Order Kiosk (Android)
- Process payments on the Self Order Kiosk
- Generate a Taiwan tax invoice from the Self Order Kiosk
- Change Self Order Kiosk (iOS) device name
- Set up Fiuu Spot Payment on the Self Order Kiosk (Android)
- Perform self-checkout on the Self Order Kiosk (Android)
- Set up pre-checkout item prompts
- Set up and manage e-Invoice (Malaysia)
- Support Fiuu payments on the Self Order Kiosk (Android)
- Support KPay payments on the Self Order Kiosk (Android)
- Integrate 365pay with the Self Order Kiosk (Android)
- Pay Station
- Dynamic Digital Menu
- Branded Online Store
- Manage Branded Online Store preferences
- Set up SMS Notification
- Book a reservation using restaurant website
- Change password on the branded online store
- Place orders on the branded online store
- Delete an account on the branded online store
- Log in and log out of the branded online store
- Sign up on the branded online store
- Manage orders on the branded online store
- Set up a Delivery Address Book on the branded online store
- Secure member credit payment on the branded online store
- Pay using member credits on the branded online store
- Purchase member credit using the branded online store
- Join a restaurant's loyalty program
- Set up a Branded Online Store
- Share a branded online store link
- Add branded online store shortcut on mobile homescreen
- Leave a restaurant review on the Branded Online Store
- Cancel restaurant membership on the Branded Online Store
- Set up predictive item suggestions for the Branded Online Store
- Manage Branded Online Store user accounts
- Set up pre-checkout item prompts
- Integrate Octopus Online (365pay) with the Branded Online Store
- Set up and manage payment methods for the Branded Online Store
- Integrate Global Payments with the Branded Online Store
- Integrate 365pay with the Branded Online Store
Table of Contents
Issue queuing tickets from the Queue Ticket Kiosk
Learn how to issue queuing tickets from the Queue Ticket Kiosk.
The Queue Ticket Kiosk is a self-service queue management system where customers can get their own queuing tickets and check their queue status.
In this article, you’ll learn how to issue queuing tickets from the Queue Ticket Kiosk and how to check a queue status.
Before you start
Make sure to complete the following checklist first before using the Queue Ticket Kiosk to issue queuing tickets.
- Pair the Queue Ticket Kiosk to the Eats365 POS.
- Connect the Queue Ticket Kiosk to a printer.
- Enable queuing from the Eats365 POS.
- Turn on Issue Ticket from the Eats365 POS.
Issue a queuing ticket
Customers can get their own queuing ticket through the Queue Ticket Kiosk.
Note:
- If you’re using an iPad, the screen shows the Ticket Kiosk settings upon opening the Ticket Kiosk app. Tap Start Ticket Kiosk to begin issuing tickets.
- If you’re using an Android device, the start screen defaults to the queuing ticket screen.
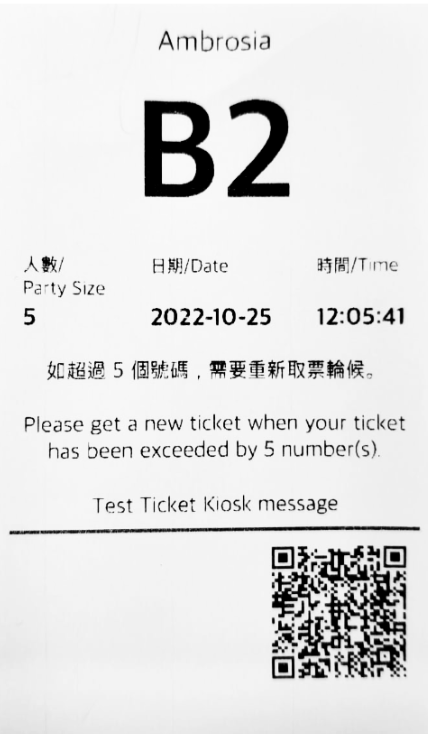
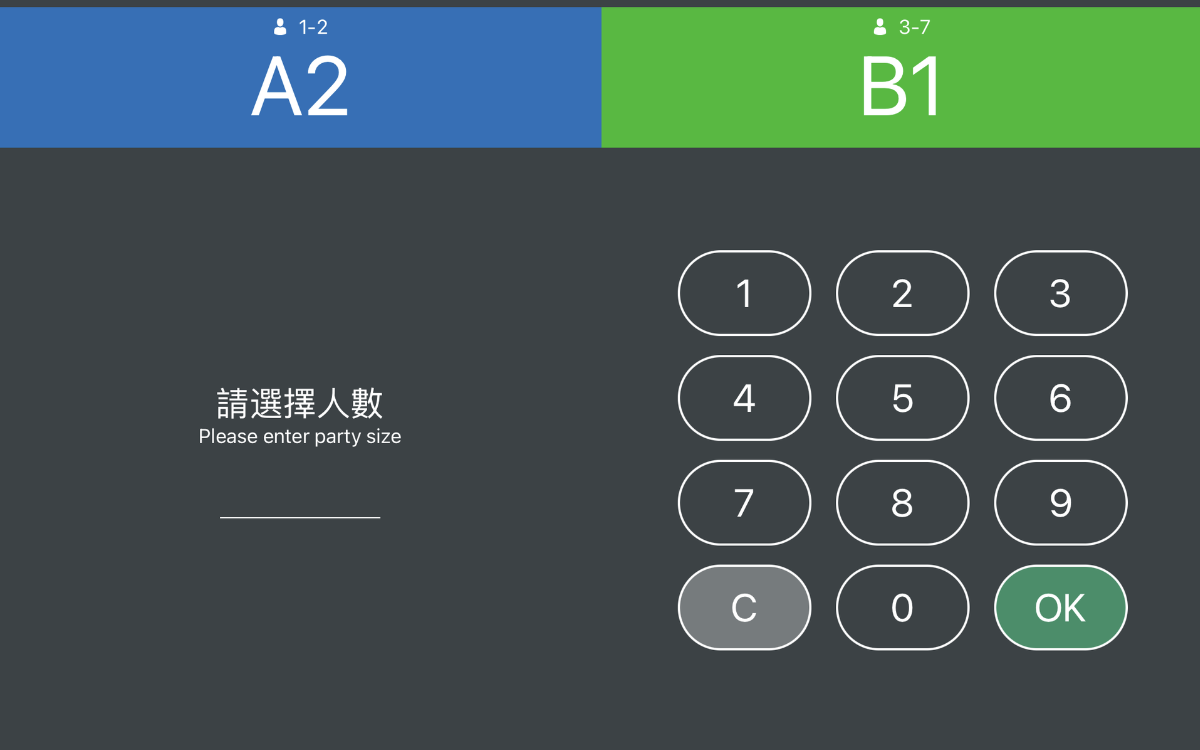
To issue a queuing ticket, instruct the customer to do the steps below:
- On the Ticket Kiosk, enter the party size.
- Tap OK.
- Wait for the Queue Ticket Kiosk to print a queuing ticket.
Check queue status
Once a queuing ticket is printed, the customer can check their queuing status on their phones. To check their queue status, the customer may scan the QR code included in the queuing ticket.