All

Contact Us

If you still have questions or prefer to get help directly from an agent, please submit a request.
We’ll get back to you as soon as possible.

Please fill out the contact form below and we will reply as soon as possible.

    Login
English (US)
English (US)
Mandarin
Cantonese
  • Home
  • Modules

Branded Online Store

All Product

Contact Us

If you still have questions or prefer to get help directly from an agent, please submit a request.
We’ll get back to you as soon as possible.

Please fill out the contact form below and we will reply as soon as possible.

    • mPOS
        • Set up and install mPOS
        • Configure mPOS settings
        • Manage orders in the mPOS app
        • Manage tables in the mPOS app
    • PhotoMenu
        • Set up and install PhotoMenu
        • Configure PhotoMenu settings
        • Place orders on the PhotoMenu
        • Set up PhotoMenu as a mobile or stationary eMenu
        • Use Service Call on PhotoMenu
    • Ticket Kiosk
        • Set up and install Queue Ticket Kiosk
        • Issue queuing tickets from the Queue Ticket Kiosk
        • Configure Queue Ticket Kiosk settings
    • eSignage
        • Set up and install eSignage
        • Configure eSignage settings
    • Kitchen Display System
        • Set up and install Kitchen Display System
        • Configure Kitchen Display System settings
        • Manage orders on the Kitchen Display System
    • Customer Facing Display
        • Set up and install Customer Facing Display
        • Configure Customer Facing Display settings
    • Expedite Display
        • Set up and install Expedite Display
        • Configure Expedite Display settings
        • Perform basic expedite operations
    • Eats365 Biz and Biz Lite
        • Set up and install Eats365 Biz and Eats365 Biz Lite
        • Configure Eats365 Biz settings
        • Manage online orders on the Eats365 Biz Lite
        • Reset Eats365 Biz
        • Compare Eats365 Biz and Eats365 Biz Lite
        • Configure Eats365 Biz Lite settings
        • Place and manage orders on the Eats365 Biz
    • Self Order Kiosk
        • Set up and install Self Order Kiosk
        • Place an order on Self Order Kiosk
        • Configure Self Order Kiosk (iOS) settings
        • Set Kivo as the Self Order Kiosk default screen
        • Configure Self Order Kiosk (Android) settings
        • Process a payment return on the Self Order Kiosk
    • Pay Station
        • Set up and install Pay Station
        • Pay using Pay Station
        • Configure Pay Station settings
    • Dynamic Digital Menu
        • Manage the menu on the Dynamic Digital Menu
    • Branded Online Store
        • Manage Branded Online Store preferences
        • Set up SMS Notification
        • Book a reservation using restaurant website
        • Change password on the branded online store
        • Place orders on the branded online store
        • Delete an account on the branded online store
        • Log in and log out of the branded online store
        • Sign up on the branded online store
        • Manage orders on the branded online store
        • Set up a Delivery Address Book on the branded online store
        • Secure member credit payment on the branded online store
        • Pay using member credits on the branded online store
        • Purchase member credit using the branded online store​
        • Join a restaurant's loyalty program

Table of Contents

Place orders on the branded online store

Learn how to place dine-in, delivery, and pickup orders through the branded online store.

The Branded Online Store allows you to browse through the different menu items available in the restaurant and quickly place your orders through the restaurant’s website. 

In this article, you’ll learn how to create orders for dine-in, delivery, and pickup. 

Place an order

To place an order on the branded online store, follow the steps below:

Mobile device

Dine-In

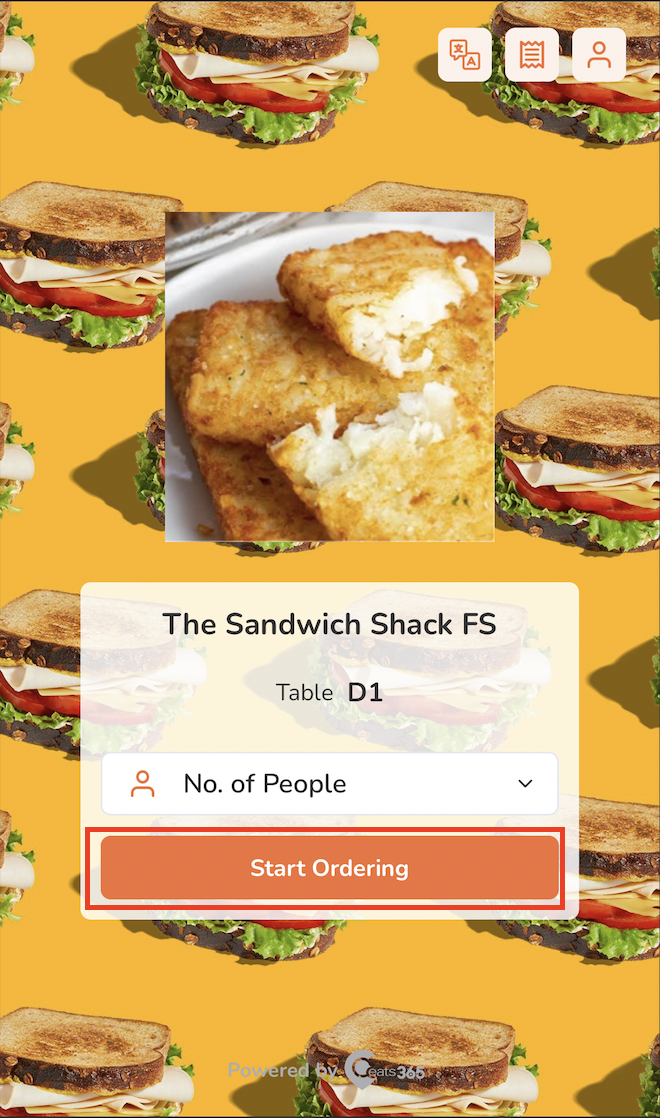
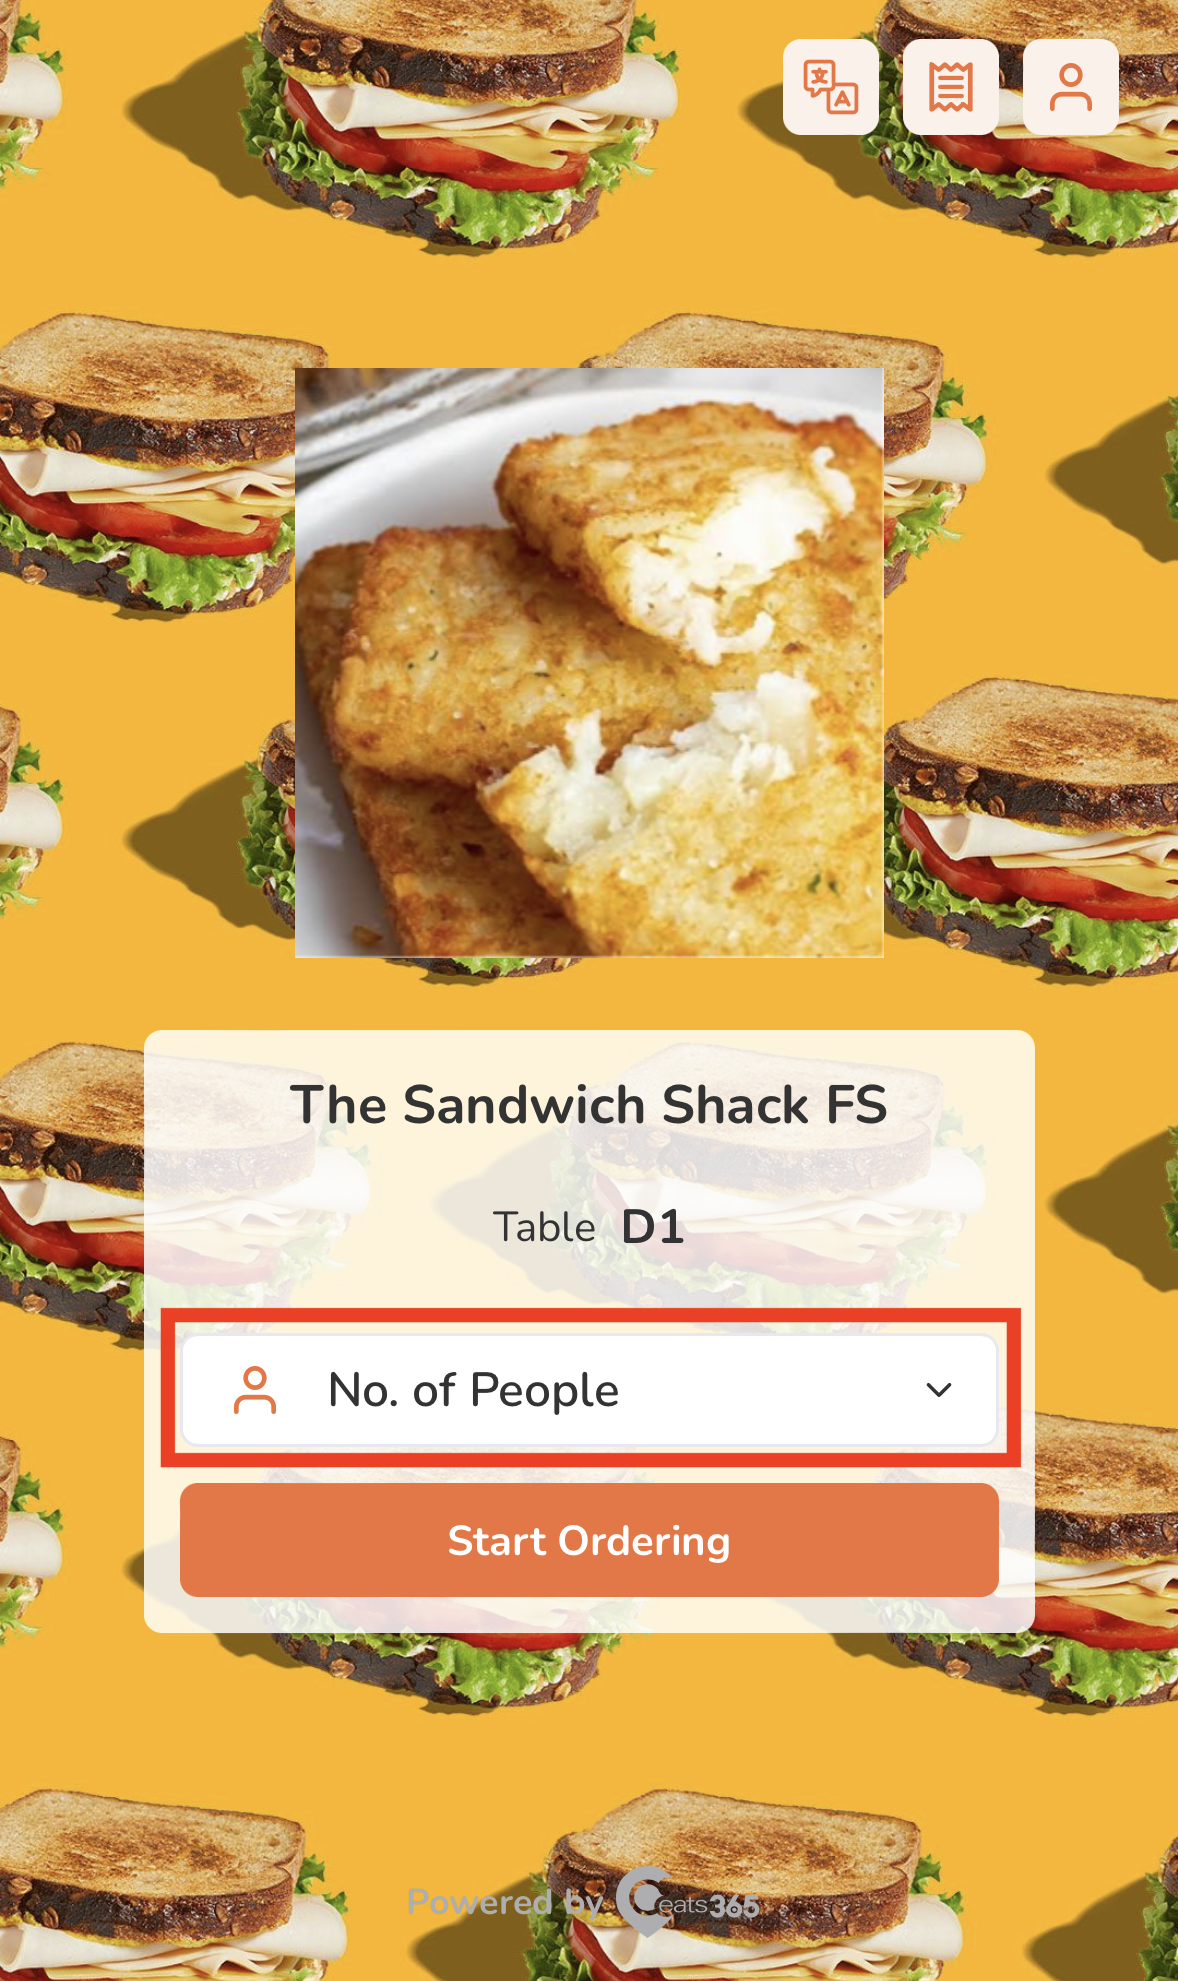
  1. Scan the QR Code printed on your order ticket. You’ll be directed to the restaurant’s branded online store.
  2. Select the number of people dining in the restaurant.
  3. Tap Start Ordering.
  4. (Optional) If you have an account on the branded online store, log in to your account to associate your order with your account. Otherwise, you can proceed with placing your order as a guest. 
    Note: 
    • Guest ordering: The restaurant must enable guest ordering to place an order without logging in to the branded online store.
    • Group ordering (with membership): For groups with two or more members present, the plan of the member who places the first order applies to the whole group. If the restaurant offers member-exclusive menu items, the whole group can enjoy them and receive member pricing, provided that the associated member has the required plan.
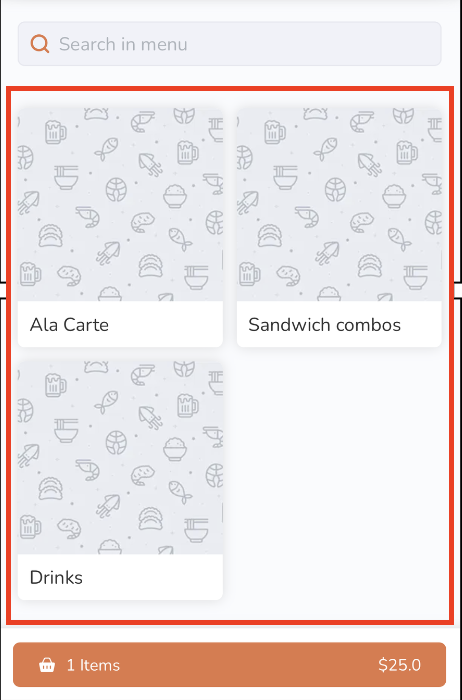
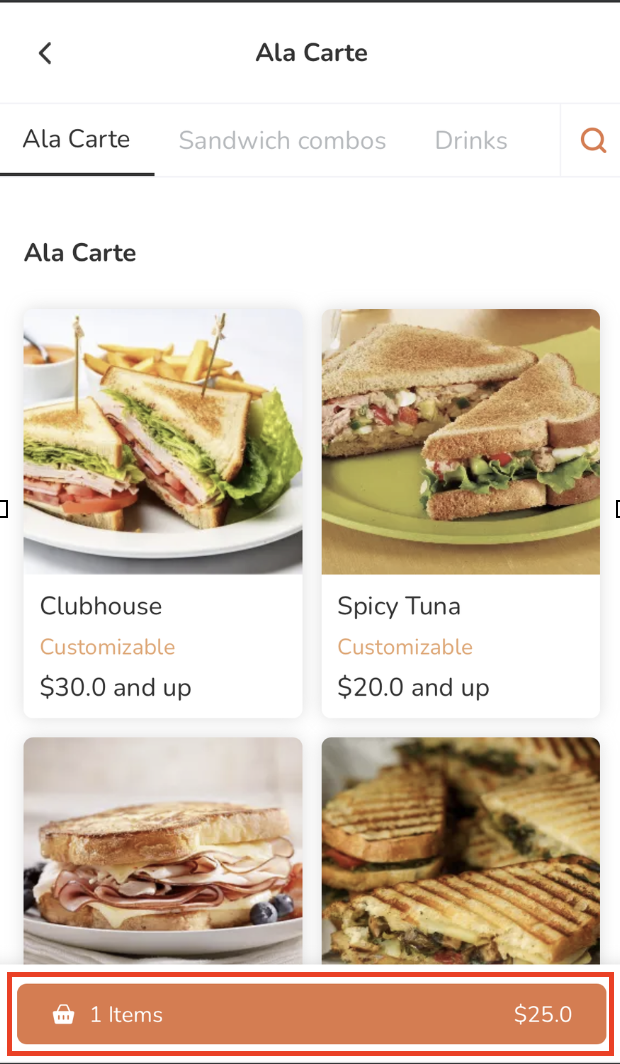
  5. Tap a category to browse through the different menu items available to order.

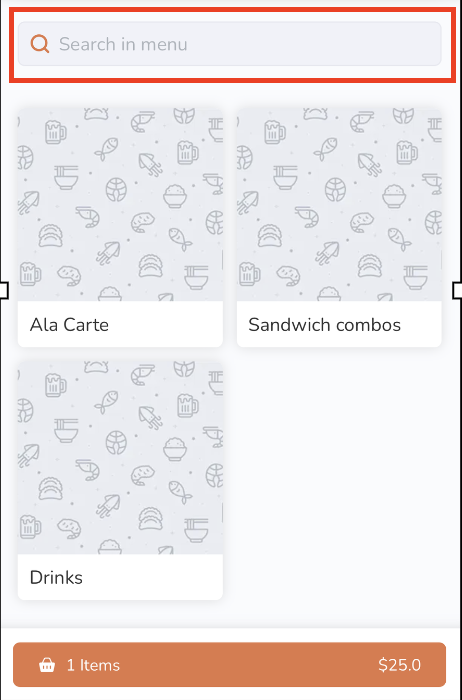
    Tip: To search for an item manually, tap the search field above the categories and then enter the item that you want to add to the order.
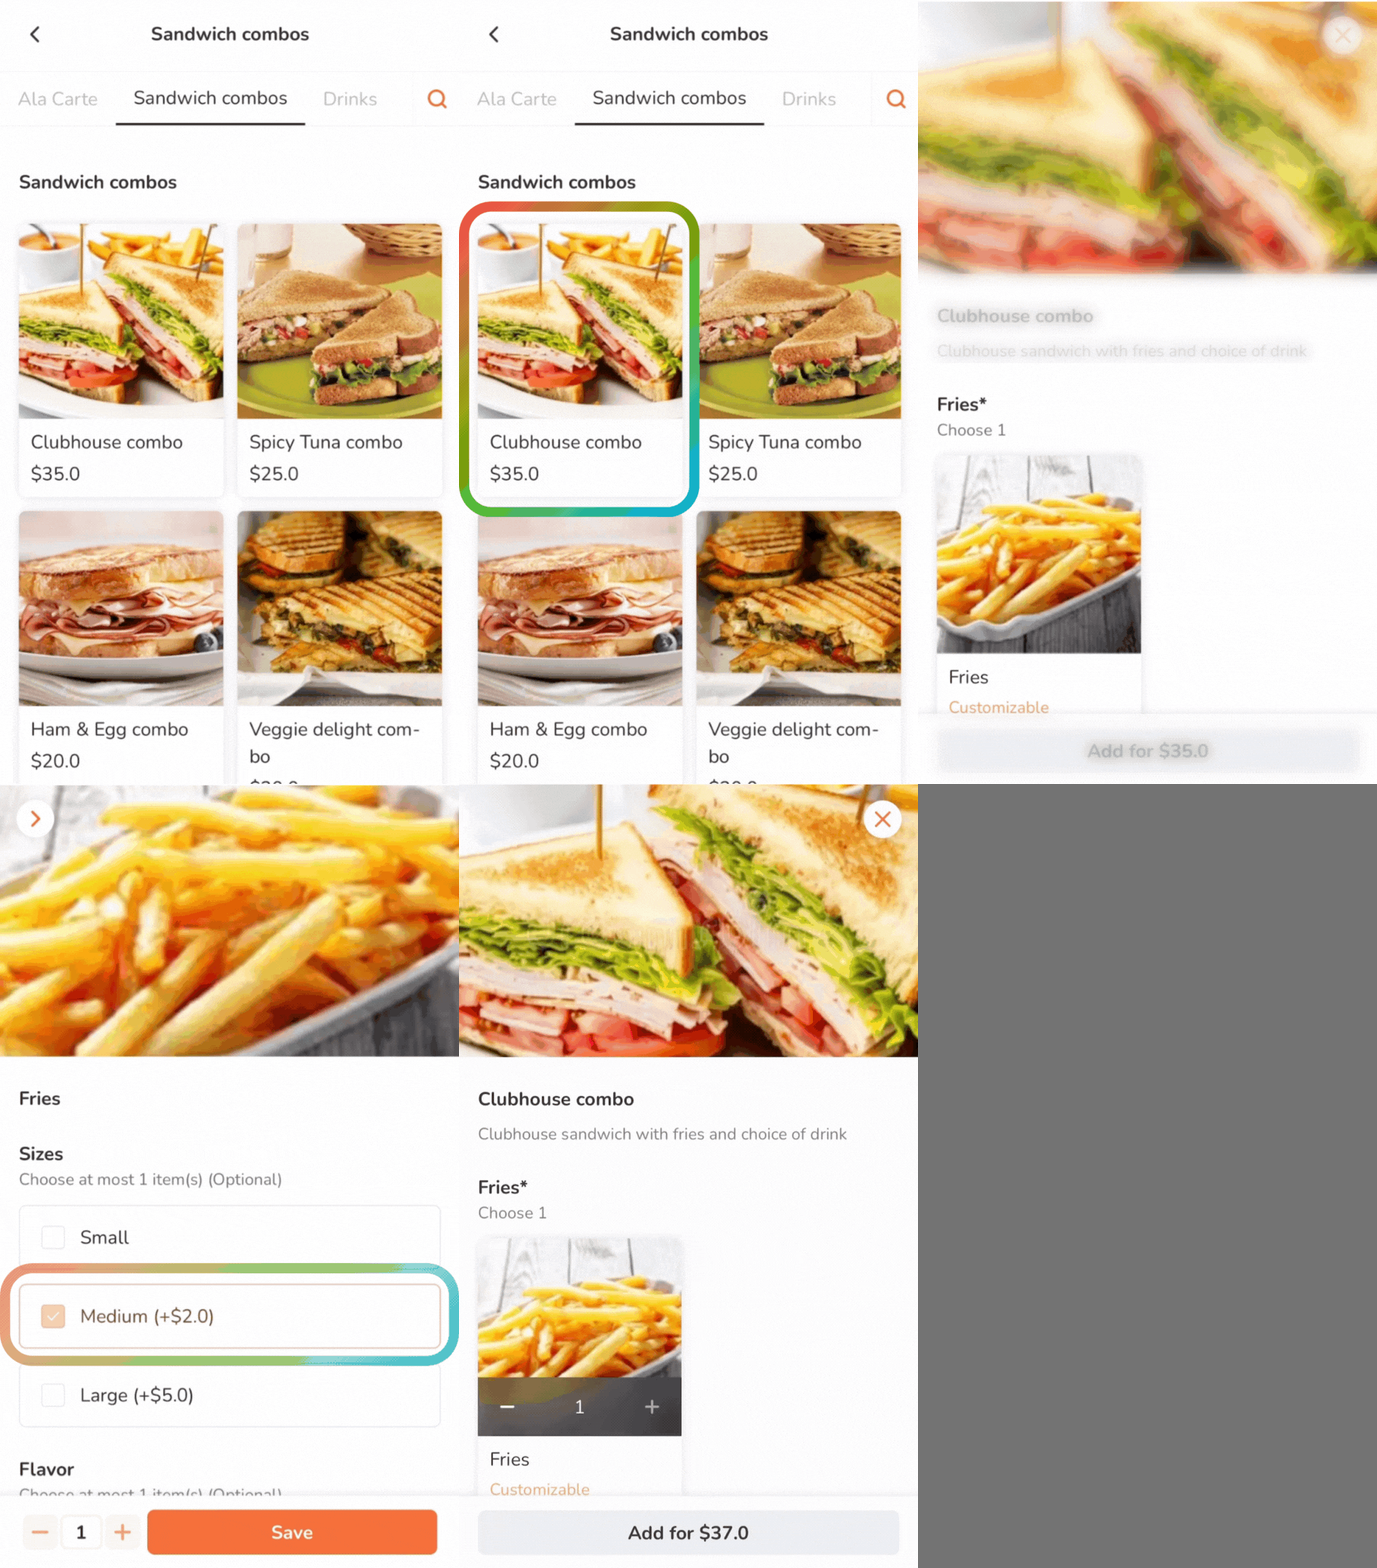
  6. To add an item to an order, tap the item.
    Note: You can purchase plan-exclusive items if you’re subscribed to the required plan.
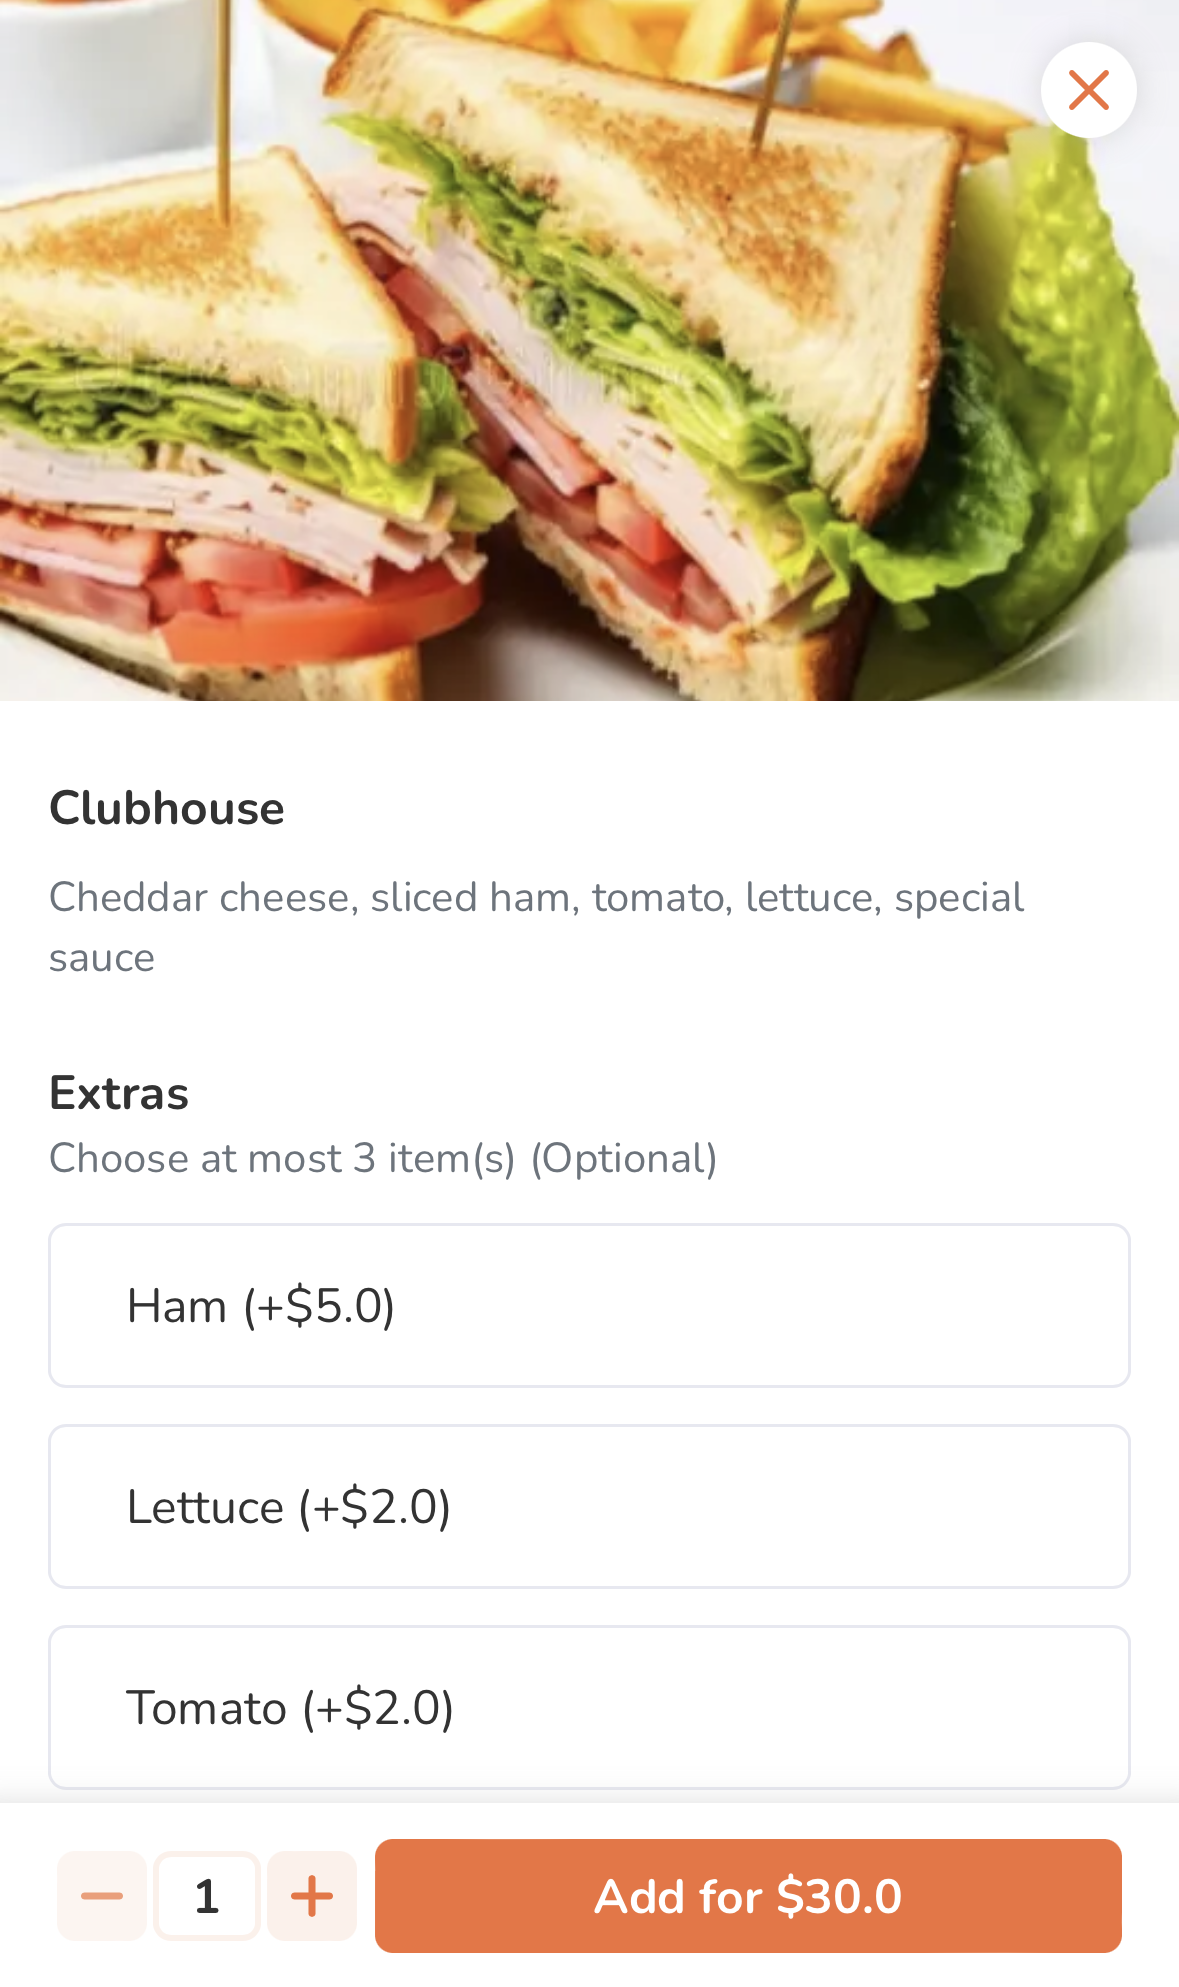
    1. If the order has modifiers available, select from the available modifiers to customize your order. Then, tap Add.
      Note: Depending on the item’s total price, the Add button changes. For example, if the total price is $35, the button shows up as Add for $35.0.
    2. If the item is a combo item, choose an option for each item included in the combo to customize your order. Then, tap Add.
      Note: 
      • Depending on the item’s total price, the Add button changes. For example, if the total price is $35, the button shows up as Add for $35.0.
      • If Enable Auto Select Next Combo Option is turned on, the screen automatically scrolls down to the next combo option to select, after an option for an item included in the combo is selected.
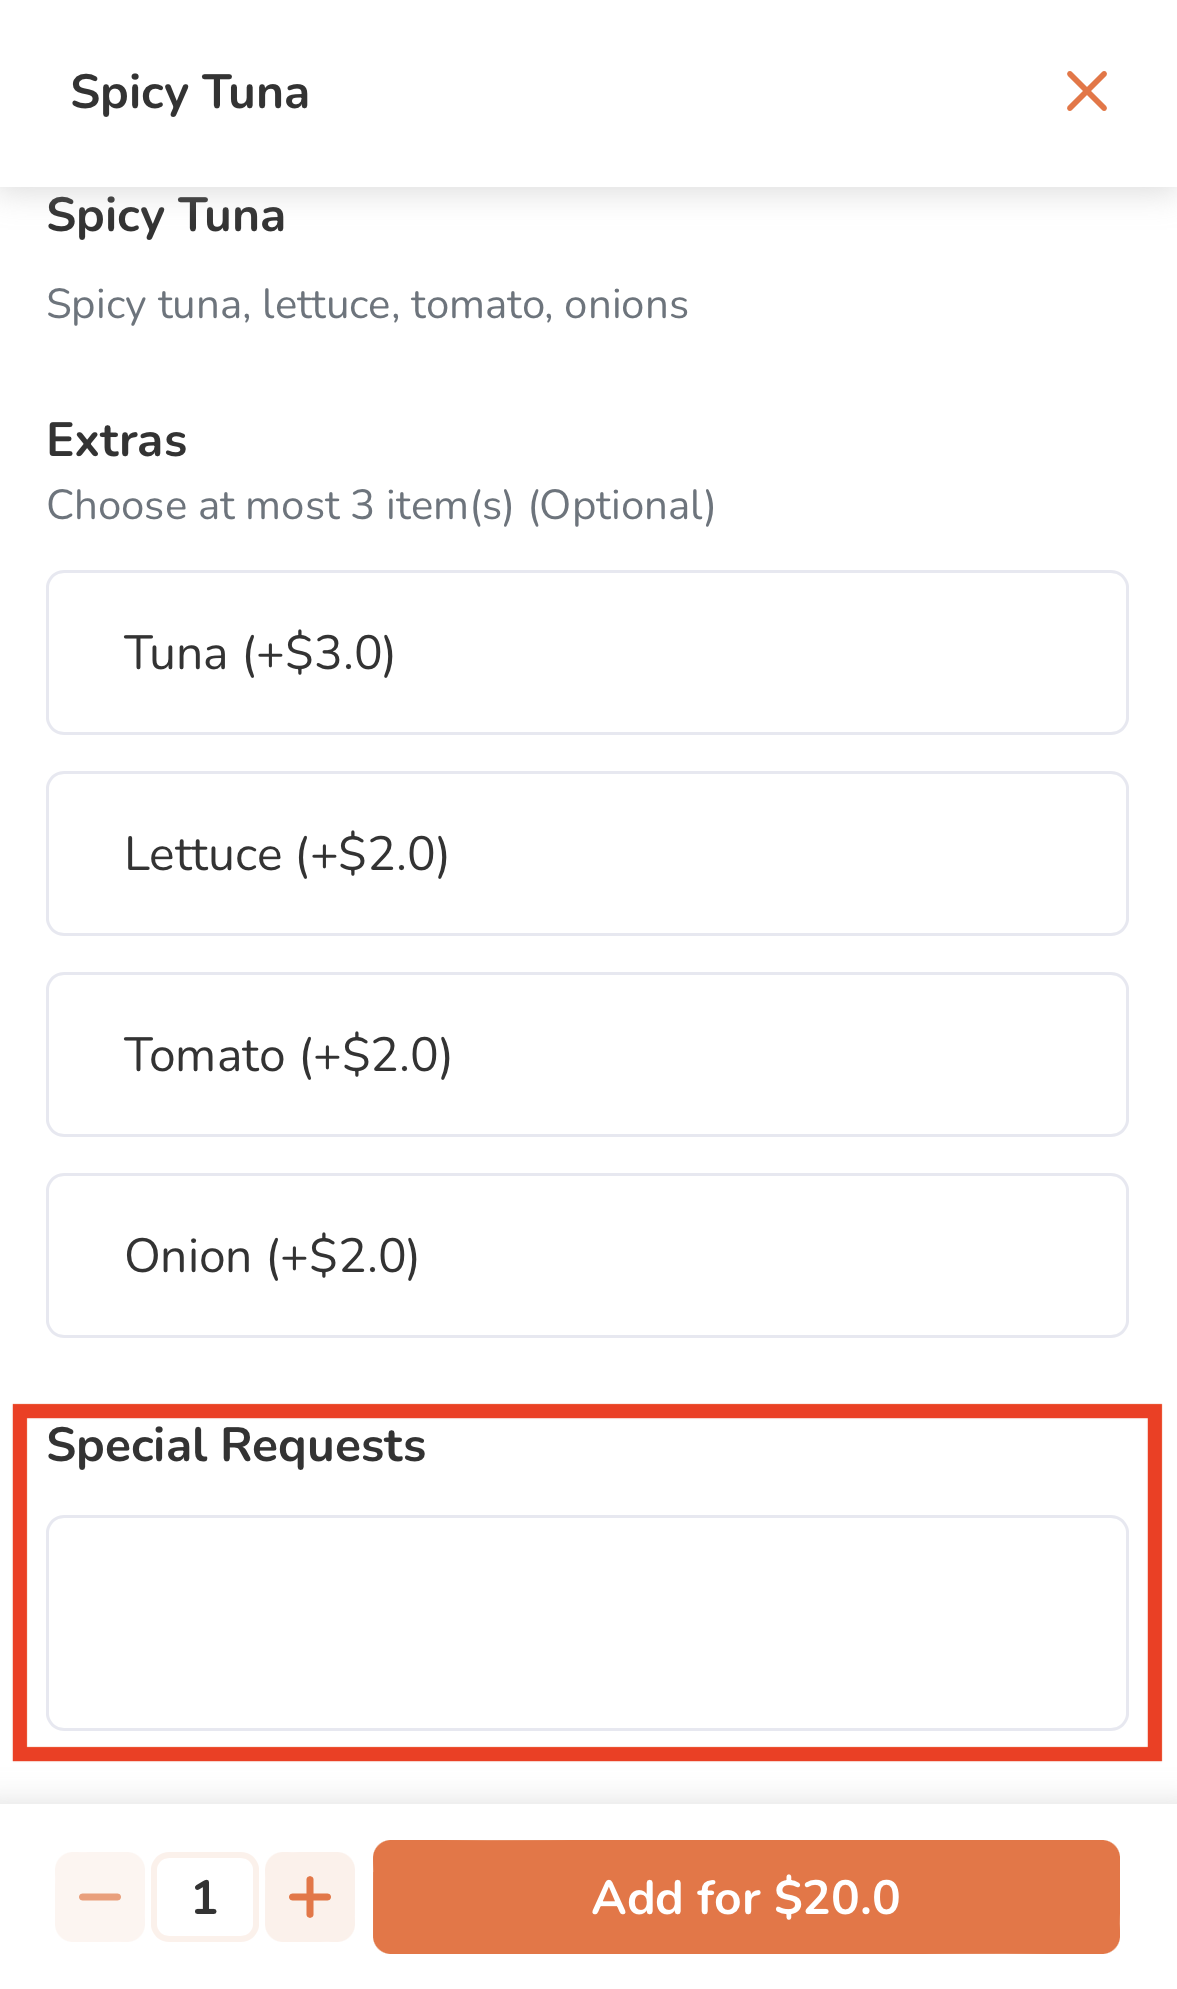
  7. To add a special request for an item, on the Special Requests field, enter your request.
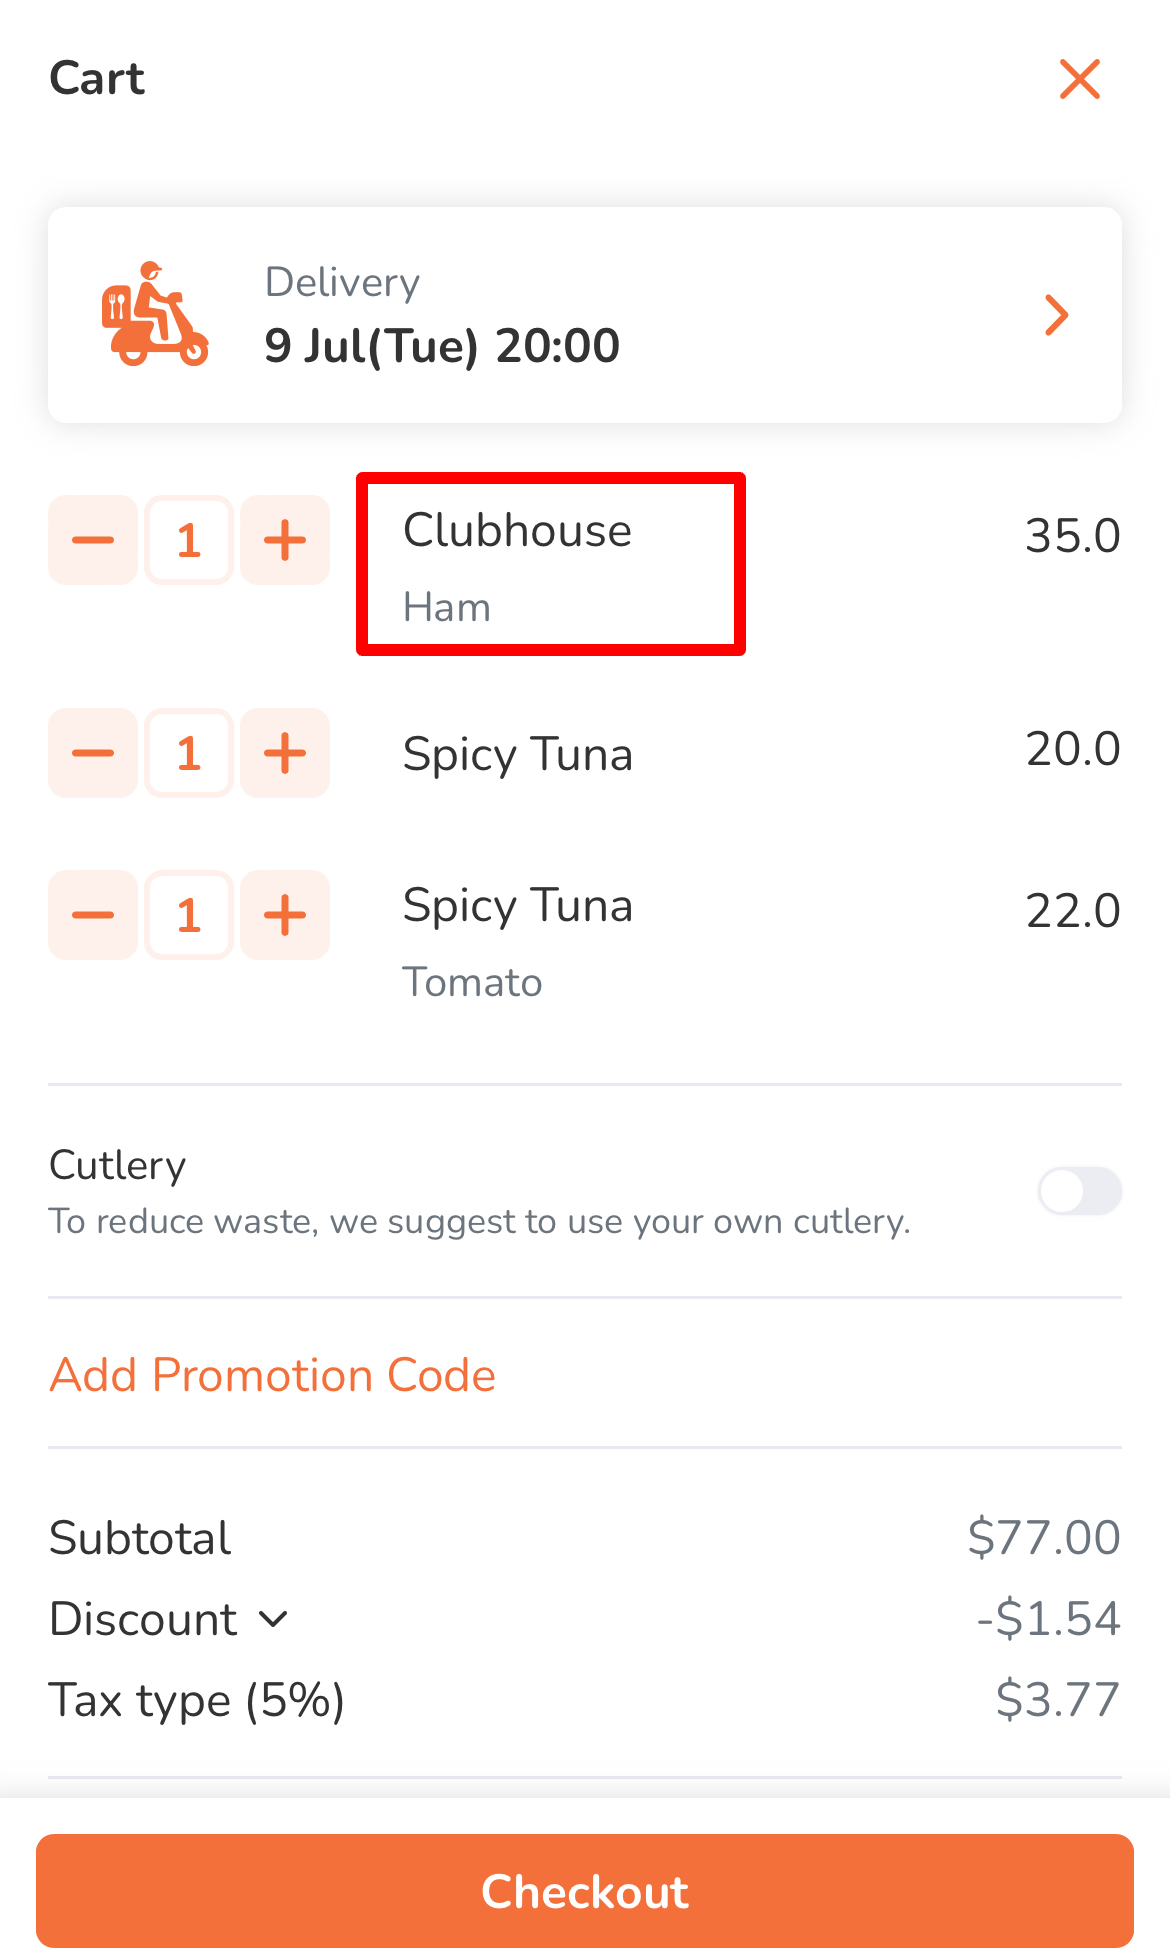
  8. Once you’re done adding items to your order, at the bottom, tap the cart summary to view a list of items currently added to the order. 
  9. (Optional) To update an item’s details or modifiers from the cart view, tap the item, then make your changes. Tap Update to save.
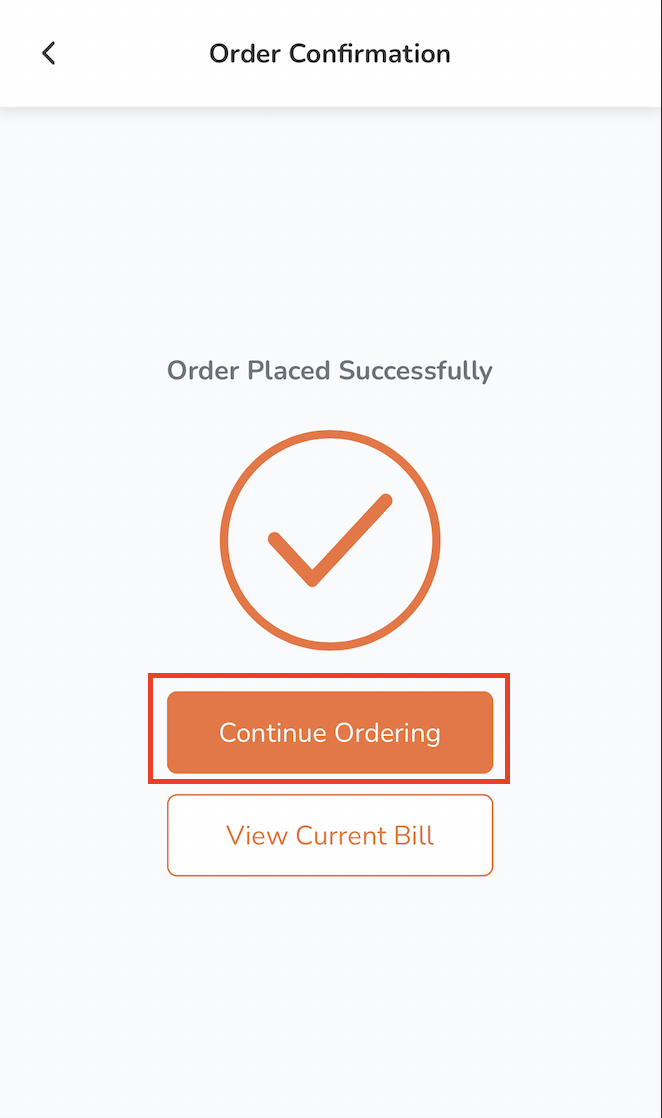
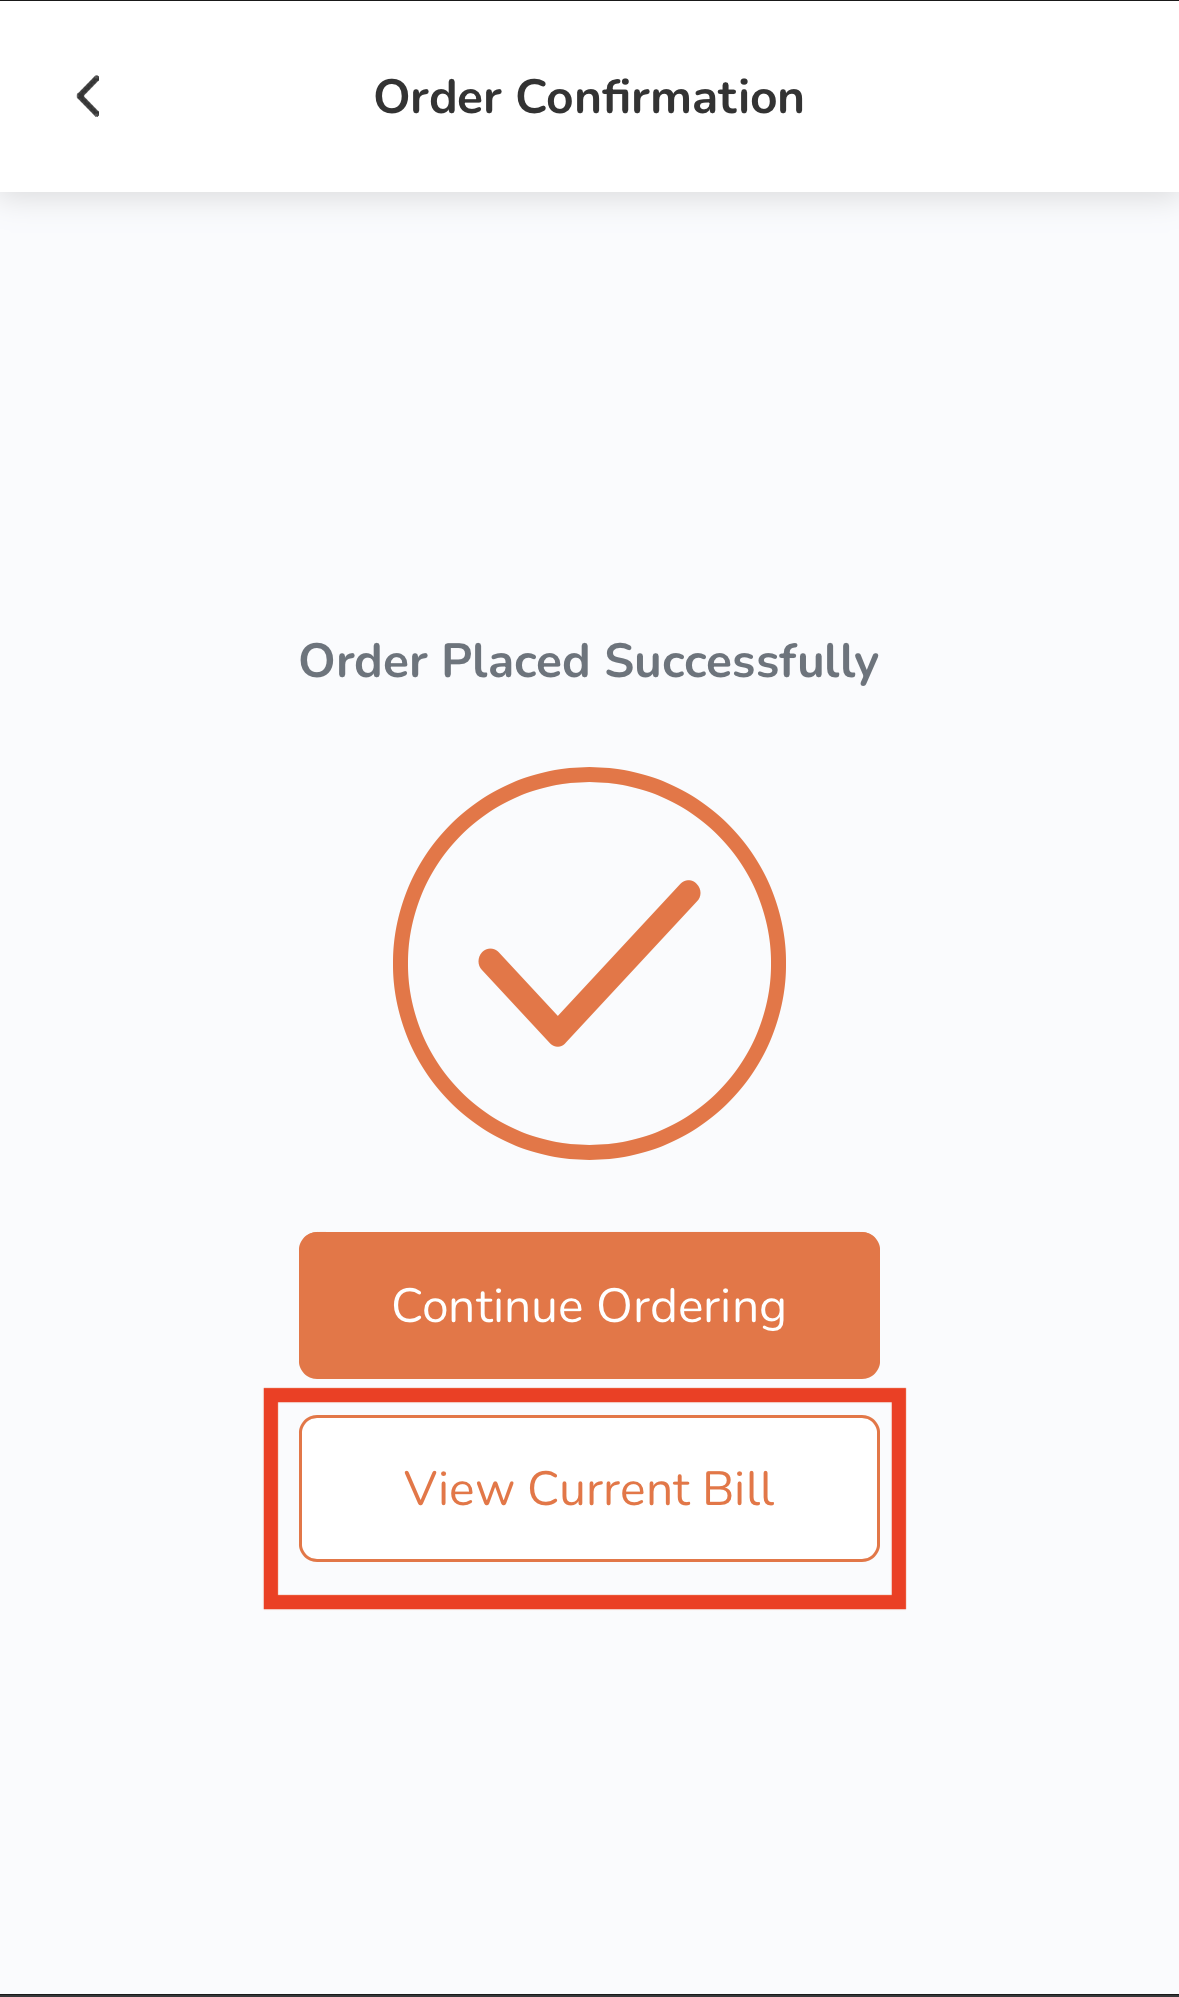
  10. Tap Place Order to confirm your order. You’ll be redirected to the Order Confirmation page.
  11. If you need to add more items to your order, tap Continue Ordering.
  12. To check your current bill, tap View Current Bill.
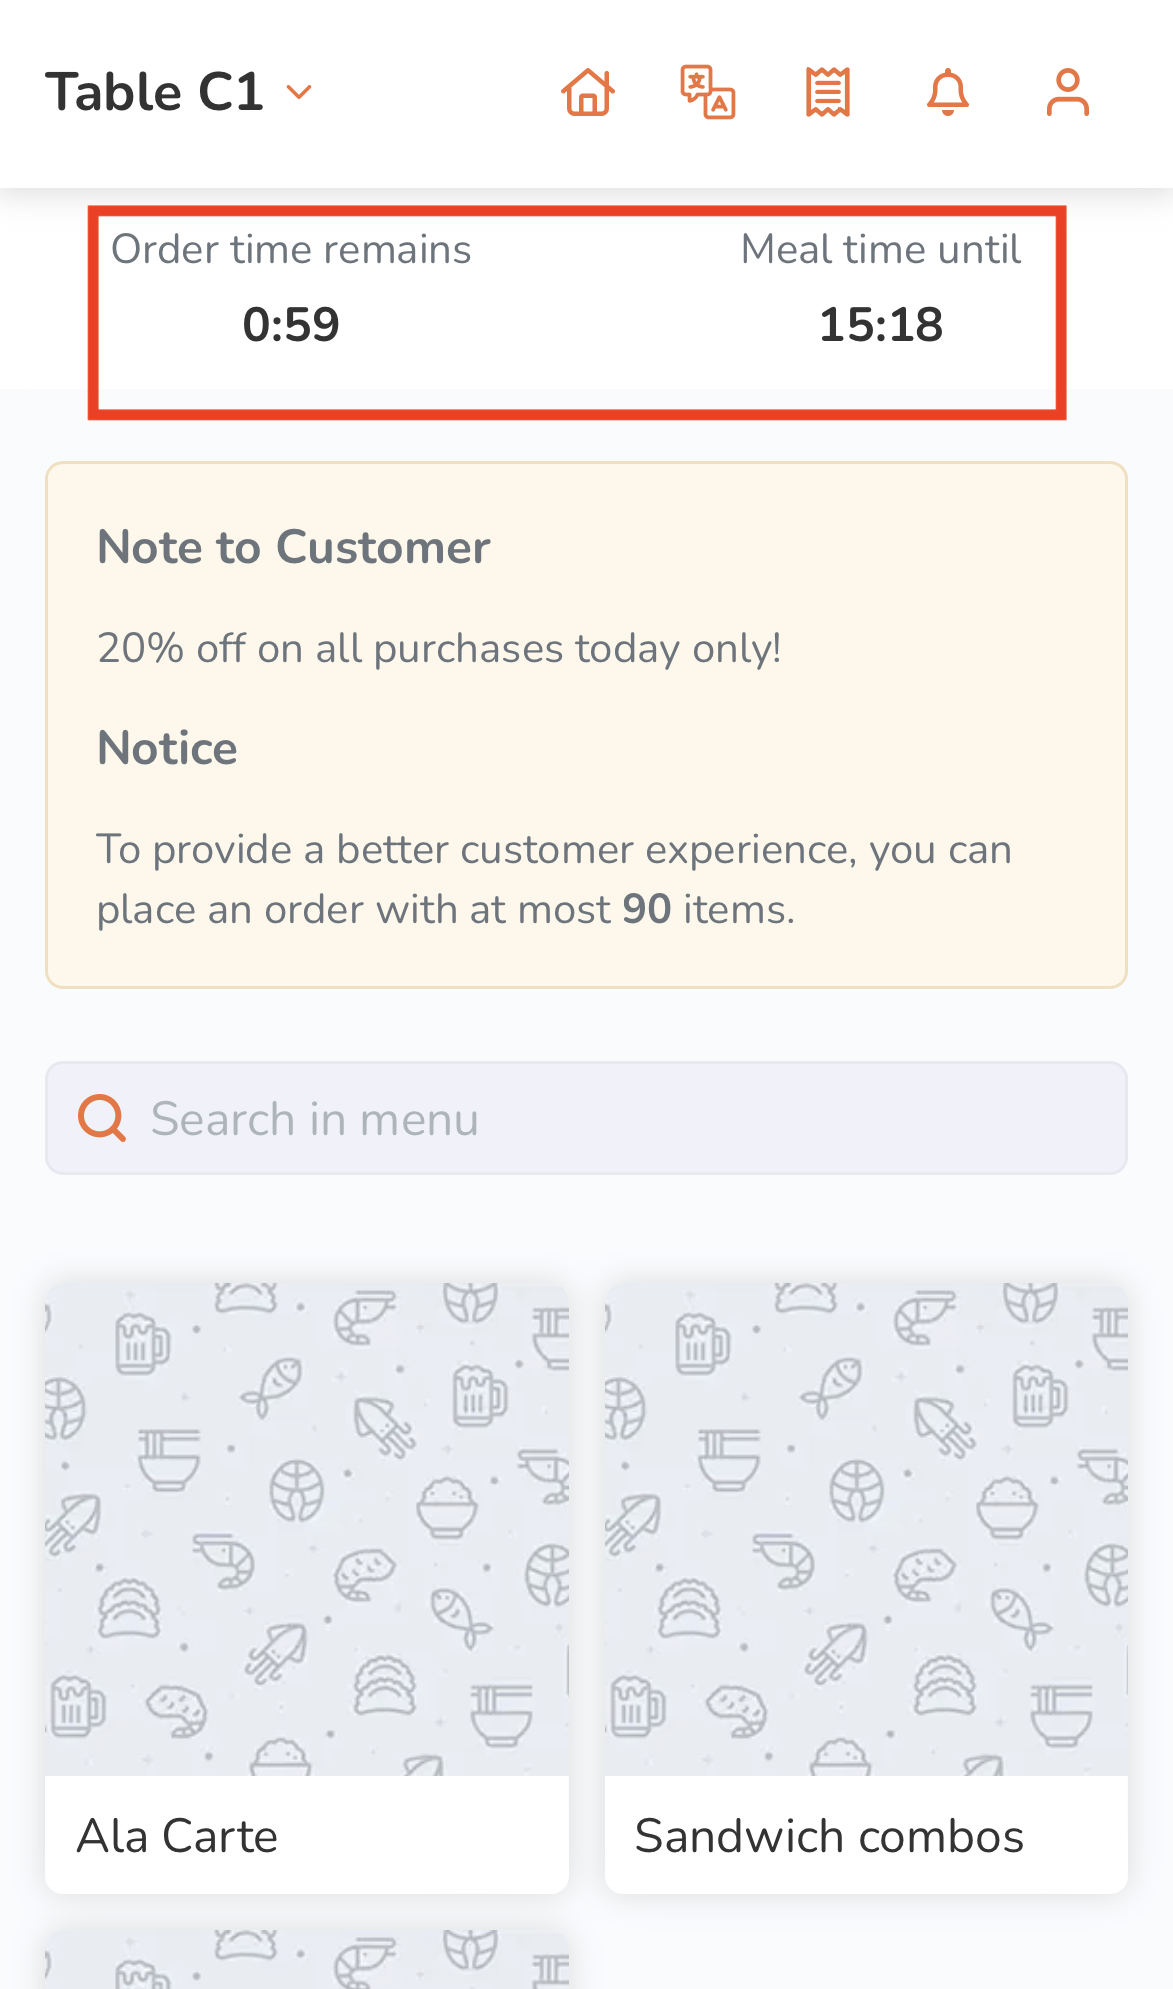
  13. Once the order has been placed, you can check your remaining ordering time and dining time at the top of the ordering dine-in menu screen.
    Note: The restaurant must have this feature enabled to check the ordering and dining time on the branded online store.
Delete

Delivery

  1. On your mobile device’s browser, visit the restaurant’s branded online store website.
  2. (Optional) If you have an account on the branded online store, log in to your account to associate your order with your account. Otherwise, you can proceed with placing your order as a guest. 
    Note: The restaurant must enable guest ordering to place an order without logging in to the branded online store.
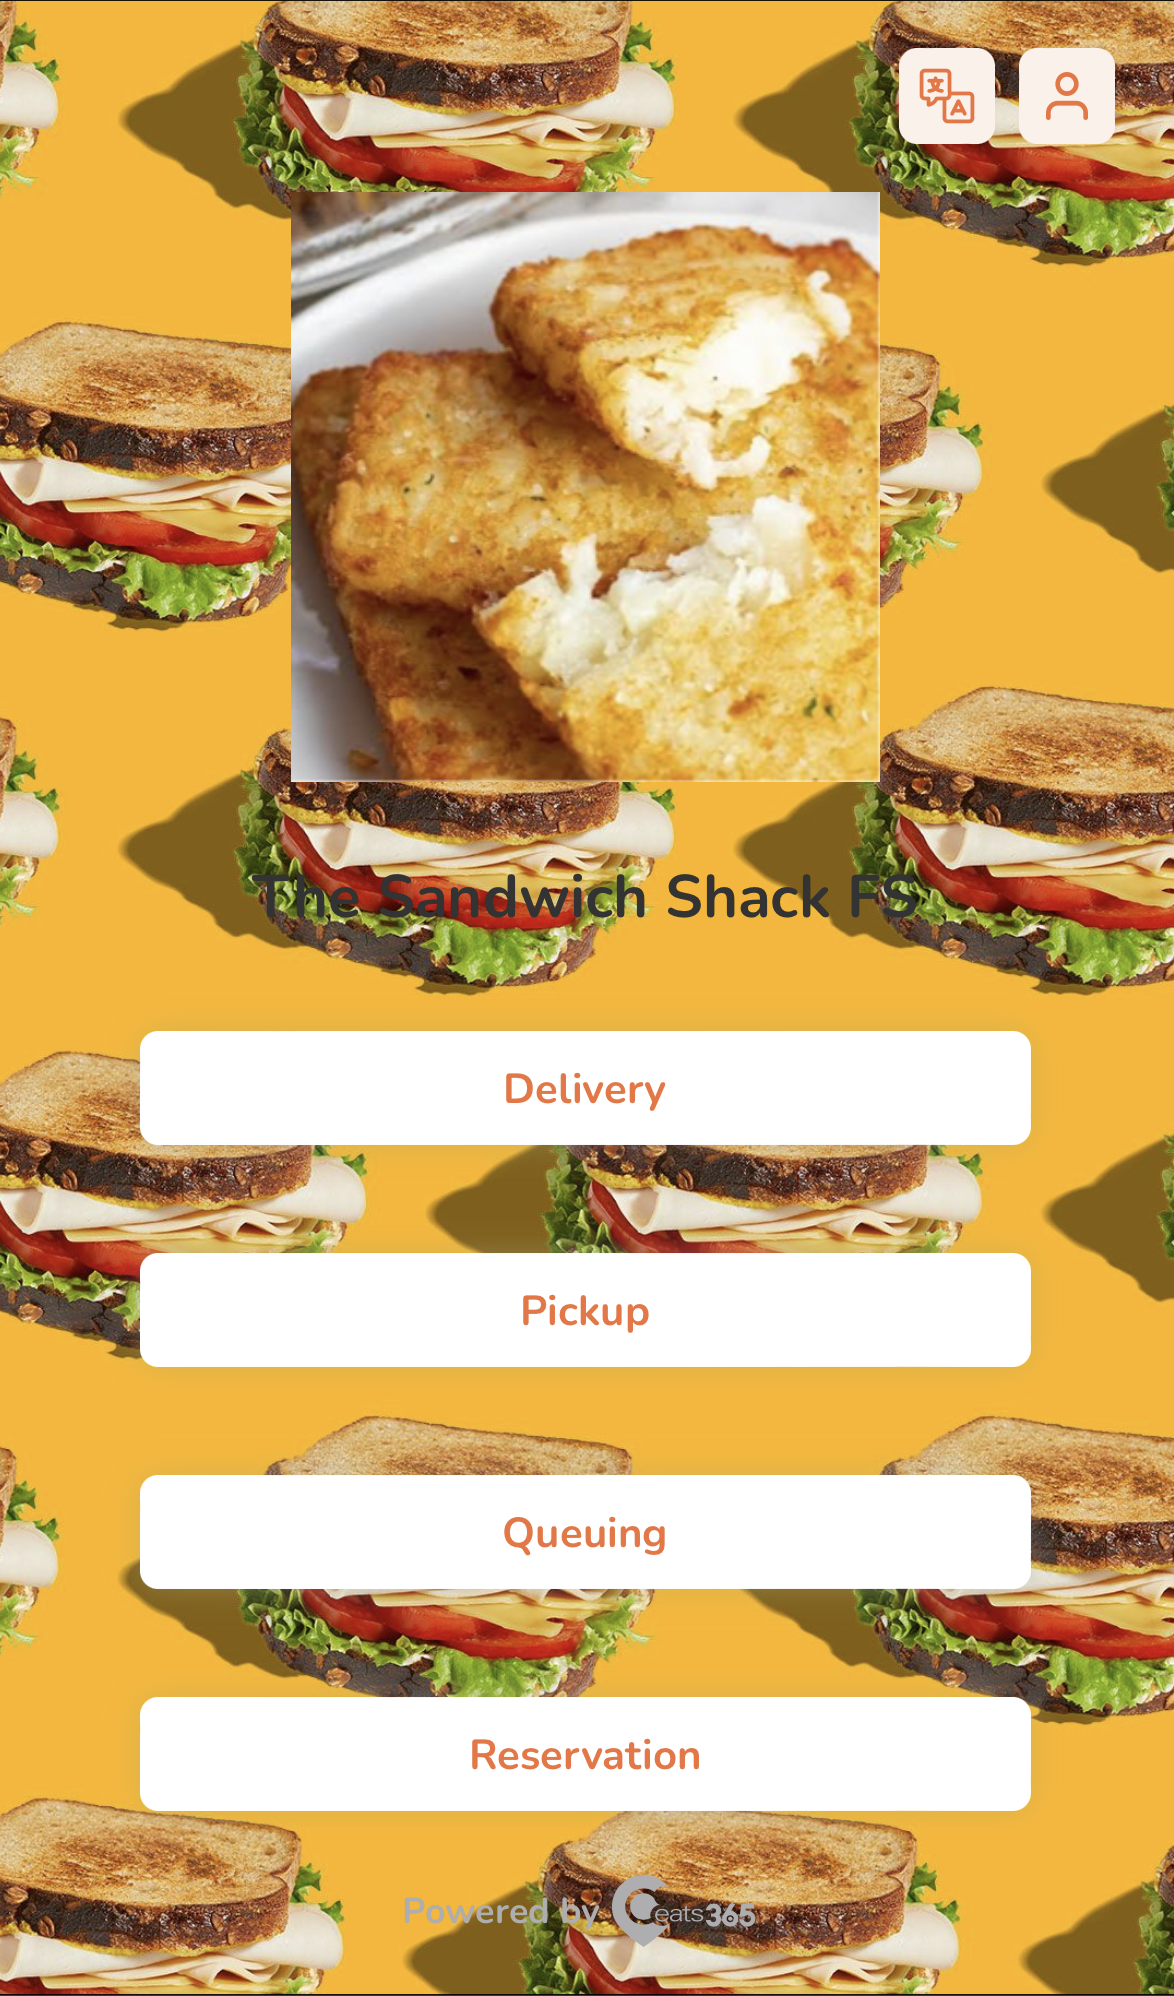
  3. On the main page, select Delivery.
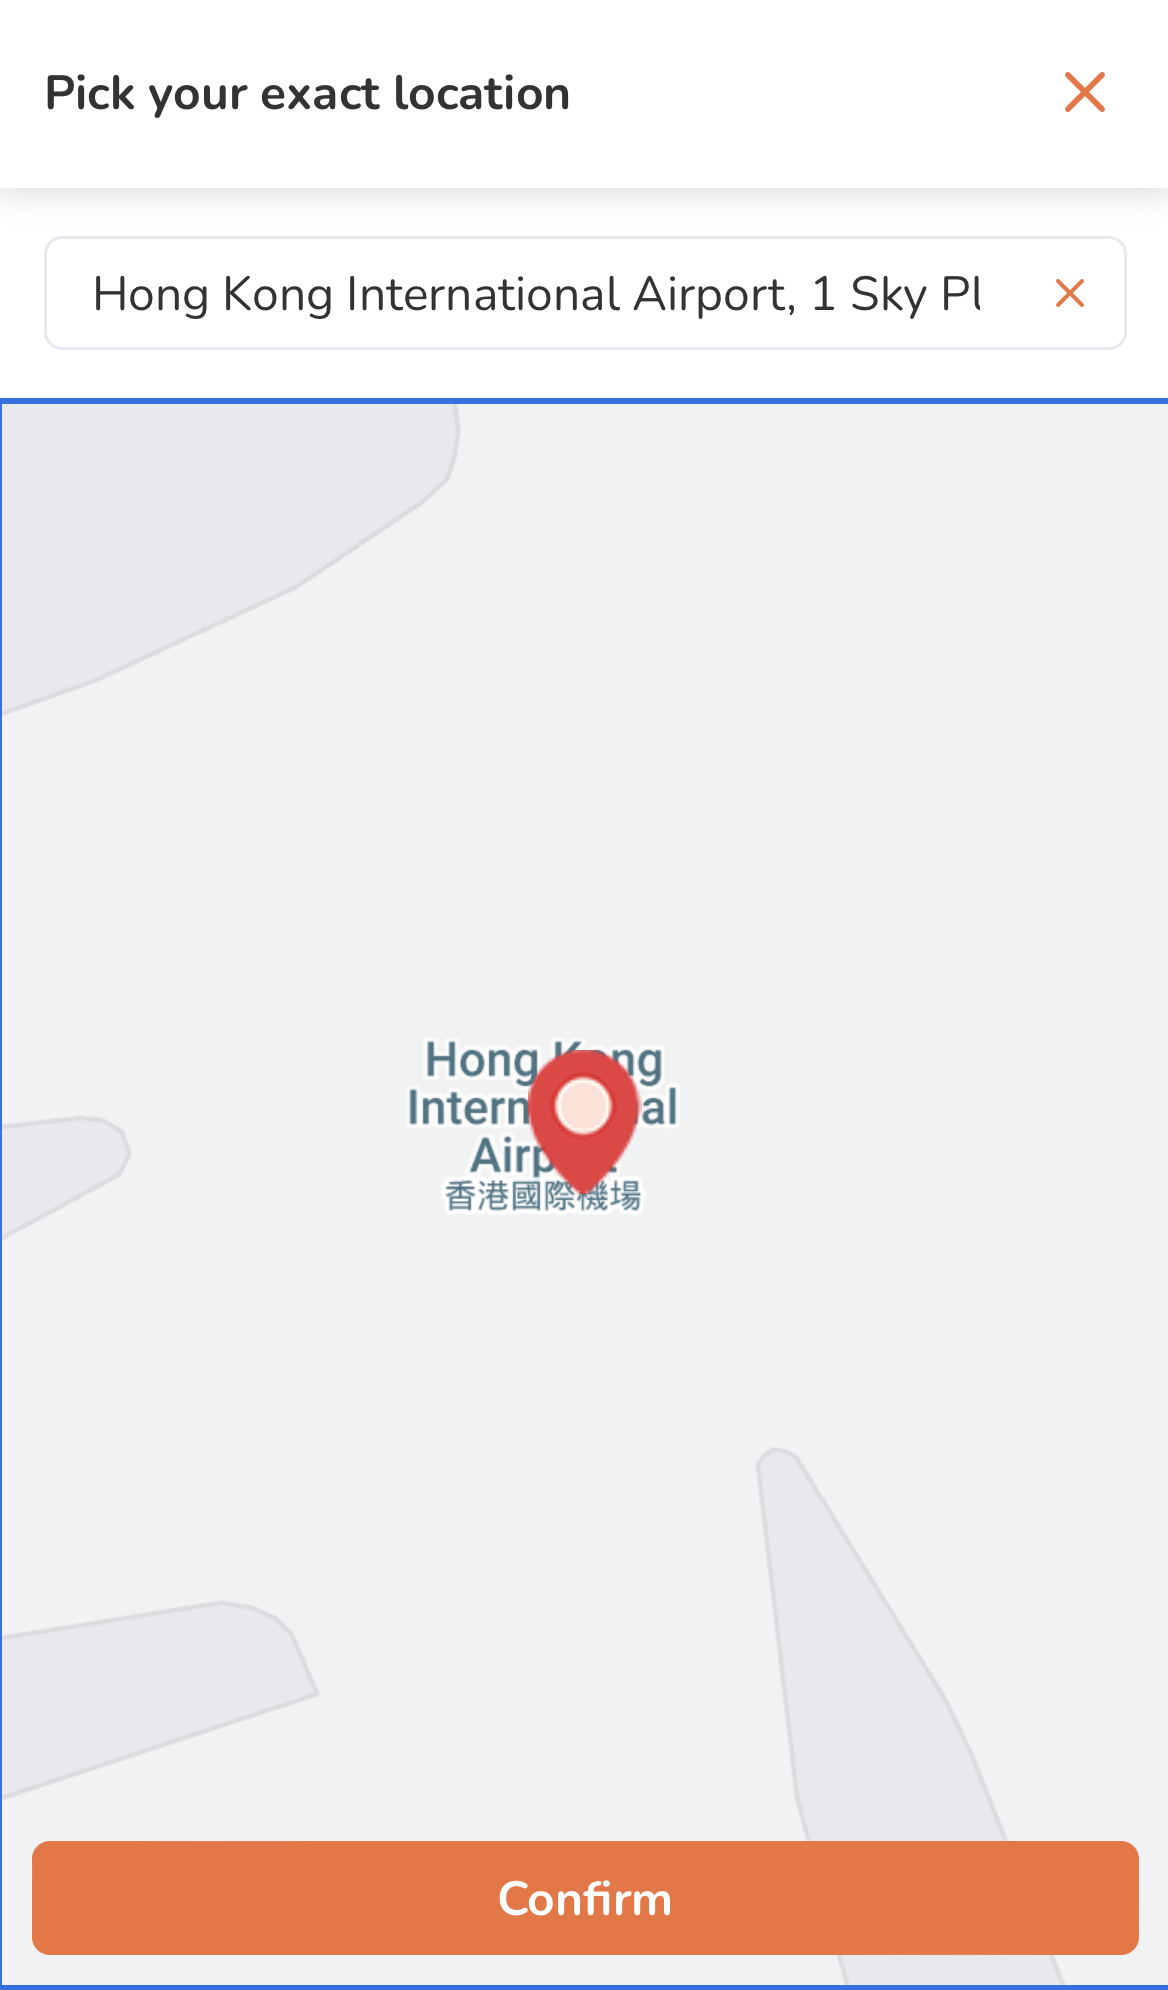
  4. Select your delivery location.
    Tip: If you have a delivery saved on the Delivery Address Book, you can tap the empty field to show the saved delivery address.
  5. Tap Confirm to proceed.
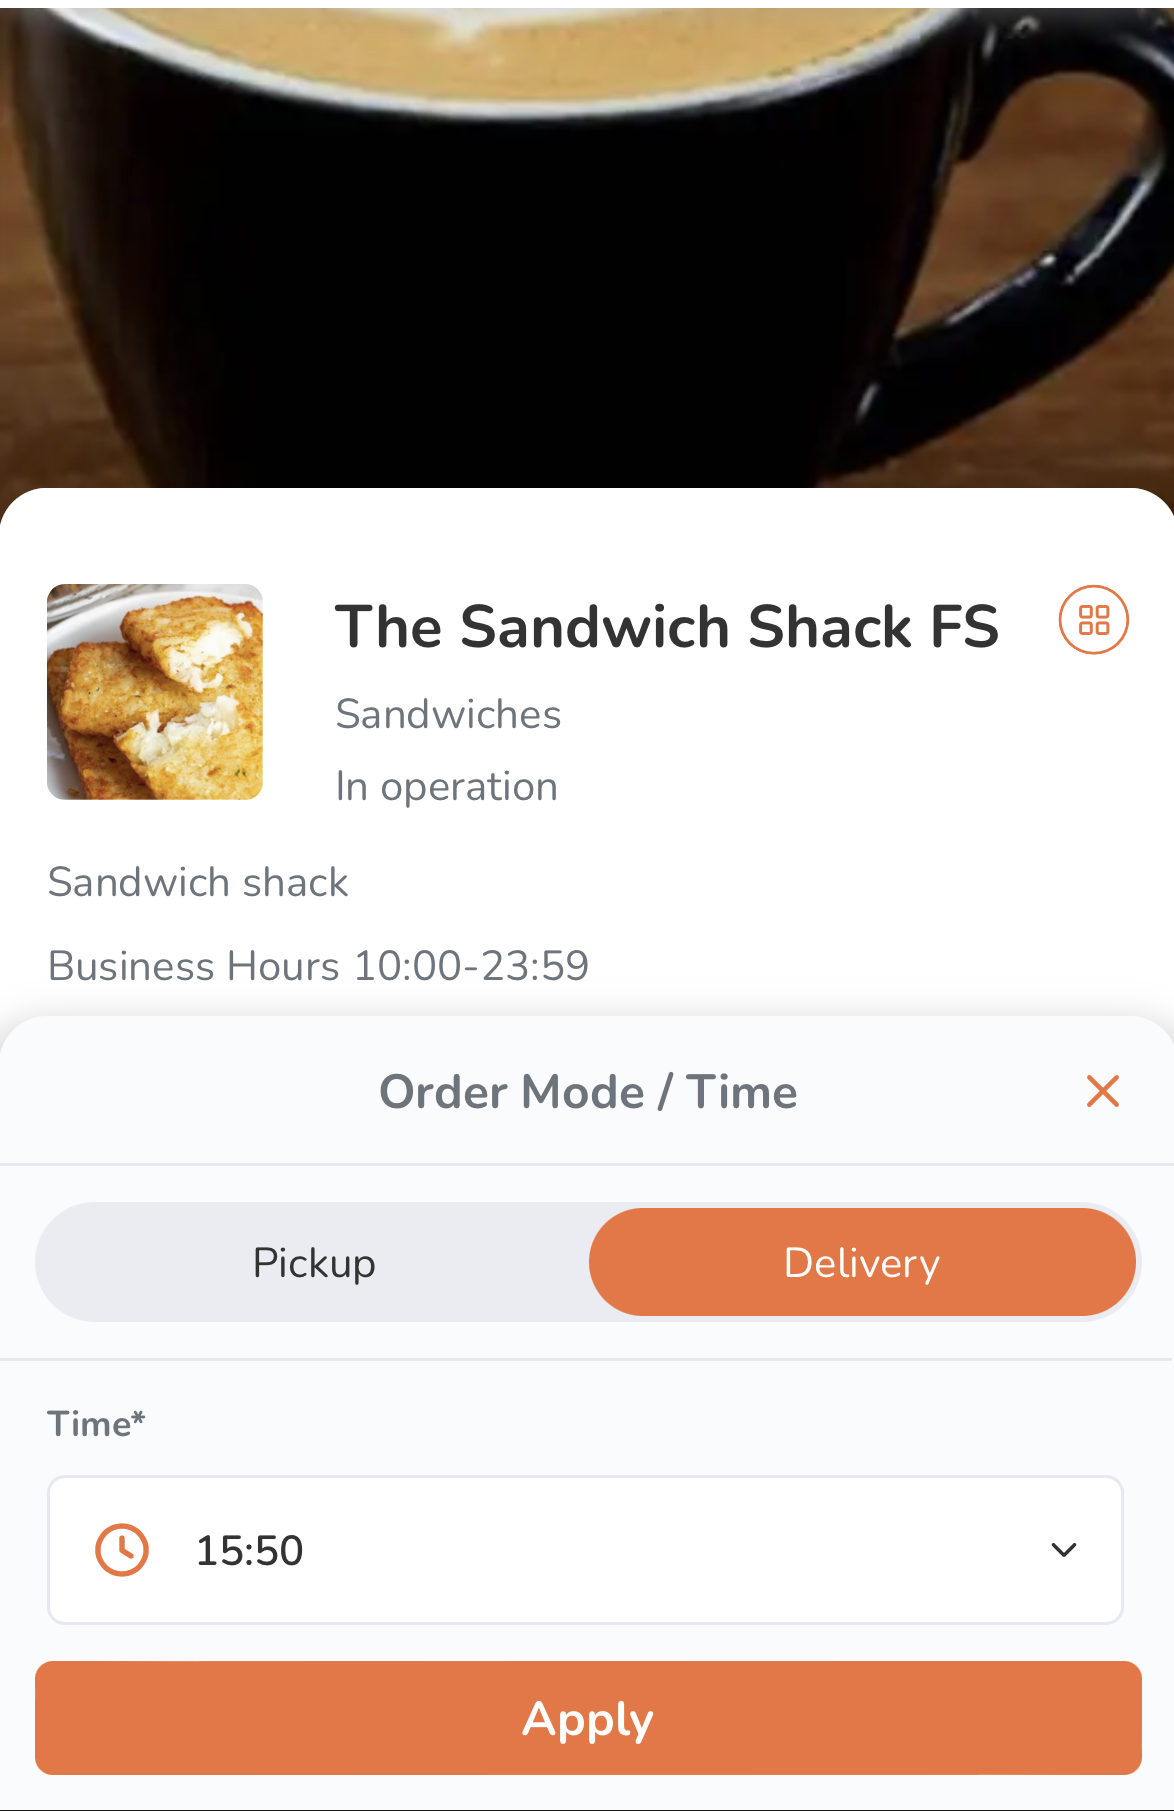
  6. Select the time when you want the order to be delivered.
  7. Tap Apply.
  8. Tap a category to browse through the different menu items available to order.

    Tip: To search for an item manually, tap the search field above the categories and then enter the item that you want to add to the order.
  9. To add an item to an order, tap the item.
    Note: You can purchase plan-exclusive items if you’re subscribed to the required plan.
    1. If the order has modifiers available, select from the available modifiers to customize your order. Then, tap Add.
      Note: Depending on the item’s total price, the Add button changes. For example, if the total price is $35, the button shows up as Add for $35.0.
    2. If the item is a combo item, choose an option for each item included in the combo to customize your order. Then, tap Add.
      Note: 
      • Depending on the item’s total price, the Add button changes. For example, if the total price is $35, the button shows up as Add for $35.0.
      • If Enable Auto Select Next Combo Option is turned on, the screen automatically scrolls down to the next combo option to select, after an option for an item included in the combo is selected.
  10. To add a special request for an item, on the Special Requests field, enter your request.
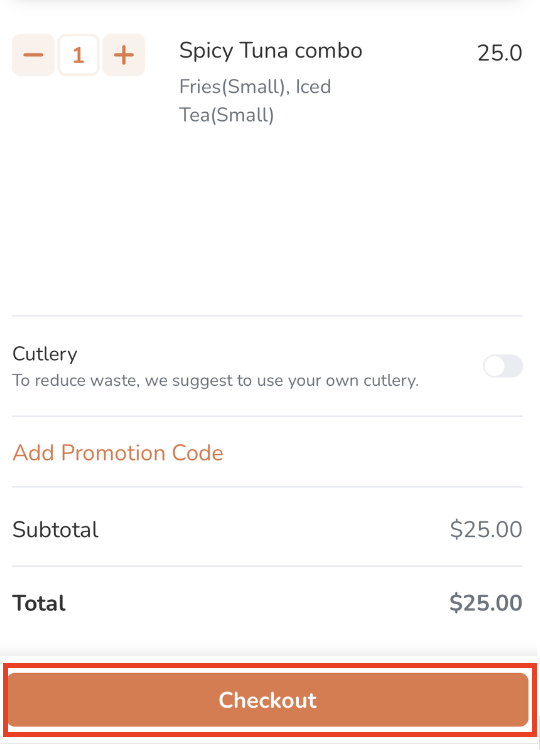
  11. Once you’re done adding items to your order, at the bottom, tap the cart summary to view a list of items currently added to the order.
  12. (Optional) To update an item’s details or modifiers from the cart view, tap the item, then make your changes. Tap Update to save.
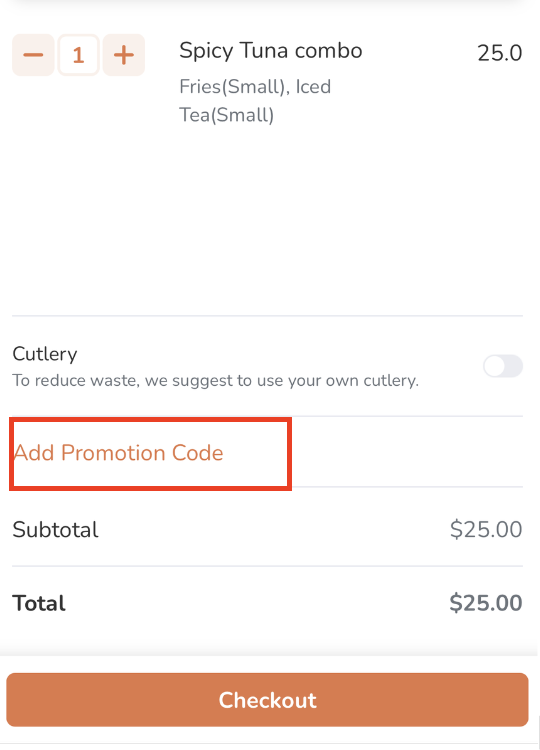
  13. (Optional) To add a discount to your order, tap Add Promotion Code. Then, enter a valid promotion code. Tap Apply to confirm.
  14. At the bottom, tap Checkout to proceed with payment.
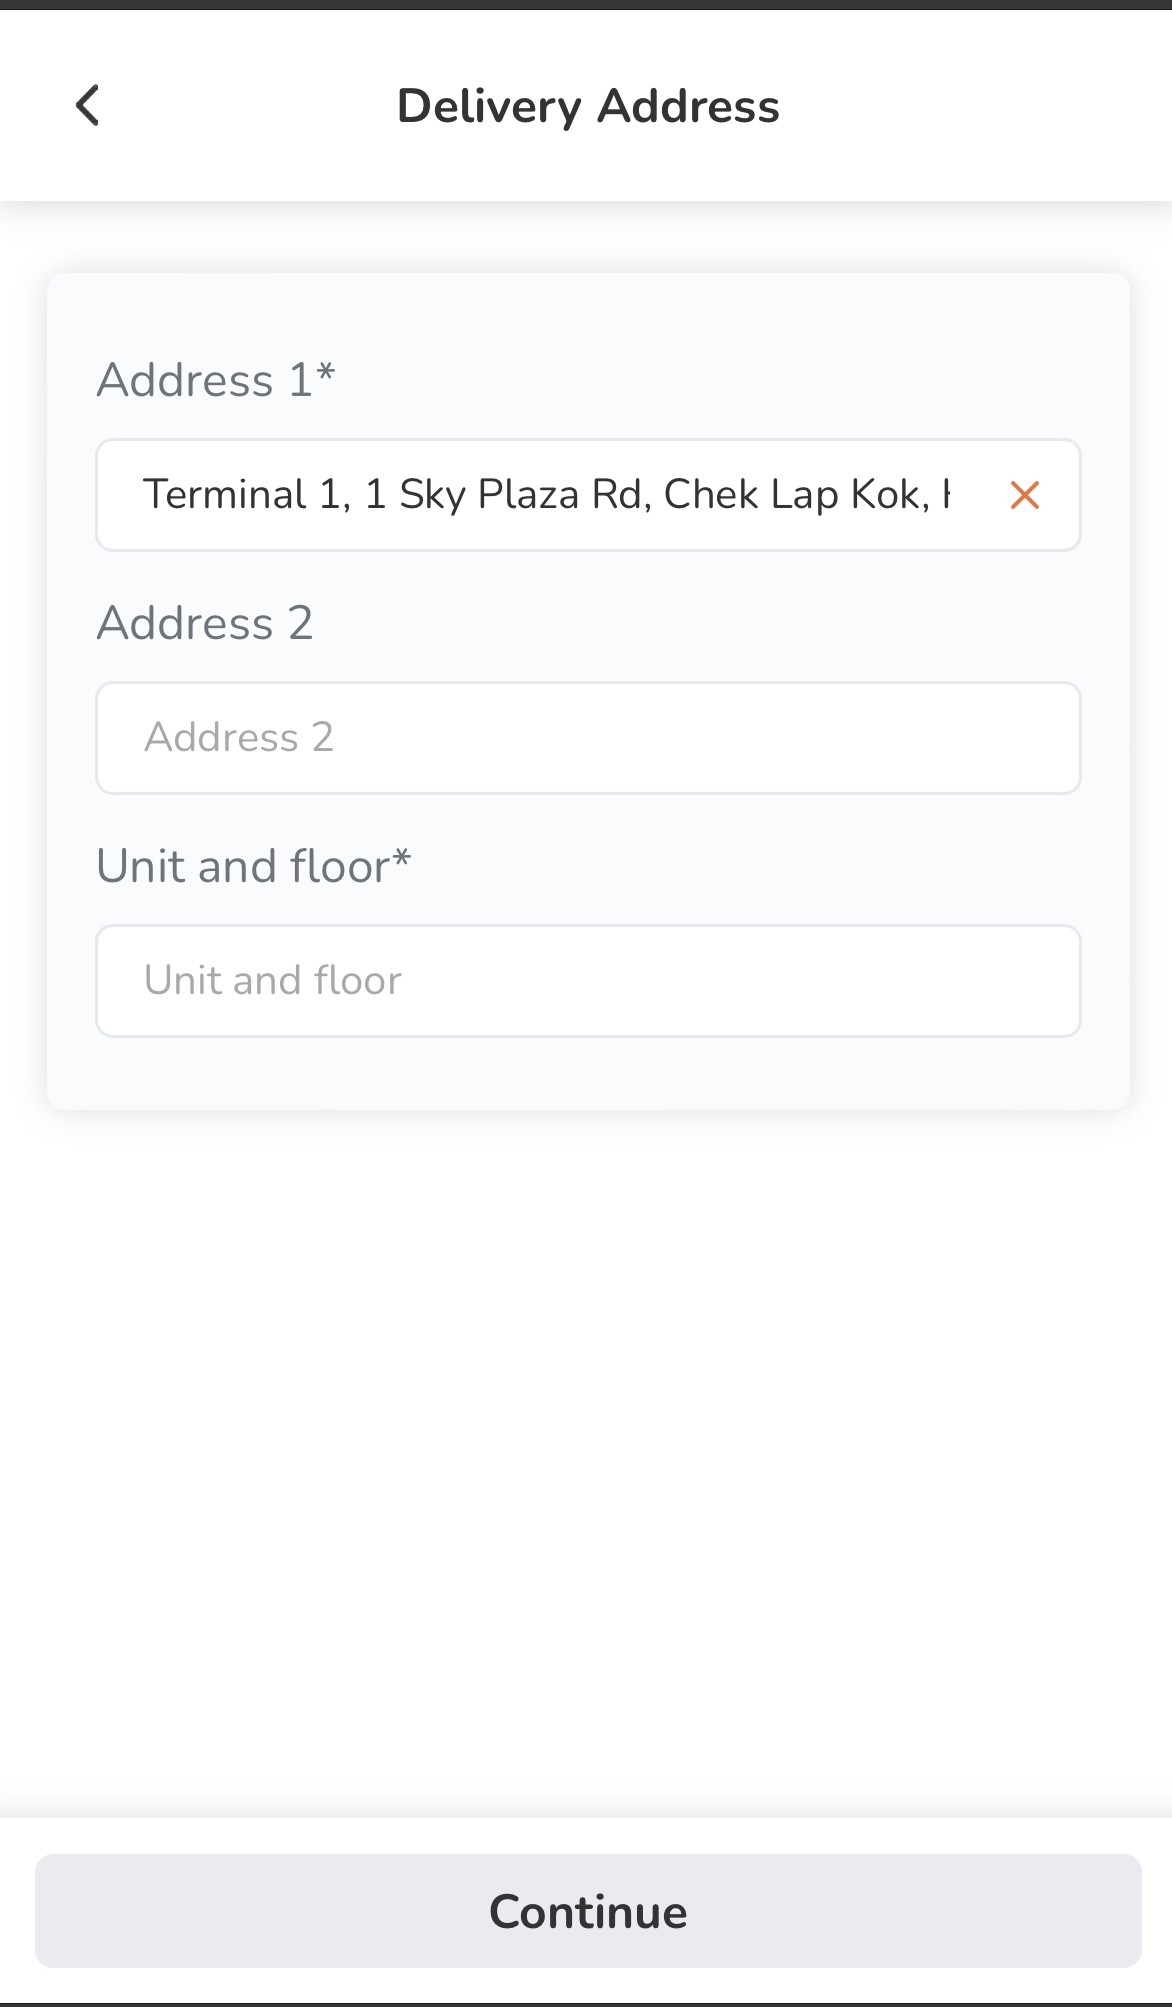
  15. Enter your complete delivery address. Then, tap Continue.
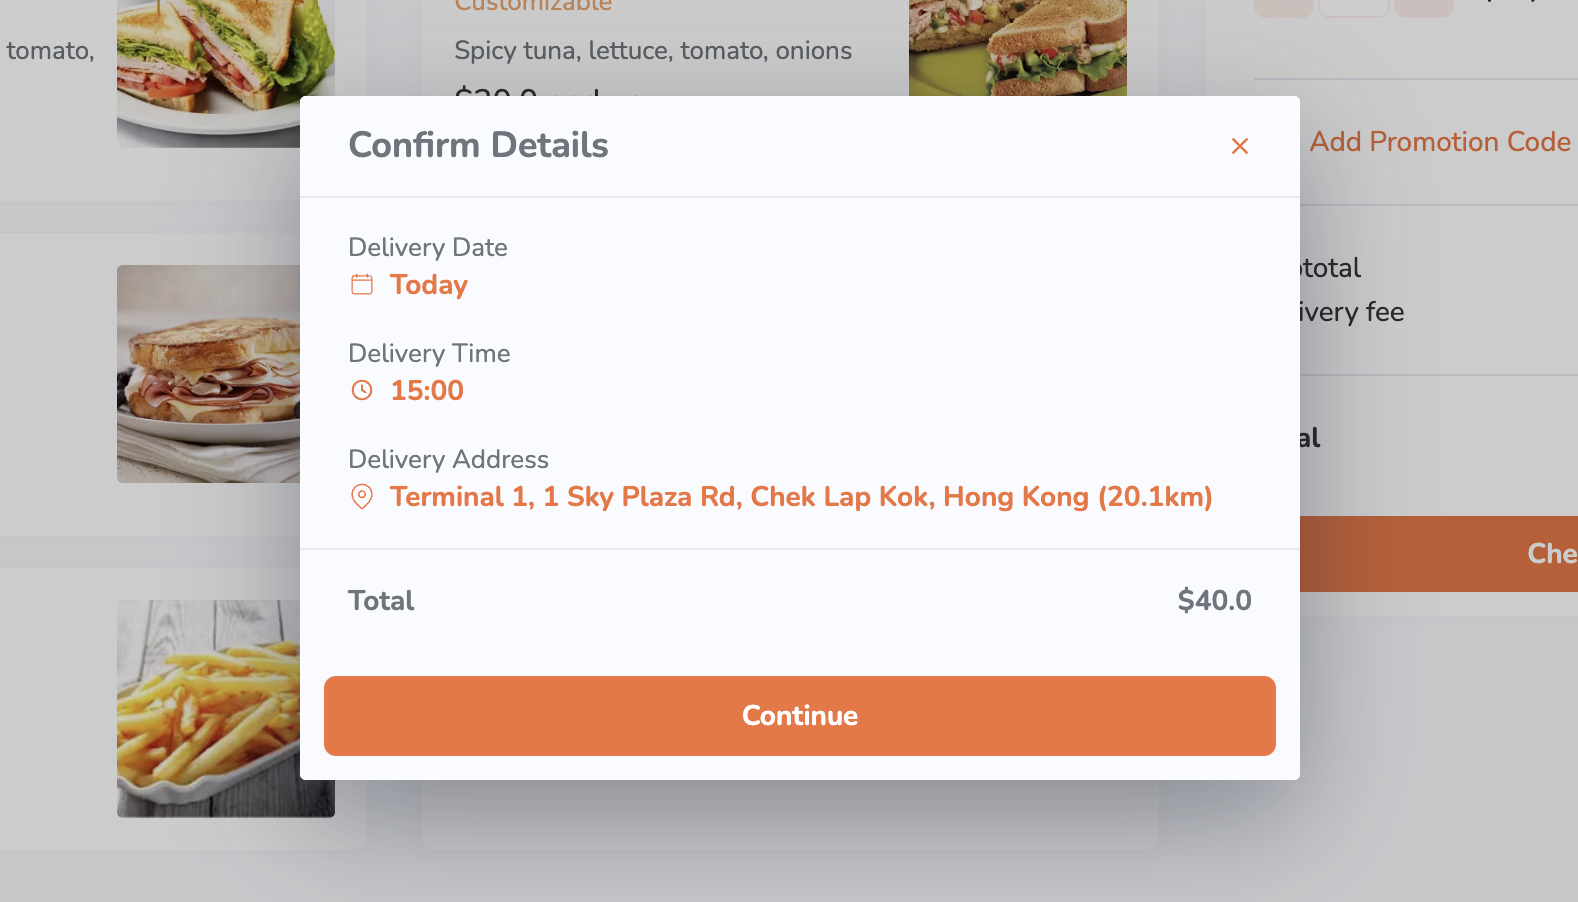
  16. Check that the delivery date, time, and address are correct. Tap Confirm to proceed.
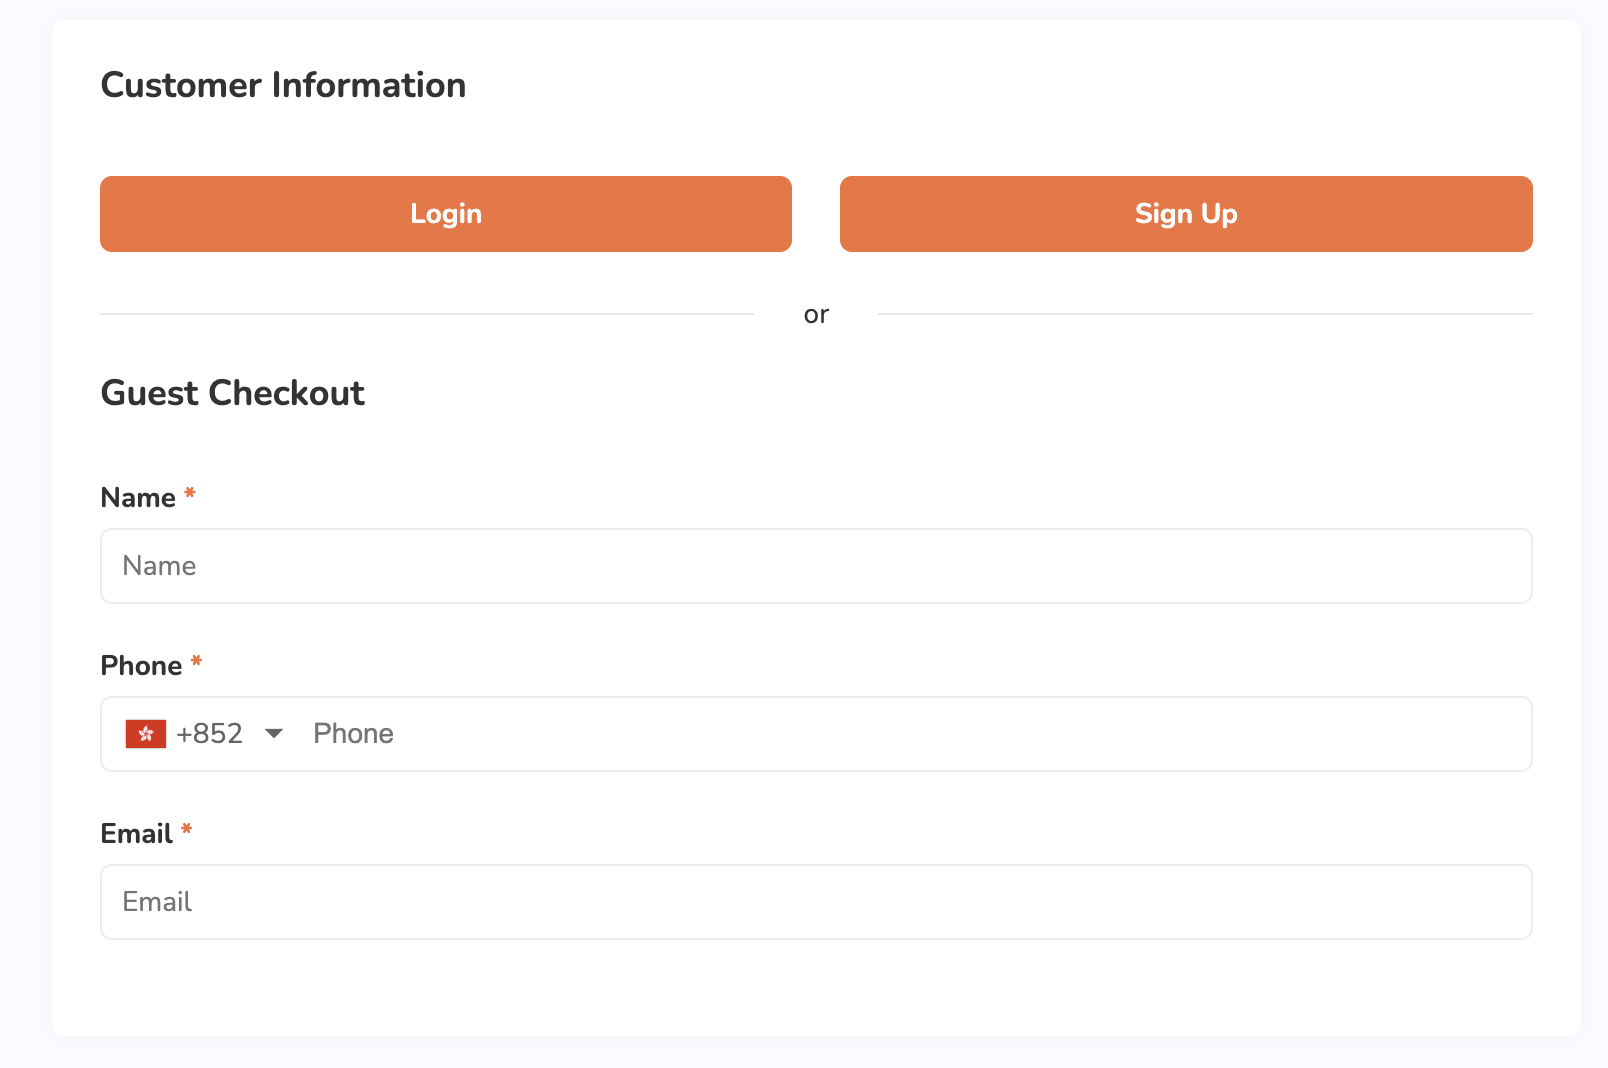
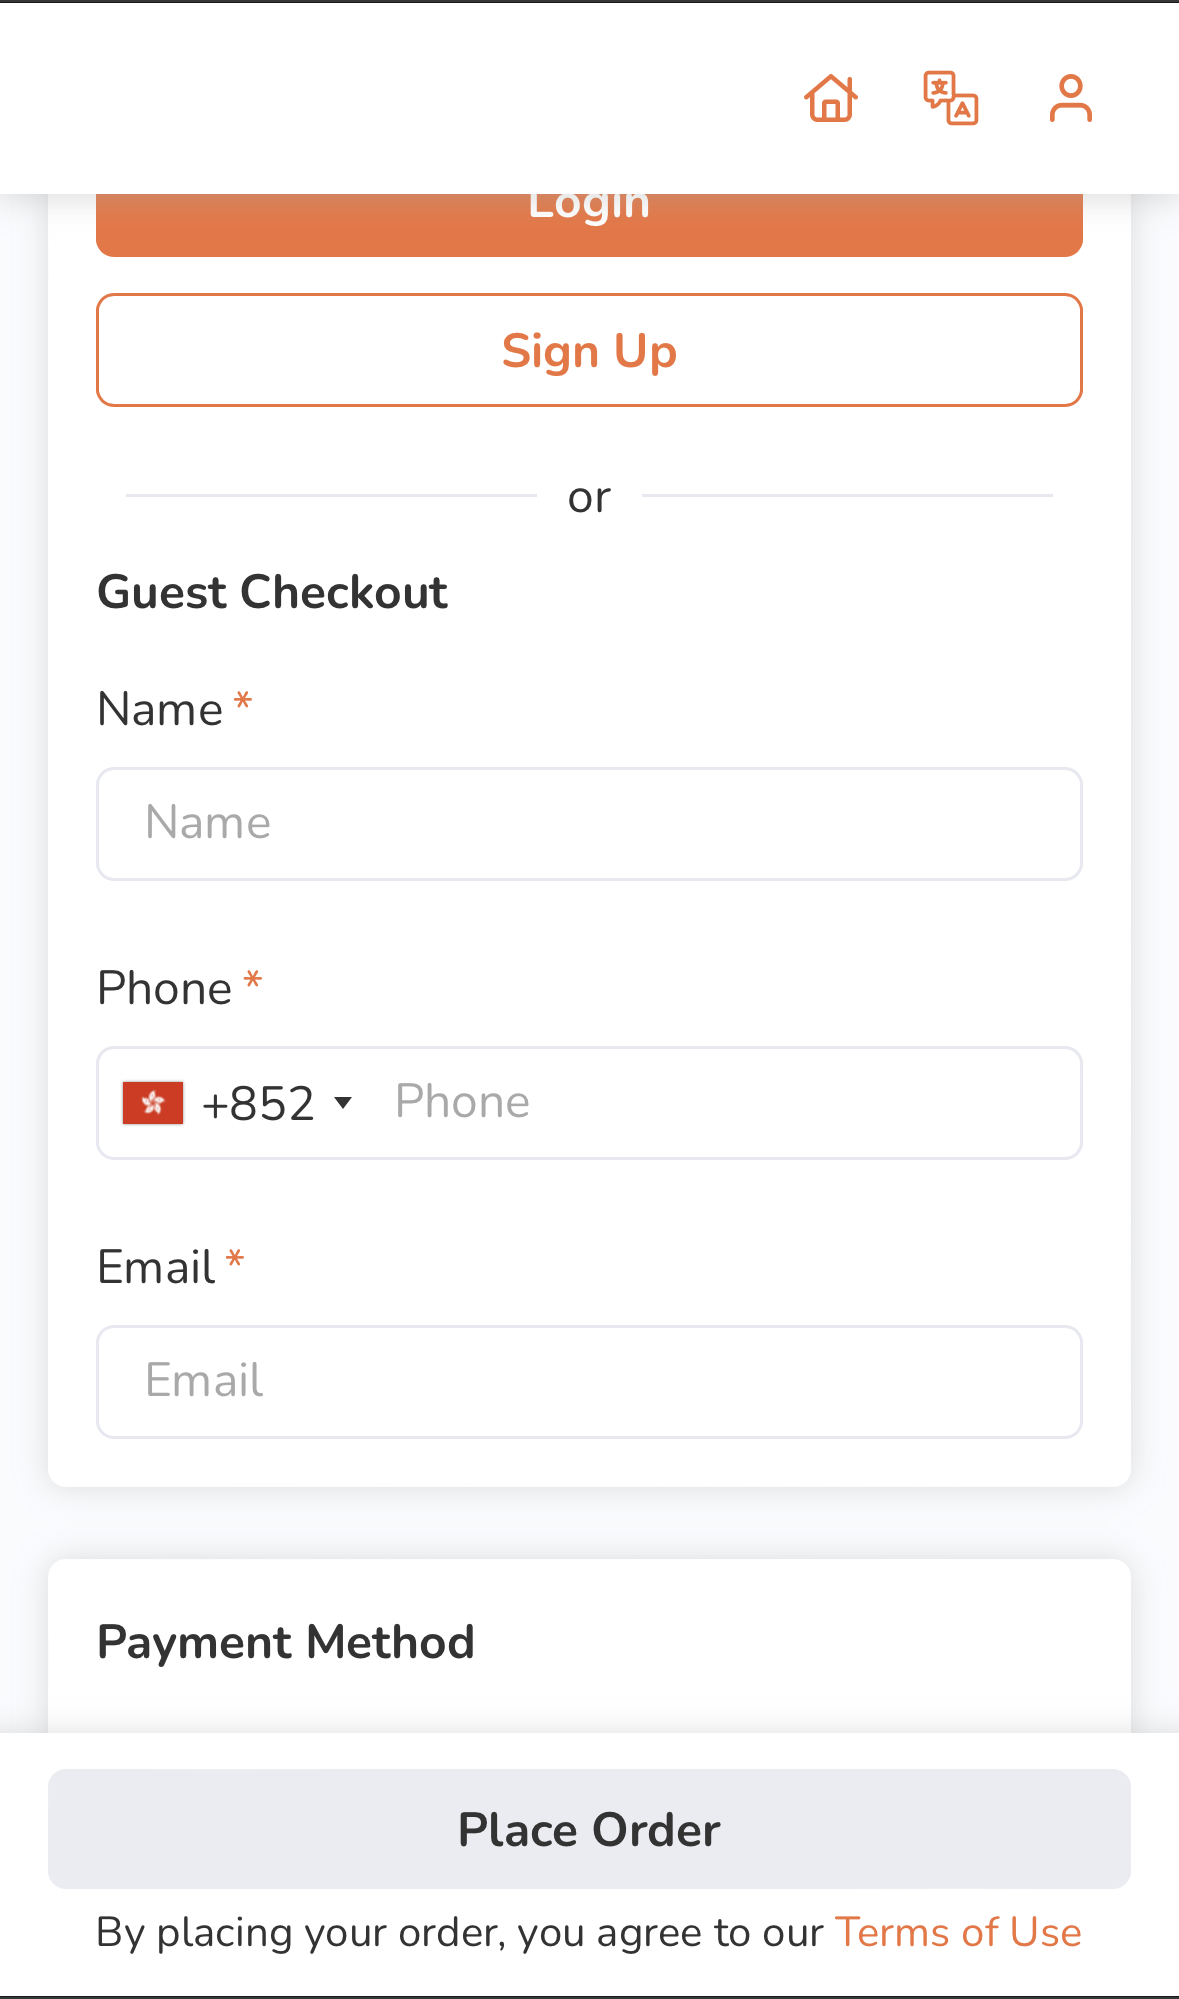
  17. If you are placing an order as a guest, under Guest Checkout, enter your contact information.
  18. Under Payment Method, select the payment method you want to use to pay for the order.

    Note: If you’re using AlipayHK as the payment method, you’ll be directed to the Alipay app to complete the payment upon placing your order.

  19. Tap Place Order to finish placing the order. 
Delete

Note: 

  • After you place an order, you’ll receive an email notification that your order has been submitted. 
  • Once the order has been accepted by the restaurant staff, you’ll receive another email notification that you order has been confirmed. If the restaurant staff rejects the order, you’ll receive an order cancellation notification instead.
  • If the order has been canceled by the restaurant, you can check the reason for cancellation on the branded online store. For more information on how to check an order’s status, refer to Manage orders on the branded online store.
Delete

Pickup

  1. On your mobile device’s browser, visit the restaurant’s branded online store website.
  2. (Optional) If you have an account on the branded online store, log in to your account to associate your order with your account. Otherwise, you can proceed with placing your order as a guest. 
    Note: The restaurant must enable guest ordering to place an order without logging in to the branded online store.
  3. On the main page, select Pickup.
  4. Select the time when you want the order to be picked up.
  5. Tap Apply.
  6. Tap a category to browse through the different menu items available to order.
    Tip: To search for an item manually, tap the search field above the categories and then enter the item that you want to add to the order.
  7. To add an item to an order, tap the item.
    Note: You can purchase plan-exclusive items if you’re subscribed to the required plan.
    1. If the order has modifiers available, select from the available modifiers to customize your order. Then, tap Add. 
      Note: Depending on the item’s total price, the Add button changes. For example, if the total price is $35, the button shows up as Add for $35.0.
    2. If the item is a combo item, choose an option for each item included in the combo to customize your order. Then, tap Add.
      Note: 
      • Depending on the item’s total price, the Add button changes. For example, if the total price is $35, the button shows up as Add for $35.0.
      • If Enable Auto Select Next Combo Option is turned on, the screen automatically scrolls down to the next combo option to select, after an option for an item included in the combo is selected.
  8. To add a special request for an item, on the Special Requests field, enter your request.
  9. Once you’re done adding items to your order, at the bottom, tap the cart summary to view a list of items currently added to the order. 
  10. (Optional) To update an item’s details or modifiers from the cart view, tap the item, then make your changes. Tap Update to save.
  11. (Optional) To add a discount to your order, tap Add Promotion Code. Then, enter a valid promotion code. Tap Apply to confirm.
  12. At the bottom, tap Checkout to proceed with payment.
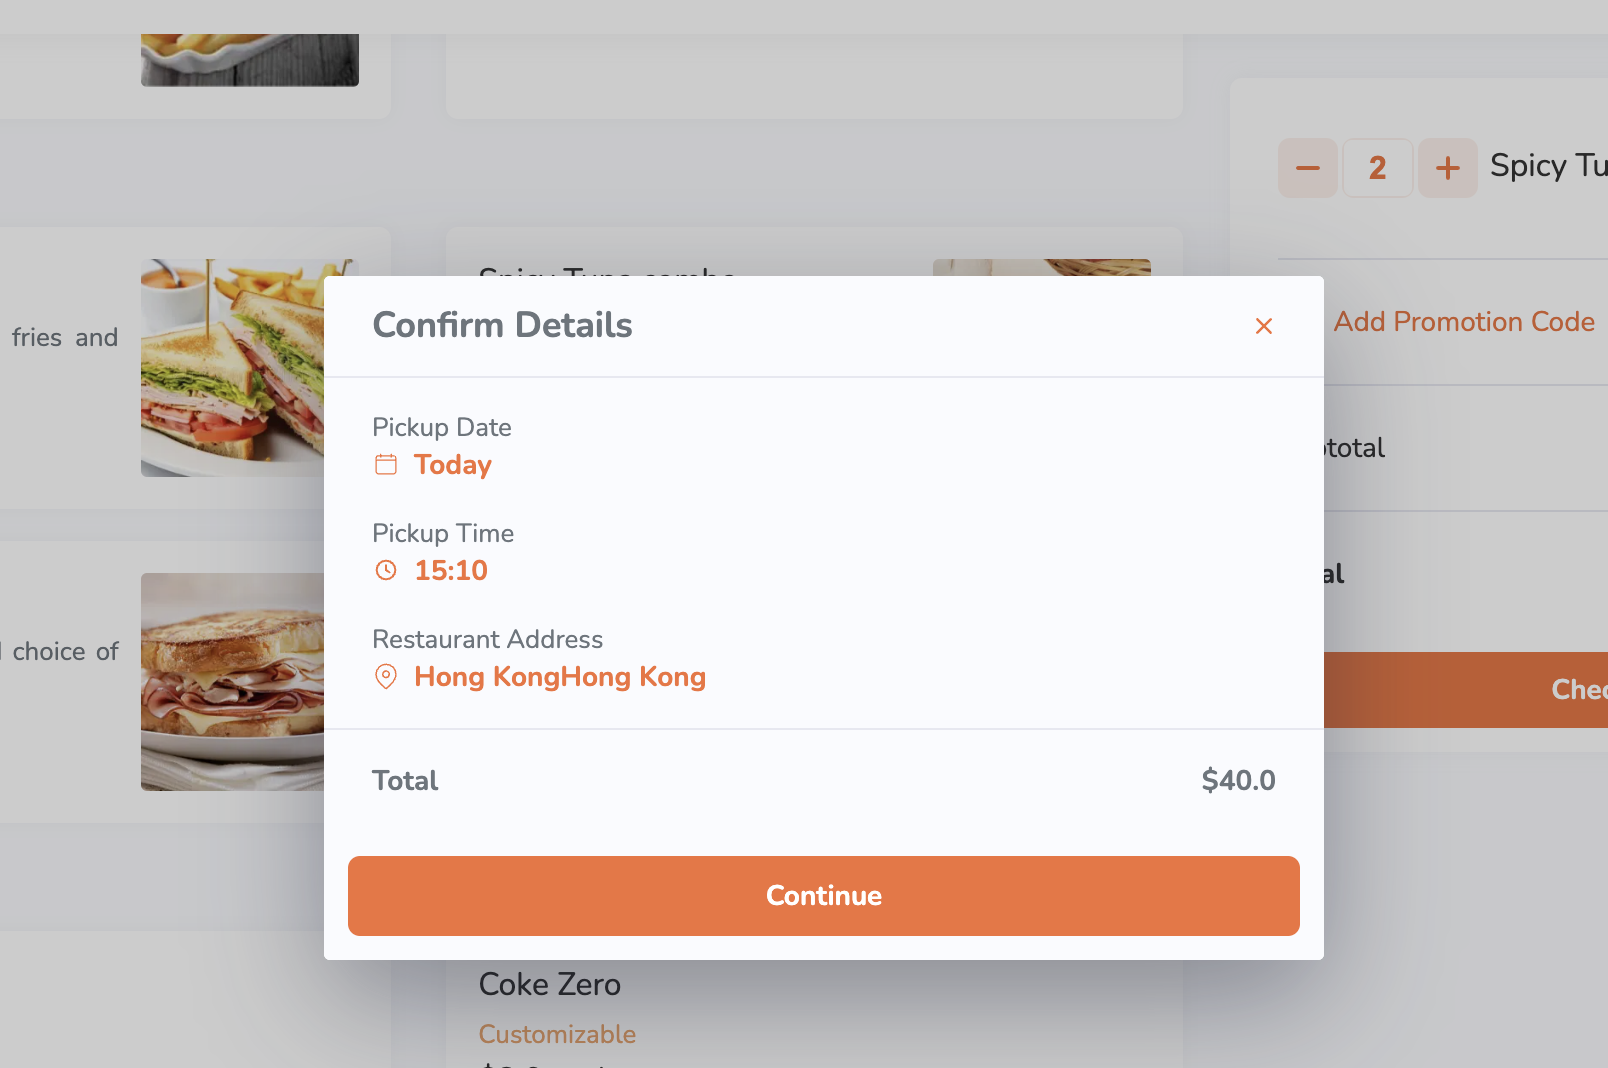
  13. Check that the pickup date and time are correct. Tap Confirm to proceed.
  14. If you are placing an order as a guest, under Guest Checkout, enter your contact information.
  15. Under Payment Method, select the payment method you want to use to pay for the order.

    Note: If you’re using AlipayHK as the payment method, you’ll be directed to the Alipay app to complete the payment upon placing your order.

  16. Tap Place Order to finish placing the order. 
Delete

Note: 

  • After you place an order, you’ll receive an email notification that your order has been submitted. 
  • Once the order has been accepted by the restaurant staff, you’ll receive another email notification that you order has been confirmed. If the restaurant staff rejects the order, you’ll receive an order cancellation notification instead.
  • If the order has been canceled by the restaurant, you can check the reason for cancellation on the branded online store. For more information on how to check an order’s status, refer to Manage orders on the branded online store.
Delete
Delete

Desktop

Delete

Note: Only Delivery and Pickup orders can be placed on the branded online store from your computer. For Dine-In orders, you must use your mobile device to scan a QR code and proceed with ordering.

Delivery

  1. On your desktop browser, visit the restaurant’s branded online store website.
  2. (Optional) If you have an account on the branded online store, log in to your account to associate your order with your account. Otherwise, you can proceed with placing your order as a guest. 
    Note: The restaurant must enable guest ordering to place an order without logging in to the branded online store.
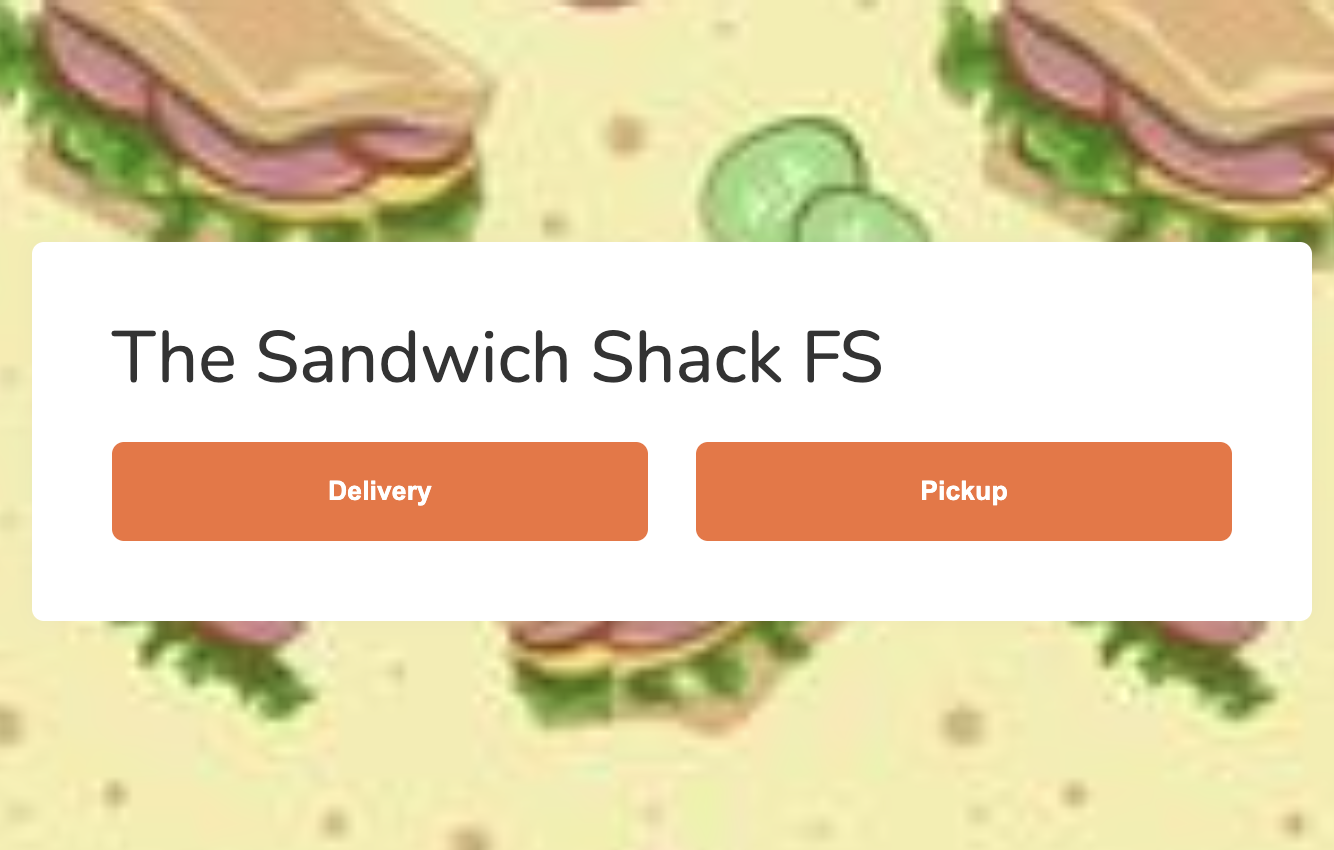
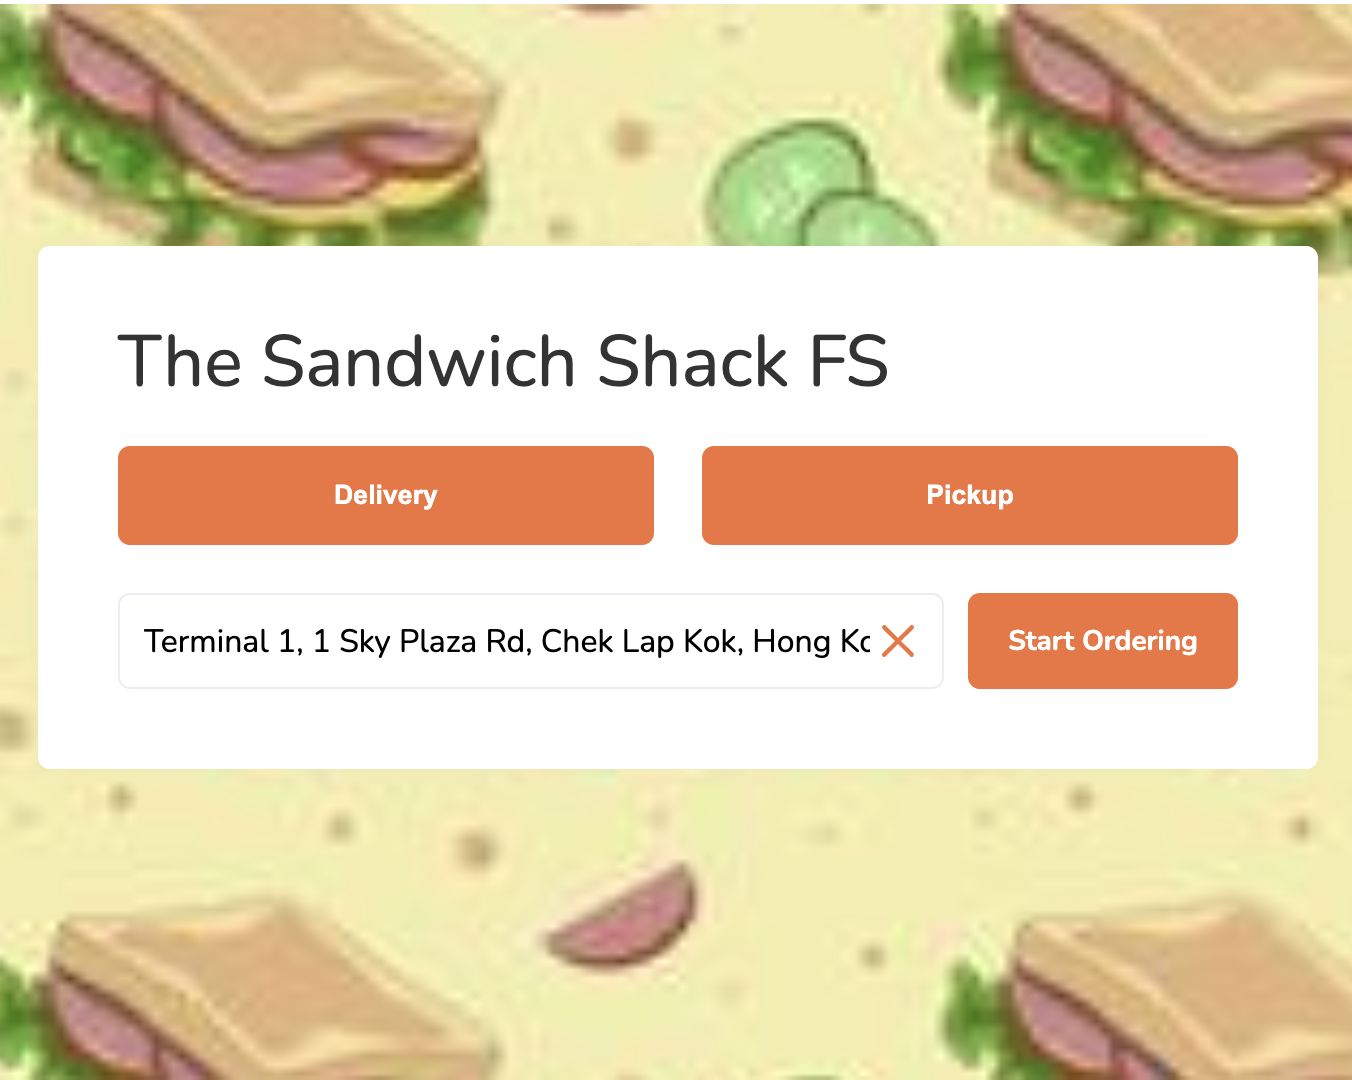
  3. On the main page, select Delivery.
  4. Enter your delivery location. Then, click on Start Ordering.
    Tip: If you have a delivery saved on the Delivery Address Book, you can click on the empty field to show the saved delivery address.
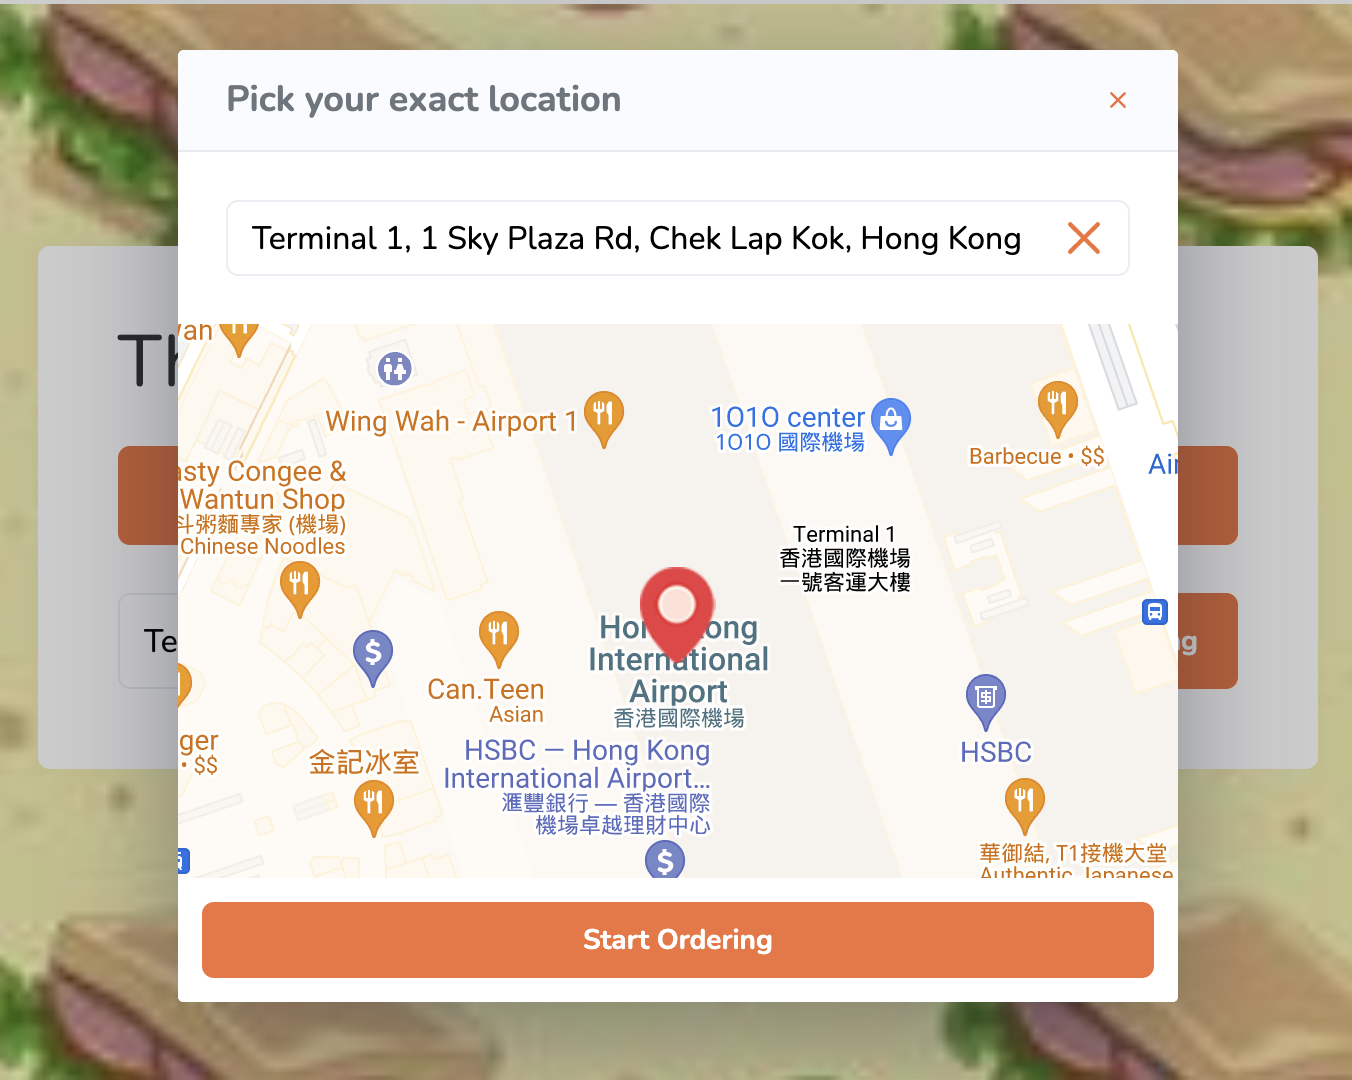
  5. Select your exact delivery location on the map.
  6. Click on Start Ordering to proceed.
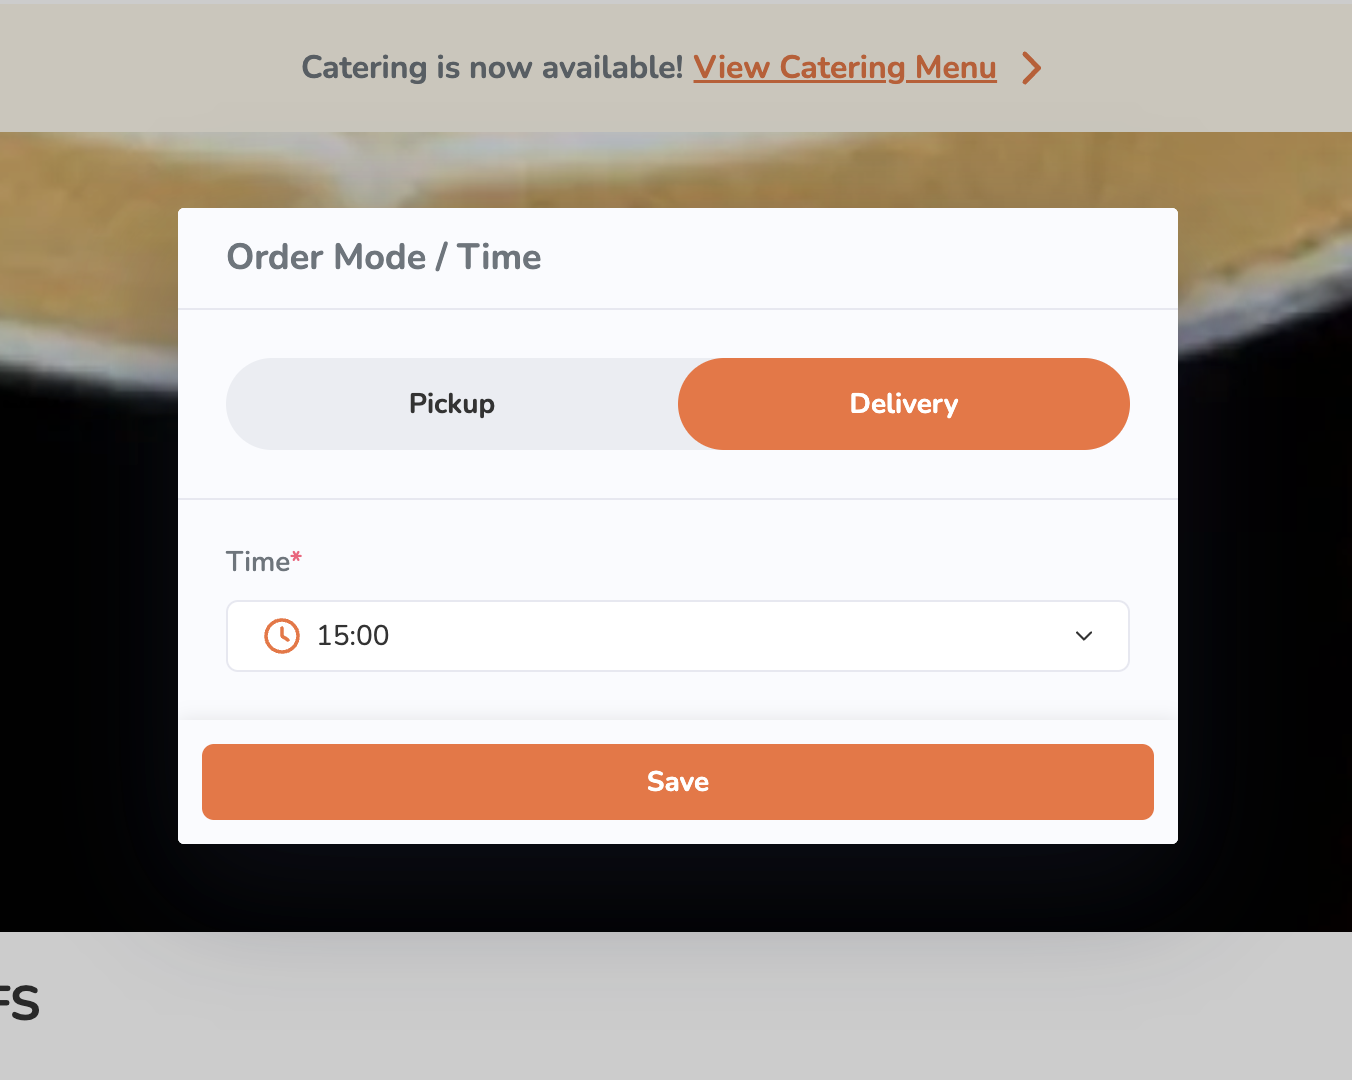
  7. Select the time when you want the order to be delivered.
  8. Click on Save.
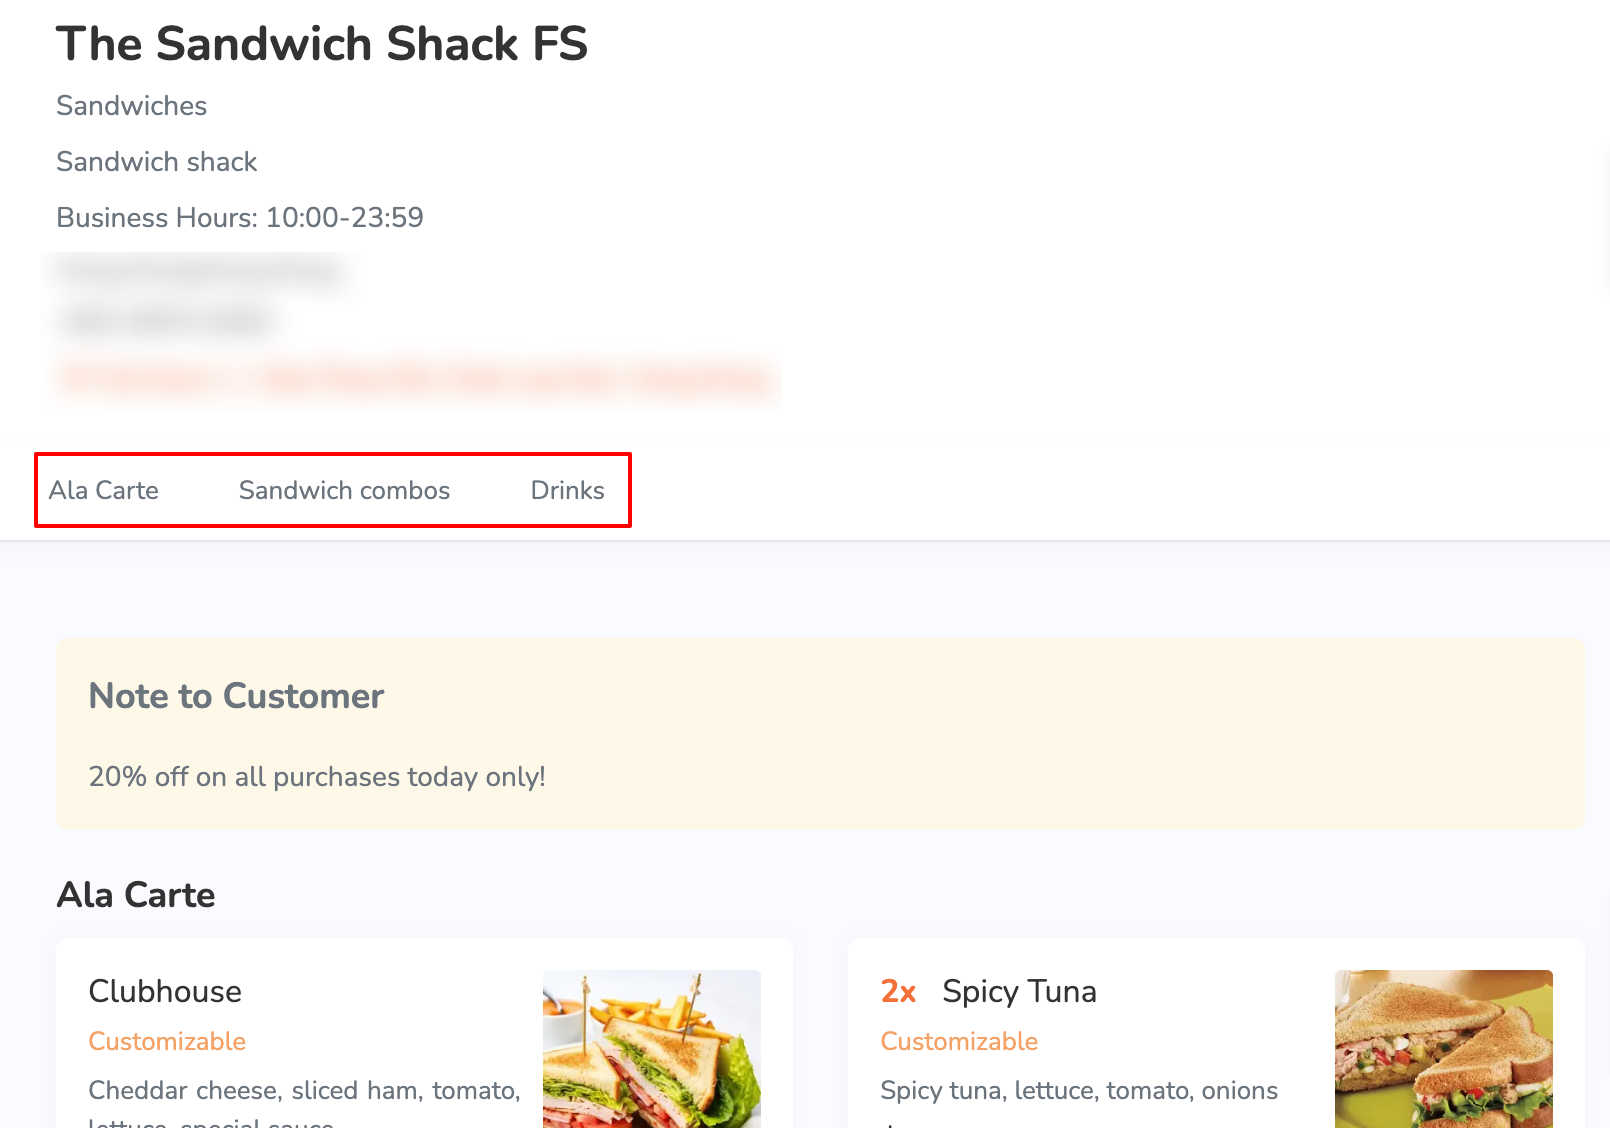
  9. Click on a category to browse through the different menu items available to order.
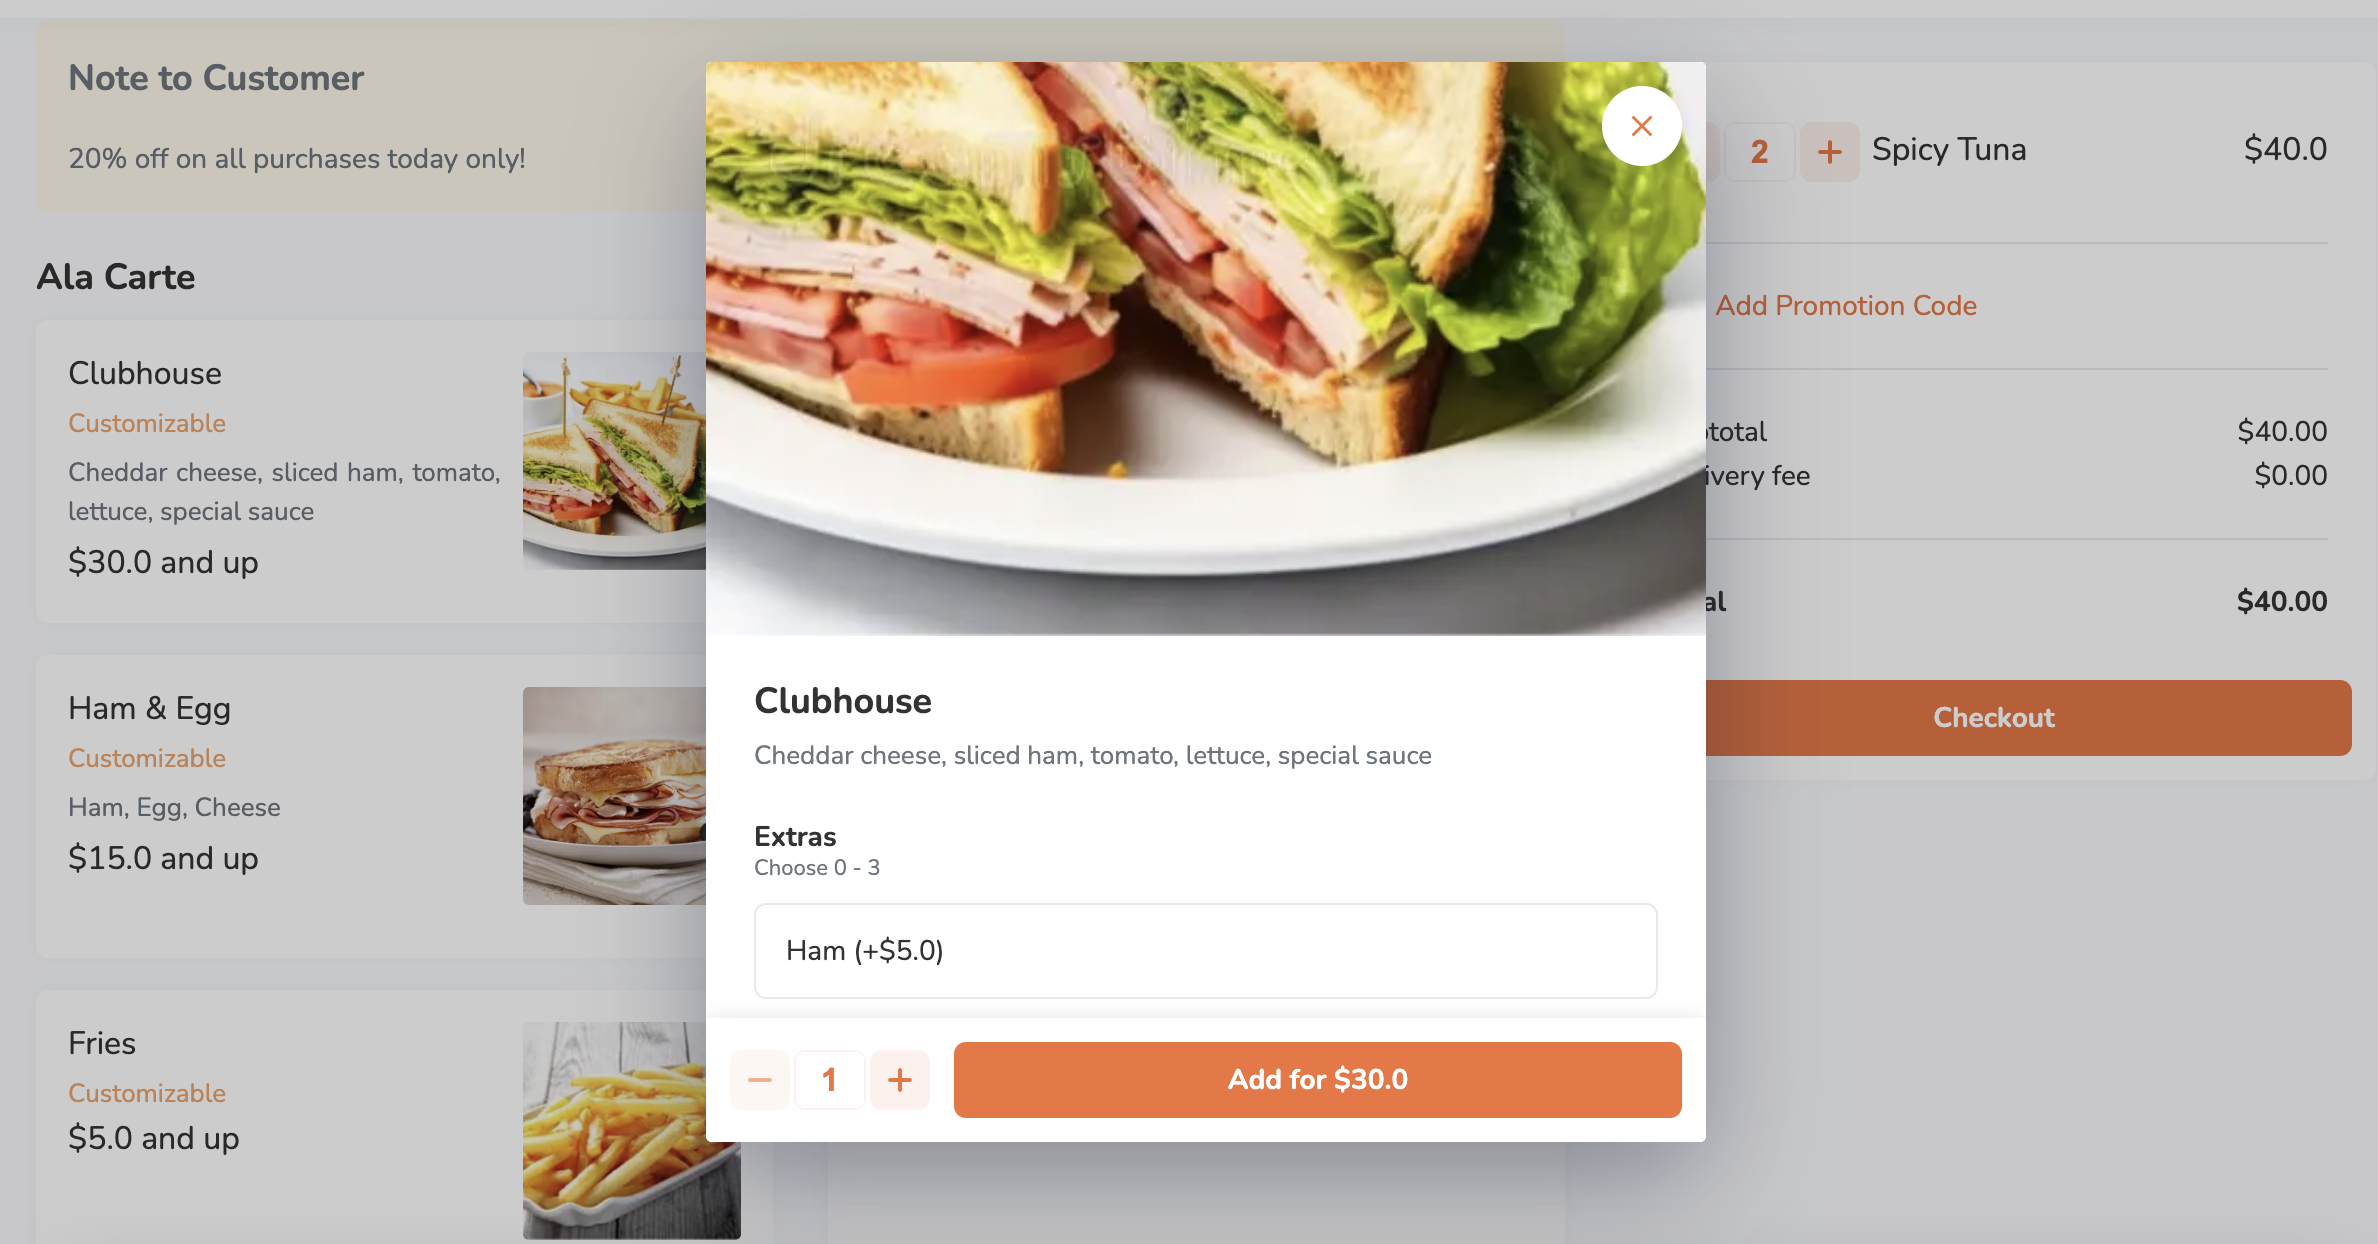
  10. To add an item to an order, click on the item.
    Note: You can purchase plan-exclusive items if you’re subscribed to the required plan.
    1. If the order has modifiers available, select from the available modifiers to customize your order. Then, tap Add.
      Note: Depending on the item’s total price, the Add button changes. For example, if the total price is $35, the button shows up as Add for $35.0.
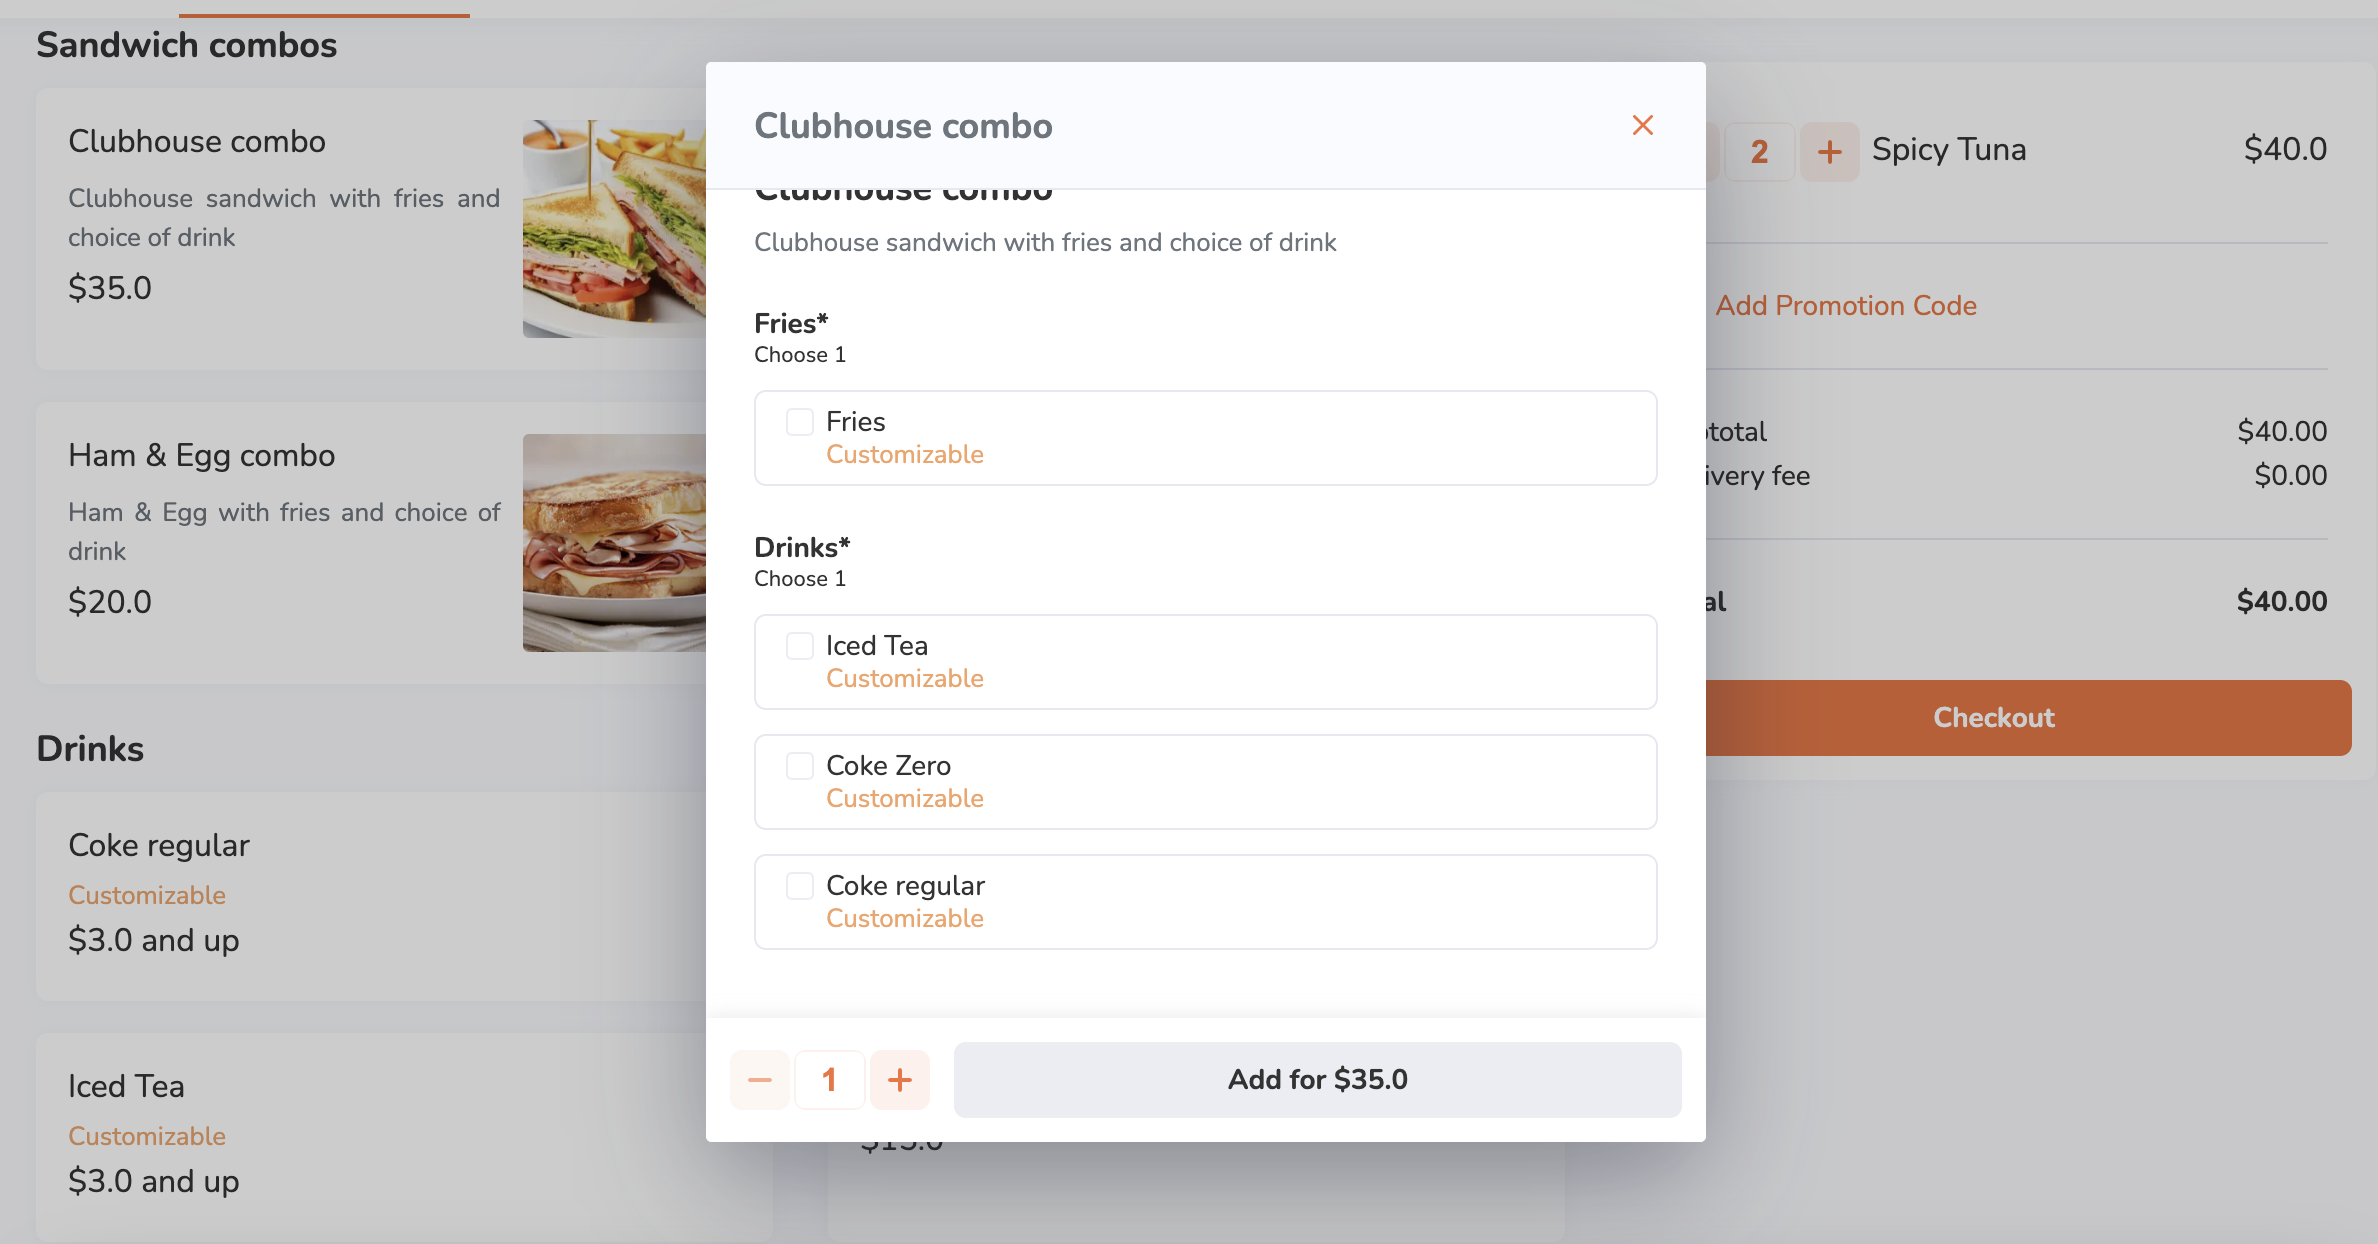
    2. If the item is a combo item, choose an option for each item included in the combo to customize your order. Then, tap Add.
      Note: 
      • Depending on the item’s total price, the Add button changes. For example, if the total price is $35, the button shows up as Add for $35.0.
      • If Enable Auto Select Next Combo Option is turned on, the screen automatically scrolls down to the next combo option to select, after an option for an item included in the combo is selected.
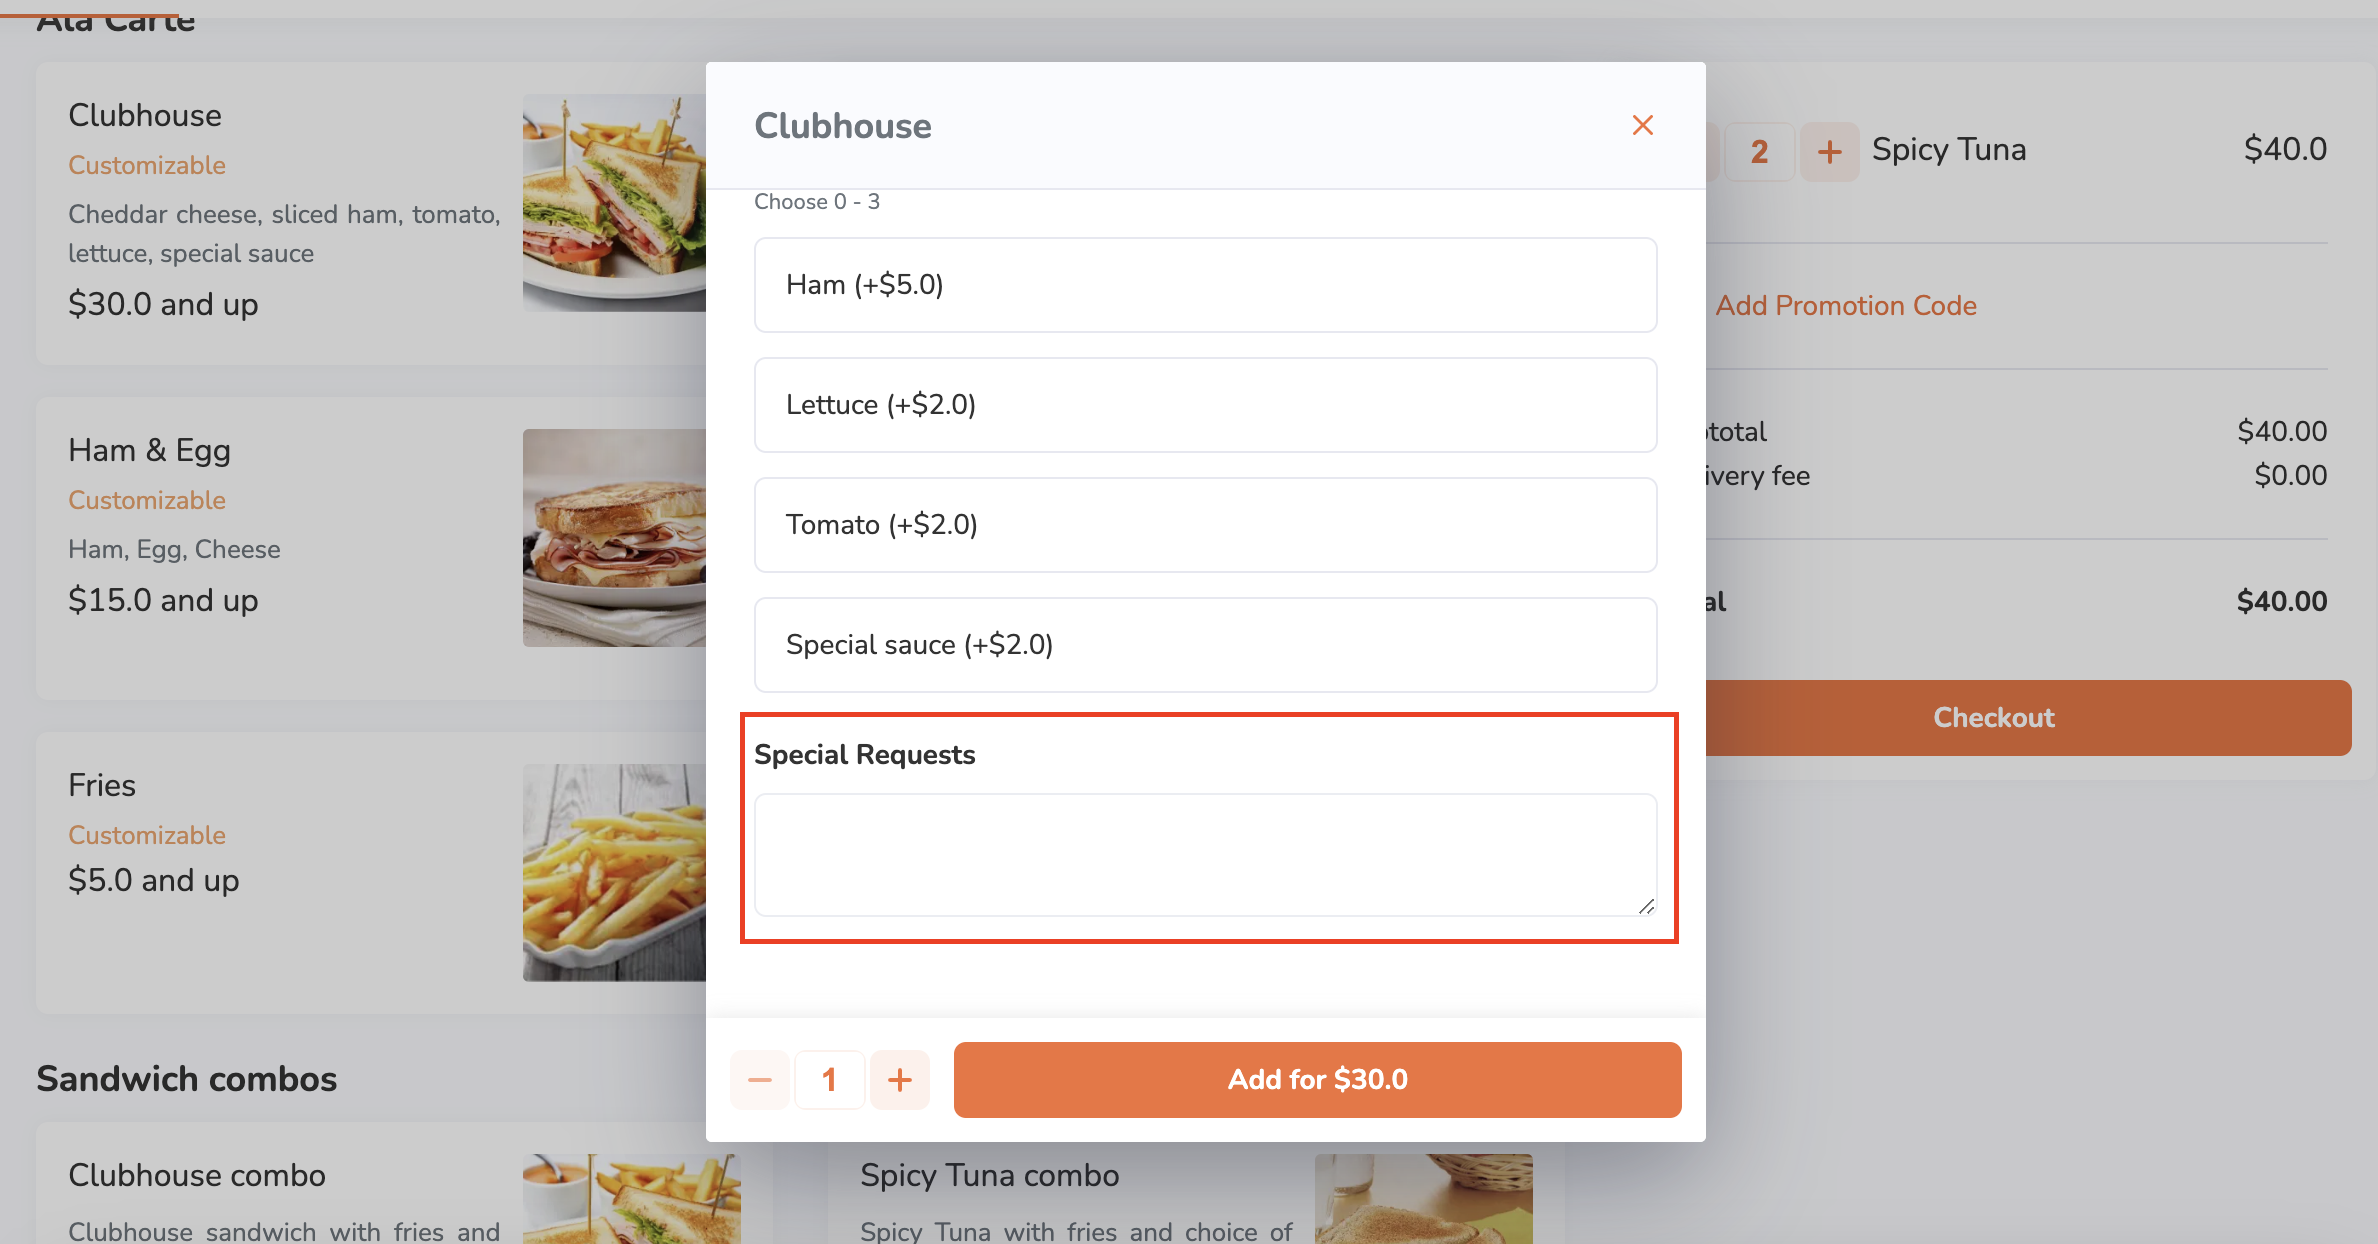
  11. To add a special request for an item, on the Special Requests field, enter your request.
  12. (Optional) To add a discount to your order, on the order list, click on Add Promotion Code. Then, enter a valid promotion code. Click on Apply to confirm.
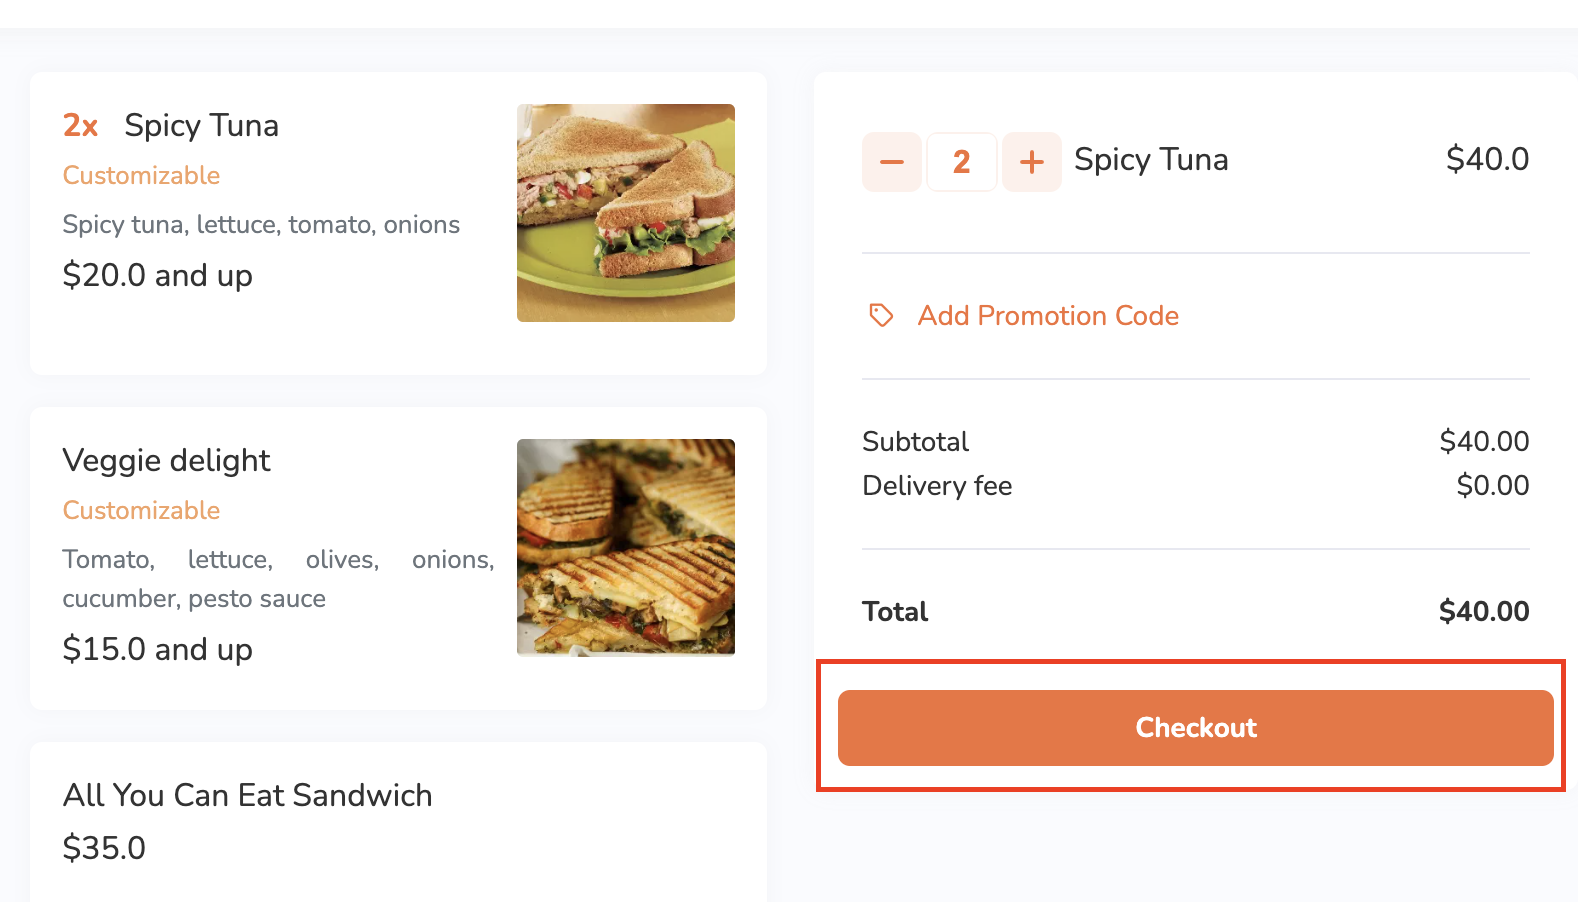
  13. Click on Checkout to proceed with payment.
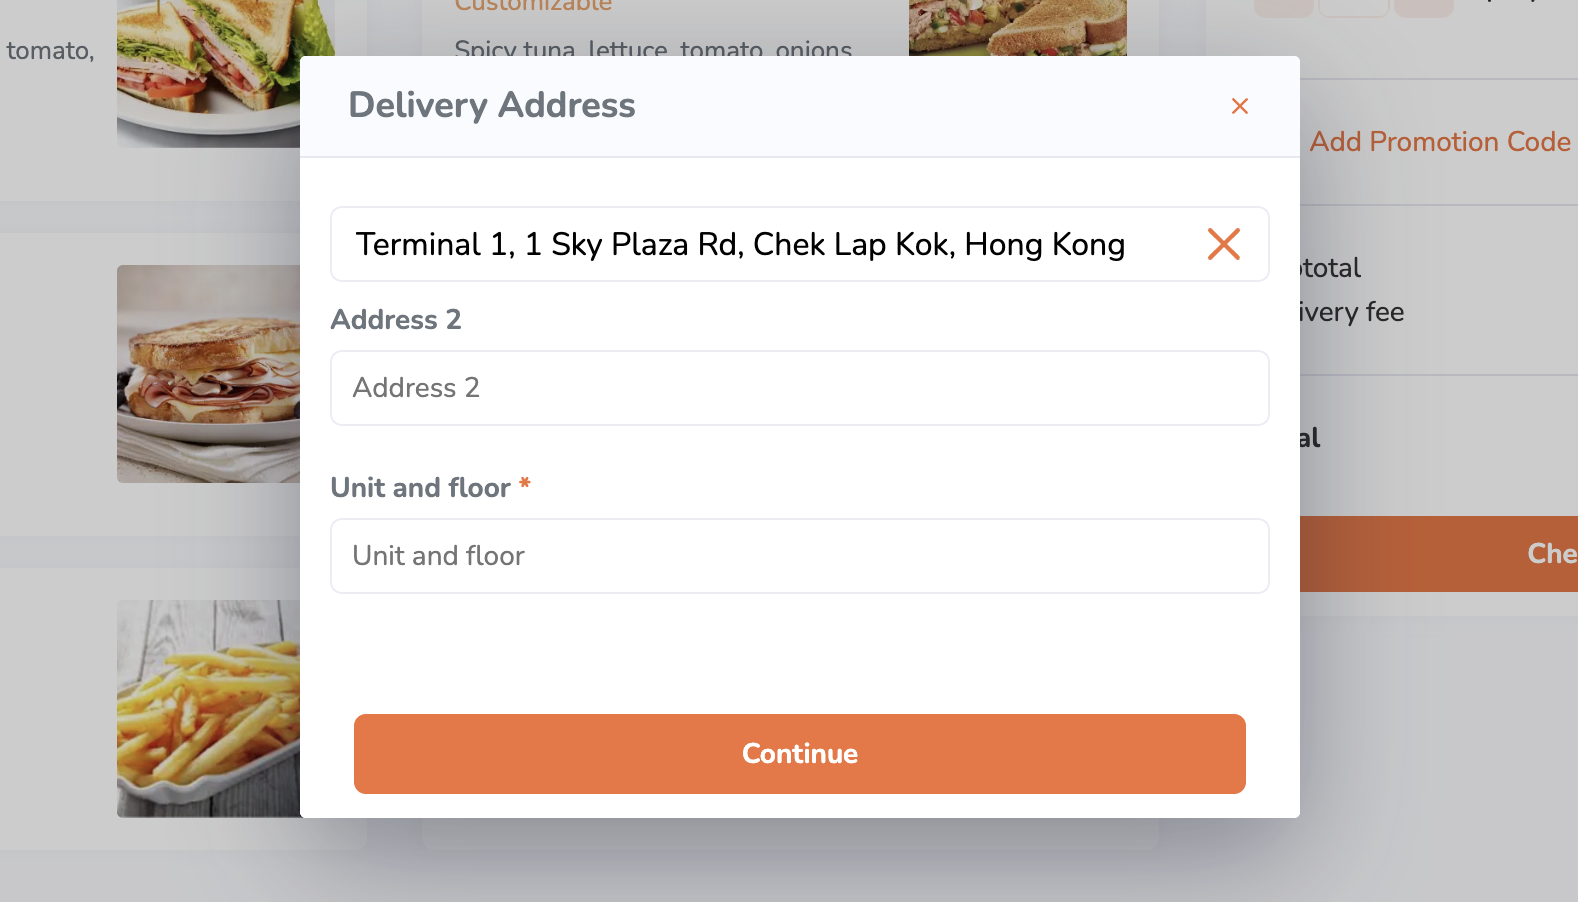
  14. Enter your complete delivery address. Then, click on Continue.
  15. Check that the delivery date, time, and address are correct. Then, click on Continue to proceed to payment.
  16. If you are placing an order as a guest, under Guest Checkout, enter your contact information.
  17. Under Payment Method, select the payment method you want to use to pay for the order.

    Note: If you’re using AlipayHK as the payment method, a QR code will be displayed on the screen upon placing the order. You must use the Alipay app to scan the QR and process the payment.

  18. Click on Place Order to finish placing the order.
Delete

Note: 

  • After you place an order, you’ll receive an email notification that your order has been submitted. 
  • Once the order has been accepted by the restaurant staff, you’ll receive another email notification that you order has been confirmed. If the restaurant staff rejects the order, you’ll receive an order cancellation notification instead.
  • If the order has been canceled by the restaurant, you can check the reason for cancellation on the branded online store. For more information on how to check an order’s status, refer to Manage orders on the branded online store.
Delete

Pickup

  1. On your desktop browser, visit the restaurant’s branded online store website.
  2. (Optional) If you have an account on the branded online store, log in to your account to associate your order with your account. Otherwise, you can proceed with placing your order as a guest. 
    Note: The restaurant must enable guest ordering to place an order without logging in to the branded online store.
  3. On the main page, select Pickup.
  4. Select the time when you want the order to be picked up.
  5. Click on Save.
  6. Click on a category to browse through the different menu items available to order.
  7. To add an item to an order, click on the item.
    Note: You can purchase plan-exclusive items if you’re subscribed to the required plan.
    1. If the order has modifiers available, select from the available modifiers to customize your order. Then, tap Add. 
      Note: Depending on the item’s total price, the Add button changes. For example, if the total price is $35, the button shows up as Add for $35.0.
    2. If the item is a combo item, choose an option for each item included in the combo to customize your order. Then, tap Add.
      Note: 
      • Depending on the item’s total price, the Add button changes. For example, if the total price is $35, the button shows up as Add for $35.0.
      • If Enable Auto Select Next Combo Option is turned on, the screen automatically scrolls down to the next combo option to select, after an option for an item included in the combo is selected.
  8. To add a special request for an item, on the Special Requests field, enter your request.
  9. (Optional) To add a discount to your order, on the order list, click on Add Promotion Code. Then, enter a valid promotion code. Click on Apply to confirm.
  10. Click on Checkout to proceed with payment.
  11. Check that the pickup date and time are correct. Then, click on Continue to proceed to payment.
  12. If you are placing an order as a guest, under Guest Checkout, enter your contact information.
  13. Under Payment Method, select the payment method you want to use to pay for the order.

    Note: If you’re using AlipayHK as the payment method, a QR code will be displayed on the screen upon placing the order. You must use the Alipay app to scan the QR and process the payment.

  14. Click on Place Order to finish placing the order.
Delete

Note: 

  • After you place an order, you’ll receive an email notification that your order has been submitted. 
  • Once the order has been accepted by the restaurant staff, you’ll receive another email notification that you order has been confirmed. If the restaurant staff rejects the order, you’ll receive an order cancellation notification instead.
  • If the order has been canceled by the restaurant, you can check the reason for cancellation on the branded online store. For more information on how to check an order’s status, refer to Manage orders on the branded online store.
Delete
Delete
branded order

Was this article helpful?

Yes
No
Give feedback about this article

Related Articles

  • Set up SMS Notification
  • Manage Branded Online Store preferences
  • Book a reservation using restaurant website
  • Log in and log out of the branded online store
            • Products
              • POS
              • mPOS
              • Eats365 Biz
              • Eats365 Marketplace
              • Branded Online Store
              • Kitchen Display System
              • Expedite Display
              • Scan-to-Order (BYOD)
              • Self-Service Kiosk
              • PhotoMenu
              • Queue Kiosk
              • Dynamic Digital Menu
              • Queue Display
              • Pickup Display
              • Customer Facing Display
            • Solutions
              • Online Ordering
              • Contactless Dining
              • Front of House
              • Guest Retention
              • Back of House
              • Back Office (Store End)
              • Multi-brand/Location Management (Enterprise)
              • Paperless Operation Experience
              • Payment
            • Restaurant Types
              • Quick Service Restaurant
              • Full Service Restaurant
              • Bars
              • Food Court
              • Cloud Kitchen
              • Food Retail
              • Self-service Restaurant
              • Enterprise
              • All-You-Can Eat (Buffet)
            • Resources
              • Eats365 Knowledge Base
              • Blog
              • Supported Hardware
            • Company
              • About Us
              • Success Stories
              • Referrals
            • Get In Touch
            • Contact Us
              • Eats365, Inc.
              • Sales info@eats365.com
              • Support support@eats365.com
        • Contact Us
          • Eats365, Inc.
          • info@eats365.com
          • www.eats365pos.com
        • Get In Touch
          • Apple Mobility Partner
            twitter facebook eats365 linkedin
        • eats365
          © 2023 Eats365 Incorporated. All rights reserved.

Knowledge Base Software powered by Helpjuice

Expand