All

Contact Us

If you still have questions or prefer to get help directly from an agent, please submit a request.
We’ll get back to you as soon as possible.

Please fill out the contact form below and we will reply as soon as possible.

    Login
English (US)
English (US)
Mandarin
Cantonese
  • Home
  • Modules

Eats365 Biz and Biz Lite

All Product

Contact Us

If you still have questions or prefer to get help directly from an agent, please submit a request.
We’ll get back to you as soon as possible.

Please fill out the contact form below and we will reply as soon as possible.

    • mPOS
        • Set up and install mPOS
        • Configure mPOS settings
        • Manage orders in the mPOS app
        • Manage tables in the mPOS app
    • PhotoMenu
        • Set up and install PhotoMenu
        • Configure PhotoMenu settings
        • Place orders on the PhotoMenu
        • Set up PhotoMenu as a mobile or stationary eMenu
        • Use Service Call on PhotoMenu
    • Ticket Kiosk
        • Set up and install Queue Ticket Kiosk
        • Issue queuing tickets from the Queue Ticket Kiosk
        • Configure Queue Ticket Kiosk settings
    • eSignage
        • Set up and install eSignage
        • Configure eSignage settings
    • Kitchen Display System
        • Set up and install Kitchen Display System
        • Configure Kitchen Display System settings
        • Manage orders on the Kitchen Display System
    • Customer Facing Display
        • Set up and install Customer Facing Display
        • Configure Customer Facing Display settings
    • Expedite Display
        • Set up and install Expedite Display
        • Configure Expedite Display settings
        • Perform basic expedite operations
    • Eats365 Biz and Biz Lite
        • Set up and install Eats365 Biz and Eats365 Biz Lite
        • Configure Eats365 Biz settings
        • Manage orders on the Eats365 Biz
        • Reset Eats365 Biz
        • Compare Eats365 Biz and Eats365 Biz Lite
        • Configure Eats365 Biz Lite settings
        • Place orders on the Eats365 Biz
        • Set up and manage integrated payments for Eats365 Biz
        • Issue a tax invoice on Eats365 Biz (Taiwan)
        • Process payments on the Eats365 Biz
    • Self Order Kiosk
        • Set up and install Self Order Kiosk
        • Place an order on Self Order Kiosk
        • Configure Self Order Kiosk (iOS) settings
        • Set Kivo as the Self Order Kiosk default screen
        • Configure Self Order Kiosk (Android) settings
        • Process a payment return on the Self Order Kiosk
    • Pay Station
        • Set up and install Pay Station
        • Pay using Pay Station
        • Configure Pay Station settings
    • Dynamic Digital Menu
        • Manage the menu on the Dynamic Digital Menu
    • Branded Online Store
        • Manage Branded Online Store preferences
        • Set up SMS Notification
        • Book a reservation using restaurant website
        • Change password on the branded online store
        • Place orders on the branded online store
        • Delete an account on the branded online store
        • Log in and log out of the branded online store
        • Sign up on the branded online store
        • Manage orders on the branded online store
        • Set up a Delivery Address Book on the branded online store
        • Secure member credit payment on the branded online store
        • Pay using member credits on the branded online store
        • Purchase member credit using the branded online store​
        • Join a restaurant's loyalty program

Table of Contents

Issue a tax invoice on Eats365 Biz (Taiwan)

Learn how to apply tax invoice to transactions using the Eats365 Biz and set custom tenders to be included or excluded from a tax invoice.

In Taiwan, the government requires establishments to issue a tax invoice for every transaction. Restaurants must set up the tax invoice function to generate tax invoices using the Eats365 Biz.

In this article, you’ll learn how to generate invoice numbers, issue a tax invoice for transactions, and use a custom tender as payment for tax-exempt transactions.

Delete

Note: This article applies to both Eats365 Biz and Eats365 Biz Lite versions.

Generate invoice numbers for tax invoice

Before you get invoice numbers on the Eats365 Biz, you must first generate invoice numbers on the e-Invoice platform’s portal. After generation, use the Biz to import invoice numbers from the e-Invoice platform for use in transactions.

Delete

Important: For merchants using Cetustek or Universal EC, you must enter the POS Number and API Access Key to be able to generate invoice numbers. The POS Number and API Access Key are usually provided by our Channel Partners upon setting up the Tax Invoice feature for your Biz.

To import invoice numbers into Biz, follow the steps below:

  1. Open the Eats365 Biz app. 
  2. On the left panel, tap Menu .
  3. Select e-Invoice Setting. 
  4. For merchants using Cetustek or Universal EC: Enter the POS Number and the API Access Key. If these details are already entered, you may skip this step.
  5. To generate invoice numbers, tap Invoice Numbers Get Invoice #.

Doing this generates 50 invoice numbers that you can use for transactions.

Delete

Note: If all invoice numbers have been used, you’ll need to generate a new set. Unused invoice numbers may disappear due to machine failure, Biz app deletion, or resetting. Therefore, only generate new sets once all available invoice numbers are used.

Issue a tax invoice

To issue a tax invoice to a transaction, follow the steps below:

Delete

Important: Once all invoice numbers have been used, the Biz app will prompt you to generate new invoice numbers before proceeding with a transaction. This message appears after tapping the “Pay” button on the order-taking screen.

  1. Open the Eats365 Biz app.
  2. On the "Orders" page, select the order that you’d like to close and issue a tax invoice.
  3. Tap Pay, then select the preferred tender.
  4. On the order, select the preferred invoice type. You can choose from the following options: 
    • Uniform Business No.
    • Carrier
    • Donation Code
      Note: If the preferred invoice type is "Paper," you can proceed directly to payment by tapping Pay.
  5. Tap Scan  and scan the customer’s "Uniform Business Number," "Carrier," or "Donation Code QR Code." If the QR Code is unavailable, manually enter the information in the field, depending on the invoice type you selected.
  6. At the bottom right, tap Pay to proceed. This initiates printing of the receipt.

Once the payment has been processed, the order information, including the selected invoice type, will be sent to the E-Invoice platform that you linked to Biz. You can check the transaction details on the E-Invoice platform’s portal.

For Paper and Uniform Business No. invoice types, the printer will print out a physical copy of the Tax Invoice.

Issue a tax invoice for a custom tender

You can configure a custom tender to issue a tax invoice or be exempt from a tax invoice upon use.

Custom tender included in tax invoice

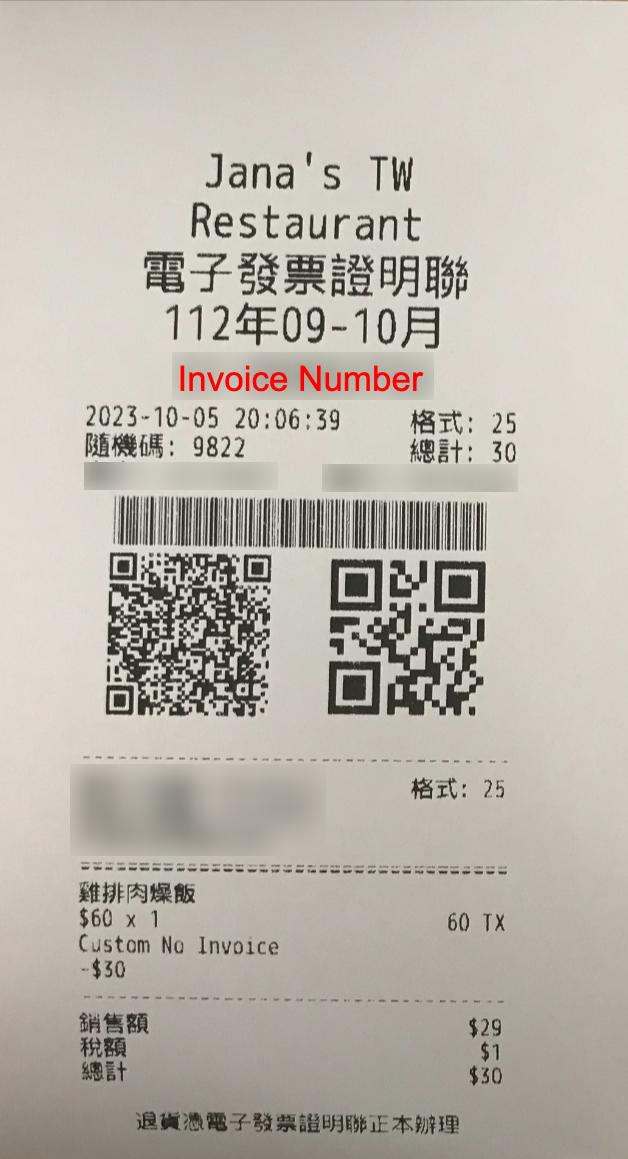
If you configure a custom tender to include a tax invoice and use it as an order's payment method, the total order amount is taxed. For example, if the order amount is $60, then $60 is included in the tax invoice.

Delete

Tax-exempt custom tender

In general, customers pay for orders using cash, credit cards, and other monetary forms. For monetary transactions, businesses collect taxes based on the taxable purchase amount. If a meal is complimentary with no payment collected to avoid discrepancies in your records. 

You can create a custom tender and set it as tax-exempt for purposes such as payments where a customer uses a separately purchased cash or meal voucher to pay for an order. Since the voucher was already taxed upon purchase, it is not subject to tax again. For example, if a customer’s total bill is $90 and they use a $30 voucher, you can use a custom tender to make the $30 voucher tax-exempt. In this case, only $60 is subject to tax. When a custom tender is tax-exempt, it appears as a discount on the order.
.

Delete
Delete

Tip: You can also create a custom tender for complimentary staff meals when employees dine as a paying customers. Staff will be taxed for their purchases, however, if they’re entitled to perks such as a free set meal, you can use the custom tender as payment for that meal so staff are not taxed for it.

Set tax invoice setting for a custom tender

To configure a custom tender’s tax invoice setting, follow the steps below:

Merchant Portal (Classic Theme)

Delete

Tip: To switch themes, at the top right, click on the account name. Then, select Experience Merchant Portal 2.0.

  1. Log in to the Merchant Portal.
  2. On the left panel, click on Restaurant Settings  Tender Settings.
  3. Select Custom Tender Type.
  4. Next to the custom tender type, click on Edit , or at the top right, click on +Custom Tender Type to create a new custom tender.
  5. Turn Issue e-Invoice on  or off .
  6. Click on Add to confirm. 
Delete

Merchant Portal 2.0

Delete

Tip: To switch themes, at the top right, click on the account name. Then, select Back to Classic Theme.

  1. Log in to the Merchant Portal. 
  2. On the left panel, click on Restaurant Settings  Tender Settings. 
  3. Select Custom Tender Type. 
  4. Next to the custom tender type, click on Edit , or at the top right, click on Add Custom Tender Type to create a new custom tender. 
  5. Turn on Issue e-Invoice on  or off .
  6. Click on Save to confirm.
Delete

Reprint a Tax Invoice

To reprint the generated tax invoice of an order, follow the steps below:

  1. Log in to the Eats365 Biz.
  2. In the "Orders" page, select the order you'd like to reprint the tax invoice for, then tap Print.
  3. Choose from the following e-invoice reprinting options:
    • Reprint e-invoice
    • Reprint receipt and e-invoice

Sample reprinted tax invoice

taiwan tax invoice biz invoice

Was this article helpful?

Yes
No
Give feedback about this article

Related Articles

  • Generate Invoice Numbers for Tax Invoice (Taiwan)
  • Place orders on the Eats365 Biz
  • Compare Eats365 Biz and Eats365 Biz Lite
            • Products
              • POS
              • mPOS
              • Eats365 Biz
              • Eats365 Marketplace
              • Branded Online Store
              • Kitchen Display System
              • Expedite Display
              • Scan-to-Order (BYOD)
              • Self-Service Kiosk
              • PhotoMenu
              • Queue Kiosk
              • Dynamic Digital Menu
              • Queue Display
              • Pickup Display
              • Customer Facing Display
            • Solutions
              • Online Ordering
              • Contactless Dining
              • Front of House
              • Guest Retention
              • Back of House
              • Back Office (Store End)
              • Multi-brand/Location Management (Enterprise)
              • Paperless Operation Experience
              • Payment
            • Restaurant Types
              • Quick Service Restaurant
              • Full Service Restaurant
              • Bars
              • Food Court
              • Cloud Kitchen
              • Food Retail
              • Self-service Restaurant
              • Enterprise
              • All-You-Can Eat (Buffet)
            • Resources
              • Eats365 Knowledge Base
              • Blog
              • Supported Hardware
            • Company
              • About Us
              • Success Stories
              • Referrals
            • Get In Touch
            • Contact Us
              • Eats365, Inc.
              • Sales info@eats365.com
              • Support support@eats365.com
        • Contact Us
          • Eats365, Inc.
          • info@eats365.com
          • www.eats365pos.com
        • Get In Touch
          • Apple Mobility Partner
            twitter facebook eats365 linkedin
        • eats365
          © 2023 Eats365 Incorporated. All rights reserved.

Knowledge Base Software powered by Helpjuice

Expand