 Eats365 Products
 Merchant Guide
 Modules
 Membership
 Integrations
 Hardware
 Staff Operations
 Roles & Permissions
 Payments
 Reports
 What’s New
 Release Notes
 Troubleshooting
 Simulators
 Glossary
 Troubleshooter
 System Status
Branded Online Store
All Product
Table of Contents
Place orders on the branded online store
Learn how to place dine-in, delivery, and pickup orders through the branded online store.
The Branded Online Store allows you to browse through the different menu items available in the restaurant and quickly place your orders through the restaurant’s website.
In this article, you’ll learn how to create orders for dine-in, delivery, and pickup.
Place an order
To place an order on the branded online store, follow the steps below:
Mobile device
Dine-In
- Scan the QR Code printed on your order ticket. You’ll be directed to the restaurant’s branded online store.
- Select the number of people dining in the restaurant.
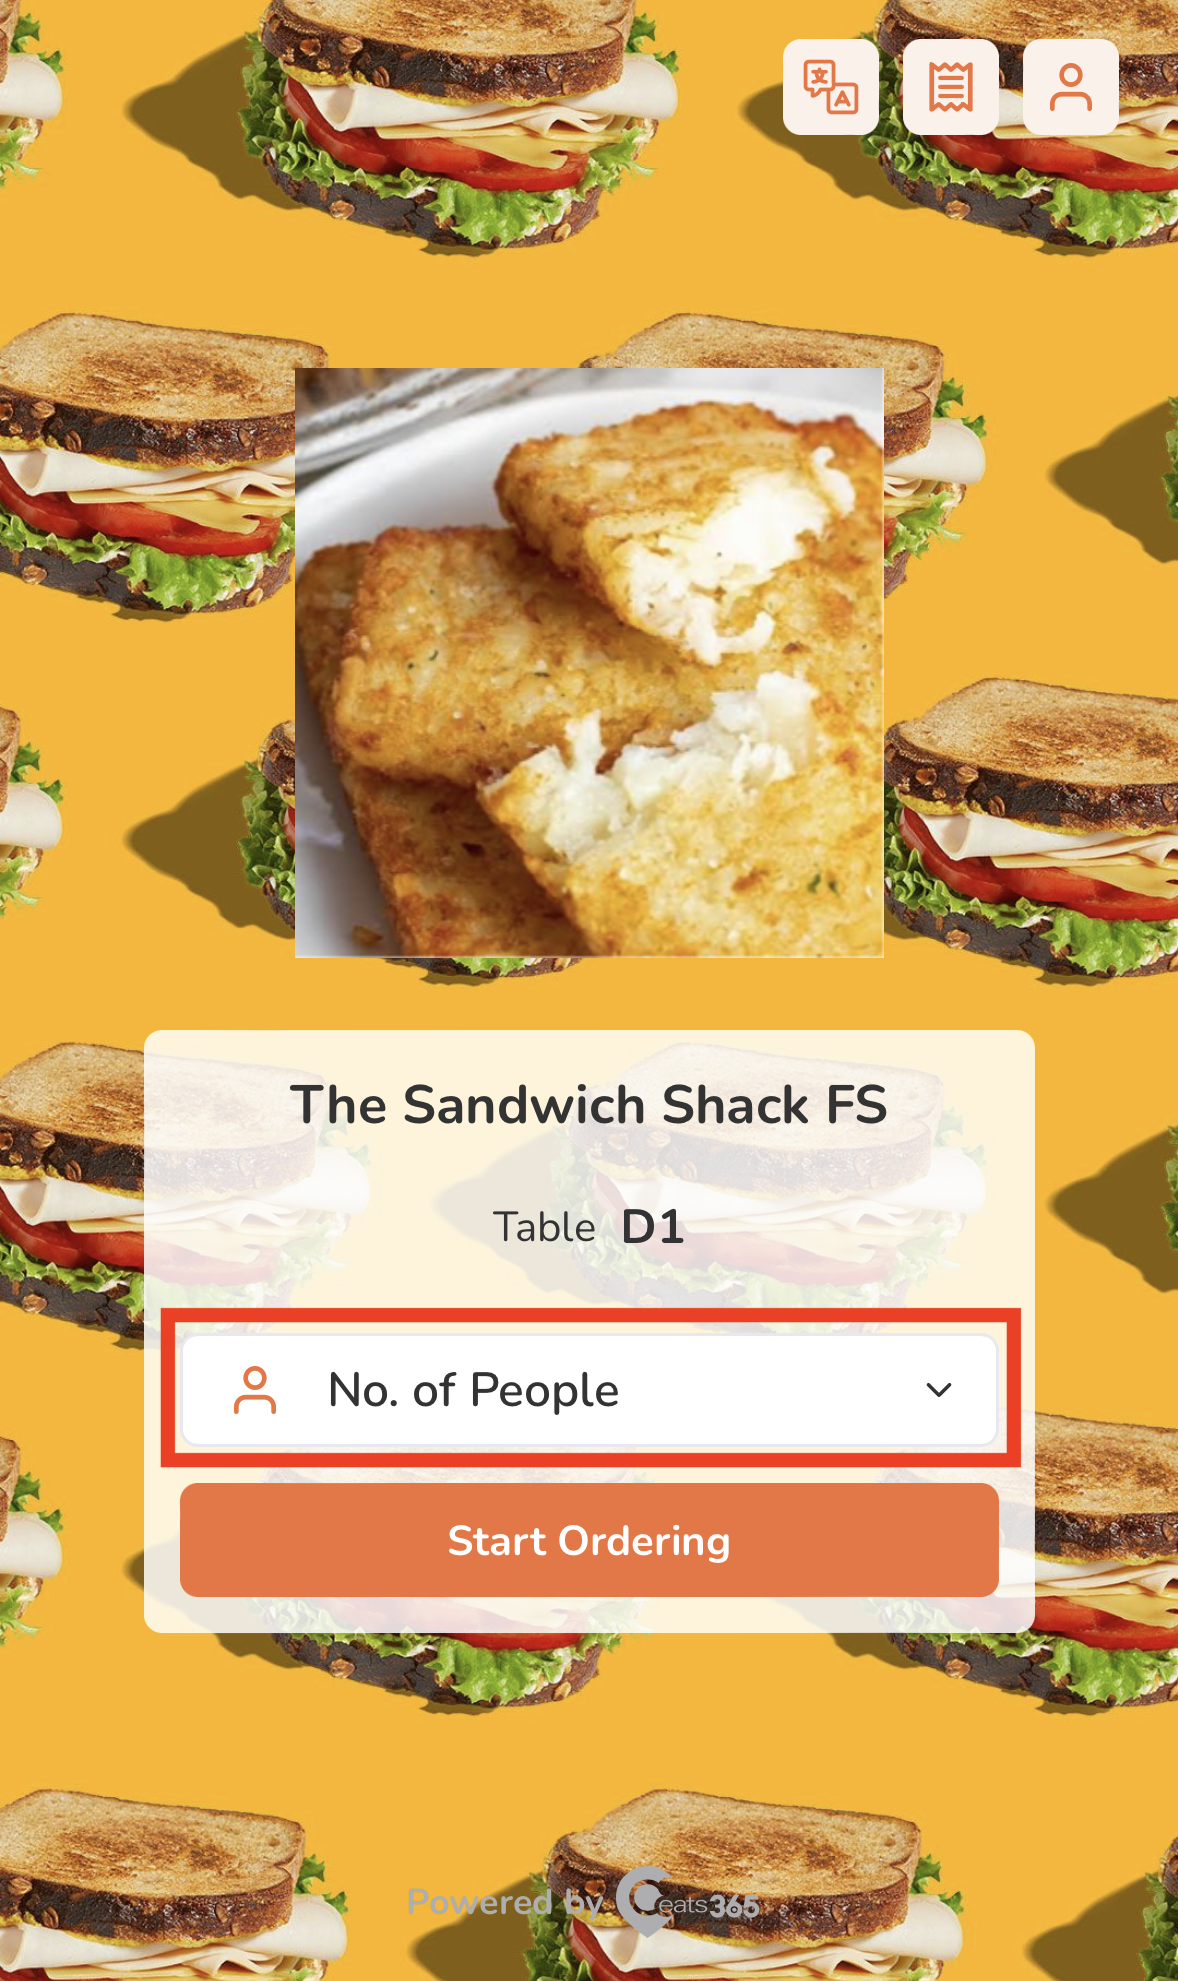
- Tap Start Ordering.

- (Optional) If you have an account on the branded online store, log in to your account to associate your order with your account. Otherwise, you can proceed with placing your order as a guest.
Note:- Guest ordering: The restaurant must enable guest ordering to place an order without logging in to the branded online store.
- Group ordering (with membership): For groups with two or more members present, the plan of the member who places the first order applies to the whole group. If the restaurant offers member-exclusive menu items, the whole group can enjoy them and receive member pricing, provided that the associated member has the required plan.
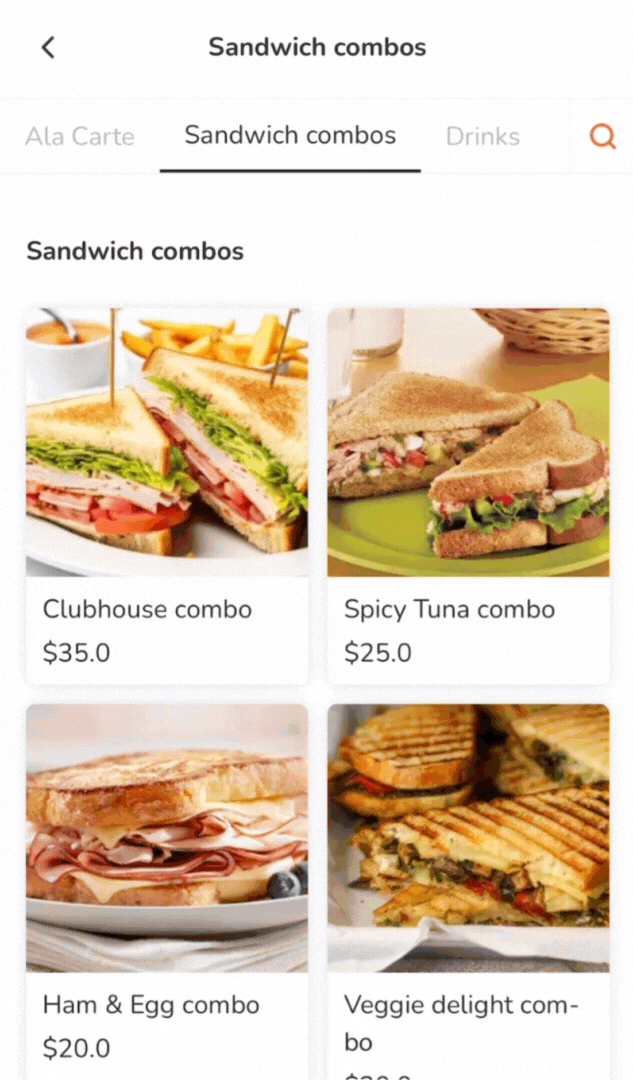
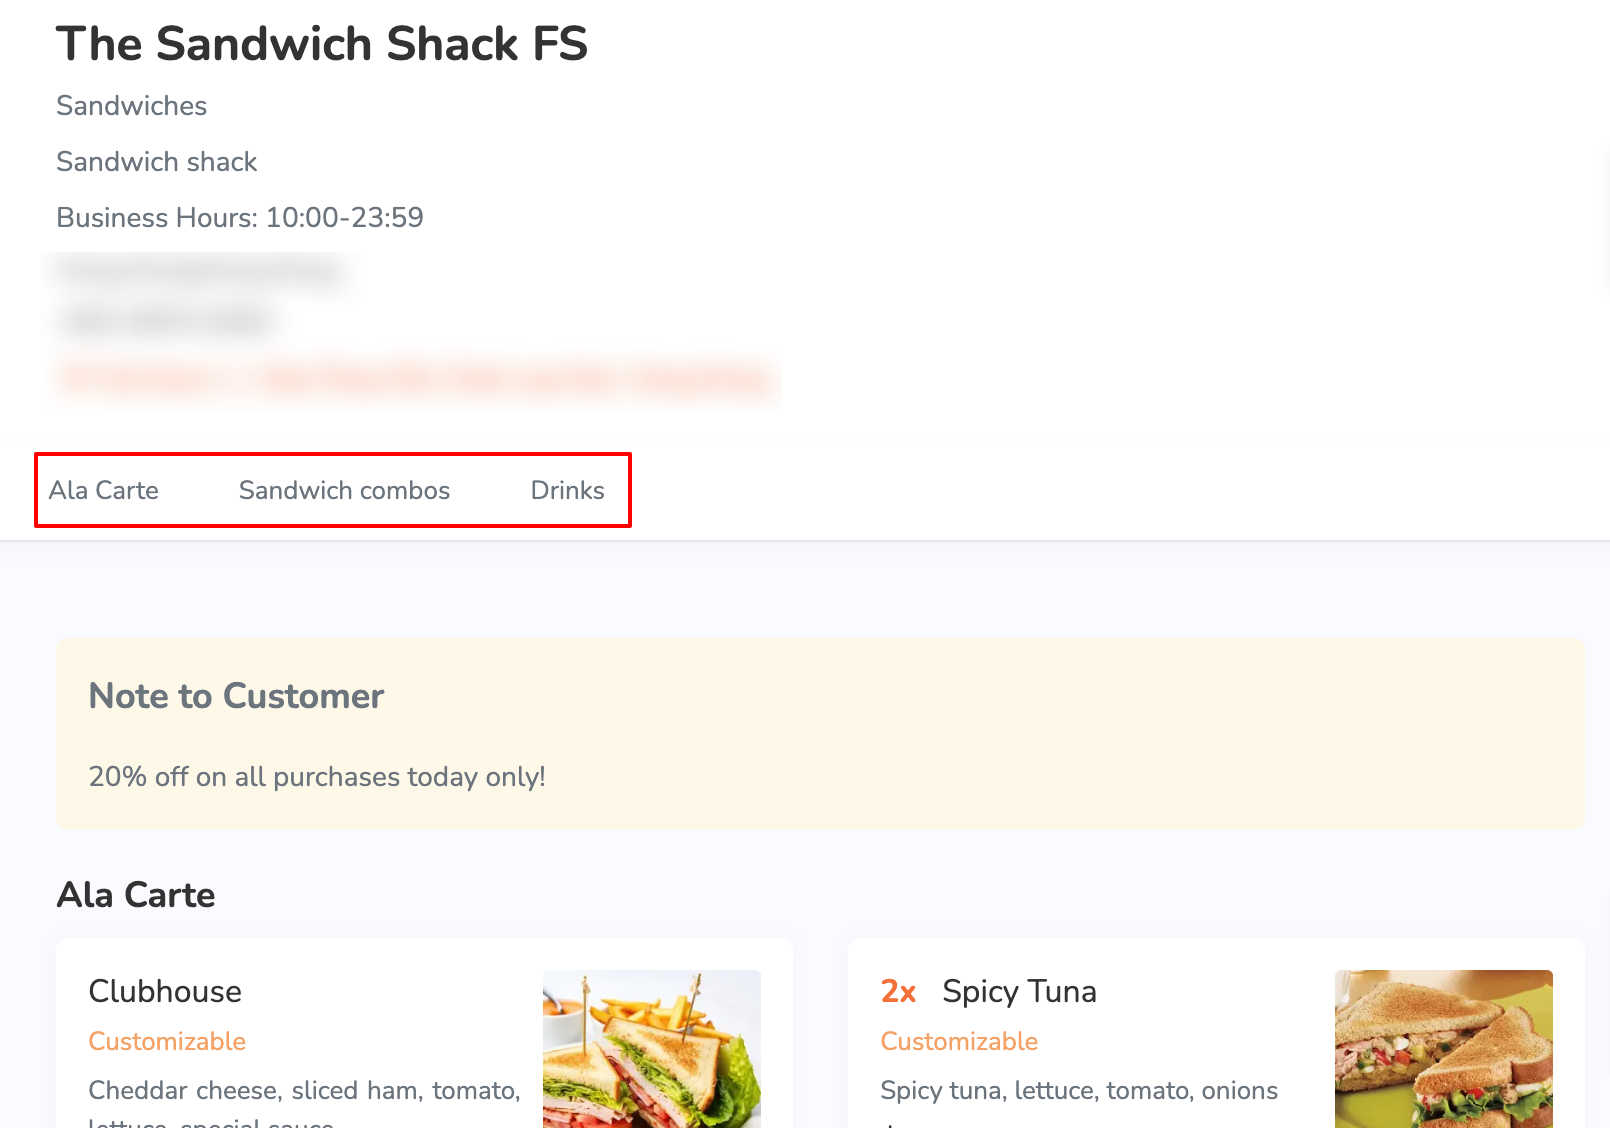
- Search for the item you want to add to the order. You can do any of the following to filter menu items:
- Tap a category to browse through the different menu items available to order.
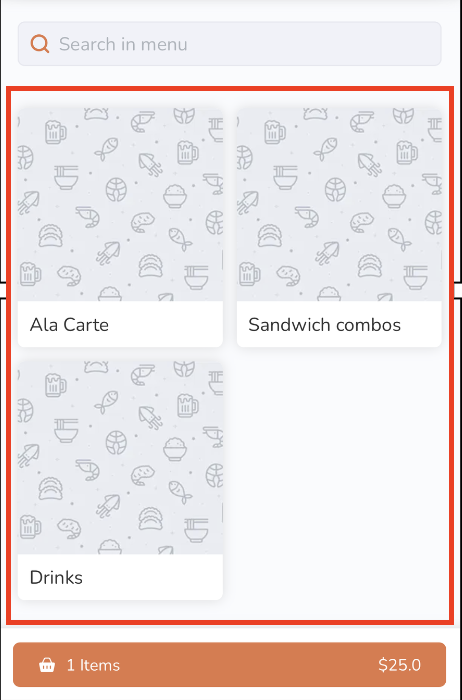
- Tap the search field above the categories and then enter the item that you want to add to the order.
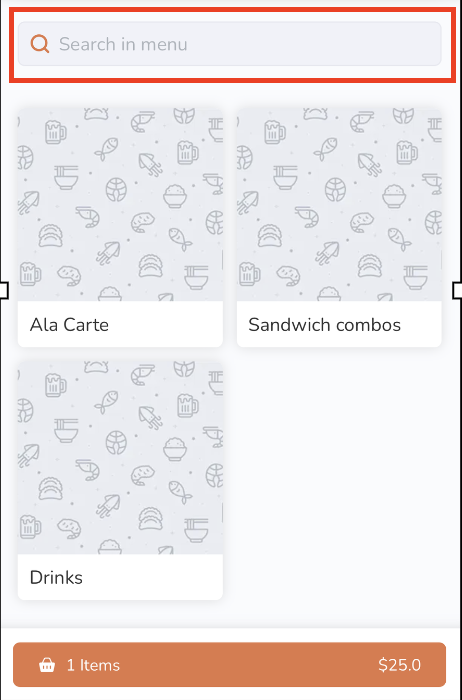
- Filter orders based on available preferences, such as dietary restrictions, most popular items, and recommended items.

- Tap a category to browse through the different menu items available to order.
- To add an item to an order, tap the item.
Note: You can purchase plan-exclusive items if you’re subscribed to the required plan.
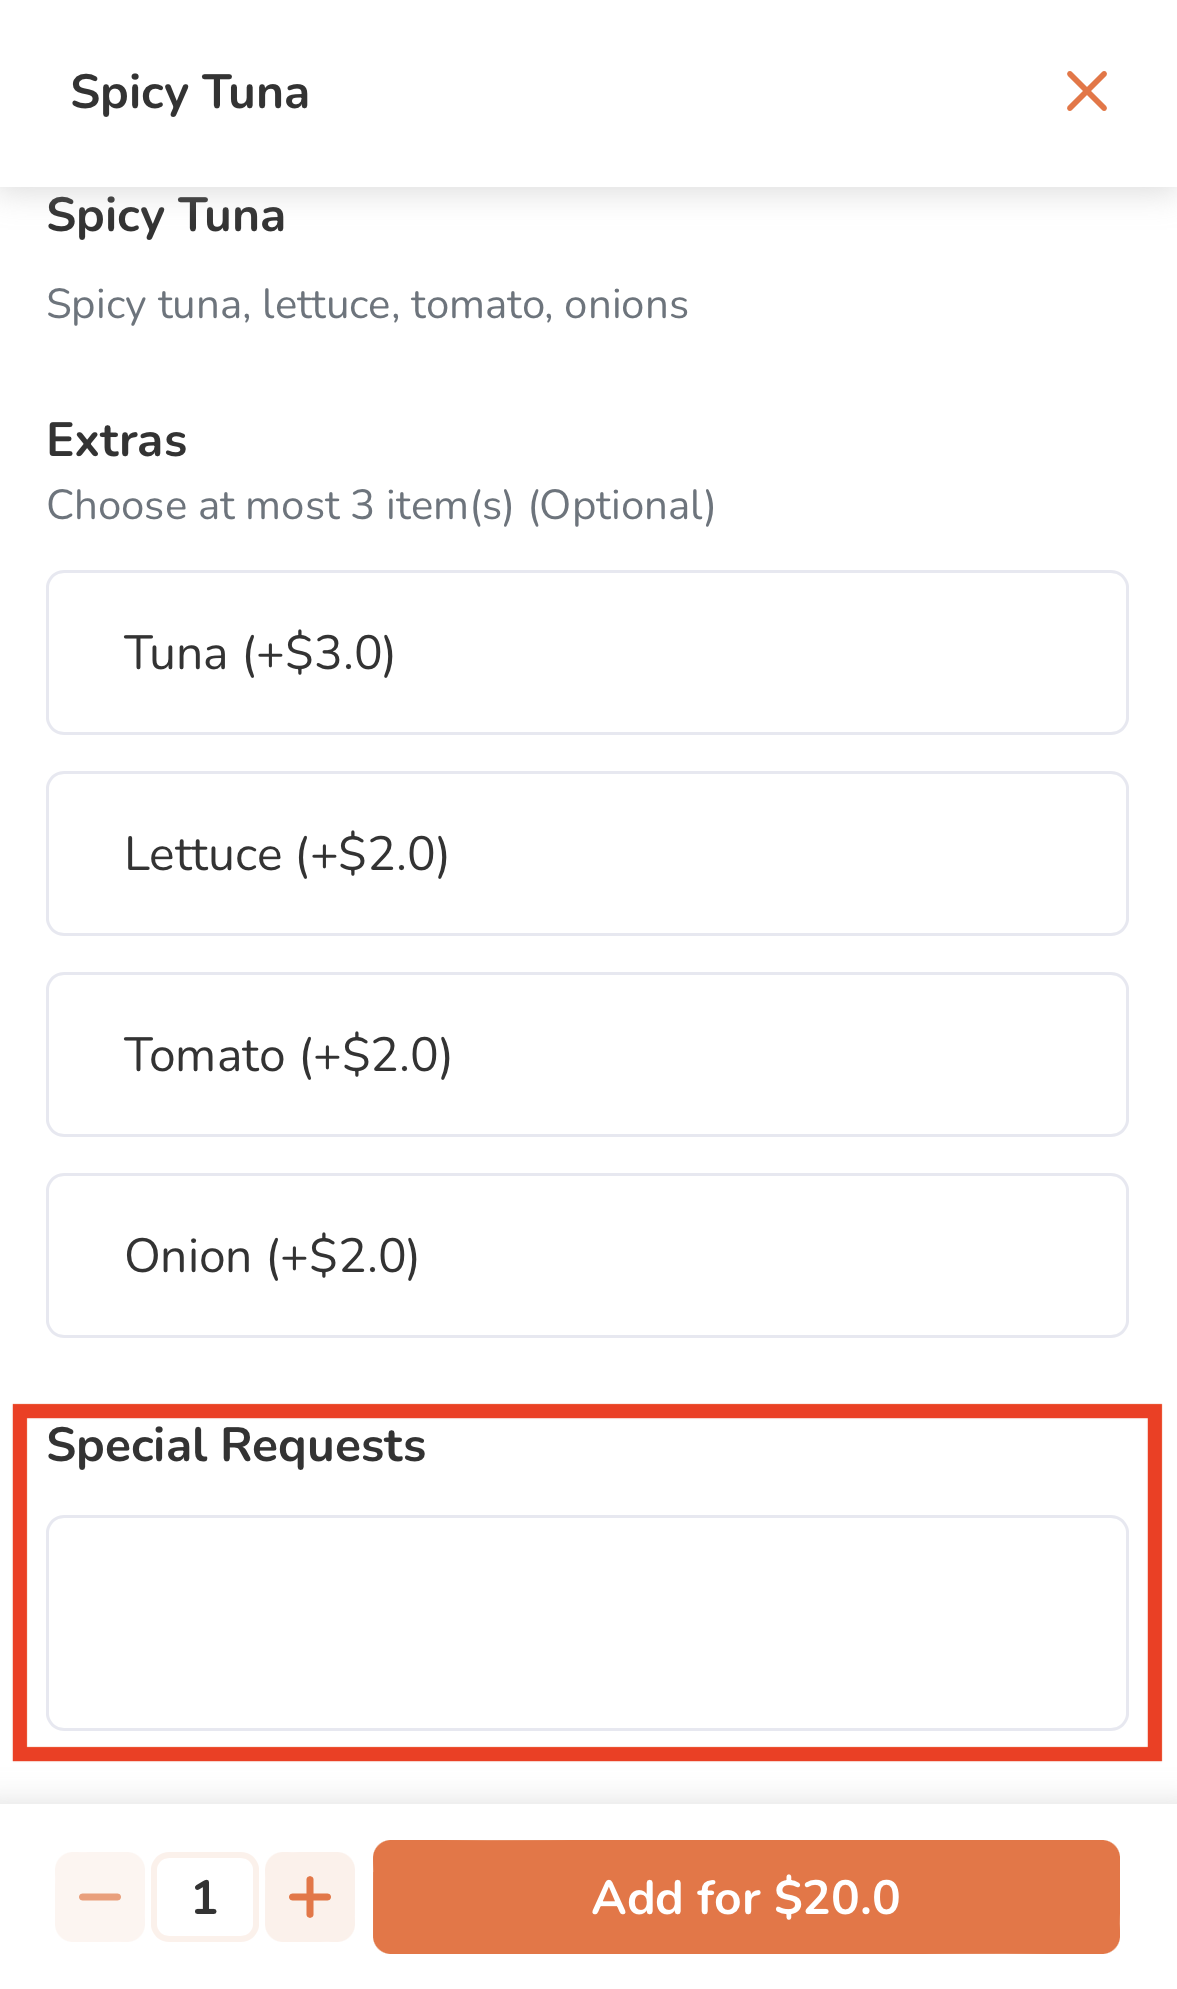
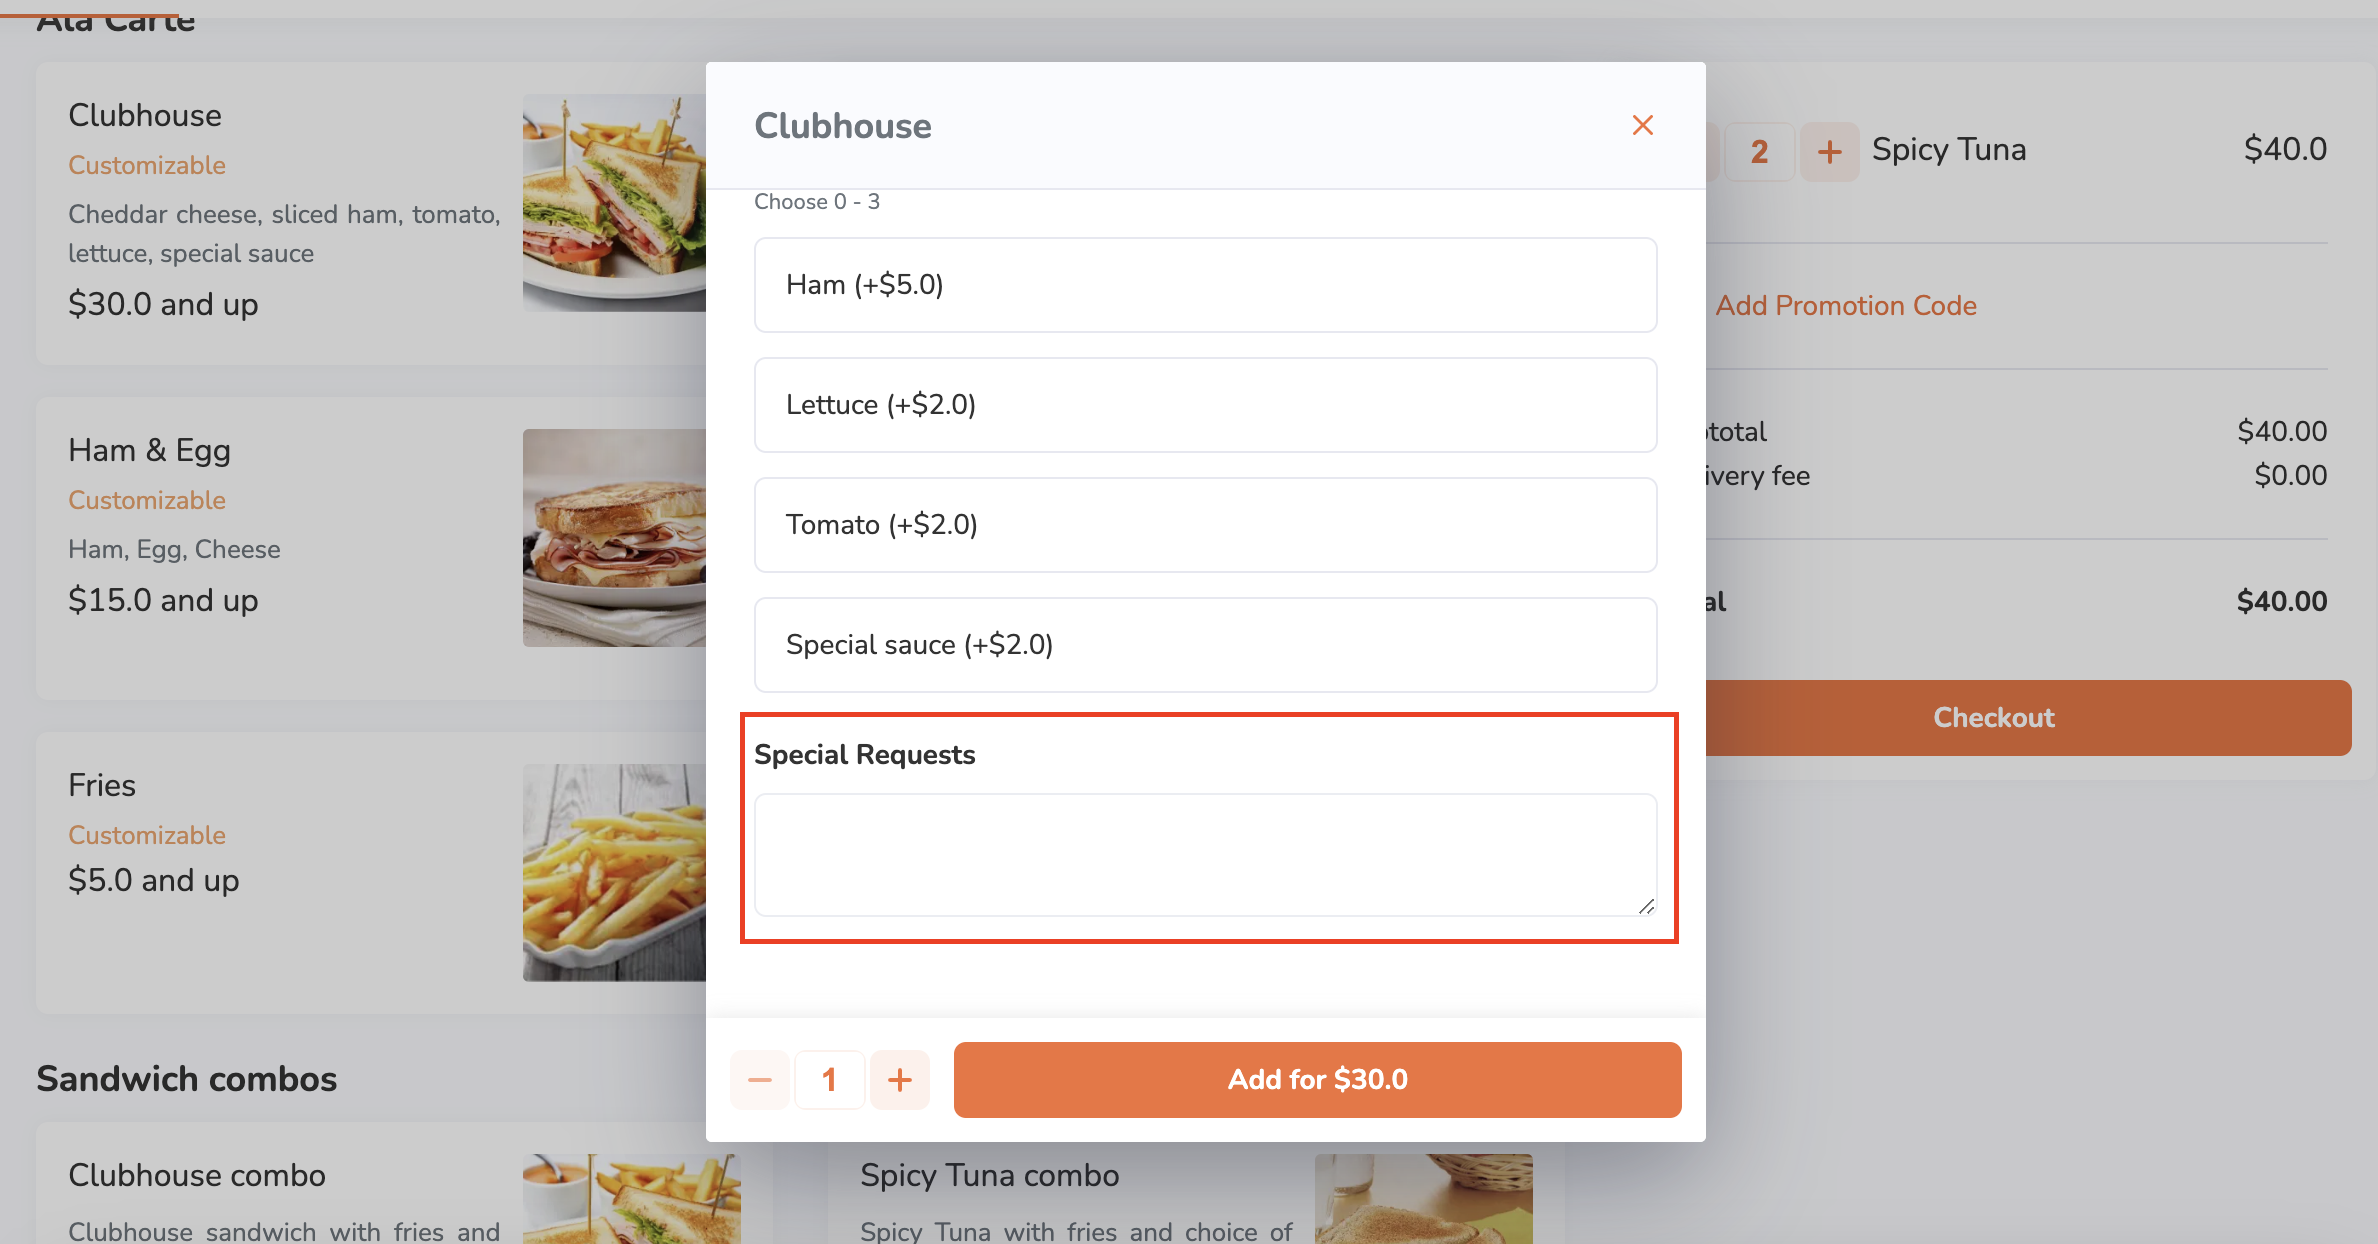
- If the order has modifiers available, select from the available modifiers to customize your order. Then, tap Add.
Note: Depending on the item’s total price, the "Add" button changes. For example, if the total price is $35, the button shows up as Add for $35.0.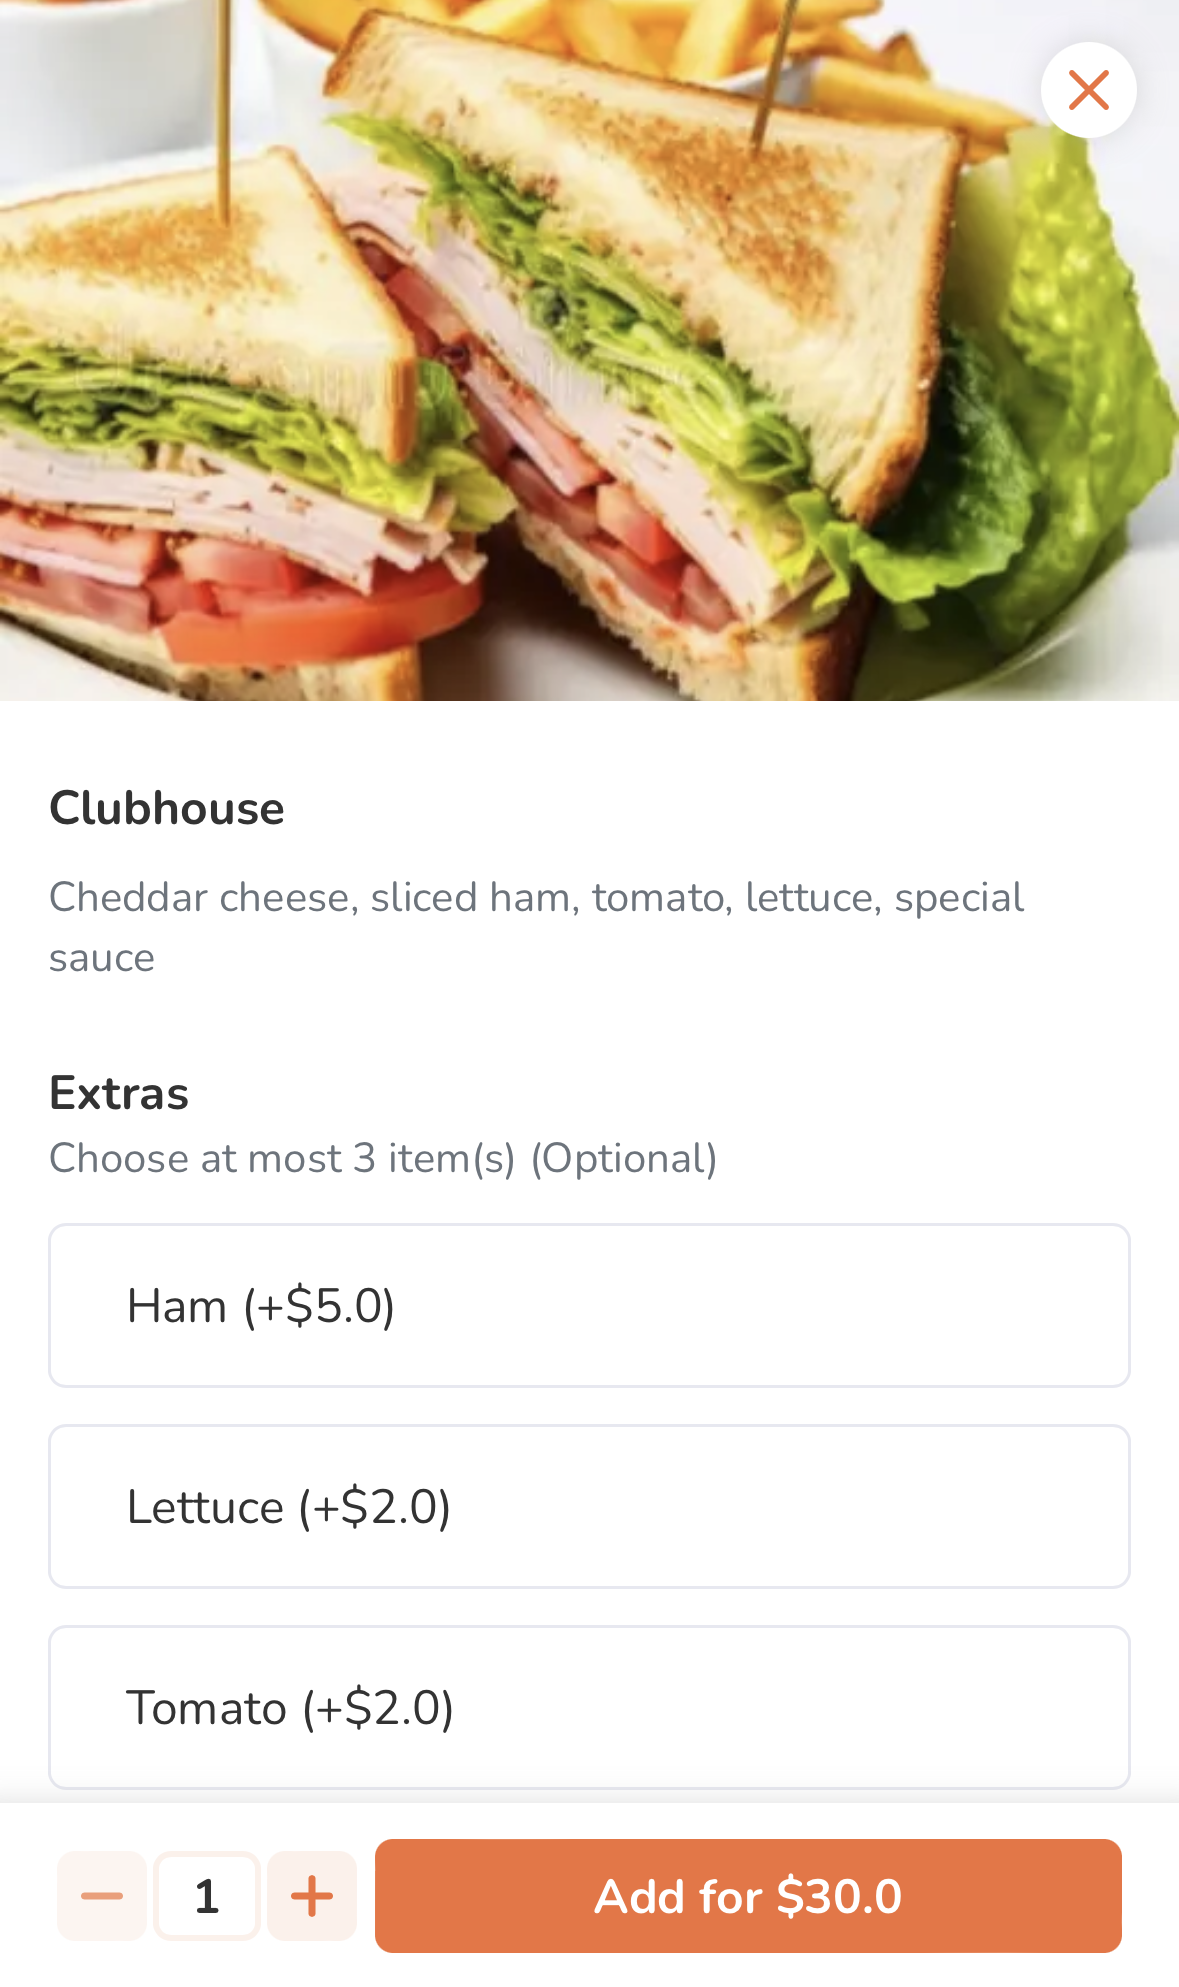
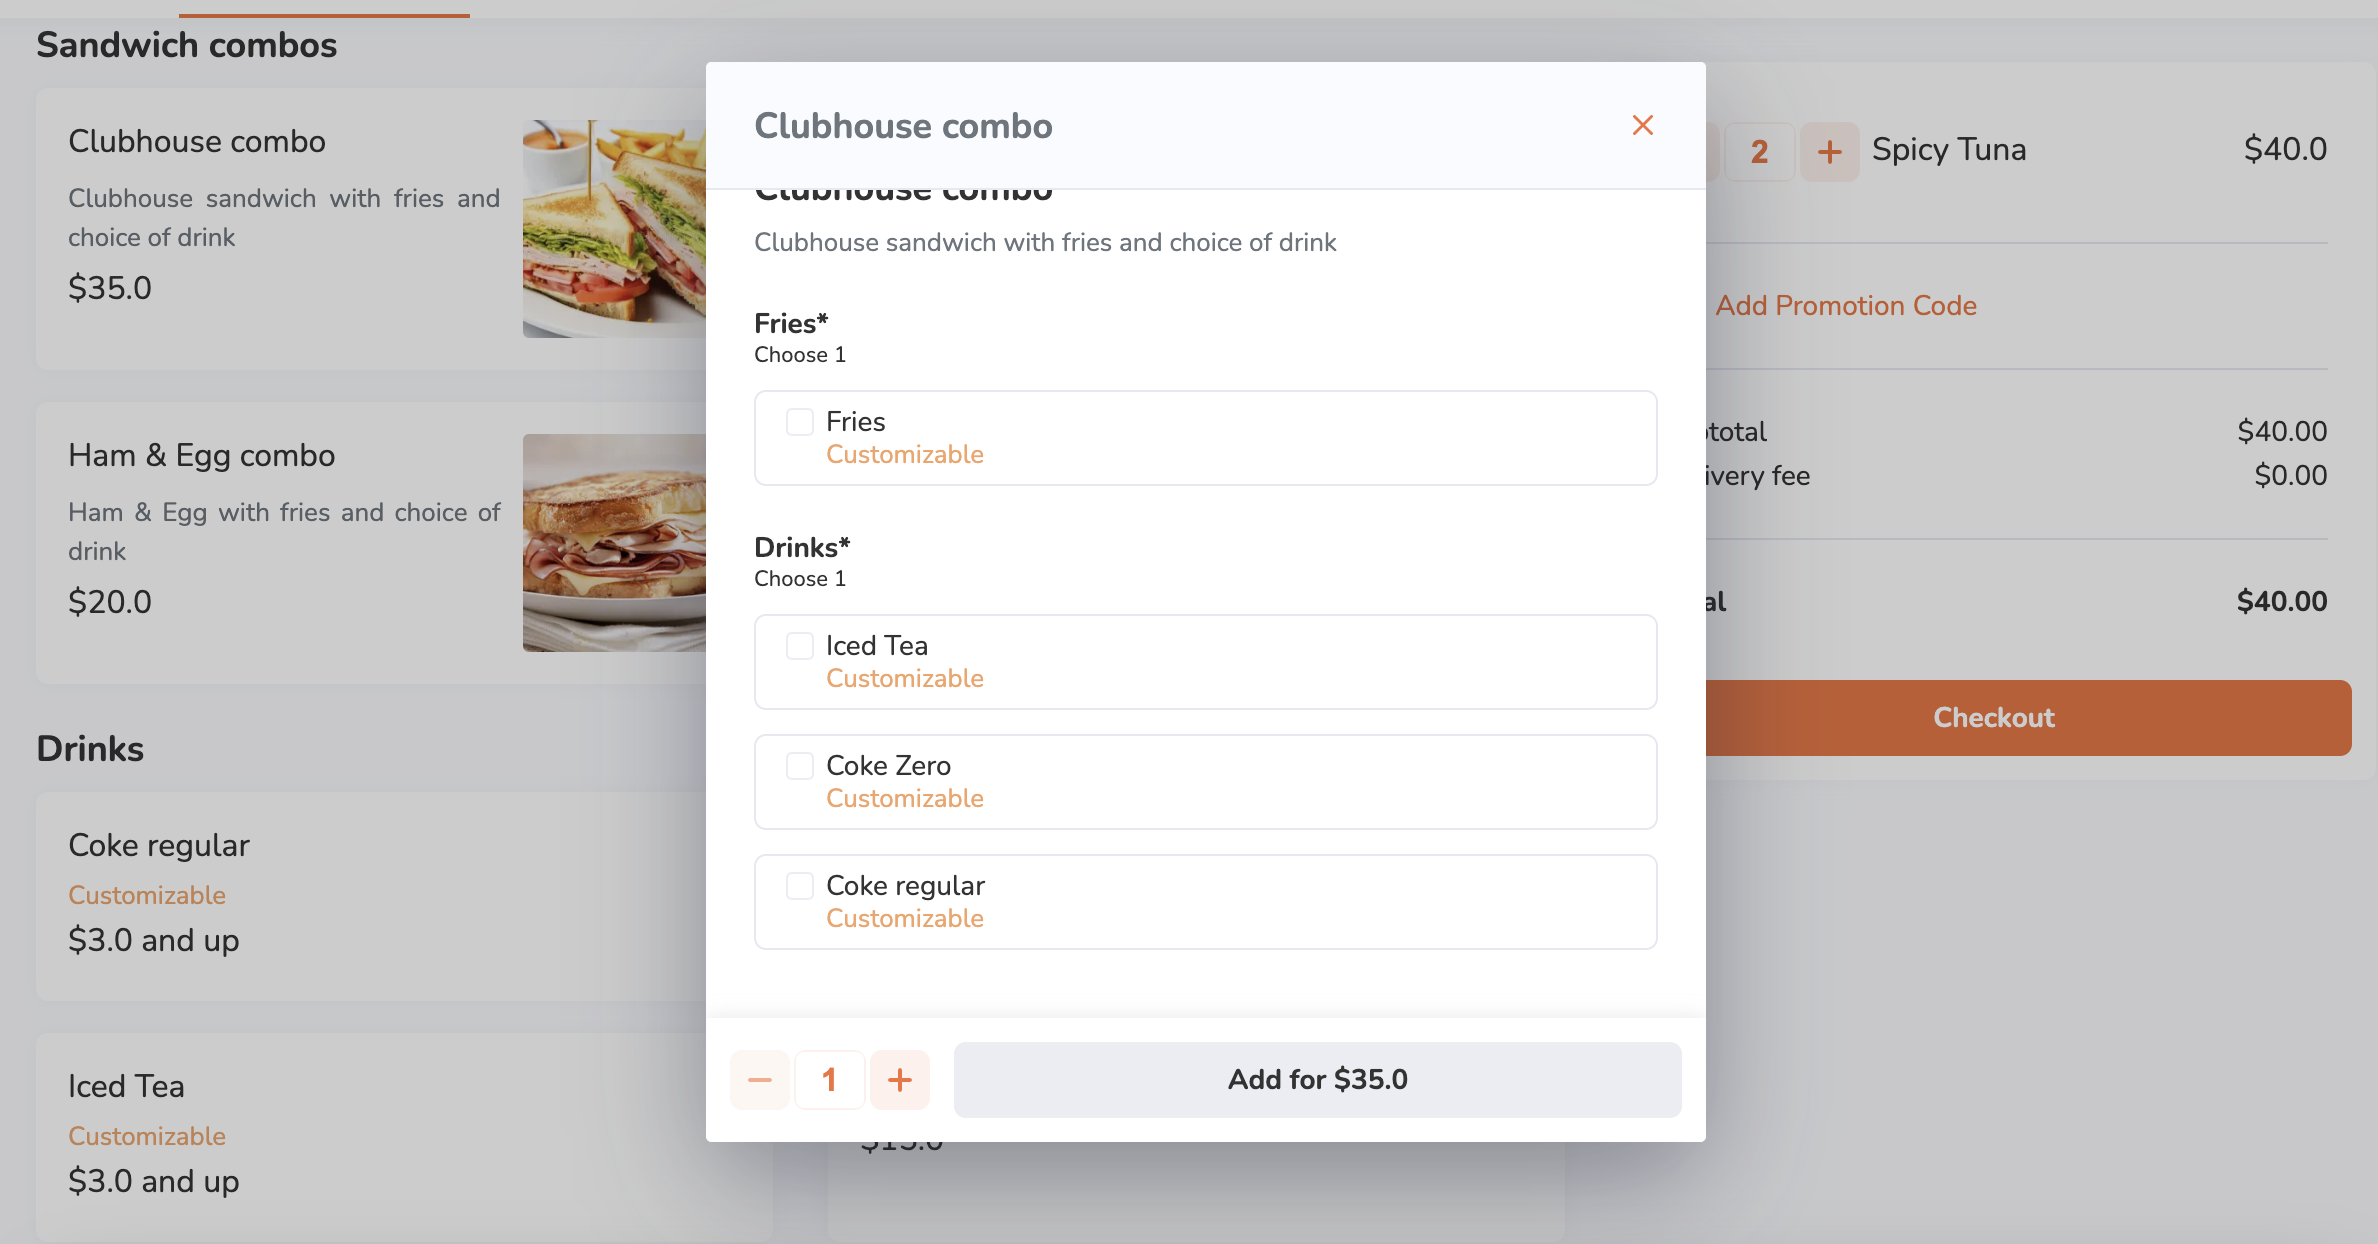
- If the item is a combo item, choose an option for each item included in the combo to customize your order. Then, tap Add.
Note:- Depending on the item’s total price, the Add button changes. For example, if the total price is $35, the button shows up as Add for $35.0.
- If "Enable Auto Select Next Combo Option" is turned on, the screen automatically scrolls down to the next combo option to select, after an option for an item included in the combo is selected.
- To add a special request for an item, in the "Special Requests" field, enter your request.
- If the order has modifiers available, select from the available modifiers to customize your order. Then, tap Add.
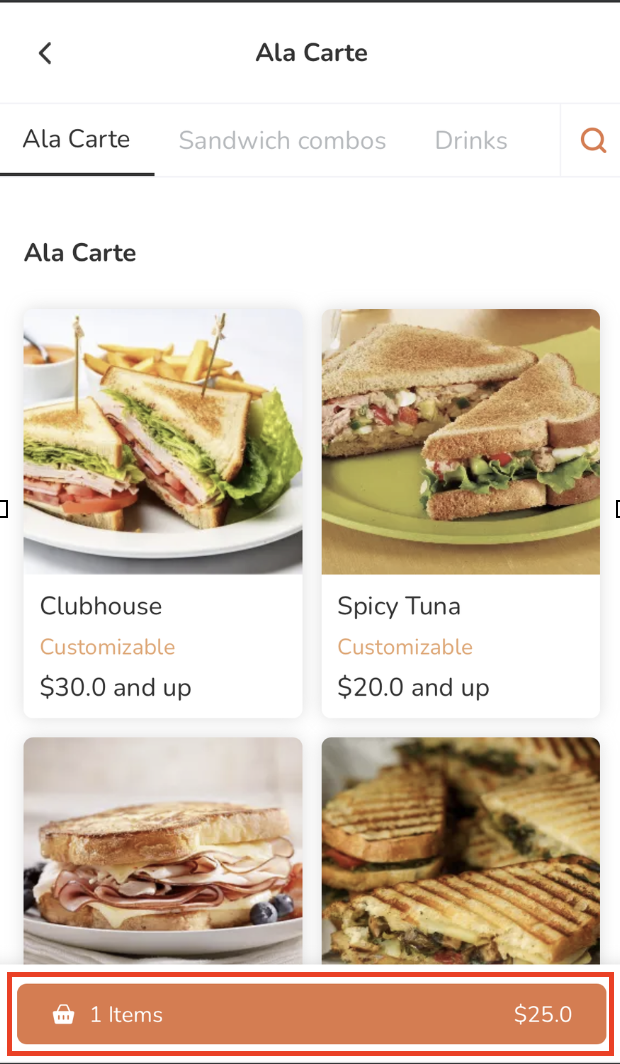
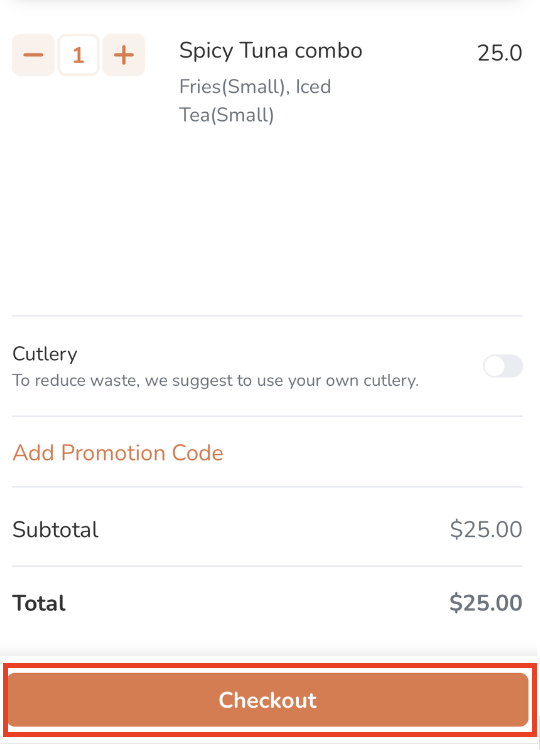
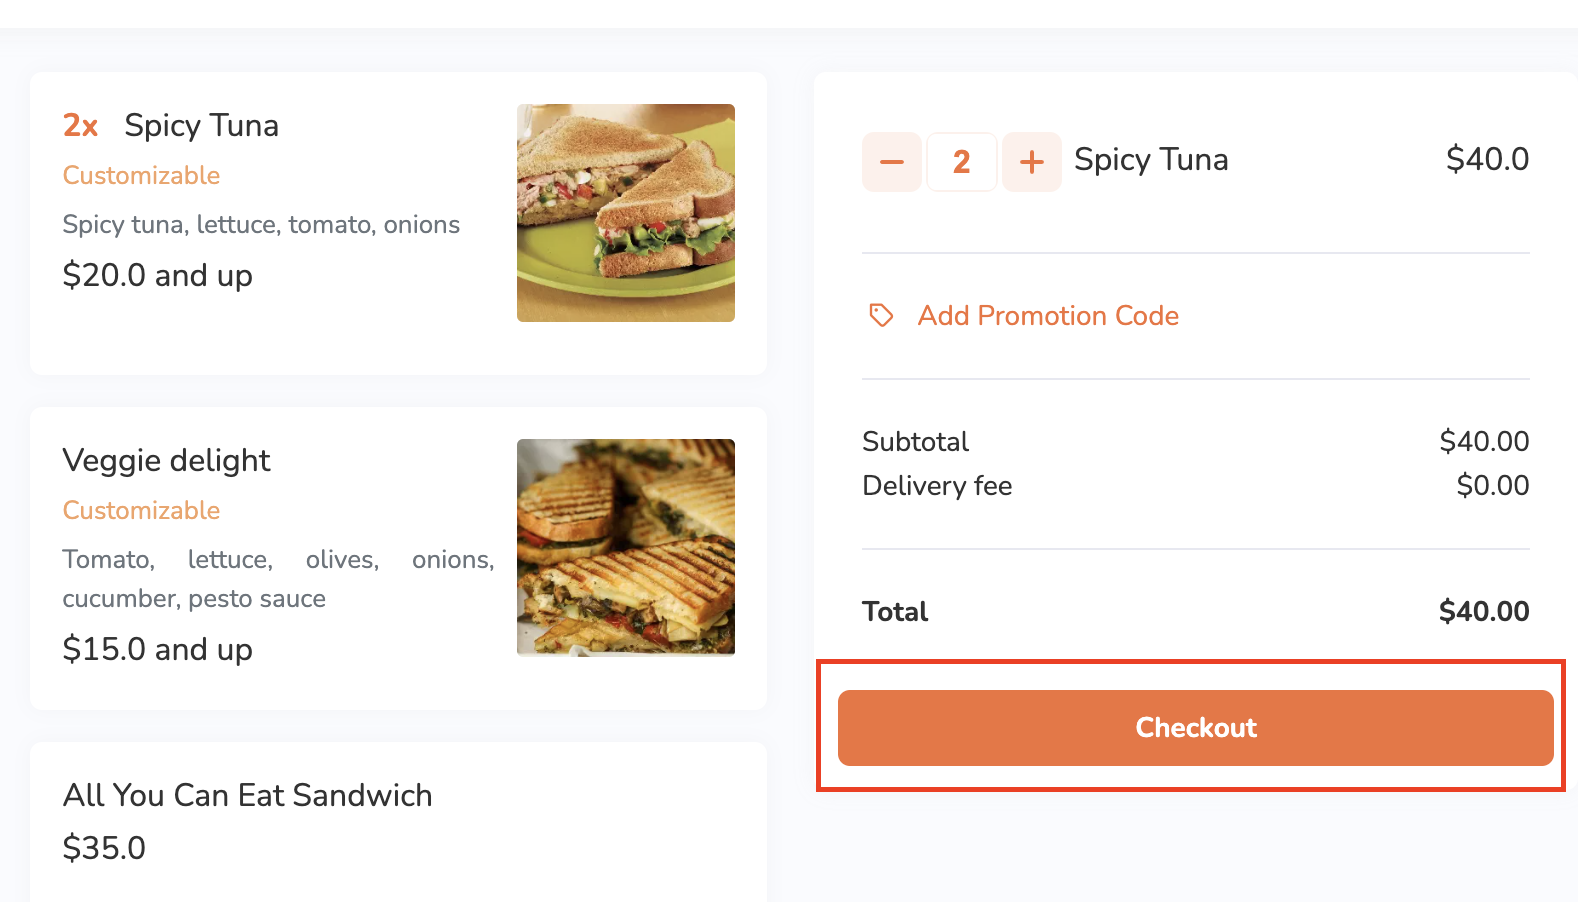
- Once you’re done adding items to your order, at the bottom, tap the cart summary to view a list of items currently added to the order.
Note: If a pre-checkout item prompt appears, select additional items as needed. In some cases, selecting an item may be mandatory.
- (Optional) To update an item’s details or modifiers from the cart view, tap the item, then make your changes. Tap Update to save.
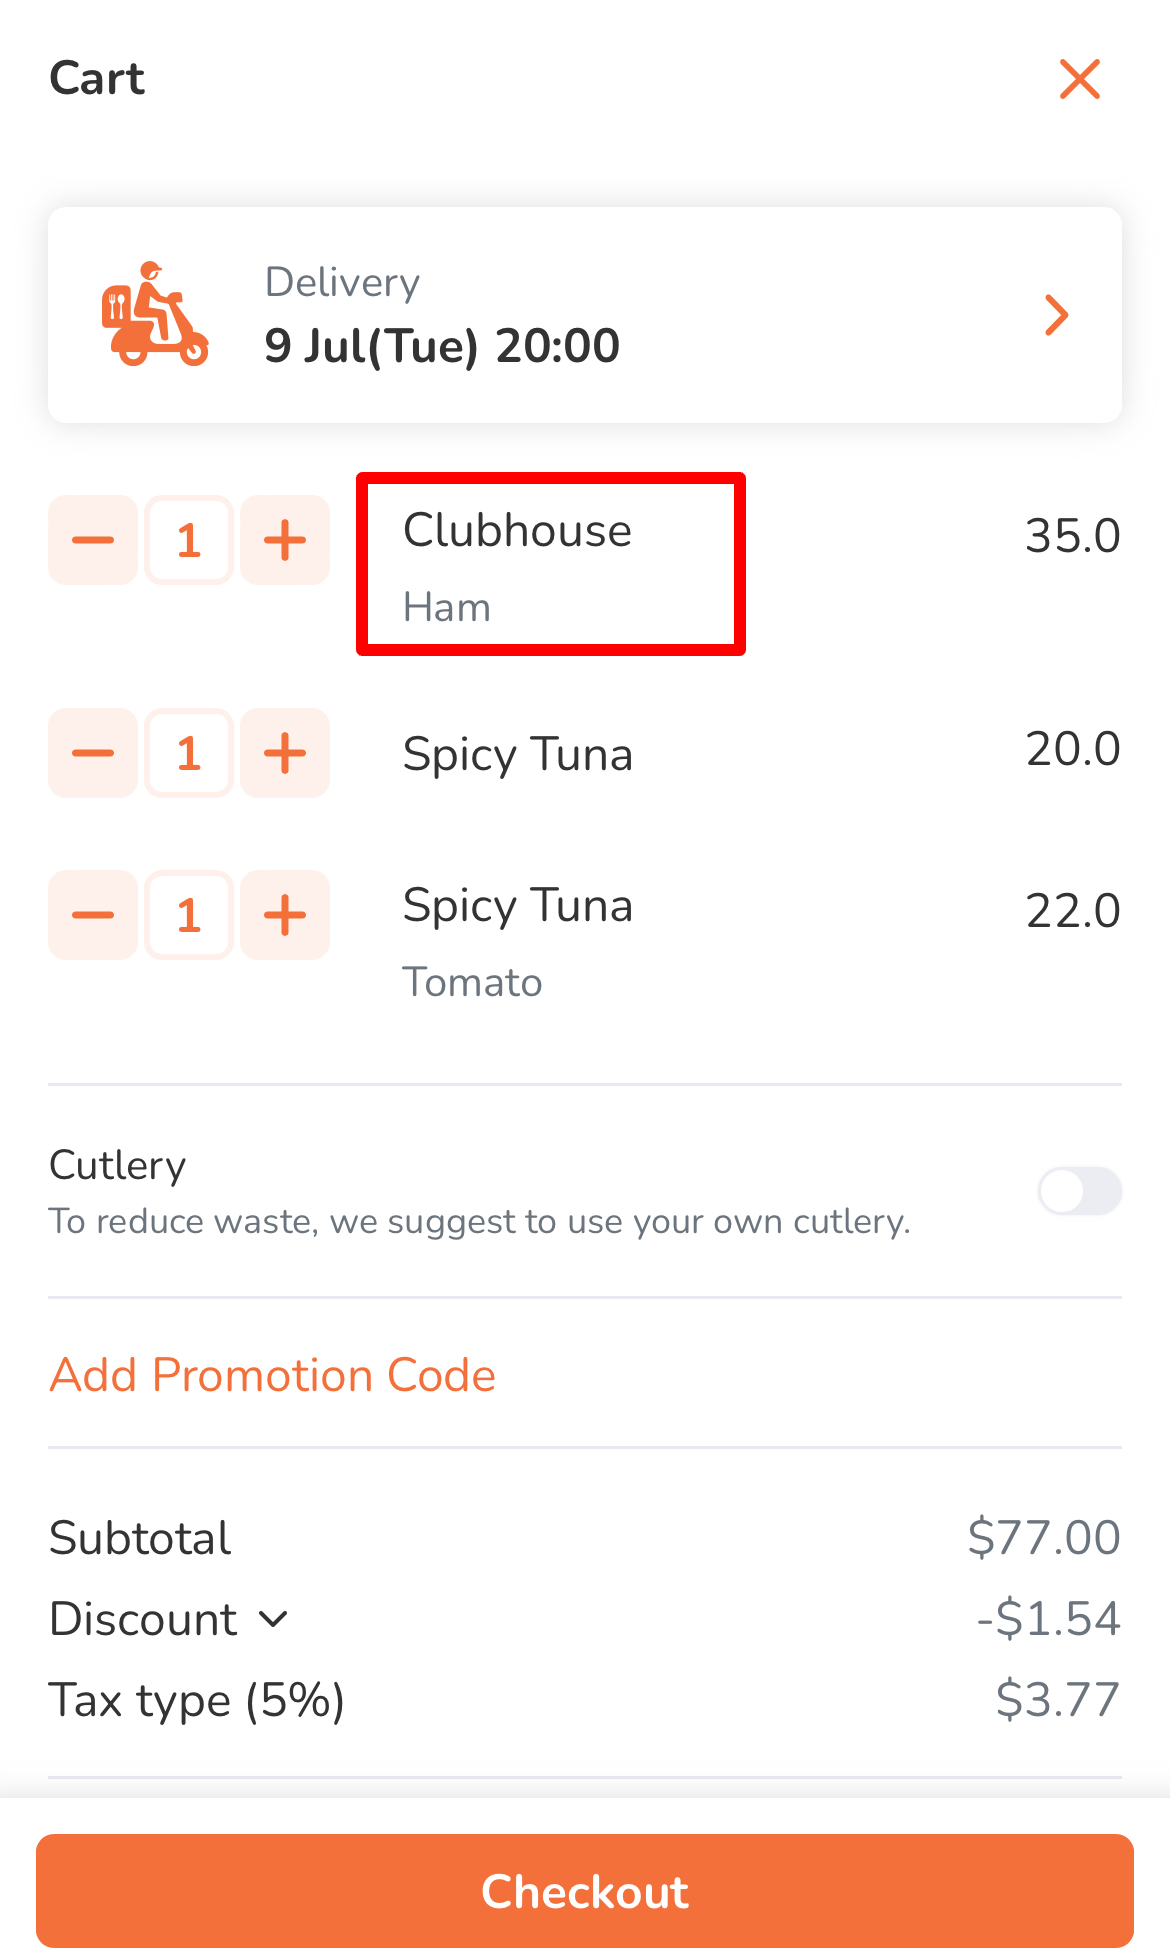
- (Optional) To add a discount to your order, tap Promotion or Add Promotion Code, depending on what's available on-screen. Then, enter a valid promotion code or select a valid promotion from the list. Tap Apply to confirm.
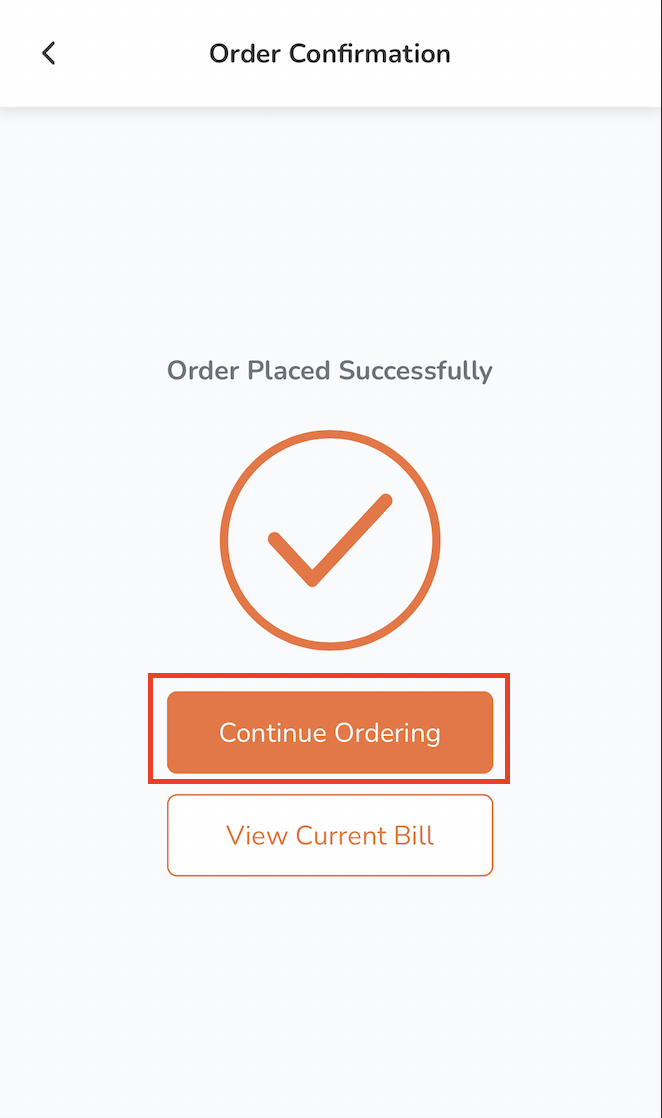
Tip: You can also choose from the list of eligible promotions. - Tap Place Order to confirm your order. You’ll be redirected to the "Order Confirmation" page.
- If you need to add more items to your order, tap Continue Ordering.
- To check your current bill, tap View Current Bill.
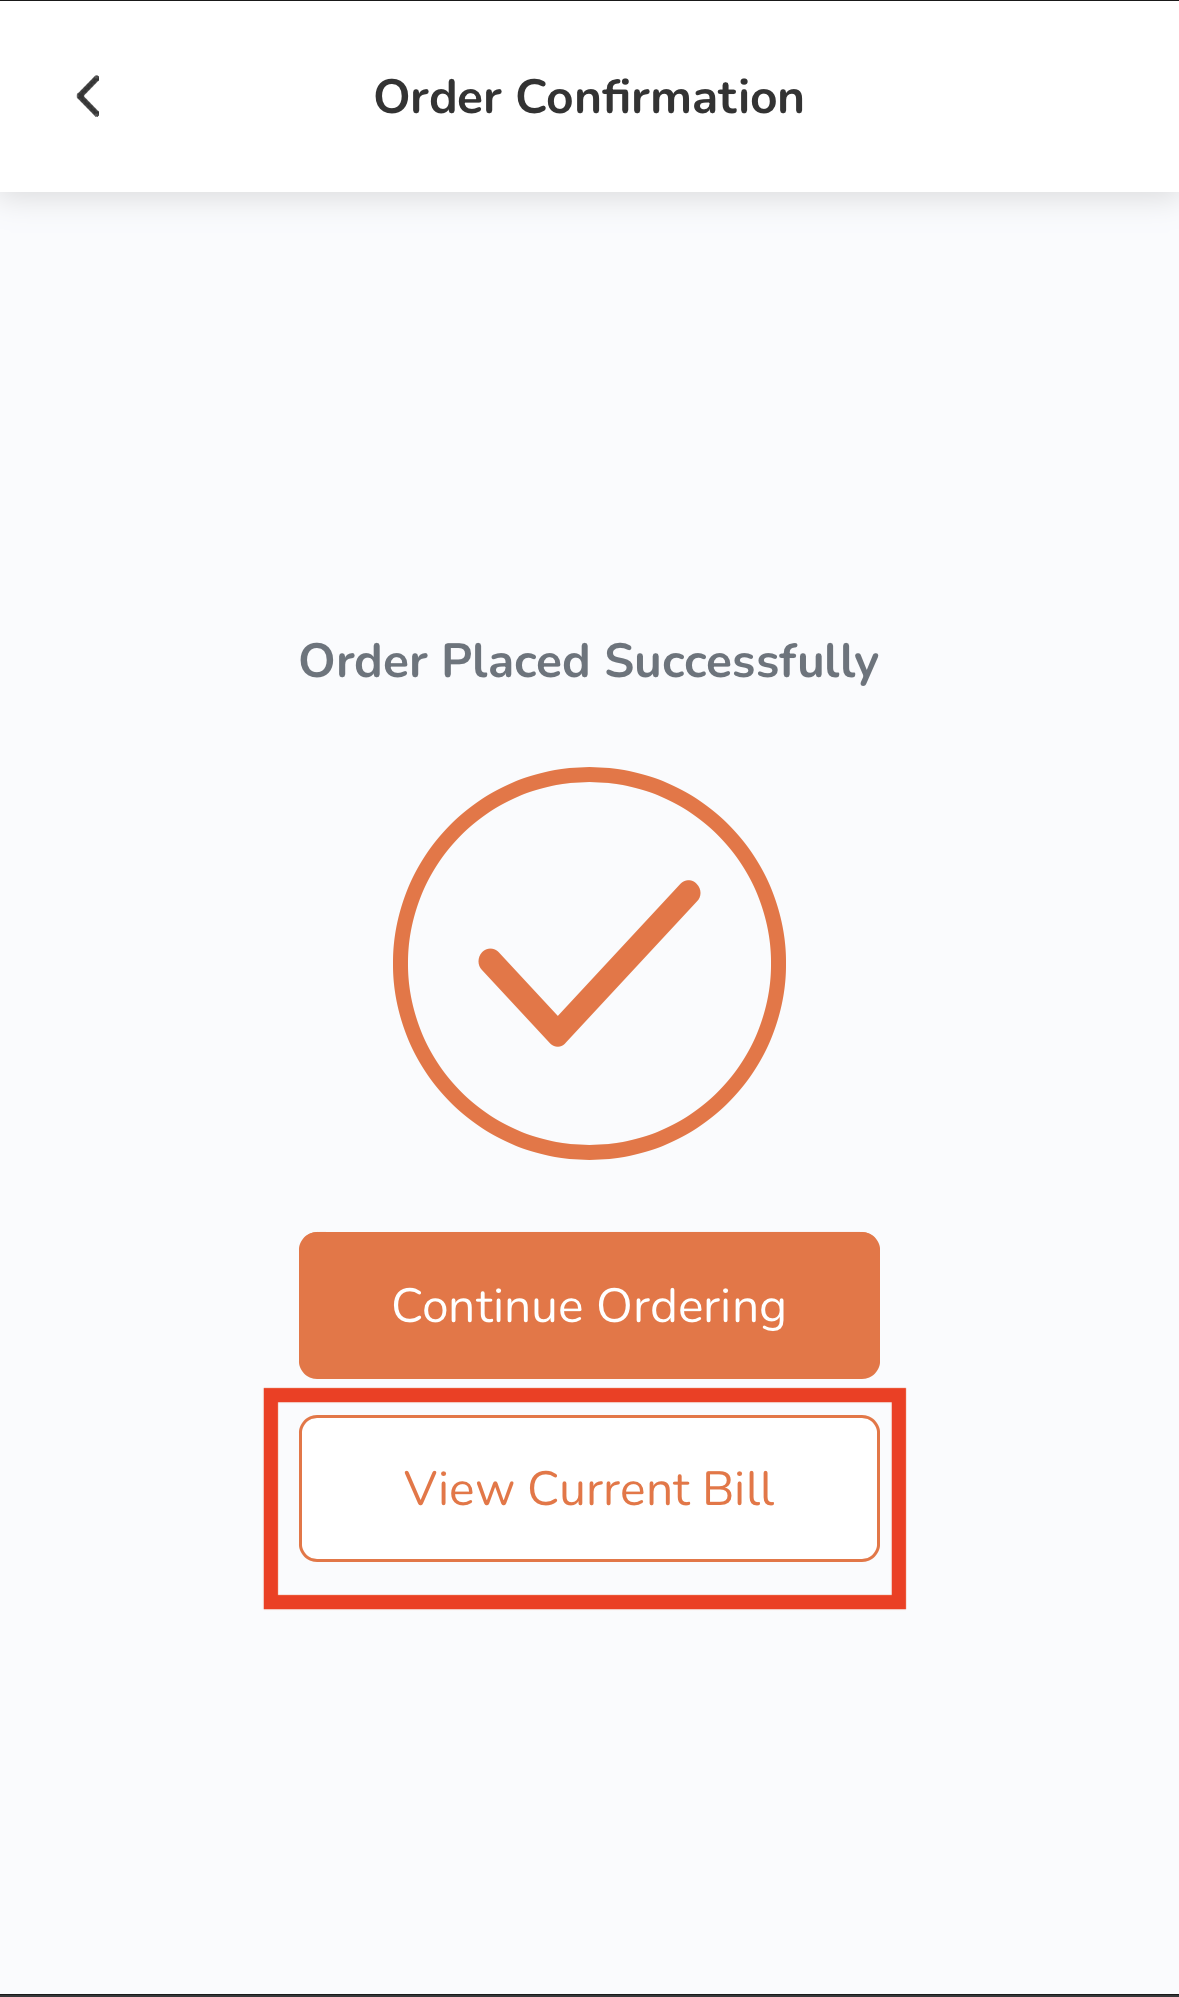
Tip: Once ready for payment, you can present the QR code displayed on the bill page (if available) to the cashier to initiate the payment for your order.
- Once the order has been placed, you can check your remaining ordering time and dining time at the top of the ordering dine-in menu screen.
Note: The restaurant must have this feature enabled to check the ordering and dining time on the branded online store.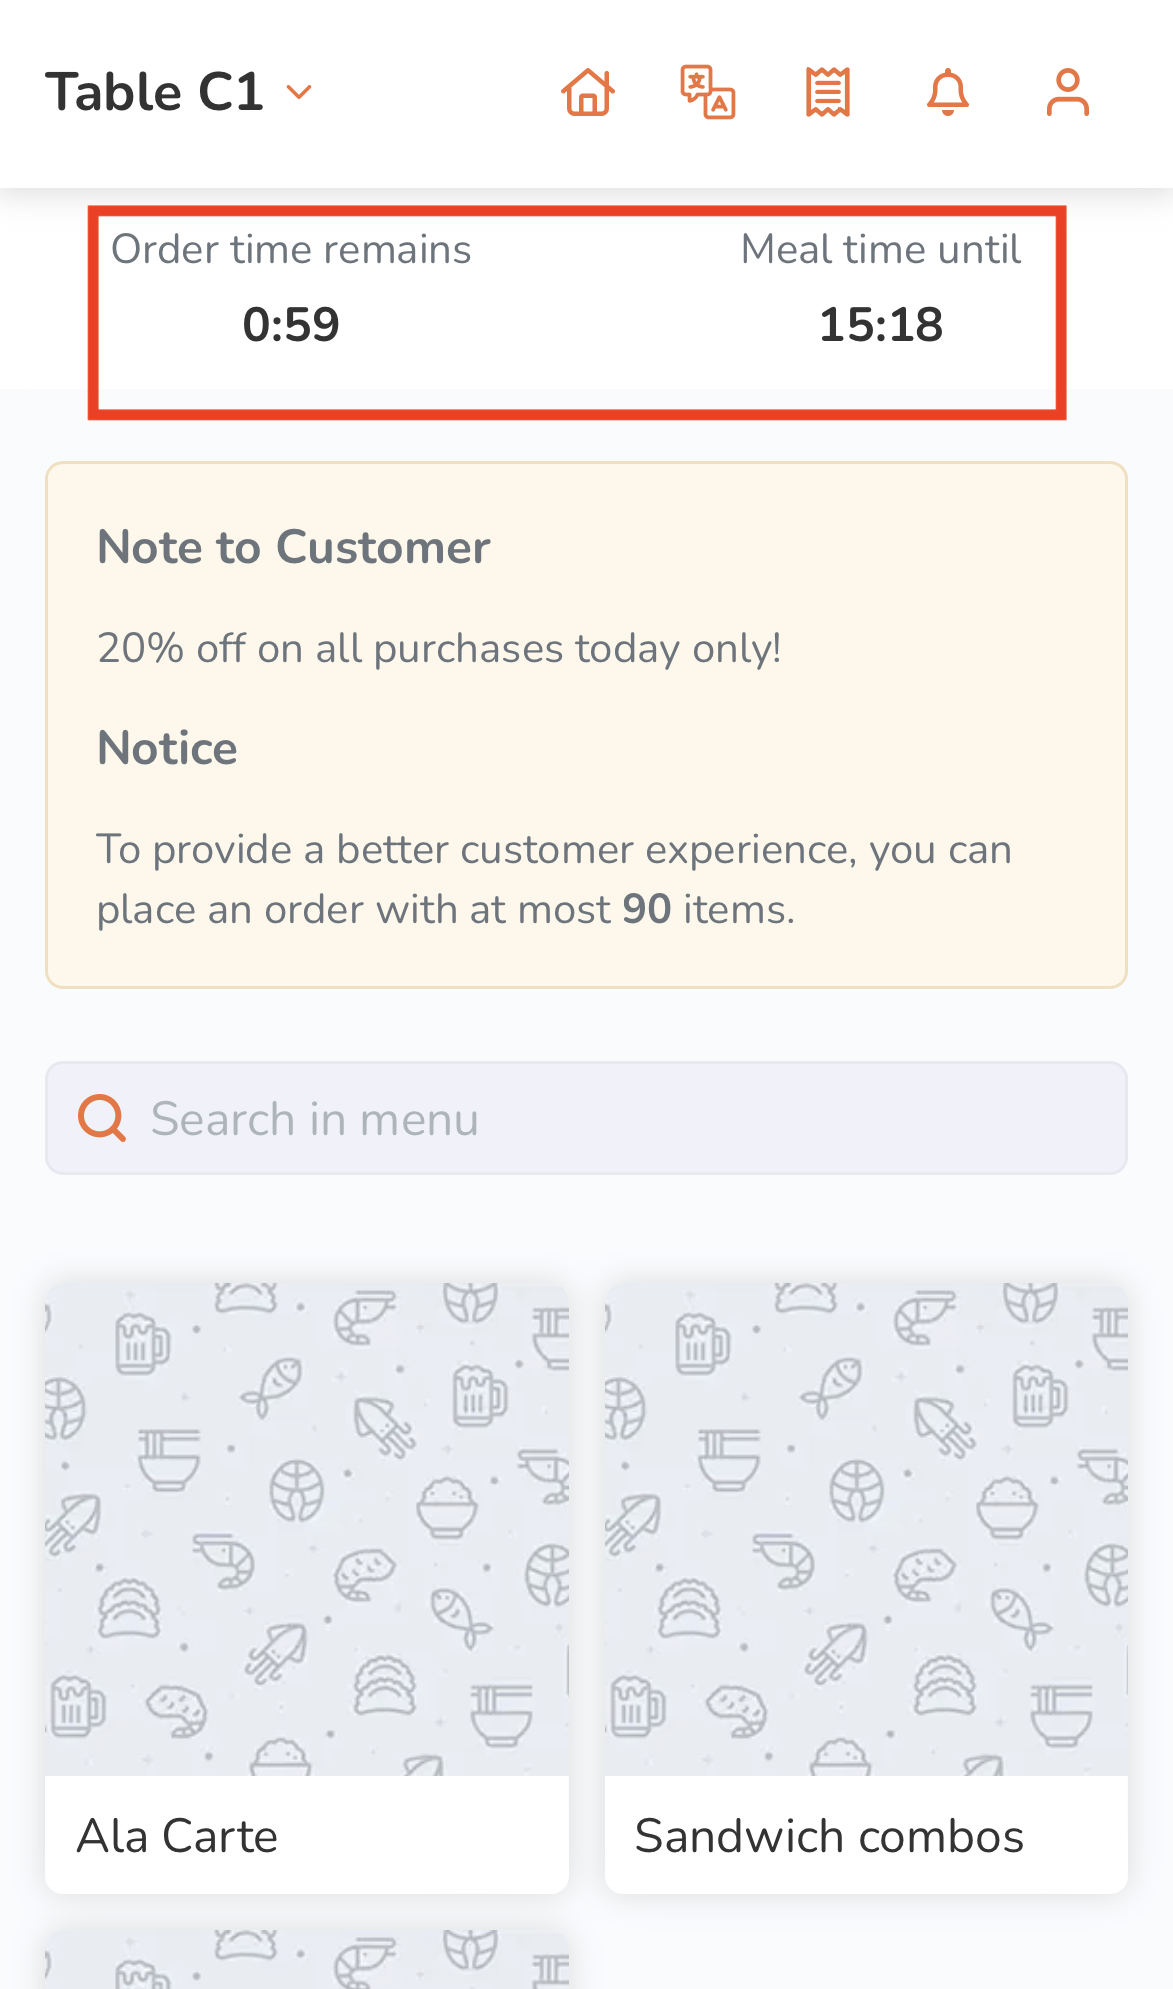
Delivery
- On your mobile device’s browser, visit the restaurant’s branded online store website.
- (Optional) If you have an account on the branded online store, log in to your account to associate your order with your account. Otherwise, you can proceed with placing your order as a guest.
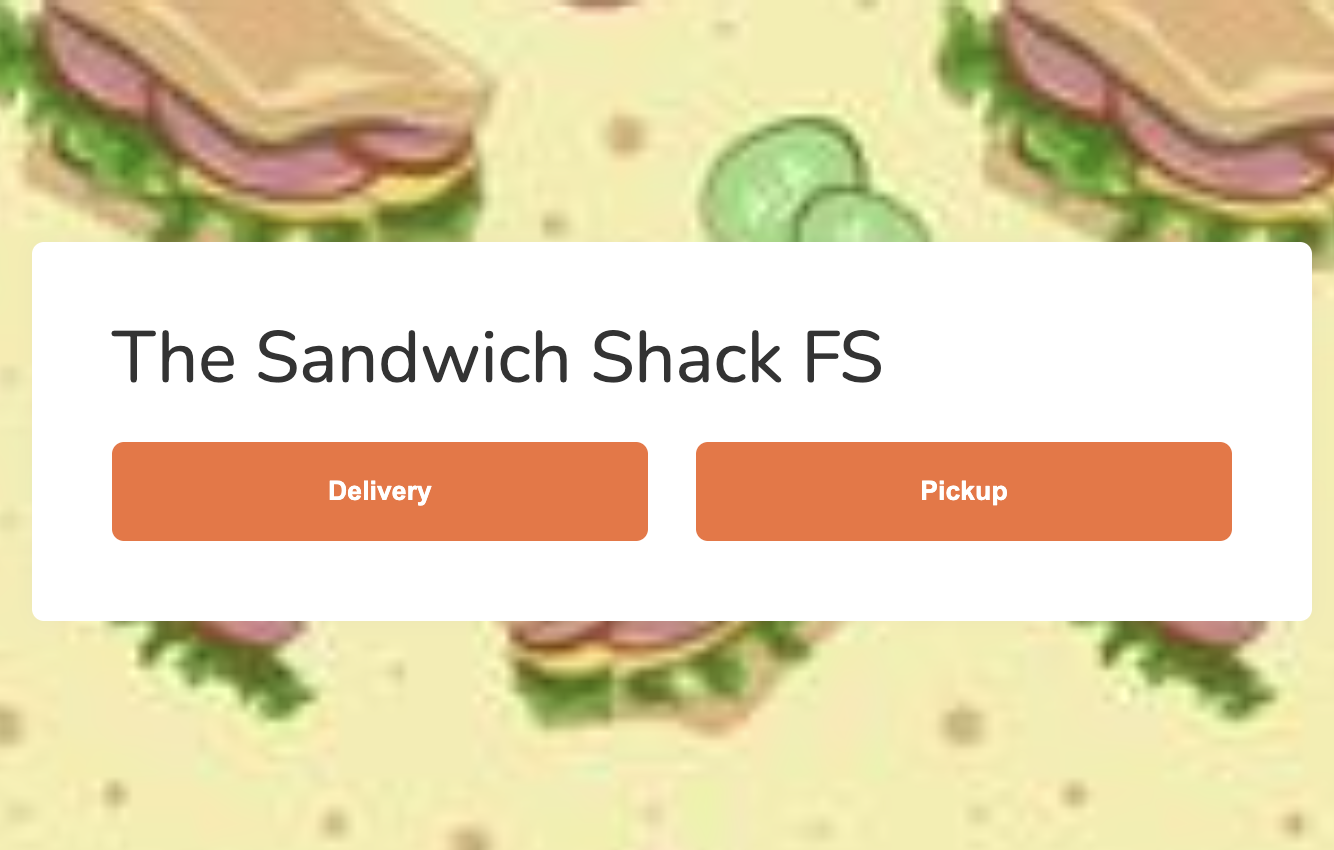
Note: The restaurant must enable guest ordering to place an order without logging in to the branded online store. - On the main page, select Delivery.
Note: The service selection interface varies depending on your configured Branded Online Store "Ordering Site Settings" preferences. - Select your delivery location.
Tip: If you have a delivery saved in the "Delivery Address Book," you can tap the empty field to show the saved delivery address.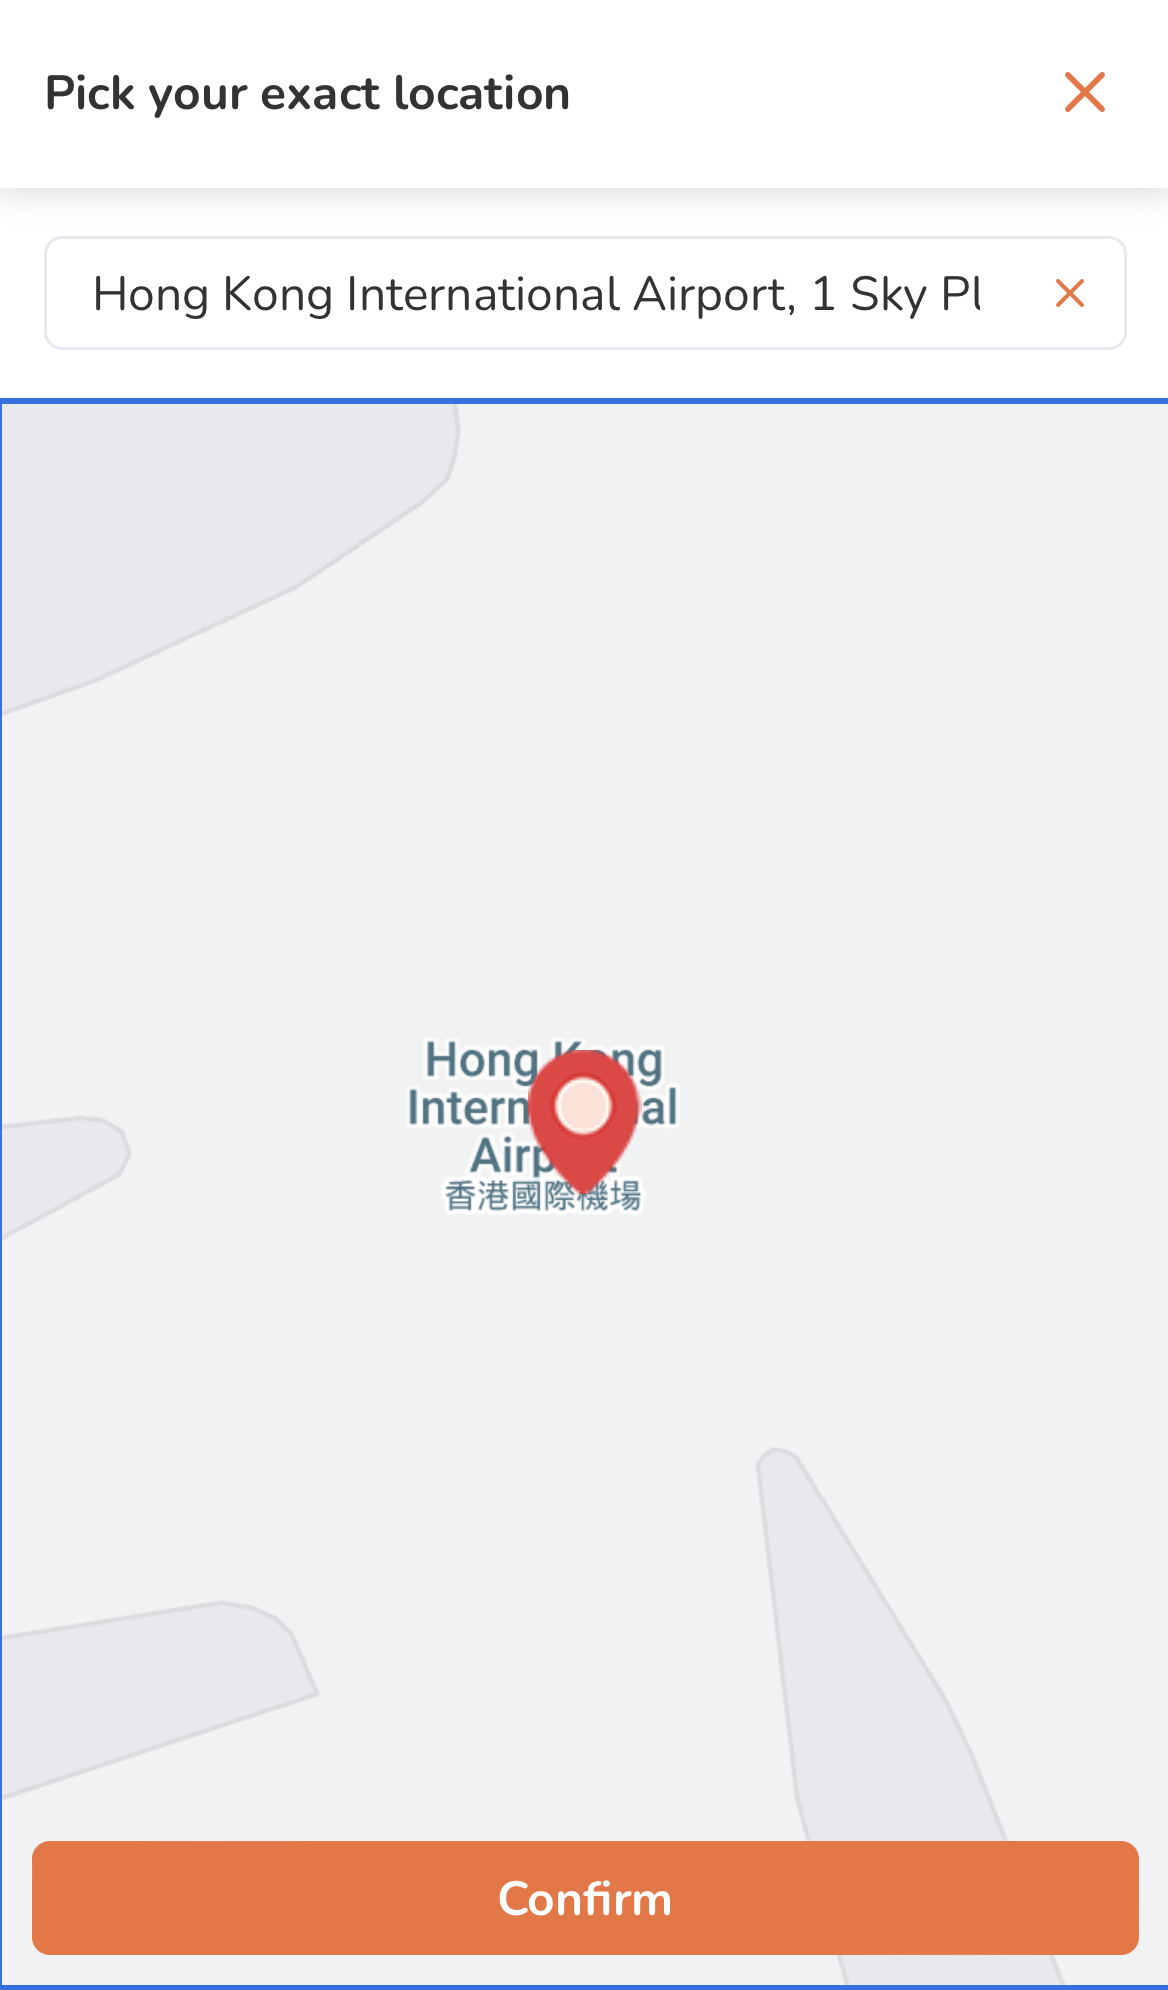
- Tap Confirm to proceed.
- Select the time when you want the order to be delivered.
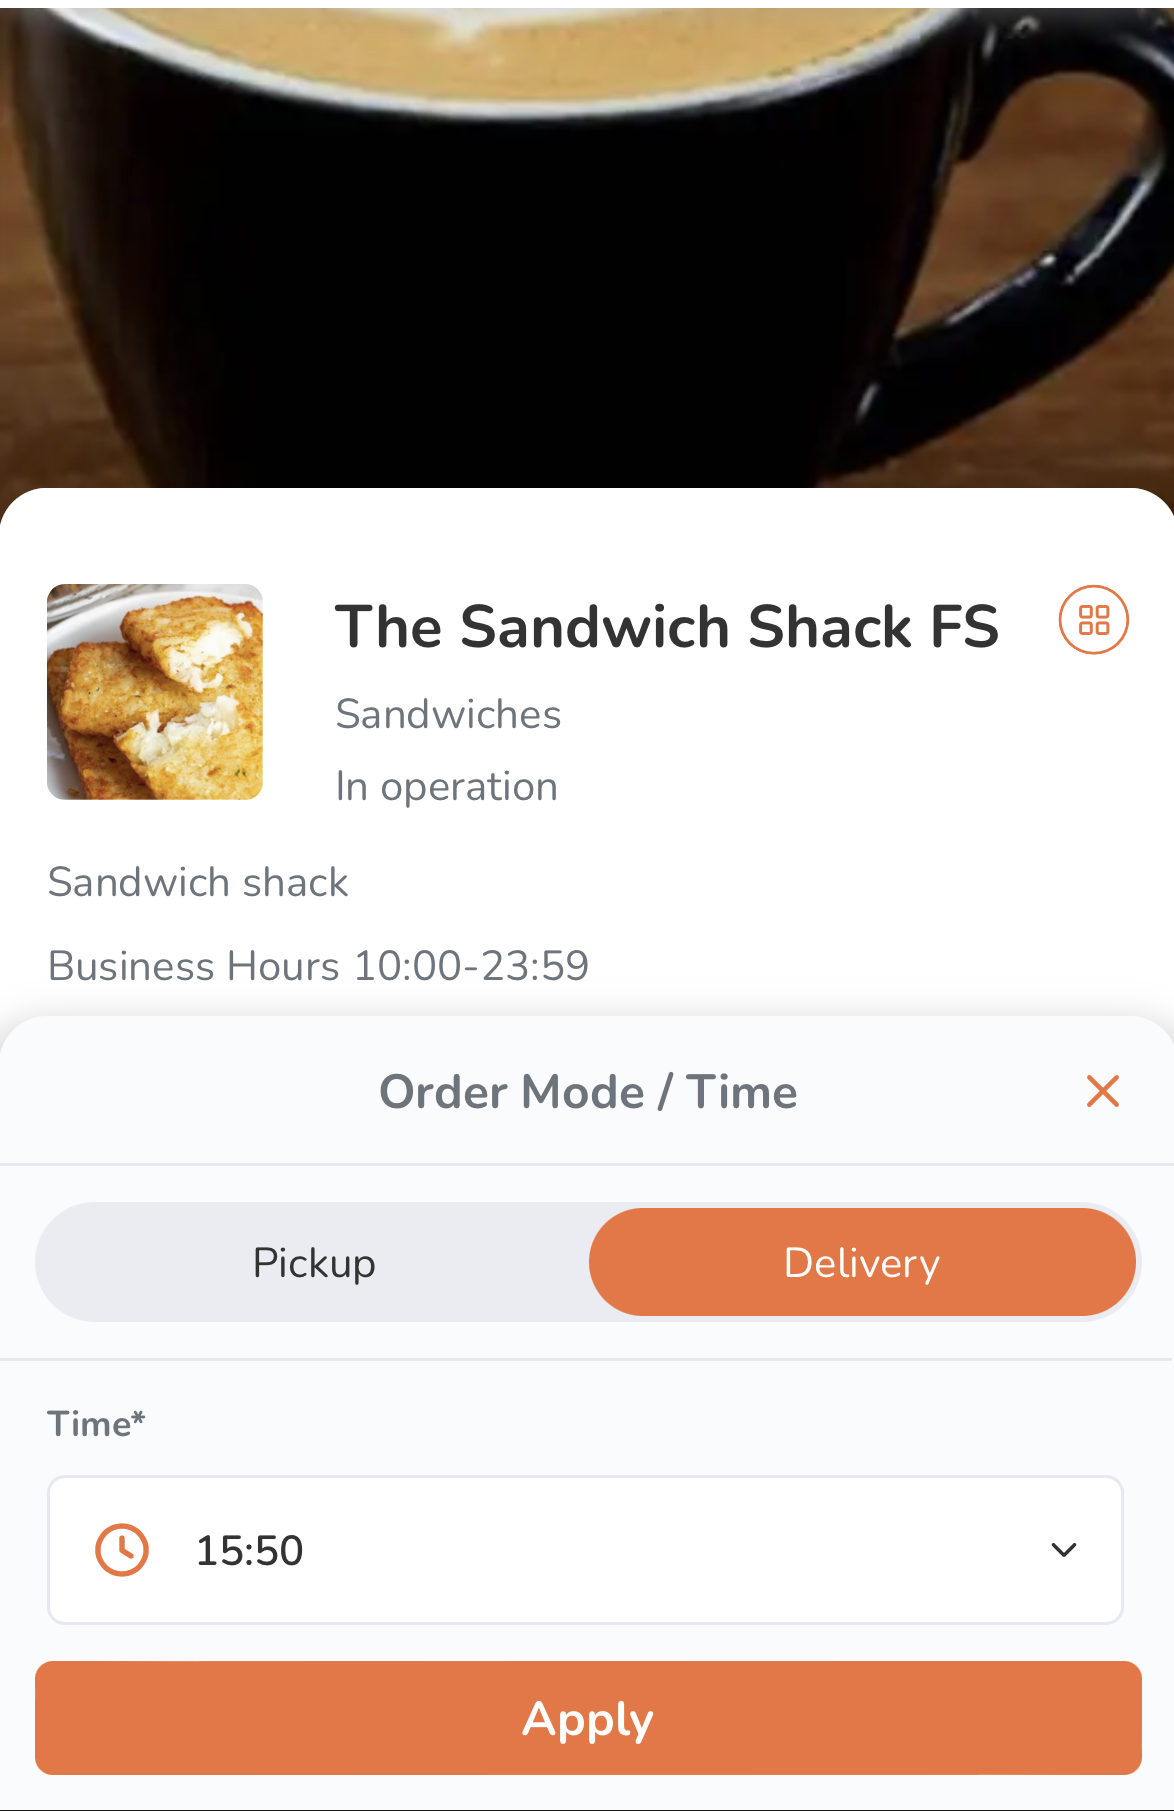
- Tap Apply.
- Search for the item you want to add to the order. You can do any of the following to filter menu items:
- Tap a category to browse through the different menu items available to order.
- Tap the search field above the categories and then enter the item that you want to add to the order.
- Filter orders based on available preferences, such as dietary restrictions, most popular items, and recommended items.
- Tap a category to browse through the different menu items available to order.
- To add an item to an order, tap the item.
Note: You can purchase plan-exclusive items if you’re subscribed to the required plan.- If the order has modifiers available, select from the available modifiers to customize your order. Then, tap Add.
Note: Depending on the item’s total price, the Add button changes. For example, if the total price is $35, the button shows up as Add for $35.0.
- If the item is a combo item, choose an option for each item included in the combo to customize your order. Then, tap Add.
Note:- Depending on the item’s total price, the Add button changes. For example, if the total price is $35, the button shows up as Add for $35.0.
- If "Enable Auto Select Next Combo Option" is turned on, the screen automatically scrolls down to the next combo option to select, after an option for an item included in the combo is selected.
- To add a special request for an item, in the "Special Requests" field, enter your request.
- If the order has modifiers available, select from the available modifiers to customize your order. Then, tap Add.
- Once you’re done adding items to your order, at the bottom, tap the cart summary to view a list of items currently added to the order.
Note: If a pre-checkout item prompt appears, select additional items as needed. In some cases, selecting an item may be mandatory.
- (Optional) To update an item’s details or modifiers from the cart view, tap the item, then make your changes. Tap Update to save.
- (Optional) To add a discount to your order, tap Promotion or Add Promotion Code, depending on what's available on-screen. Then, enter a valid promotion code or select a valid promotion from the list. Tap Apply to confirm.
Tip: You can also choose from the list of eligible promotions. - At the bottom, tap Checkout to proceed with payment.
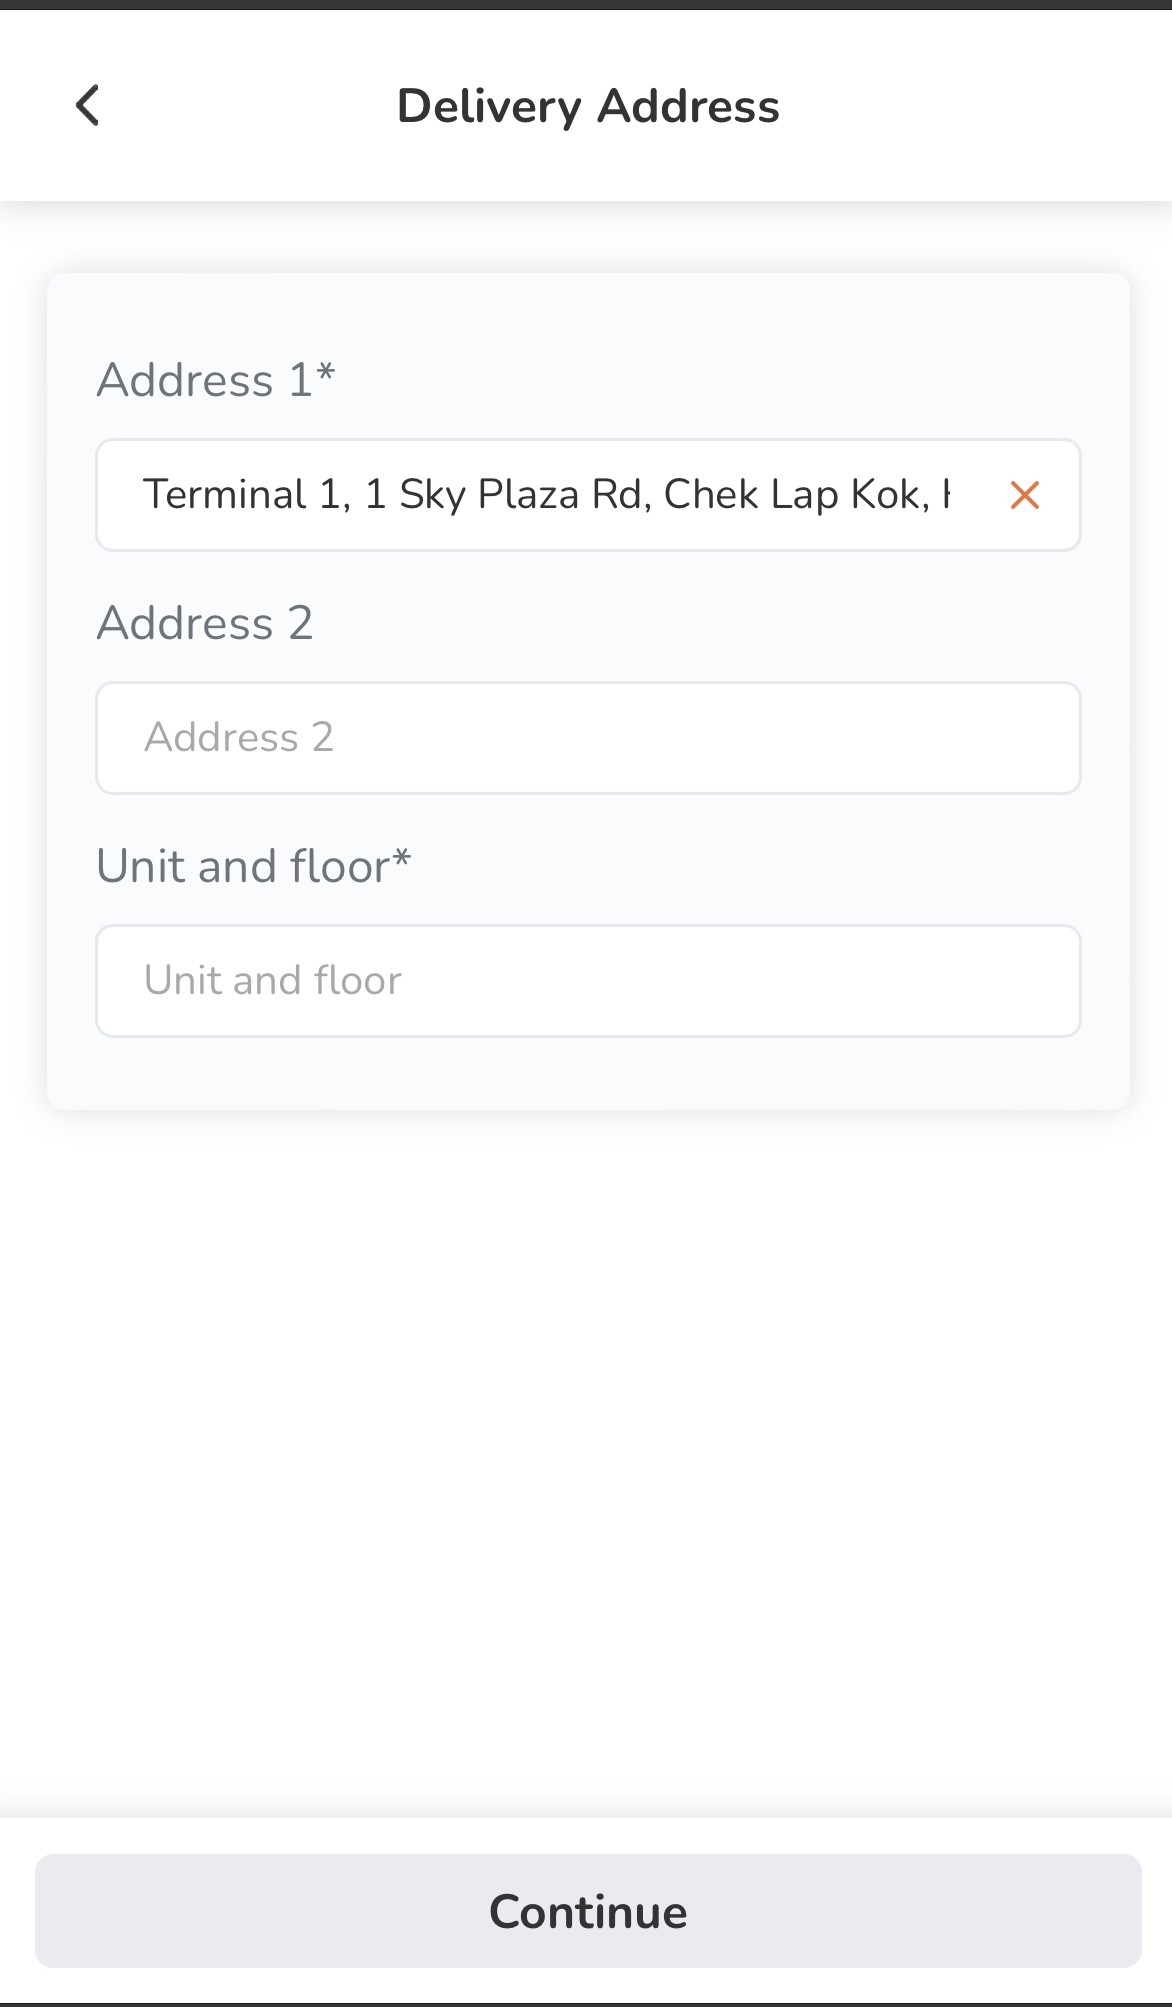
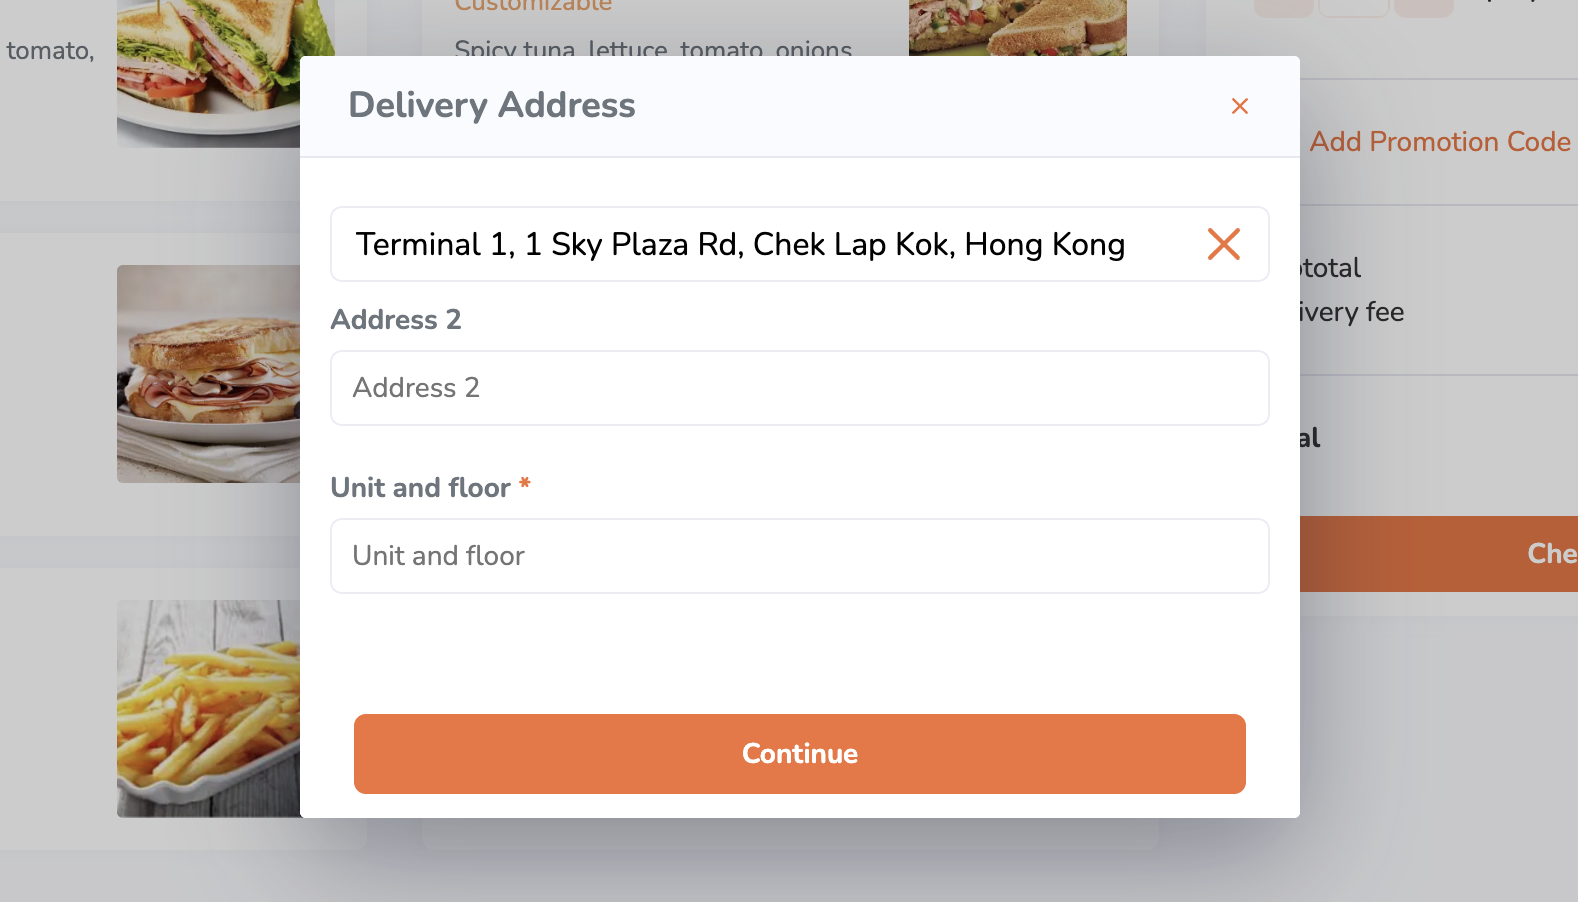
- Enter your complete delivery address. Then, tap Continue.
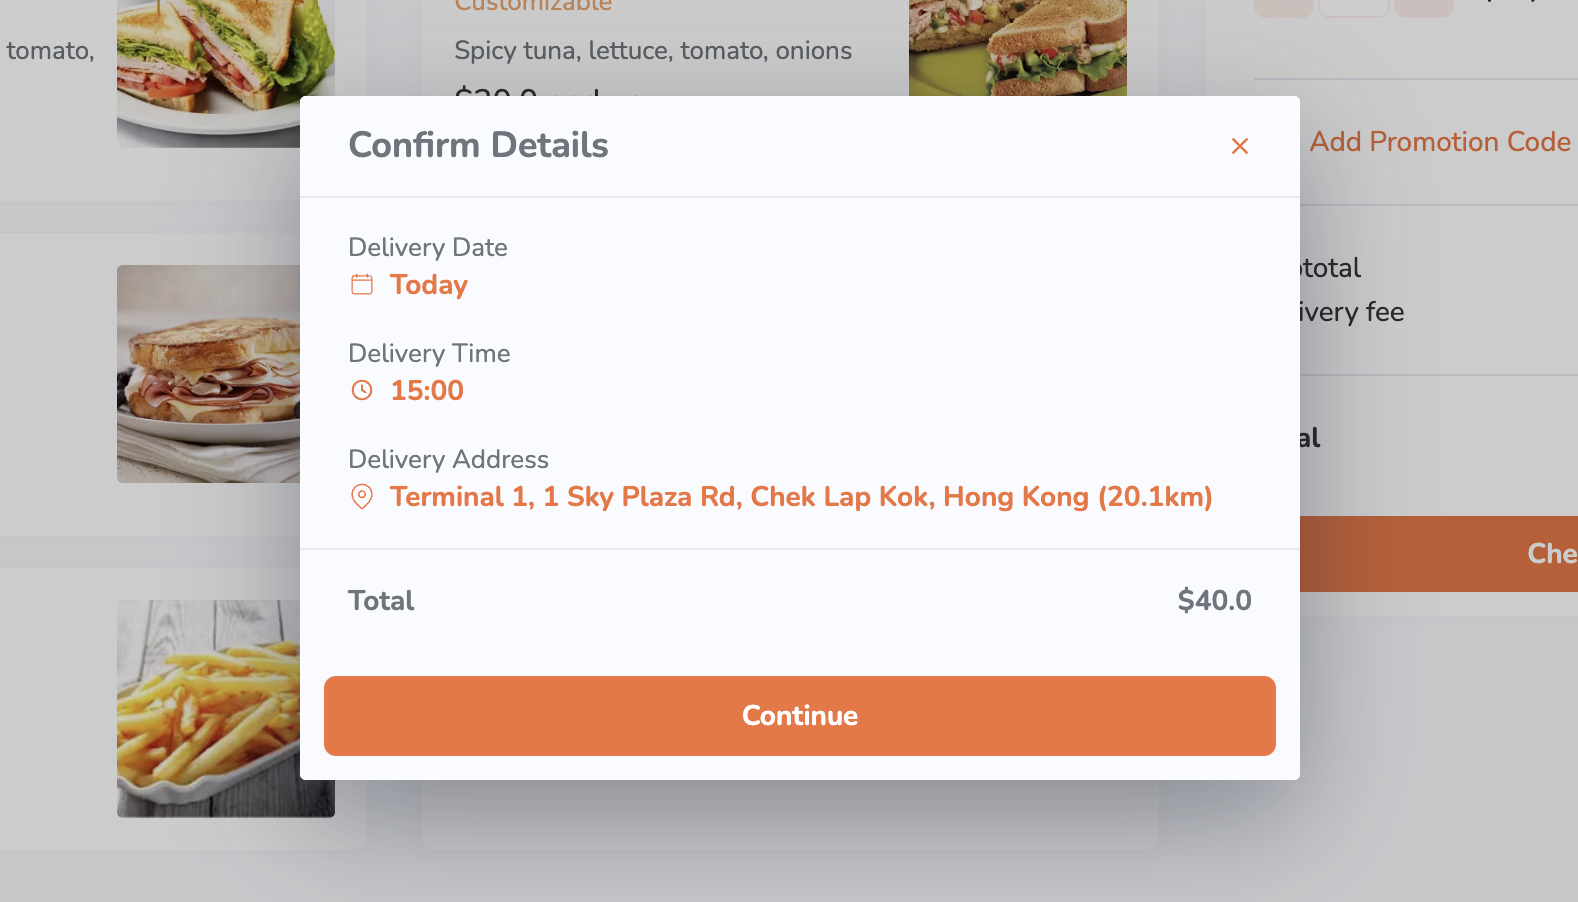
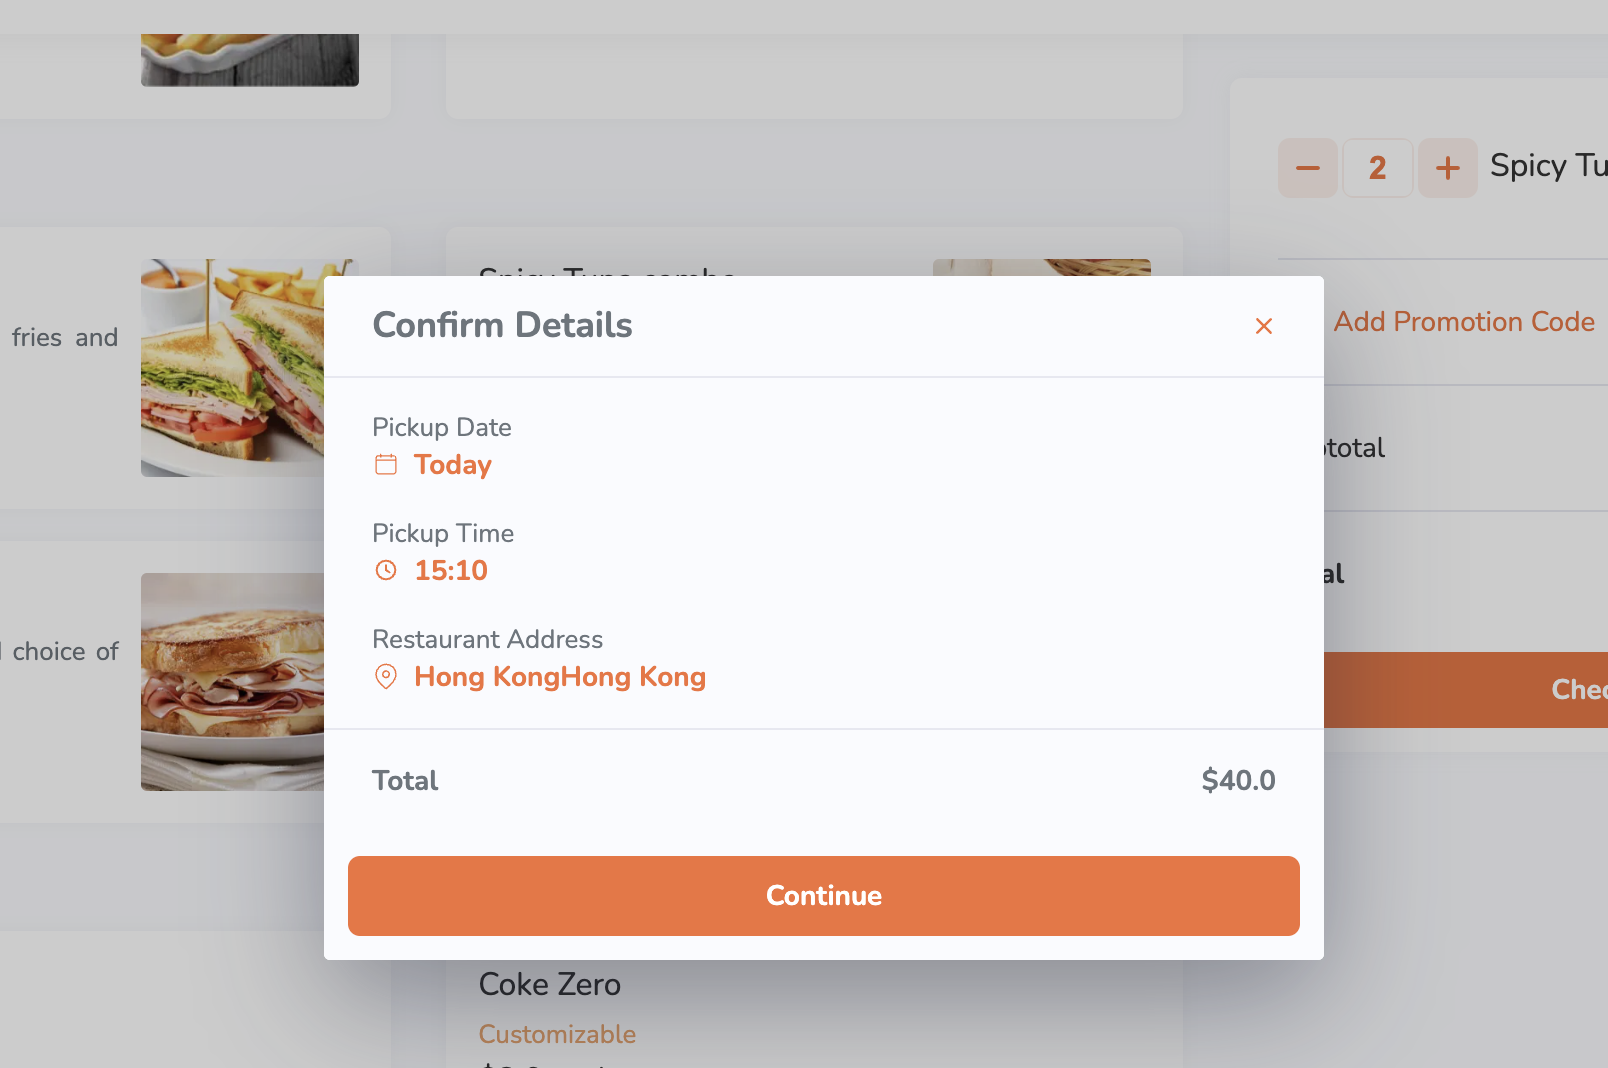
- Check that the delivery date, time, and address are correct. Tap Confirm to proceed.
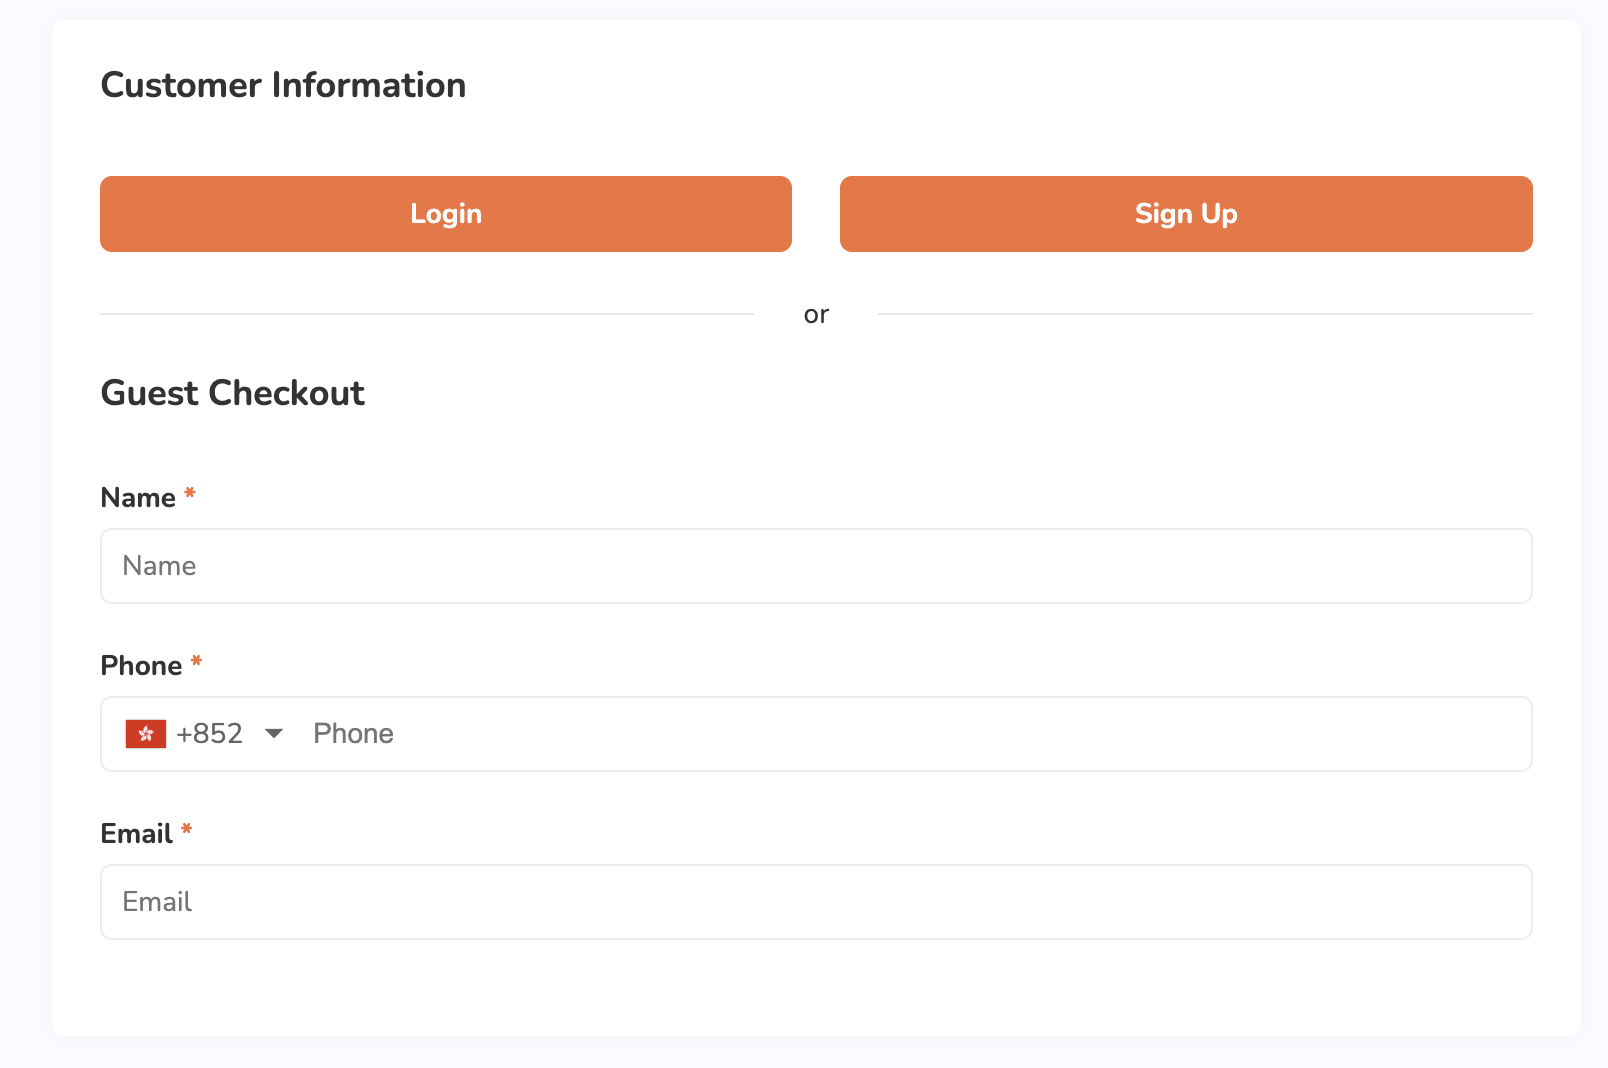
- If you are placing an order as a guest, under "Guest Checkout," enter your contact information.
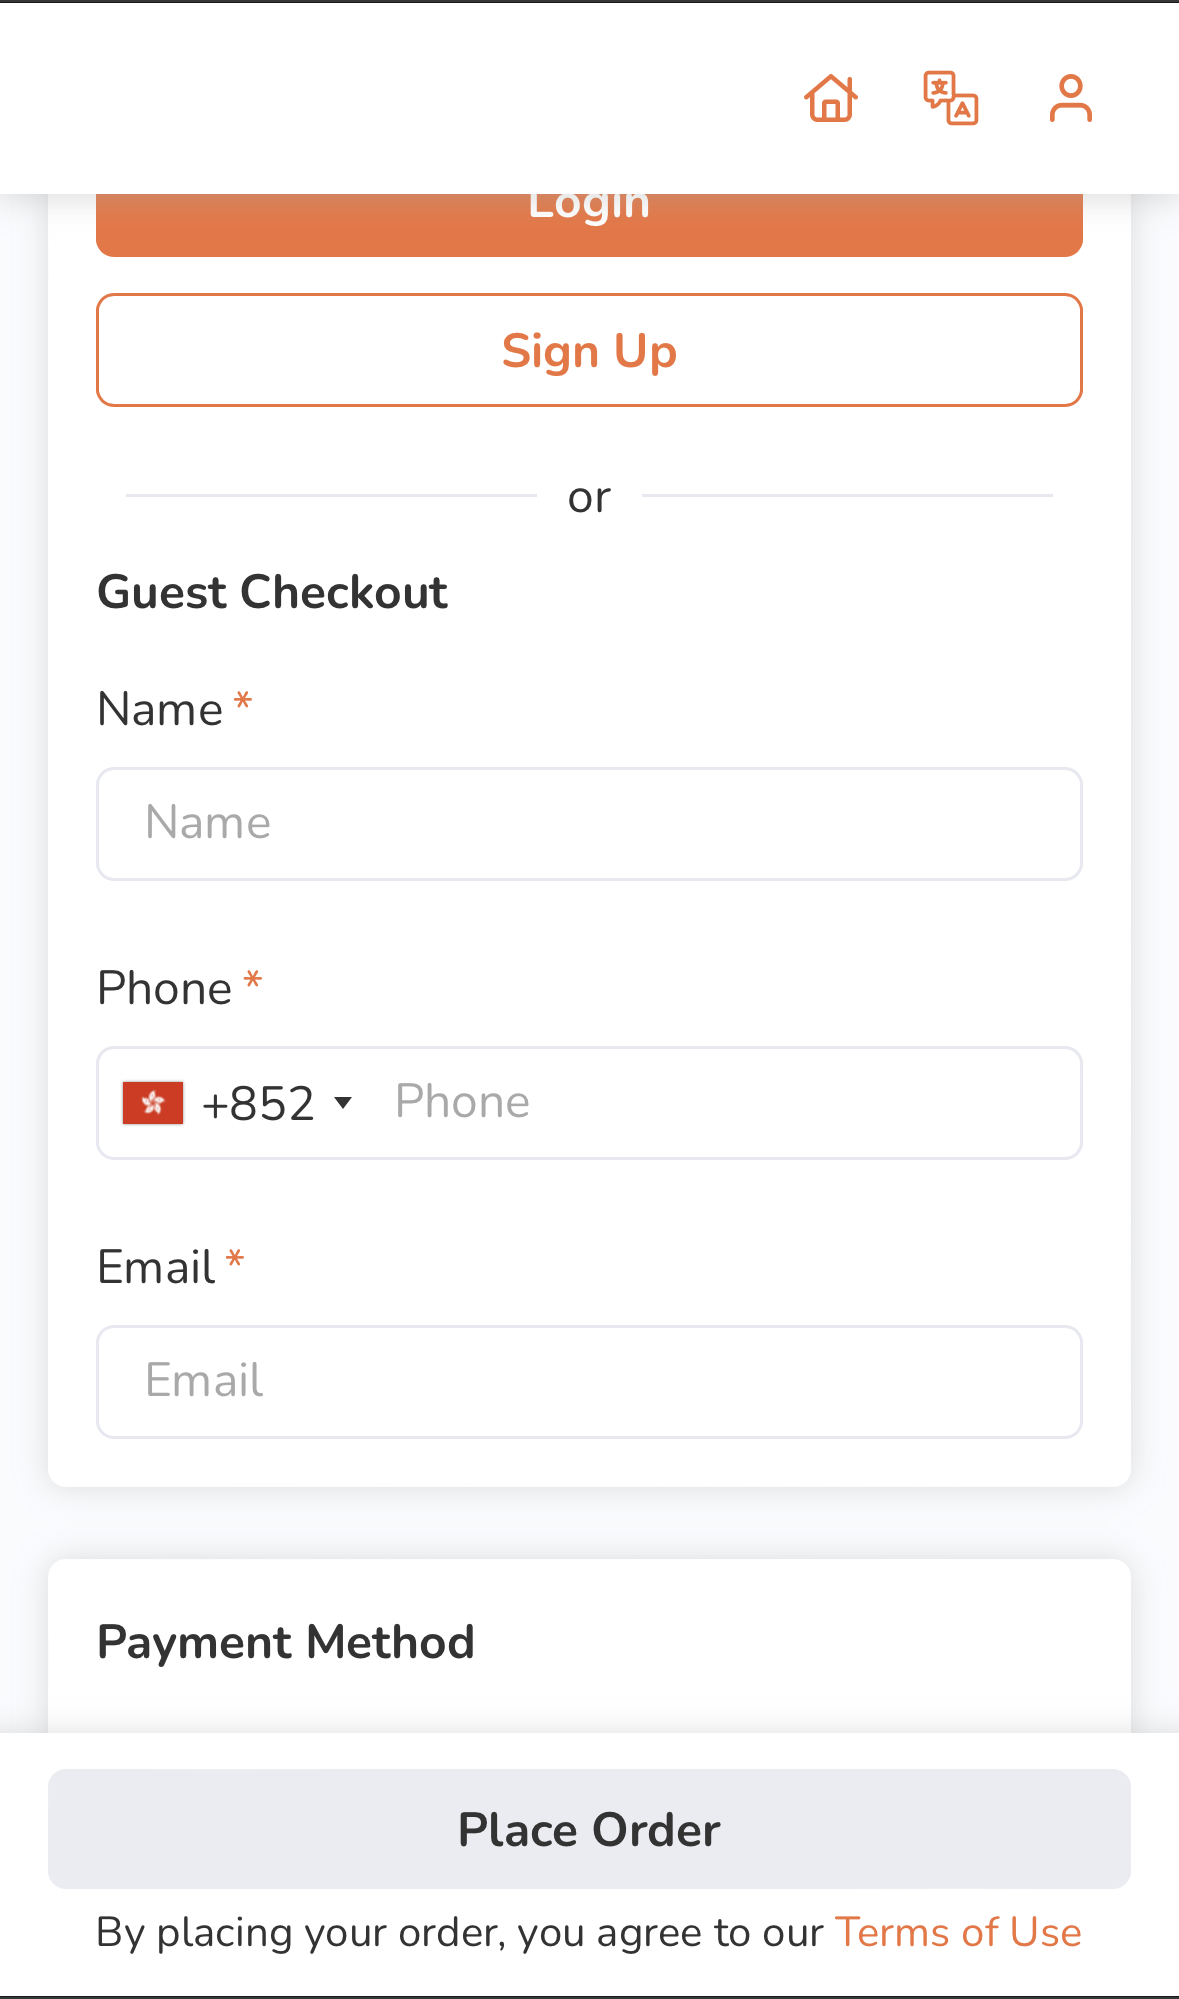
- Under "Payment Method," select the payment method you want to use to pay for the order.

- To add a tip, select from the available tip options.
- Tap Place Order to finish placing the order.
Pickup
- On your mobile device’s browser, visit the restaurant’s branded online store website.
- (Optional) If you have an account on the branded online store, log in to your account to associate your order with your account. Otherwise, you can proceed with placing your order as a guest.
Note: The restaurant must enable guest ordering to place an order without logging in to the branded online store. - On the main page, select Pickup.
Note: The service selection interface varies depending on your configured Branded Online Store "Ordering Site Settings" preferences. - Select the time when you want the order to be picked up.
- Tap Apply.
- Search for the item you want to add to the order. You can do any of the following to filter menu items:
- Tap a category to browse through the different menu items available to order.
- Tap the search field above the categories and then enter the item that you want to add to the order.
- Filter orders based on available preferences, such as dietary restrictions, most popular items, and recommended items.
- Tap a category to browse through the different menu items available to order.
- To add an item to an order, tap the item.
Note: You can purchase plan-exclusive items if you’re subscribed to the required plan.- If the order has modifiers available, select from the available modifiers to customize your order. Then, tap Add.
Note: Depending on the item’s total price, the Add button changes. For example, if the total price is $35, the button shows up as Add for $35.0.
- If the item is a combo item, choose an option for each item included in the combo to customize your order. Then, tap Add.
Note:- Depending on the item’s total price, the Add button changes. For example, if the total price is $35, the button shows up as Add for $35.0.
- If "Enable Auto Select Next Combo Option" is turned on, the screen automatically scrolls down to the next combo option to select, after an option for an item included in the combo is selected.
- To add a special request for an item, on the "Special Requests" field, enter your request.
- If the order has modifiers available, select from the available modifiers to customize your order. Then, tap Add.
- Once you’re done adding items to your order, at the bottom, tap the cart summary to view a list of items currently added to the order.
Note: If a pre-checkout item prompt appears, select additional items as needed. In some cases, selecting an item may be mandatory.
- (Optional) To update an item’s details or modifiers from the cart view, tap the item, then make your changes. Tap Update to save.
- (Optional) To add a discount to your order, tap Promotion or Add Promotion Code, depending on what's available on-screen. Then, enter a valid promotion code or select a valid promotion from the list. Tap Apply to confirm.
Tip: You can also choose from the list of eligible promotions. - At the bottom, tap Checkout to proceed with payment.
- Check that the pickup date and time are correct. Tap Confirm to proceed.
- If you are placing an order as a guest, under "Guest Checkout," enter your contact information.
- Under "Payment Method," select the payment method you want to use to pay for the order.
- To add a tip, select from the available tip options.
- Tap Place Order to finish placing the order.
Desktop
Delivery
- On your desktop browser, visit the restaurant’s branded online store website.
- (Optional) If you have an account on the branded online store, log in to your account to associate your order with your account. Otherwise, you can proceed with placing your order as a guest.
Note: The restaurant must enable guest ordering to place an order without logging in to the branded online store. - On the main page, select Delivery.
 Note: The service selection interface varies depending on your configured Branded Online Store "Ordering Site Settings" preferences.
 - Enter your delivery location. Then, click on Start Ordering.
Tip: If you have a delivery saved in the "Delivery Address Book," you can click on the empty field to show the saved delivery address.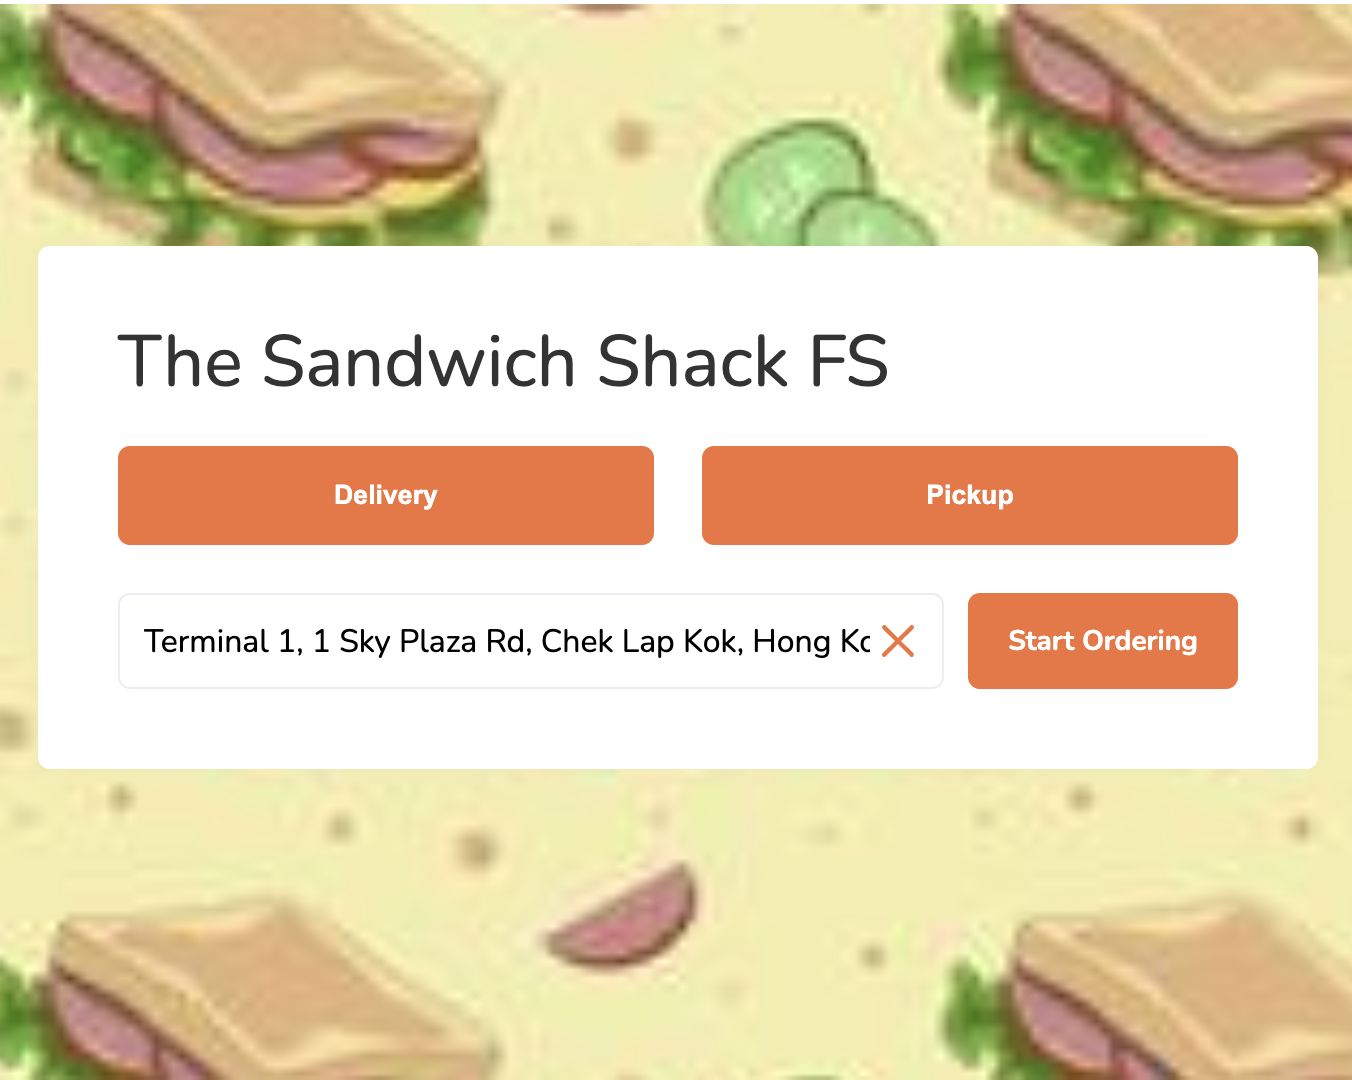
- Select your exact delivery location on the map.
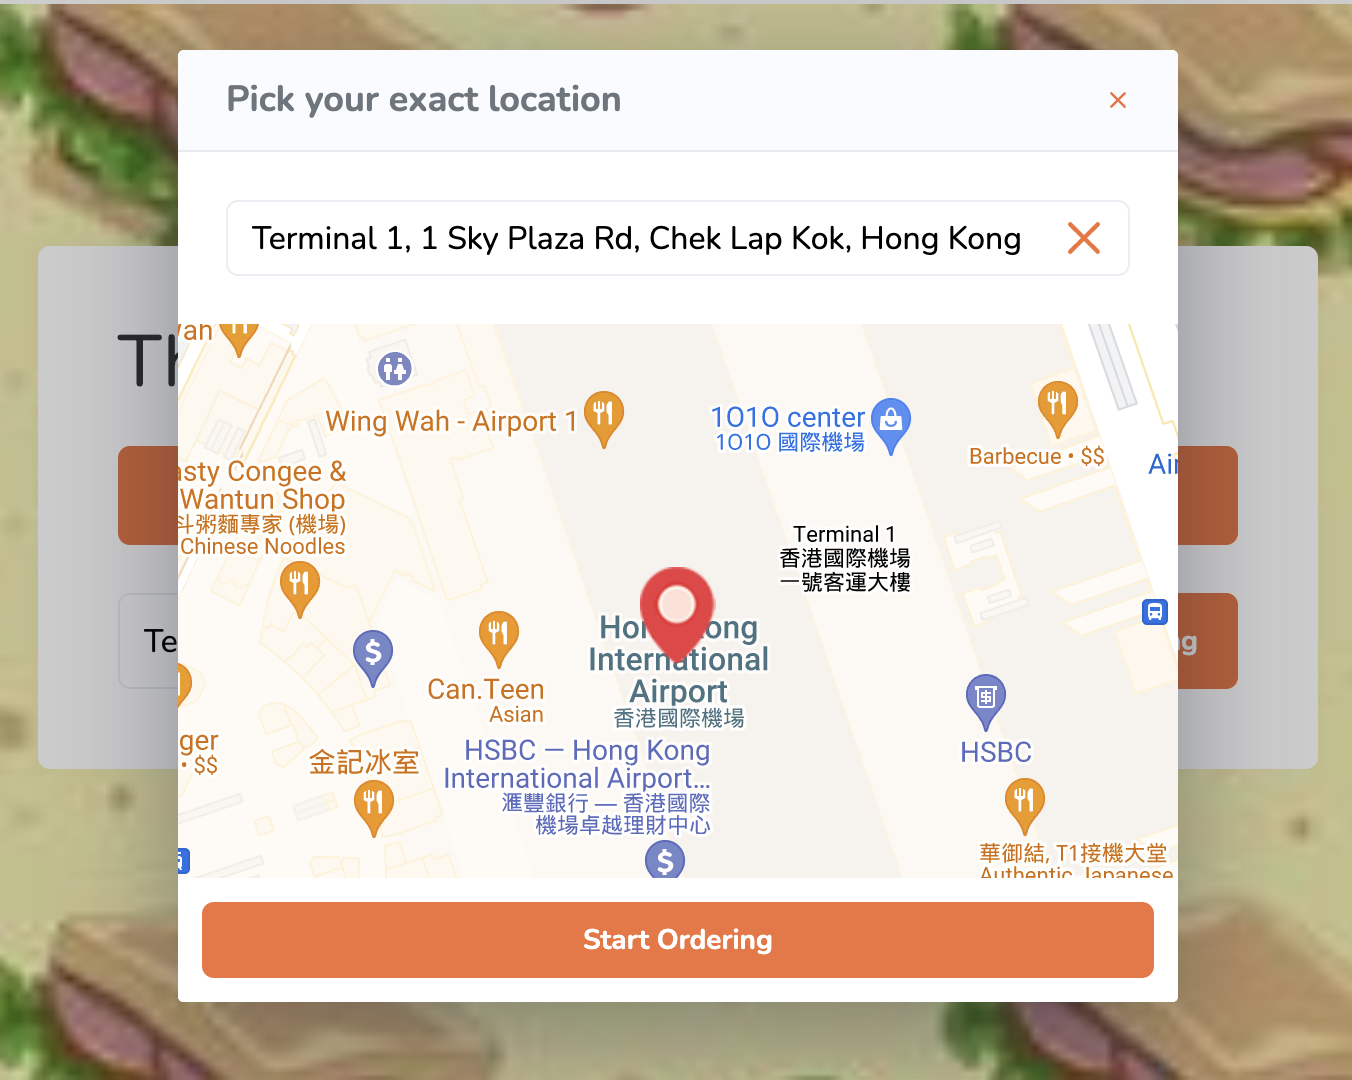
- Click on Start Ordering to proceed.
- Select the time when you want the order to be delivered.
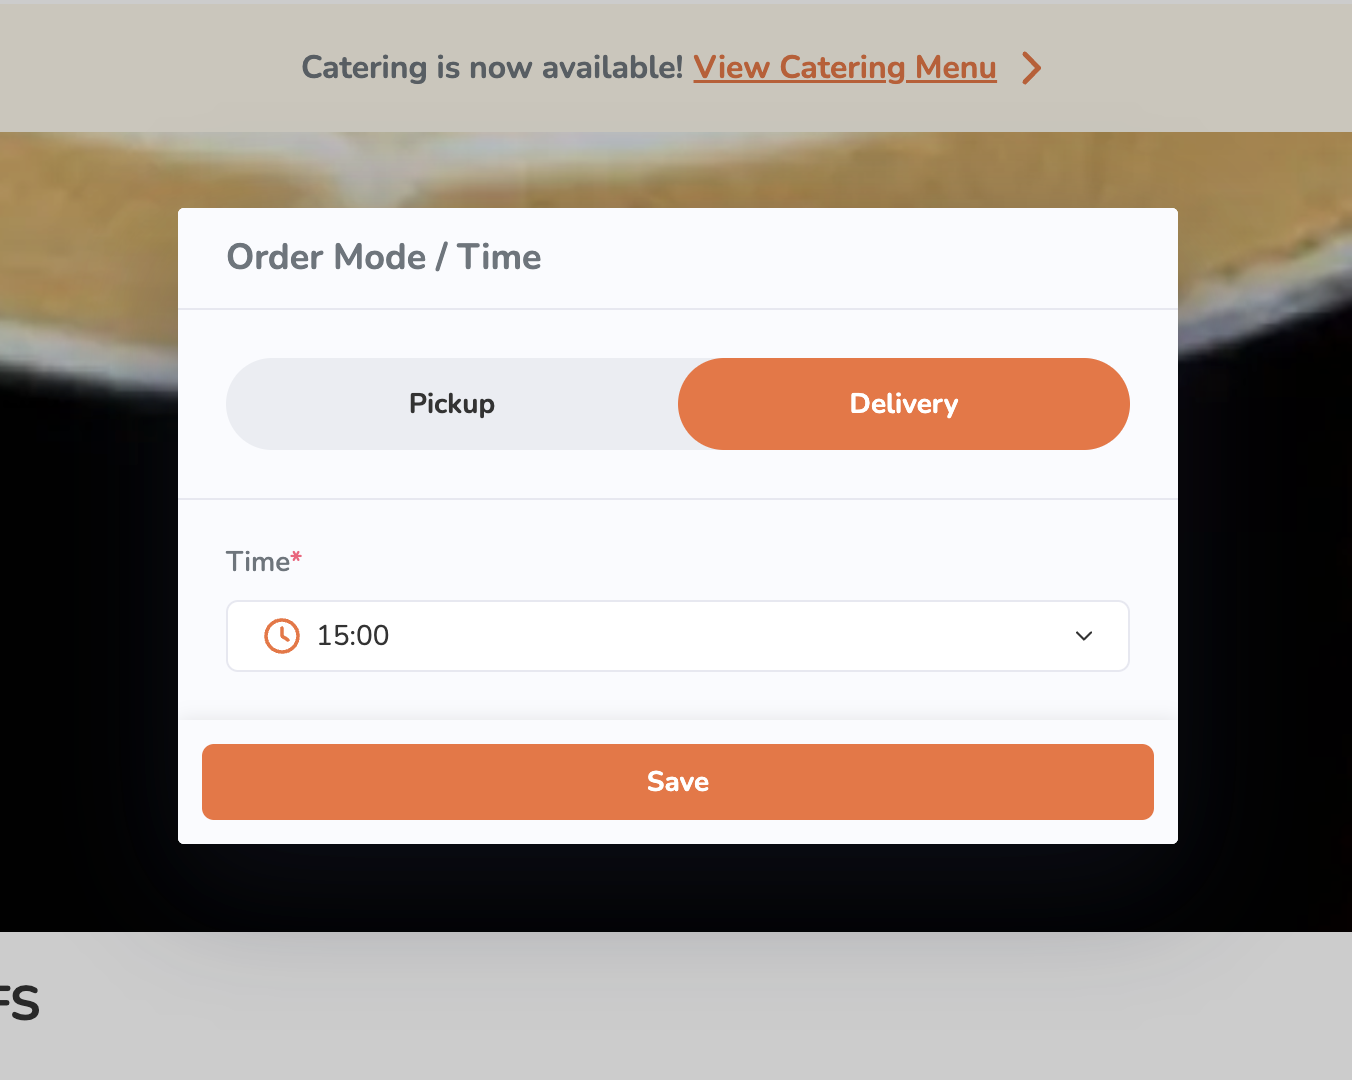
- Click on Save.
- Search for the item you want to add to the order. You can do any of the following to filter menu items:
- Click on a category to browse through the different menu items available to order.
- Click on a menu tagto filter orders based on available preferences, such as dietary restrictions, most popular items, and recommended items.

- Click on a category to browse through the different menu items available to order.
- To add an item to an order, click on the item.
Note: You can purchase plan-exclusive items if you’re subscribed to the required plan.
- If the order has modifiers available, select from the available modifiers to customize your order. Then, tap Add.
Note: Depending on the item’s total price, the Add button changes. For example, if the total price is $35, the button shows up as Add for $35.0.
- If the item is a combo item, choose an option for each item included in the combo to customize your order. Then, tap Add.
 Note:
Note: - Depending on the item’s total price, the Add button changes. For example, if the total price is $35, the button shows up as Add for $35.0.
- If "Enable Auto Select Next Combo Option" is turned on, the screen automatically scrolls down to the next combo option to select, after an option for an item included in the combo is selected.
- To add a special request for an item, on the "Special Requests" field, enter your request.
- If the order has modifiers available, select from the available modifiers to customize your order. Then, tap Add.
- (Optional) To add a discount to your order, tap Promotion or Add Promotion Code, depending on what's available on-screen. Then, enter a valid promotion code or select a valid promotion from the list. Tap Apply to confirm.
Tip: You can also choose from the list of eligible promotions.
- Click on Checkout to proceed with payment.
 Note: If a pre-checkout item prompt appears, select additional items as needed. In some cases, selecting an item may be mandatory.
- Enter your complete delivery address. Then, click on Continue.
- Check that the delivery date, time, and address are correct. Then, click on Continue to proceed to payment.
- If you are placing an order as a guest, under "Guest Checkout," enter your contact information.
- Under "Payment Method," select the payment method you want to use to pay for the order.

- To add a tip, select from the available tip options.
- Click on Place Order to finish placing the order.
Pickup
- On your desktop browser, visit the restaurant’s branded online store website.
- (Optional) If you have an account on the branded online store, log in to your account to associate your order with your account. Otherwise, you can proceed with placing your order as a guest.
Note: The restaurant must enable guest ordering to place an order without logging in to the branded online store. - On the main page, select Pickup.
Note: The service selection interface varies depending on your configured Branded Online Store "Ordering Site Settings" preferences. - Select the time when you want the order to be picked up.
- Click on Save.
- Search for the item you want to add to the order. You can do any of the following to filter menu items:
- Click on a category to browse through the different menu items available to order.
- Click on a menu tag to filter orders based on available preferences, such as dietary restrictions, most popular items, and recommended items.
- Click on a category to browse through the different menu items available to order.
- To add an item to an order, click on the item.
Note: You can purchase plan-exclusive items if you’re subscribed to the required plan.- If the order has modifiers available, select from the available modifiers to customize your order. Then, tap Add.
Note: Depending on the item’s total price, the Add button changes. For example, if the total price is $35, the button shows up as Add for $35.0.
- If the item is a combo item, choose an option for each item included in the combo to customize your order. Then, tap Add.Note:
- Depending on the item’s total price, the Add button changes. For example, if the total price is $35, the button shows up as Add for $35.0.
- If "Enable Auto Select Next Combo Option" is turned on, the screen automatically scrolls down to the next combo option to select, after an option for an item included in the combo is selected.
- To add a special request for an item, on the "Special Requests" field, enter your request.
- If the order has modifiers available, select from the available modifiers to customize your order. Then, tap Add.
- (Optional) To add a discount to your order, tap Promotion or Add Promotion Code, depending on what's available on-screen. Then, enter a valid promotion code or select a valid promotion from the list. Tap Apply to confirm.
Tip: You can also choose from the list of eligible promotions.
- Click on Checkout to proceed with payment.
Note: If a pre-checkout item prompt appears, select additional items as needed. In some cases, selecting an item may be mandatory.
- Check that the pickup date and time are correct. Then, click on Continue to proceed to payment.
- If you are placing an order as a guest, under "Guest Checkout," enter your contact information.
- Under "Payment Method," select the payment method you want to use to pay for the order.
- To add a tip, select from the available tip options.
- Click on Place Order to finish placing the order.
Re-order a past order
To repurchase the items of an order on the branded online store, follow the steps below:
Mobile
Delivery
- On your mobile device’s browser, visit the restaurant’s branded online store website and log in to your account.
- On the main page, select Delivery.
 Note: The service selection interface varies depending on your configured Branded Online Store "Ordering Site Settings" preferences.
 - Select your delivery location.
 Tip: If you have a delivery saved in the "Delivery Address Book," you can tap on the empty field to show the saved delivery address.
 - Tap Confirm to proceed.
- Select the time when you want the order to be delivered. Then, tap Apply.

- Under "Reorder," select a past order that includes the items you want to purchase again. This section shows your three most recent pickup and delivery orders.

- Tap Add to Cart to confirm the addition. Doing this adds the previously-bought items to your current cart, including modifiers and combo options.

- To modify the added items, tap the item name to modify the modifiers or combo options.

- To adjust the quantity of the items or remove unwanted items, update the item quantity to "0" (zero) by using the adjuster buttons or manually entering the quantity.

- To modify the added items, tap the item name to modify the modifiers or combo options.
- To add additional items to your cart:
- Tap a category to browse through the different menu items available to order.
 Tip: To search for an item manually, tap the search field above the categories and then enter the item that you want to add to the order.
- To add an item to an order, tap the item.
Note: You can purchase plan-exclusive items if you’re subscribed to the required plan.
- If the item has modifiers available, select from the available modifiers to customize your order. Then, tap Add.
Note: Depending on the item’s total price, the Add button changes. For example, if the total price is $35, the button shows up as Add for $35.0.
- If the item is a combo item, choose an option for each item included in the combo to customize your order. Then, tap Add.
 Note:
Note: - Depending on the item’s total price, the Add button changes. For example, if the total price is $35, the button shows up as Add for $35.0.
- If “Enable Auto Select Next Combo Option” is turned on, the screen automatically scrolls down to the next combo option to select, after an option for an item included in the combo is selected.
- To add a special request for an item, in the "Special Requests" field, enter your request.
- Tap a category to browse through the different menu items available to order.
- Once you’re done adding items to your order, at the bottom, tap the cart summary to view a list of items currently added to the order.
 Note: If a pre-checkout item prompt appears, select additional items as needed. In some cases, selecting an item may be required.
- (Optional) To update an item’s details or modifiers from the cart view, tap the item, then make your changes. Tap Update to save.

- (Optional) To add a discount to your order, tap Promotion or Add Promotion Code, depending on what's available on-screen. Then, enter a valid promotion code or select a valid promotion from the list. Tap Apply to confirm.

- At the bottom, tap Checkout to proceed with payment.

- Enter your complete delivery address. Then, tap Continue.

- Check that the delivery date, time, and address are correct. Tap Confirm to proceed.
- Under "Payment Method," select the payment method you want to use to pay for the order.
- To add a tip, select from the available tip options.
- Tap Place Order to finish placing the order.
Pickup
- On your mobile device’s browser, visit the restaurant’s branded online store website and log in to your account.
- On the main page, select Pickup.Note: The service selection interface varies depending on your configured Branded Online Store "Ordering Site Settings" preferences.
- Select the time when you want the order to be picked up.
- Tap Apply.
- Under "Reorder," select a past order that includes the items you want to purchase again. This section shows your three most recent pickup and delivery orders.

- Tap Add to Cart to confirm the addition. Doing this adds the previously-bought items to your current cart, including modifiers and combo options.

- To modify the added items, tap the item name to modify the modifiers or combo options.

- To adjust the quantity of the items or remove unwanted items, update the item quantity to "0" (zero) by using the adjuster buttons or manually entering the quantity.

- To modify the added items, tap the item name to modify the modifiers or combo options.
- To add additional items to your cart:
- Tap a category to browse through the different menu items available to order.
 Tip: To search for an item manually, tap the search field above the categories and then enter the item that you want to add to the order.
- To add an item to an order, tap the item.
Note: You can purchase plan-exclusive items if you’re subscribed to the required plan.
- If the order has modifiers available, select from the available modifiers to customize your order. Then, tap Add.
Note: Depending on the item’s total price, the Add button changes. For example, if the total price is $35, the button shows up as Add for $35.0.
- If the item is a combo item, choose an option for each item included in the combo to customize your order. Then, tap Add.Note:
- Depending on the item’s total price, the Add button changes. For example, if the total price is $35, the button shows up as Add for $35.0.
- If “Enable Auto Select Next Combo Option” is turned on, the screen automatically scrolls down to the next combo option to select, after an option for an item included in the combo is selected.
- To add a special request for an item, in the "Special Requests" field, enter your request.
- Tap a category to browse through the different menu items available to order.
- Once you’re done adding items to your order, at the bottom, tap the cart summary to view a list of items currently added to the order.
 Note: If a pre-checkout item prompt appears, select additional items as needed. In some cases, selecting an item may be required.
- (Optional) To update an item’s details or modifiers from the cart view, tap the item, then make your changes. Tap Update to save.

- (Optional) To add a discount to your order, tap Promotion or Add Promotion Code, depending on what's available on-screen. Then, enter a valid promotion code or select a valid promotion from the list. Tap Apply to confirm.

- At the bottom, tap Checkout to proceed with payment.
- Check that the pickup date and time are correct. Tap Confirm to proceed.
- Under "Payment Method," select the payment method you want to use to pay for the order.
- To add a tip, select from the available tip options.
- Tap Place Order to finish placing the order.
Desktop
Delivery
- On your desktop browser, visit the restaurant’s branded online store website and log in to your account.
- On the main page, select Delivery.
 Note: The service selection interface varies depending on your configured Branded Online Store "Ordering Site Settings" preferences.
 - Enter your delivery location. Then, click on Start Ordering.
 Tip: If you have a delivery saved in the "Delivery Address Book," you can click on the empty field to show the saved delivery address.
 - Select the time when you want the order to be delivered. Then, click on Save.

- Under "Reorder," select a past order that includes the items you want to purchase again. This section shows your three most recent pickup and delivery orders.

- Click on Add to Cart to confirm the addition. Doing this adds the previously-bought items to your current cart, including modifiers and combo options.

- To modify the added items, click on the item name to modify the modifiers or combo options.

- To adjust the quantity of the items or remove unwanted items, update the item quantity to "0" (zero) by using the adjuster buttons or manually entering the quantity.

- To modify the added items, click on the item name to modify the modifiers or combo options.
- To add additional items to your cart:
- Click on a category to browse through the different menu items available to order.

- To add an item to the order, click on the item.
Note: You can purchase plan-exclusive items if you’re subscribed to the required plan.
- If the item has modifiers available, select from the available modifiers to customize your order. Then, click on Add.
Note: Depending on the item’s total price, the Add button changes. For example, if the total price is $35, the button shows up as Add for $35.0.
- If the item is a combo item, choose an option for each item included in the combo to customize your order. Then, tap Add.
 Note:
Note: - Depending on the item’s total price, the Add button changes. For example, if the total price is $35, the button shows up as Add for $35.0.
- If “Enable Auto Select Next Combo Option” is turned on, the screen automatically scrolls down to the next combo option to select, after an option for an item included in the combo is selected.
- To add a special request for an item, in the "Special Requests" field, enter your request.

- Click on a category to browse through the different menu items available to order.
- (Optional) To add a discount to your order, tap Promotion or Add Promotion Code, depending on what's available on-screen. Then, enter a valid promotion code or select a valid promotion from the list. Tap Apply to confirm.

- Click on Checkout to proceed with payment.
 Note: If a pre-checkout item prompt appears, select additional items as needed. In some cases, selecting an item may be required.
- Enter your complete delivery address. Then, click on Continue.

- Check that the delivery date, time, and address are correct. Then, click on Continue to proceed to payment.

- Under "Payment Method," select the payment method you want to use to pay for the order.
- To add a tip, select from the available tip options.
- Click on Place Order to finish placing the order.
Pickup
- On your desktop browser, visit the restaurant’s branded online store website and log in to your account.
- On the main page, select Pickup.Note: The service selection interface varies depending on your configured Branded Online Store "Ordering Site Settings" preferences.
- Select the time when you want the order to be picked up. Then, click on Save.

- Under "Reorder," select a past order that includes the items you want to purchase again. This section shows your three most recent pickup and delivery orders.

- Click on Add to Cart to confirm the addition. Doing this adds the previously-bought items to your current cart, including modifiers and combo options.

- To modify the added items, click on the item name to modify the modifiers or combo options.

- To adjust the quantity of the items or remove unwanted items, update the item quantity to "0" (zero) by using the adjuster buttons or manually entering the quantity.

- To modify the added items, click on the item name to modify the modifiers or combo options.
- To add additional items to your cart:
- Click on a category to browse through the different menu items available to order.

- To add an item to the order, click on the item.
Note: You can purchase plan-exclusive items if you’re subscribed to the required plan.
- If the order has modifiers available, select from the available modifiers to customize your order. Then, tap Add.
Note: Depending on the item’s total price, the Add button changes. For example, if the total price is $35, the button shows up as Add for $35.0.
- If the item is a combo item, choose an option for each item included in the combo to customize your order. Then, click on Add.Note:
- Depending on the item’s total price, the Add button changes. For example, if the total price is $35, the button shows up as Add for $35.0.
- If “Enable Auto Select Next Combo Option” is turned on, the screen automatically scrolls down to the next combo option to select, after an option for an item included in the combo is selected.
- To add a special request for an item, in the "Special Requests" field, enter your request.
- Click on a category to browse through the different menu items available to order.
- (Optional) To add a discount to your order, tap Promotion or Add Promotion Code, depending on what's available on-screen. Then, enter a valid promotion code or select a valid promotion from the list. Click on Apply to confirm.

- Click on Checkout to proceed with payment.
 Note: If a pre-checkout item prompt appears, select additional items as needed. In some cases, selecting an item may be required.
- Check that the pickup date and time are correct. Then, click on Continue to proceed to payment.
- Under "Payment Method," select the payment method you want to use to pay for the order.
- To add a tip, select from the available tip options.
- Click on Place Order to finish placing the order.