Eats365 Biz and Biz Lite
Table of Contents
Place and manage orders on the Eats365 Biz
Learn how to use the Eats365 Biz to place, accept, and reject orders, as well as process payments, refunds, and print receipts.
The Eats365 Biz lets you efficiently manage your restaurant operations by enabling you to place orders, seamlessly process payments, and manage all online orders placed through your restaurant’s online channels, which includes your restaurant’s Branded Online Store (dine-in, pickup, and delivery), Eats365 Marketplace (pickup and delivery), and third-party online ordering platforms (pickup and delivery). From the Eats365 Biz app, you can do the following:
- Accept or reject orders
- Update order statuses
- Place immediate and scheduled orders
- Process payments
- Adjust estimated finishing times
- Process refunds
- Print receipts
To begin taking orders, you must start the business day in the Eats365 Biz app. Refer to Configure Eats365 Biz settings to learn more.
In this article, you’ll learn about placing orders and managing orders using the Eats365 Biz.
Place an order on the Eats365 Biz
To process an order on the Eats365 Biz, follow the steps below:
- Open the Eats365 Biz app.
- At the top left, tap Menu
 . Then, select Place Order.
- Next to "Takeout Mode," tap Edit
 . At the top, choose Pickup or Delivery.
- Enter the customer’s information for the order.
- Pickup: Enter the First Name, Last Name, and phone number of the customer.

- Delivery: Enter the customer’s phone number. Then, tap + New Address or select an existing address associated to the customer’s number.

- Pickup: Enter the First Name, Last Name, and phone number of the customer.
- At the bottom right, tap Save.
- Select the category or tap Category List
 to open the list of available categories and select the category you’d like to show. Then, select the items that you want to add to the customer's order.
- Once all items have been added, at the bottom right, tap Confirm.
- To check the order details before proceeding, tap Order Summary. You can also tap Expand
 to open the cart and view all added items.
- To check the order details before proceeding, tap Order Summary. You can also tap Expand
- Tap Send Order to send the order to the kitchen for preparation, or tap Pay Now If the customer is ready to process the payment.

- If you choose "Pay Now," under "Payment Method," select the customer’s preferred tender.
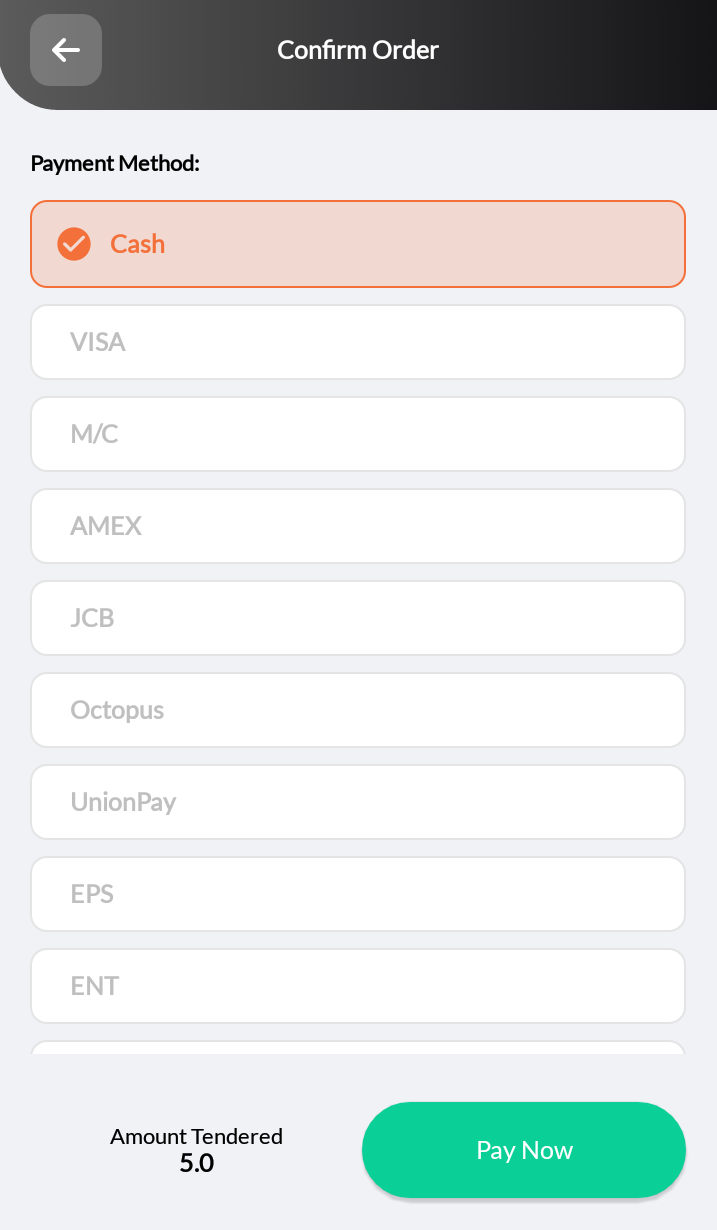 Tip: To add tender options, use the Merchant Portal. Refer to Set up and manage tenders to learn more.
- If you choose "Pay Now," under "Payment Method," select the customer’s preferred tender.
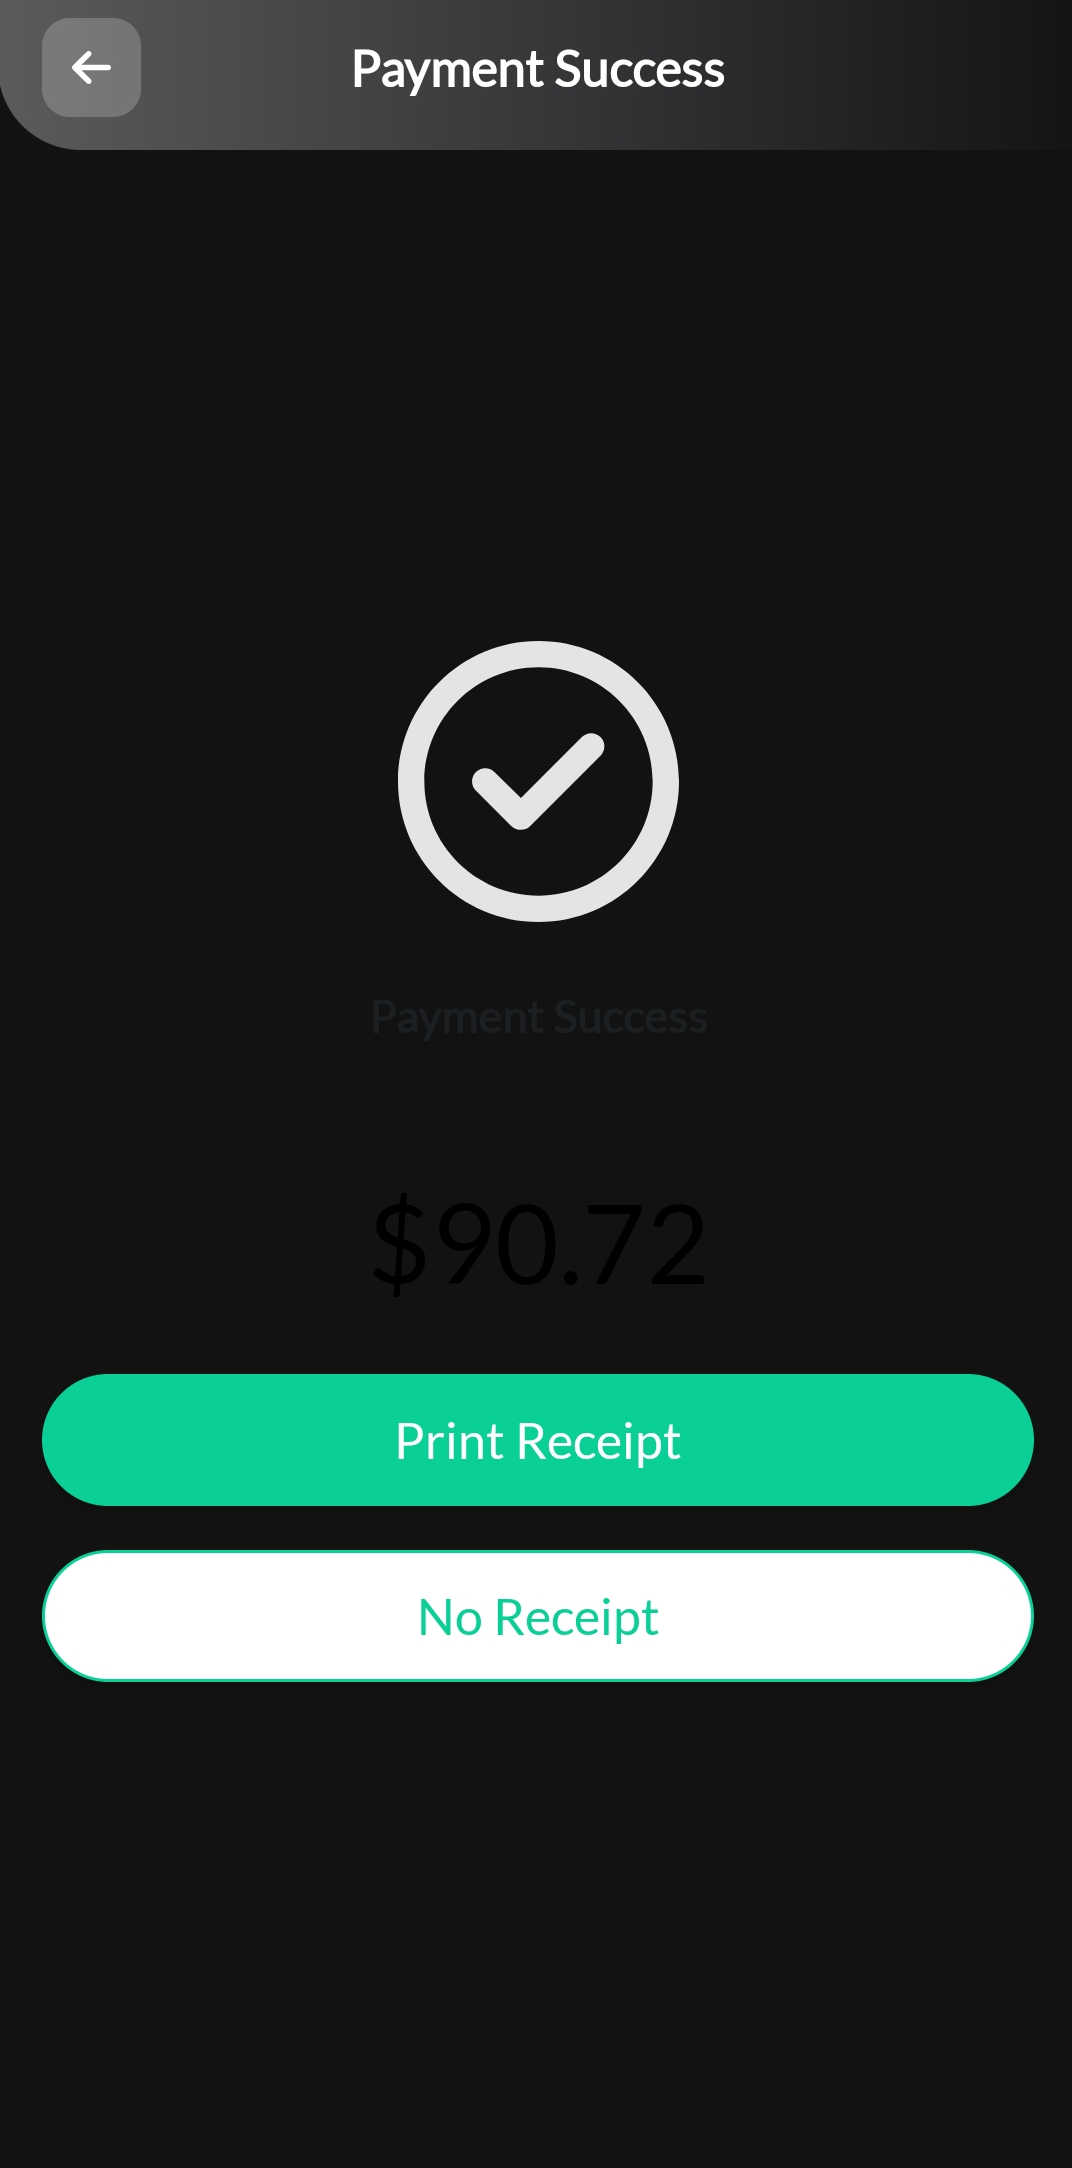
- At the bottom right, tap Pay Now. Then, tap Print Receipt to issue a receipt. Tap No Receipt to skip printing a receipt.
To view the order, at the top left, tap Menu , then select Orders. Orders should appear under the “Processing” tab.

Manage incoming online orders
When an order is placed on your restaurant’s online channels, the order immediately appears on the Eats365 Biz app. You can then choose to accept or reject the order.
Accept an online order
To accept an order, follow the steps below:
- Open the Eats365 Biz app.
- On the Order page, tap the new order. The screen shows the order details.
- At the bottom, tap Accept.
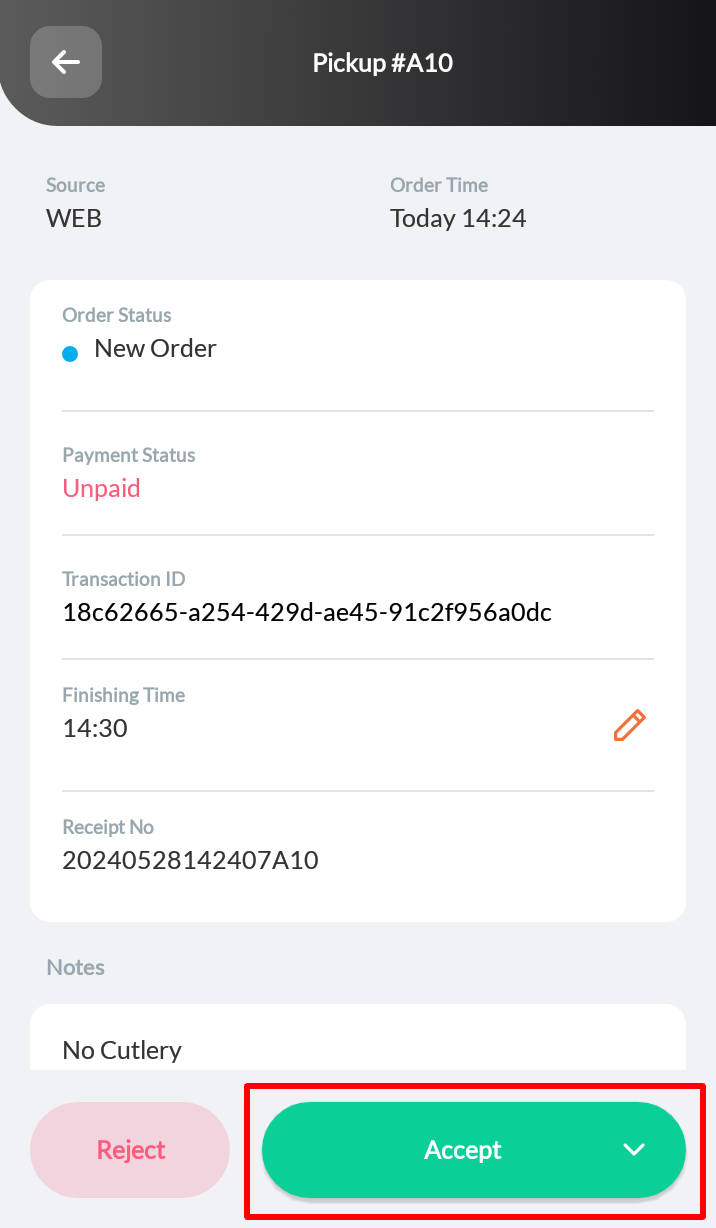
- Select Accept and Pay to accept the order and require payment, or Accept to accept the order without payment.
 Note: If you choose “Accept and Pay,” you must select a payment method.
Accept paid orders automatically
If you have “Auto Accept Paid Order” enabled, the system will automatically process all fully paid orders without requiring manual confirmation.
To turn on "Auto Accept Paid Order," follow the steps below:
Merchant Portal (Classic Theme)
- Log in to the Merchant Portal.
- On the left panel, click on Restaurant Settings. Then, click on Takeout.
- Click on the User App tab.
- Turn on Allow User App to Place Pickup Order
 or Allow User App to Place Delivery Order.
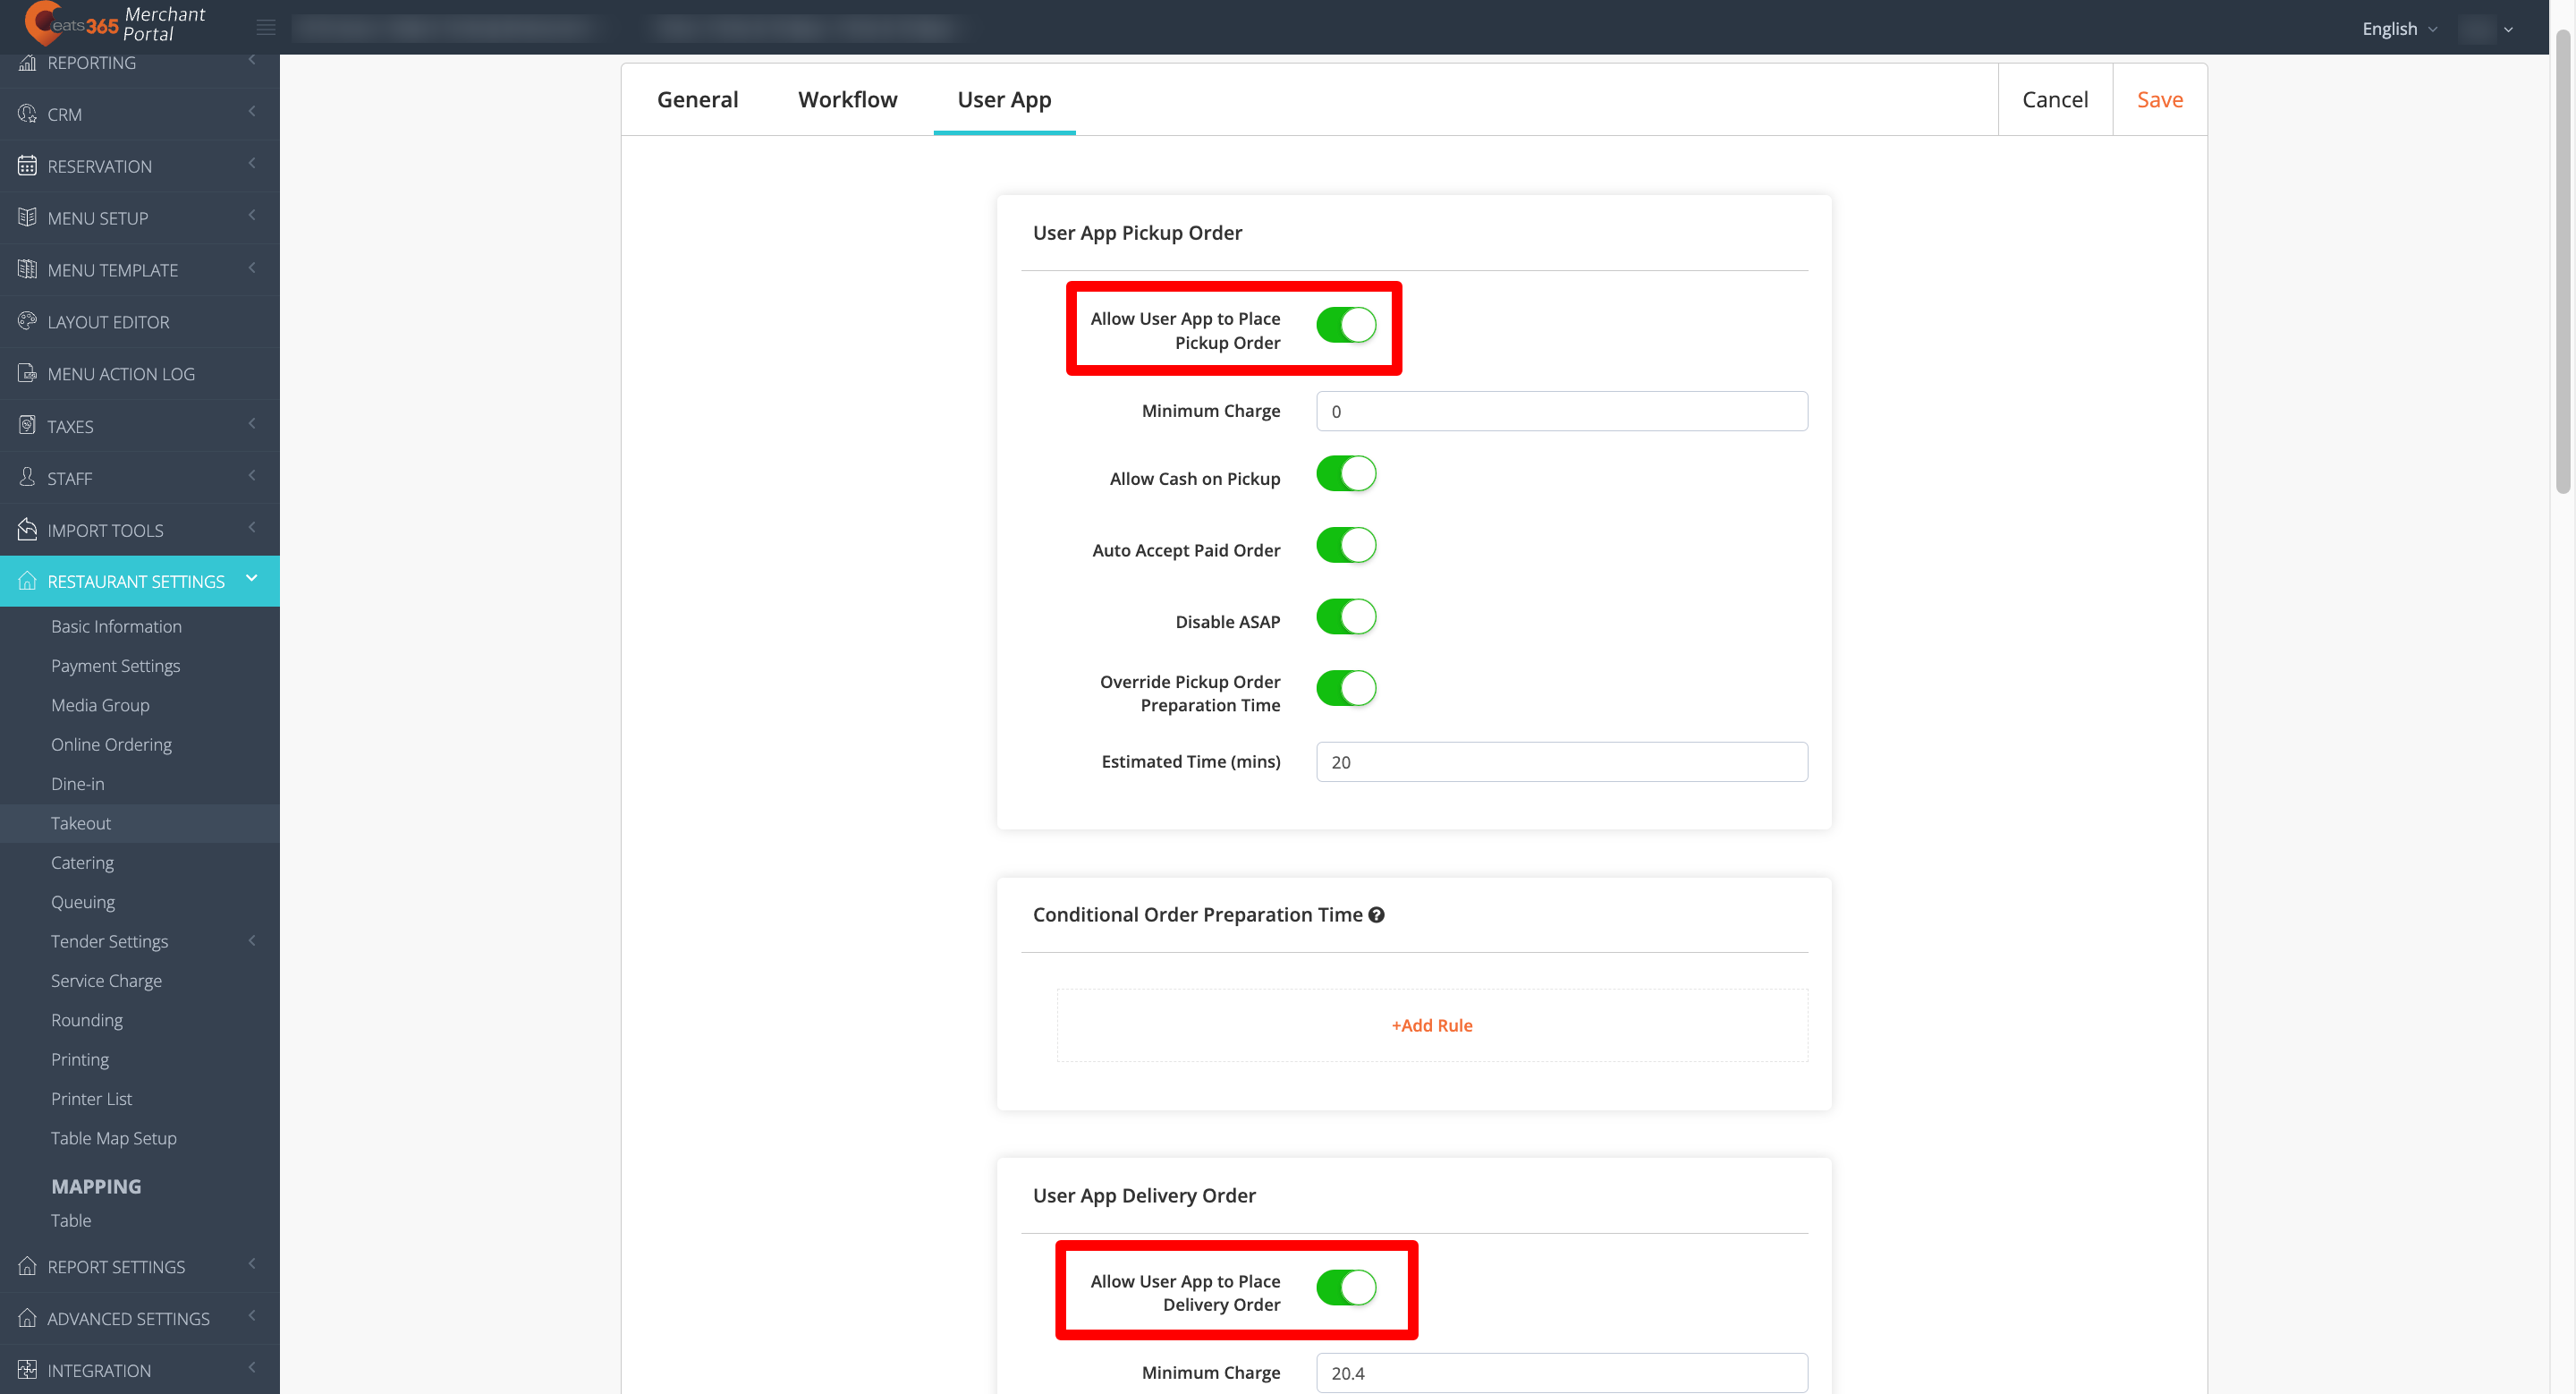
- Turn on Auto Accept Paid Order.
- At the top right, click on Save to confirm.
Merchant Portal 2.0
- Log in to the Merchant Portal.
- On the left panel, click on Restaurant Settings. Then, click on Takeout.
- Click on Online Ordering.
- Turn on Allow Pickup Order
 or Allow Delivery Order .
- Turn on Auto Accept Paid Order.
- At the top right, click on Save to confirm.
Reject an online order
To reject an immediate online order, follow the steps below:
- Open the Eats365 Biz app.
- On the Order page, tap the new order. The screen shows the order details.
- At the bottom left, tap Reject. Then, enter a reason.
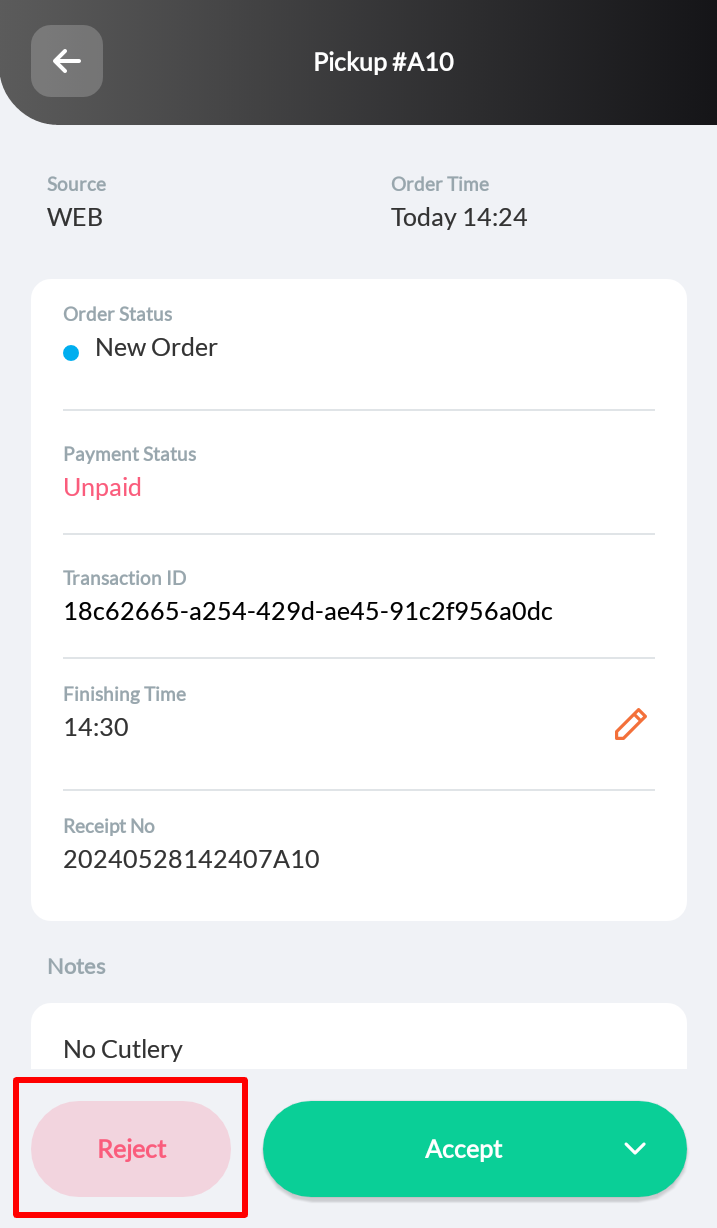
- Tap Done to confirm.
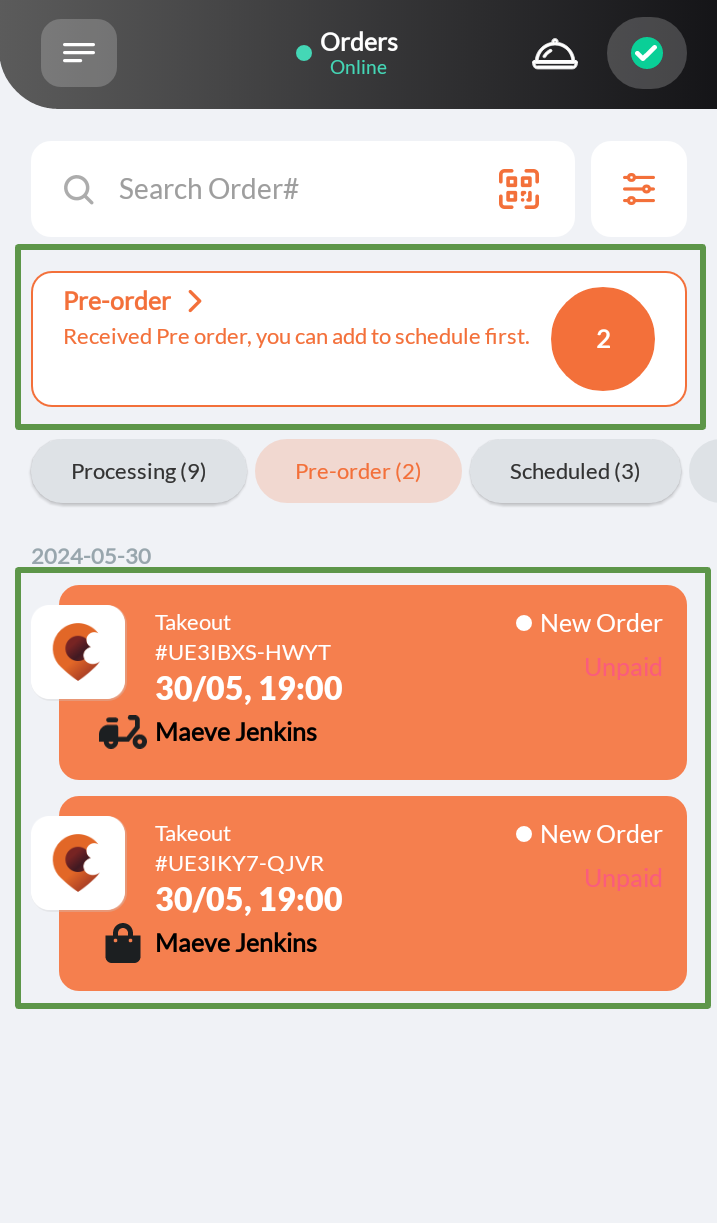
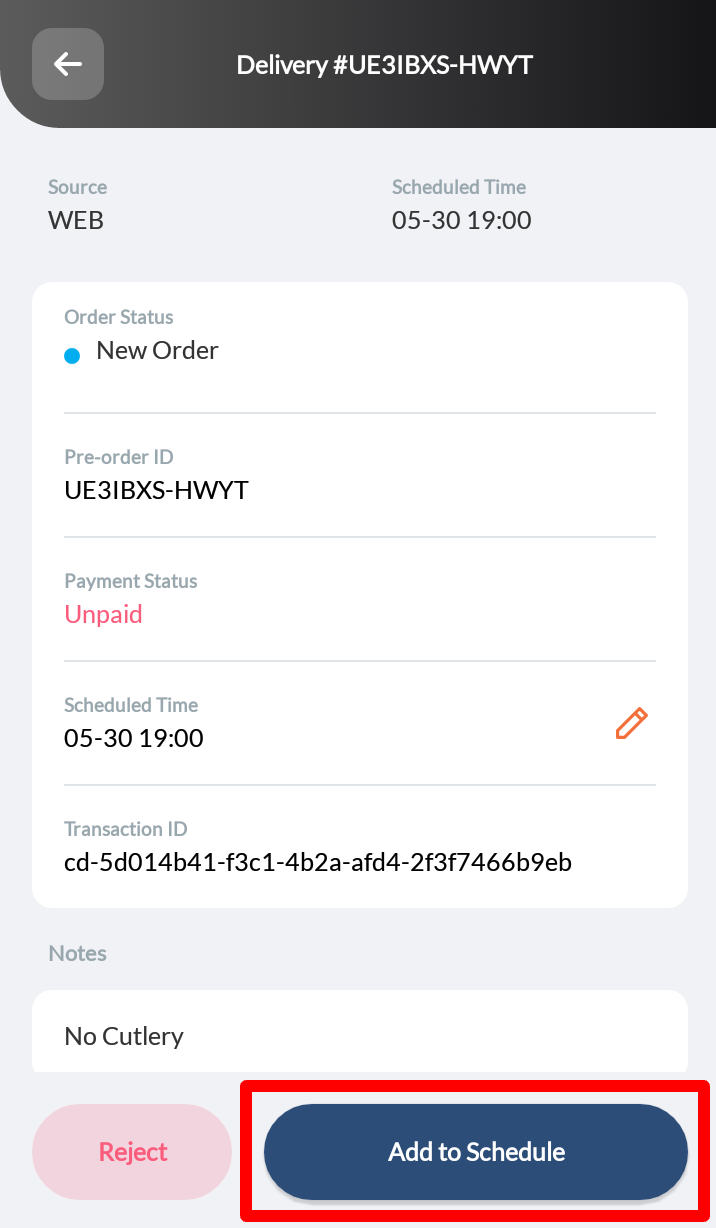
Accept an online pre-order
To accept online pre-orders in the Biz app, follow the steps below:
- Open the Eats365 Biz app.
- On the order page, tap the Pre-order tab.
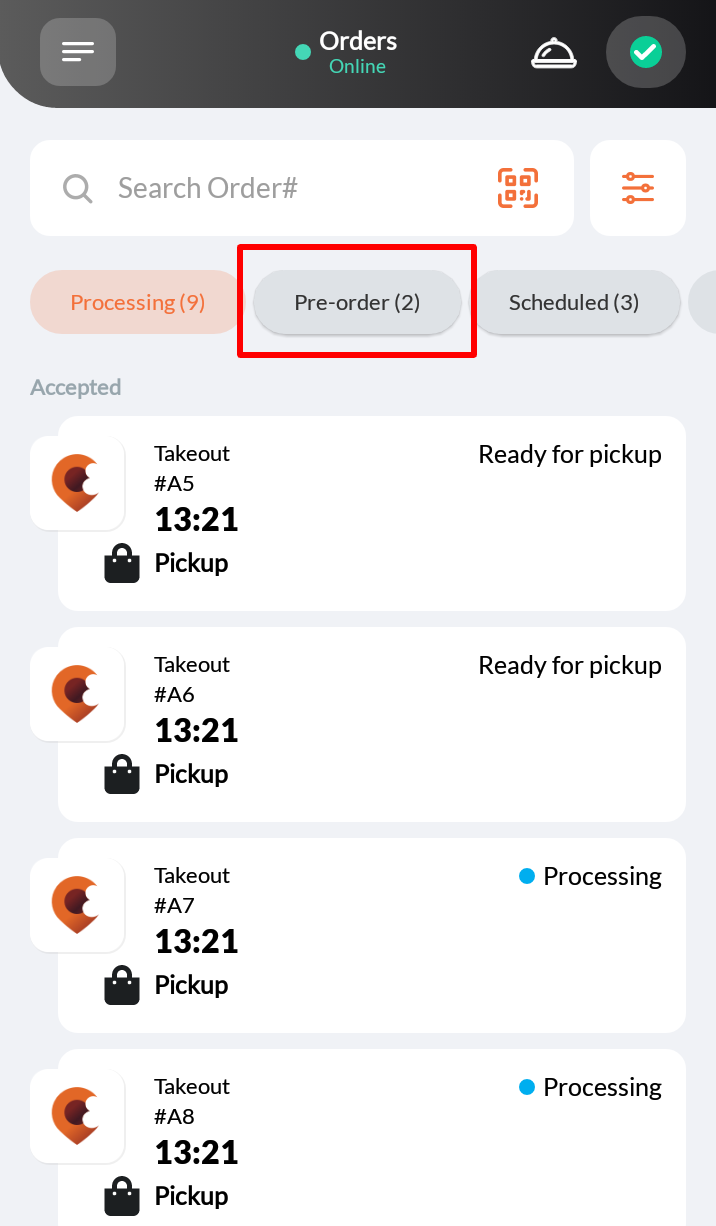
- At the top, you can tap the Pre-order prompt to go through all pending pre-orders, or tap the pre-order you’d like to accept. The screen shows the order details.
- At the bottom right, tap Add to Schedule to add the pre-order to the Scheduled tab. When the scheduled day and time arrives, you must confirm the scheduled order to proceed with preparation.
Reject an online pre-order
To accept online pre-orders in the Biz app, follow the steps below:
- Open the Eats365 Biz app.
- On the order page, tap the Pre-order tab.
- At the top, you can tap the Pre-order prompt to go through all pending pre-orders, or tap the pre-order you’d like to reject. The screen shows the order details.
- At the bottom left, tap Reject, then enter a reason.
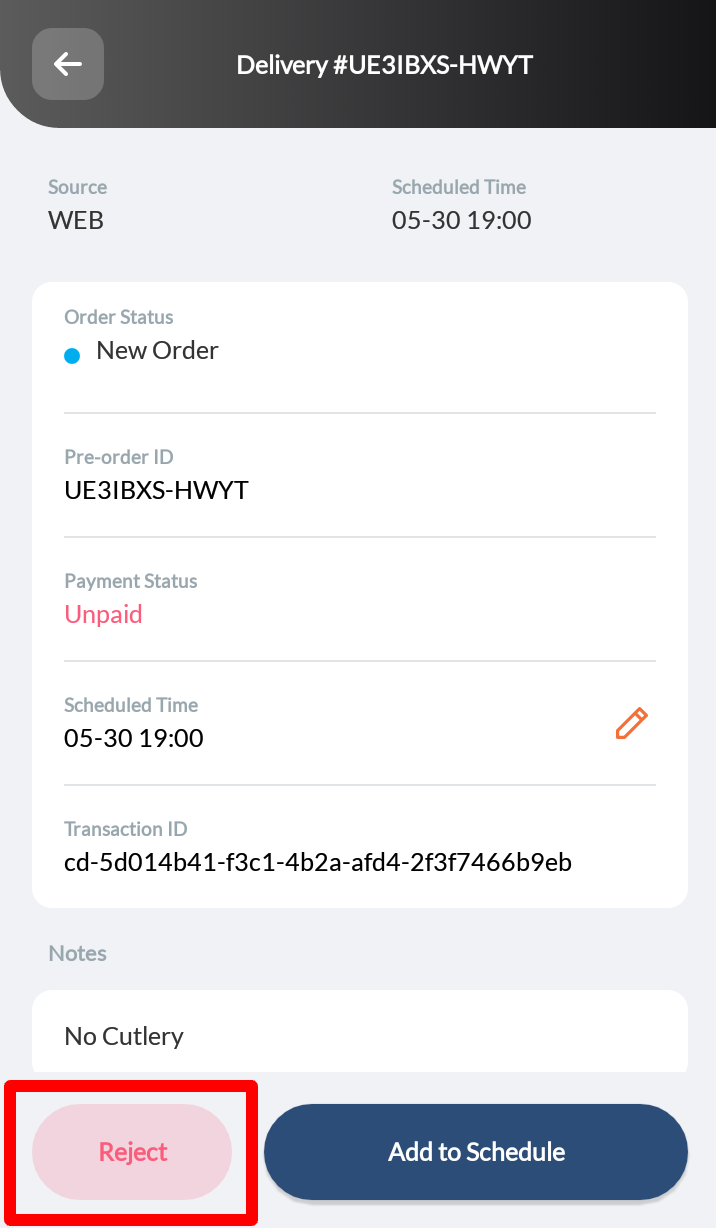
- Tap Done to confirm.
Confirm a scheduled order
Scheduled orders are orders that were placed in advance (pre-orders). When the scheduled day and time arrives, you must first confirm the scheduled order to begin processing the order. Once the order is confirmed, the system will print the confirmation receipt.
To confirm a scheduled order for preparation, follow the steps below:
- Open the Eats365 Biz app.
- On the Order page, tap the Scheduled tab.
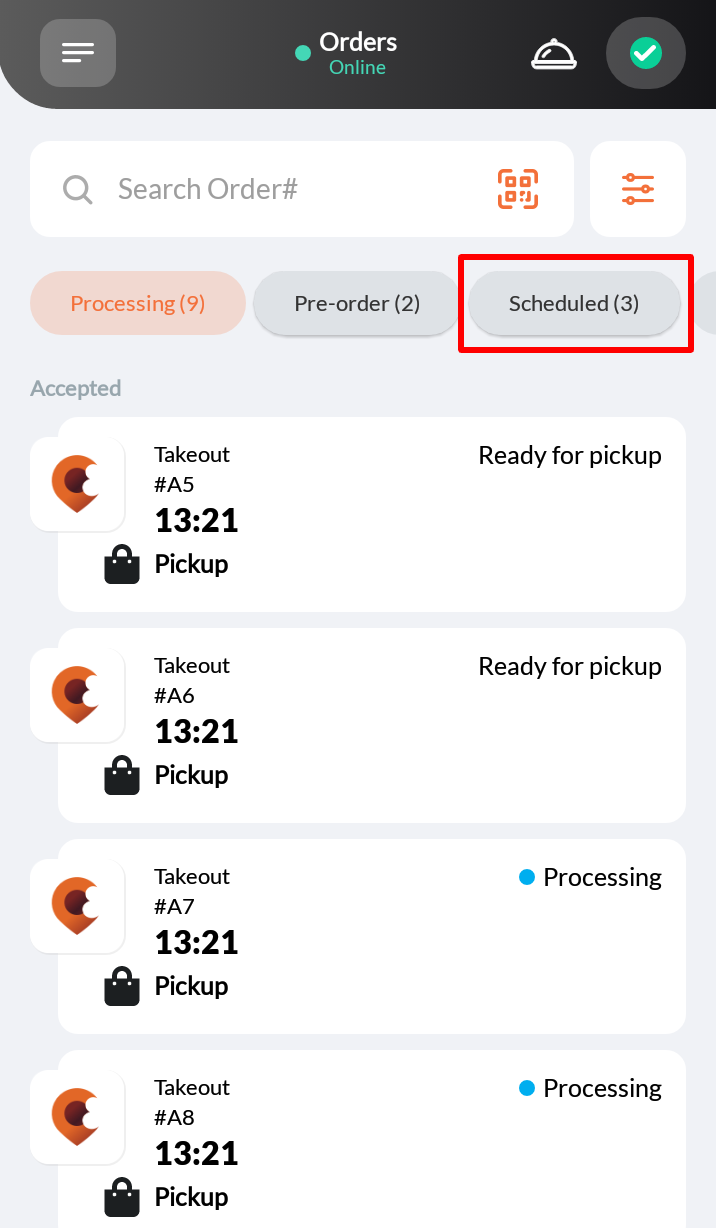
- At the top, you can tap the "Scheduled Order" prompt to go through all scheduled orders that require confirmation, or tap the scheduled order you’d like to accept. The screen shows the order details.
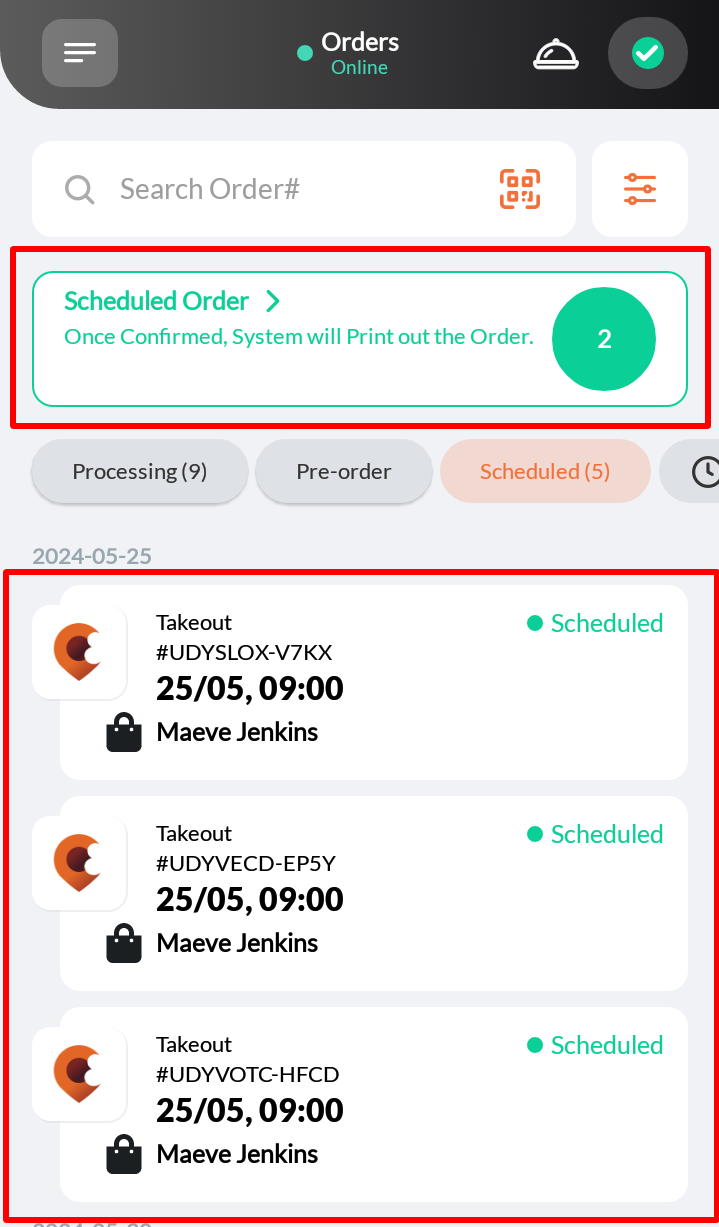
- At the bottom, tap Add to Schedule. This prints the confirmation receipt for the order.
Cancel a scheduled order
To cancel a scheduled online order in the Biz app, follow the steps below:
- Open the Eats365 Biz app.
- On the Order page, tap the Scheduled tab.
- At the top, you can tap the “Scheduled Order” prompt to go through all pending pre-orders, or tap the pre-order you’d like to cancel. The screen shows the order details.
- At the bottom left, tap Void, then enter a reason.
- Tap Done to confirm.
Manage orders on the Eats365 Biz
When you place orders directly through the Eats365 Biz or accept online orders, you can view and manage the order afterwards.
Process payment for an order
Before an order can be ready to be picked up or delivered, the customer must settle the bill.
To process a payment for an order, follow the steps below:
- Open the Eats365 Biz app.
- On the Order page, tap the order that you want to process a payment for. The screen shows the order details.
 Tip:
Tip: - If there are multiple orders available, you can search for the order directly from the search bar. To filter your search further, tap Filter
 beside the search bar.
 - To change the order view, tap the available order view options or tap Order History
 .
.
- If there are multiple orders available, you can search for the order directly from the search bar. To filter your search further, tap Filter
- Under "Order Details," tap Pay.

- Under "Payment Method," select the customer’s preferred tender. Tip: To add tender options, use the Merchant Portal. Refer to Set up and manage tenders to learn more.
- At the bottom right, tap Pay Now. Then, tap Print Receipt to issue a receipt. Tap No Receipt to skip printing a receipt.
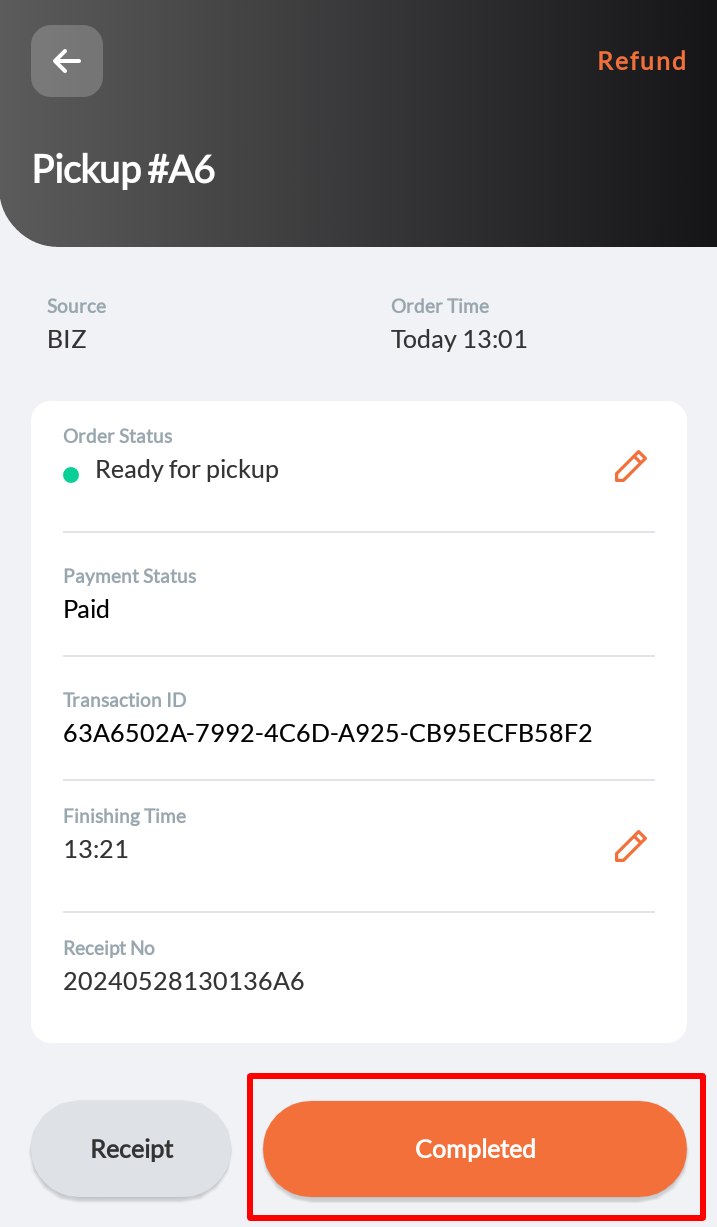
Change an order's status
Once the payment has been settled for an order, you can then update the order’s status to ready for pickup or delivery.
To change an order’s status, follow the steps below:
- Open the Eats365 Biz app.
- On the Order page, tap the order that you want to change the order status. The screen shows the order details. Tip:
- If there are multiple orders available, you can search for the order directly from the search bar. To filter your search further, tap Filter beside the search bar.
- To change the order view, tap the available order view options or tap Order History .
- If there are multiple orders available, you can search for the order directly from the search bar. To filter your search further, tap Filter
- To change the order status, you can do any of the following:
- Under “Order Status,” tap Edit . Then, change the order status to Ready for pickup or Ready to deliver.
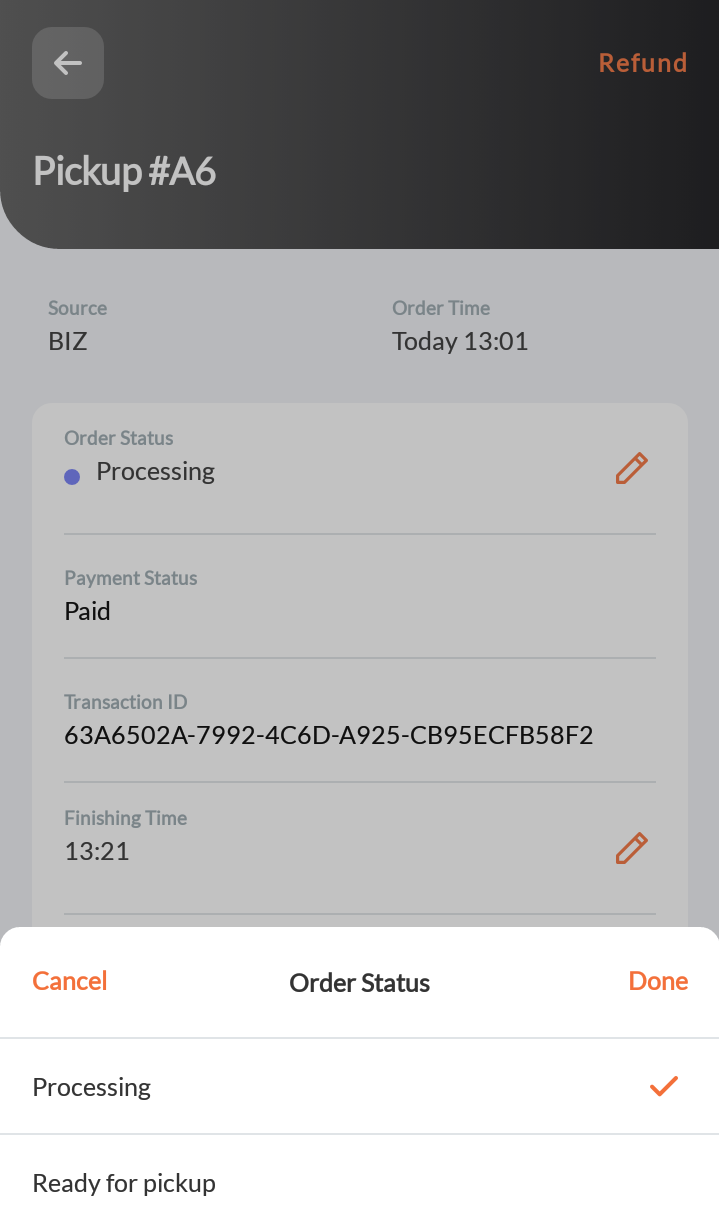
- At the bottom, tap Ready for pickup or Ready to deliver.

- Under “Order Status,” tap Edit
Once the order status has been changed, the customer is notified that their order is now ready for pickup or delivery.
Once the order has been picked up by the customer or delivery person, tap Completed or change the order status to “Completed.”
Adjust the finishing time
In some cases, the default estimated finishing time might not be enough to complete a customer’s order. In such cases, you can adjust the “Finishing Time” of the order.
To adjust the Finishing Time, follow the steps below:
- Open the Eats365 Biz app.
- On the Order page, tap the order that you want to adjust the finishing time. The screen shows the order details. Tip:
- If there are multiple orders available, you can search for the order directly from the search bar. To filter your search further, tap Filter beside the search bar.
- To change the order view, tap the available order view options or tap Order History .
- If there are multiple orders available, you can search for the order directly from the search bar. To filter your search further, tap Filter
- To adjust the estimated finishing time, next to “Finishing Time,” tap Edit . Then, enter a new time.

Process refunds
The Eats365 Biz can also process refunds for orders placed through the Eats365 Biz or your restaurant’s online channels.
To process refunds, follow the steps below:
- Open the Eats365 Biz app.
- On the Order page, tap the order that you want to process a refund. Tip:
- If there are multiple orders available, you can search for the order directly from the search bar. To filter your search further, tap Filter beside the search bar.
- To change the order view, tap the available order view options or tap Order History .
- If there are multiple orders available, you can search for the order directly from the search bar. To filter your search further, tap Filter
- At the top right, tap Refund.

- Select a Refund Reason and add an optional note.
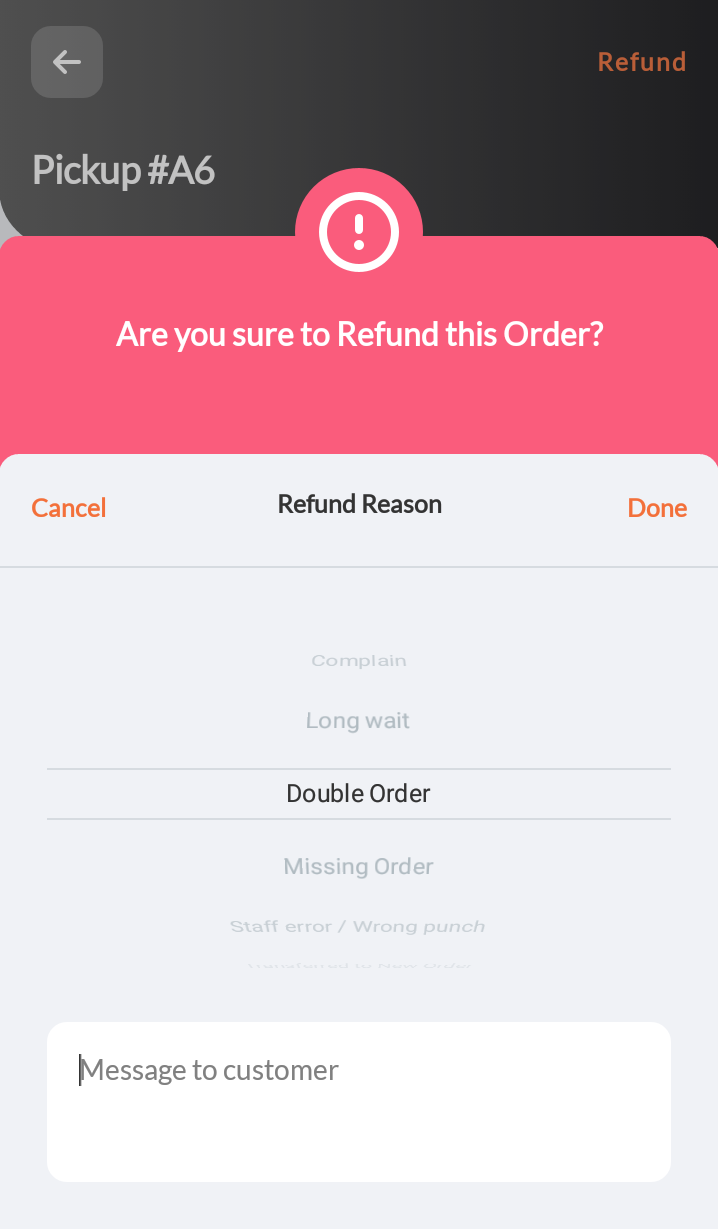
- Tap Done to confirm.
Print receipts
The Eats365 Biz can print receipts for orders placed through the Eats365 Biz or your restaurant’s online channels.
To print receipts, follow the steps below:
- Open the Eats365 Biz app.
- On the Order page, tap the order that you want to print a receipt. Tip:
- If there are multiple orders available, you can search for the order directly from the search bar. To filter your search further, tap Filter beside the search bar.
- To change the order view, tap the available order view options or tap Order History .
- If there are multiple orders available, you can search for the order directly from the search bar. To filter your search further, tap Filter
- At the bottom, tap Receipt.
