 Eats365 Products
 Merchant Guide
 Modules
 Membership
 Integrations
 Hardware
 Staff Operations
 Roles & Permissions
 Payments
 Reports
 What’s New
 Release Notes
 Troubleshooting
 Simulators
 Glossary
 Troubleshooter
 System Status
Taxes
Table of Contents
Set up and manage taxes
Learn how to set up taxes that can be added to customer’s total bill.
The Taxes settings allow you to create and customize tax types with specific rates. You can group these tax together and assign them to menu items, automatically adding the appropriate tax to the customer’s total bill.
In this article, you’ll learn about the different settings included under Taxes and how to set up and manage those settings.
Set up a Tax Type
A Tax Type allows you to create a tax preset where you can define the tax rate. This setting is also where you can choose if the tax applies to Dine-in, Takeout, or Catering.
To set up a Tax Type, follow the steps below:
Eats365 POS
- Log in to the Eats365 POS.
- At the top left, tap Settings
 .
. - Under Settings, tap Taxes.
- On the left panel, select Tax Type. Then, at the top right, tap Add Tax Type.
- Enter the Tax Type Name and Tax Rate.
- Select the type of services where you want to apply the Tax Type. You can apply the Tax Type to Dine-In, Takeout, Catering.
- At the top right, tap Save to confirm.
Once created, you can add taxes to the Items listed under the type of service that you chose.
DeleteMerchant Portal (Classic Theme)
- Log in to the Merchant Portal.
- On the left panel, click on Taxes, then select Tax Type.
- At the top right, click on +Tax Type.
- Enter the Tax Type Name and Tax Rate.
- Select the type of service where you want to apply the Tax Type. You can apply the Tax Type to Dine-In, Takeout, or Catering.
- At the top right, click on Add to confirm.
Once created, you can add taxes to the Items listed under the type of service you chose.
DeleteMerchant Portal 2.0
- Log in to the Merchant Portal.
- On the left panel, click on Taxes, then select Tax Type.
- At the top right, click on AddTax Type.
- Enter the Tax Type Name and Tax Rate.
- Select the type of service where you want to apply the Tax Type. You can apply the Tax Type to Dine-In, Takeout, or Catering.
Tip: To make the Tax Type available for all service types, click on all the service types. - At the top right, click on Save to confirm.
Once created, you can add taxes to the Items listed under the type of service you chose.
DeleteSet up a Tax Group
A Tax Group lets you control which items are subject to specific tax types. For example, you could create a delivery tax rate and apply it exclusively to items marked for delivery.
You can also combine multiple tax types into a single tax group. The included tax rates will be added together and applied to orders unless you’ve set tax exemption rules that would indicate otherwise. This is helpful in regions where sales tax combines multiple tax types. For example, you can create Tax Type A which is 5% tax and Tax Type B which is 2% tax. Upon adding these tax types to a tax group, the total tax rate will be 7%.
To set up a Tax Group, follow the steps below:
Eats365 POS
- Log in to the Eats365 POS.
- At the top left, tap Settings .
- Under Settings, tap Taxes.
- On the left panel, select Tax Group. Then, at the top right, tap Add Tax Group.
- Enter the Tax Group Name.
- Next to the Tax Type that you want to include in the Tax Group, tap the checkbox
 .
. - Next to the Product Type that you want to include in the Tax Group, tap the checkbox .
Tip: When you add a Product Type to a Tax Group, taxes would apply to all Items under the Product Type. To apply the Tax Group to specific items, next to the Product Type, tap the drop-down arrow and select the Items that you want to include.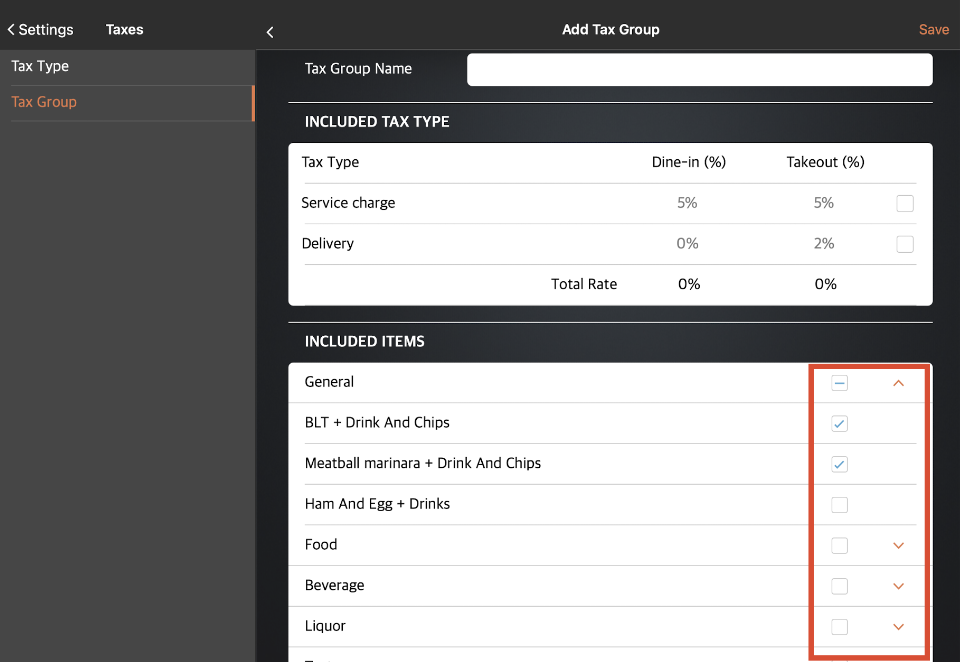
- At the top right, tap Save to confirm.
Merchant Portal (Classic Theme)
- Log in to the Merchant Portal.
- On the left panel, click on Taxes, then select Tax Group.
- At the top right, click on +Tax Group.
- Enter the Tax Group Name.
- Select the Tax Type that you want to include in the Tax Group.
- Next to the Product Type that you want to include in the Tax Group, click on the checkbox
 .
.
Tip: When you add a Product Type to a Tax Group, taxes would apply to all Items under the Product Type. To apply the Tax Group to specific items, next to the Product Type, click on Expand then select the Items that you want to include.
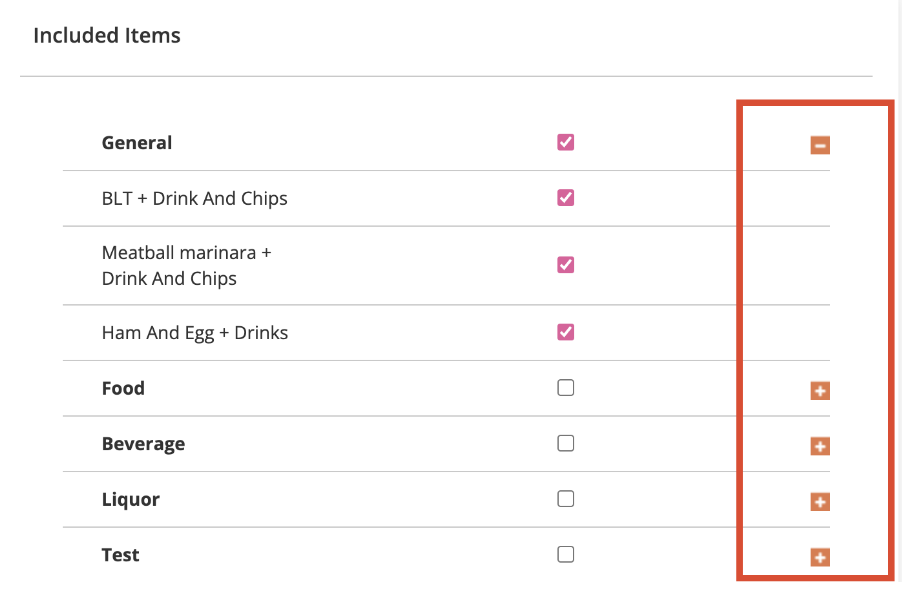
- At the top right, click on Add to confirm.
Merchant Portal 2.0
- Log in to the Merchant Portal.
- On the left panel, click on Taxes, then select Tax Group.
- At the top right, click on Add Tax Group.
- Enter the Tax Group Name.
- Under Included Tax Type, select the Tax Type(s) that you want to include in the Tax Group.
- Under Included Items, click on the checkbox next to the Product Type that you want to include in the Tax Group.
Tip: When you add a Product Type to a Tax Group, taxes would apply to all Items under the Product Type. To apply the Tax Group to specific items, next to the Product Type, click on Expand then select the Items that you want to include.
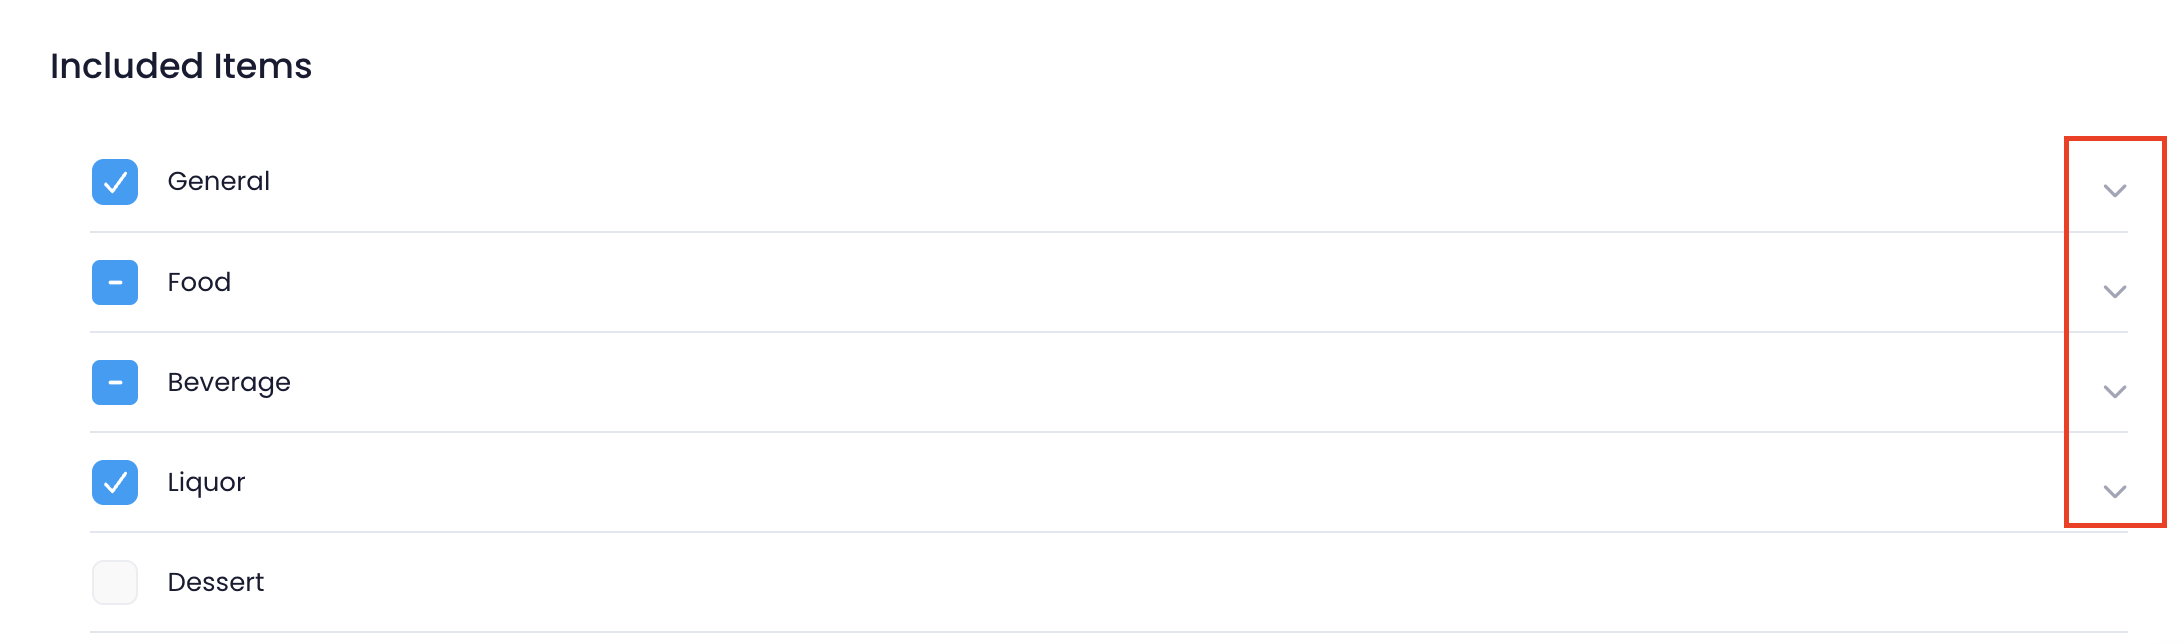
- To create rules that exempt certain items from particular taxes, under Tax Exemption, turn on Enable Tax Exemption
 . This feature allows you to define conditions that prevent a selected Tax Type from applying to items when their subtotal meets your specified criteria. For example, you can set Tax Type A to apply without any conditions, and set Tax Type B to only apply if the items’ subtotal amounts to $10 or more.
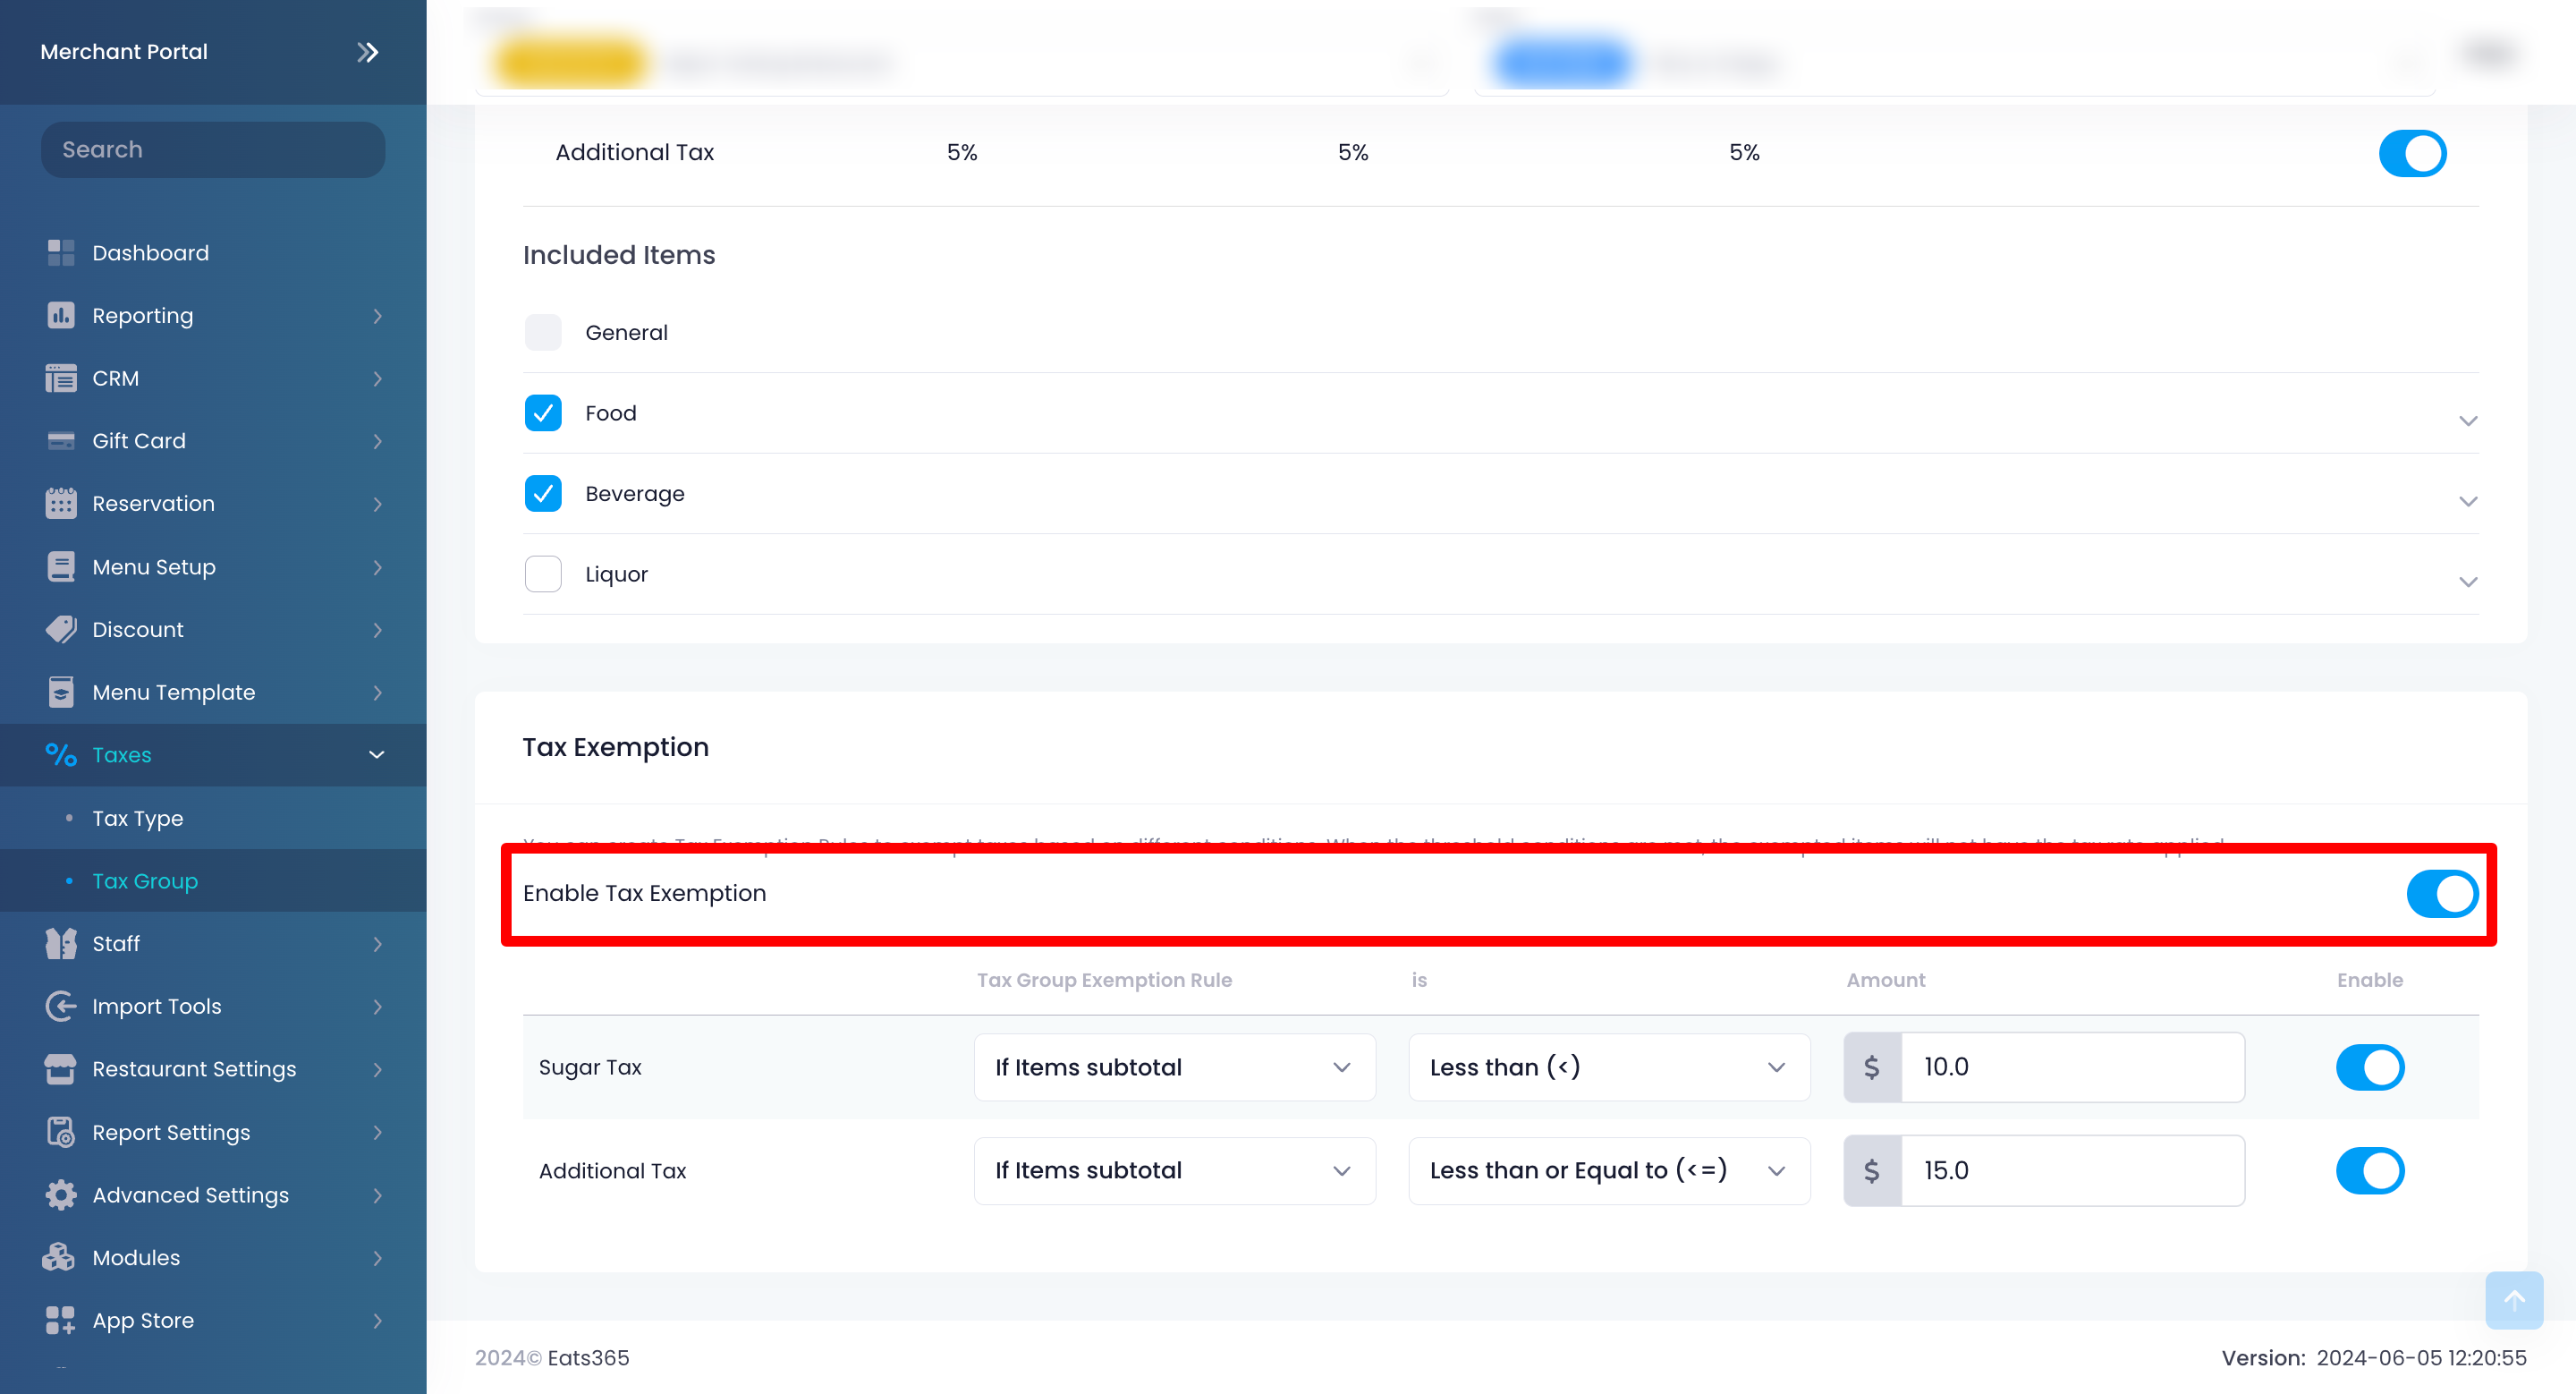
- Next to the Tax Type that you’d like to set taxing conditions for, turn on Enable . If you want a Tax Type to be applied every time, leave it turned off
 .
.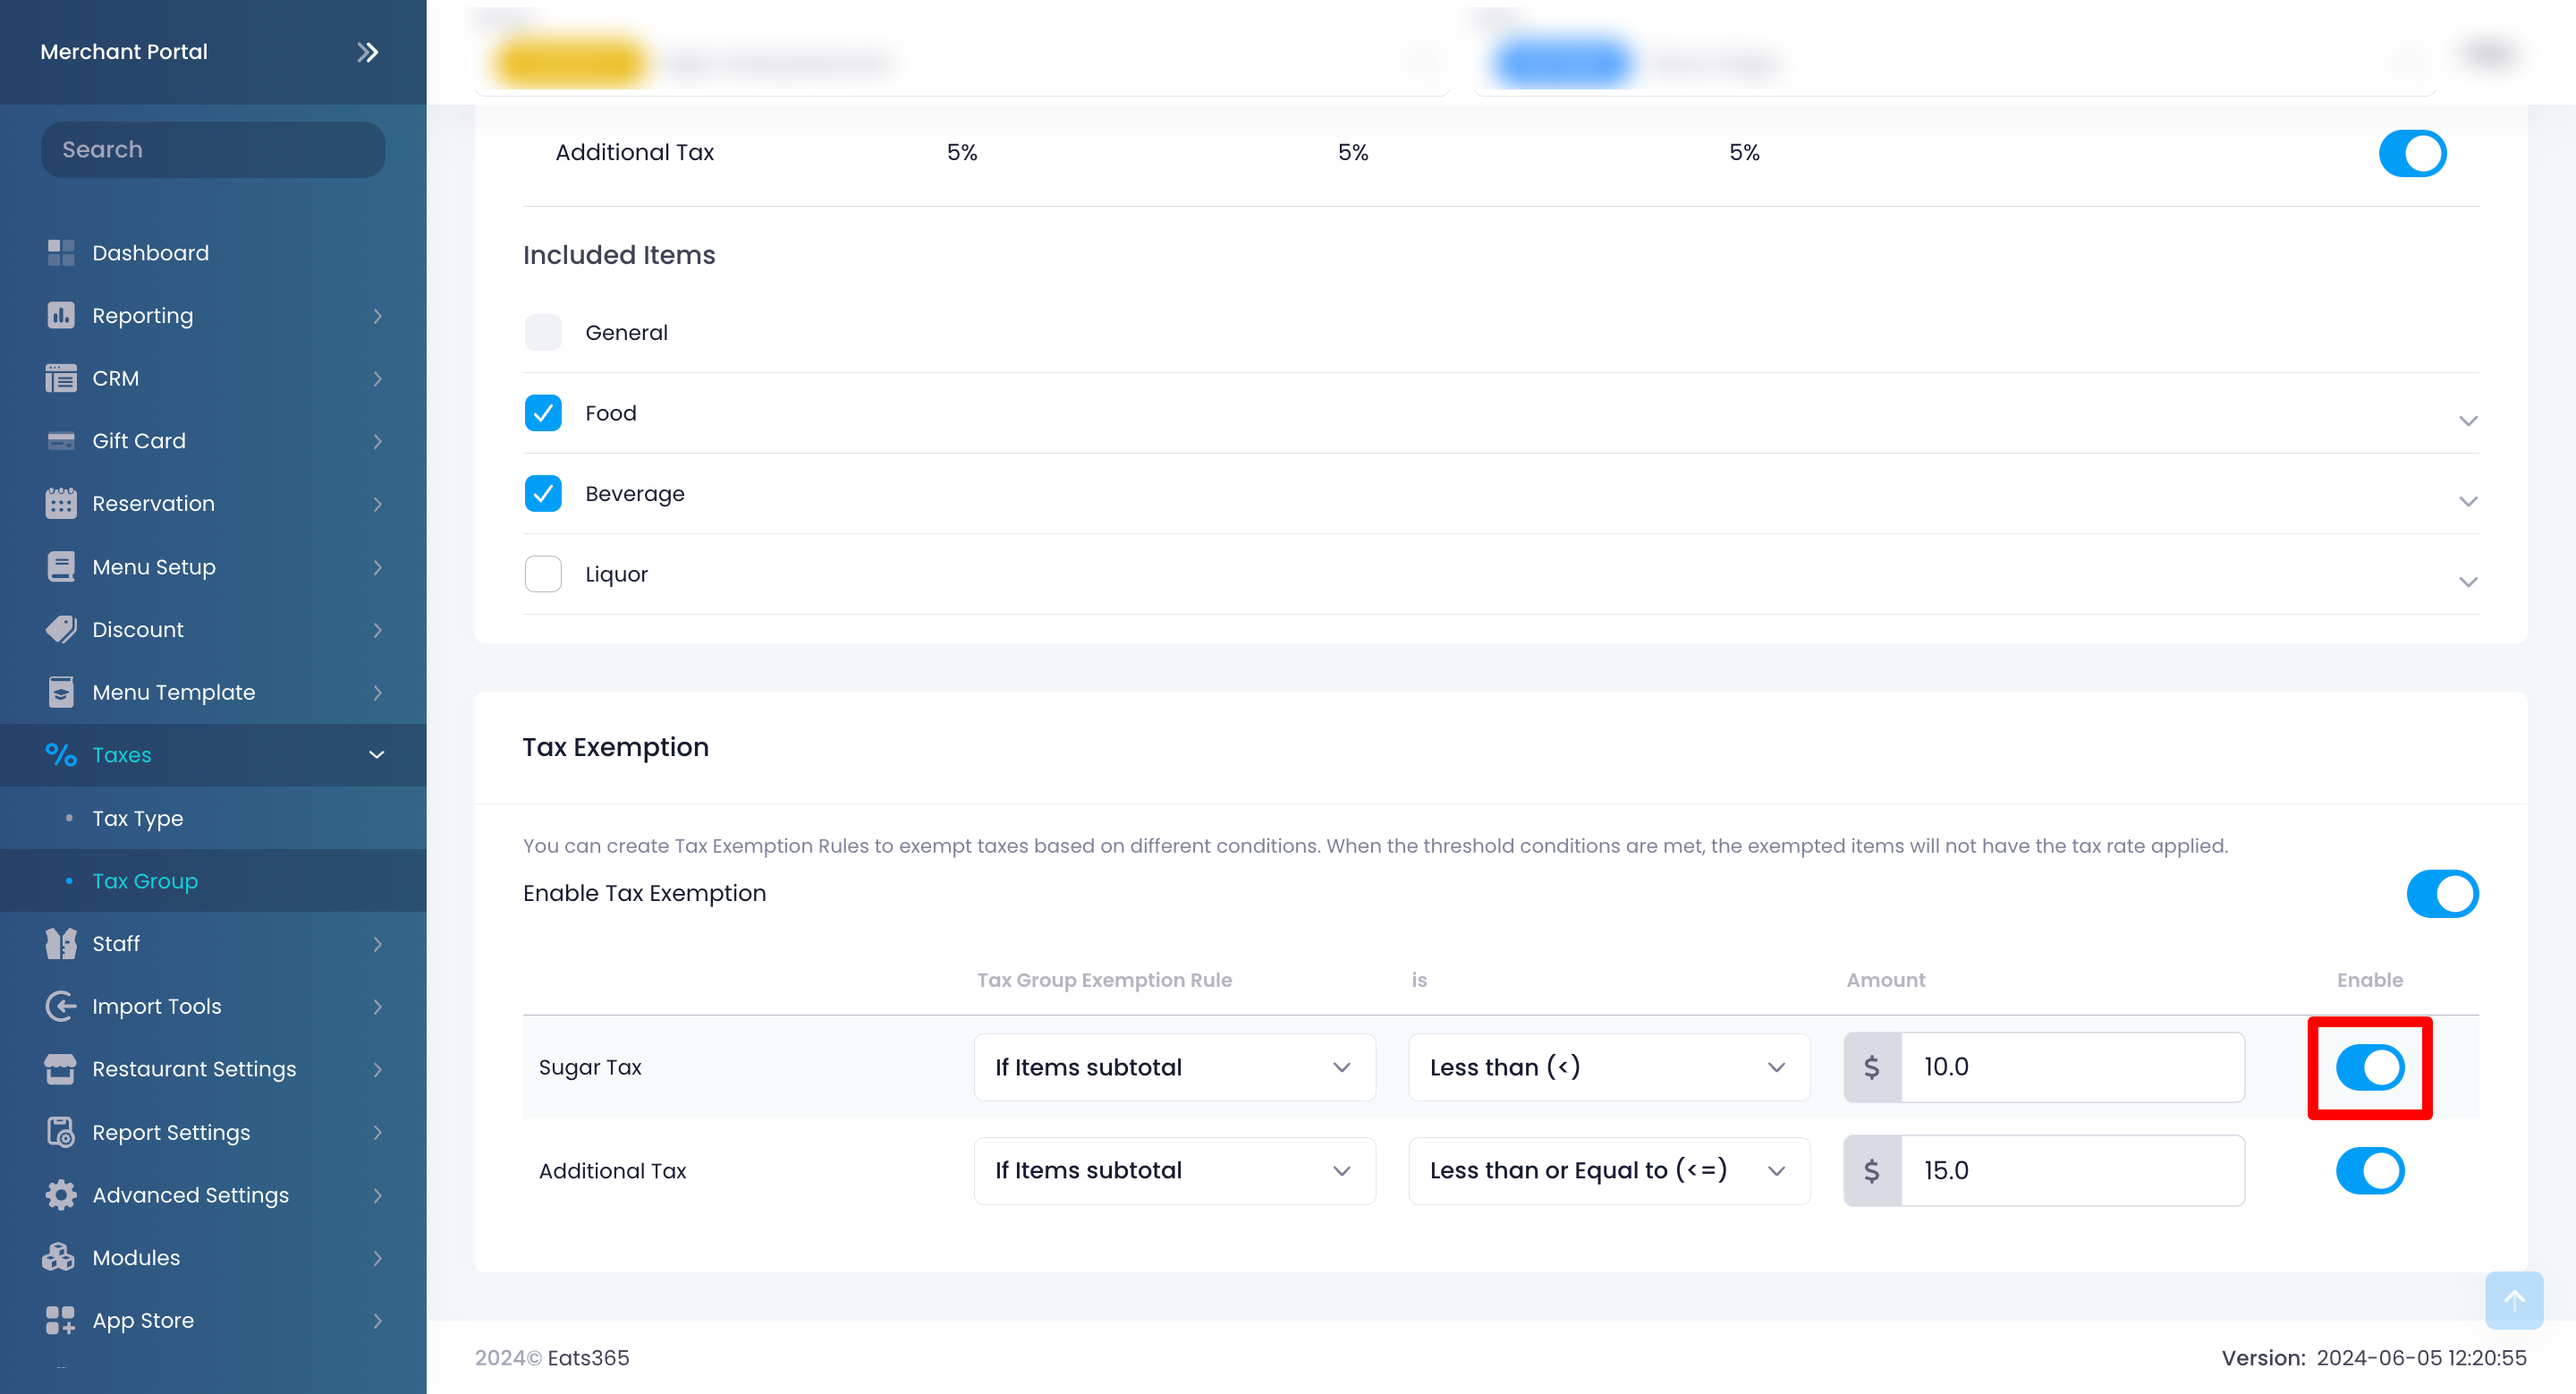
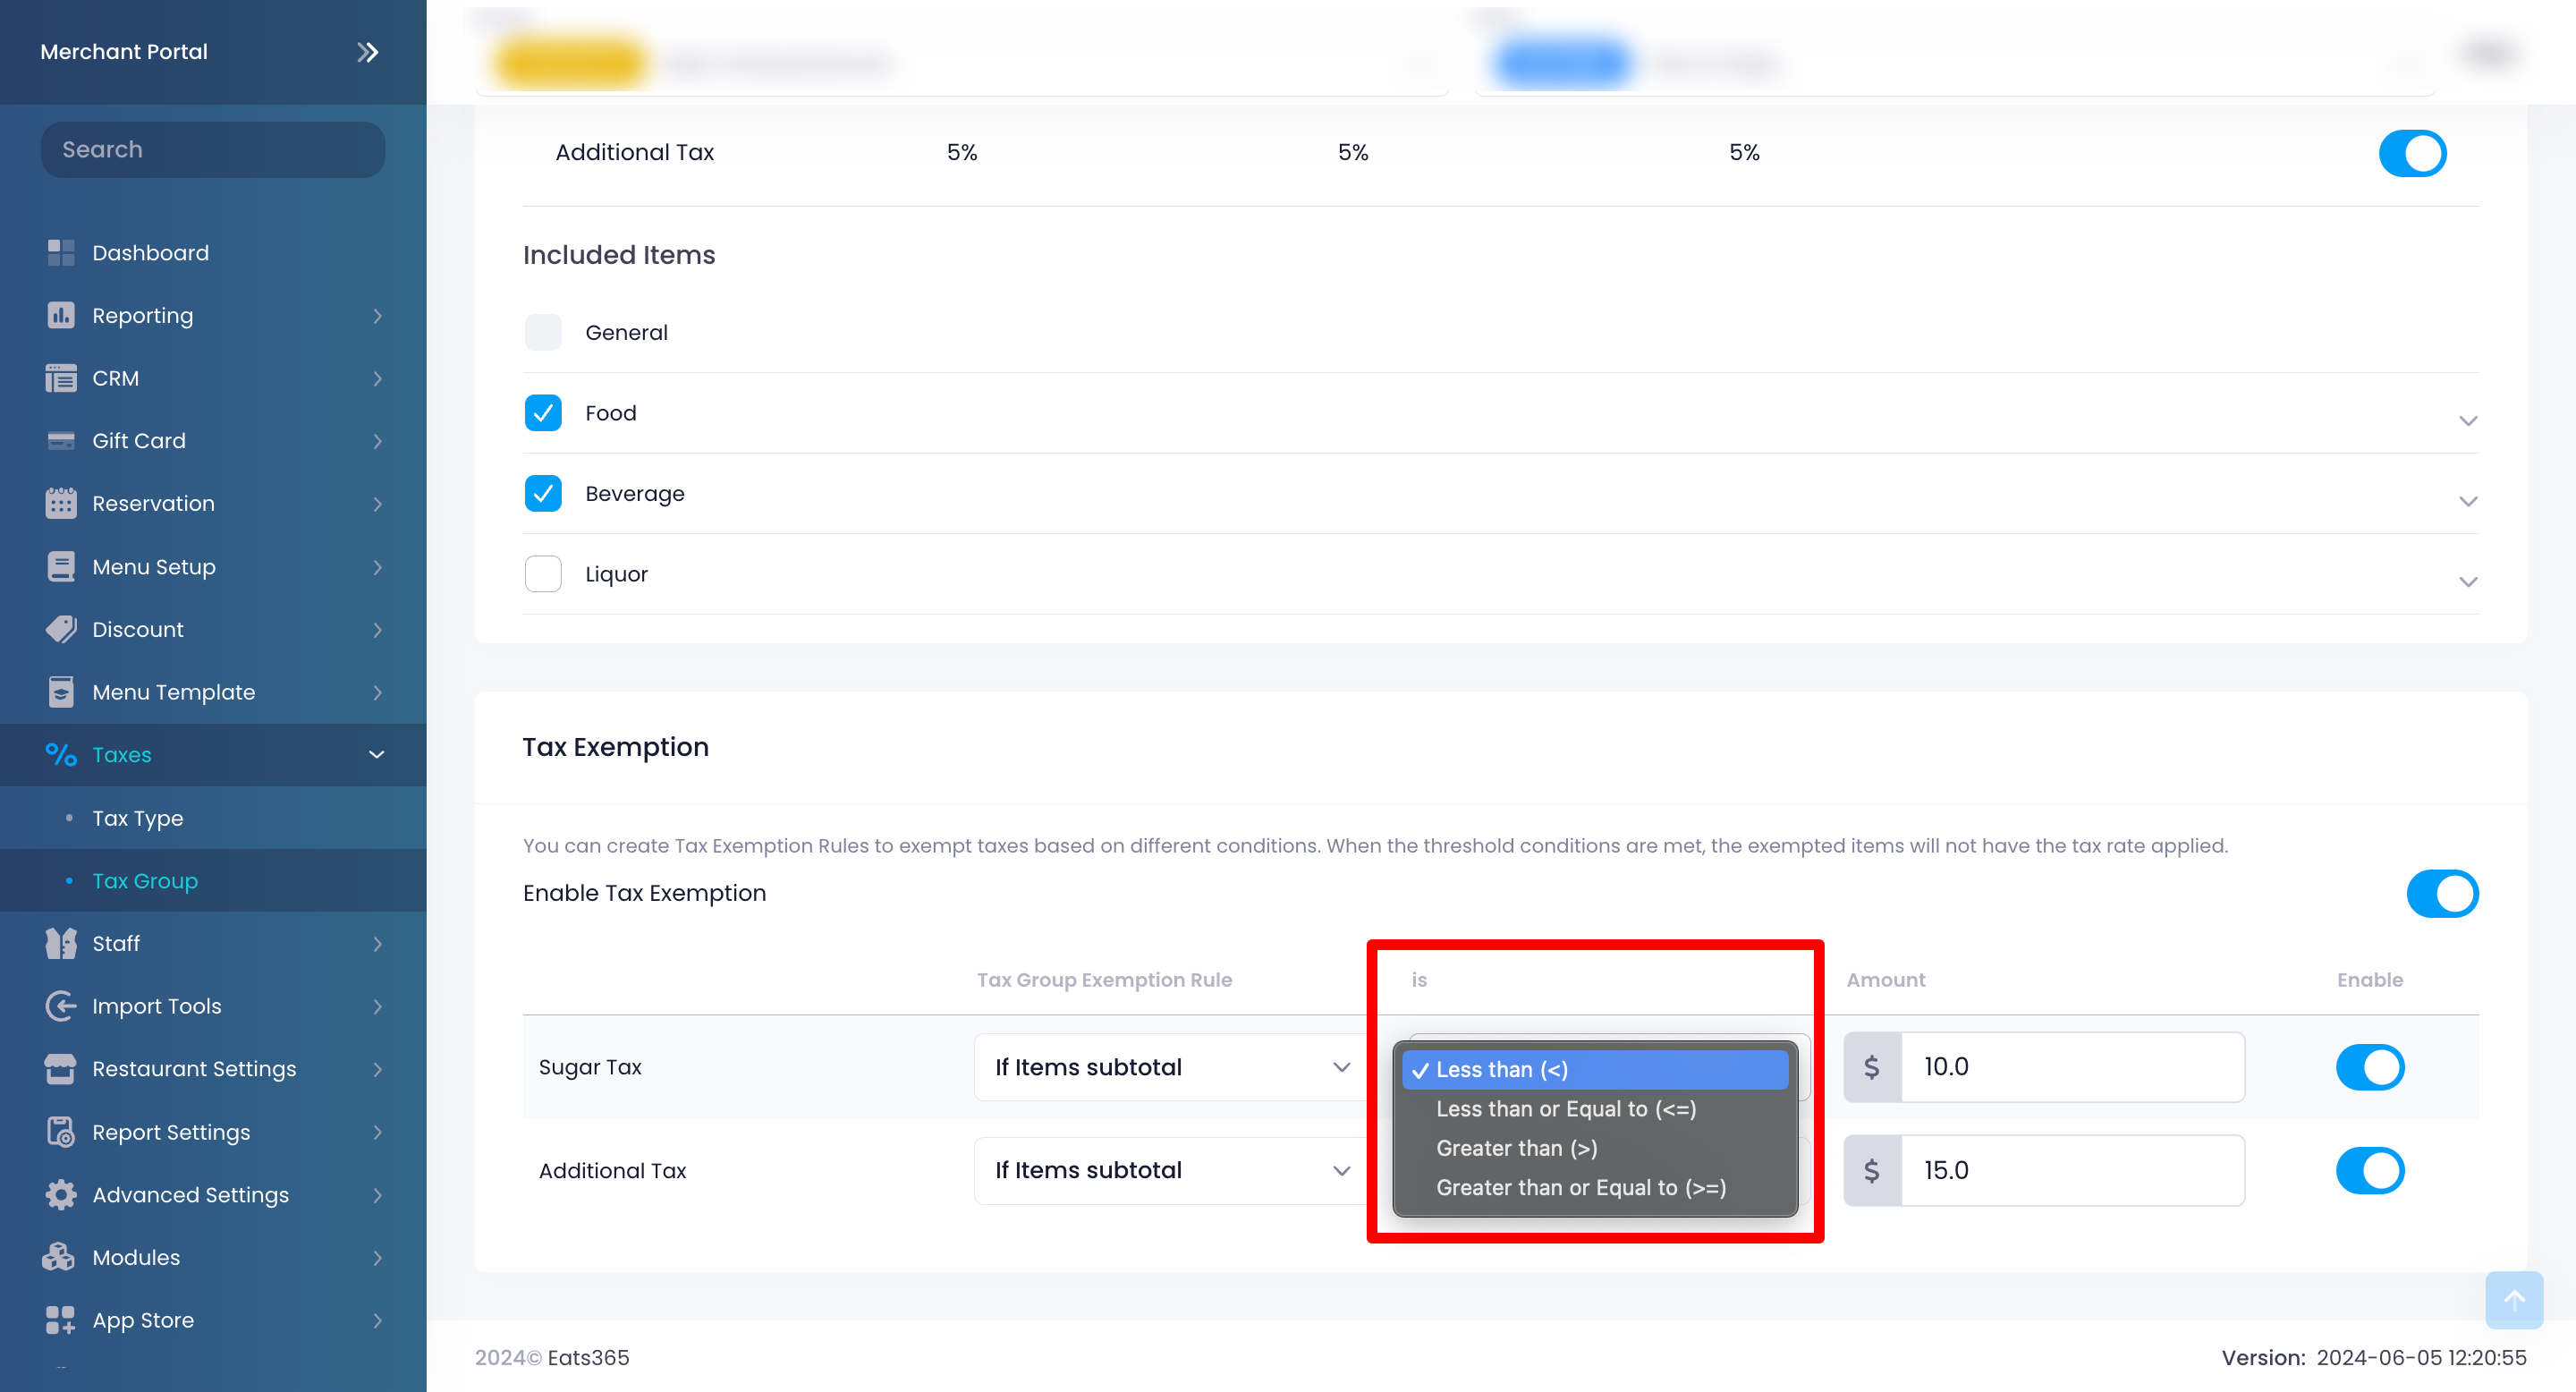
Note: If a Tax Type isn’t included under Included Tax Type, it will be disabled (grayed out). - By default, the Tax Group Exemption Rule is set to “If items subtotal.” Under is, select the condition you’d like to set for the Tax Type. Then, enter the amount for the condition.
- Less than (<) - If the item subtotal is lower than the conditional amount, the selected Tax Type will not apply to the items.
- Less than or Equal to (<=) - If the item subtotal is lower than or equal to the set amount, the selected Tax Type will not apply to the items.
- Greater than (>) - If the item subtotal is higher than the conditional amount, the selected Tax Type will not apply to the items.
-
Greater than or Equal to (>=) - If the item subtotal is higher than or equal to the set amount, the selected Tax Type will not apply to the items.
- At the top right, click on Save to confirm.
Set tax exemption rules
Tax Exemption allows you to define conditions that prevent a selected Tax Type from applying to items when their subtotal meets your specified criteria. For example, you can set Tax Type A to apply without any conditions, and set Tax Type B to only apply if the items’ subtotal amounts to $10 or more.
You must have an existing Tax Group to add tax exemption rules. If you haven’t created a Tax Group, refer to the “Set up a Tax Group” section to create one.
To create tax exemption rules, follow the steps below:
- Log in to the Merchant Portal.
- On the left panel, click on Taxes, then select Tax Group.
- Next to the Tax Group that you want to set tax exemption rules for, click on Edit
 .
. - Under Tax Exemption, turn on Enable Tax Exemption .
- Next to the Tax Type that you’d like to set taxing conditions for, turn on Enable . If you want a Tax Type to be applied every time, leave it turned off .
Note: If a Tax Type isn’t included under Included Tax Type, it will be disabled (grayed out). - By default, the Tax Group Exemption Rule is set to “If items subtotal.” Under is, select the condition you’d like to set for the Tax Type. Then, enter the amount for the condition.
- Less than (<) - If the item subtotal is lower than the conditional amount, the selected Tax Type will not apply to the items.
- Less than or Equal to (<=) - If the item subtotal is lower than or equal to the set amount, the selected Tax Type will not apply to the items.
- Greater than (>) - If the item subtotal is higher than the conditional amount, the selected Tax Type will not apply to the items.
-
Greater than or Equal to (>=) - If the item subtotal is higher than or equal to the set amount, the selected Tax Type will not apply to the items.
- At the top right, click on Save to confirm.
Manage Tax Type
Edit a Tax Type
To modify a Tax Type, follow the steps below:
Eats365 POS
- Log in to the Eats365 POS.
- At the top left, tap Settings .
- Under Settings, tap Taxes.
- On the left panel, select Tax Type.
- Tap the Tax Type that you want to edit.
- Update the Tax Type.
- At the top right, tap Save to confirm.
Merchant Portal (Classic Theme)
- Log in to the Merchant Portal.
- On the left panel, click on Taxes, then select Tax Type.
- Next to the Tax Type that you want to edit, click on Edit
 .
. - Update the Tax Type.
- At the top right, click on Save to confirm.
Merchant Portal 2.0
- Log in to the Merchant Portal.
- On the left panel, click on Taxes, then select Tax Type.
- Next to the Tax Type that you want to edit, click on Edit .
- Update the Tax Type.
- At the top right, click on Save to confirm.
Delete a Tax Type
To delete a Tax Type, follow the steps below:
Eats365 POS
- Log in to the Eats365 POS.
- At the top left, tap Settings .
- Under Settings, tap Taxes.
- On the left panel, select Tax Type.
- Tap the Tax Type that you want to delete.
- At the top right, tap Delete to confirm.
Note: You won’t be able to delete a Tax Type that’s included in a Tax Group. Make sure to remove the Tax Type from the Tax Group first before you delete it.
Merchant Portal (Classic Theme)
- Log in to the Merchant Portal.
- On the left panel, click on Taxes, then select Tax Type.
- Next to the Tax Type that you want to delete, click on Delete
 . A prompt appears to confirm if you want to delete it.
 - Click on Confirm.
Note: You won’t be able to delete a Tax Type that’s included in a Tax Group. Make sure to remove the Tax Type from the Tax Group first before you delete.
Merchant Portal 2.0
- Log in to the Merchant Portal.
- On the left panel, click on Taxes, then select Tax Type.
- Next to the Tax Type that you want to delete, click on Delete
 . A prompt appears to confirm if you want to delete it.
 - Click on Confirm.
Note: You won’t be able to delete a Tax Type that’s included in a Tax Group. Make sure to remove the Tax Type from the Tax Group first before you delete.
Manage Tax Group
Edit a Tax Group
To modify a Tax Group, follow the steps below:
Eats365 POS
- Log in to the Eats365 POS.
- At the top left, tap Settings .
- Under Settings, tap Taxes.
- On the left panel, select Tax Group.
- Tap the Tax Group that you want to edit.
- Update the Tax Group.
- At the top right, tap Save to confirm.
Merchant Portal (Classic Theme)
- Log in to the Merchant Portal.
- On the left panel, click on Taxes, then select Tax Group.
- Next to the Tax Group that you want to edit, click on Edit .
- Update the Tax Group.
- At the top right, click on Save to confirm.
Merchant Portal 2.0
- Log in to the Merchant Portal.
- On the left panel, click on Taxes, then select Tax Group.
- Next to the Tax Group that you want to edit, click on Edit .
- Update the Tax Group.
- At the top right, click on Save to confirm.
Delete a Tax Group
To delete a Tax Group, follow the steps below:
Eats365 POS
- Log in to the Eats365 POS.
- At the top left, tap Settings .
- Under Settings, tap Taxes.
- On the left panel, select Tax Group.
- Tap the Tax Group that you want to delete.
- At the top right, tap Delete to confirm.
Note: You won’t be able to delete a Tax Group that has Items included in it. Make sure to remove the Items from the Tax Group first before you delete them.
Merchant Portal (Classic Theme)
- Log in to the Merchant Portal.
- On the left panel, click on Taxes, then select Tax Group.
- Next to the Tax Group that you want to delete, click on Delete . A prompt appears to confirm if you want to delete it.
- Click on Confirm.
Note: You won’t be able to delete a Tax Group that has Items included in it. Make sure to remove the Items from the Tax Group first before you delete them.
Merchant Portal 2.0
- Log in to the Merchant Portal.
- On the left panel, click on Taxes, then select Tax Group.
- Next to the Tax Group that you want to delete, click on Delete. A prompt appears to confirm if you want to delete it.
- Click on Confirm.
Note: You won’t be able to delete a Tax Group that has Items included in it. Make sure to remove the Items from the Tax Group first before you delete them.