 Eats365 Products
 Merchant Guide
 Modules
 Membership
 Integrations
 Hardware
 Staff Operations
 Roles & Permissions
 Payments
 Reports
 What’s New
 Release Notes
 Troubleshooting
 Simulators
 Glossary
 Troubleshooter
 System Status
Discounts
Table of Contents
Create and manage discounts (Discount 1.0)
Learn how to create, modify, and delete discounts using Discount 1.0 on the Eats365 POS and Merchant Portal.
The Eats365 POS allows you to create different types of discounts, such as “Public,” “Online Ordering,” and “Merchant” discounts, and configure discount settings based on what your restaurant offers. Once discounts are available, you can apply them to orders on the POS or the Branded Online Store, depending on the supported platforms for the discount type.
In this article, you’ll learn how to create, edit, and delete a discount.
Create a discount
To create a discount, follow the steps below:
Eats365 POS
- Log in to the Eats365 POS.
- At the top left, tap Settings
 .
. - Under “Settings,” tap Discount. Then, select the type of discount that you’d like to create. You can choose from the following:

- Public Discount - Create a discount that applies to all customers and is available through all relevant modules.
- Online Ordering Discount - Create a discount that applies to orders placed on the Branded Online Store.
- Merchant Discount - Create a discount that applies to orders placed on the Eats365 POS.
- Merchant Discount (Member) - Create a discount that applies to members’ orders on the Eats365 POS.
- At the top right, tap Add Discount.

- Configure the discount to your preferred settings.
- At the top right, tap Save to confirm.
You can configure the following settings:
Basic Information

Discount Preview
Select an available coupon design for the discount or tap Upload Image to upload a custom image.

Basic Information
Active
Enable this setting to activate the discount.

Discount Name
Enter a name for the discount. This is the discount name that appears on relevant modules.
Receipt Name (As appears on the receipt)
Enter the name that appears on printed tickets and receipts.
Available Quantity
Add the available quantity for the discount. This option can be used to create limited-quantity discounts.
Discount Description
Add the discount’s description.
Terms / Conditions
Add the terms and conditions that apply to the discount.
Auto Apply to Orders
Enable this setting to allow the system to automatically apply the discount to eligible orders.
Exclude from Bundle Discount
Enable this setting to restrict the discount from being applied to items already included in a bundle discount.
Specific Service Type
Select the service type where the discount applies.
Discount Code
Add the code to associate with the discount. The “Discount Code” can be used to easily apply discounts on relevant modules or associate a discount coupon with a specific discount.
Reporting ID
Set a specific reporting ID for the discount. This allows the system to group discounts with the same reporting ID as the same discount for consolidated analysis.
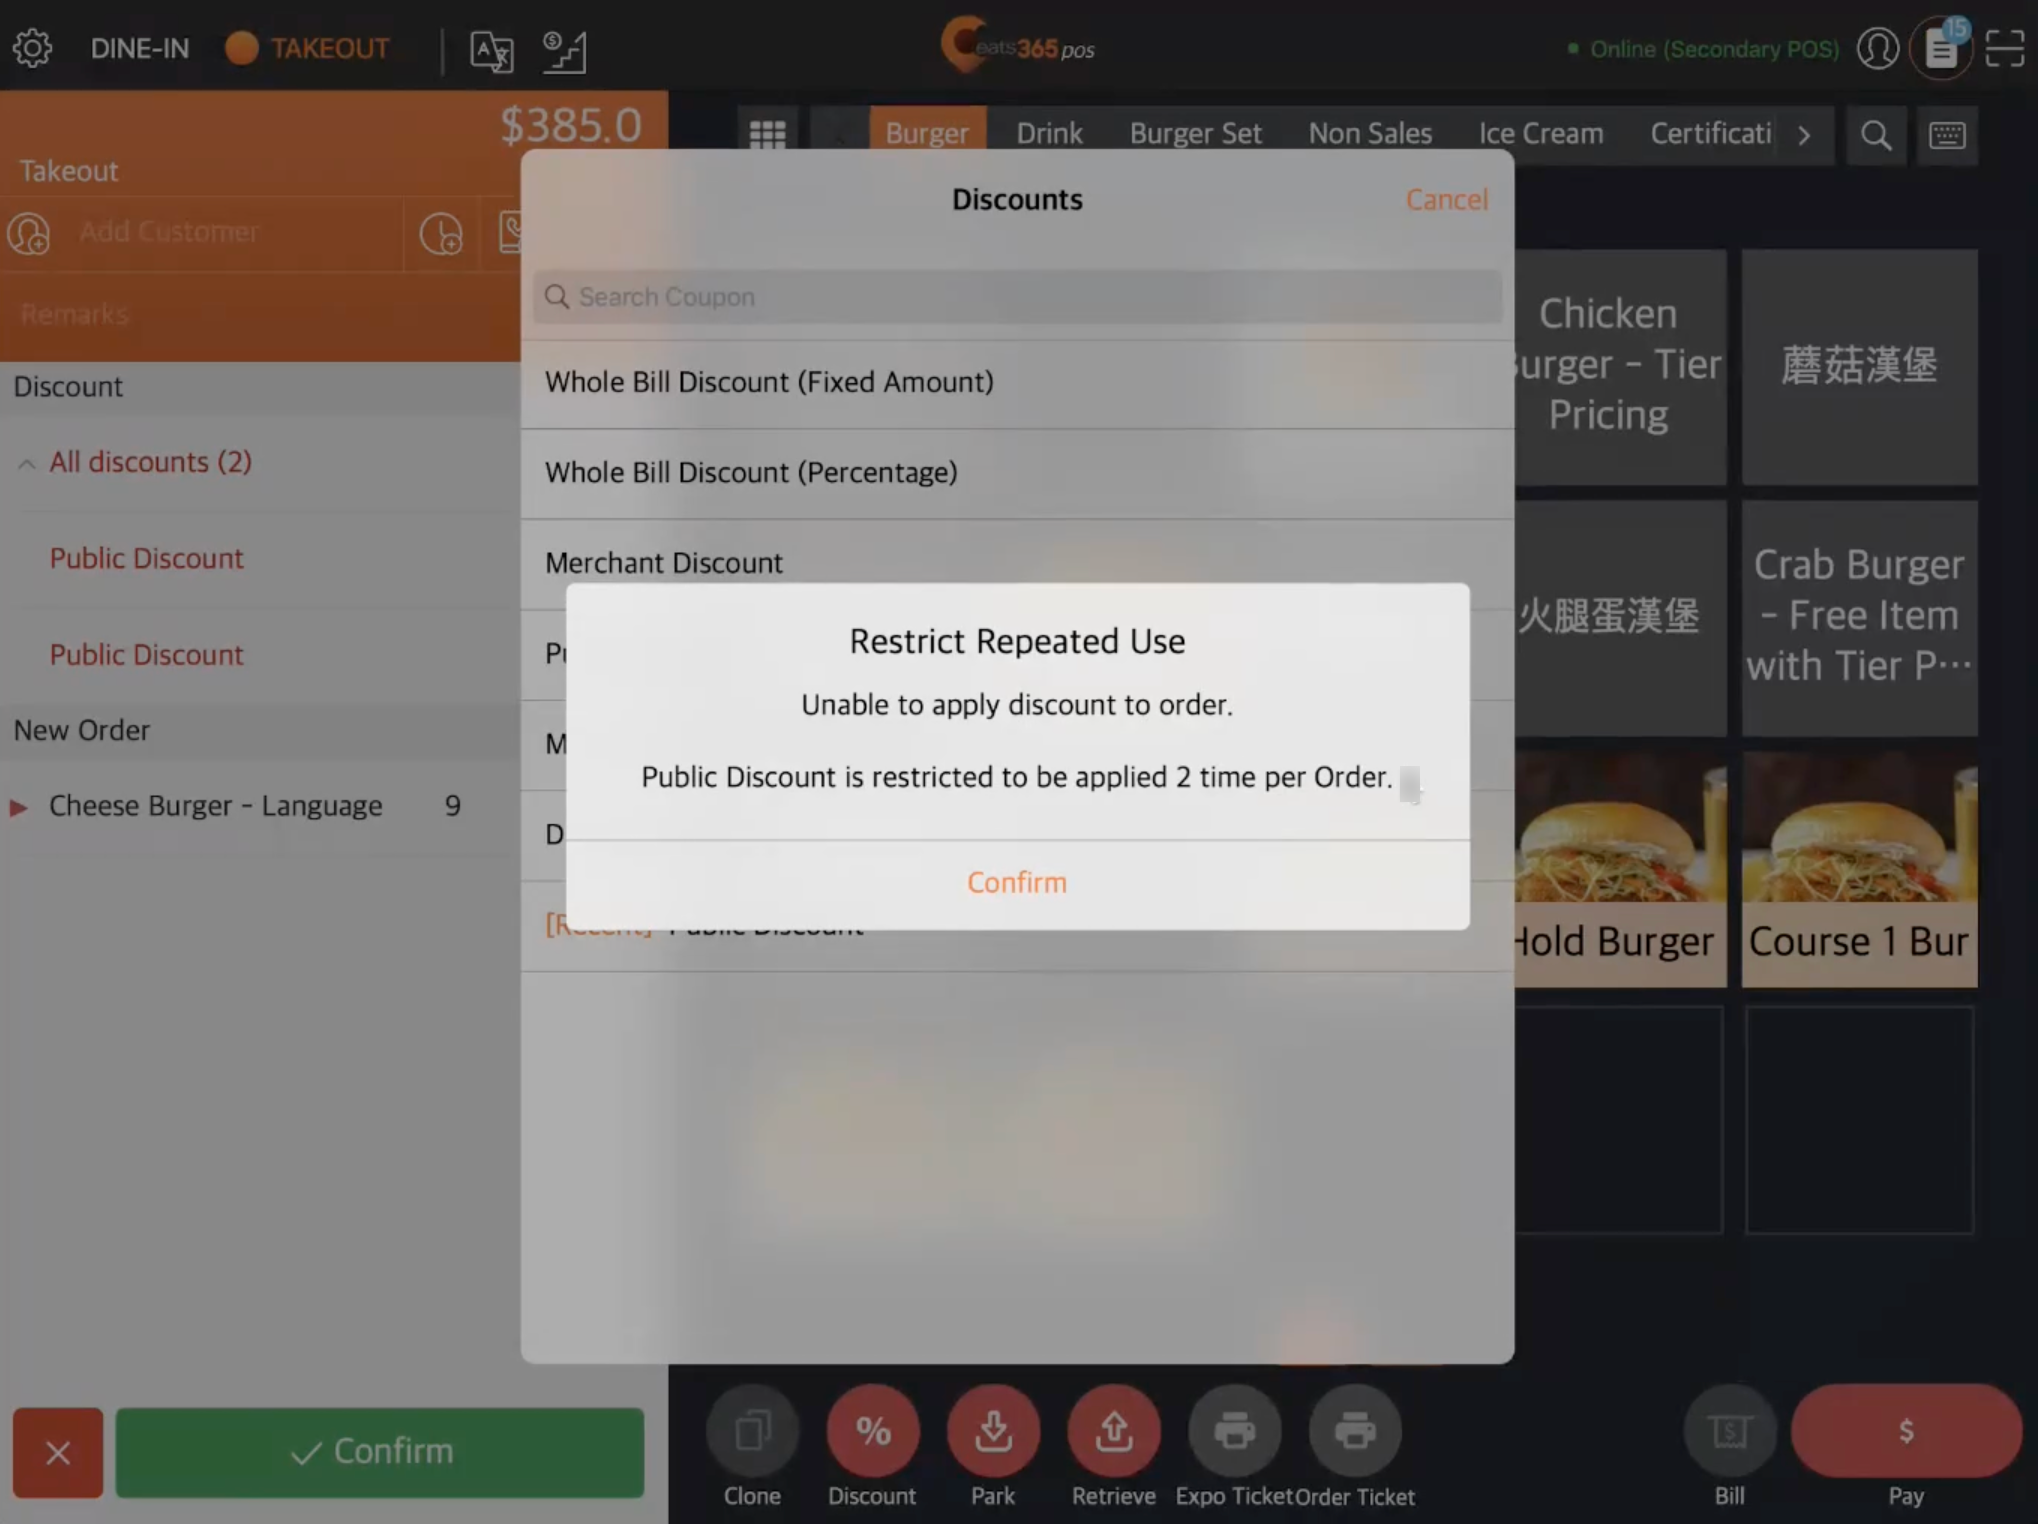
Restrict Repeated Use
Enable this setting to limit the number of times the discount can be used in the same order. For more information on limiting discount usage per order, refer to Add restrictions to discount usage (Discount 1.0).
Availability
Date
Select the start and end date for the availability of the discount.
Time slots
Select the days and time when the discount can be applied to an order.
DeleteDiscount Details
Offers
Choose the offer type that you want to apply to the order. The “Offer Type” determines the promotion that the discount entails. For example, if you select “Complimentary Item” as the offer type, the customer will receive a complimentary item if they meet the conditions of the discount. Refer to the “Offer Type” section below to learn how to add offer types to a discount.

Conditions
Set the condition that customers must meet to be eligible for the discount. You can choose from the following requirement options:

- Item - Select this option to allow the system to apply the discount when certain items are added to the order.
- Total price - Set the total order amount that customers must meet to avail of the discount.
- Category - Select this option to allow the system to apply the discount when items from a specific category are added to the order.
- Quantity - Set the required order quantity that customers must purchase to get the discount. You can set the order quantity to apply to all items or configure the setting to apply to specific items.
- Party Size - Set the minimum party size required to be eligible for the discount. You can set the party size to apply to a specific party size range or an age group.
Merchant Portal 2.0
- Log in to the Merchant Portal.
- On the left panel, click on Discount
 Discount Type.
 - Select the type of discount that you’d like to create. You can choose from the following:

- Public Discount - Create a discount that applies to all customers and is available through all relevant modules.
- Online Ordering Discount - Create a discount that applies to orders placed on the Branded Online Store.
- Merchant Discount - Create a discount that applies to orders placed on the Eats365 POS.
- Merchant Discount (Member) - Create a discount that applies to members’ orders on the Eats365 POS.
- Depending on the discount type you selected, at the top right, click on + Discount Type. For example, “+ Public Discount.”

- Configure the discount to your preferred settings.
- At the top right, click on Save to confirm.
You can configure the following settings:
Basic Information
Basic Information
Discount Image
Add an image to easily identify the discount.
Active
Enable this setting to activate the discount.

Discount Name
Enter a name for the discount per language. This is the discount name that appears on relevant modules.
Receipt Name
Enter the name that appears on printed tickets and receipts.
Discount Description
Add the discount’s description.
Terms / Conditions
Add the terms and conditions that apply to the discount.
Available Quantity
Add the available quantity for the discount. This option can be used to create limited-quantity discounts.
Discount Code
Add the code to associate with the discount. The “Discount Code” can be used to easily apply discounts on relevant modules or associate a discount coupon with a specific discount.
Item Code (Reporting)
Set a specific reporting ID for the discount. This allows the system to group discounts with the same reporting ID as the same discount for consolidated analysis.
Auto Apply
Enable this setting to allow the system to automatically apply the discount to eligible orders.
Restrict Repeated Use
Enable this setting to limit the number of times the discount can be used in the same order. For more information on limiting discount usage per order, refer to Add restrictions to discount usage (Discount 1.0).
Exclude Bundle Discount Items
Enable this setting to restrict the discount from being applied to items already included in a bundle discount.
DeleteAvailability
Available for Pre-order
Enable this setting to allow the discount to be applied to pre-orders.
Available For
Select the service type where the discount applies.
Available
Select the start and end date for the availability of the discount.
Time Slots
Select the days and time when the discount can be applied to an order.
Special Handling Date(s)
Set a different time slot for specific dates, such as special holidays.
Unavailable Date(s)
Set the discount to be unavailable during specific dates, such as special holidays.
DeleteDiscount Detail
Offer
Choose the offer type that you want to apply to the order. The “Offer Type” determines the promotion that the discount entails. For example, if you select “Complimentary Item” as the offer type, the customer will receive a complimentary item if they meet the conditions of the discount. Refer to the “Offer Type” section below to learn how to add offer types to a discount.

Conditions
Set the condition that customers must meet to be eligible for the discount. You can choose from the following requirement options:

- Item - Select this option to allow the system to apply the discount when certain items are added to the order.
- Total price - Set the total order amount that customers must meet to avail of the discount.
- Category - Select this option to allow the system to apply the discount when items from a specific category are added to the order.
- Quantity - Set the required order quantity that customers must purchase to get the discount. You can set the order quantity to apply to all items or configure the setting to apply to specific items.
- Party Size - Set the minimum party size required to be eligible for the discount. You can set the party size to apply to a specific party size range or an age group.
Merchant Portal (Classic Theme)
- Log in to the Merchant Portal.
- On the left panel, click on Menu Setup.
- Under “Discount,” select the type of discount that you’d like to create. You can choose from the following options:
- Public Discount - Create a discount that applies to all customers and is available through all relevant modules.
- User App Discount - Create a discount that applies to orders placed on the Branded Online Store.
- Merchant Discount - Create a discount that applies to orders placed on the Eats365 POS.
- Merchant Discount (Member) - Create a discount that applies to members’ orders on the Eats365 POS.
- Depending on the discount type you selected, at the top right, click on + Discount Type. For example, “+ Public Discount.”
- Configure the discount to your preferred settings.
- At the top right, click on Save to confirm.
You can configure the following settings:
Basic Information
Basic Information
Language
Select the language for the discount you’re creating.
Discount Name
Enter a name for the discount. This is the discount name that appears on relevant modules.
Active
Enable this setting to activate the discount.
Receipt Name
Enter the name that appears on printed tickets and receipts.
Available Quantity
Add the available quantity for the discount. This option can be used to create limited-quantity discounts.
Discount Description
Add the discount’s description.
Terms / Conditions
Add the terms and conditions that apply to the discount.
Discount Code
Add the code to associate with the discount. The “Discount Code” can be used to easily apply discounts on relevant modules or associate a discount coupon with a specific discount.
Item Code (Reporting)
Set a specific reporting ID for the discount. This allows the system to group discounts with the same reporting ID as the same discount for consolidated analysis.
Auto Apply
Enable this setting to allow the system to automatically apply the discount to eligible orders.
Restrict Repeated Use
Enable this setting to limit the number of times the discount can be used in the same order. For more information on limiting discount usage per order, refer to Add restrictions to discount usage (Discount 1.0).
Exclude from Bundle Promotion
Enable this setting to restrict the discount from being applied to items already included in a bundle discount.
DeleteAvailability
Available for Pre-order
Enable this setting to allow the discount to be applied to pre-orders.
Available For
Select the service type where the discount applies.
Available
Select the start and end date for the availability of the discount.
Time Slots
Select the days and time when the discount can be applied to an order.
DeleteDiscount Detail
Offer
Choose the offer type that you want to apply to the order. The “Offer Type” determines the promotion that the discount entails. For example, if you select “Complimentary Item” as the offer type, the customer will receive a complimentary item if they meet the conditions of the discount. Refer to the “Offer Type” section below to learn how to add offer types to a discount.
DeleteConditions
Set the condition that customers must meet to be eligible for the discount. You can choose from the following requirement options:
- Item - Select this option to allow the system to apply the discount when certain items are added to the order.
- Total price - Set the total order amount that customers must meet to avail of the discount.
- Category - Select this option to allow the system to apply the discount when items from a specific category are added to the order.
- Quantity - Set the required order quantity that customers must purchase to get the discount. You can set the order quantity to apply to all items or configure the setting to apply to specific items.
- Party Size - Set the minimum party size required to be eligible for the discount. You can set the party size to apply to a specific party size range or an age group.
Offer Types
Use the guide below to set a discount offer:
Eats365 POS
Whole Bill Discount (Percentage)
Deducts a certain percentage from the total bill. For example, if you set the Whole Bill Discount percentage to “10” and the total bill is $100, 10 percent of $100 or $10, will be deducted from the total bill.
- Enter the percentage that you’d like to deduct from the bill.
- (Optional) Exclude select items from getting the discount:
- Tap Excluded Items
 .
. - At the top right, tap Add Category or Add Item, then select the category or items that you’d like to exclude.
- Tap Back
 to go back to the "Discount Details" page.
- Tap Excluded Items
Whole Bill Discount (Amount)
Deducts a fixed amount from the total bill. For example, if you set the Whole Bill Discount amount to “20,” then $20 will be deducted from the total bill.
- Enter the amount that you’d like to deduct from the bill.
- (Optional) Exclude select items from getting the discount:
- Tap Excluded Items.
- At the top right, tap Add Category or Add Item, then select the category or items that you’d like to exclude.
- Tap Back to go back to the "Discount Details" page.
- Tap Excluded Items
Category Discount (Percentage)
Deducts a certain percentage from the price of items under the participating category. For example, if you set the Category Discount percentage to “50” and the customer purchases $100 worth of items from the participating category, then 50 percent of $100 or $50 will be deducted from the total worth of participating items.
- Select the category where the discount applies.
- Enter the percentage that you’d like to deduct from a participating item’s price.
- (Optional) Exclude select items from getting the discount:
- Tap Excluded Items.
- At the top right, tap Add Category or Add Item, then select the category or items you’d like to exclude.
- Tap Back to go back to the "Discount Details" page.
- Tap Excluded Items
Category Discount (Amount)
Deducts a fixed amount from the price of items under the participating category. The Category Discount amount that you set is the maximum amount that can be applied to an order using the discount, regardless of the total worth of participating items included in the order.
For example, if you set the Category Discount amount to “10” and the total bill is $100, which includes $25 worth of participating items, $10 will be deducted from the total worth of participating items.
- Select the category where the discount applies.
- Enter the amount that you’d like to deduct from a participating item’s price.
- (Optional) Exclude select items from getting the discount:
- Tap Excluded Items.
- At the top right, tap Add Category or Add Item, then select the category or items you’d like to exclude.
- Tap Back to go back to the "Discount Details" page.
- Tap Excluded Items
Item Discount (Percentage)
Deducts a certain percentage from the price of participating items. For example, if a participating item’s price is $10 and you set the Item Discount percentage to “50,” then 50 percent of $10 or a total of $5 will be deducted from the total price of the participating items.
- Select the item where the discount applies.
- Enter the percentage that you’d like to deduct from the price of the participating item.
Item Discount (Amount)
Deducts a fixed amount from the price of participating items. The Item Discount amount that you set is the maximum amount that can be applied to an order using the discount, regardless of the total worth of the participating items included in the order.
For example, if you set the Item Discount amount to “10” and the total bill is $100, including $25 worth of participating items, then $10 will be deducted from the total worth of participating items.
- Select the item where the discount applies.
- Enter the amount you’d like to deduct from the price of the participating item.
Complimentary Item
Adds a free item to the order. For example, if you create a complimentary discount with “Banana Split” as the free item and “2” as the item quantity, customers who are eligible for the promotion are entitled to two free servings of Banana Split.
- Select an item to make complimentary.
- Enter the quantity.
Third Party
Used for tagging and reporting purposes only. No information is required for this discount type, and when this discount is applied to an order, it appears as “0.”
DeleteCategory Discount (Amount) - 1 Item Only
Deducts a fixed amount from one participating item, regardless if the customer orders multiple items from the participating category.
- Select the category where the discount applies.
- Enter the amount that you’d like to deduct from the price of the participating item.
- (Optional) Exclude selected items from getting the discount:
- Tap Excluded Items.
- At the top right, tap Add Category or Add Item, then select the category or items that you’d like to exclude.
- Tap Back to go back to the "Discount Details" page.
- Tap Excluded Items
Item Discount (Amount) - 1 Item Only
Deducts a fixed amount from one participating item, regardless if the customer orders multiple participating items. For example, if the customer orders three participating items worth $5 each, the discount will only apply to one item, amounting to $5.
- Select the item where the discount applies.
- Enter the amount that you’d like to deduct from the price of the participating item.
Merchant Portal 2.0
Whole Bill Discount (Percentage)
Deducts a certain percentage from the total bill. For example, if you set the Whole Bill Discount percentage to “10” and the total bill is $100, 10 percent of $100 or $10, will be deducted from the total bill.
- Enter the percentage you’d like to deduct from the bill.
- (Optional) To exclude select items from getting the discount, click on the Excluded Category or Excluded Item drop-down, then select the category or items you’d like to exclude.
Whole Bill Discount (Amount)
Deducts a fixed amount from the total bill. For example, if you set the Whole Bill Discount amount to “20,” then $20 will be deducted from the total bill.
- Enter the amount you’d like to deduct from the bill.
- (Optional) To exclude select items from getting the discount, click on the Excluded Category or Excluded Item drop-down, then select the category or items you’d like to exclude.
Category Discount (Percentage)
Deducts a certain percentage from the price of items under the participating category. For example, if you set the Category Discount percentage to “50” and the customer purchases $100 worth of items from the participating category, then 50 percent of $100 or $50 will be deducted from the total worth of participating items.
- Next to "Category," click on the drop-down list. Then, choose a category where the discount applies.
- Enter the percentage you’d like to deduct from a participating item’s price.
- (Optional) To exclude select items from getting the discount, click on the Excluded Item drop-down, then select the items you’d like to exclude.
Category Discount (Amount)
Deducts a fixed amount from the price of items under the participating category. The Category Discount amount that you set is the maximum amount that can be applied to an order using the discount, regardless of the total worth of participating items included in the order.
For example, if you set the Category Discount amount to “10” and the total bill is $100, which includes $25 worth of participating items, $10 will be deducted from the total worth of participating items.
- Next to "Category," click on the drop-down list. Then, choose a category where the discount applies.
- Enter the amount you’d like to deduct from a participating item’s price.
- (Optional) To exclude select items from getting the discount, click on the Excluded Item drop-down, then select the items you’d like to exclude.
Item Discount (Percentage)
Deducts a certain percentage from the price of participating items. For example, if a participating item’s price is $10 and you set the Item Discount percentage to “50,” then 50 percent of $10 or a total of $5 will be deducted from the total price of the participating items.
- Next to "Category," click on the drop-down list. Then, choose the category under which the item you intend to add is located.
- Next to "Item," click on the drop-down list. Then, select an item where the discount applies.
- Enter the percentage you’d like to deduct from the price of the participating item.
Item Discount (Amount)
Deducts a fixed amount from the price of participating items. The Item Discount amount that you set is the maximum amount that can be applied to an order using the discount, regardless of the total worth of the participating items included in the order.
For example, if you set the Item Discount amount to “10” and the total bill is $100, including $25 worth of participating items, then $10 will be deducted from the total worth of participating items.
- Next to "Category," click on the drop-down list. Then, choose the category under which the item you intend to add is located.
- Next to "Item," click on the drop-down list. Then, select an item where the discount applies.
- Enter the amount you’d like to deduct from the price of the participating item.
Complimentary Item
Adds a free item to the order. For example, if you create a complimentary discount with “Banana Split” as the free item and “2” as the item quantity, customers who are eligible for the promotion are entitled to two free servings of Banana Split.
- Next to "Category," click on the drop-down list. Then, choose the category under which the item you intend to add is located.
- Next to "Item," click on the drop-down list. Then, select an item to make complimentary.
- Enter the quantity.
Third Party
Used for tagging and reporting purposes only. No information is required for this discount type, and when this discount is applied to an order, it appears as “0.”
DeleteCategory Discount (Amount) - 1 Item Only
Deducts a fixed amount from one participating item, regardless if the customer orders multiple items from the participating category.
- Next to "Category," click on the drop-down list. Then, choose a category where the discount applies.
- Enter the amount you’d like to deduct from the price of the participating item.
- (Optional) To exclude select items from getting the discount, click on the Excluded Item drop-down, then select the items you’d like to exclude.
Item Discount (Amount) - 1 Item Only
Deducts a fixed amount from one participating item, regardless if the customer orders multiple participating items. For example, if the customer orders three participating items worth $5 each, the discount will only apply to one item, amounting to $5.
- Next to "Item," click on the drop-down list. Then, select an item where the discount applies.
- Enter the amount you’d like to deduct from the price of the participating item.
Merchant Portal (Classic Theme)
Whole Bill Discount (Percentage)
Deducts a certain percentage from the total bill. For example, if you set the Whole Bill Discount percentage to “10” and the total bill is $100, 10 percent of $100 or $10, will be deducted from the total bill.
- Enter the percentage that you’d like to deduct from the bill.
- (Optional) Exclude select items from getting the discount.
Whole Bill Discount (Amount)
Deducts a fixed amount from the total bill. For example, if you set the Whole Bill Discount amount to “20,” then $20 will be deducted from the total bill.
- Enter the amount you’d like to deduct from the bill.
- (Optional) To exclude select items from getting the discount, click on the Excluded Category or Excluded Item drop-down, then select the categories or items you’d like to exclude.
Category Discount (Percentage)
Deducts a certain percentage from the price of items under the participating category. For example, if you set the Category Discount percentage to “50” and the customer purchases $100 worth of items from the participating category, then 50 percent of $100 or $50 will be deducted from the total worth of participating items.
- Next to "Category," click on the drop-down list. Then, choose a category where the discount applies.
- Enter the percentage you’d like to deduct from a participating item’s price.
- (Optional) To exclude select items from getting the discount, click on the Excluded Item drop-down, then select the items you’d like to exclude.
Category Discount (Amount)
Deducts a fixed amount from the price of items under the participating category. The Category Discount amount that you set is the maximum amount that can be applied to an order using the discount, regardless of the total worth of participating items included in the order.
For example, if you set the Category Discount amount to “10” and the total bill is $100, which includes $25 worth of participating items, $10 will be deducted from the total worth of participating items.
- Next to "Category," click on the drop-down list. Then, choose a category where the discount applies.
- Enter the amount you’d like to deduct from a participating item’s price.
- (Optional) To exclude select items from getting the discount, click on the Excluded Item drop-down, then select the items you’d like to exclude.
Item Discount (Percentage)
Deducts a certain percentage from the price of participating items. For example, if a participating item’s price is $10 and you set the Item Discount percentage to “50,” then 50 percent of $10 or a total of $5 will be deducted from the total price of the participating items.
- Next to "Category," click on the drop-down list. Then, choose the category under which the item you intend to add is located.
- Next to "Item," click on the drop-down list. Then, select an item where the discount applies.
- Enter the percentage you’d like to deduct from the price of the participating item.
Item Discount (Amount)
Deducts a fixed amount from the price of participating items. The Item Discount amount that you set is the maximum amount that can be applied to an order using the discount, regardless of the total worth of the participating items included in the order.
For example, if you set the Item Discount amount to “10” and the total bill is $50, including $25 worth of participating items, then $10 will be deducted from the total worth of participating items.
- Next to "Category," click on the drop-down list. Then, choose the category under which the item you intend to add is located.
- Next to "Item," click on the drop-down list. Then, select an item where the discount applies.
- Enter the amount you’d like to deduct from the price of the participating item.
Complimentary Item
Adds a free item to the order. For example, if you create a complimentary discount with “Banana Split” as the free item and “2” as the item quantity, customers who are eligible for the promotion are entitled to two free servings of Banana Split.
- Next to "Category," click on the drop-down list. Then, choose the category under which the item you intend to add is located.
- Next to "Item," click on the drop-down list. Then, select an item to make complimentary.
- Enter the quantity.
Third Party
Used for tagging and reporting purposes only. No information is required for this discount type, and when this discount is applied to an order, it appears as “0.”
DeleteCategory Discount (Amount) - 1 Item Only
Deducts a fixed amount from one participating item, regardless if the customer orders multiple items from the participating category.
- Next to "Category," click on the drop-down list. Then, choose a category where the discount applies.
- Enter the amount you’d like to deduct from the price of the participating item.
- (Optional) To exclude select items from getting the discount, click on the Excluded Item drop-down, then select the items you’d like to exclude.
Item Discount (Amount) - 1 Item Only
Deducts a fixed amount from one participating item, regardless of whether the customer orders multiple participating items. For example, if the customer orders three participating items worth $5 each, the discount will only apply to one item, amounting to $5.
- Next to "Item," click on the drop-down list. Then, select an item where the discount applies.
- Enter the amount you’d like to deduct from the price of the participating item.
Use an existing discount to create a new discount
When creating a discount with details and settings that are similar to an existing discount, you can create a copy of the existing discount and use it to create a new discount. This reduces the effort needed to create a similar discount from scratch. Once a copy is created, you can customize the discount to fit the new discount you want to create.
To duplicate an existing discount, follow the steps below:
Eats365 POS
- Log in to the Eats365 POS.
- At the top left, tap Settings .
- Under "Settings," tap Discount. Then, select the type of discount you’d like to duplicate. You can choose from the following:
- Public Discount
- Online Ordering Discount
- Merchant Discount
- Merchant Discount (Member)
- Next to the discount that you’d like to duplicate, tap the three-dot menu
 . Then, tap Copy to a new Discount
  . This creates a new discount with the same information as the original discount.
 Tip: To search for a discount by name, at the top right, tap Search Coupon. Then, enter the discount name.
- Configure the discount settings to fit the new discount.
- Once done, at the top right, tap Save.
Merchant Portal 2.0
- Log in to the Merchant Portal.
- On the left panel, click on DiscountDiscount Type.
- Select the type of discount you’d like to add:
- Public Discount
- Merchant Discount
- Online Ordering Discount
- Merchant Discount (Member)
- Next to the discount you’d like to duplicate, click on Copy
 . This creates a new discount with the same information as the original discount.
 Tip: You can find an existing discount by entering the discount name or discount code in the search bar, or using the “Availability” and “Status” filters.
- Configure the discount settings to fit the new discount.
- Once done, at the top right, click on Save.
Merchant Portal (Classic Theme)
- Log in to the Merchant Portal.
- On the left panel, click on Menu Setup.
- Under “Discount,” select the type of discount that you’d like to duplicate. You can choose from the following:
- Public Discount
- Merchant Discount
- User App Discount
- Merchant Discount (Member)
- Next to the discount that you’d like to duplicate, click on Copy . This creates a new discount with the same information as the original discount.
Tip: You can use the search bar or "Availability" and "Status" filters to find an existing discount easier. - Configure the discount settings to fit the new discount.
- Once done, at the top right, click on Save.
Manage discounts
Edit a discount
To modify a discount, follow the steps below:
Eats365 POS
- Log in to the Eats365 POS.
- At the top left, tap Settings .
- Under "Settings," tap Discount. Then, select the type of discount you’d like to edit:
- Public Discount
- Online Ordering Discount
- Merchant Discount
- Merchant Discount (Member)
- Next to the discount you’d like to edit, tap the three-dot menu . Then, tap Edit
 .
. Tip: To search for a discount by name, at the top right, tap Search Coupon. Then, enter the discount name.
- Update the discount.
- Once done, at the top right, tap Save.
Merchant Portal 2.0
- Log in to the Merchant Portal.
- On the left panel, click on DiscountDiscount Type.
- Select the type of discount you’d like to add:
- Public Discount
- Merchant Discount
- Online Ordering Discount
- Merchant Discount (Member)
- Next to the discount that you’d like to edit, click on Edit
 .
.  Tip: You can find an existing discount by entering the discount name or discount code on the search bar, or using the “Availability” and “Status” filters.
- Update the discount.
- Once done, at the top right, click on Save.
Merchant Portal (Classic Theme)
- Log in to the Merchant Portal.
- On the left panel, click on Menu Setup.
- Under "Discount," select the type of discount that you’d like to edit:
- Public Discount
- Merchant Discount
- User App Discount
- Merchant Discount (Member)
- Next to the discount that you’d like to edit, click on Edit.
Tip: You can use the search bar or “Availability” and “Status” filters to find an existing discount more easily. - Update the discount.
- Once done, at the top right, click on Save.
Delete a discount
To remove a discount, follow the steps below:
Eats365 POS
- Log in to the Eats365 POS.
- At the top left, tap Settings .
- Under "Settings," tap Discount. Then, select the type of discount you’d like to delete:
- Public Discount
- Online Ordering Discount
- Merchant Discount
- Merchant Discount (Member)
- Next to the discount you’d like to delete, tap the three-dot menu . Then, tap Remove
 .
. Tip: To search for a discount by name, at the top right, tap Search Coupon. Then, enter the discount name.
- Tap Delete to confirm.
Merchant Portal 2.0
- Log in to the Merchant Portal.
- On the left panel, click on DiscountDiscount Type.
- Select the type of discount that you’d like to delete:
- Public Discount
- Merchant Discount
- User App Discount
- Merchant Discount (Member)
- Next to the discount that you’d like to delete, click on Remove
 .
.  Tip: You can find an existing discount by entering the discount name or discount code on the search bar, or using the “Availability” and “Status” filters.
- Click on Confirm to delete.
Merchant Portal (Classic Theme)
- Log in to the Merchant Portal.
- On the left panel, click on Menu Setup.
- Under "Discount," select the type of discount that you’d like to delete:
- Public Discount
- Merchant Discount
- User App Discount
- Merchant Discount (Member)
- Next to the discount that you’d like to delete, click on Remove.
Tip: You can use the search bar or "Availability" and "Status" filters to find an existing discount more easily. - Click on Confirm to delete.