 Eats365 Products
 Merchant Guide
 Modules
 Membership
 Integrations
 Hardware
 Staff Operations
 Roles & Permissions
 Payments
 Reports
 What’s New
 Release Notes
 Troubleshooting
 Simulators
 Glossary
 Troubleshooter
 System Status
Menu Setup
Table of Contents
Set up and manage Modifiers
Learn how to create and manage modifiers for menu Items on the Eats365 POS or on the Merchant Portal.
Modifiers allow you to use preset options to modify your menu items. Examples of modifiers that you can add to your items include item sizes, add-ons, drink options, and more.
In this article, you’ll learn about the different types of modifiers that are available in the Eats365 POS, as well as how to create and manage modifiers from the item and modifier settings.
For information on how to create Modifier Presets, refer to Set up and manage Modifier Presets.
Types of modifiers
There are two types of modifiers that are available in the Eats365 POS:
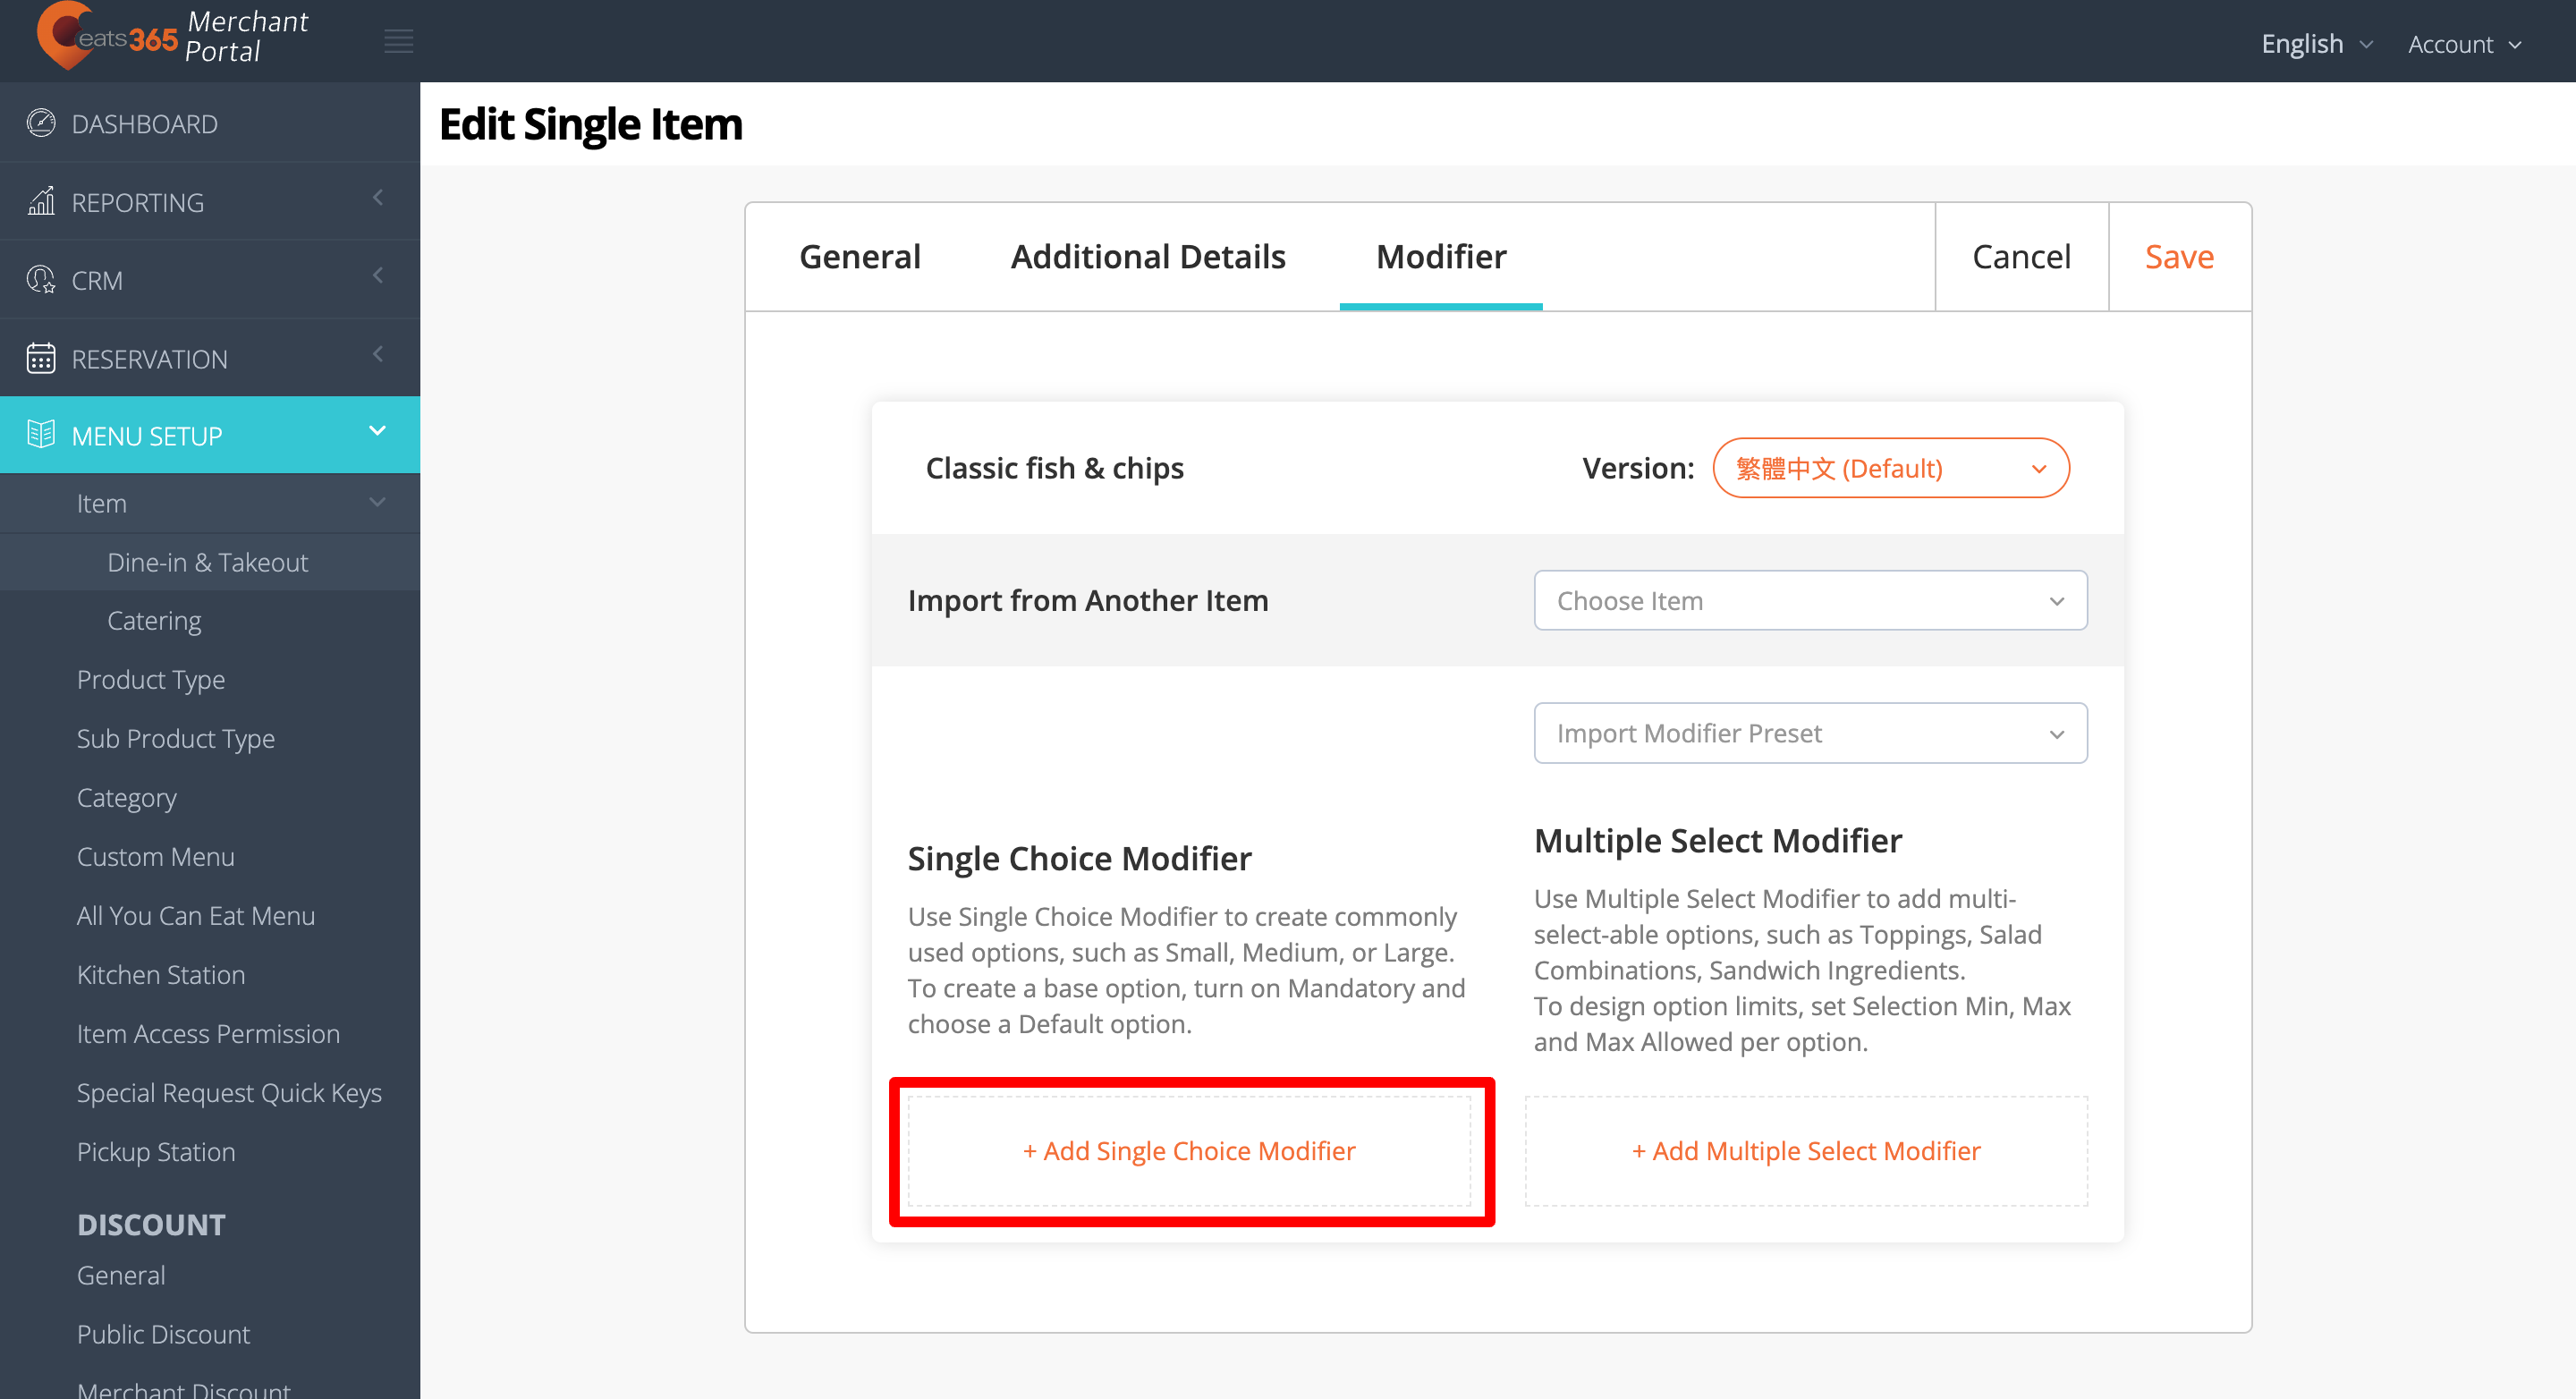
- Single Choice Modifier
- Multiple Select Modifier
Single Choice Modifier
Single Choice Modifiers are used if you want to create a preset of commonly used options, such as drink and meal sizes. For example, if your restaurant offers options for different meal sizes, you can then create a Single Choice Modifier for meal sizes.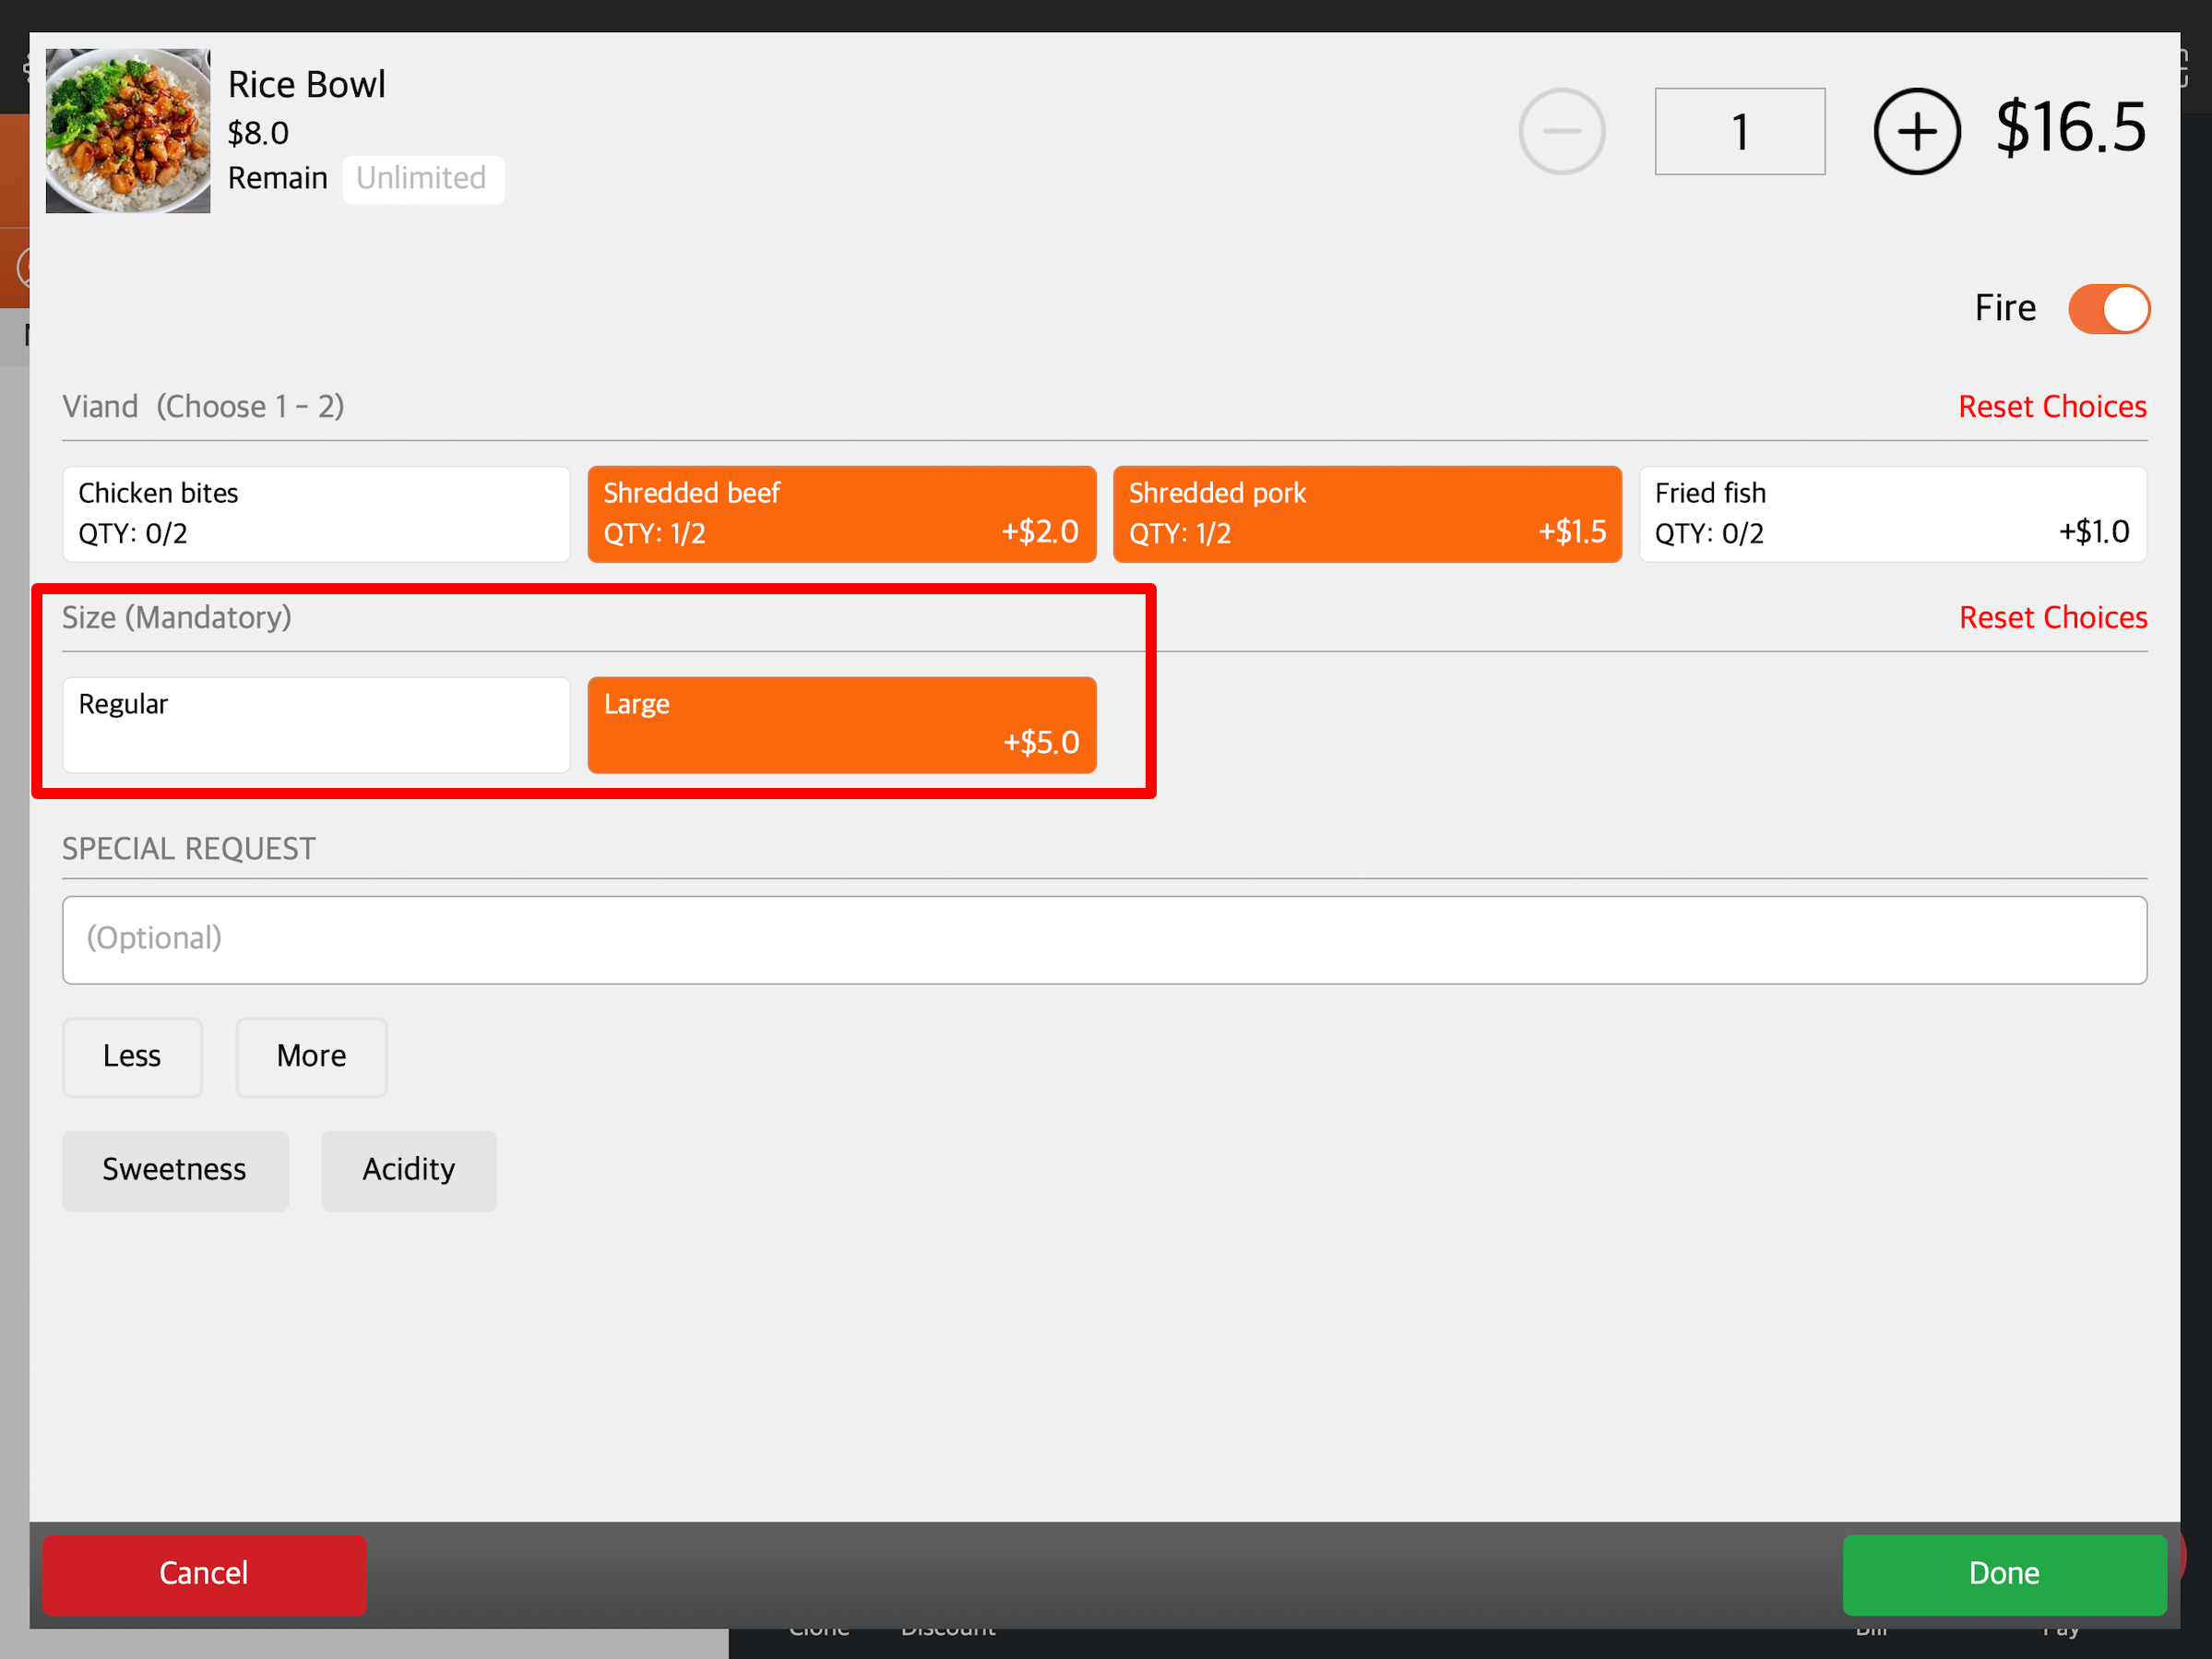
Multiple Select Modifier
Multiple Select Modifiers are used if you want to create multi-selectable options for your items. This modifier is often used on items that can be customized, such as drink options, toppings, etc.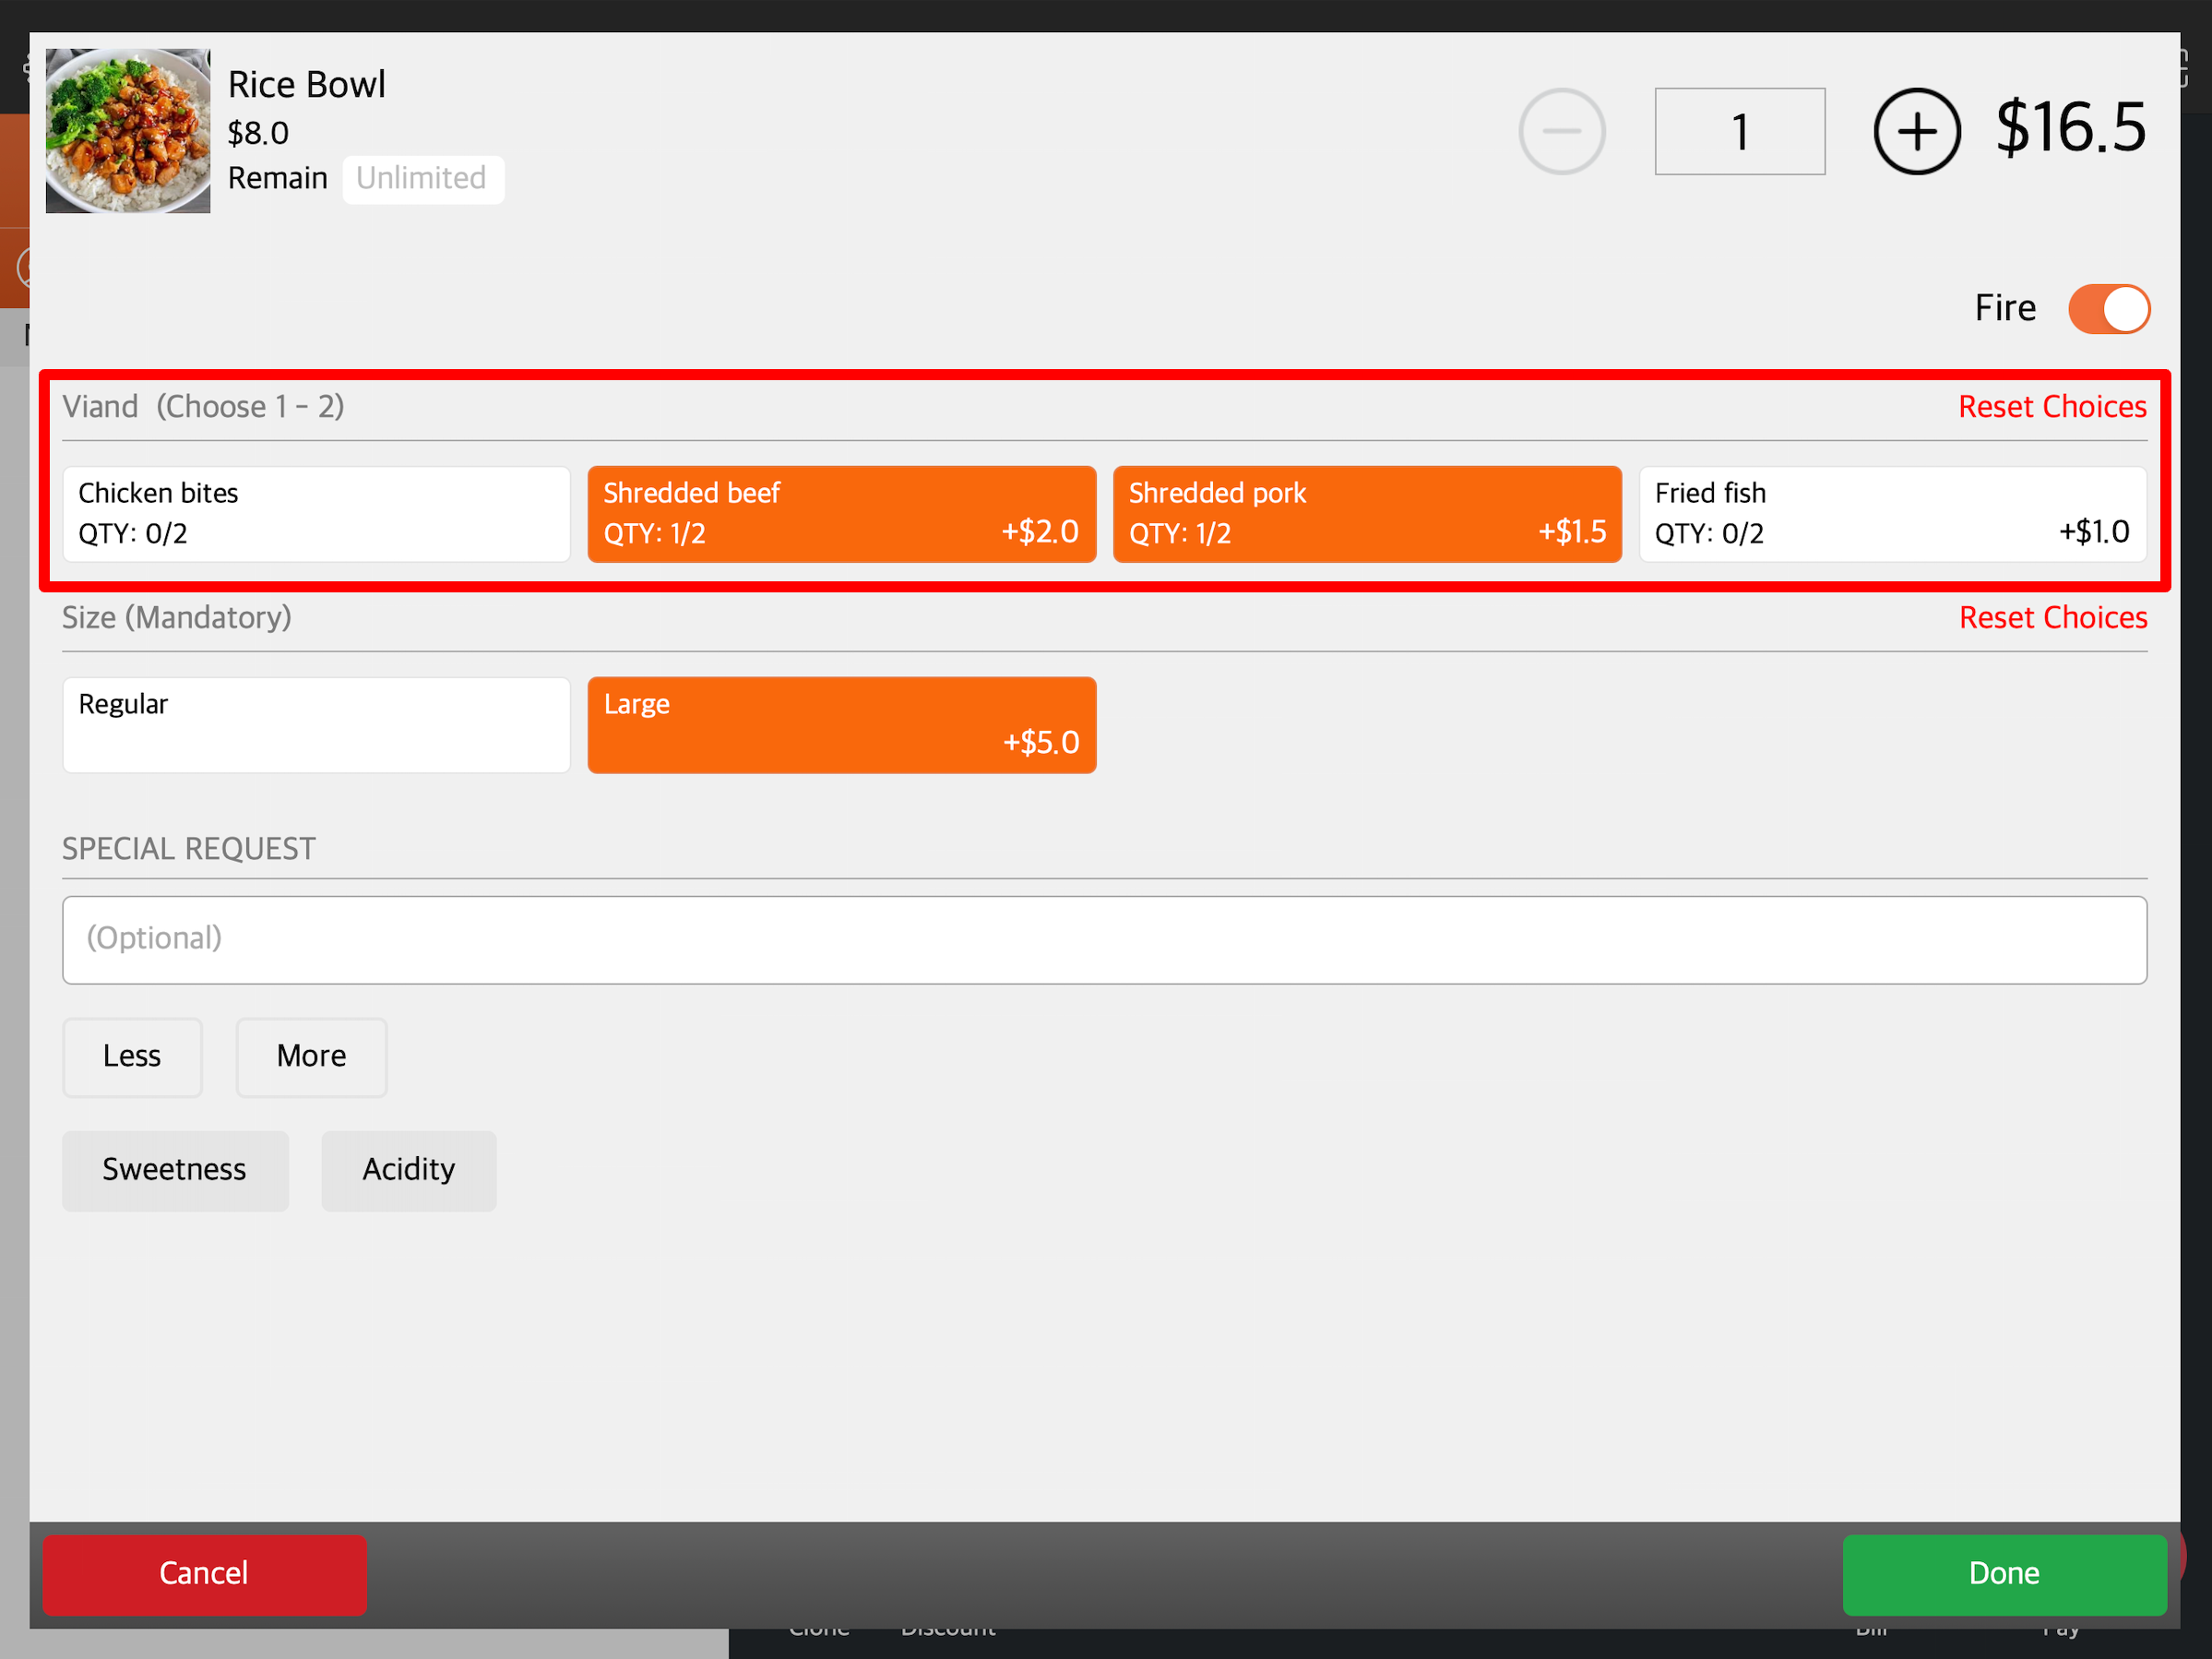
Add modifiers
Add a Single Choice Modifier
To add a Single Choice Modifier to an item, follow the steps below:
Eats365 POS
- Log in to the Eats365 POS.
- At the top left, tap Settings
 .
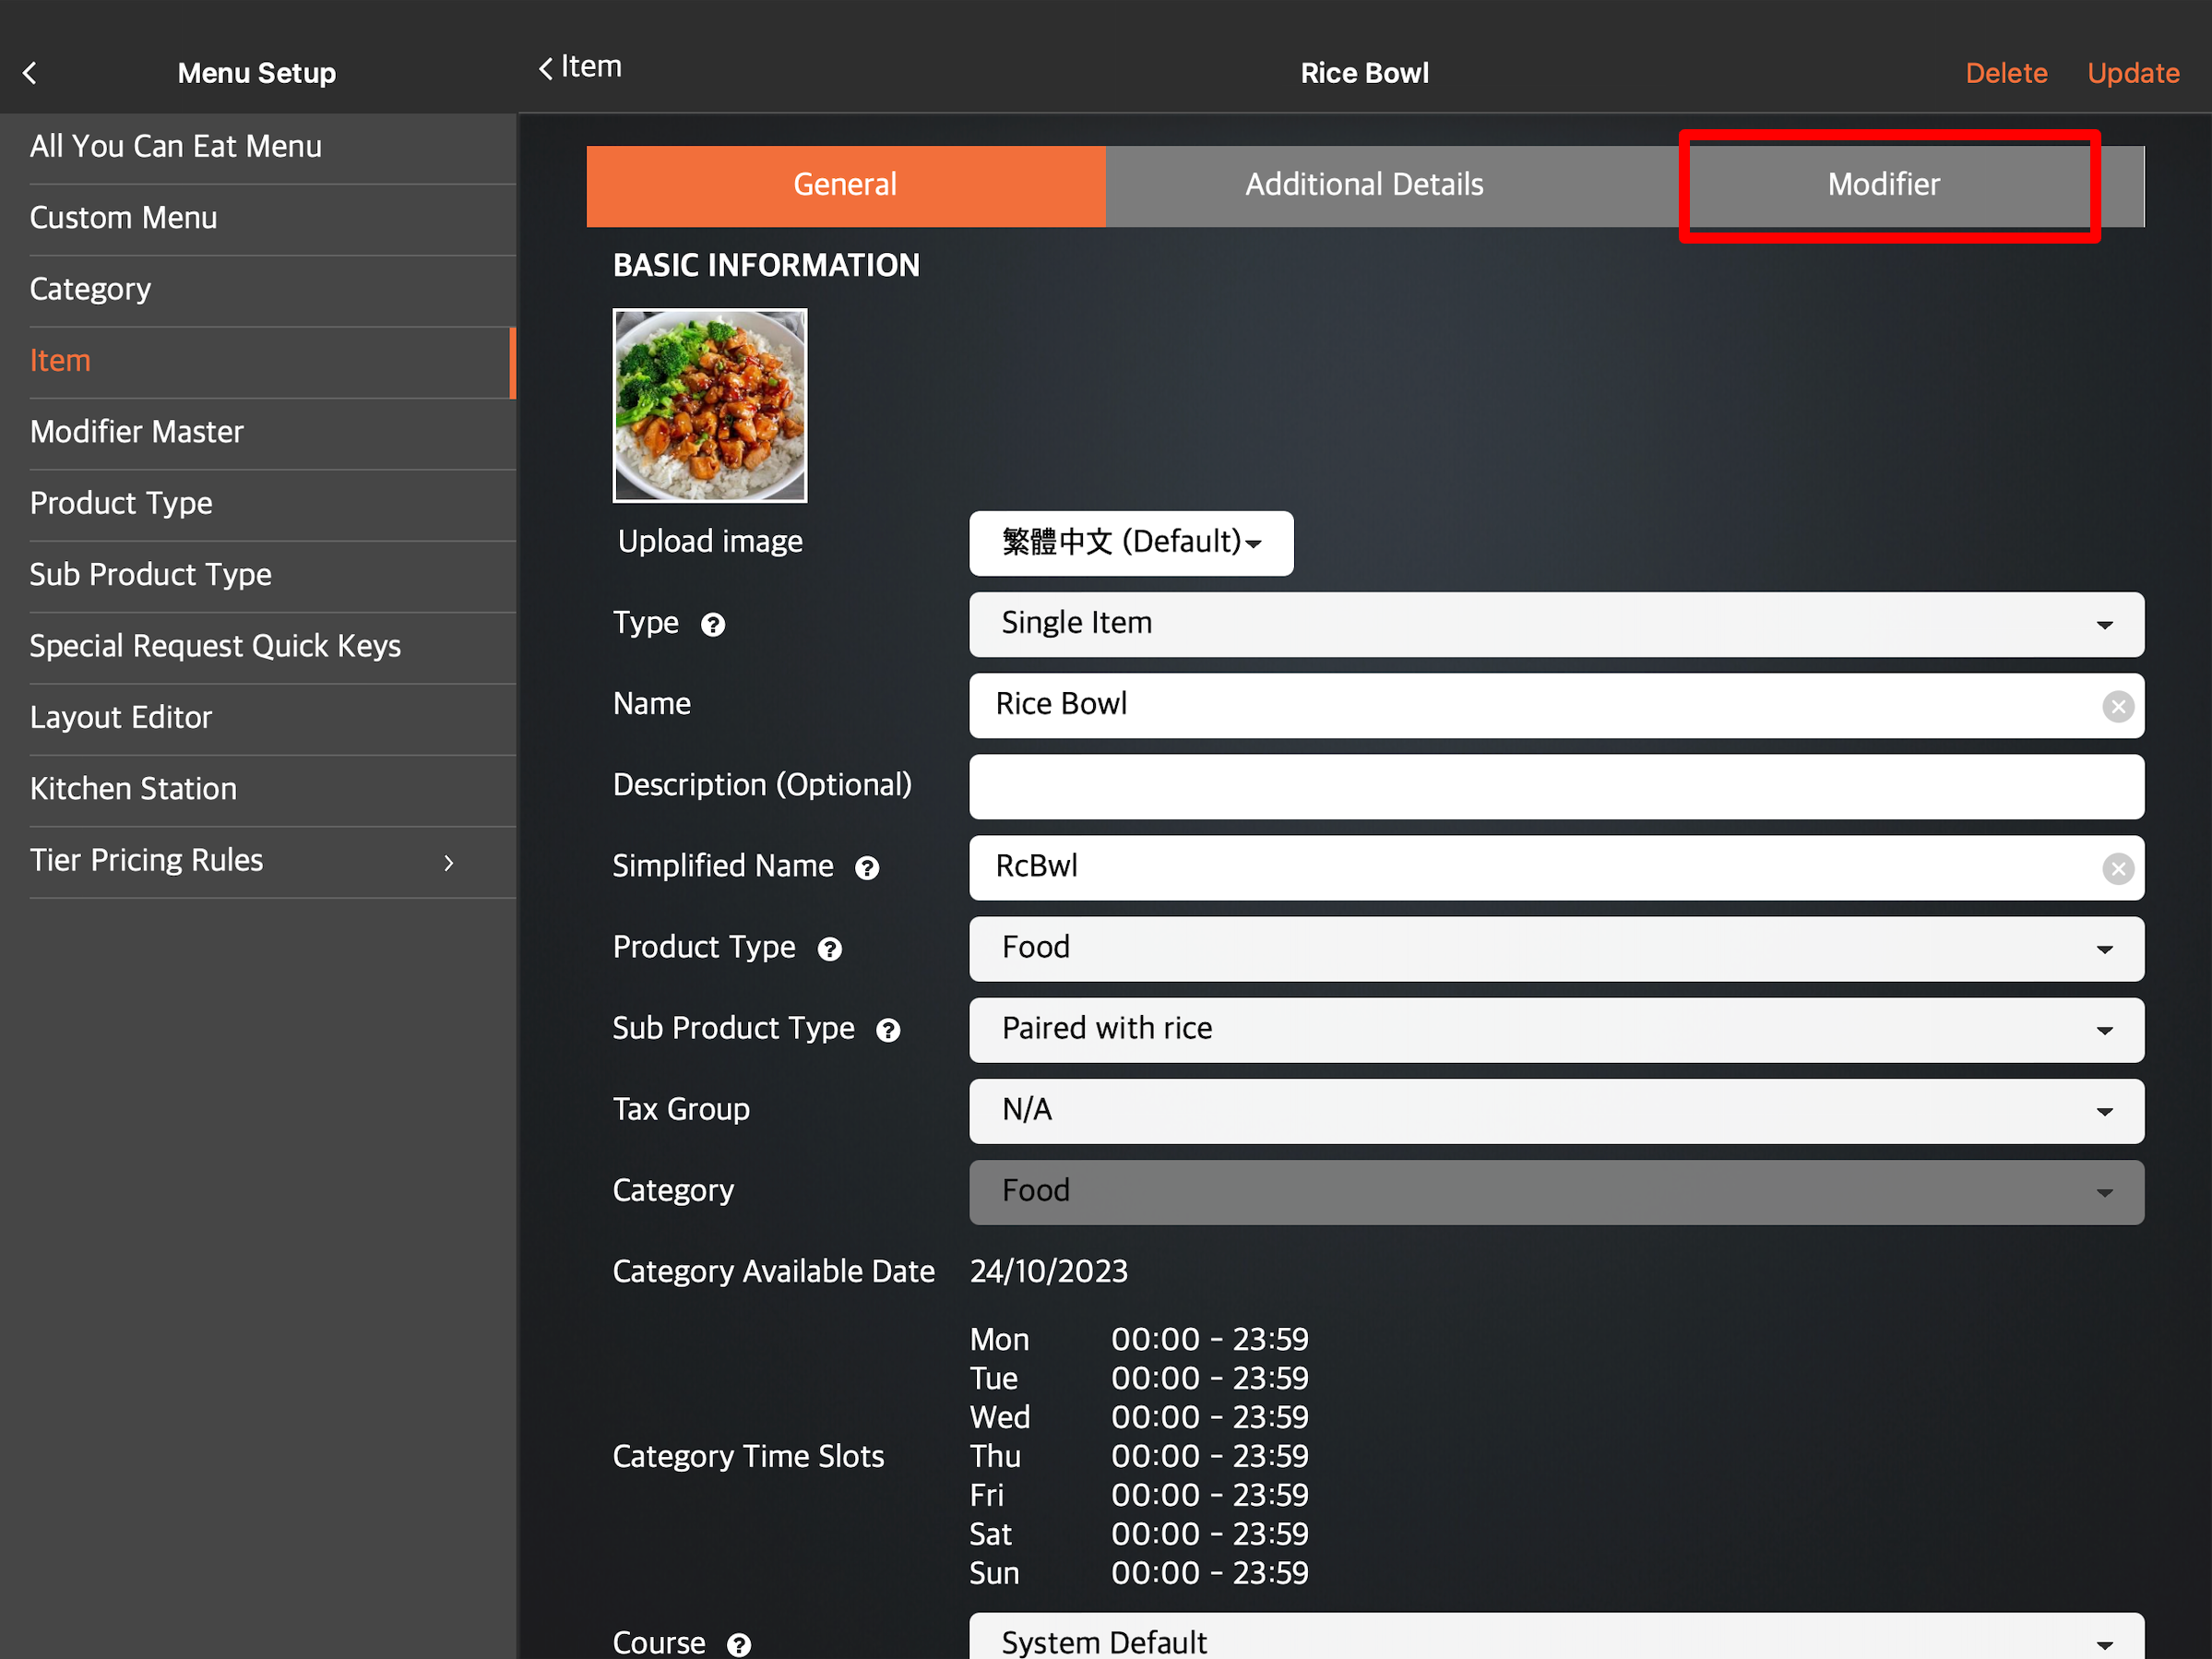
. - Under "General," tap Menu Setup then select Item.
- At the top right, tap Add Item.
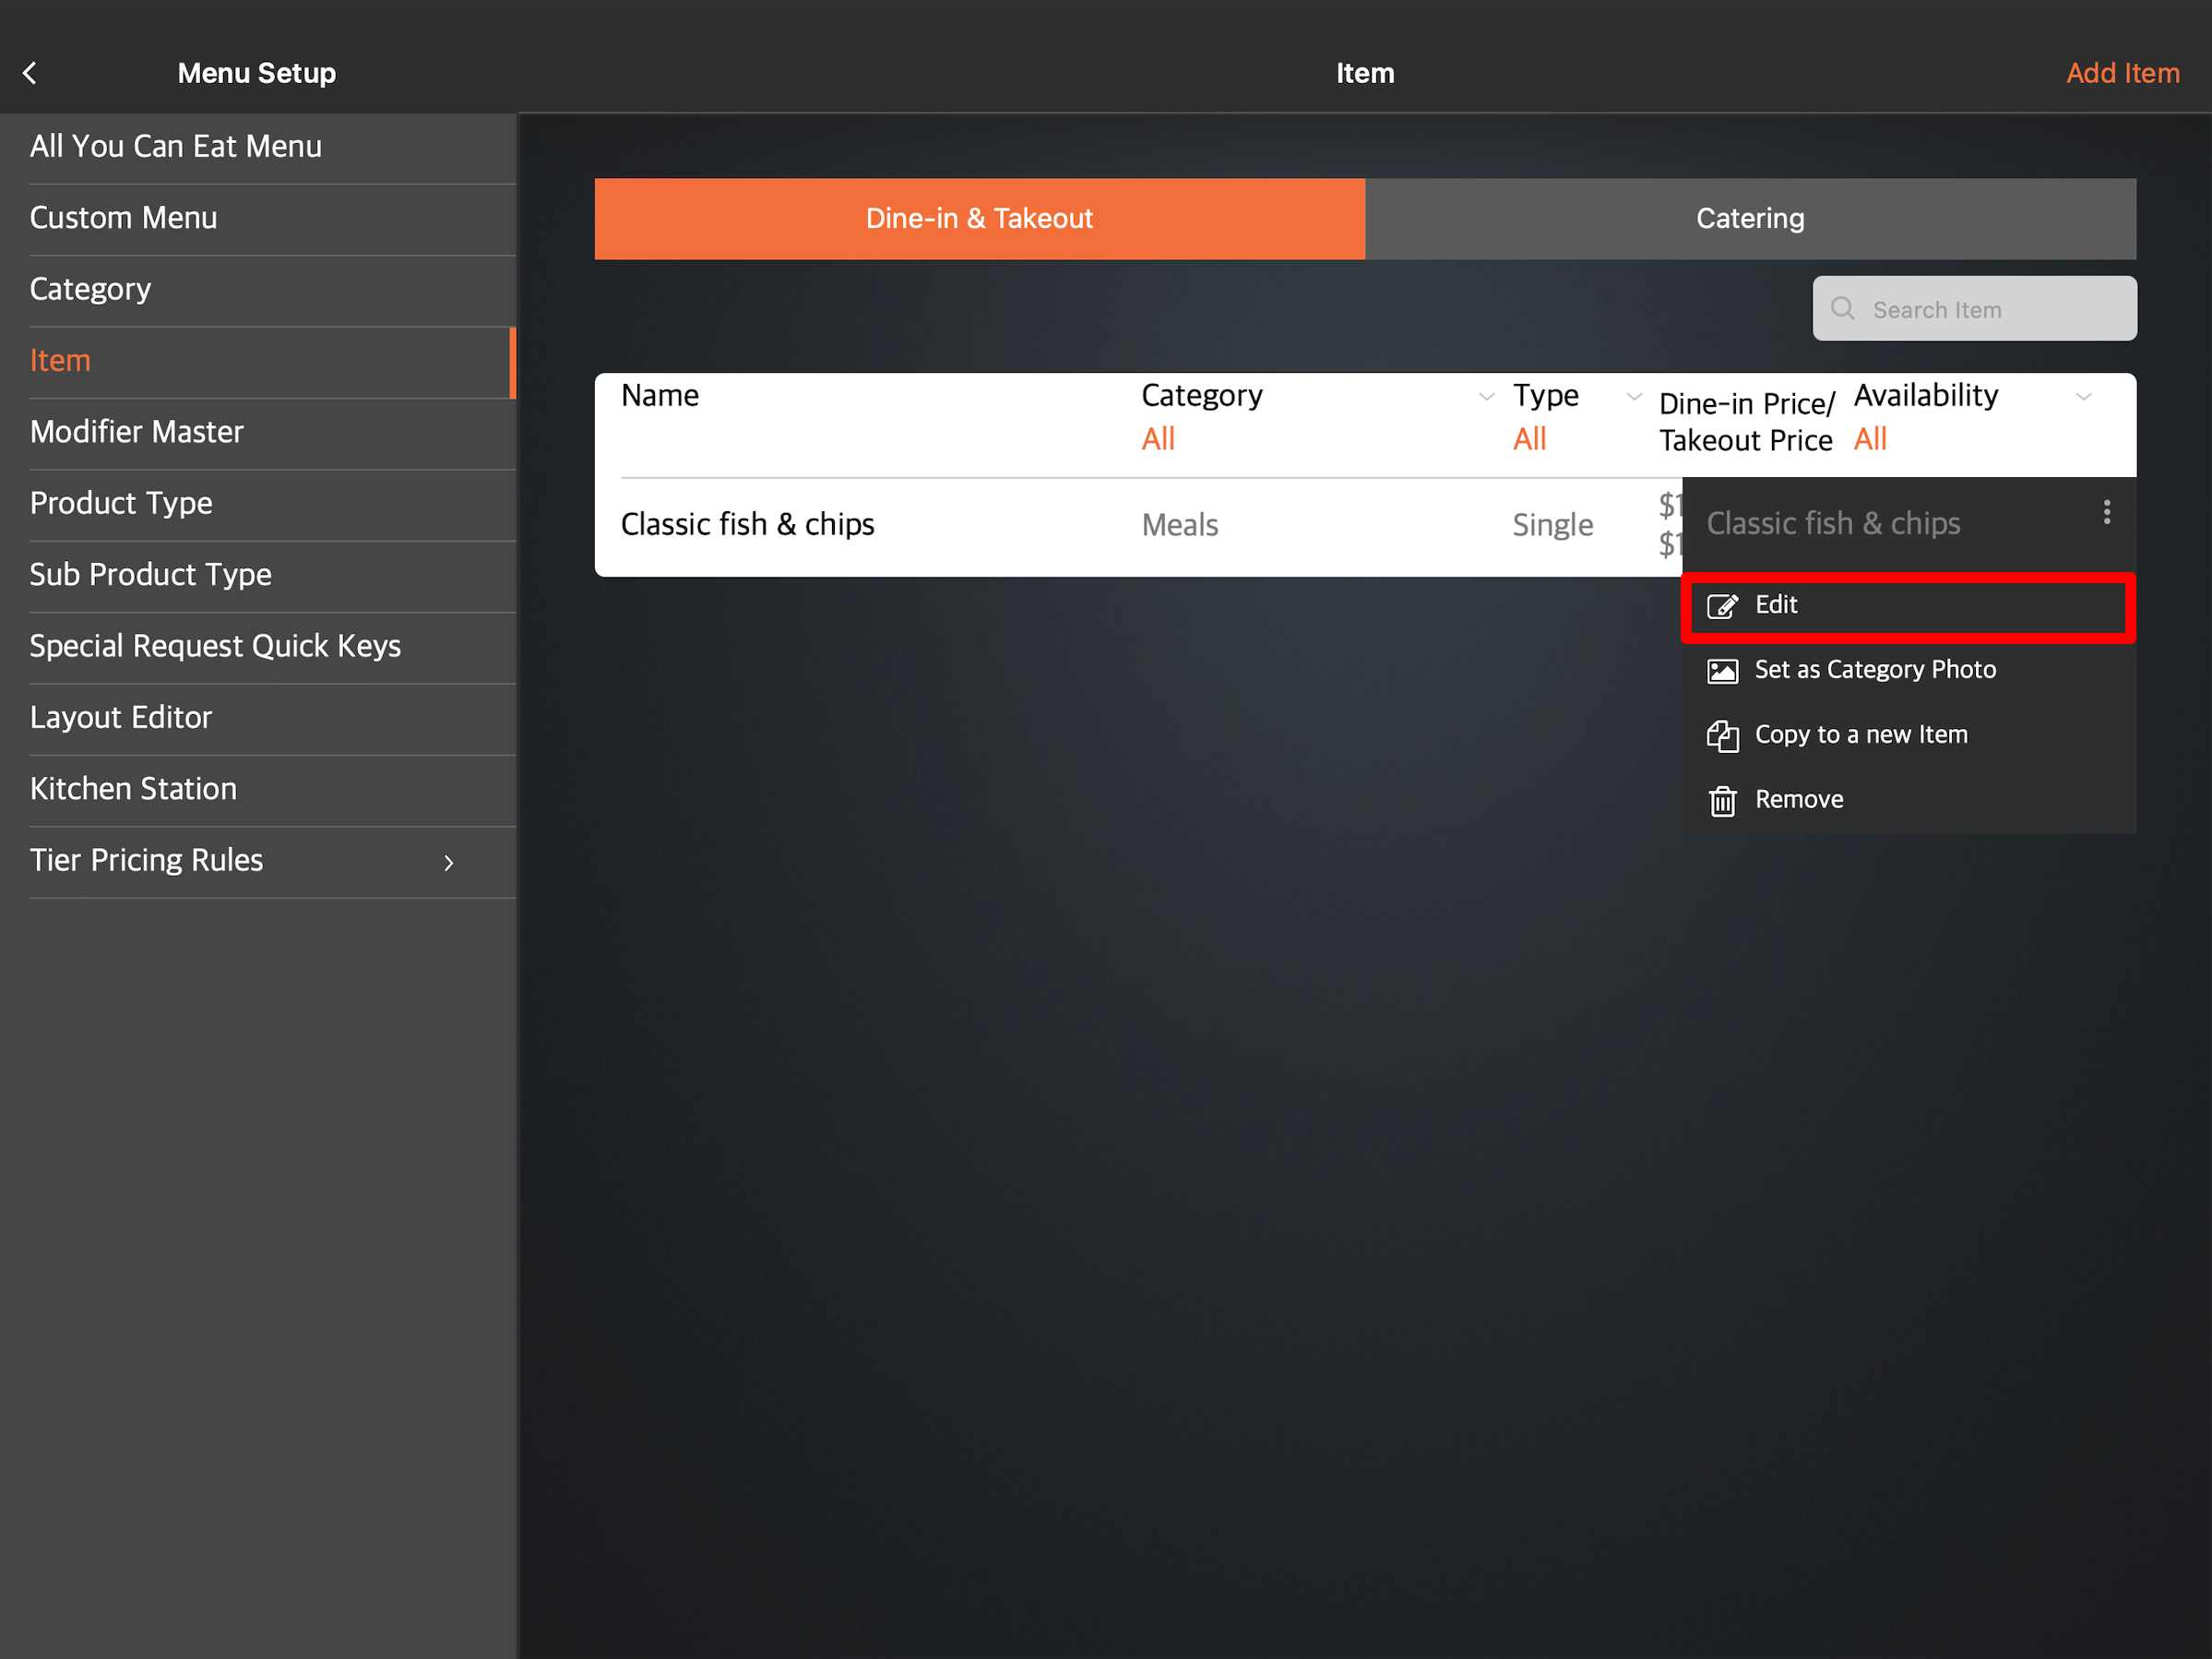
Note: If you're adding a modifier to an already existing item, tap the existing item instead. You can also tap the three-dot menu next to the item, and then tap Edit
 .
.
- Select Single Item. Then, create an item.
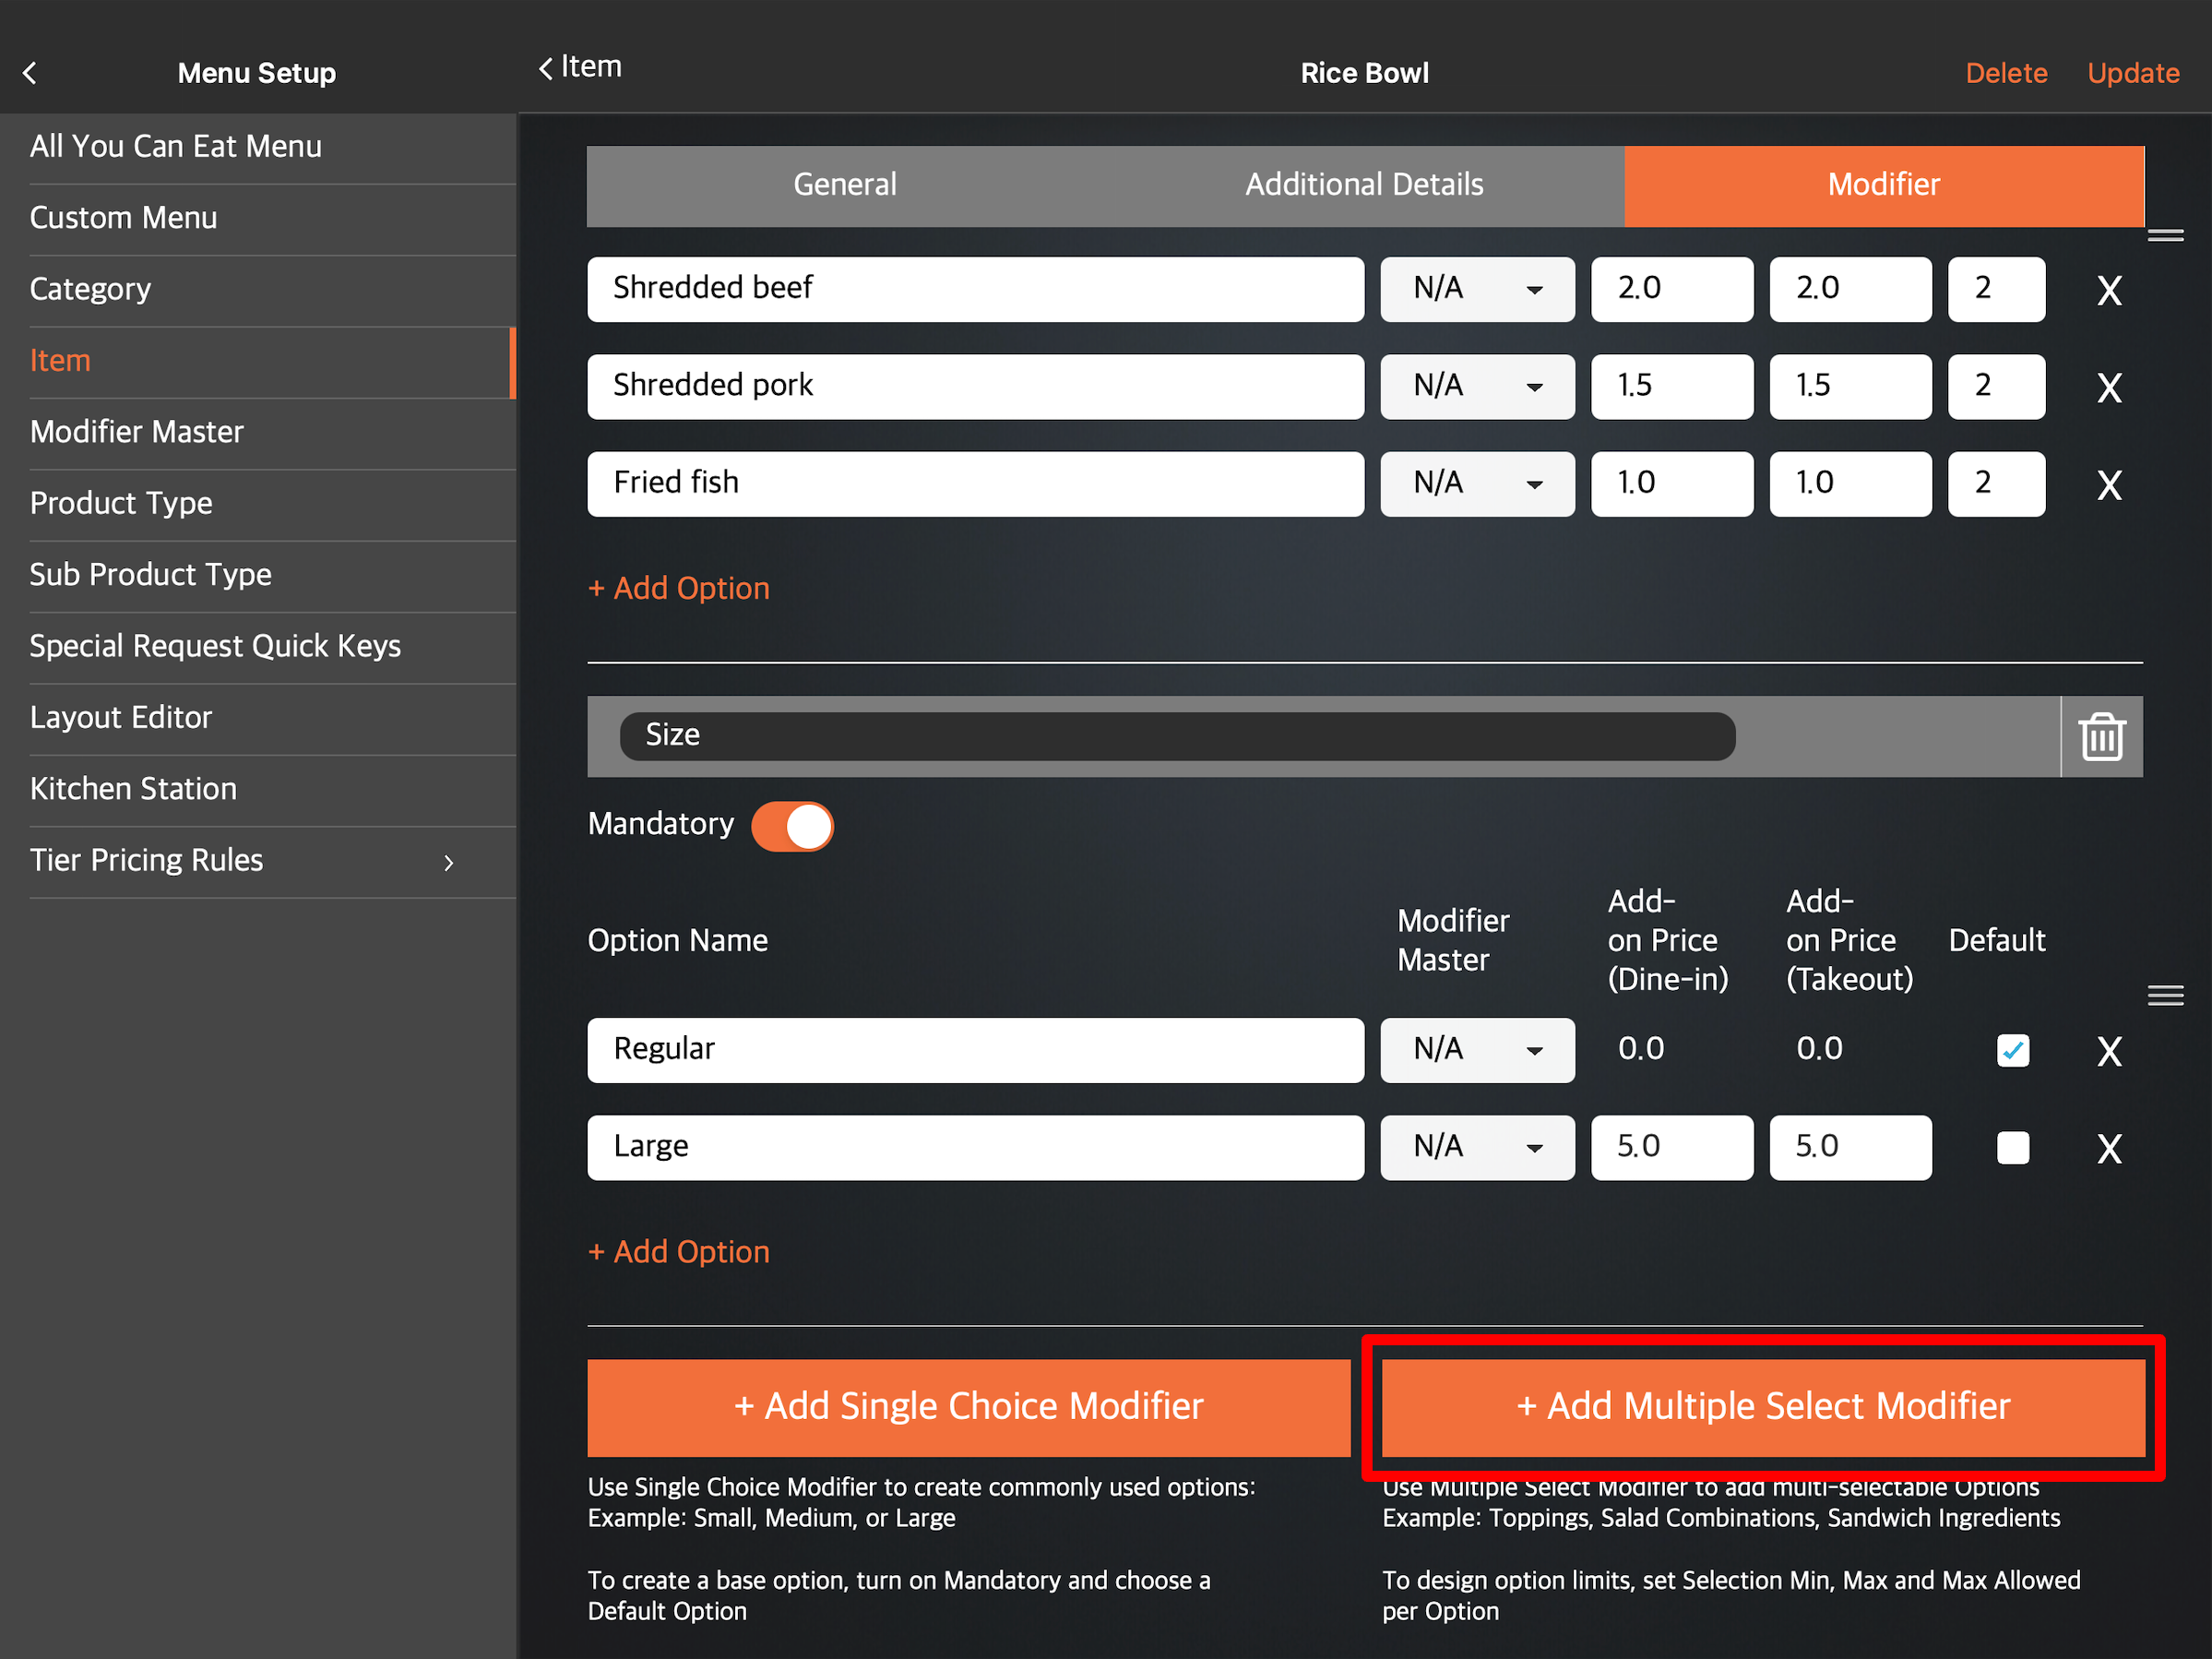
- Tap the Modifier tab. Then, select Add Single Choice Modifier.
-
Select the modifier language.
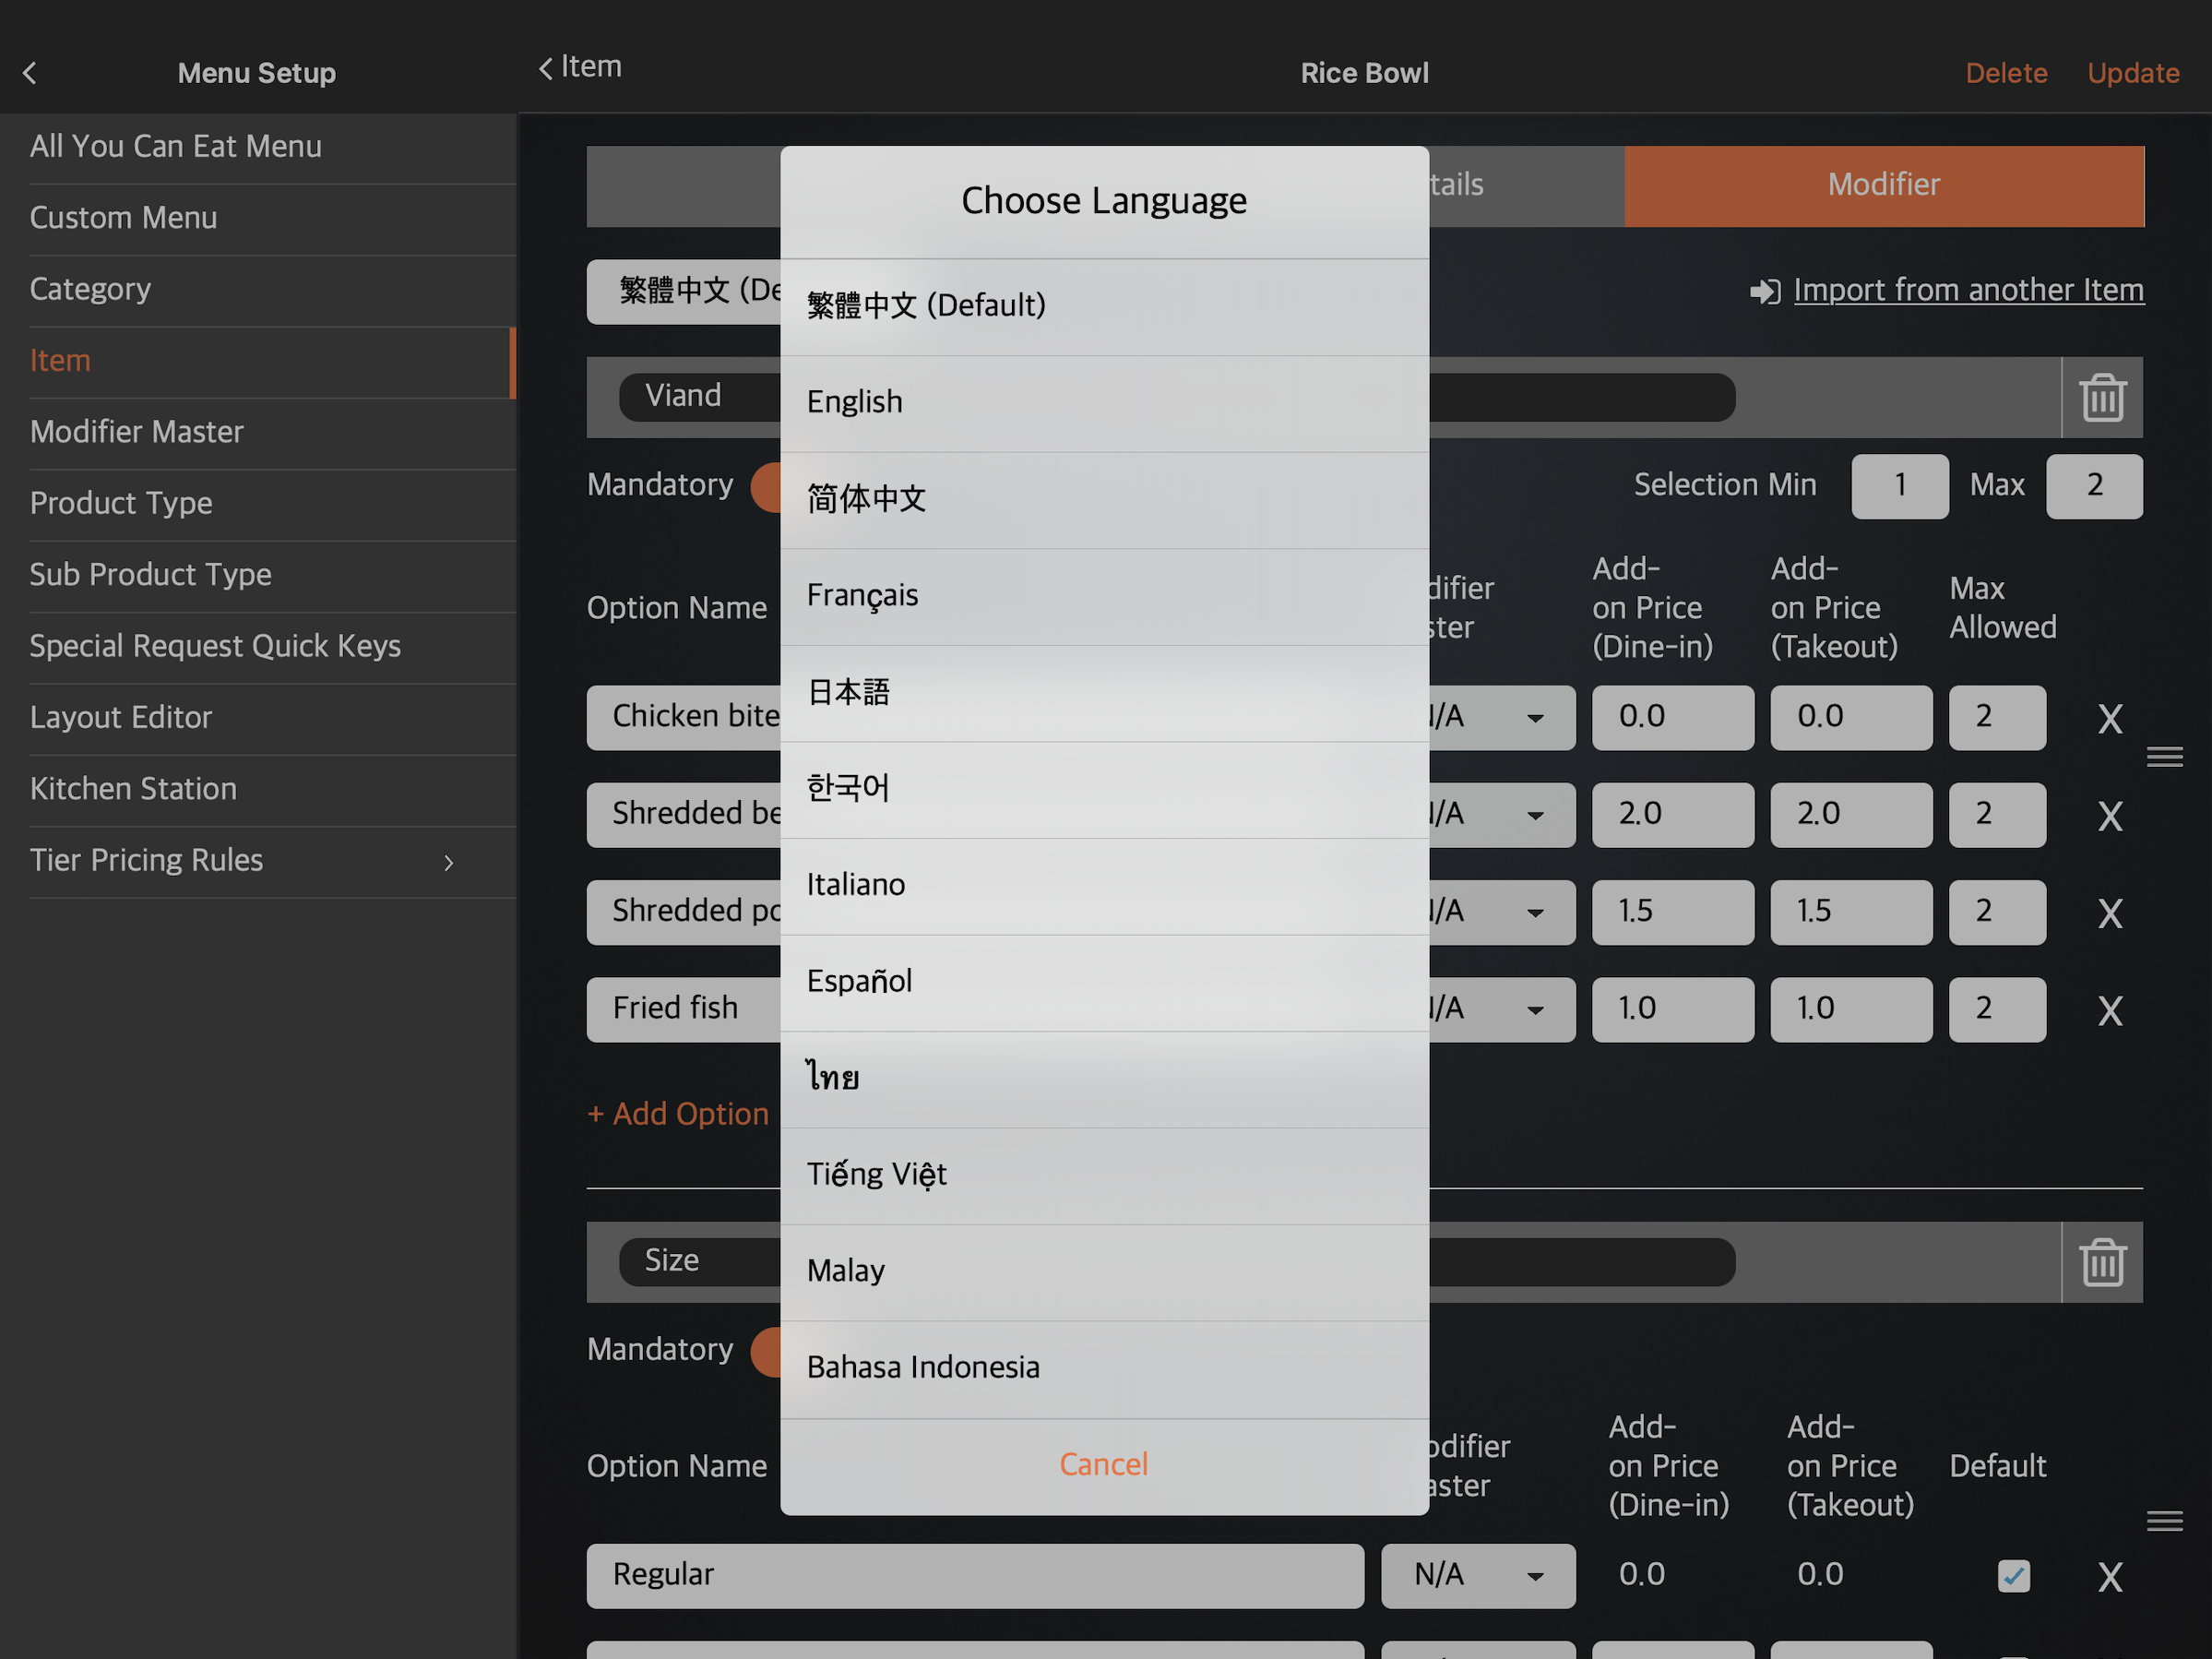 Note: You must enter a default name for the modifier. The name becomes available in whatever language the POS app is using. For multi-language menus, after selecting a default language, tap the language drop-down list and select your preferred language. Then, enter the alternate name in that language.
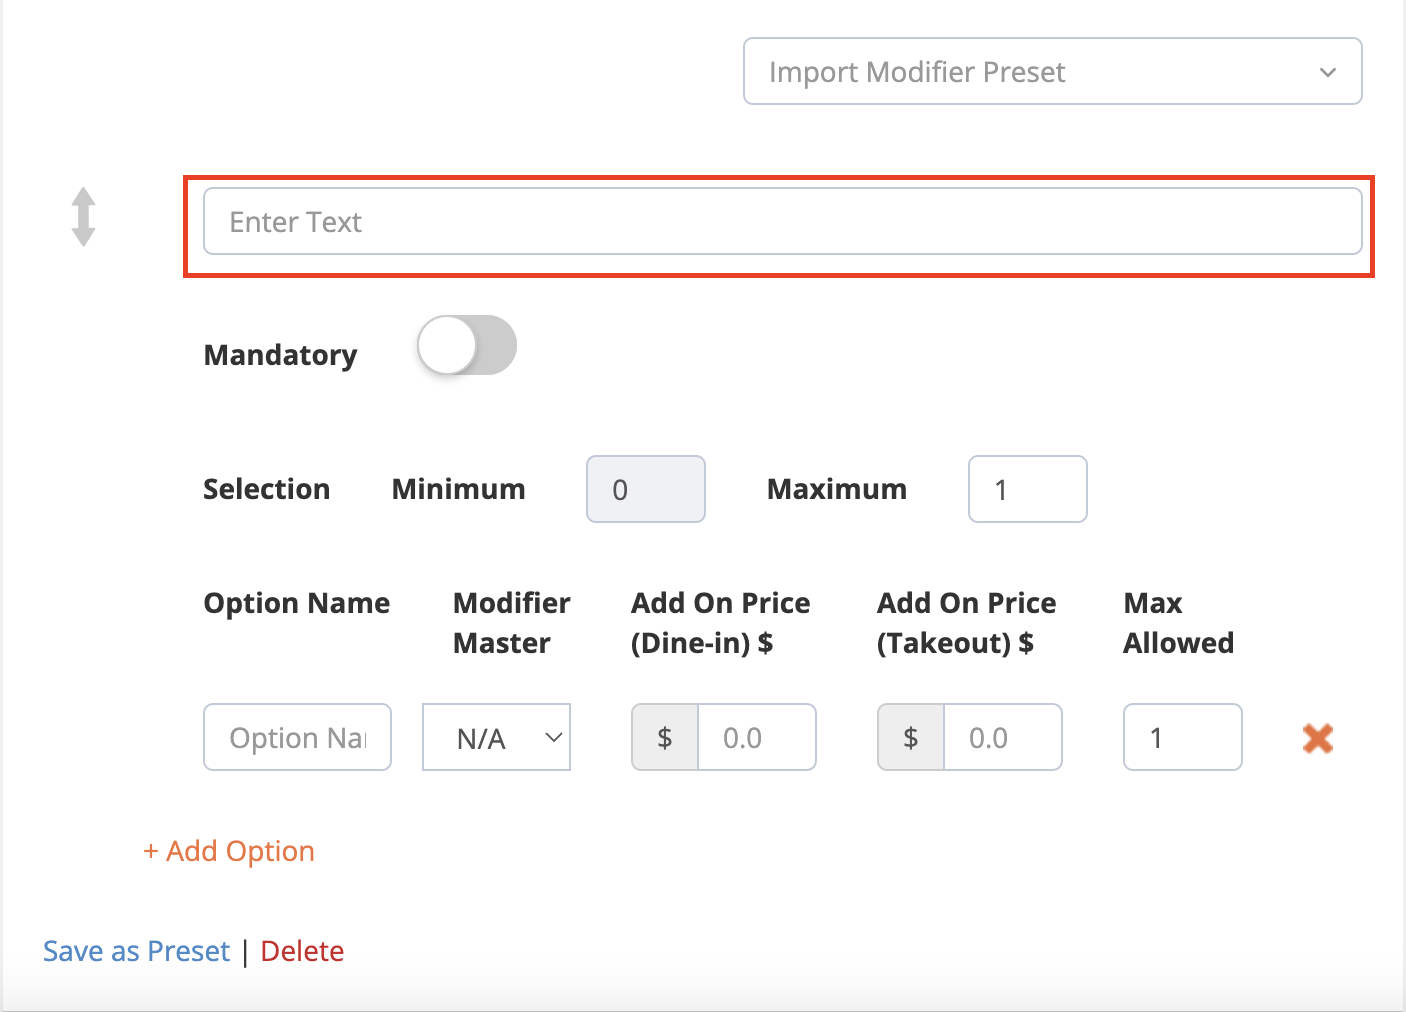
 - In the blank field, enter a name for the modifier. For example, if you are creating an option for drink sizes, you can enter “Drink Sizes.”

- Enter the details for the modifier options.
Note: If you haven’t set up any modifier in Modifier Master, the Modifier Master section shows up as "N/A." - To add another option to the same modifier, tap Add Option.
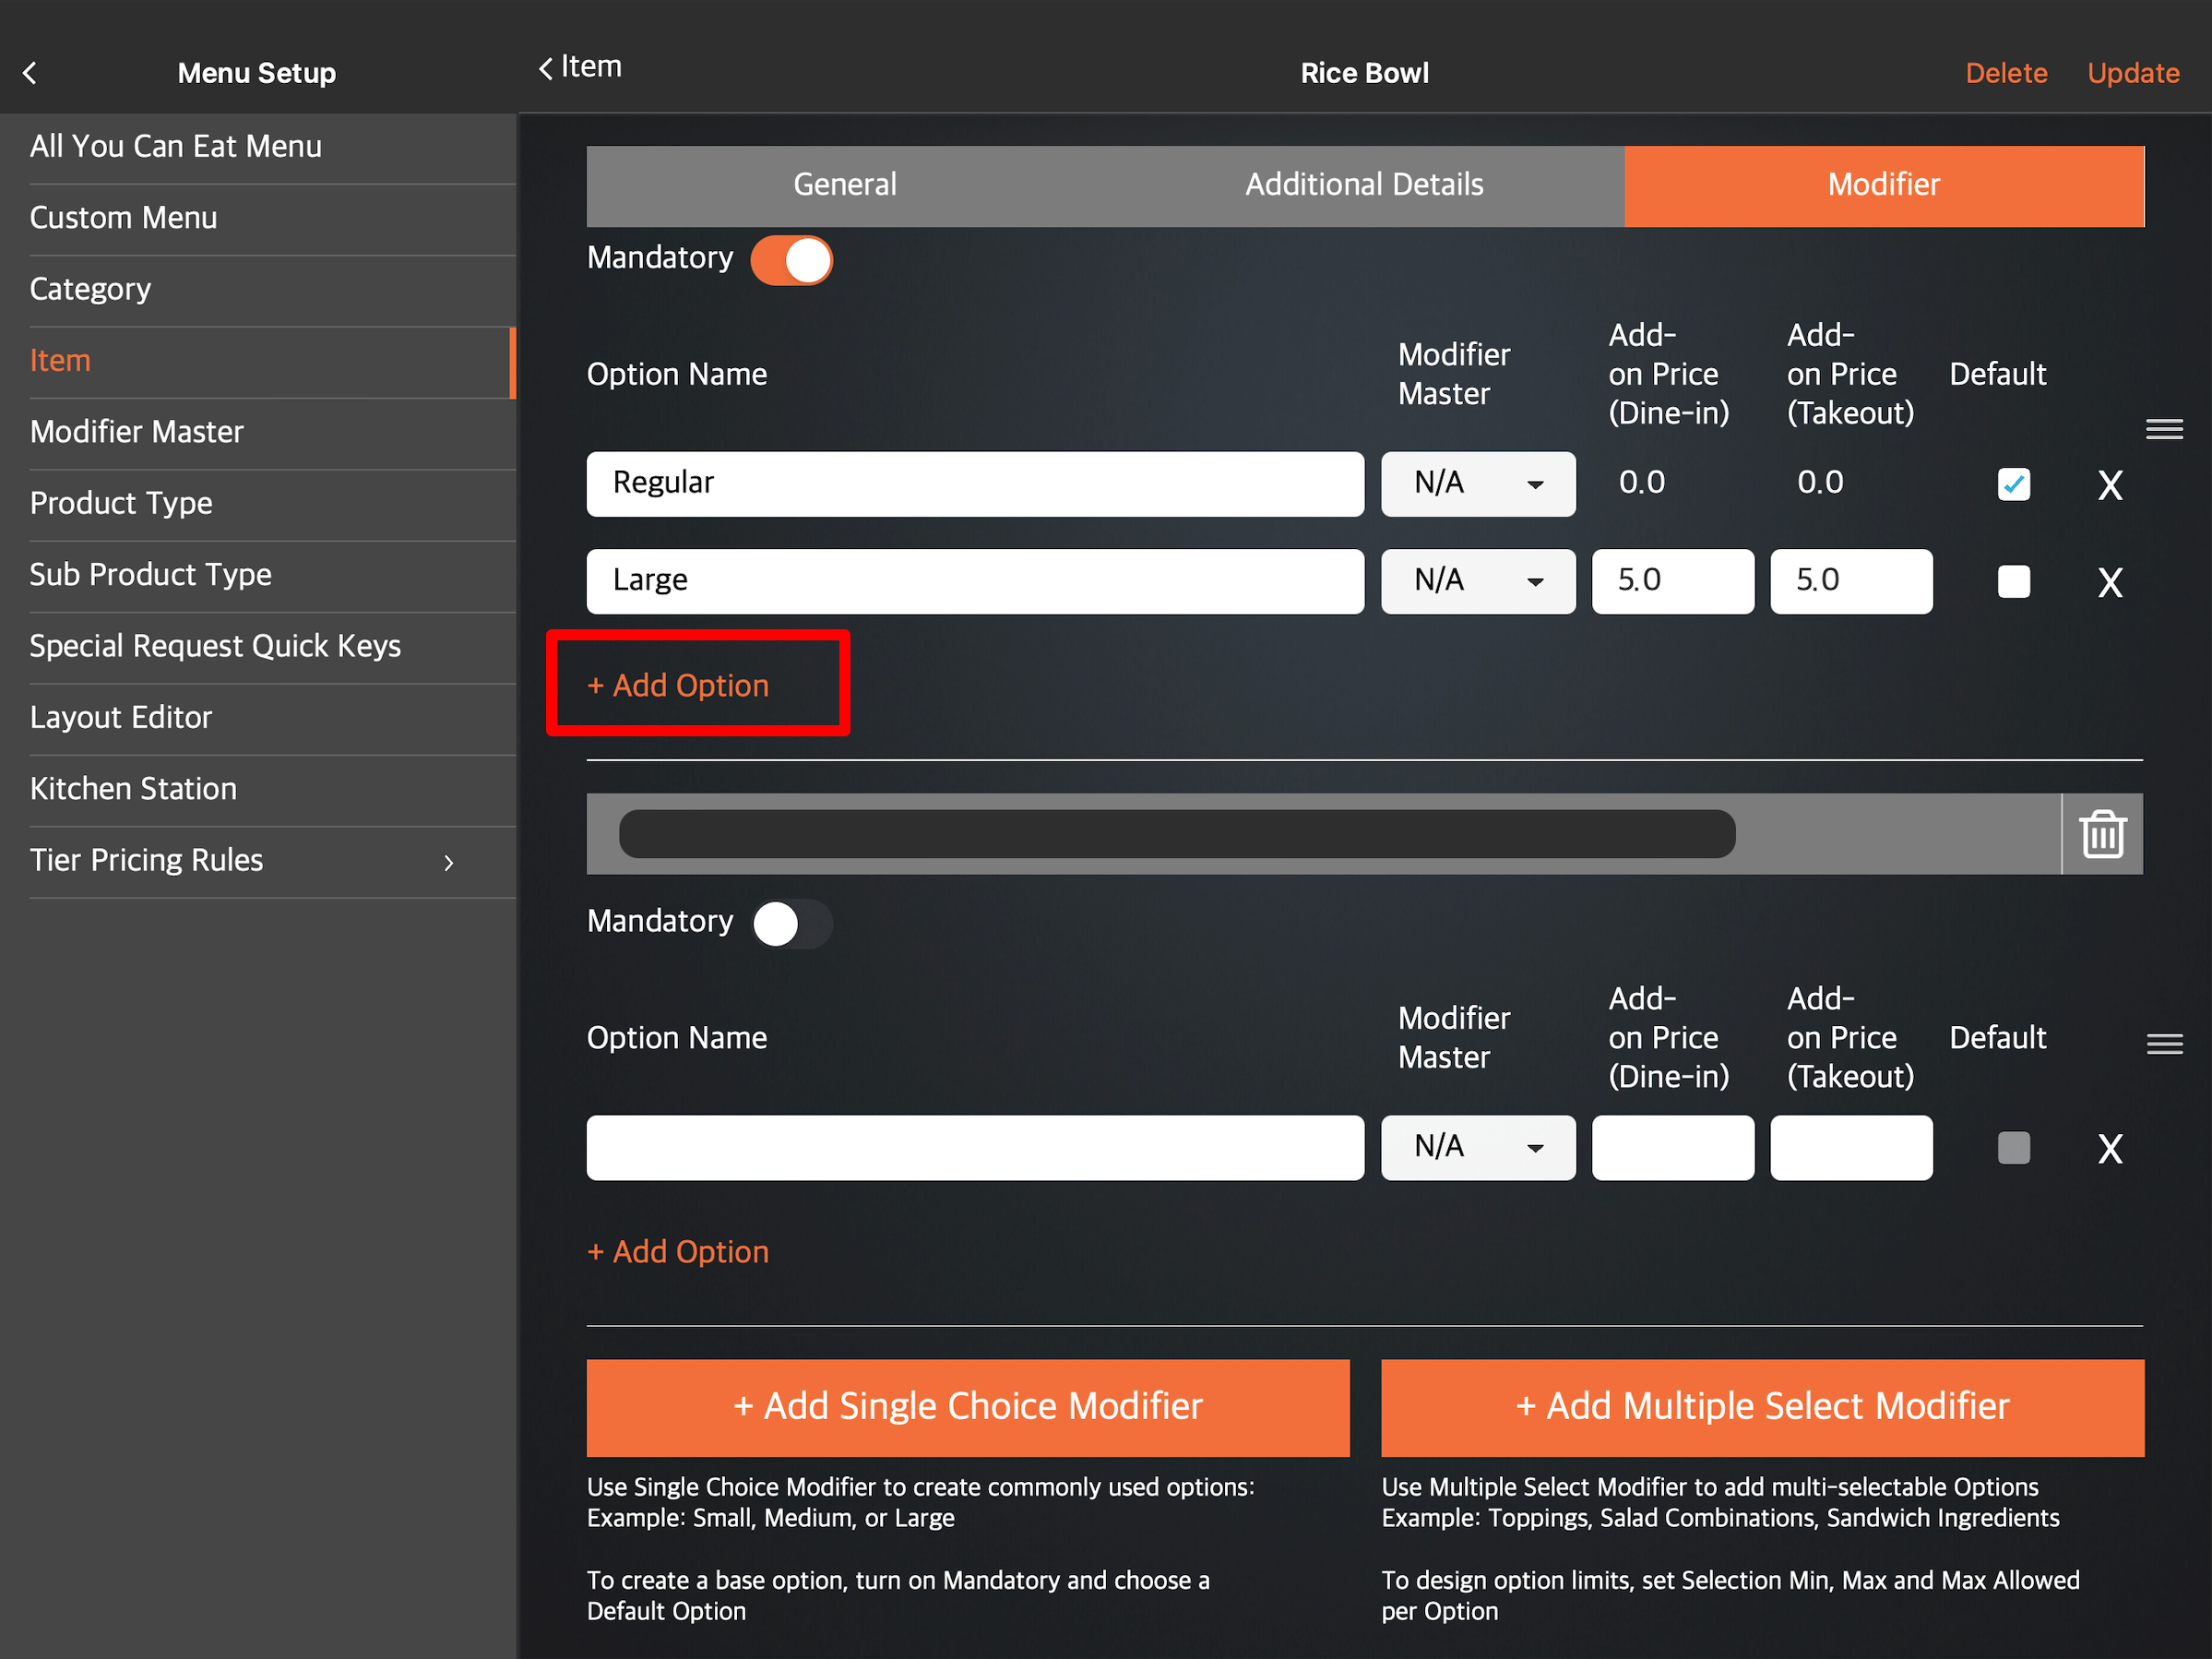
- To create another modifier, tap Add Single Choice Modifier again.
Tip: You can also add a Multiple Select Modifier to the same item. - If you want to have a default option for the modifier, turn on Mandatory
 . Then, next to the option that you want to set as the default option, tap the check box
  .
.
- At the top right, tap Save to confirm.
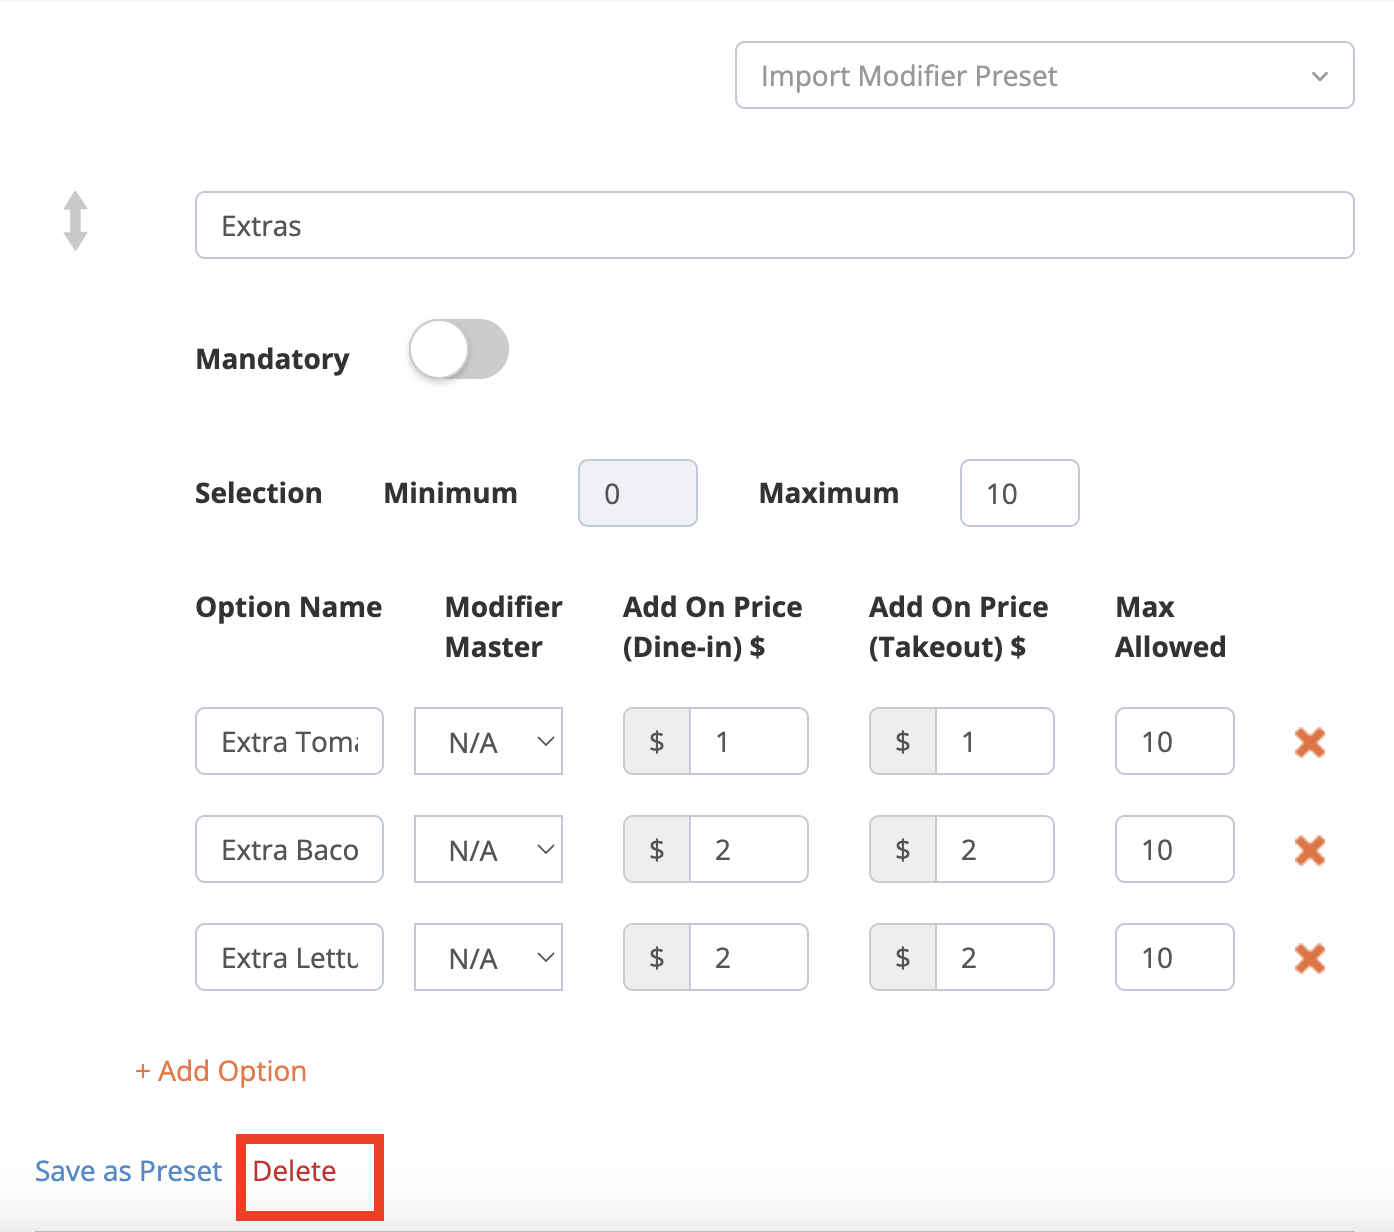
Merchant Portal (Classic Theme)
- Log in to the Merchant Portal.
- On the left panel, click on Menu Setup, then select Item.
- At the top, select Single Item. Then, create an Item.
Note: If you're adding a modifier to an already existing item, next to the item that you want to add a modifier to, click on Edit.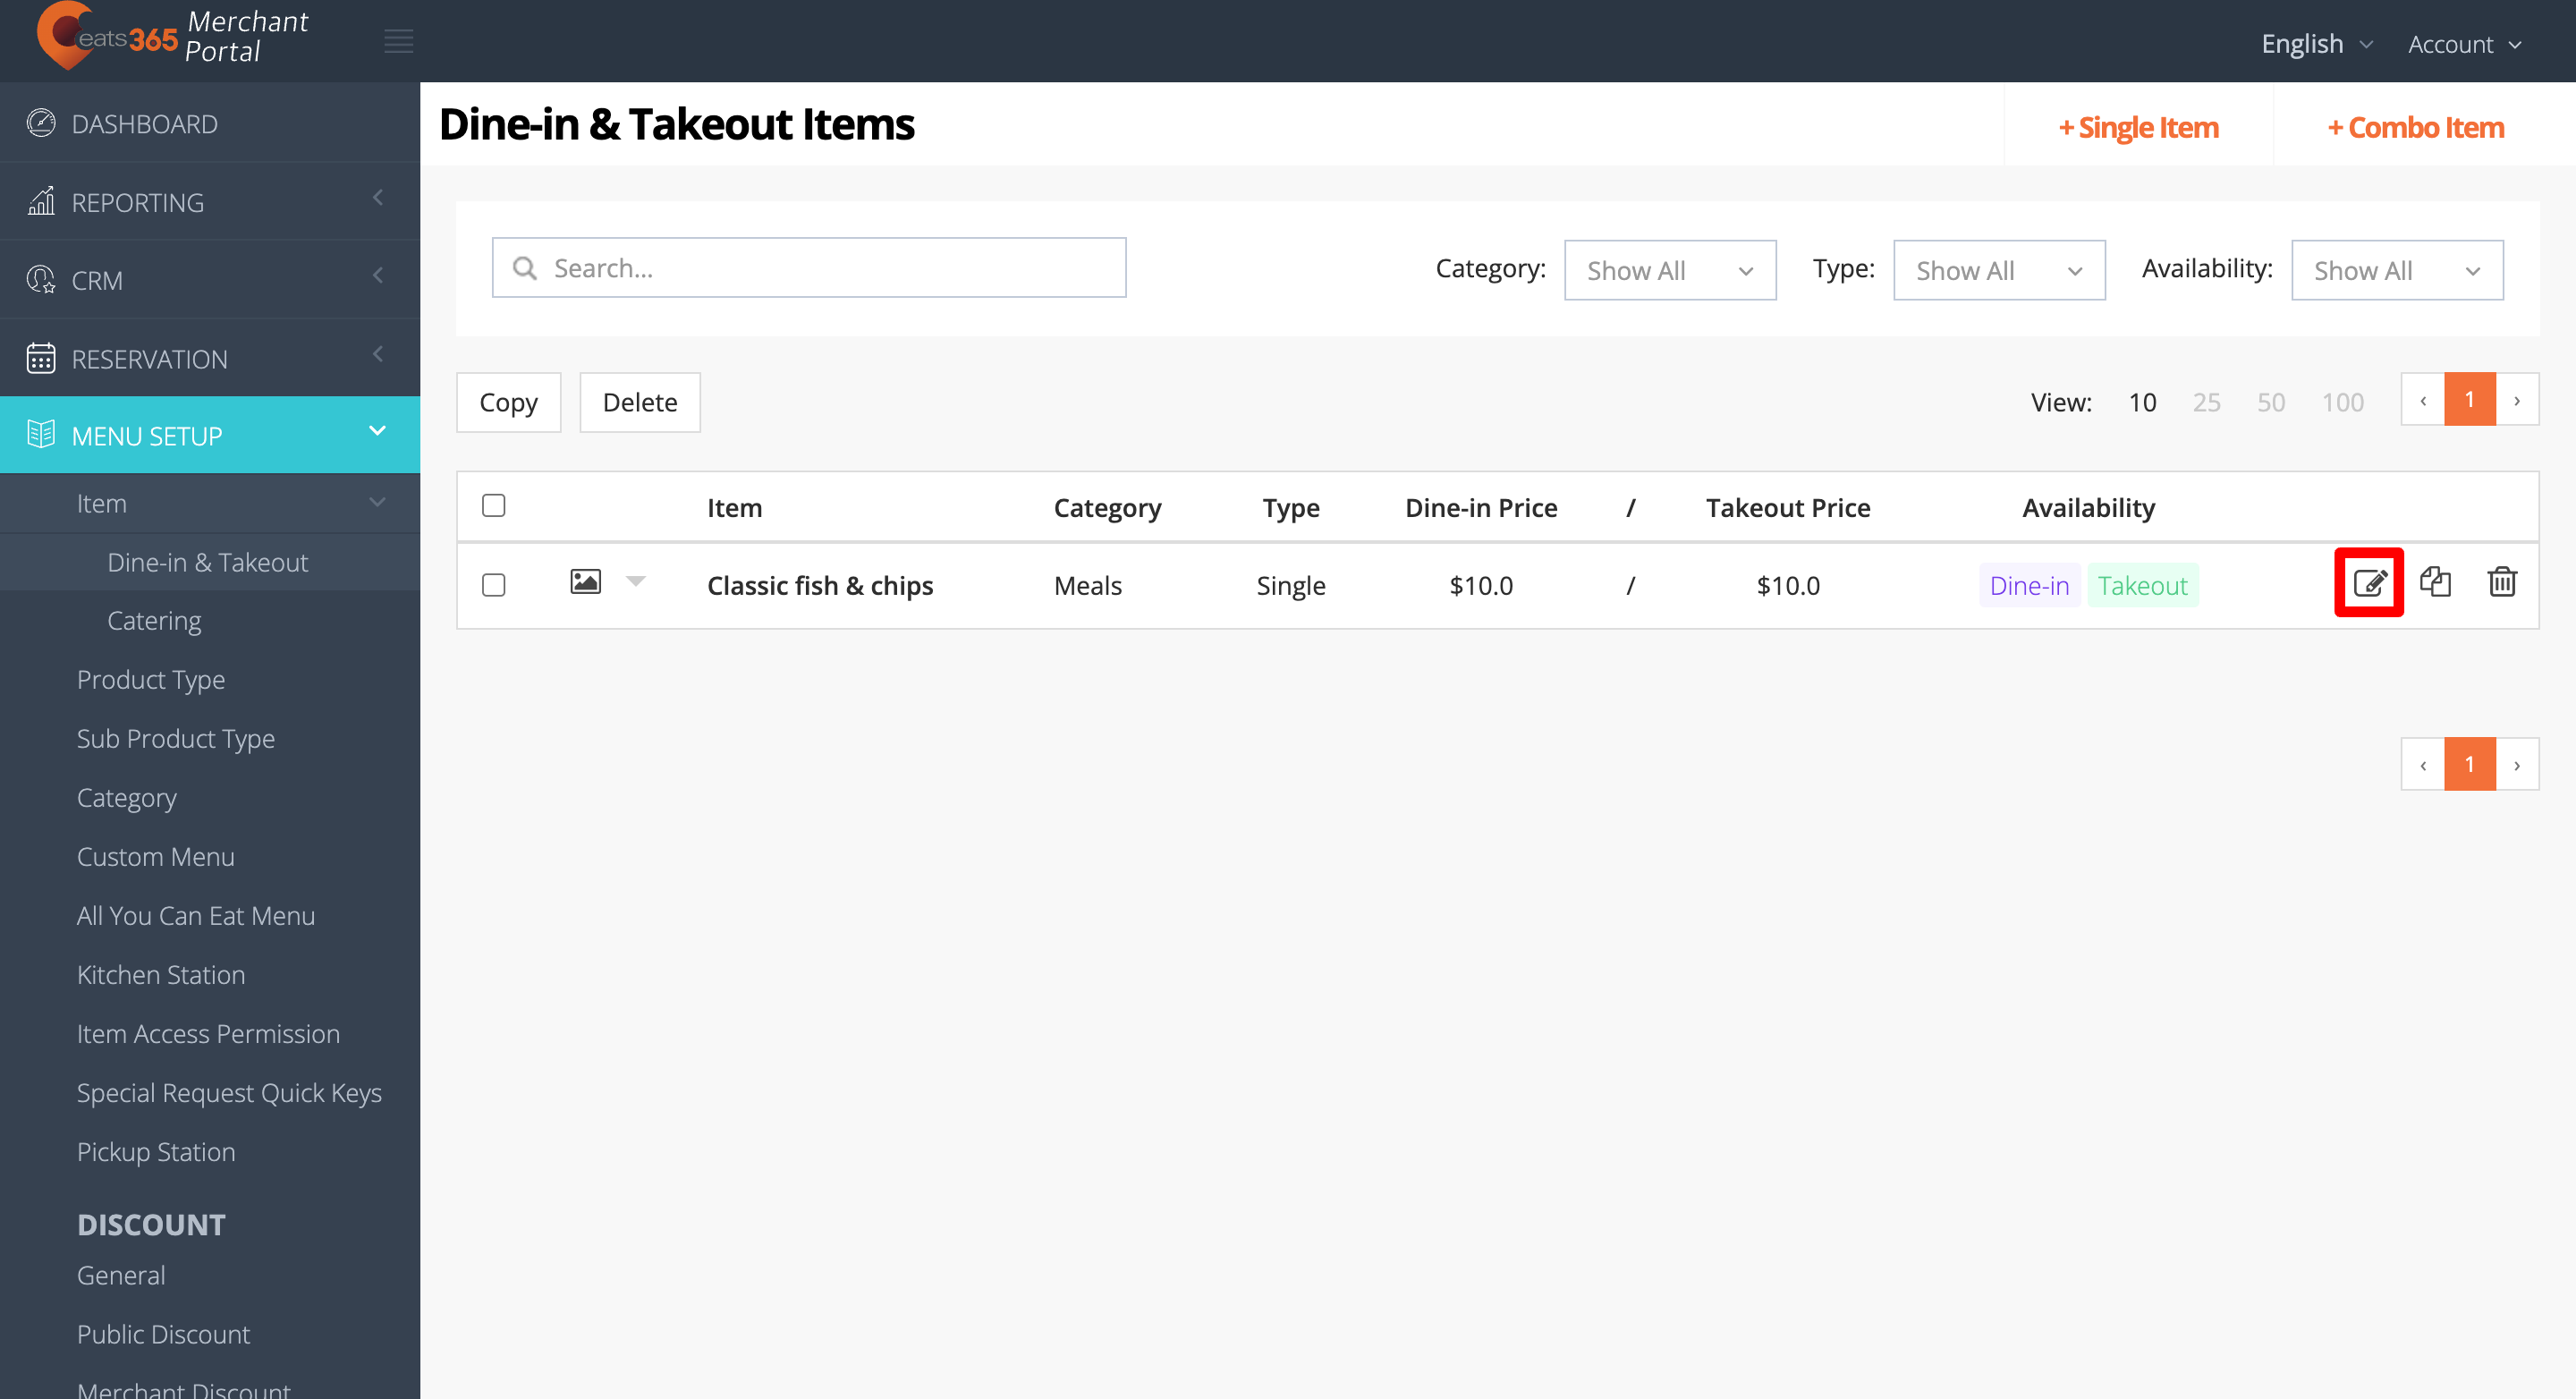
- Click on the Modifier tab.
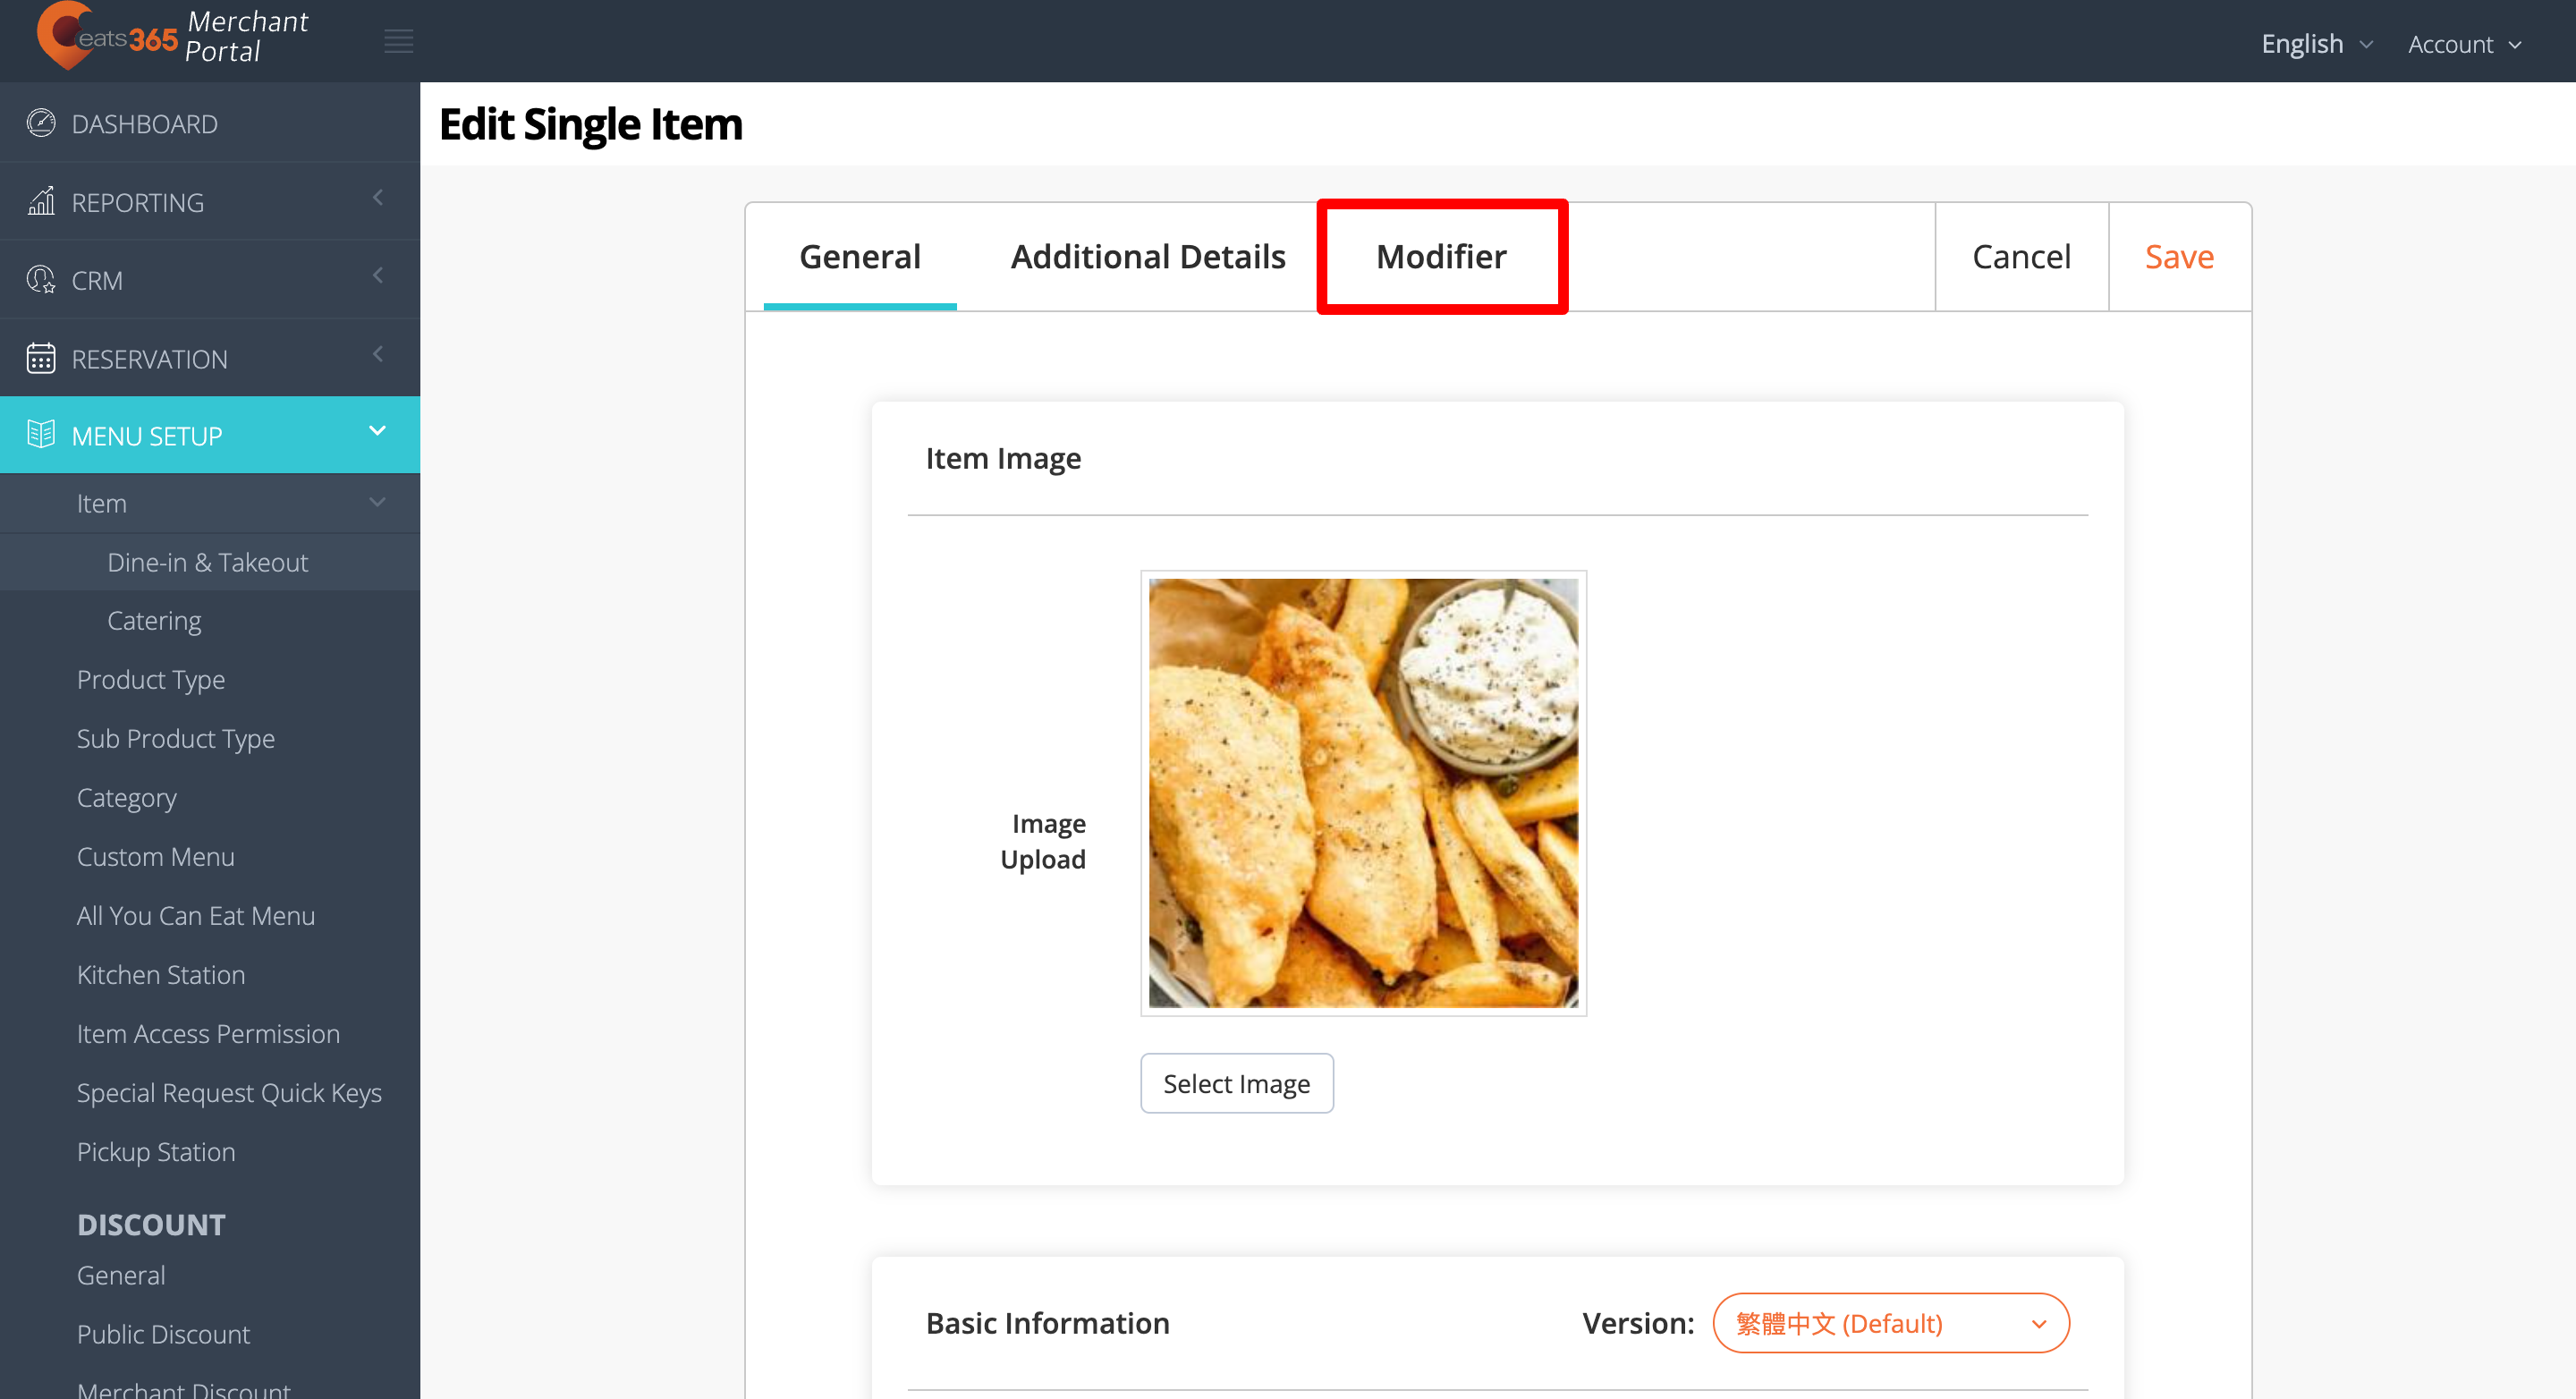
- If you already have a Modifier Preset set up, you can choose to import a Modifier Preset to the item. Click on Import Modifier Preset, then choose the Modifier Preset that you want to apply to the item.
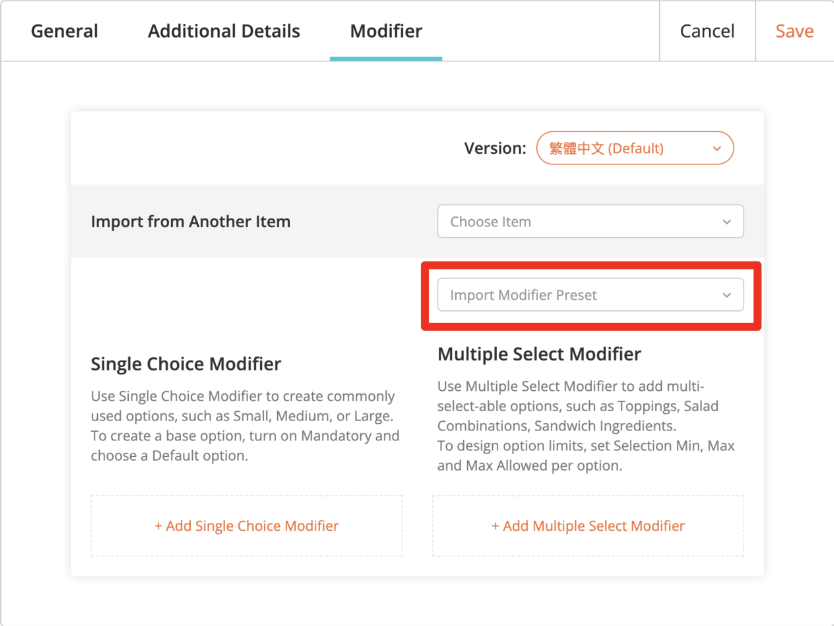
- If you don’t have a Modifier Preset set up, select Add Single Choice Modifier.
-
Select the modifier language.
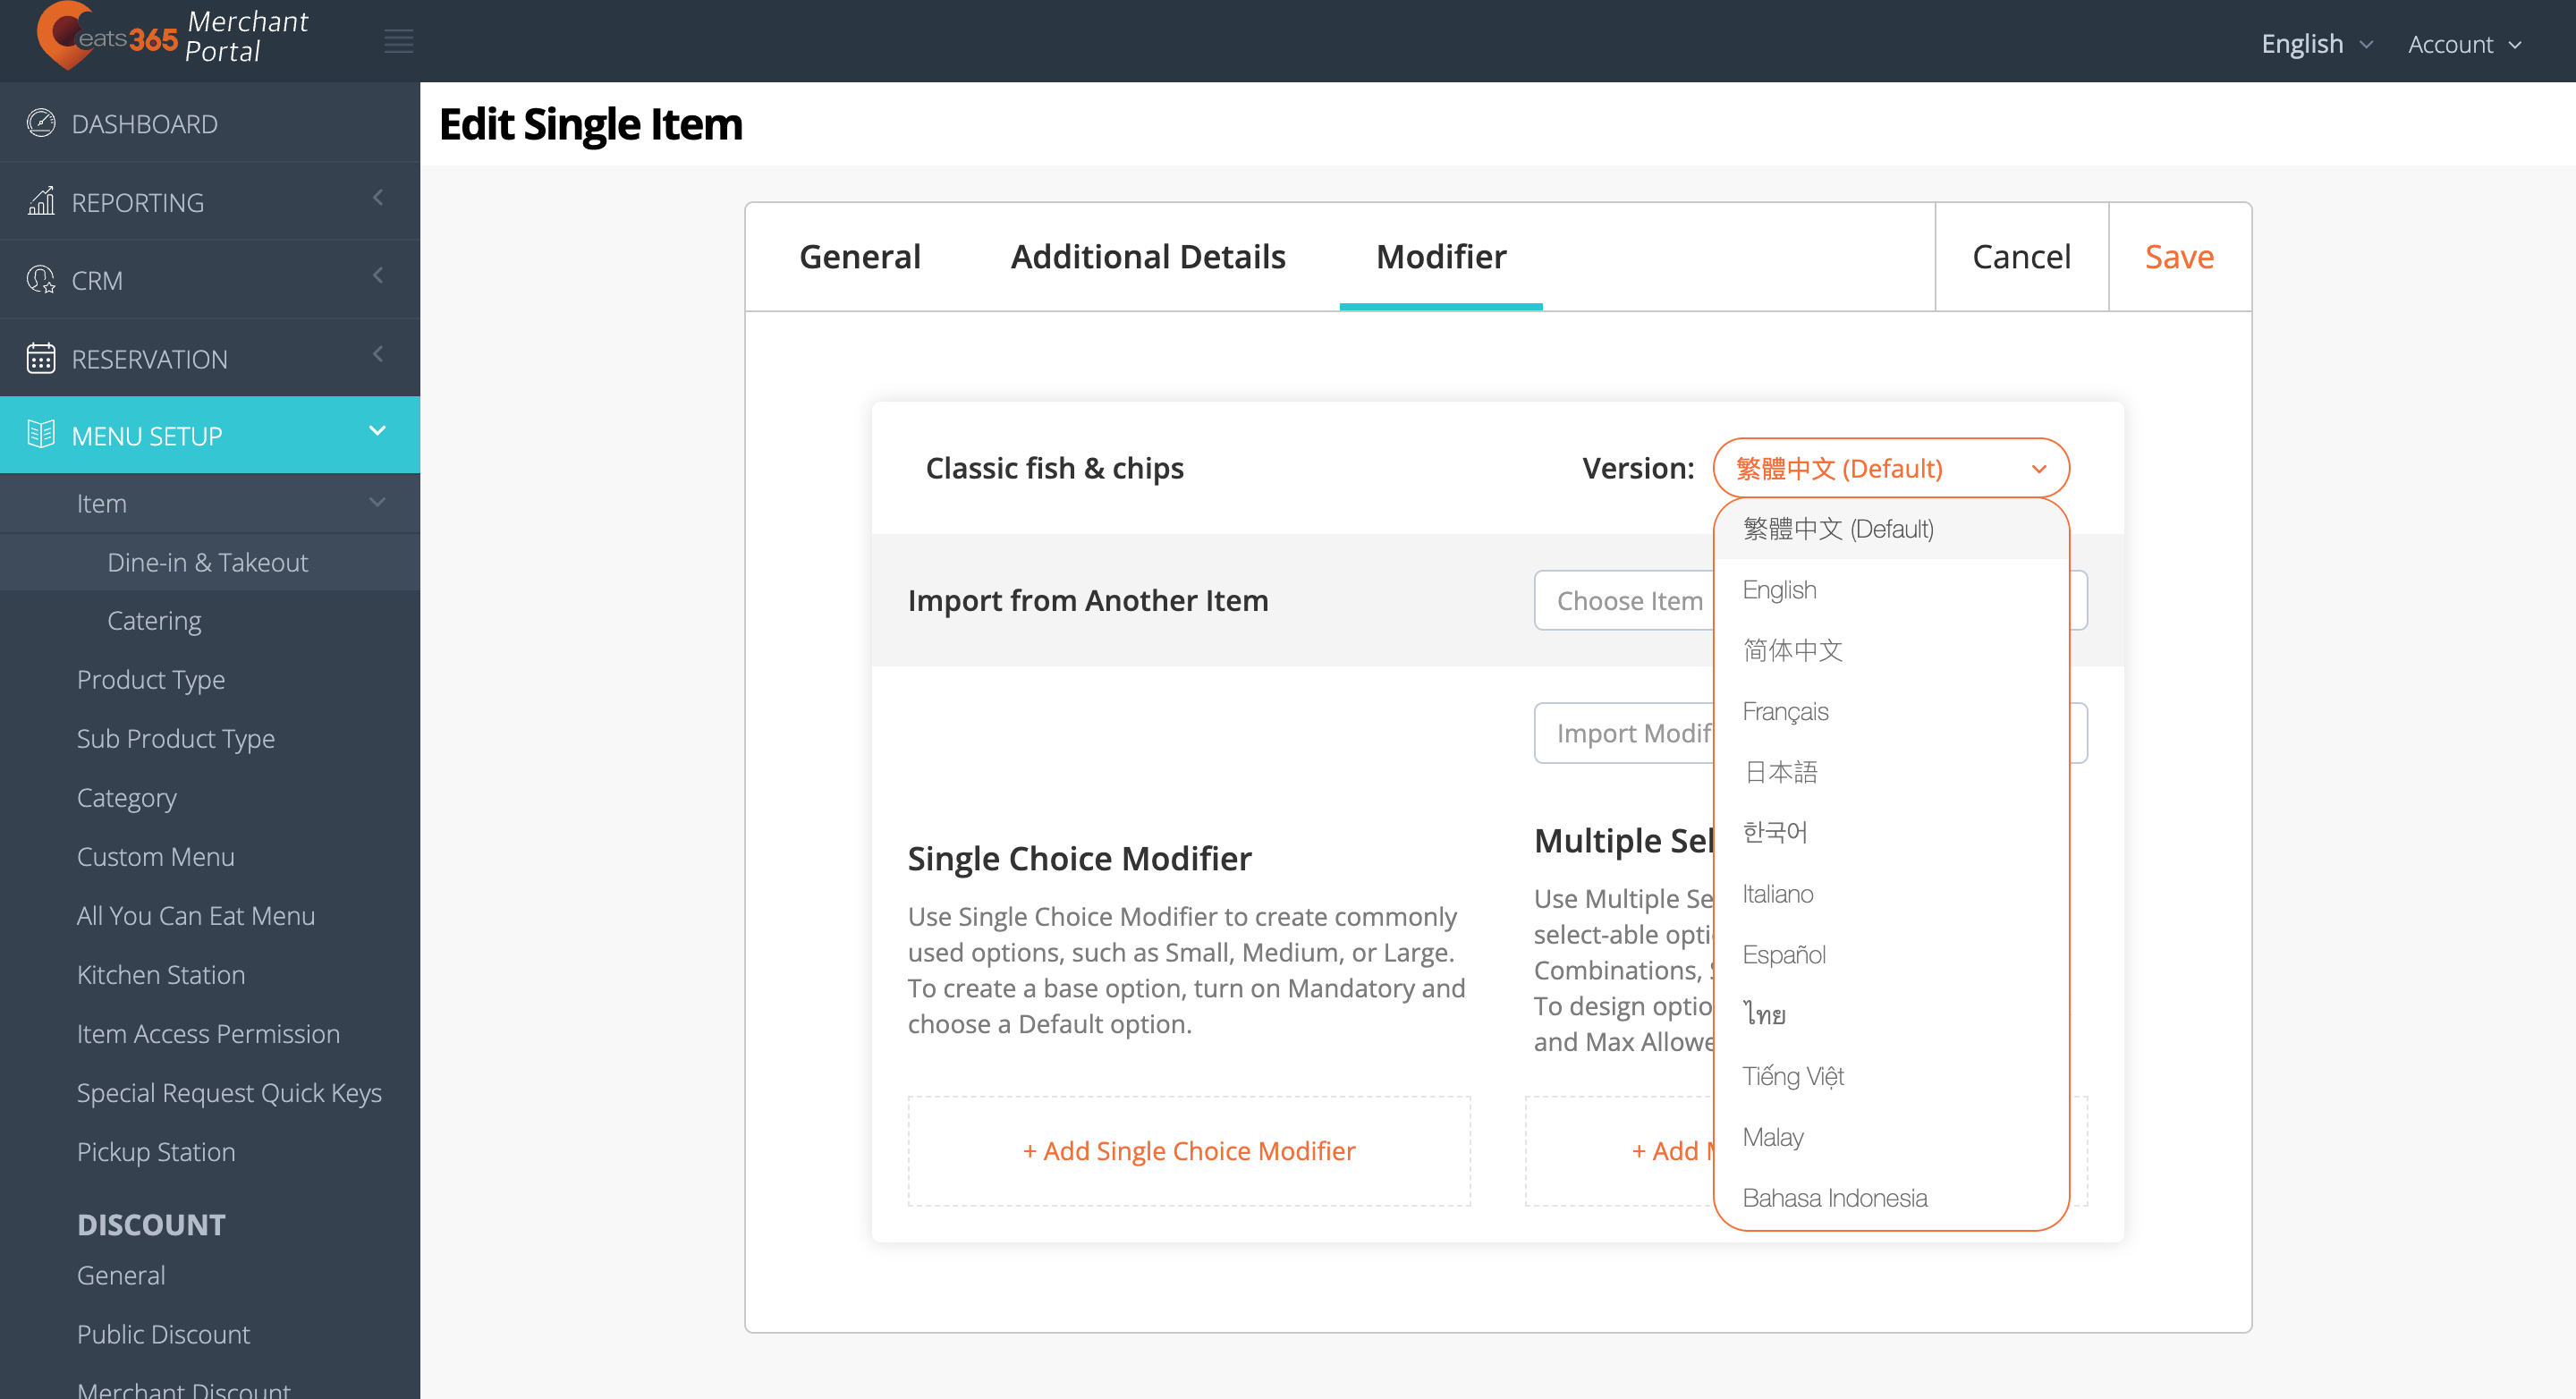 Note: You must enter a default name for the modifier. The name becomes available in whatever language the POS app is using. For multi-language menus, after selecting a default language, click on the language drop-down list and select your preferred language. Then, enter the alternate name in that language.
 - On the blank field, enter a name for the modifier. For example, if you are creating an option for drink sizes, you can enter “Drink Sizes.”
- Enter the details for the modifier option.
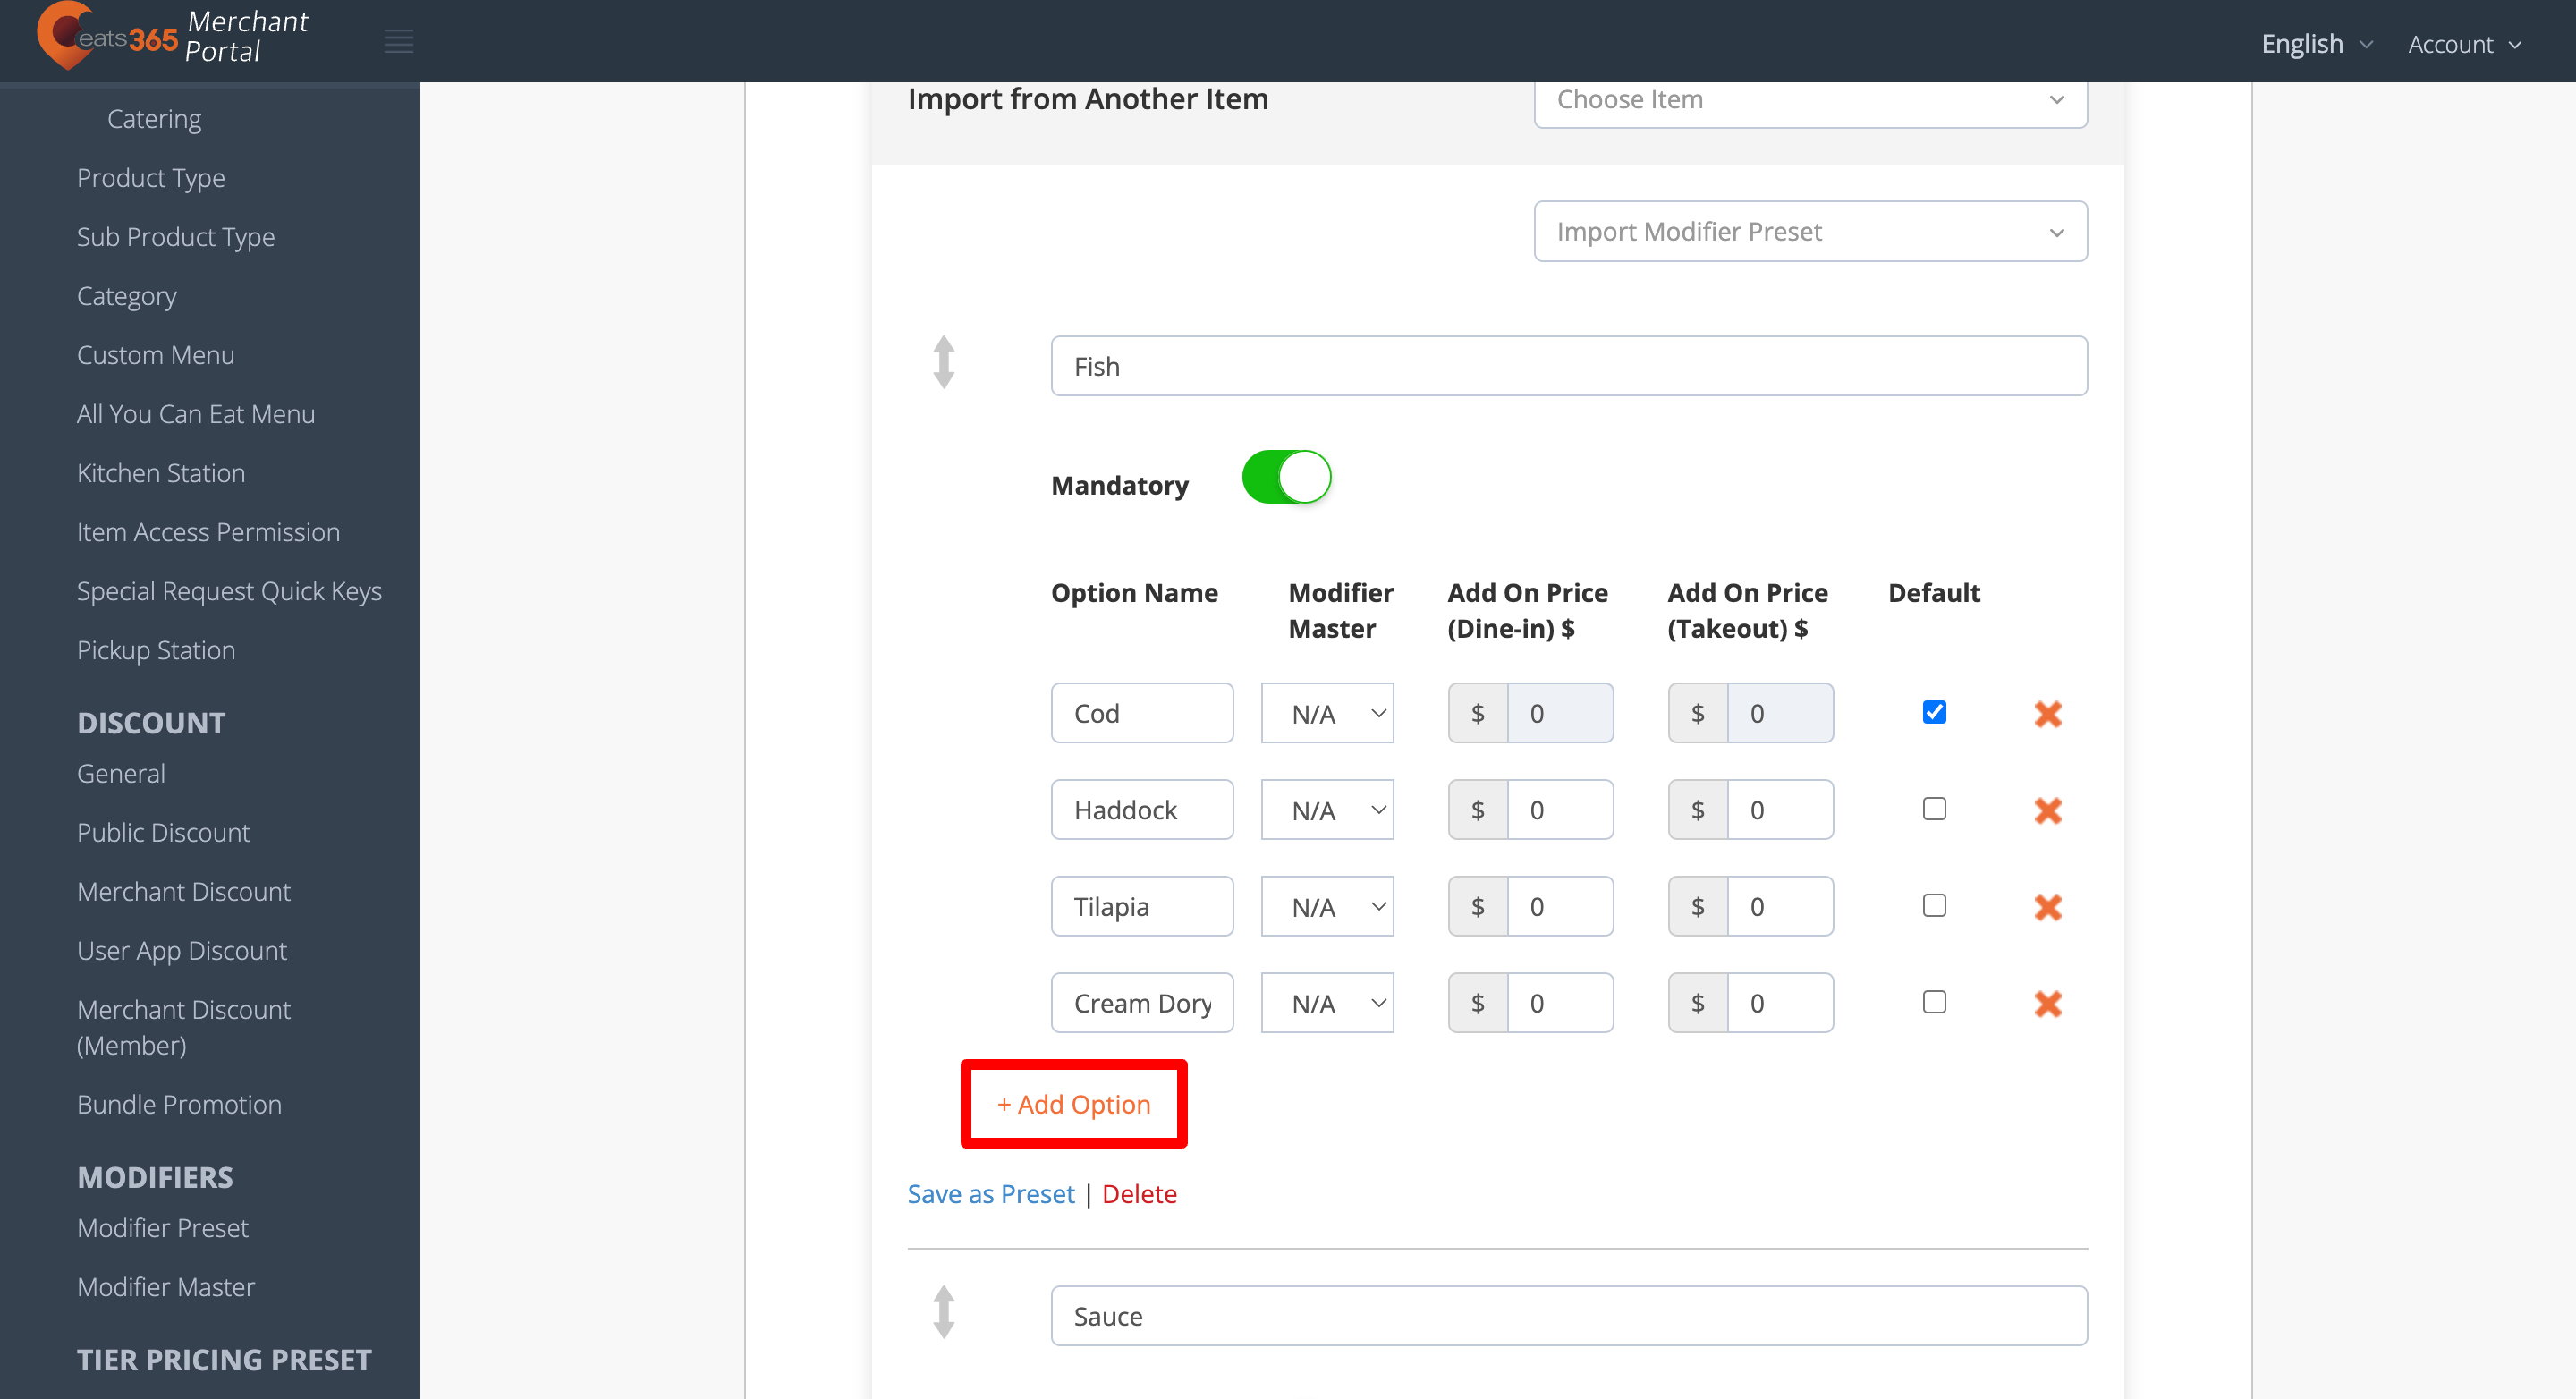
- To add another option to the same modifier, select Add Option.
- To create another modifier, select Add Single Choice Modifier again.
Tip: You can also add a Multiple Select Modifier to the same item. - If you want to have a default option for the modifier, turn on Mandatory
 . Then, next to the option that you want to set as the default option, click on the check box
  .
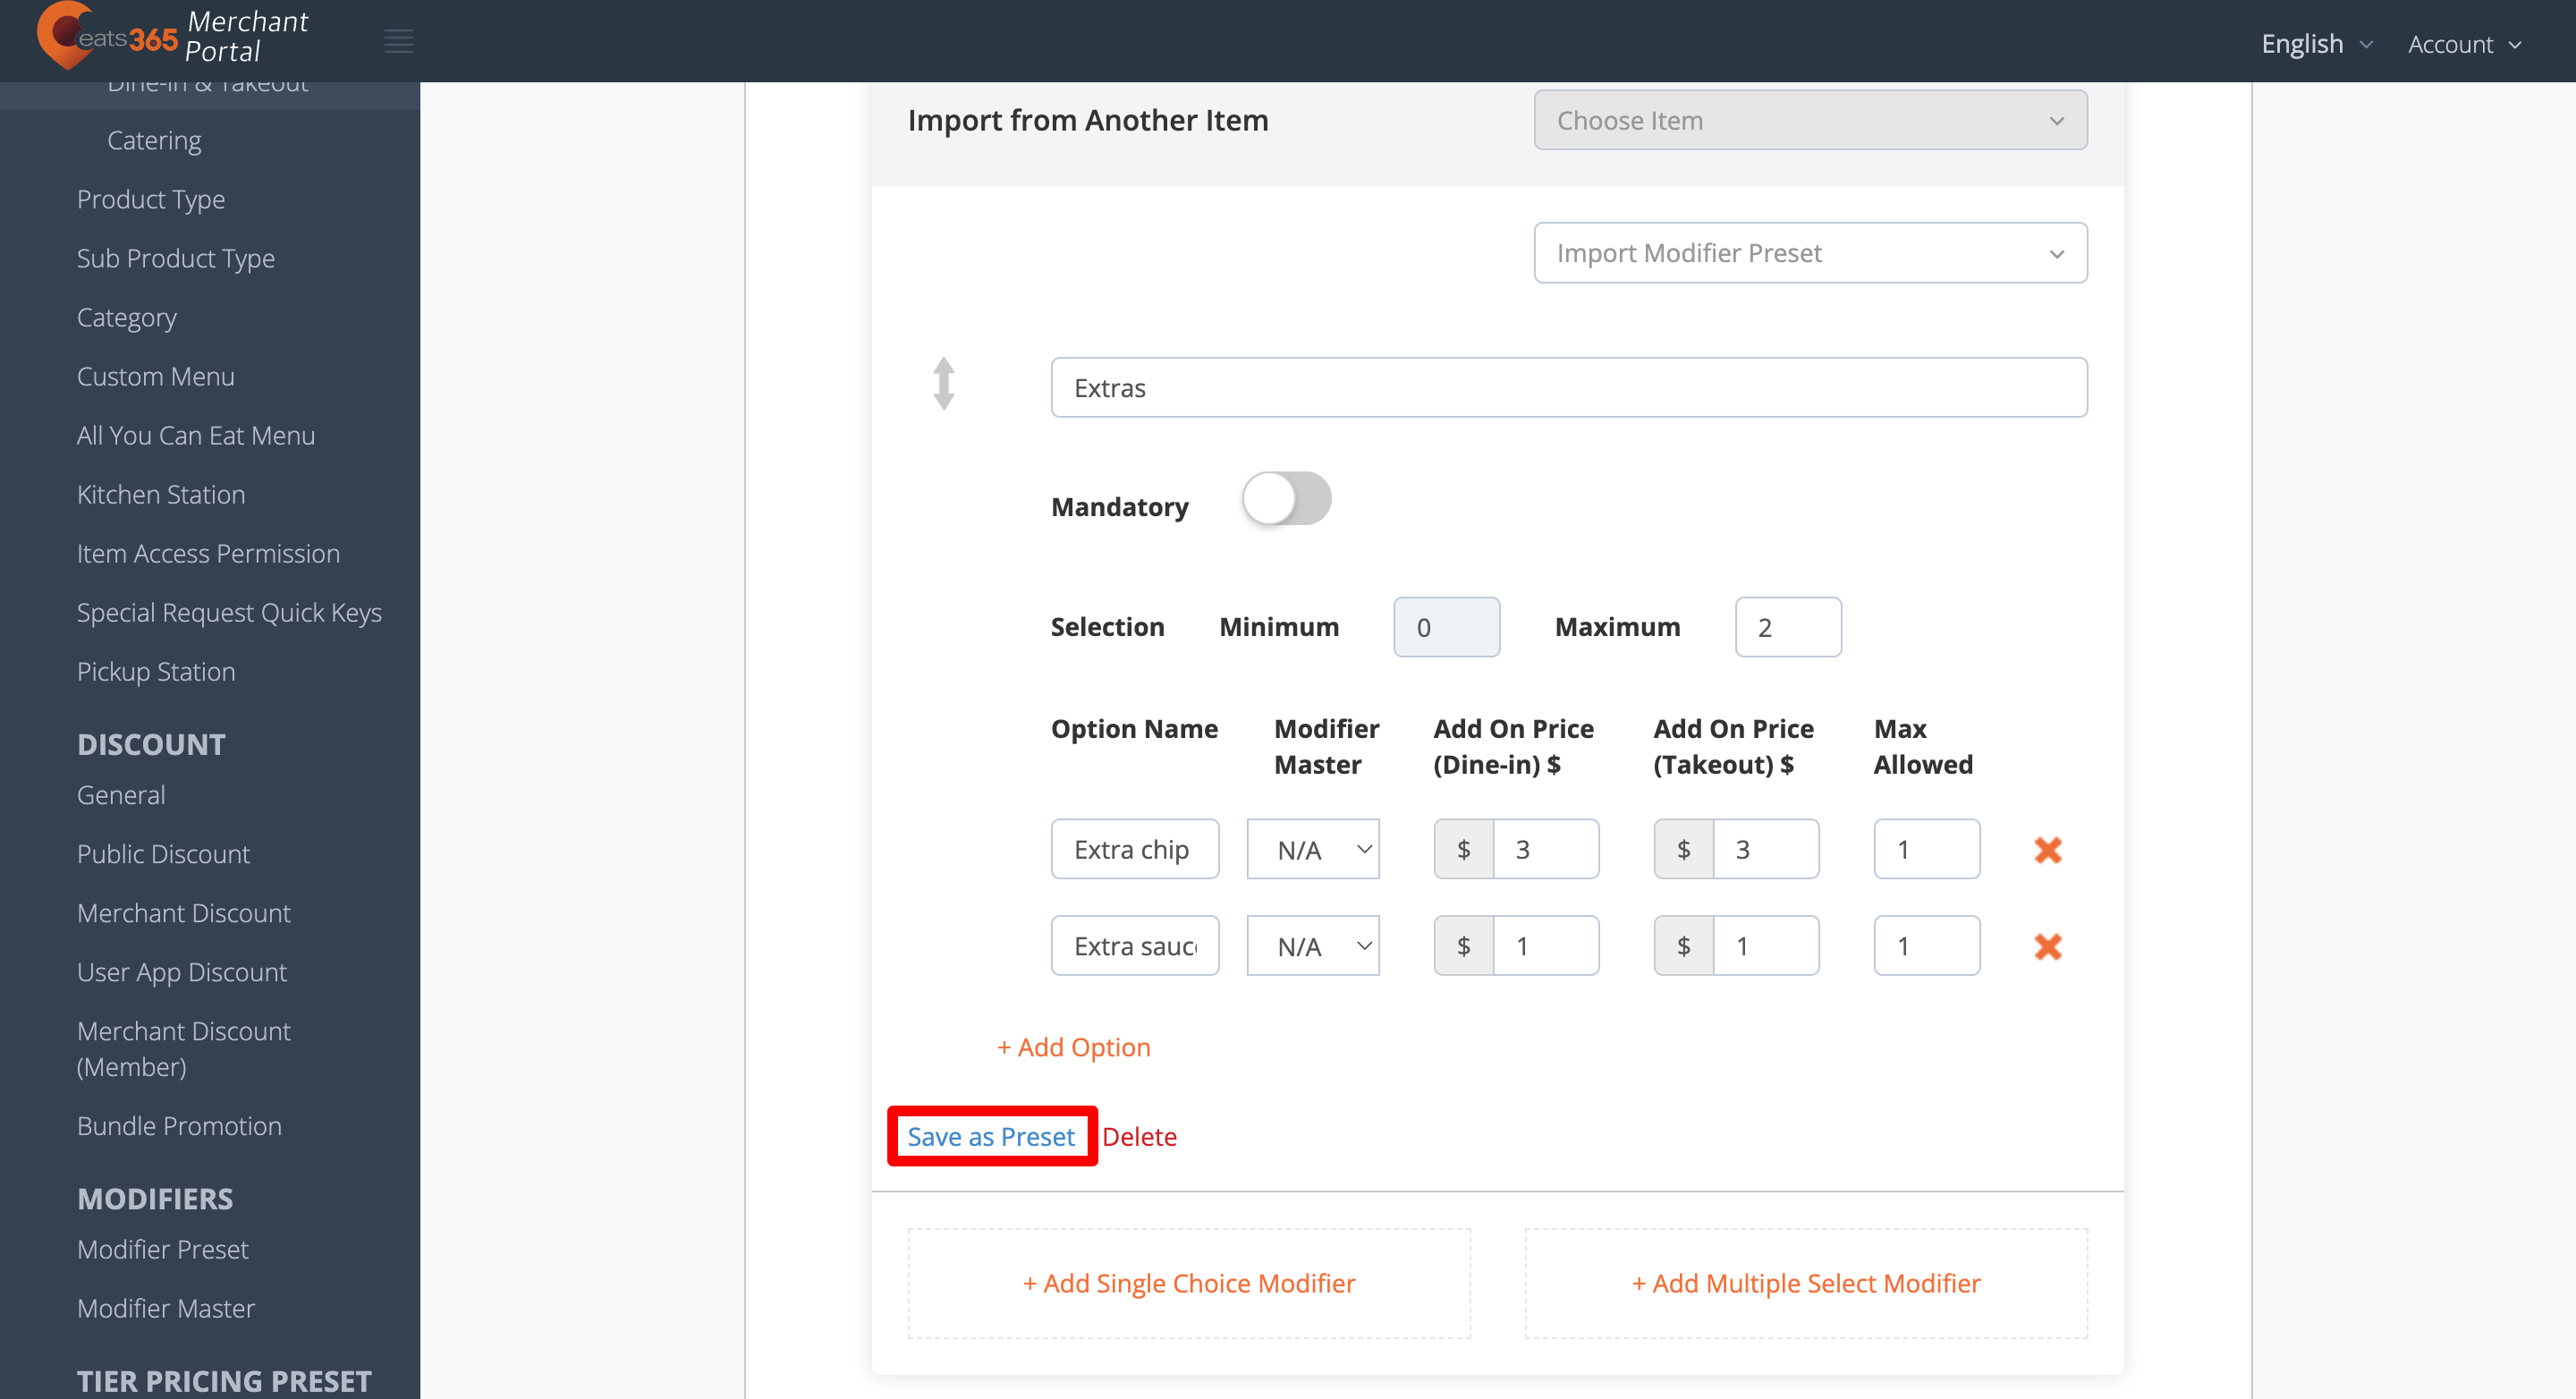
. - (Optional) If you want to save the modifier as a Modifier Preset, select Save as Preset.

- At the top right, click on Save to confirm.
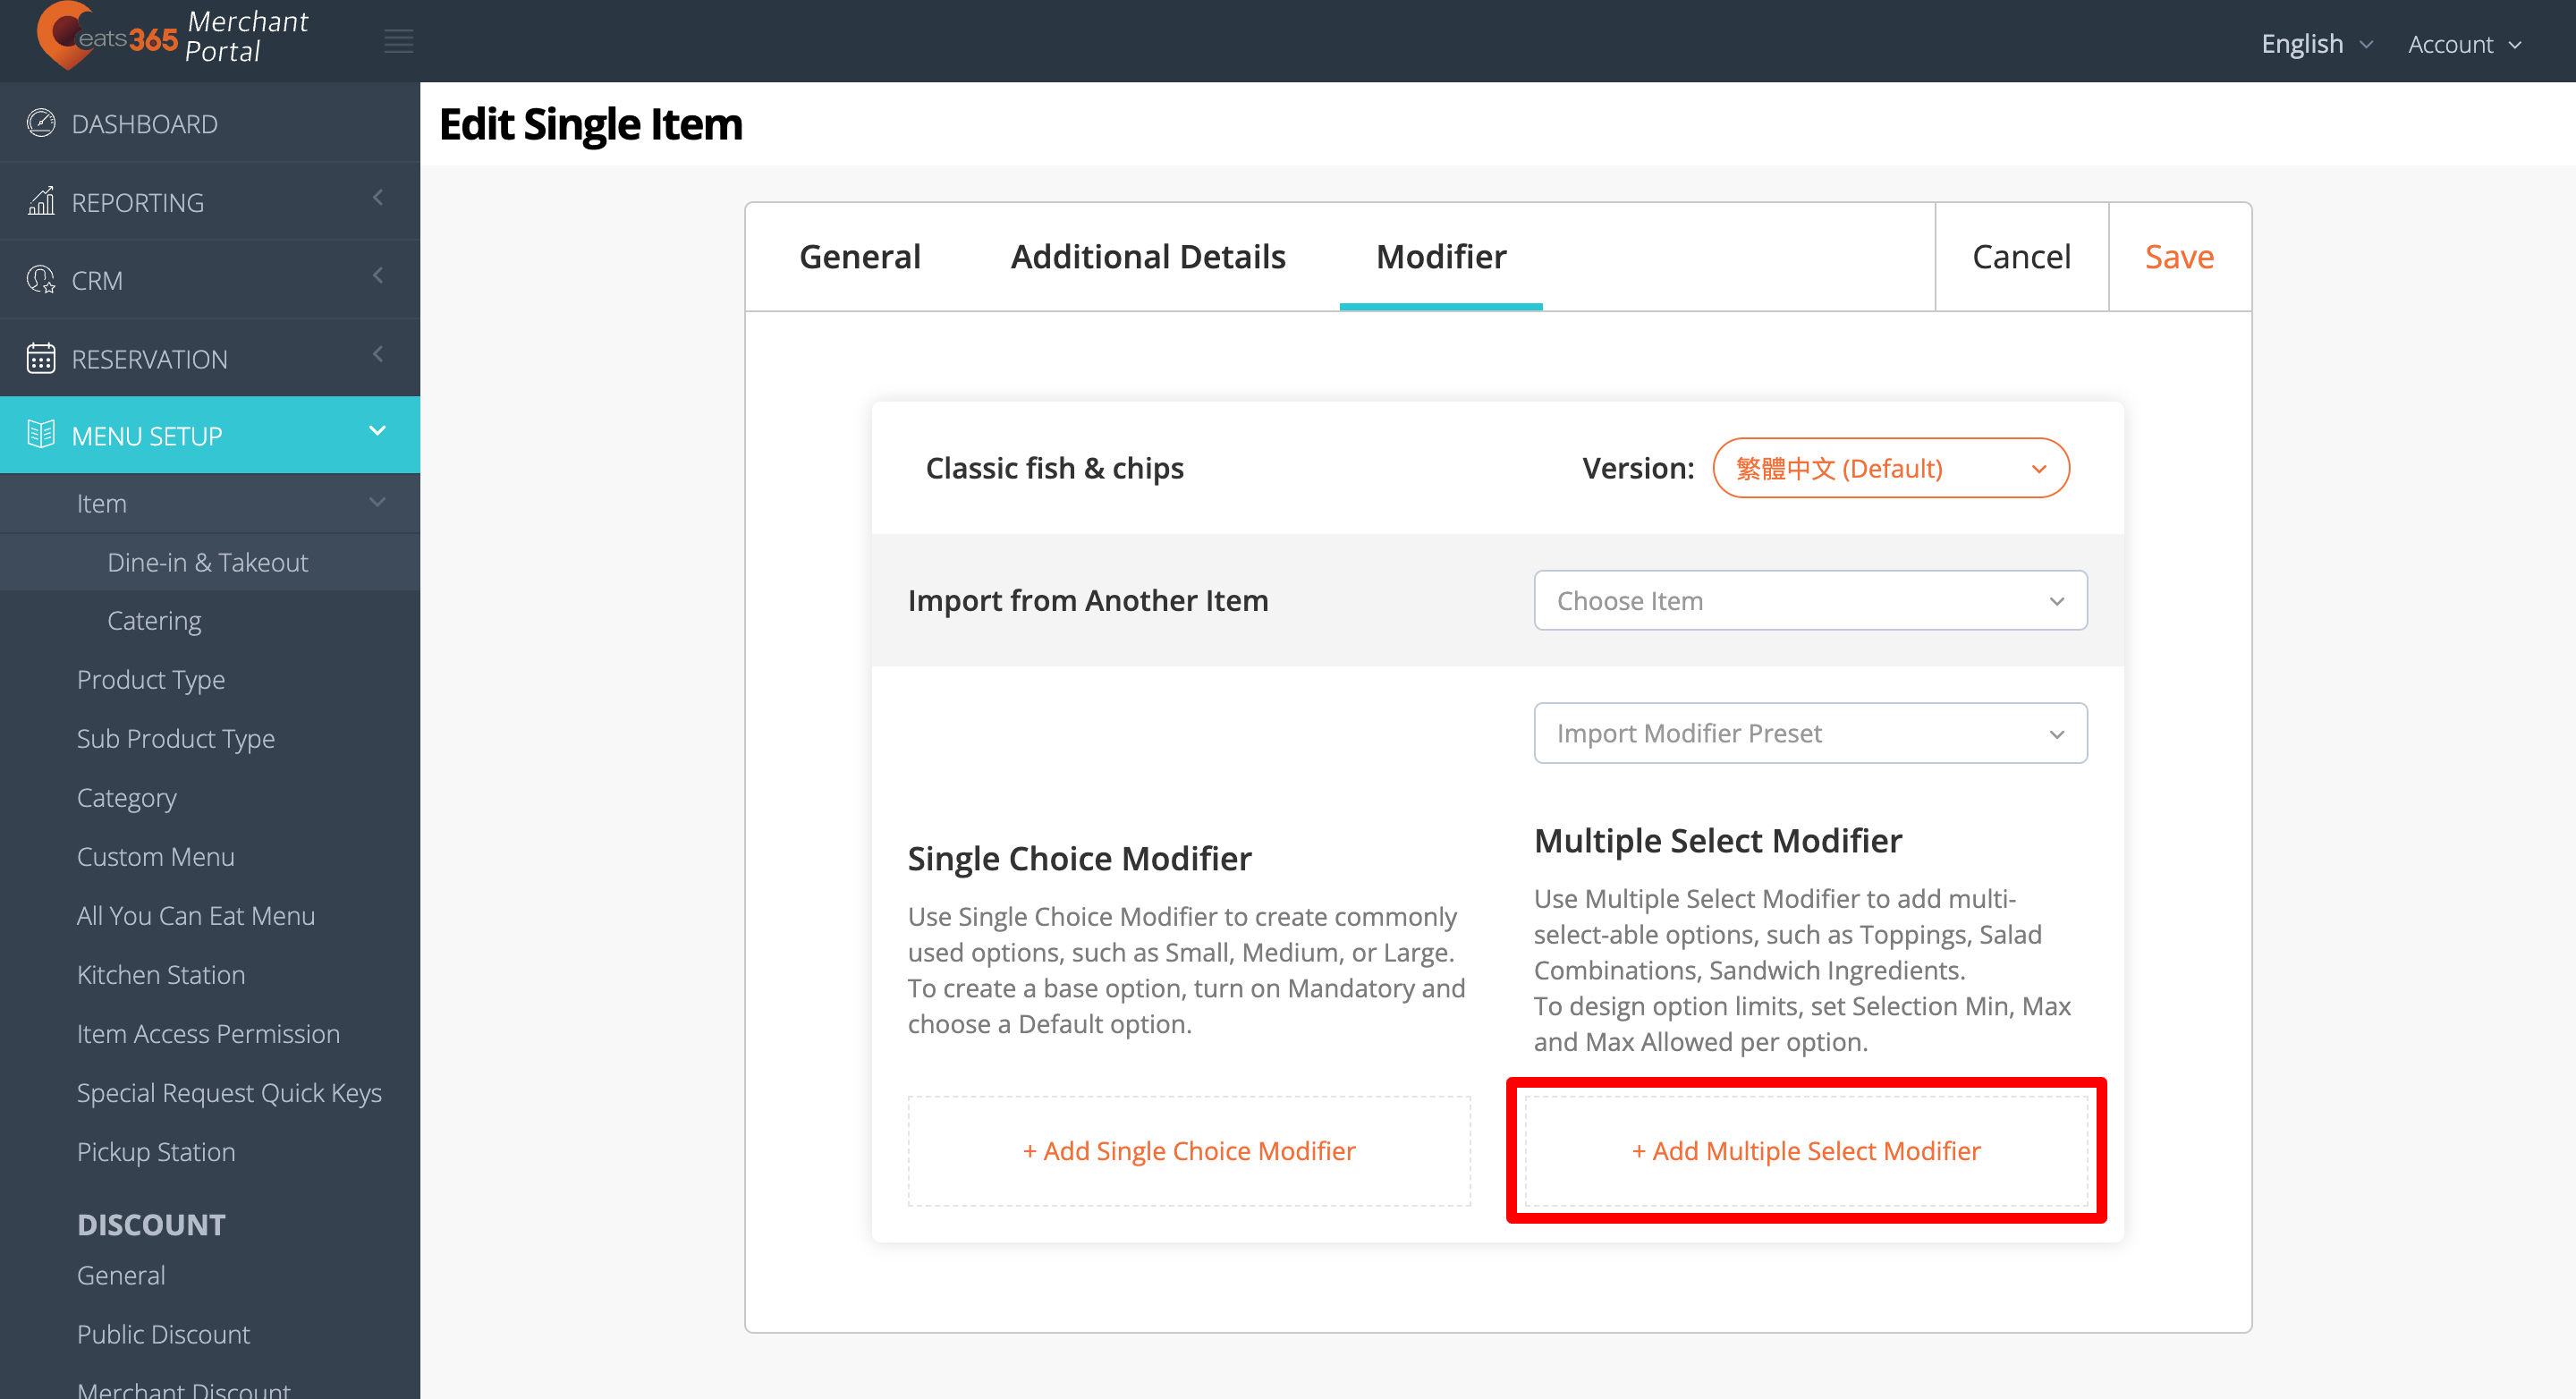
Merchant Portal 2.0
- Log in to the Merchant Portal.
- On the left panel, click on Menu Setup, then select Item.
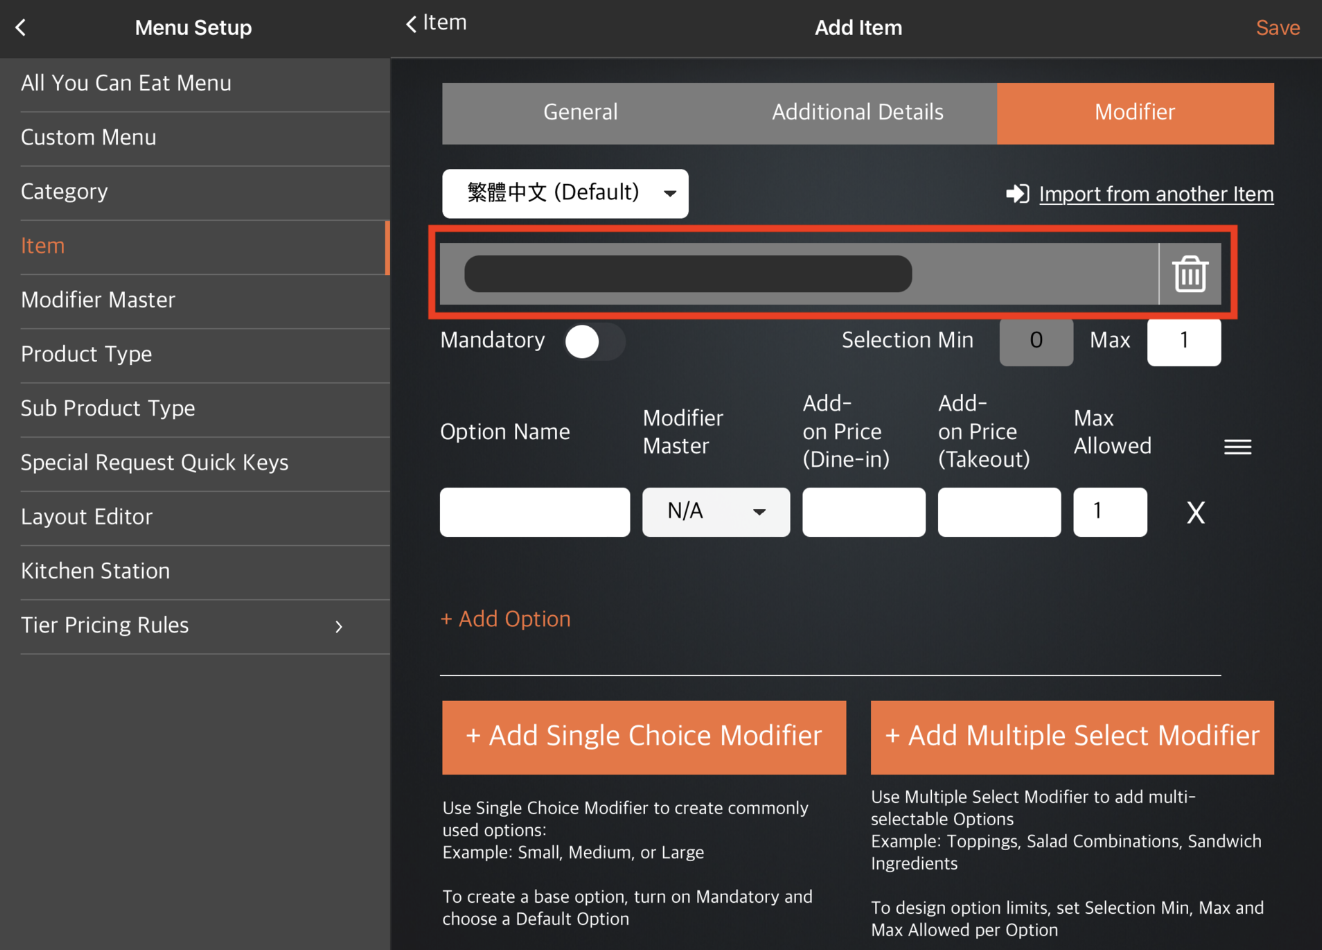
- At the top right, click on +Single Item. Then, create an item.
Note: If you're adding a modifier to an already existing item, next to the item that you want to add a modifier to, click on Edit .
.
- Click on the Modifier tab.
- If you’ve created Modifier Presets before creating the item, such as modifier templates and shared modifiers, you can choose to apply them to the item.
- To import a modifier template, click on the Import Modifier Preset drop-down. Then, select the modifier template that you want to apply to your item.
Note: Once a modifier template is imported, the changes you make to the modifier will not apply to the original template.
- To apply a shared modifier, click on the Apply Shared Modifier drop-down. Then, choose the shared modifier that you want to apply to your item. Once a shared modifier is applied to the item, changes made to the shared modifier will also apply to the item.
Note: You can only edit a shared modifier in the Modifier Preset settings.
- To import a modifier template, click on the Import Modifier Preset drop-down. Then, select the modifier template that you want to apply to your item.
- If you don’t have a modifier preset set up, select Add Single Choice Modifier.

- Next to "Modifier Name," enter a name for the modifier. For example, if you are creating an option for drink sizes, you can enter “Drink Size.” To add a name per language, click on the relevant language tab.
Note: To add more languages, click on +Languages.
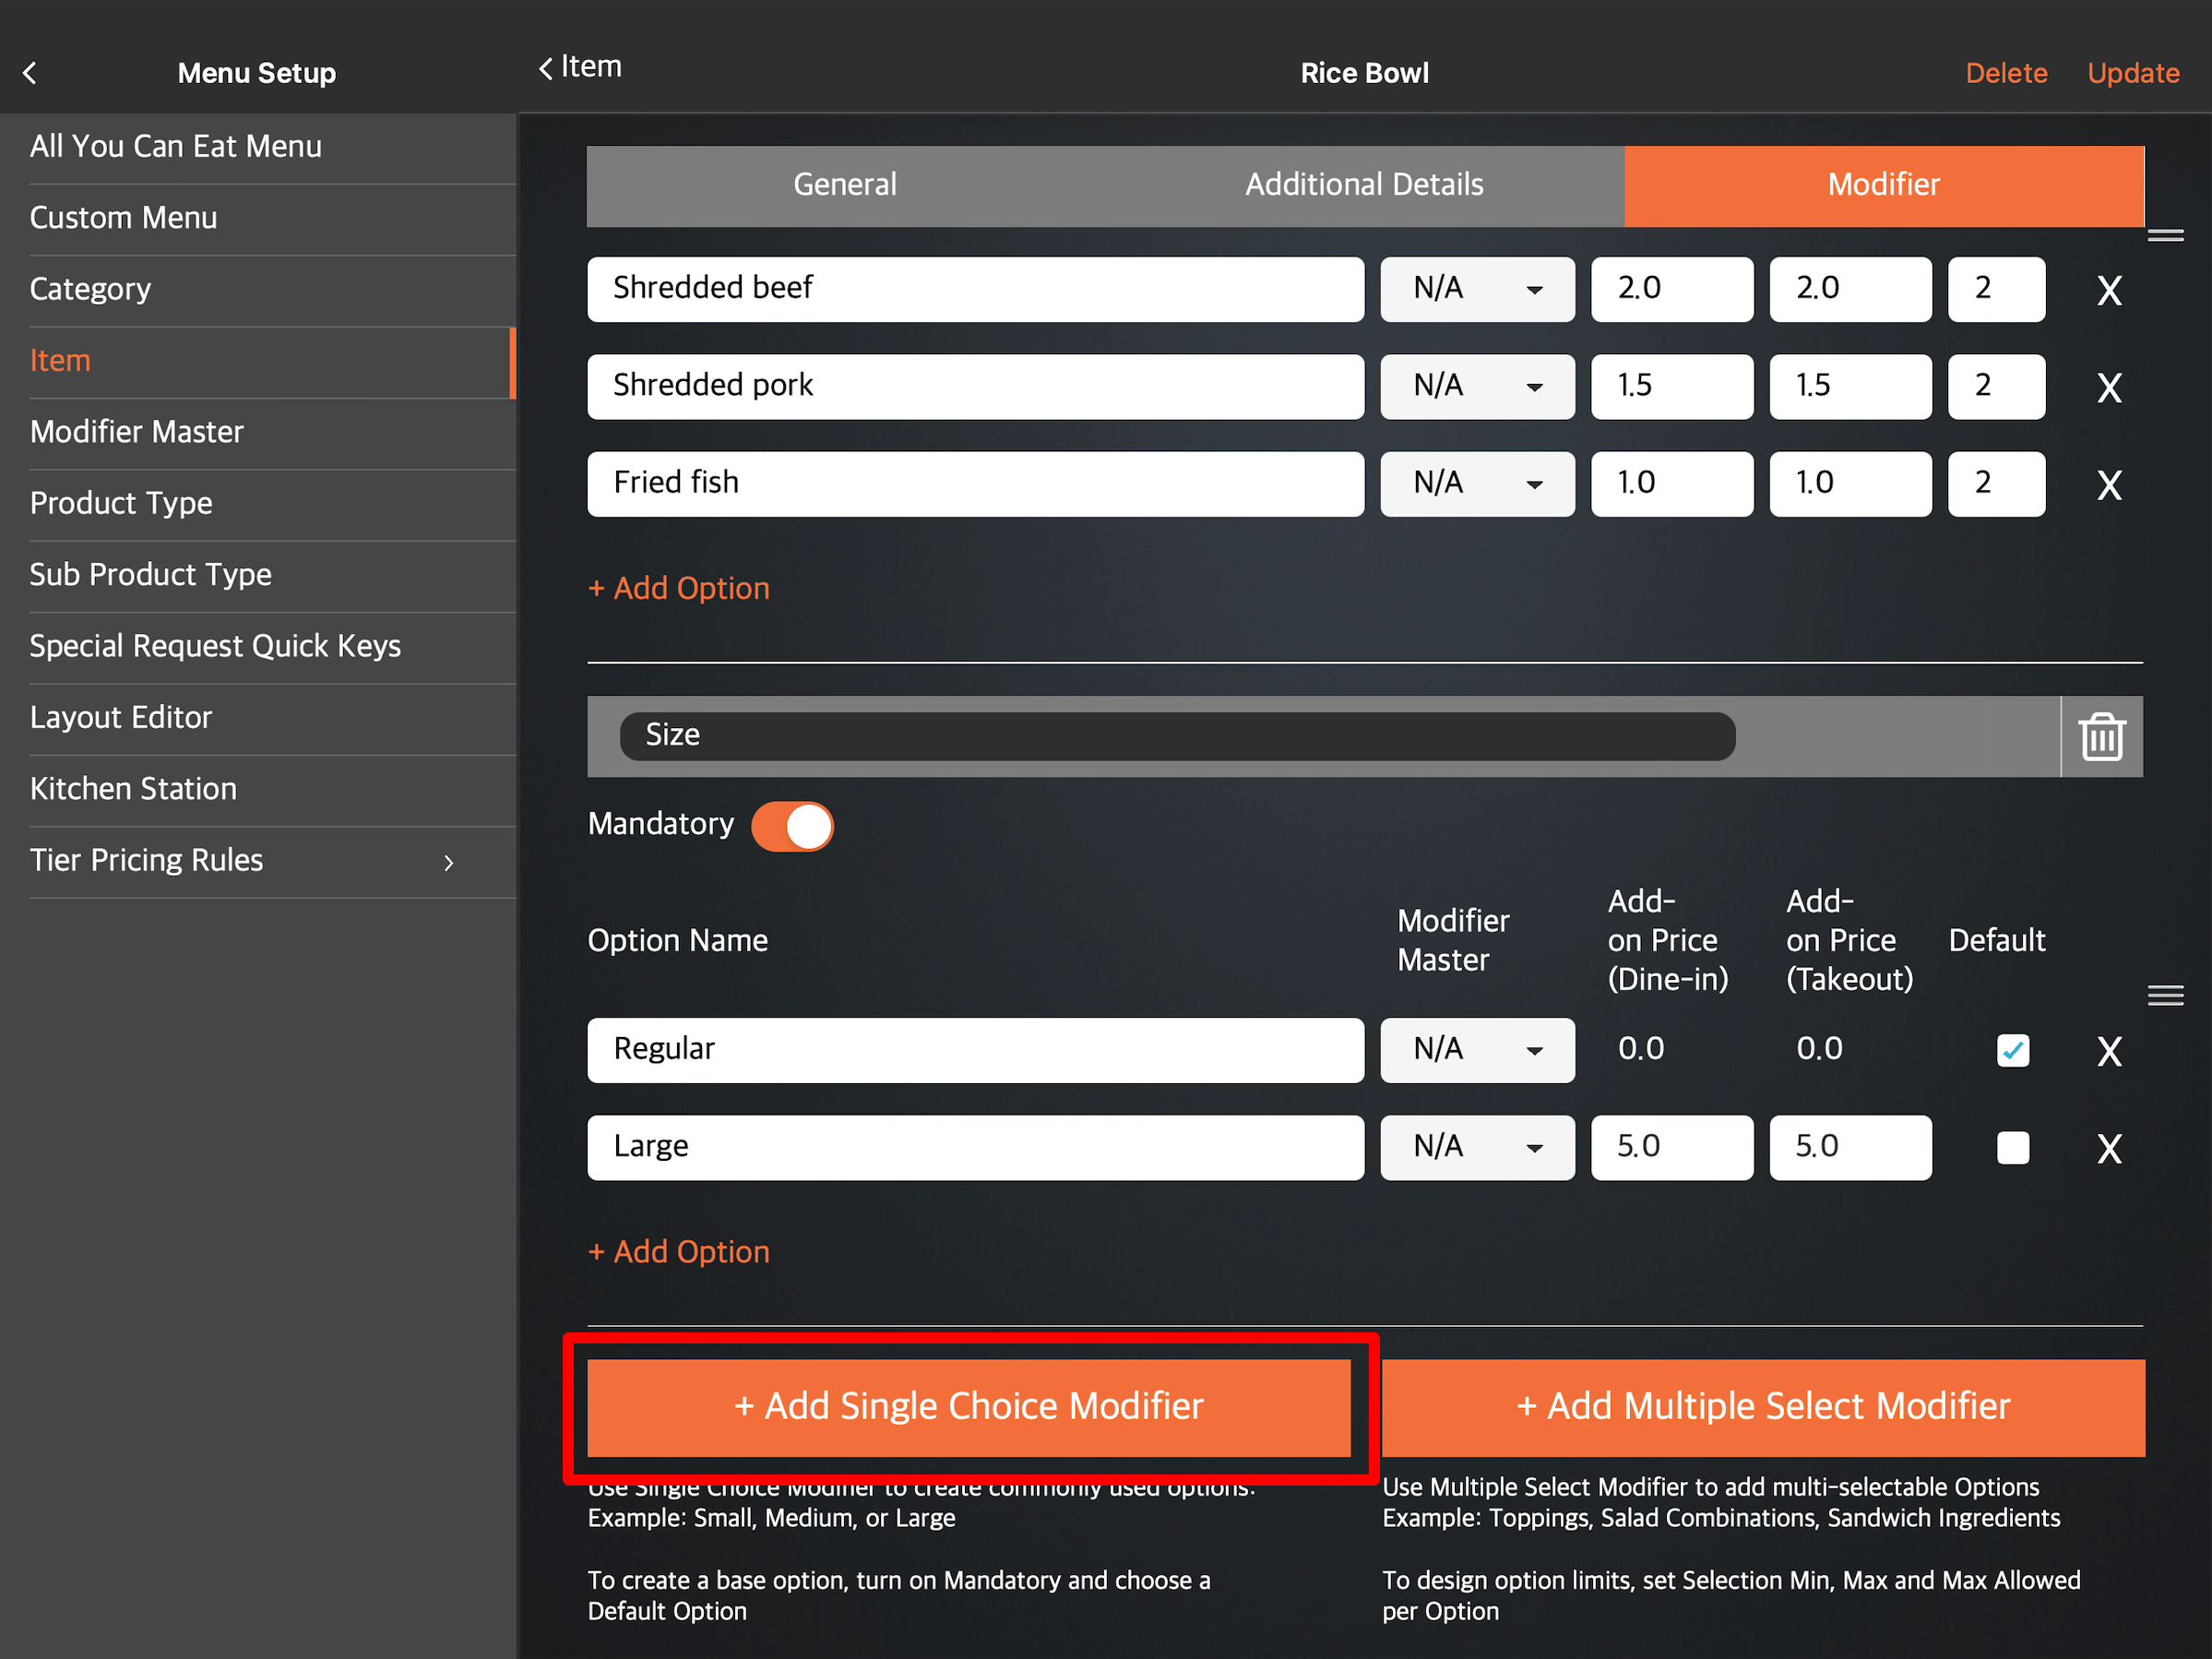
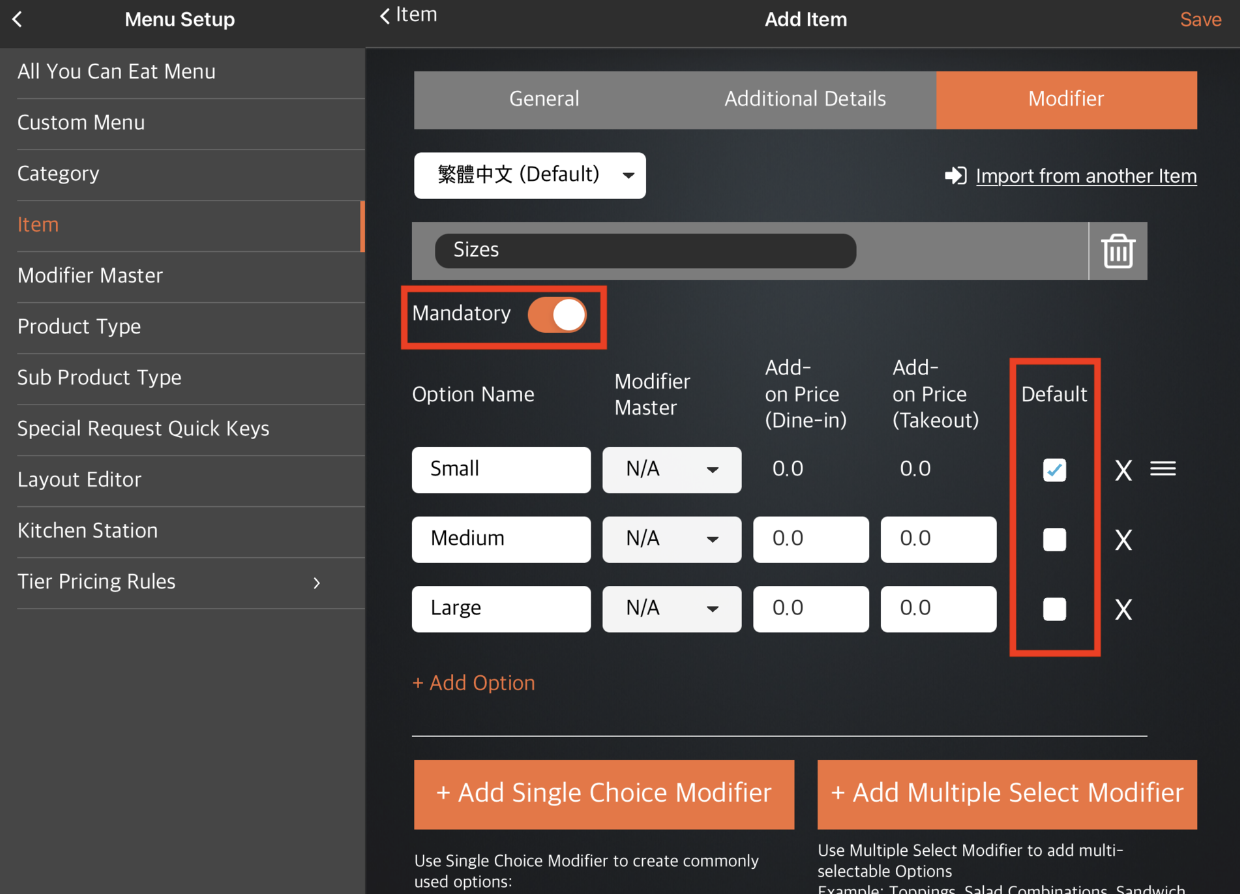
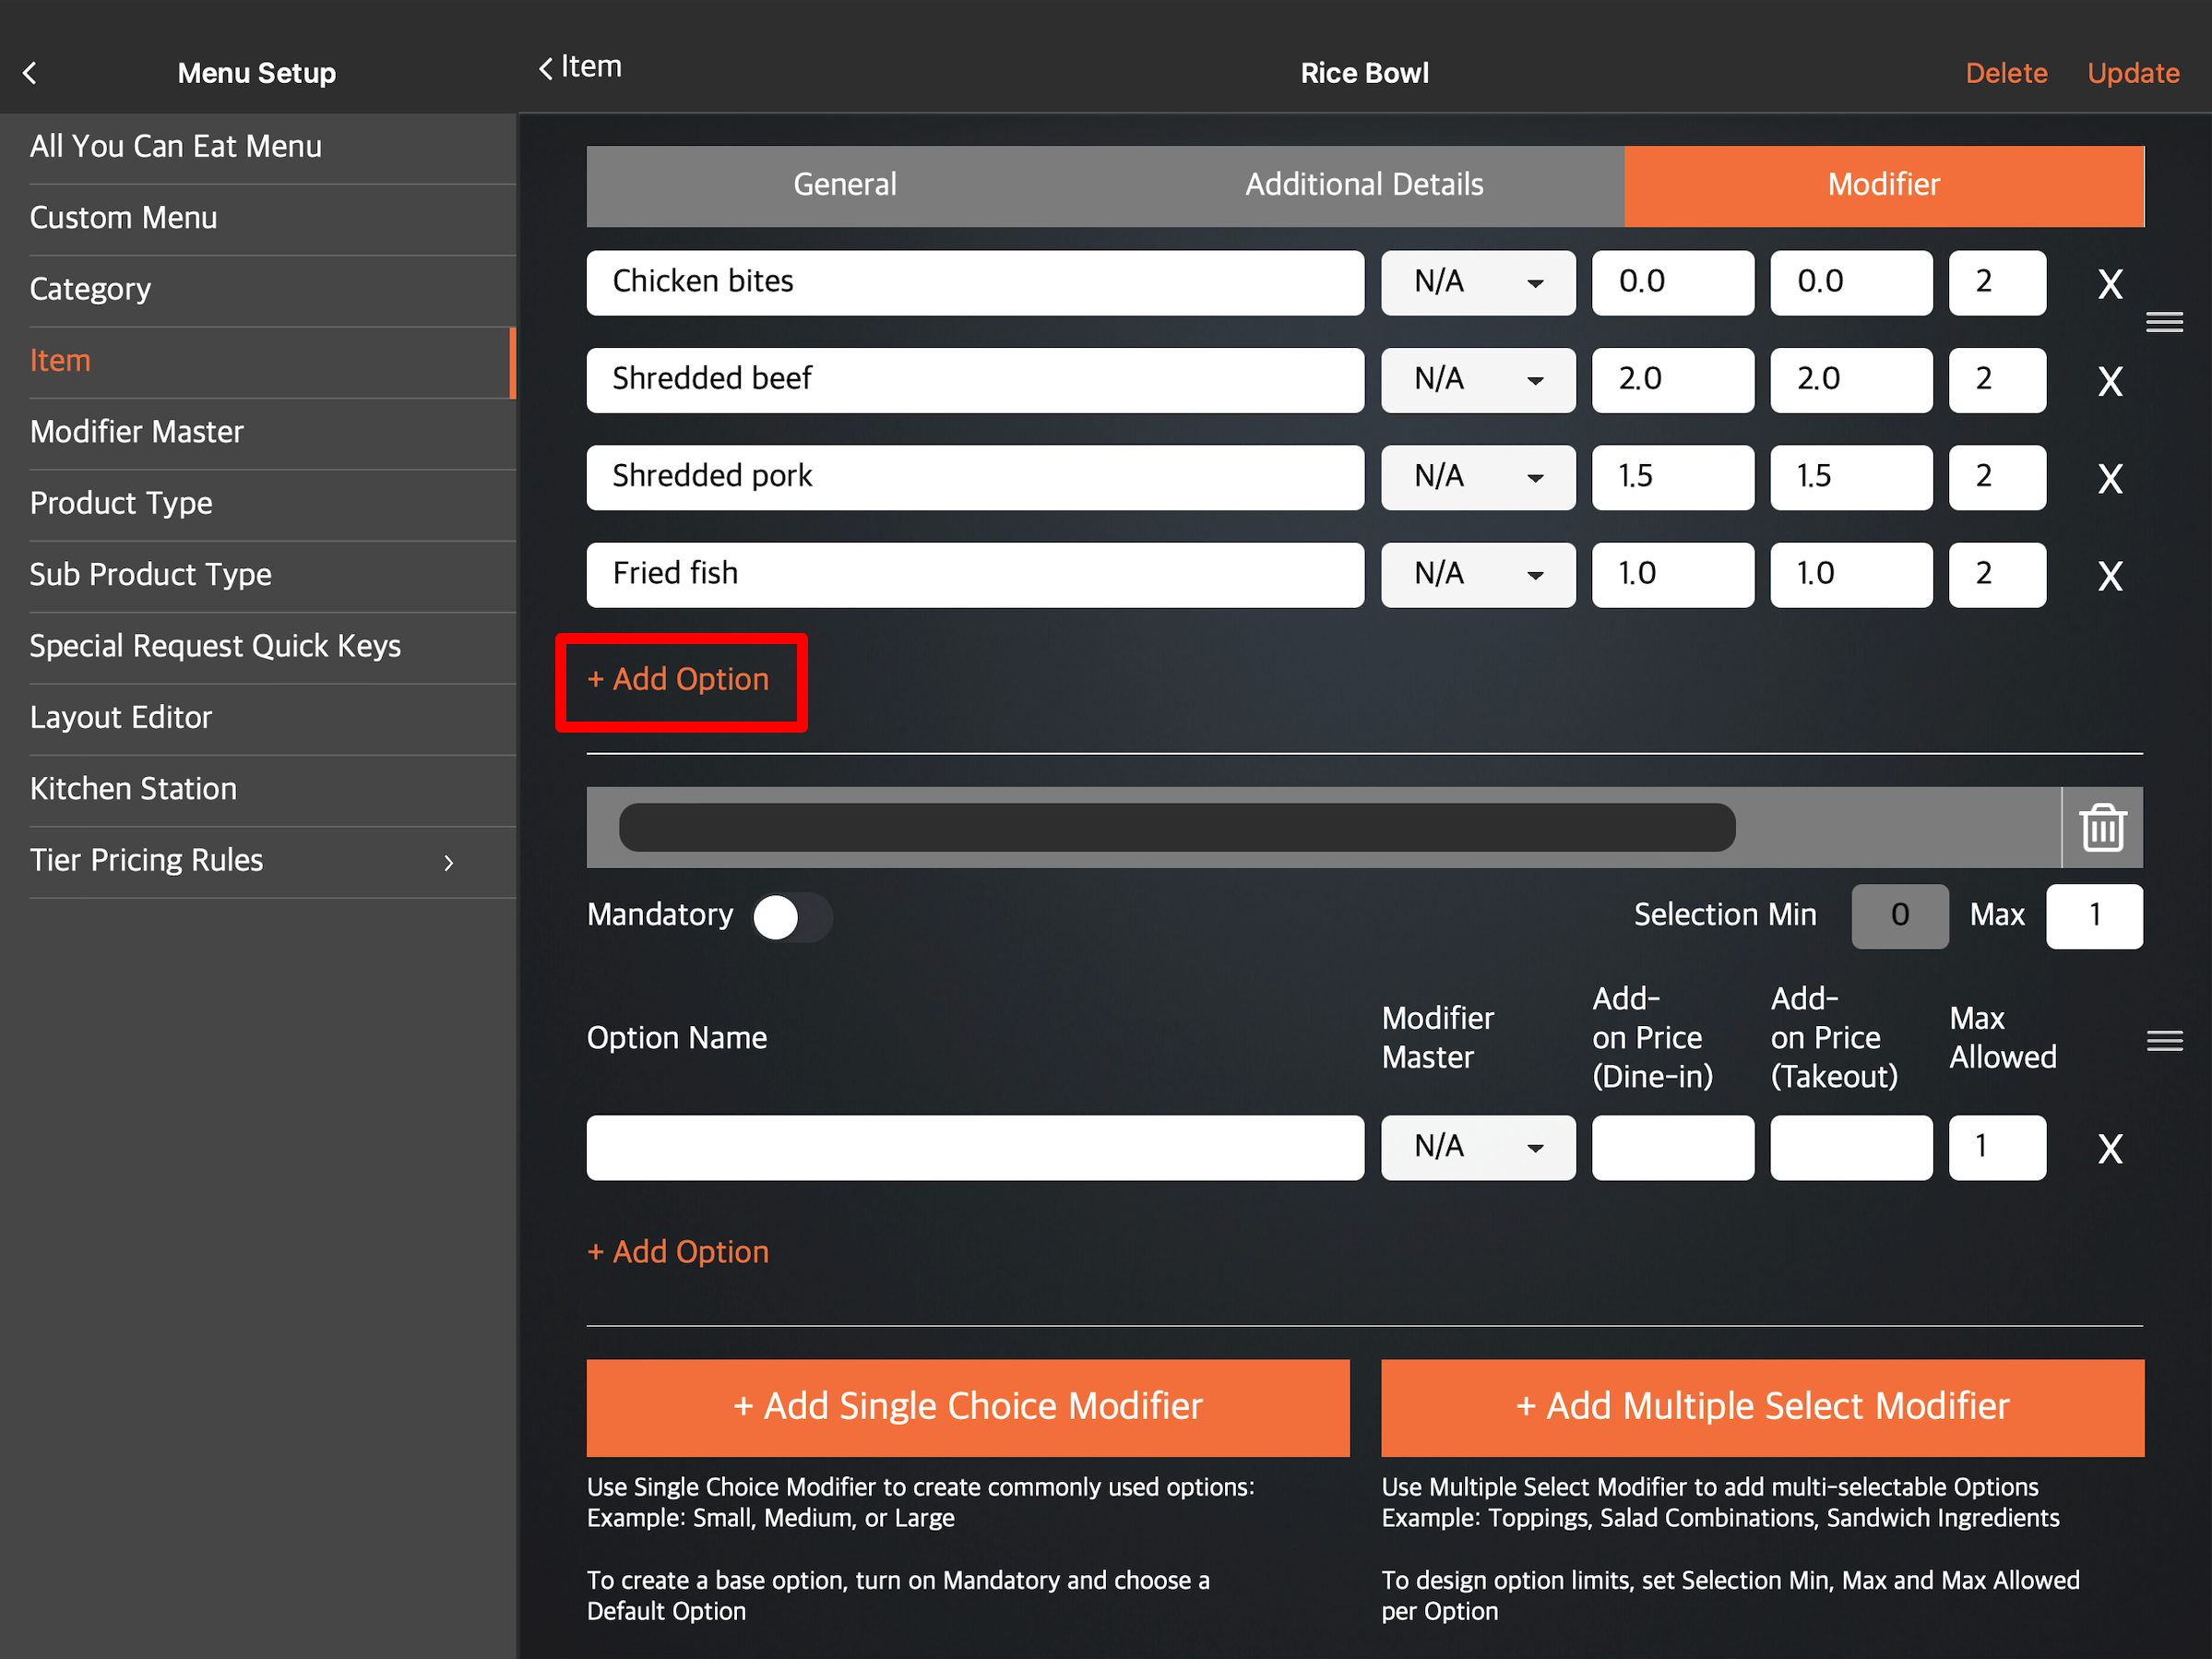
- Enter the details for the modifier options. You can configure the following:

- Option Name - Enter the name for the modifier option. For example, if creating a modifier option for "Drink sizes," you can enter "Small" as an option name.
- Inventory Consumption - To keep track of the modifier's inventory information, select from the list of available Modifier Masters.
- Add-on Price (Dine-In) - Enter the price that would be added to the base item price upon selection of the modifier. This applies to Dine-in orders.
- Add-on Price (Takeout) - Enter the price that would be added to the base item price upon selection of the modifier. This applies to Takeout orders.
- Default - Enable this setting to set the modifier option as the default selection.
- Once the modifier details have been completely filled out, a new entry automatically appears to add another option to the same modifier.

- At the top right, click on Confirm to proceed with the changes.
- To create another modifier, select Add Single Choice Modifier again.
Tip: You can also add a Multiple Select Modifier to the same item. - If you want to save the modifier as a modifier template, next to the modifier, click on Edit
 . Then, at the bottom, select Save as Modifier Template. To save the modifier as a shared modifier, click on Convert to Shared Modifier.
- On the main Modifier page, click on Save to confirm.
Add a Multiple Select Modifier
To add a Multiple Select Modifier to an Item, follow the steps below:
Eats365 POS
- Log in to the Eats365 POS.
- At the top left, tap Settings .
- Under "General," tap Menu Setup and then select Item.
- At the top right, tap Add Item.
Note: If you're adding a modifier to an already existing item, tap the existing item instead. You can also tap the three-dot menunext to the item, and then tap Edit .
- Select Single Item. Then, create an item.
- Tap the Modifier tab. Then, select Add Multiple Select Modifier.
-
Select the modifier language. Note: You must enter a default name for the modifier. The name becomes available in whatever language the POS app is using. For multi-language menus, after selecting a default language, tap the language drop-down list and select your preferred language. Then, enter the alternate name in that language.
- In the blank field, enter a name for the modifier. For example, if you are creating an option for drink selections, you can enter “Drink options.”
- Enter the details for the modifier options.
Note: If you haven’t set up any modifier in Modifier Master, the Modifier Master section shows up as N/A. - To add another option to the same modifier, tap Add Option.
- To create another Multiple Select Modifier, tap Add Multiple Select Modifier again.
Tip: You can also add a Single Choice Modifier to the same item. - To create option limits for the modifier, set the number under "Selection Min," "Max," and "Max Allowed" to your preferred limit.
Note: To set the minimum selection, you must turn on Mandatory first.
- At the top right, tap Save to confirm.
Merchant Portal (Classic Theme)
- Log in to the Merchant Portal.
- On the left panel, click on Menu Setup, then select Item.
- At the top, select Single Item. Then, create an item.
Note: If you're adding a modifier to an already existing item, next to the item that you want to add a modifier to, click on Edit.
- Click on the Modifier tab.
- If you already have a Modifier Preset set up, you can choose to import a Modifier Preset to the item. Click on Import Modifier Preset, then choose the Modifier Preset that you want to apply to the item.
- If you don’t have a Modifier Preset set up, select Add Multiple Select Modifier.
-
Select the modifier language. Note: You must enter a default name for the modifier. The name becomes available in whatever language the POS app is using. For multi-language menus, after selecting a default language, click on the language drop-down list and select your preferred language. Then, enter the alternate name in that language.
- On the blank field, enter a name for the modifier. For example, if you are creating an option for drink selections, you can enter “Drink options.”
- Enter the details for the modifier options.
- To add another option to the same modifier, select Add Option.
- To create another modifier, select Add Multiple Select Modifier again.
Tip: You can also add a Single Choice Modifier to the same item. - To create option limits for your modifier, set the number under "Selection Minimum," "Maximum," and "Max Allowed" to your preferred limit.
Note: To set the minimum selection, you must turn on Mandatory first. - If you want to save the modifier as a Modifier Preset, select Save as Preset.
- At the top right, click on Save to confirm.
Merchant Portal 2.0
- Log in to the Merchant Portal.
- On the left panel, click on Menu Setup, then select Item.
- At the top right, click on +Single Item. Then, create an item.
Note: If you're adding a modifier to an already existing item, next to the item that you want to add a modifier to, click on Edit.
- Click on the Modifier tab.
- If you’ve created Modifier Presets before creating the item, such as modifier templates and shared modifiers, you can choose to apply them to the item.
- To import a modifier template, click on the Import Modifier Preset drop-down. Then, select the modifier template that you want to apply to your item.
Note: Once a modifier template is imported, the changes you make to the modifier will not apply to the original template.
- To apply a shared modifier, click on the Apply Shared Modifier drop-down. Then, choose the shared modifier that you want to apply to your item. Once a shared modifier is applied to the item, changes made to the shared modifier will also apply to the item.
Note: You can only edit a shared modifier in the Modifier Preset settings.
- To import a modifier template, click on the Import Modifier Preset drop-down. Then, select the modifier template that you want to apply to your item.
- If you don’t have a modifier preset set up, select Add Multiple Select modifier.

- Next to "Modifier Name," enter a name for the modifier. For example, if you are creating an option for pizza toppings, you can enter “Toppings.” To add a name per language, click on the relevant language tab.
Note: To add more languages, click on +Languages.
- Enter the details for the modifier options. You can configure the following:

- Option Name - Enter the name for the modifier option. For example, if creating a modifier option for "Pizza toppings," you can enter "Pepperoni" as an option name.
- Inventory Consumption - To keep track of the modifier's inventory information, select from the list of available Modifier Masters.
- Add-on Price (Dine-In) - Enter the price that would be added to the base item price upon selection of the modifier. This applies to Dine-in orders.
- Add-on Price (Takeout) - Enter the price that would be added to the base item price upon selection of the modifier. This applies to Takeout orders.
- Max Allowed - Set a limit to the number of times the modifier can be added to the item. For example, if you set the "Max Allowed" limit to 2, you can select the modifier option twice.
- To create option limits for the modifier, enable Mandatory
 and set the "Min" and "Max" numbers to your preferred limit. This number will determine how many modifier options can be selected. For example, if you set the limit to a minimum of 1 and a maximum of 5, customers can only add five modifier options.
- Once the modifier details have been completely filled out, a new entry automatically appears to add another option to the same modifier.

- At the top right, click on Confirm to proceed with the changes.
- To create another modifier, select Add Multiple Select Modifier again.
Tip: You can also add a Single Choice Modifier to the same item. - If you want to save the modifier as a modifier template, next to the modifier, click on Edit . Then, at the bottom, select Save as Modifier Template. To save the modifier as a shared modifier, click on Convert to Shared Modifier.

- On the main Modifier page, click on Save to confirm.
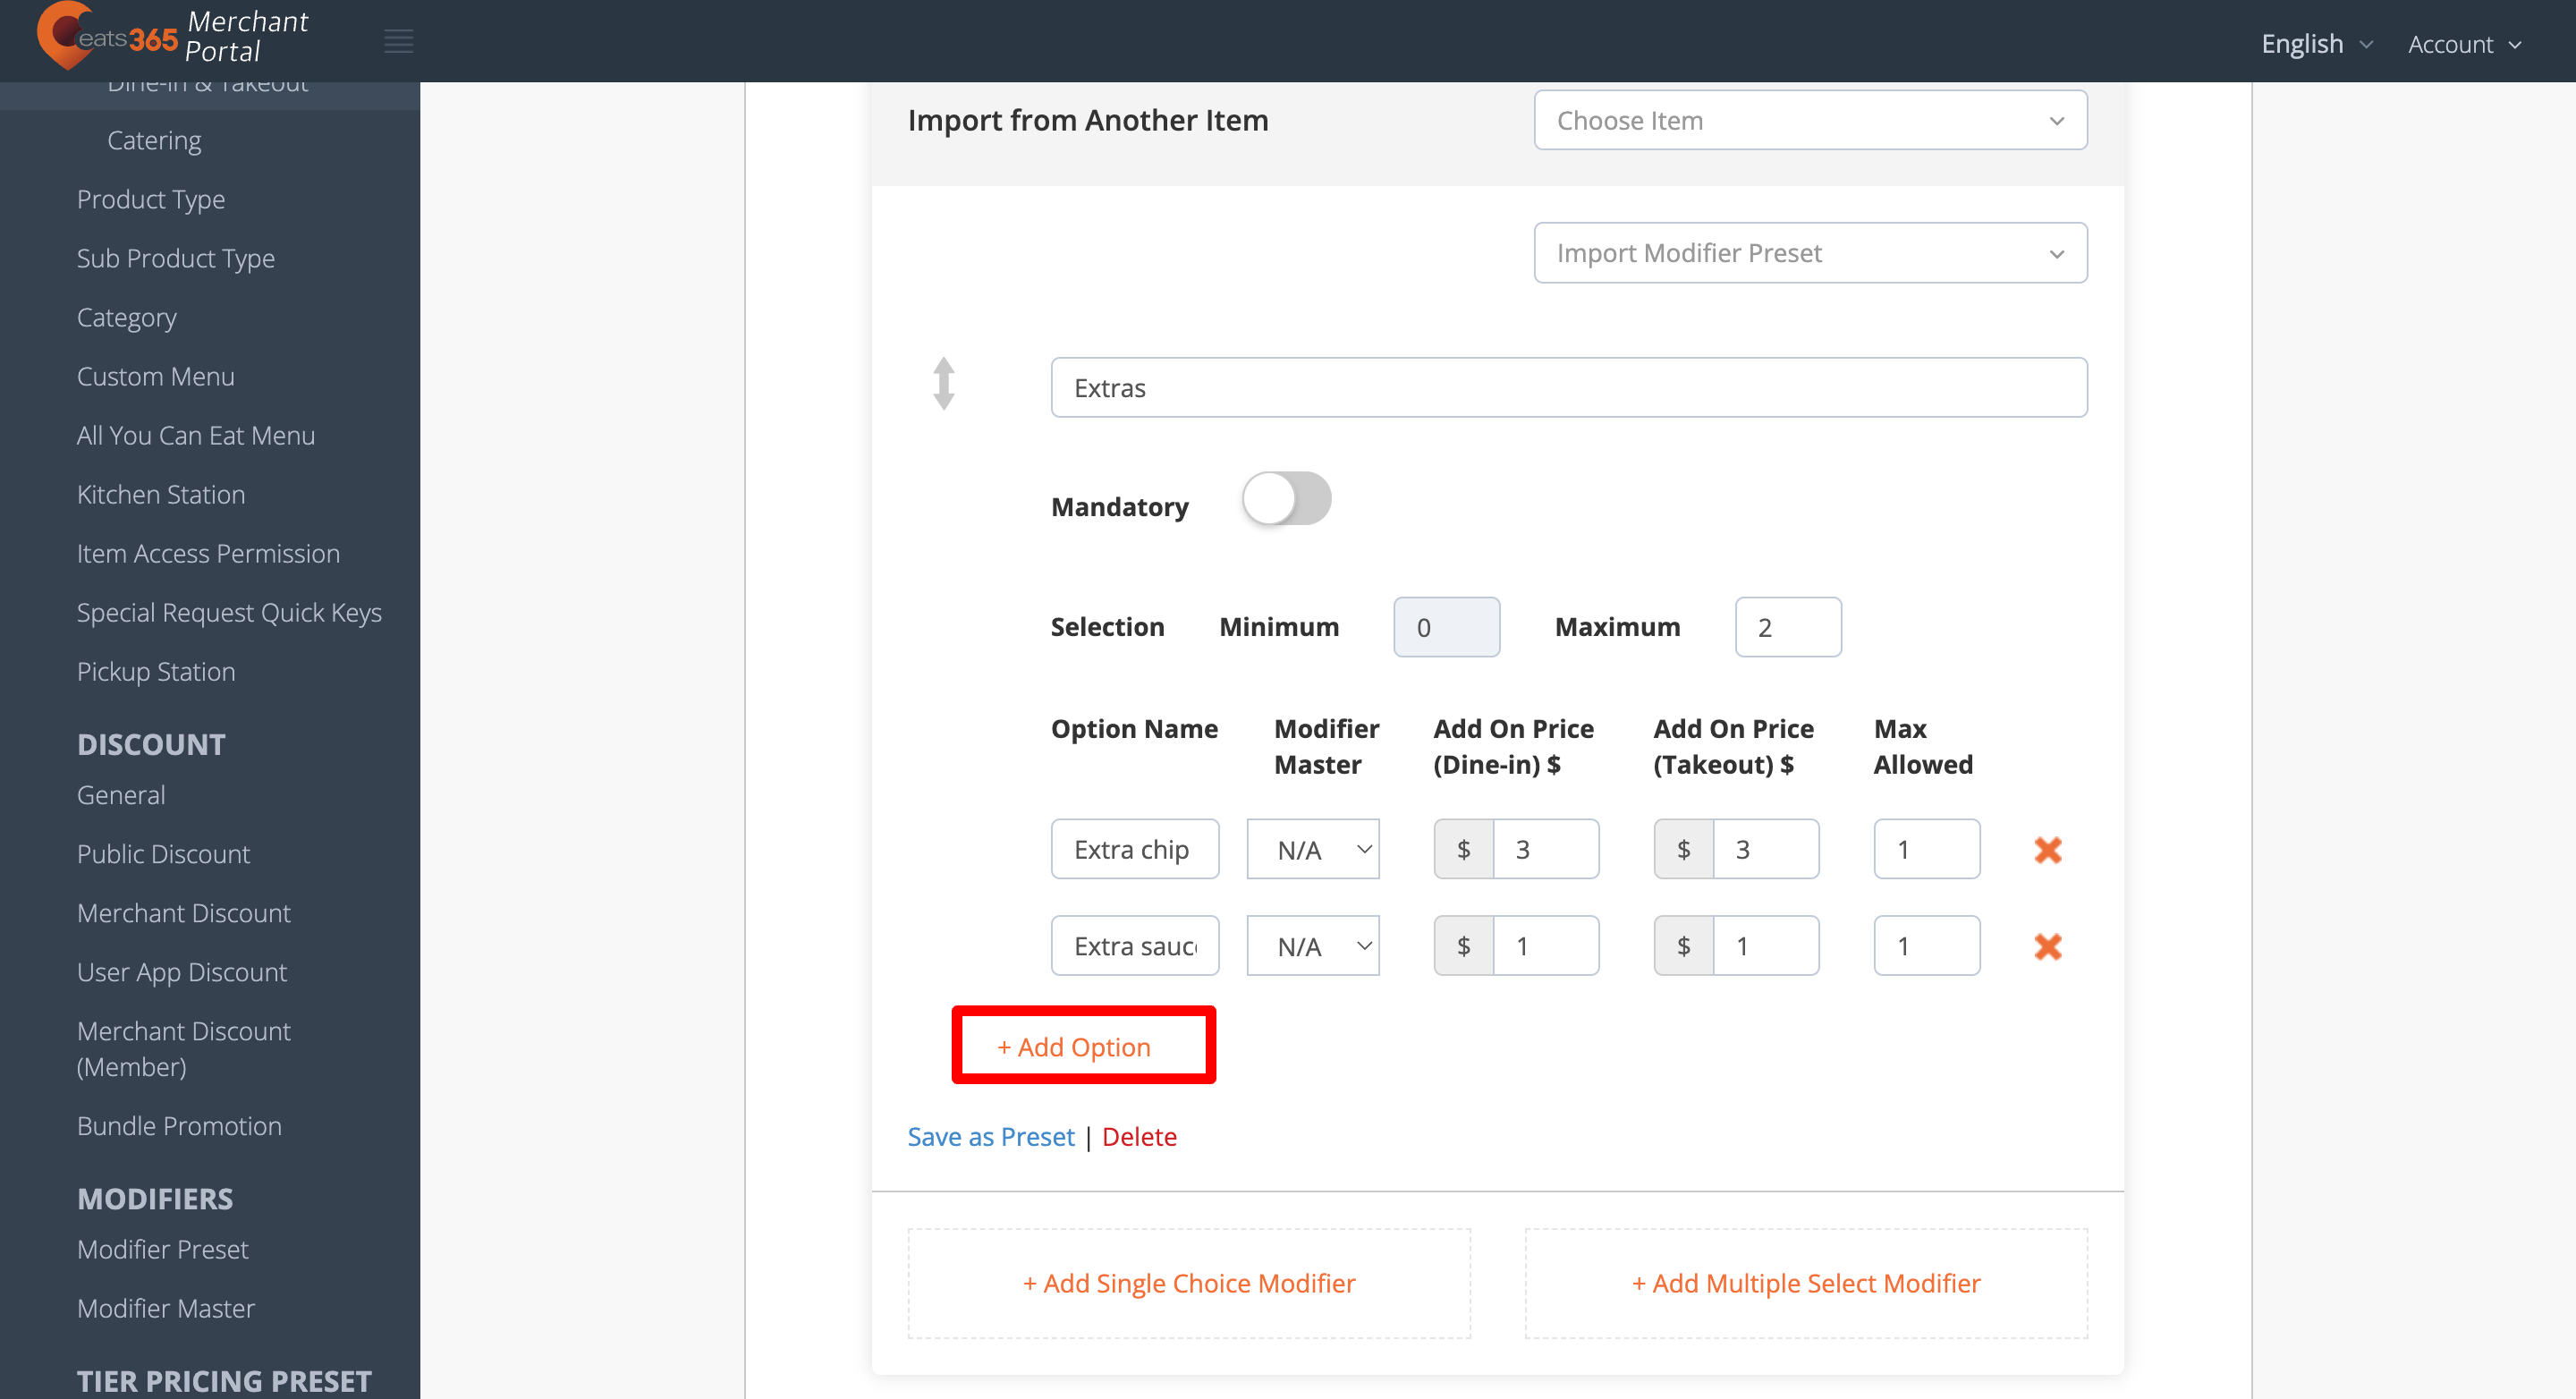
Import modifiers from another Item
If you’re creating multiple menu items that share a common set of modifiers, you can import modifiers from an existing item instead of creating the modifiers individually.
To import existing modifiers, follow the steps below:
Eats365 POS
- Log in to the Eats365 POS.
- At the top left, tap Settings .
- Under "General," tap Menu Setup and then select Item.
- At the top right, tap Add Item.
Note: If you're adding a modifier to an already existing item, tap the existing item instead. You can also tap the three-dot menunext to the item, and then tap Edit. - Tap the Modifier tab.
- Next to the "Language" option, you’ll find the option to import from another item. Tap Import from another Item.
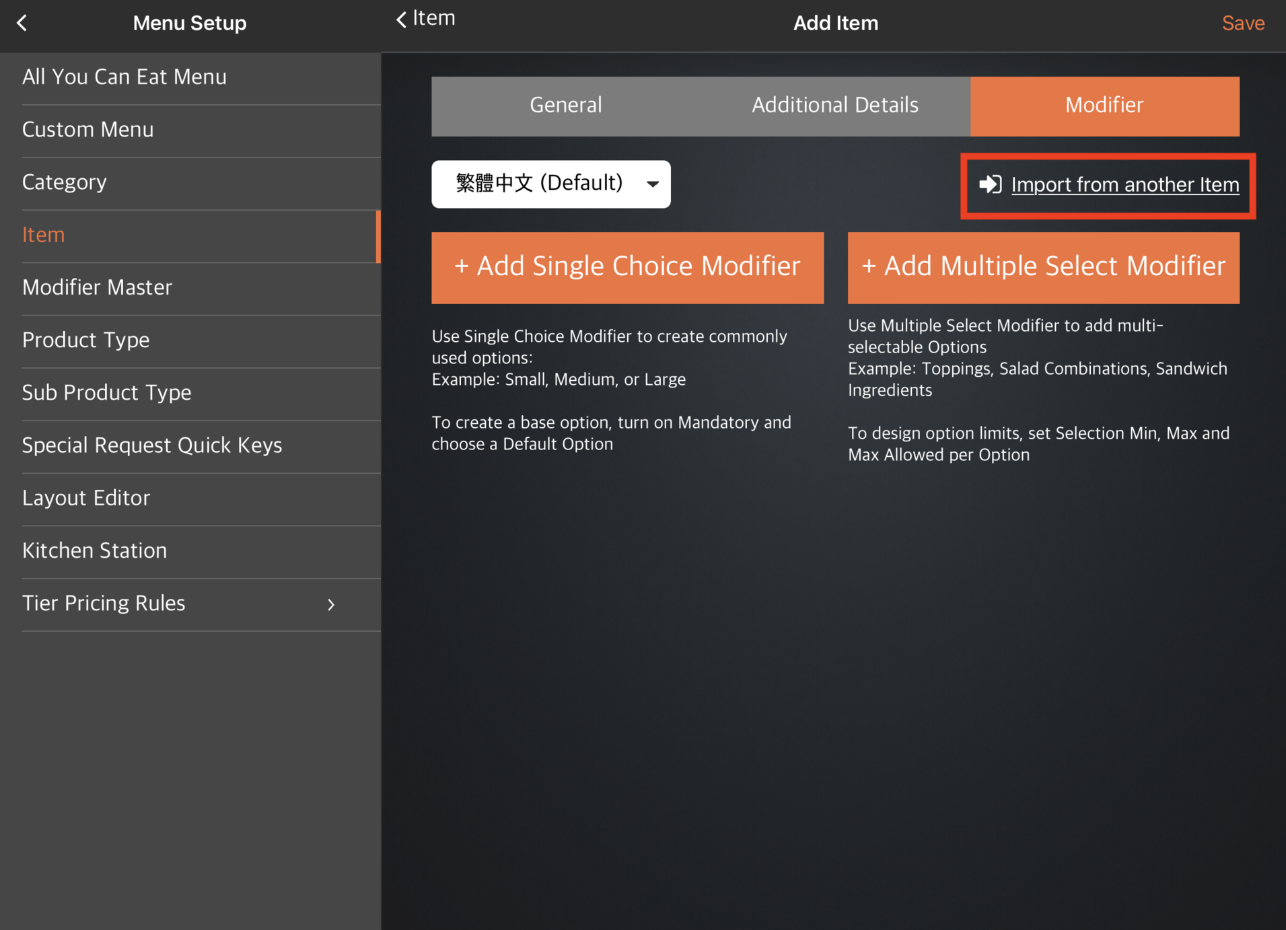
- Choose the item with the modifiers that you want to import. Then, tap Import.
- At the top right, tap Save to confirm.
Merchant Portal (Classic Theme)
- Log in to the Merchant Portal.
- On the left panel, click on Menu Setup, then select Item.
- At the top, select Single Item. Then, create an item.
Note: If you're adding a modifier to an already existing item, next to the item that you want to add a modifier to, click on Edit. - Click on the Modifier tab.
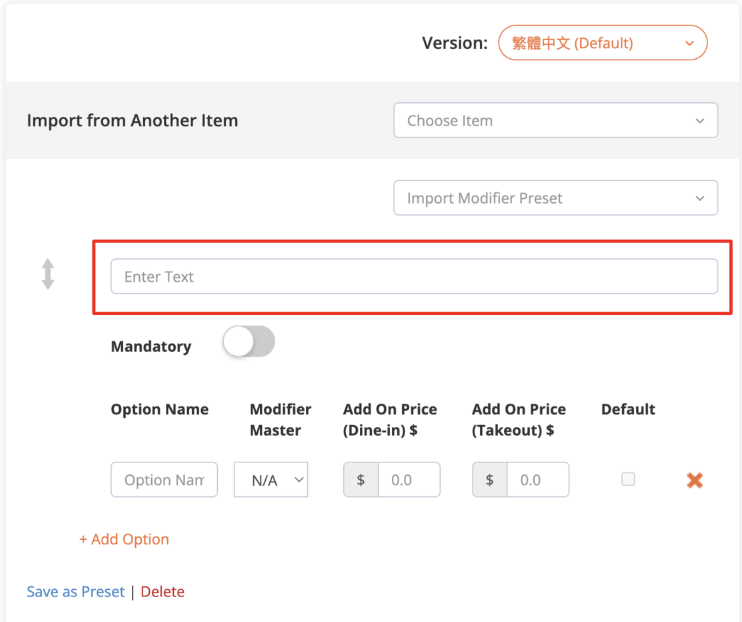
- Next to "Import from Another Item," click on the drop-down list and choose the item with the modifiers that you want to import.

- At the top right, click on Save to confirm.
Merchant Portal 2.0
- Log in to the Merchant Portal.
- On the left panel, click on Menu Setup, then select Item.
- At the top right, click on +Single Item. Then, create an item.
Note: If you're adding a modifier to an already existing item, next to the item that you want to add a modifier to, click on Edit. - Click on the Modifier tab.
- Under “Import Modifier(s) from Another item,” click on the drop-down list and choose the item with the modifiers that you want to import.

- At the top right, click on Save to confirm.
Add supplementary notes for modifier combinations
For more information about supplementary notes for modifiers, refer to Display supplementary notes for selected modifier combinations.
To set up supplementary notes for modifiers included on items, follow the steps below:
- Log in to the Merchant Portal.
- On the left panel, click on Menu Setup
 Item.
Item. - At the top right, click on +Single Item to create a new item.
- If updating an existing item, next to the item that you want to add supplementary notes for, click on Edit.
- If updating an existing item, next to the item that you want to add supplementary notes for, click on Edit
- Click on the Modifier tab.
- Create modifier options.
- Under "Supplementary Notes for Modifier Combinations," click on +Select Modifier(s).

- Select the modifiers that you want to add supplementary notes. You'll find a list of all applicable modifier combinations.
Tip: Ensure to select all applicable modifiers. Adding a new modifier after creating supplementary notes for modifier combinations may remove the notes previously added.
- Enter the supplementary note for each option. Each note appears as a separate row printed on the item label.

- Click on Save to confirm.
Manage modifiers
Edit modifiers
To modify a modifier, follow the steps below:
Eats365 POS
- Log in to the Eats365 POS.
- At the top left, tap Settings .
- Under "General," tap Menu Setup and then select Item.
- Tap the item with the modifier that you want to edit. You can also tap the three-dot menunext to the item, and then tap Edit.
- Tap the Modifier tab.
- Update the modifier.
- At the top right, tap Update to confirm.
Merchant Portal (Classic Theme)
- Log in to the Merchant Portal.
- On the left panel, click on Menu Setup, then select Item.
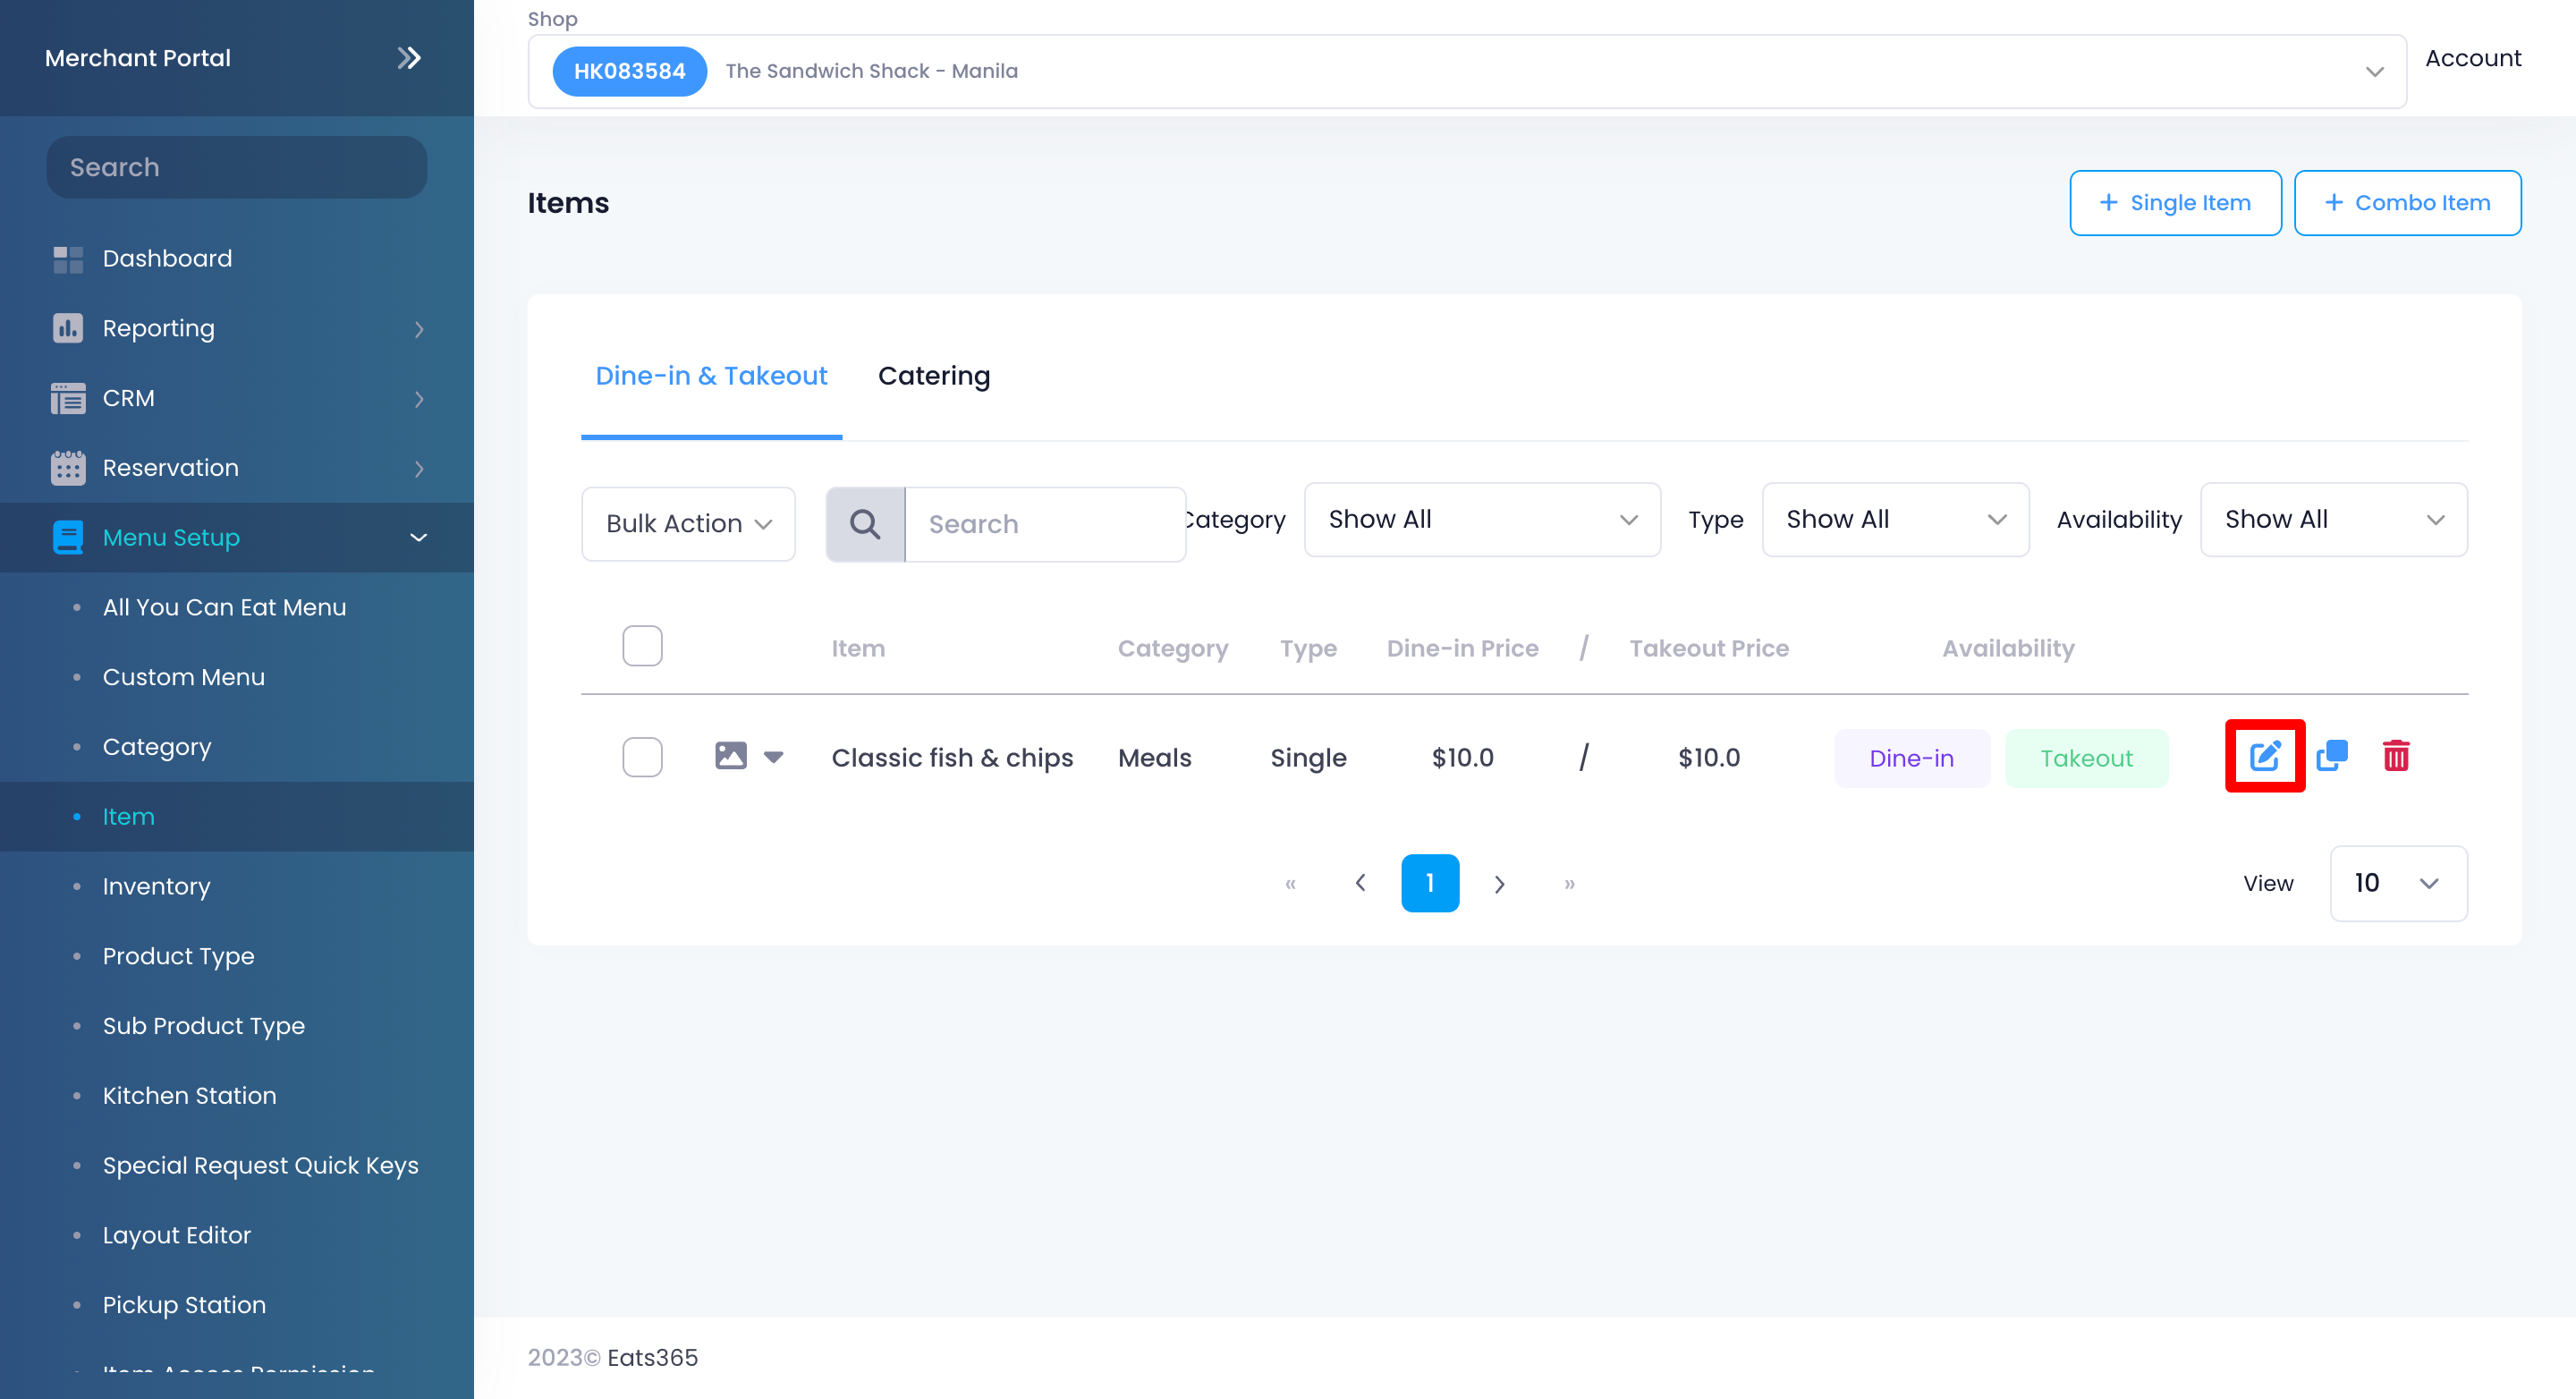
- Select the item with the modifier that you want to edit. Next to the item, click on Edit .
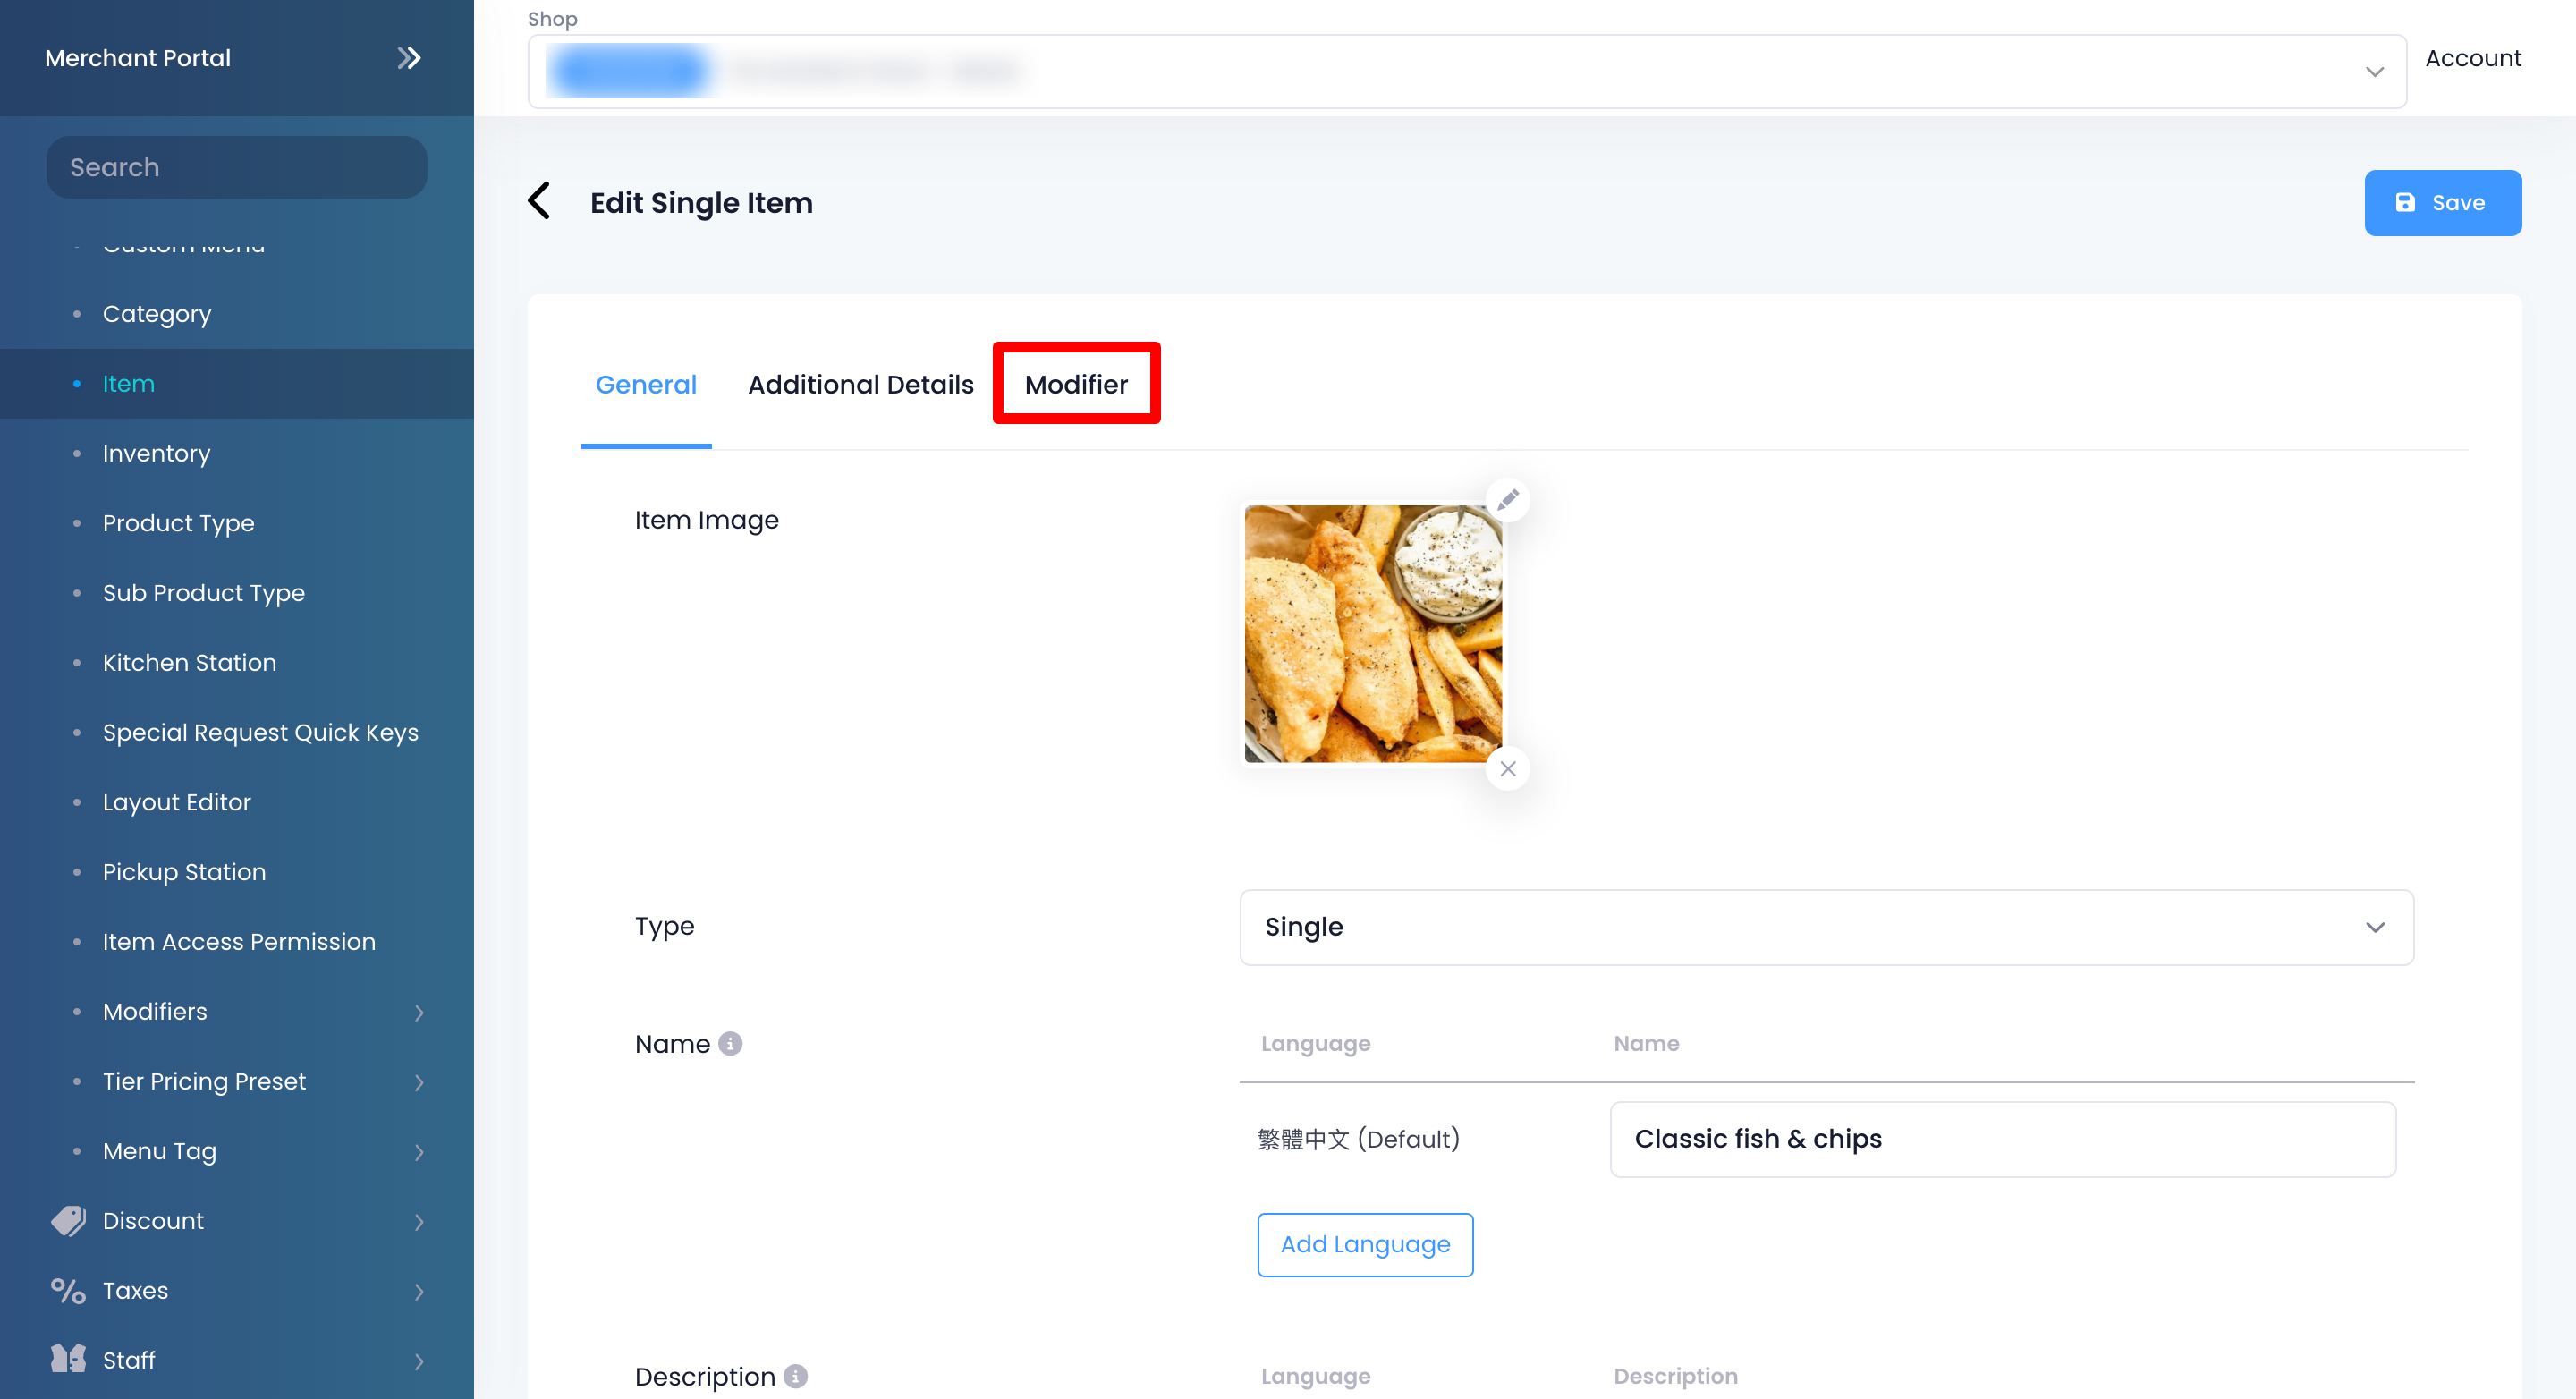
- Click on the Modifier tab.
- Update the modifier.
- At the top right, click on Save to confirm.
Merchant Portal 2.0
- Log in to the Merchant Portal.
- On the left panel, click on Menu Setup, then select Item.
- Select the item with the modifier that you want to edit. Next to the item, click on Edit.
- Click on the Modifier tab.
- Next to the modifier that you want to update, click on Edit .

- Update the modifier.
- On the main Modifier page, click on Save to confirm.
Delete modifiers
To delete a modifier, follow the steps below:
Eats365 POS
- Log in to the Eats365 POS.
- At the top left, tap Settings .
- Under "General," tap Menu Setup and then select Item.
- Tap the item with the modifier that you want to delete. You can also tap the three-dot menunext to the item, and then tap Edit.
- Tap the Modifier tab.
- To delete an option under a modifier, select the option that you want to delete, then tap Remove
 .
.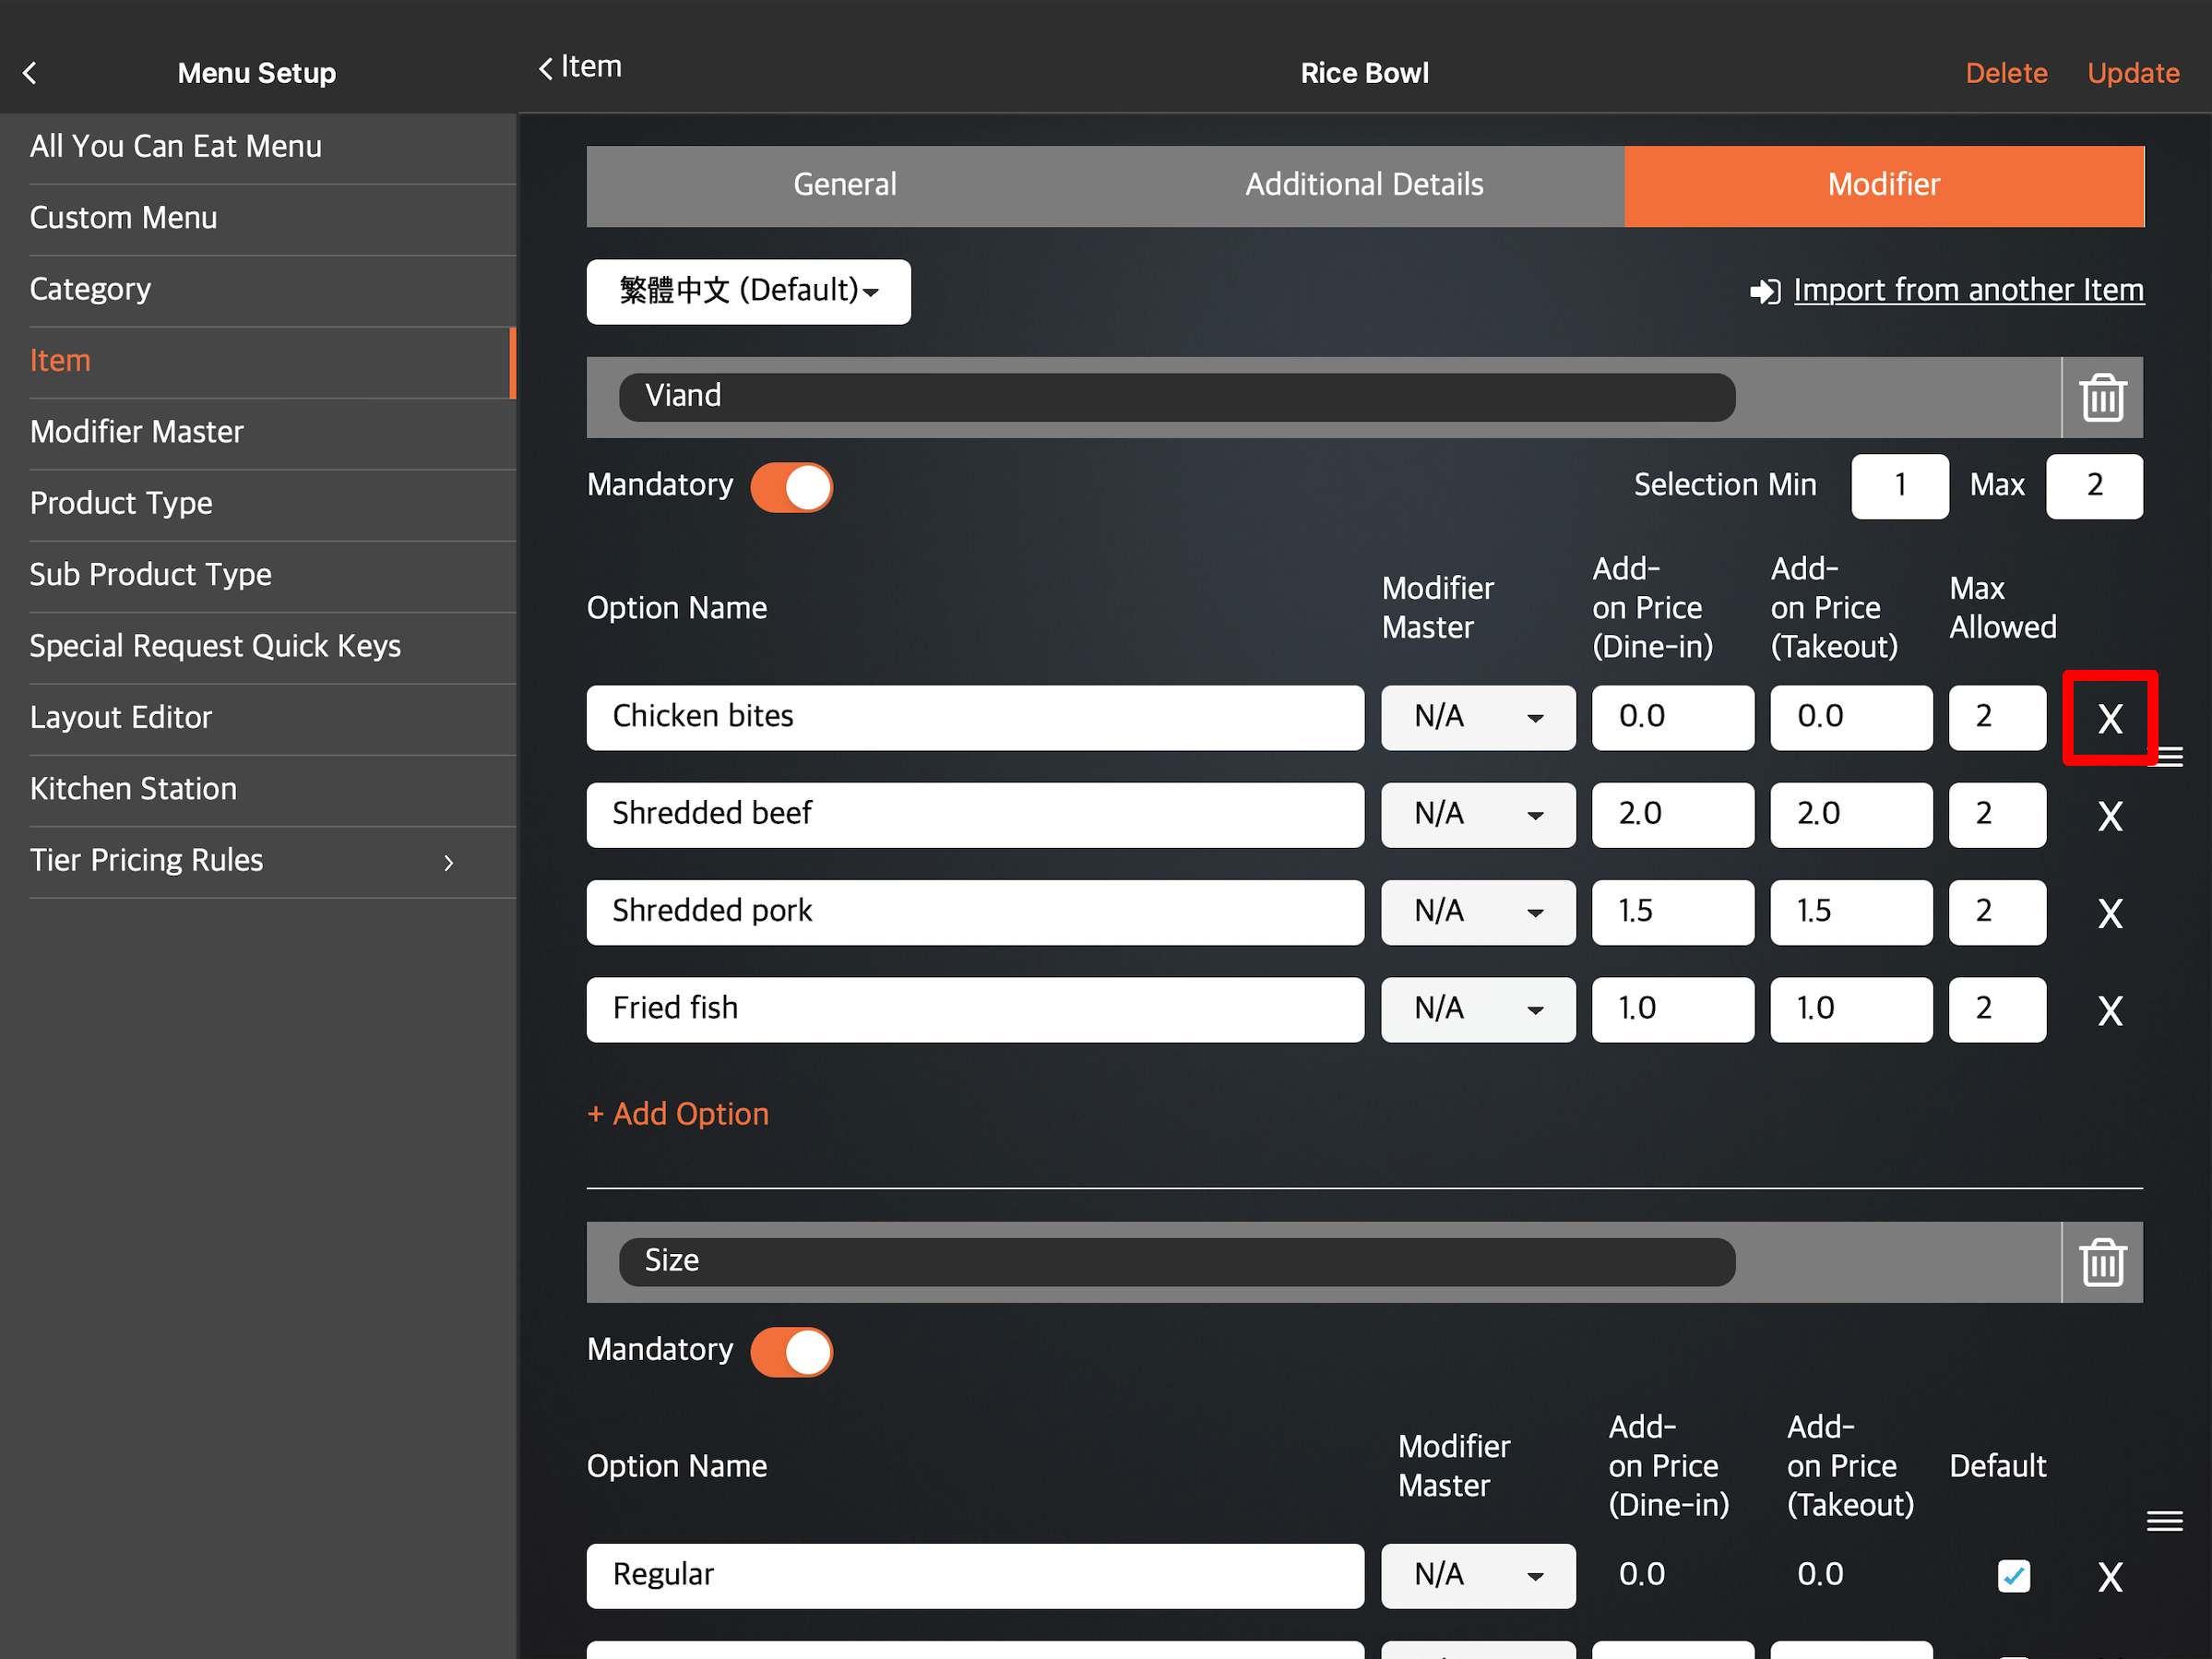
- To delete a modifier, including all its options, select the modifier that you want to delete, then tap Delete
 .
.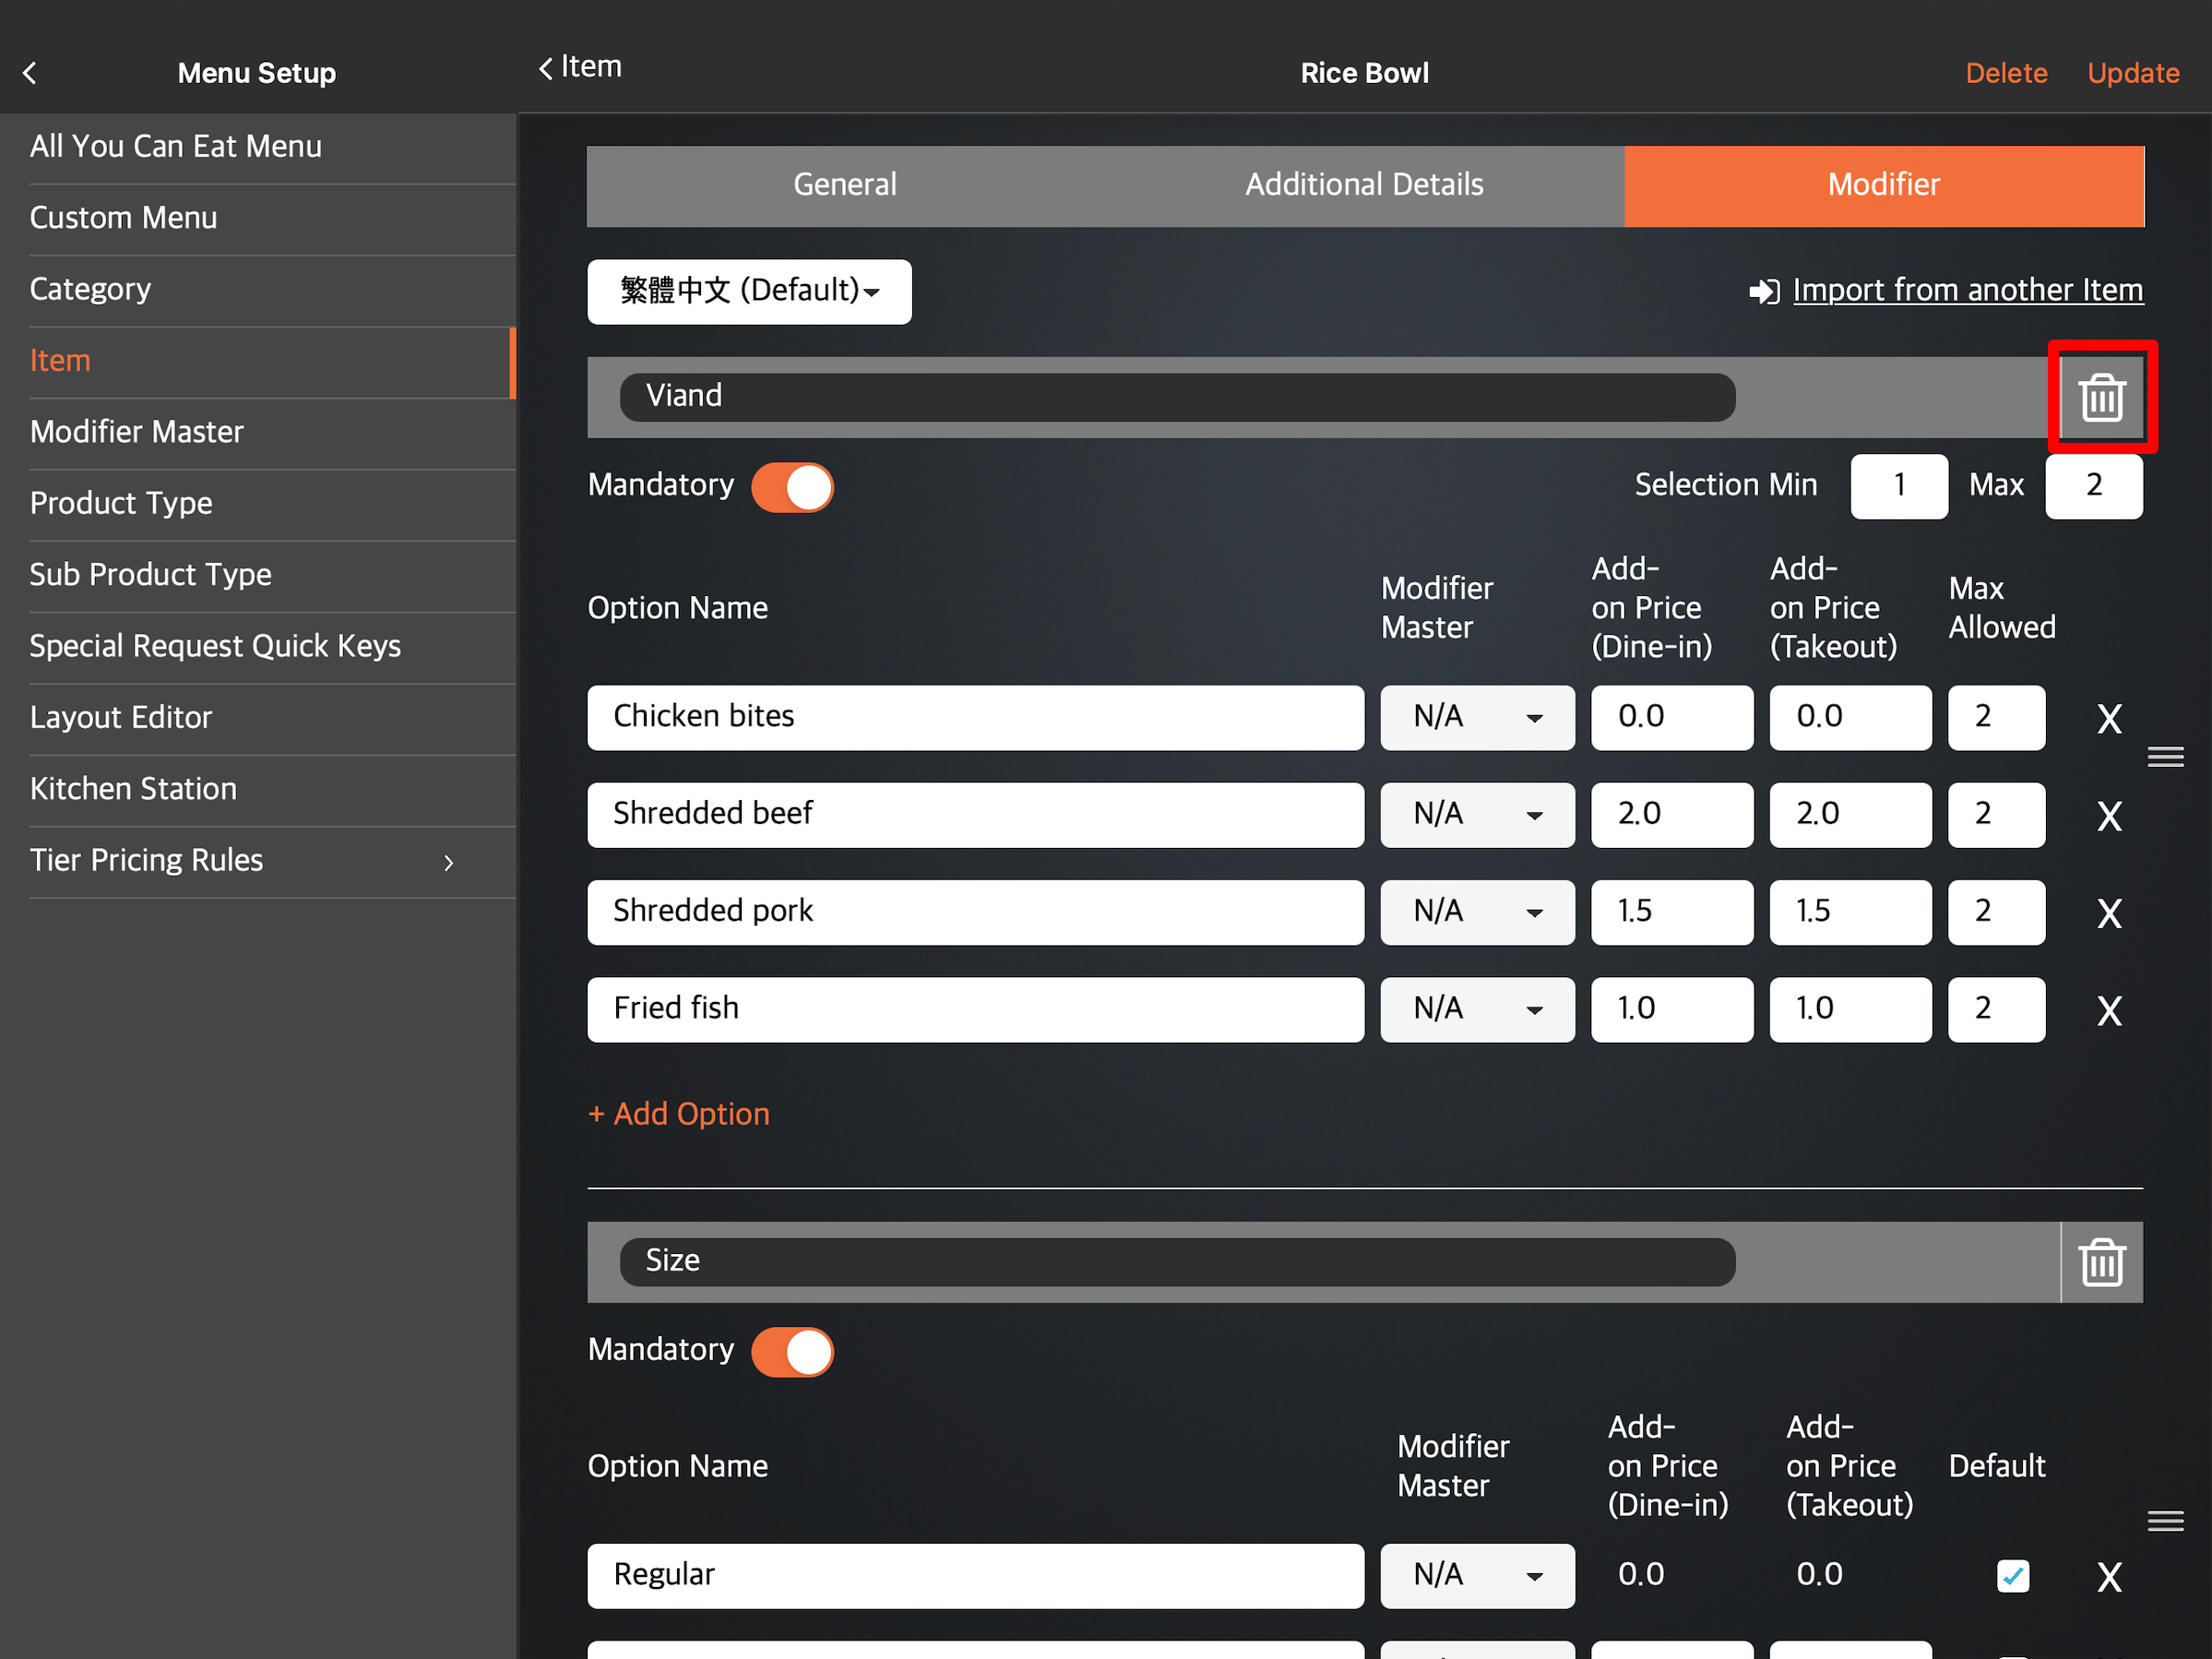
- At the top right, tap Update to confirm.
Merchant Portal (Classic Theme)
- Log in to the Merchant Portal.
- On the left panel, click on Menu Setup, then select Item.
- Select the item with the modifier that you want to delete. Next to the item, click on Edit .
- Click on the Modifier tab.
- To delete an option under a modifier, select the option that you want to delete, then click on Remove
 .
.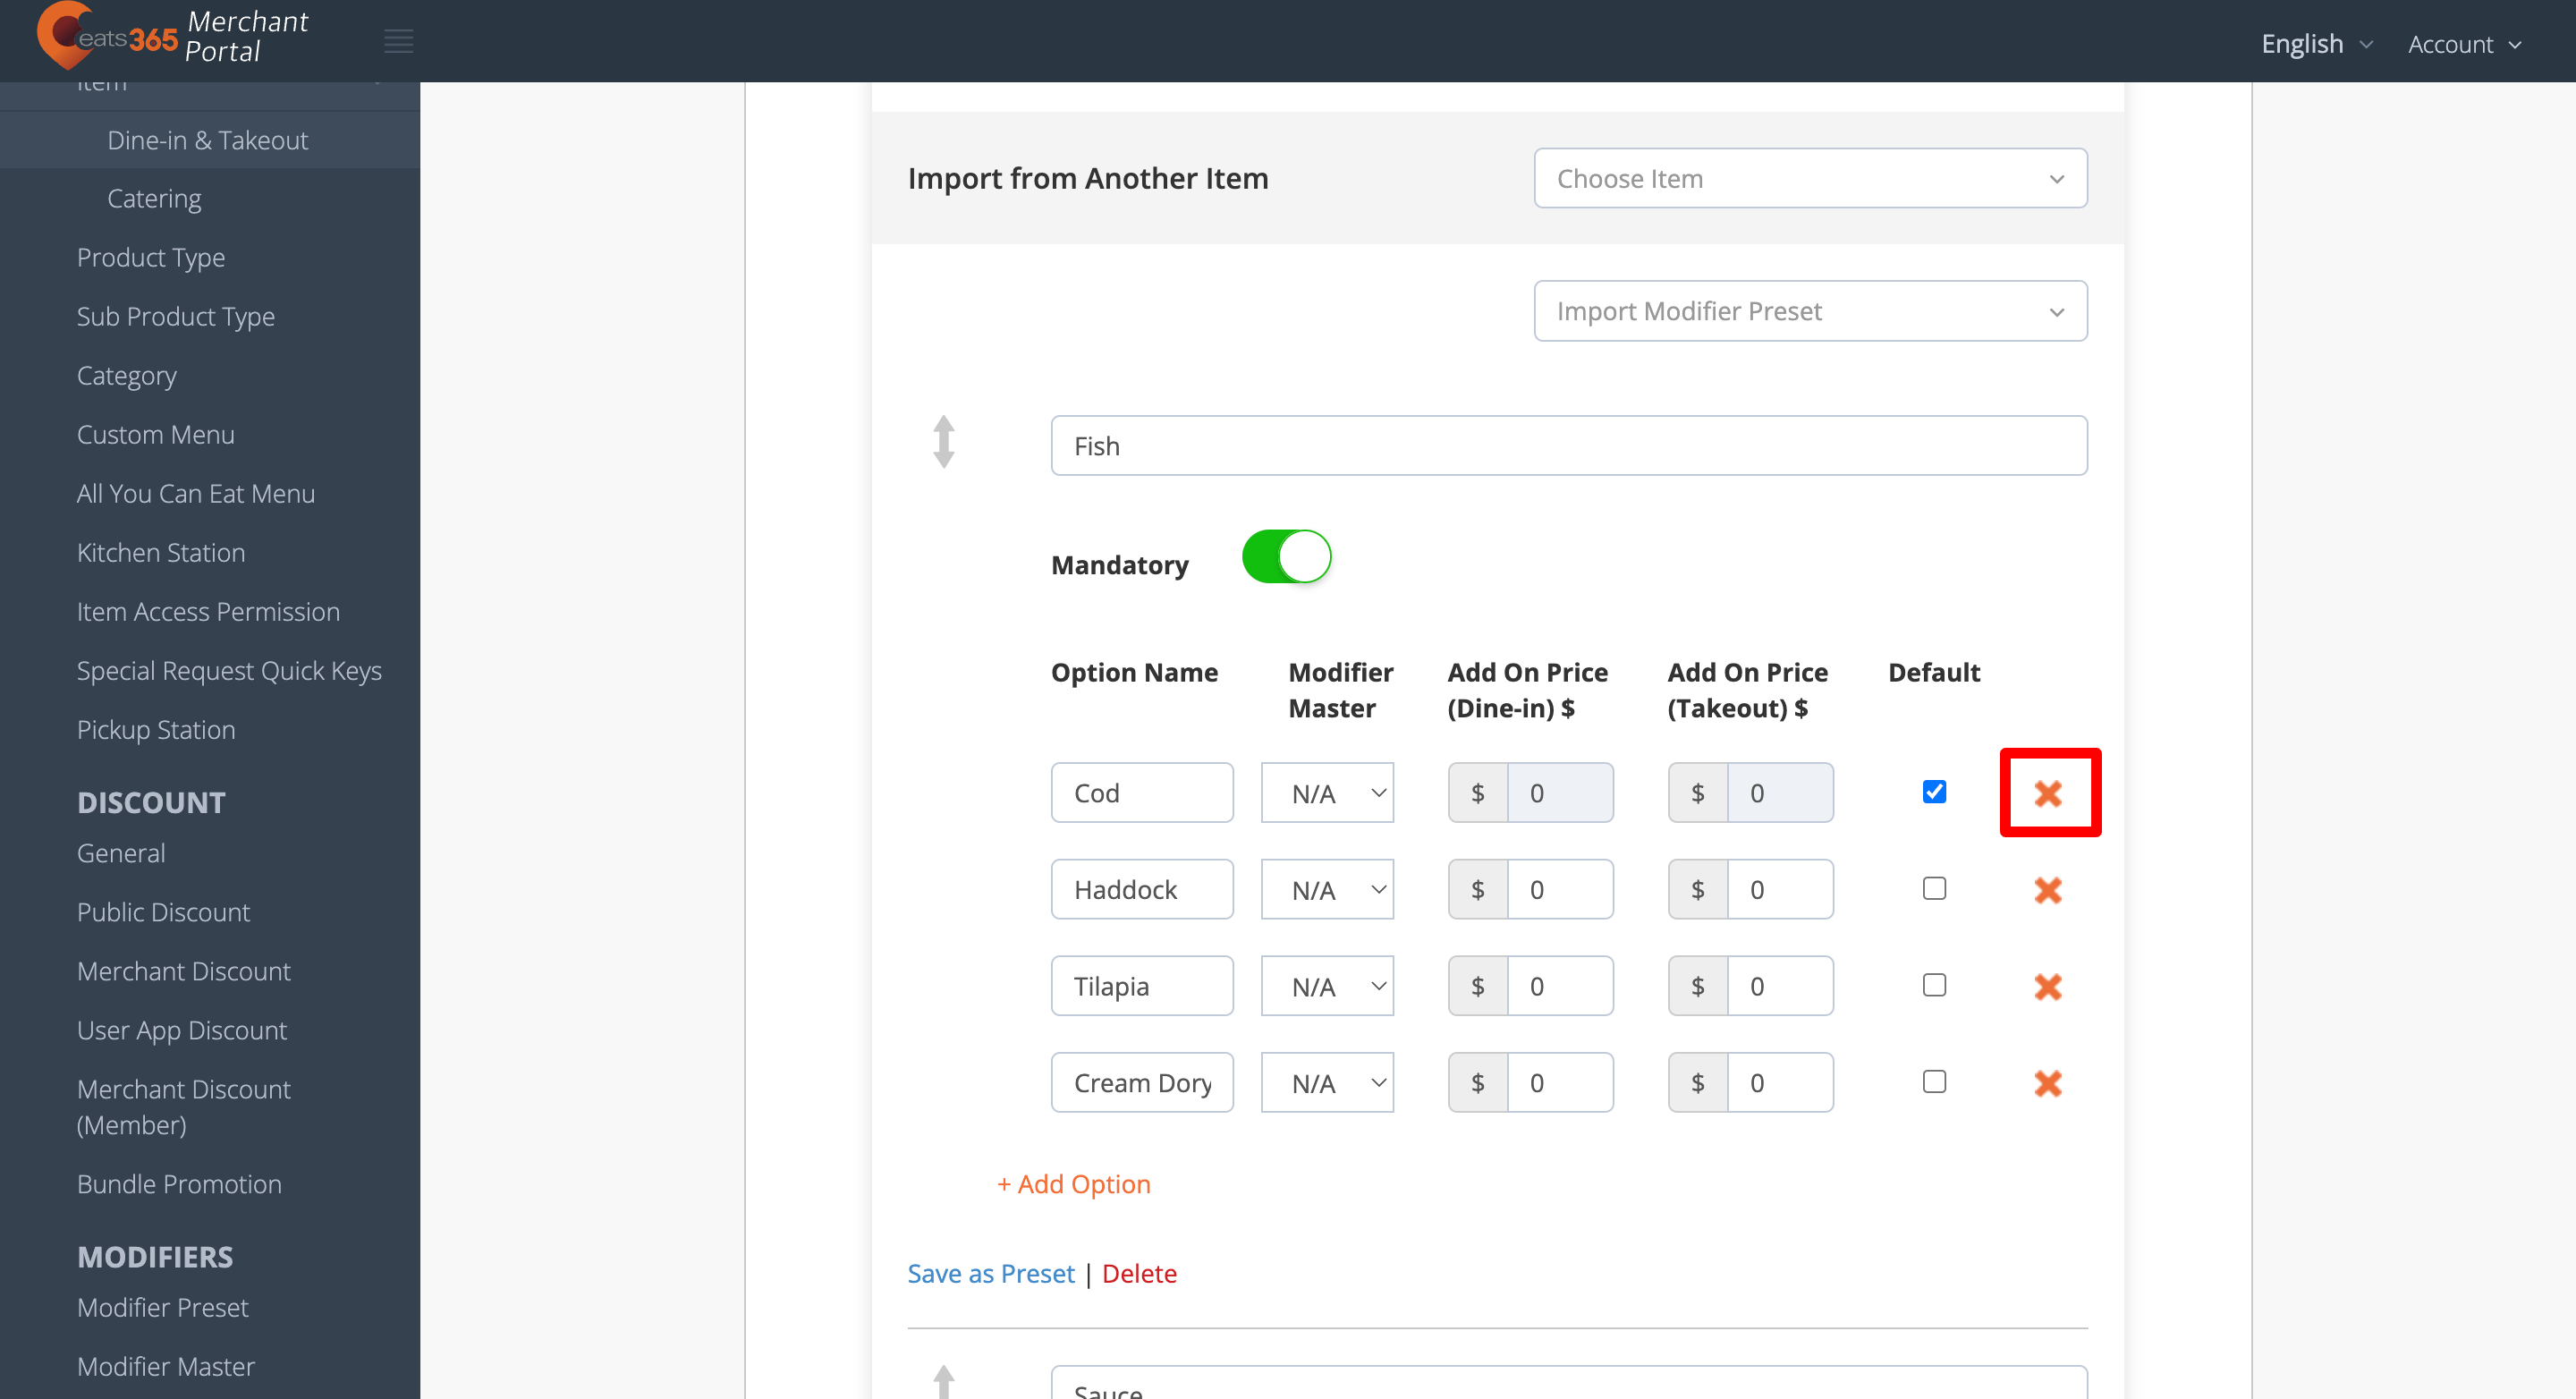
- To delete a modifier including all its options, select the modifier that you want to delete, then click on Delete.
 .
. - At the top right, click on Save to confirm.
Merchant Portal 2.0
- Log in to the Merchant Portal.
- On the left panel, click on Menu Setup, then select Item.
- Select the item with the modifier that you want to delete. Next to the item, click on Edit.
- Click on the Modifier tab.
- To delete a modifier, including all its options, next to the modifier, click on Delete
 .
.
- To delete an option under a modifier, next to the modifier, click on Edit . Then, next to the modifier option, click on Remove
 .
.
- On the main Modifier page, click on Save to confirm.
Reorder modifiers
If you want to arrange modifiers in a specific order, follow the steps below:
Eats365 POS
- Log in to the Eats365 POS.
- At the top left, tap Settings .
- Under "General," tap Menu Setup and then select Item.
- Tap the item with the modifier that you want to rearrange. You can also tap the three-dot menunext to the item, and then tap Edit.
- Tap the Modifier tab.
- Next to the modifier that you want to move, tap and hold Reorder
 . Then, drag the modifier in the order that you want it to appear on the POS.
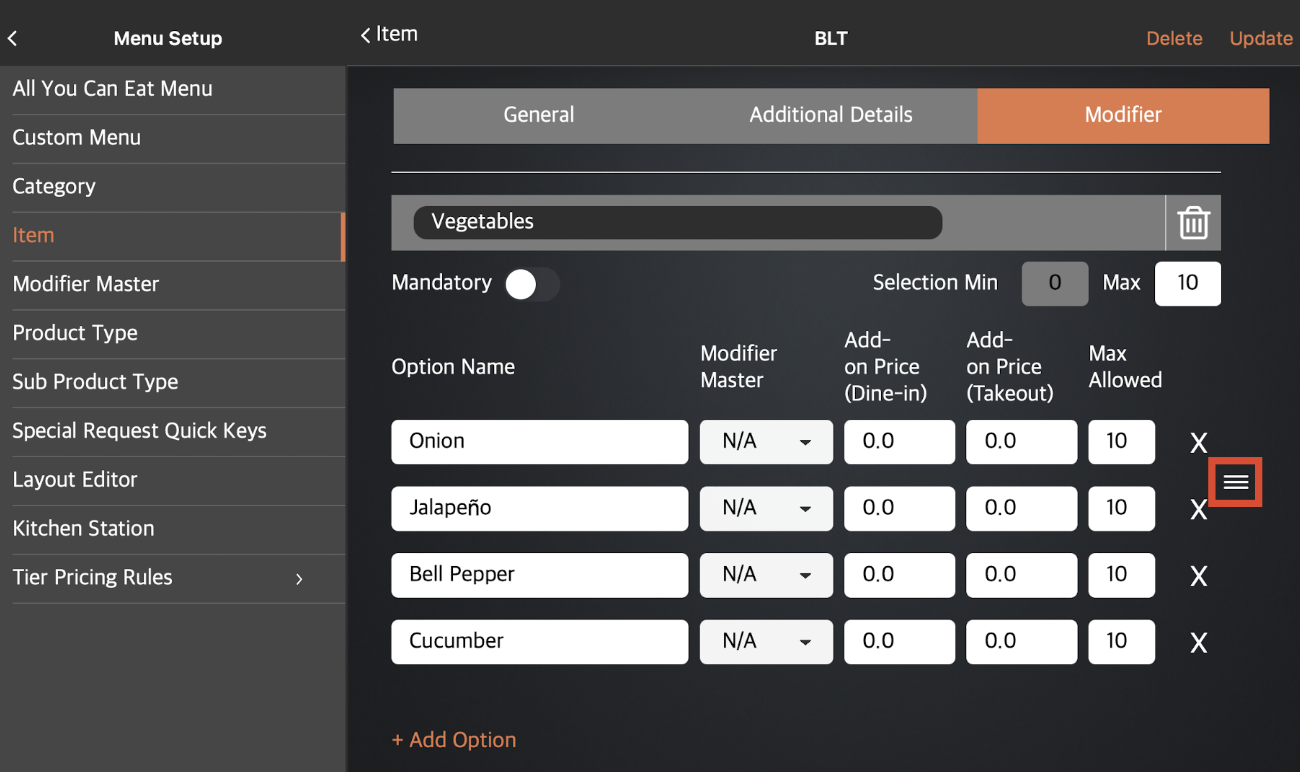
- At the top right, tap Update to confirm.
Merchant Portal (Classic Theme)
- Log in to the Merchant Portal.
- On the left panel, click on Menu Setup, then select Item.
- Select the item with the modifiers that you want to rearrange. Next to the item, click on Edit .
- Click on the Modifier tab.
- Click and hold on the modifier that you want to move. Then, drag the modifier in the order that you want it to appear on the POS.
- At the top right, click on Save to confirm.
Merchant Portal 2.0
- Log in to the Merchant Portal.
- On the left panel, click on Menu Setup, then select Item.
- Select the item with the modifiers that you want to rearrange. Next to the item, click on Edit.
- Click on the Modifier tab.
- Next to the modifier, click and hold Reorder and drag the modifier in the order that you want it to appear on the POS.

- At the top right, click on Save to confirm.
Add modifiers to items in bulk
With the Bulk Replace Item Modifiers feature, you can add modifier presets, such as modifier templates and shared modifiers, to multiple items simultaneously. To do this, follow the steps below:
- Log in to the Merchant Portal.
- On the left panel, click on Menu Setup.
- Click on Modifiers. Then, select Bulk Replace Item Modifiers.
- On the left panel, select the modifier presets that you want to add to items. Each modifier preset is labelled as “Modifier Template” and “Shared Modifier” depending on its type.
 Tip: Click on Show
  to reveal the modifier details.
- To rearrange the modifiers in a specific order, next to a modifier, click on Reorder . Then, drag the modifier in the position that you want it to appear.

- On the right panel, select the items or categories to which you’d like to apply the modifier presets. You can browse the list by category or search for an item using the search field.

- At the top right, click on Save to confirm. A pop-up screen appears to review the change.
- Click on Confirm. A confirmation screen appears to verify that you wish to proceed with the action.
- Enter “confirm” in the required field, then click on Confirm to proceed.