All

Contact Us

If you still have questions or prefer to get help directly from an agent, please submit a request.
We’ll get back to you as soon as possible.

Please fill out the contact form below and we will reply as soon as possible.

    Login
English (US)
English (US)
Mandarin
Cantonese
  • Home
  • Merchant Guide

Set up and Installation

All Product

Contact Us

If you still have questions or prefer to get help directly from an agent, please submit a request.
We’ll get back to you as soon as possible.

Please fill out the contact form below and we will reply as soon as possible.

    • Explore Eats365 products
        • Explore the Eats365 POS screens
        • Restaurant service modes
    • Set up and Installation
        • Set up and install the Eats365 POS app
        • List of compatible devices
        • Connect an iPad to a network
        • Log in to the Merchant Portal
        • Hardware Setup
        • Scan and pair a printer
    • Menu Setup
        • Set up and manage a Category
        • Set up and manage a Single Item
        • Set up and manage a Kitchen Station
        • Set up and manage Modifiers
        • Set up and manage Special Request Quick Keys
        • Set up and manage a Custom Menu
        • Customize the menu layout
        • Set up and manage Tier Pricing Rules
        • Set up and manage a Combo Item
        • Set up and manage Modifier Master settings
        • Set up a Pickup Station
        • Set up and manage Product and Sub Product Type
        • Set up and manage All You Can Eat Menu
        • Set up and manage Menu Tags
        • Set up and manage Catering Items
    • Table Map Setup
        • Set up and manage Areas and Tables
    • Restaurant Settings
        • Set up and manage Media Group
        • Set up restaurant information
        • Restaurant Codes
    • Dine-In Settings
        • Set up Dine-In settings
    • Takeout Settings
        • Set up Takeout settings
    • Catering settings
        • Set up Catering settings
    • Queuing Settings
        • Set up Queuing
    • System Preferences
        • Manage System Preferences
        • Manage General Preferences
    • Device Management
        • Set a primary POS
        • Reset the Eats365 POS
        • Update the Eats365 POS
    • Account Management
        • Change POS password
        • Change the Merchant Portal password
        • Change activation email or phone number
        • Switch between Merchant Portal themes
    • Reservation
        • Set up Reservation
    • Import Tools
        • How to use Import Tools
    • Time Sheets
        • Manage Staff Time Sheet

Table of Contents

Hardware Setup

Learn how to set up Eats365 POS with the necessary hardware such as receipt and ticket printers and Cash Drawers.

Before using Eats365 POS, you must first set up the necessary hardware such as the iPad, printers, cash drawers, and more, and connect them to each other through a wired or wireless network. 

In this article, you’ll learn the basics of setting up your hardware, how to connect them to a network, and how to connect them all together to get your POS setup ready. 

What you need to get started

  • Stable internet connection with at least 10 Mbps download and 5 Mbps upload speeds
  • Router that supports Wi-Fi 5 (802.11 ac) and up
  • Network switch
  • iPad with Ethernet adapter
  • iPad Stand
  • Thermal printer for printing receipts
  • Dot Matrix printer for printing kitchen tickets
  • Cash Drawer

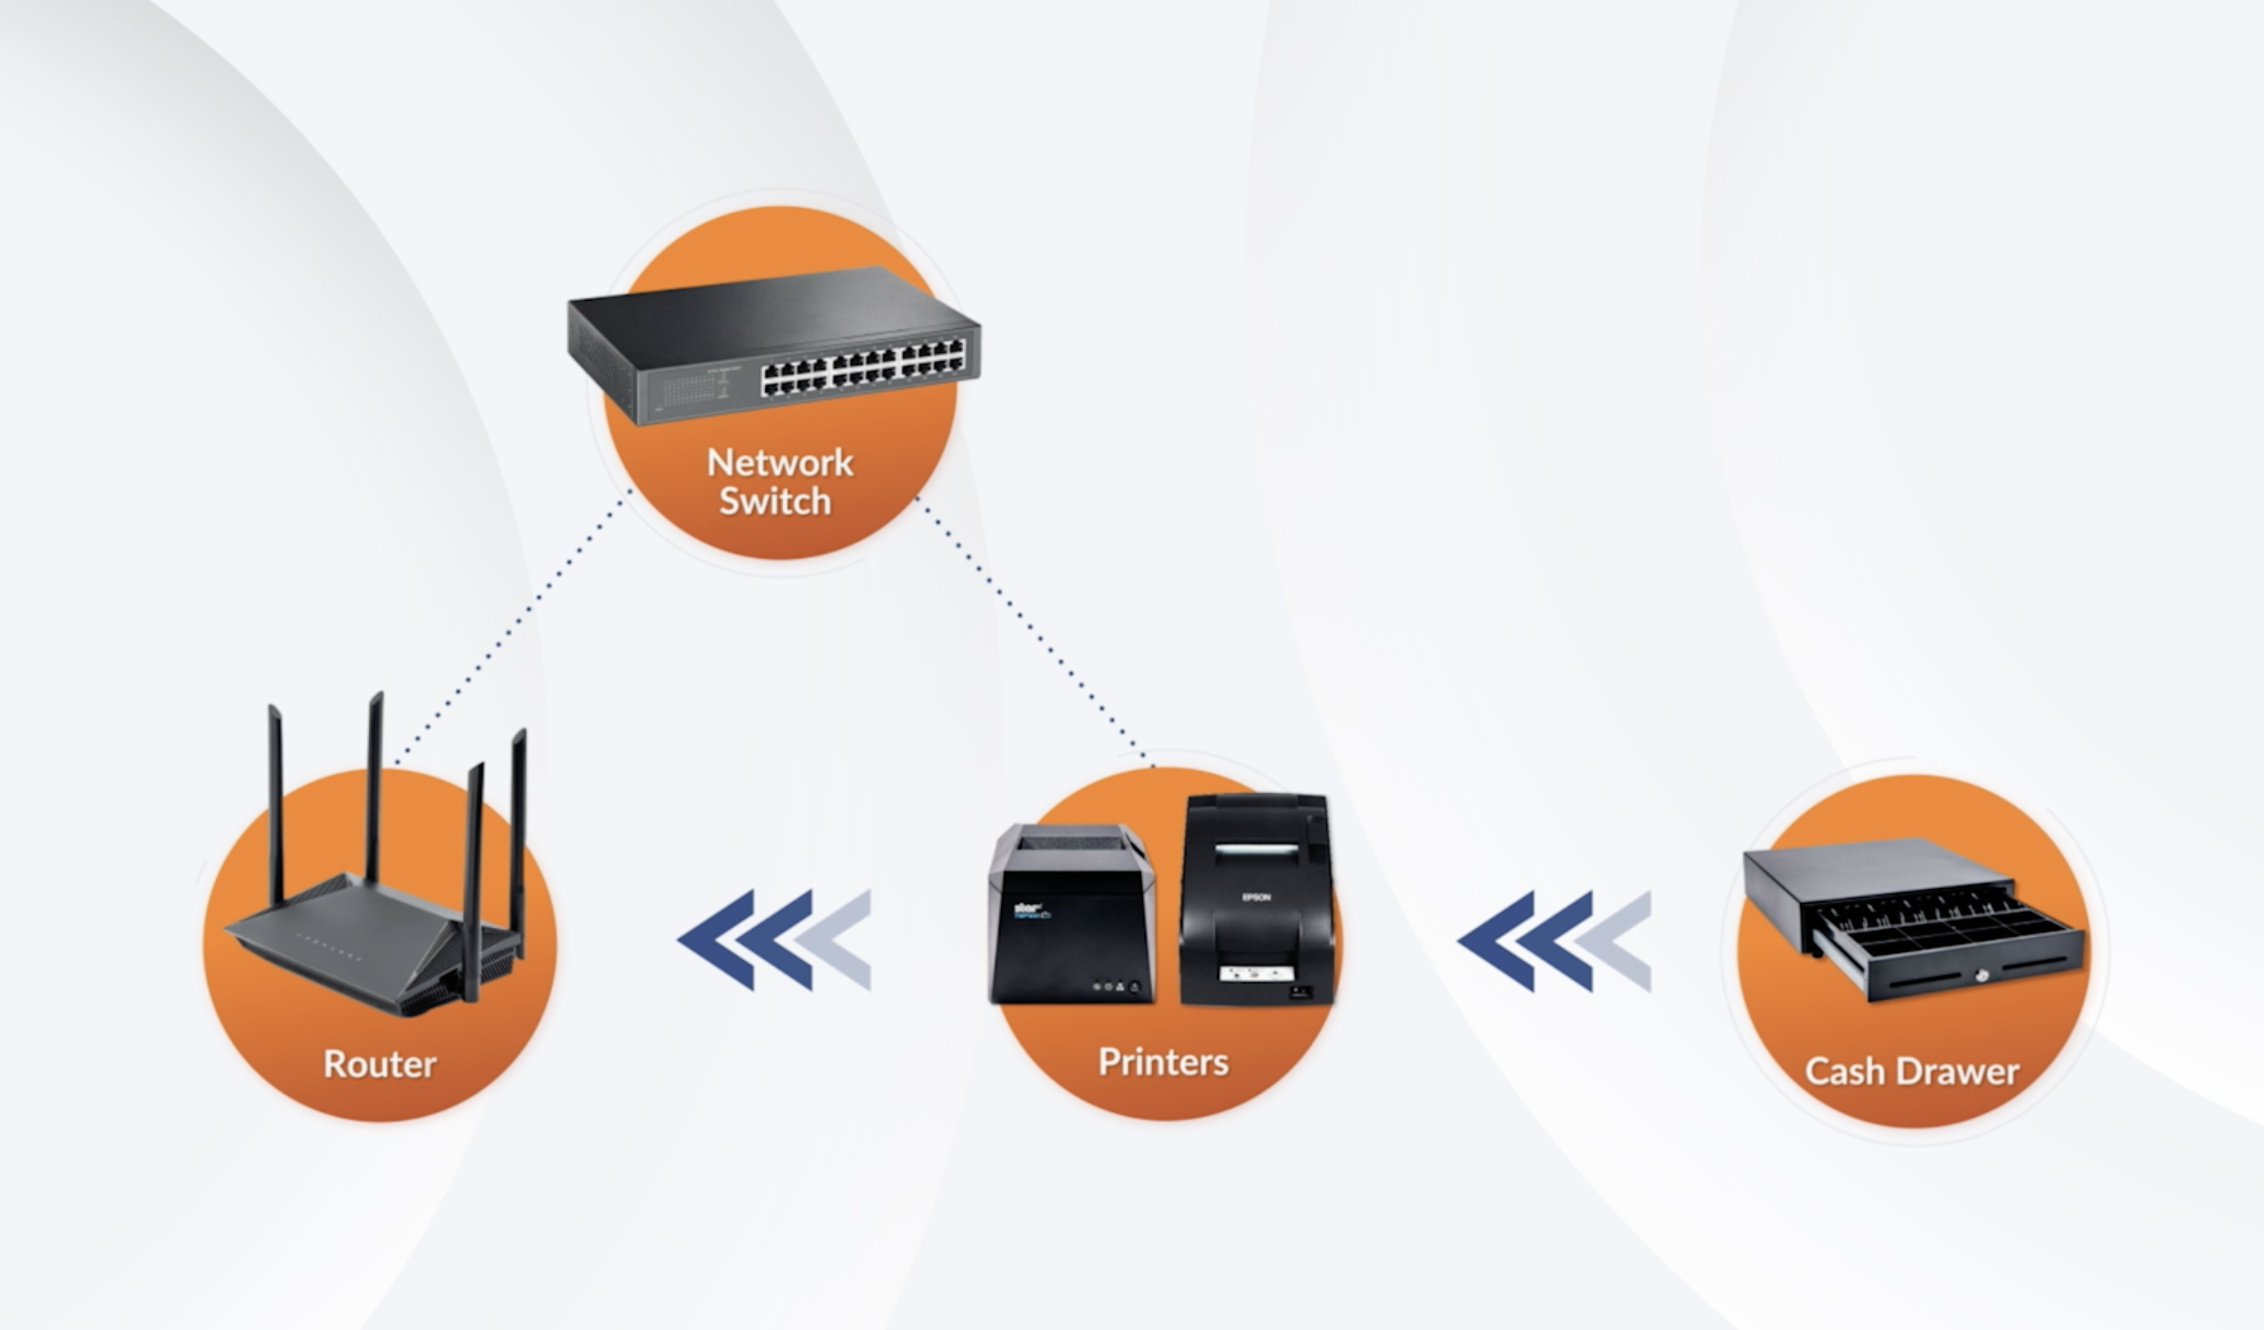
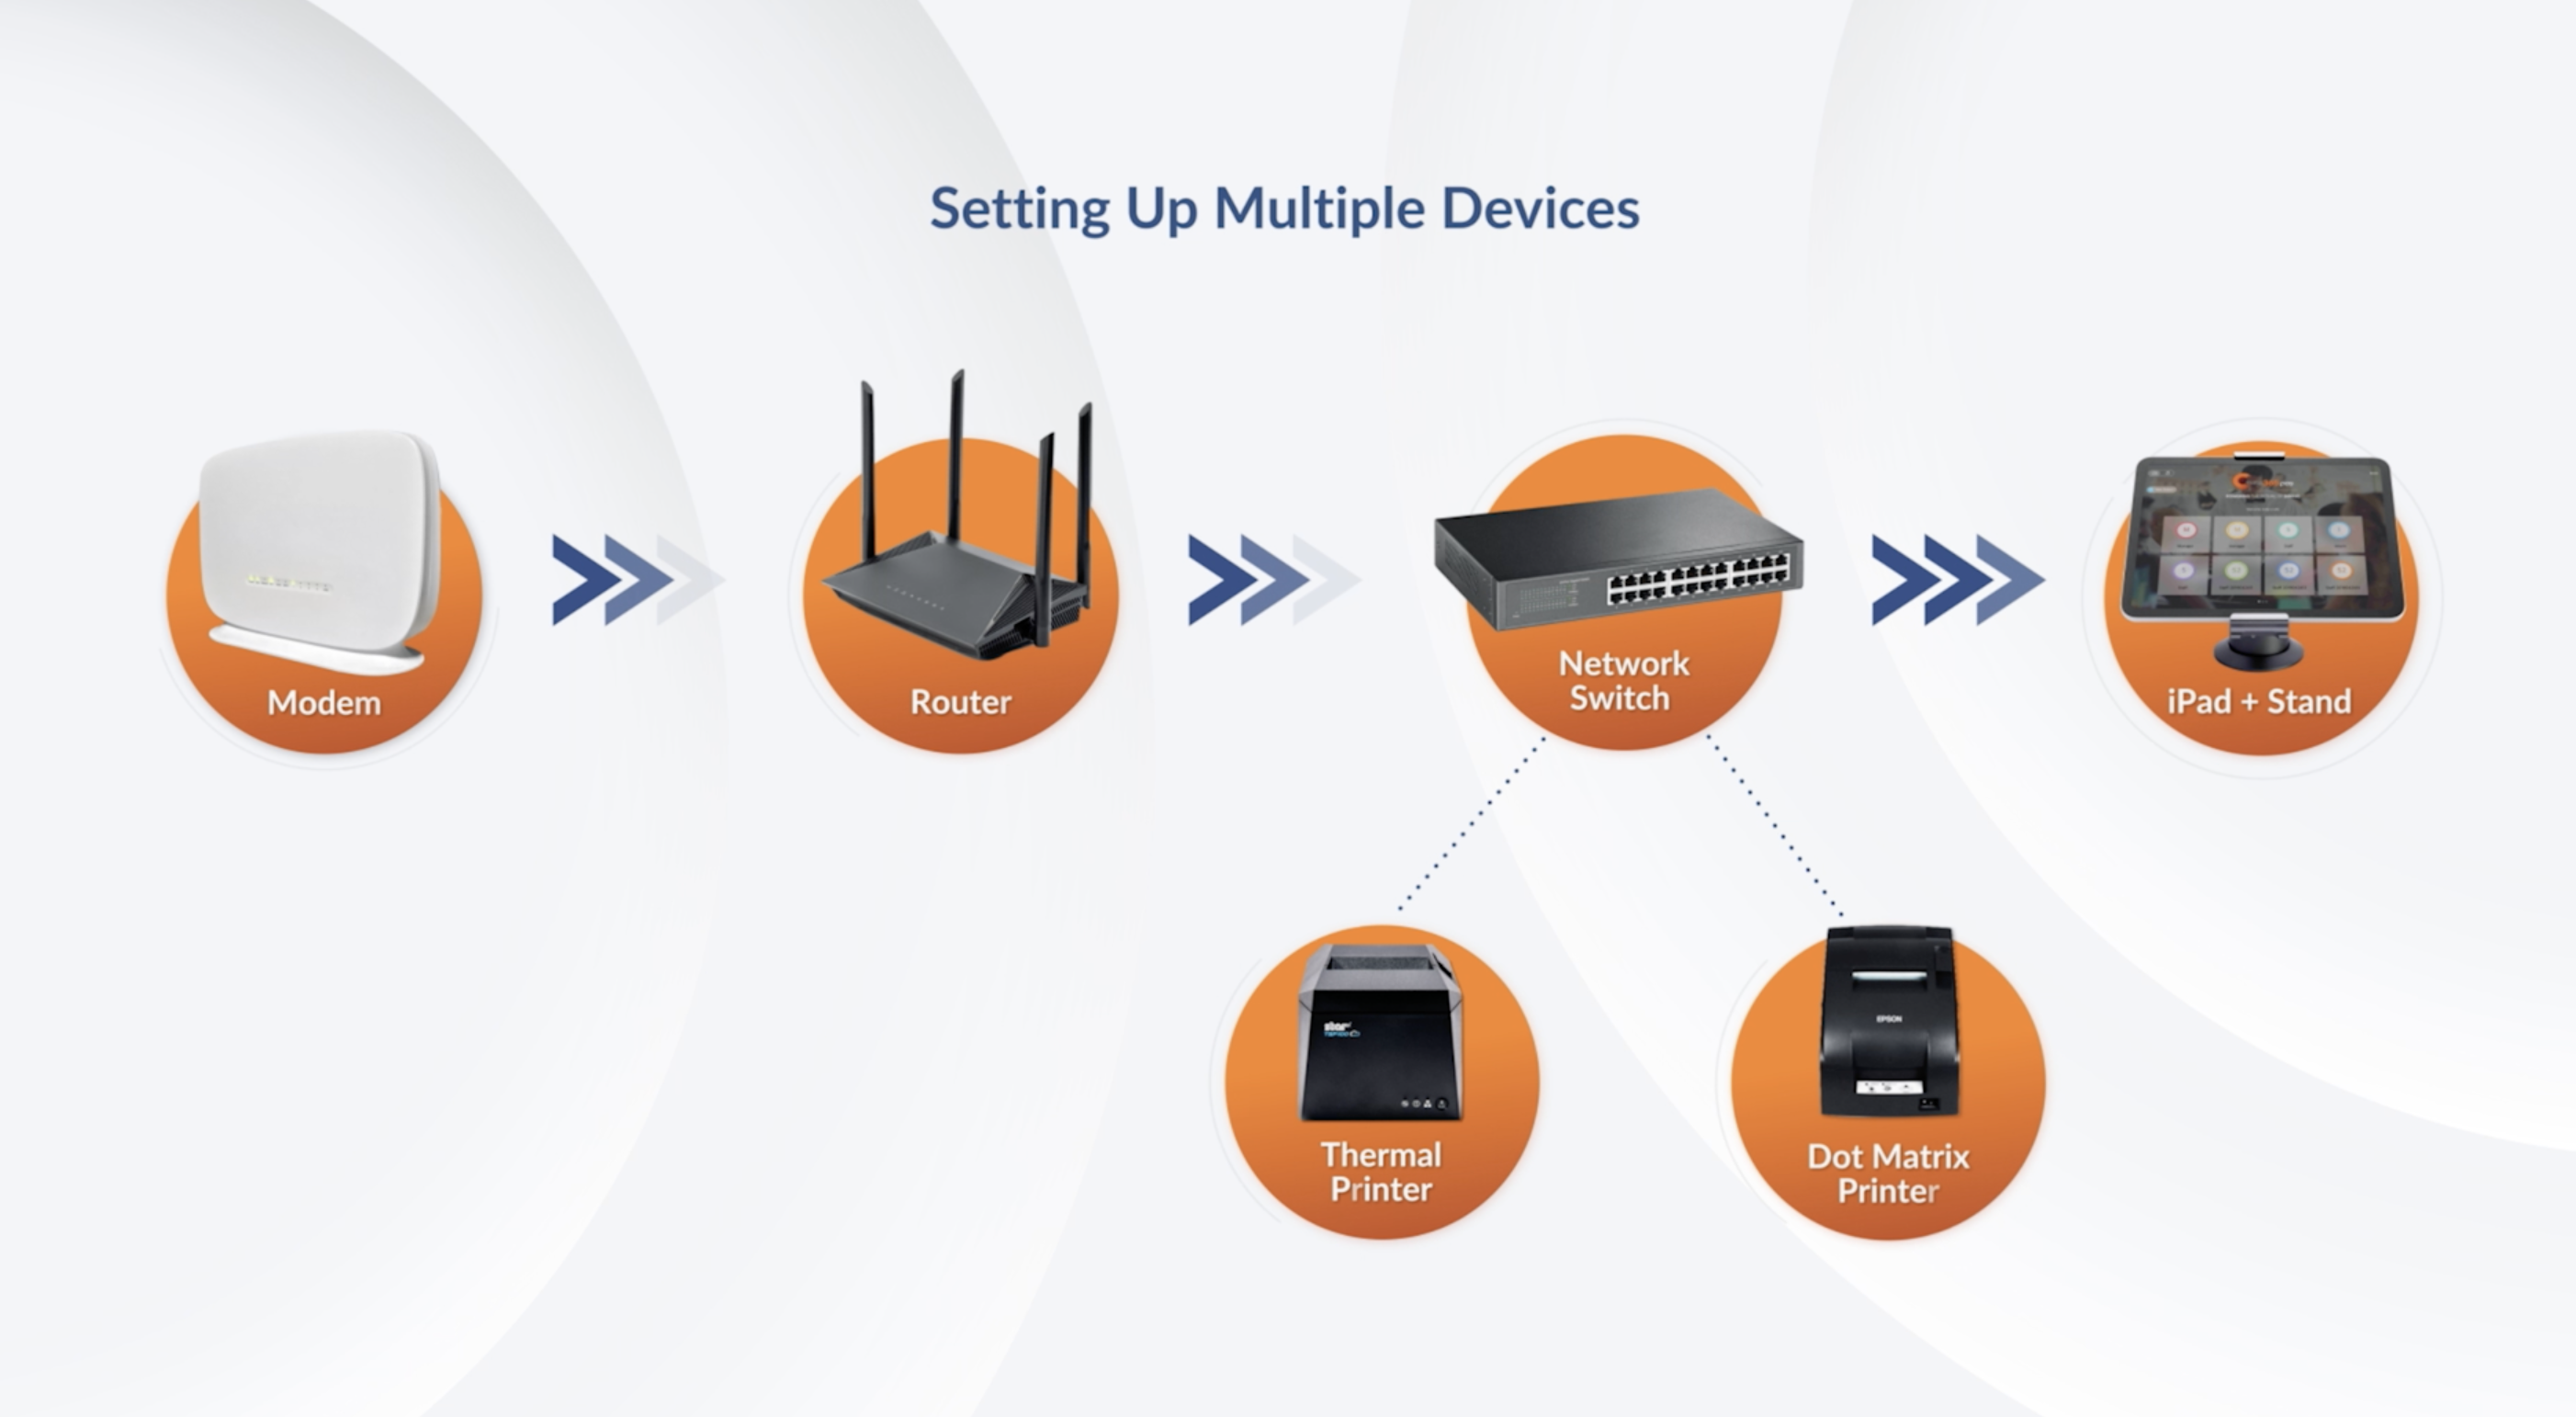
The diagram below shows the basic setup for the network and hardware.
Set up your devices

To set up your devices, follow the steps below:

1. Make sure you have a stable Internet connection

A reliable Internet connection is required for the Eats365 POS, modules, and online solutions to work properly. Together they help facilitate a modern and efficient workflow for your restaurant’s day-to-day operations.

To ensure you have a stable internet connection, you must:

  • Have an internet connection with at least 10 Mbps download and 5 Mbps upload speeds
  • For wireless connections: 
    • Ensure proper Wi-Fi coverage and the least interference. A Wi-Fi router with at least Wi-Fi 5 or 802.11ac equipped with a 5GHz band is recommended.
    • Place your Wi-Fi router or modem at a location that can cover your establishment evenly with the least interference.
Delete

Note: If this is not possible or you have a large establishment, please check with your Network Hardware documentation to ensure proper Wi-Fi coverage. You may be required to set up additional Wi-Fi Access Points.

Tips: 

  • You can use speedtest.net to check your internet speeds.
  • Some Internet Service Providers (ISP) provide a singular device that acts as both a modem and Wi-Fi router. In such a case, you may elect not to add a Wi-Fi router, given that the provided router is sufficient.

2. Add a Network Router

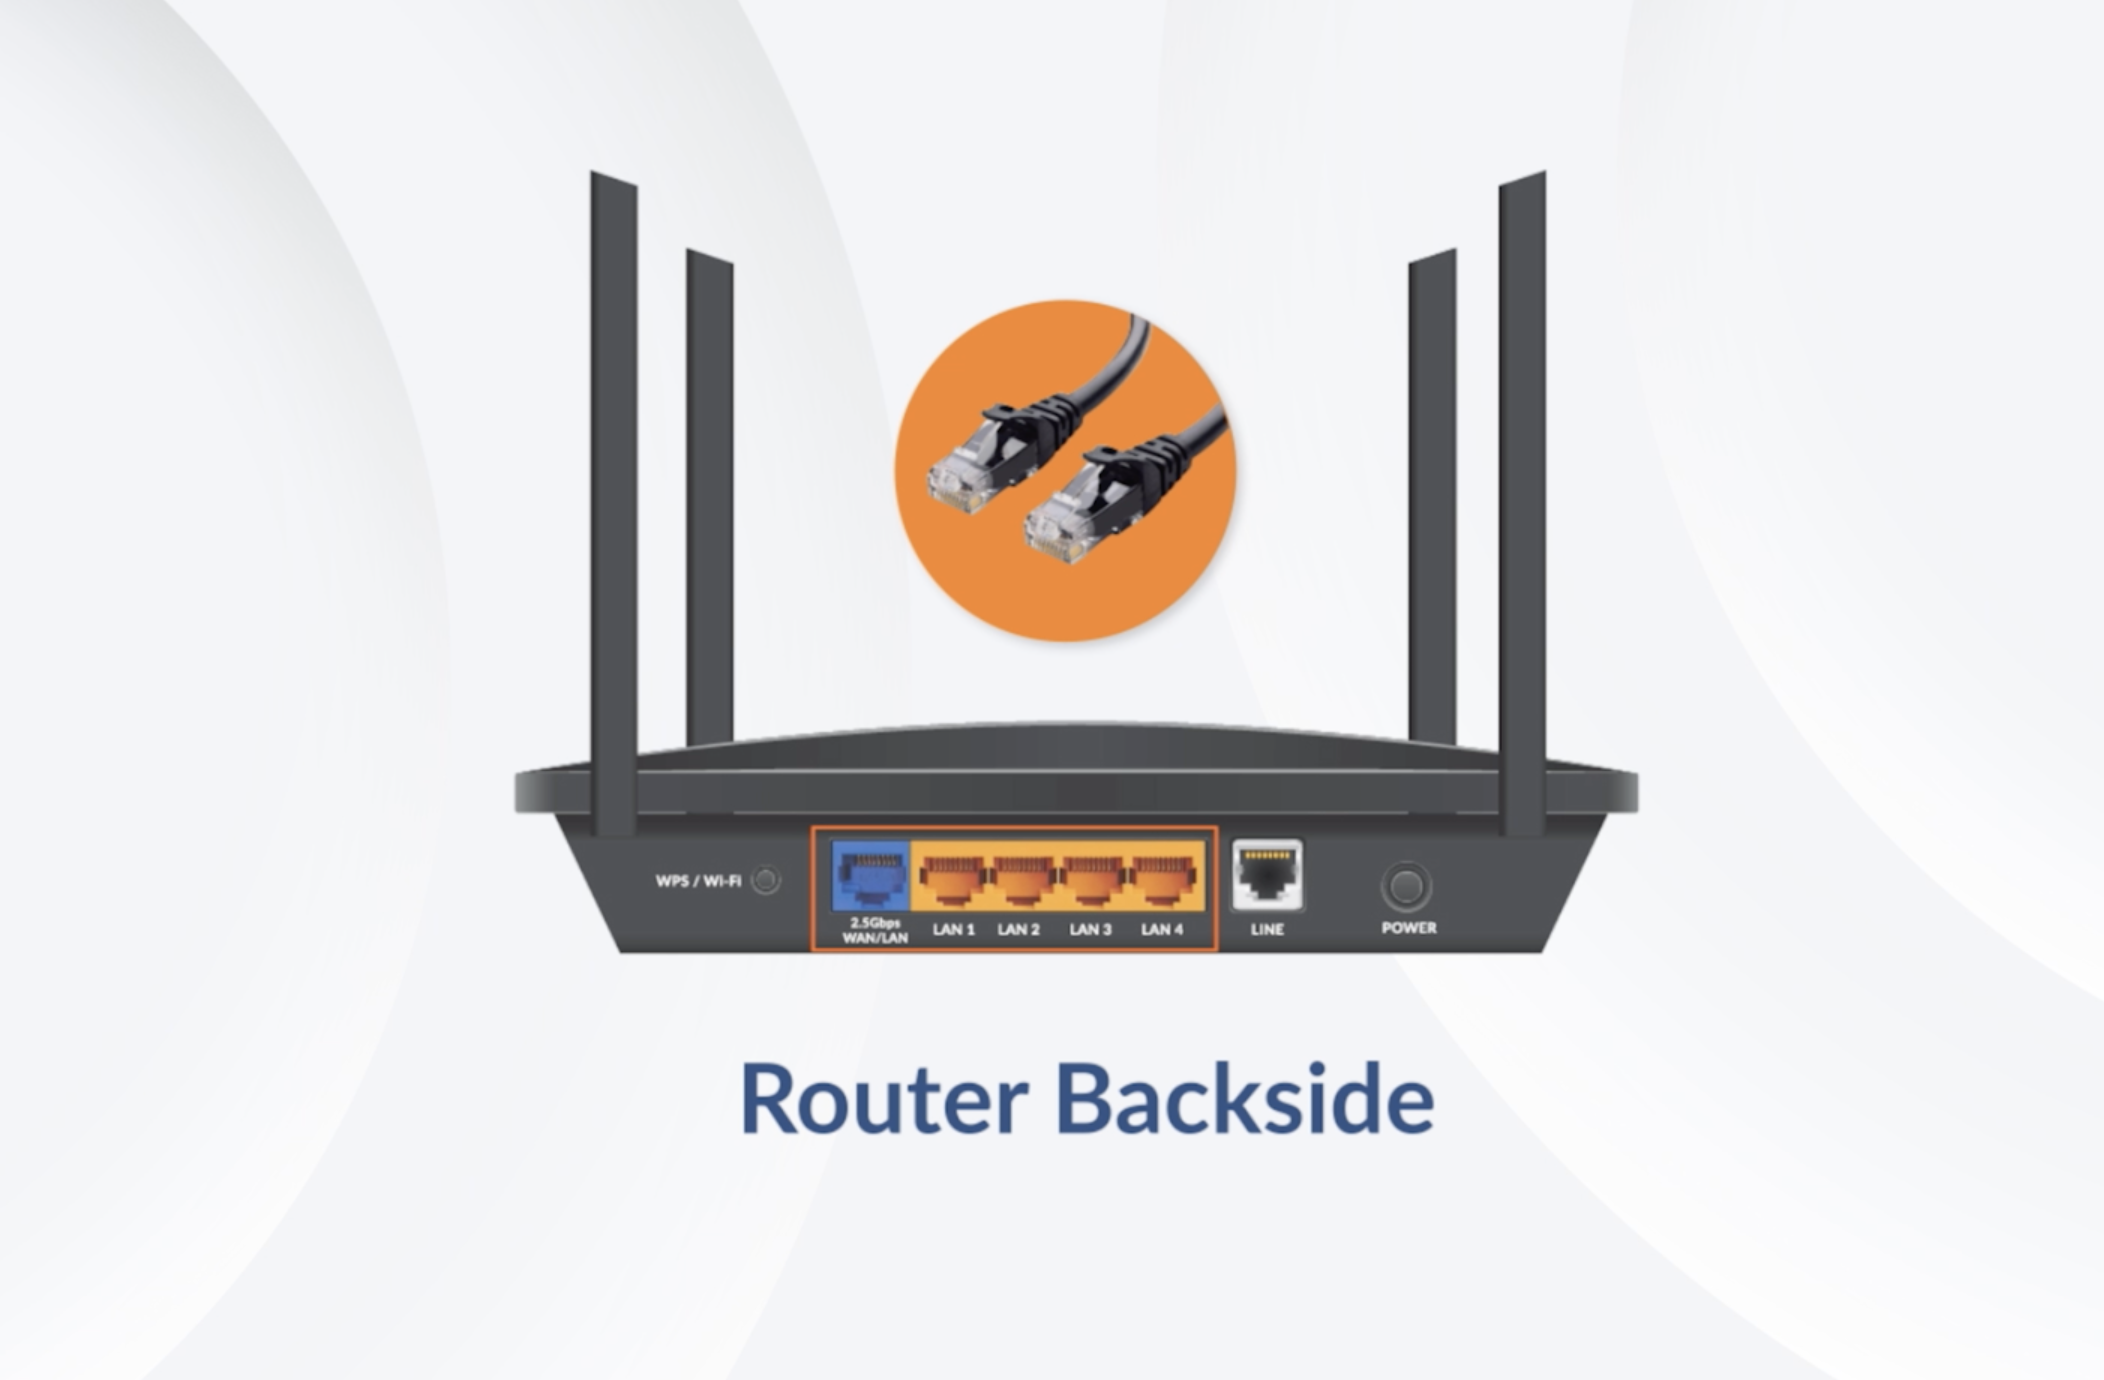
Connect the Network Router to the provided modem using an Ethernet cable. On the back of the router, locate the WAN port and plug in one end of the Ethernet cable, then plug the other end of the cable into the modem.

Delete

3. Add a Network Switch

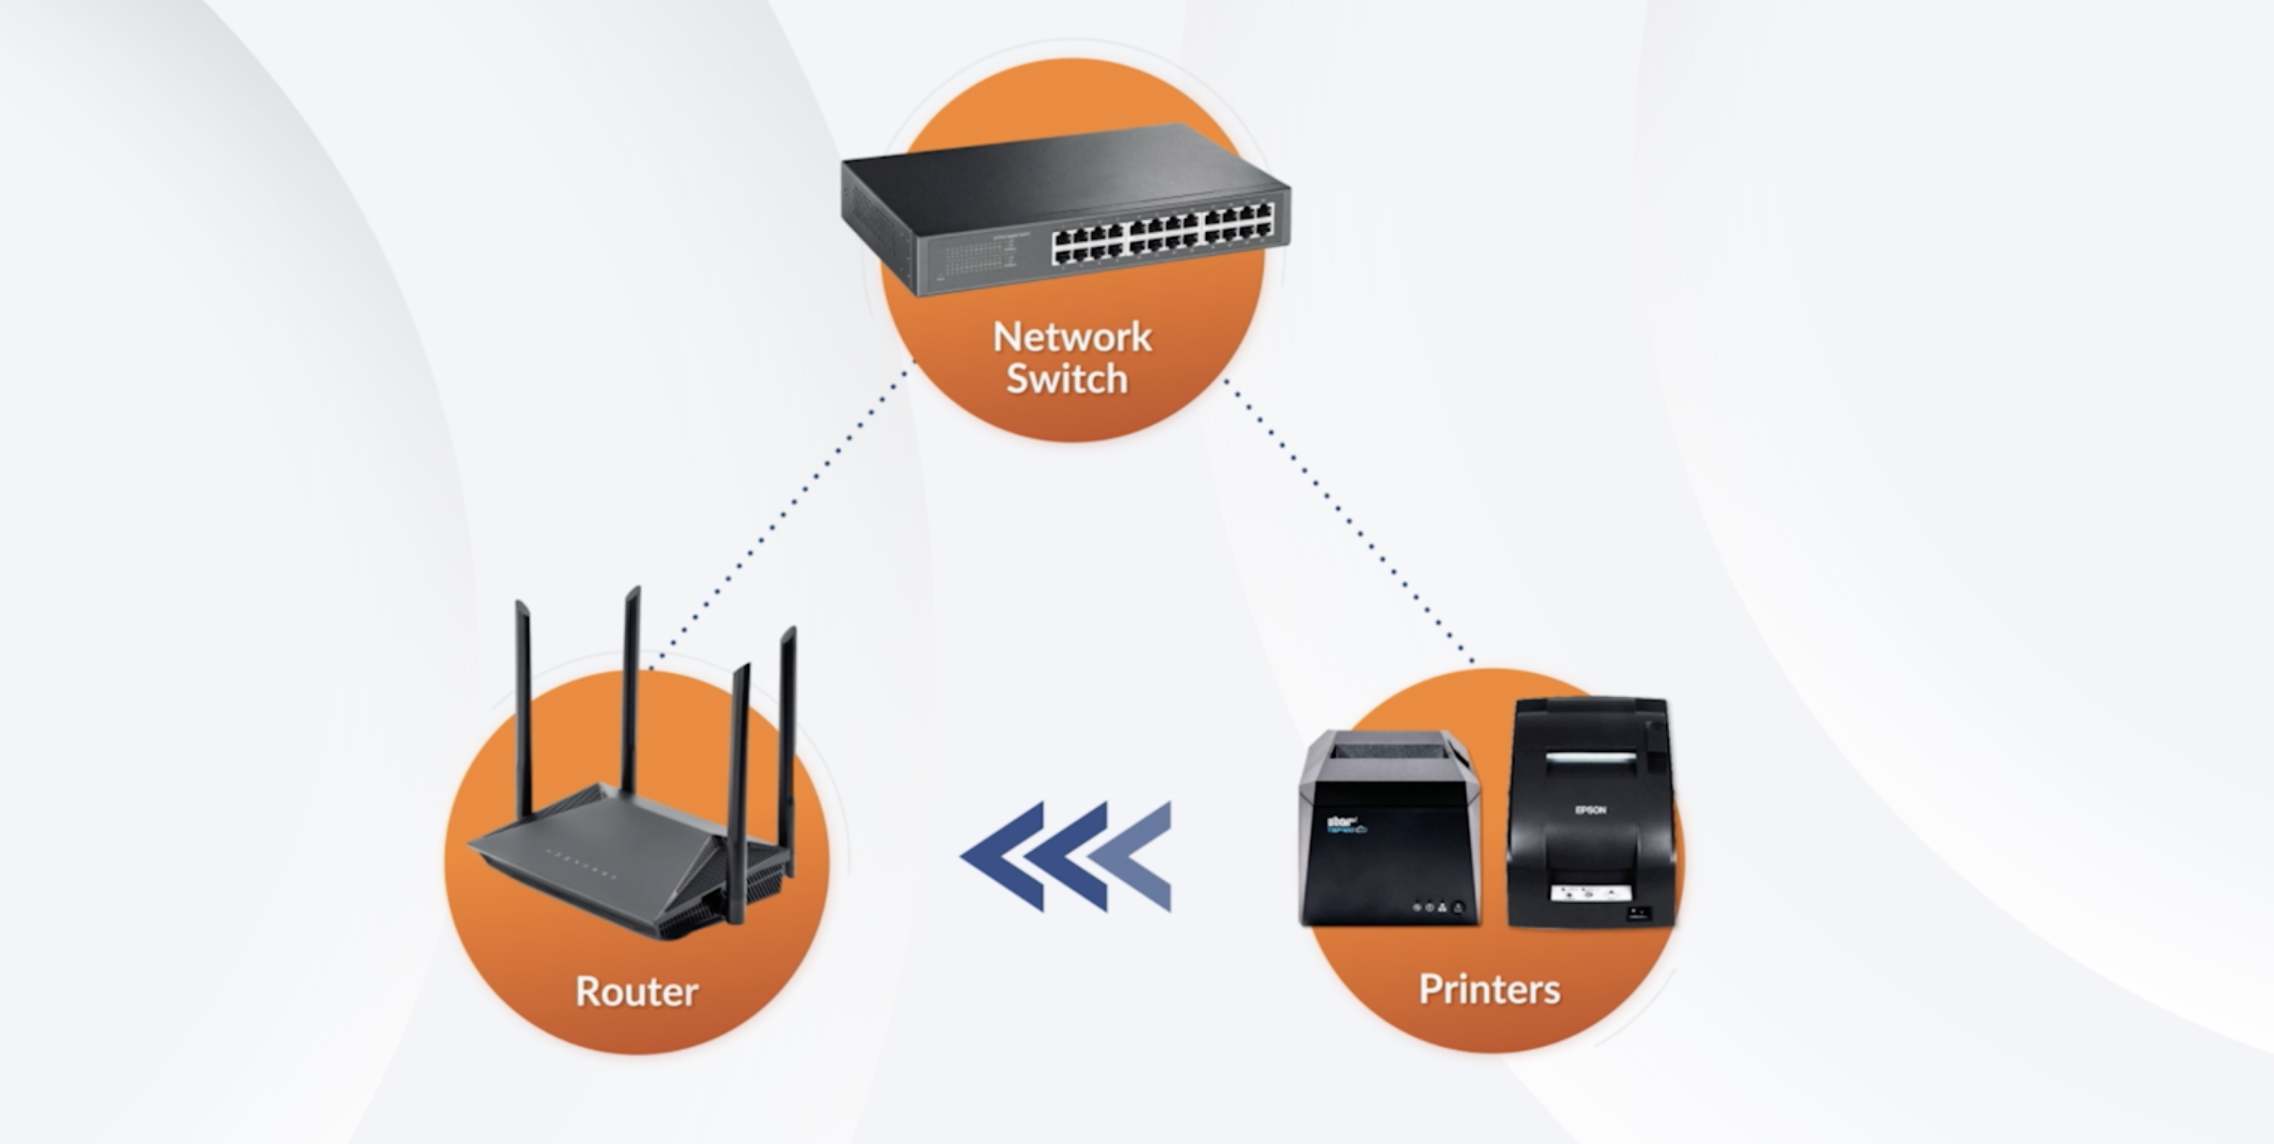
Connect the Network Switch to the Router using an Ethernet cable. On the back of the router, locate any of the LAN ports and plug in one end of the Ethernet cable, then plug the other end of the cable into one of the ports on the switch. The network switch allows you to connect multiple devices, such as iPad and printers, to your wired network. 

Delete

4. Connect an iPad to the network

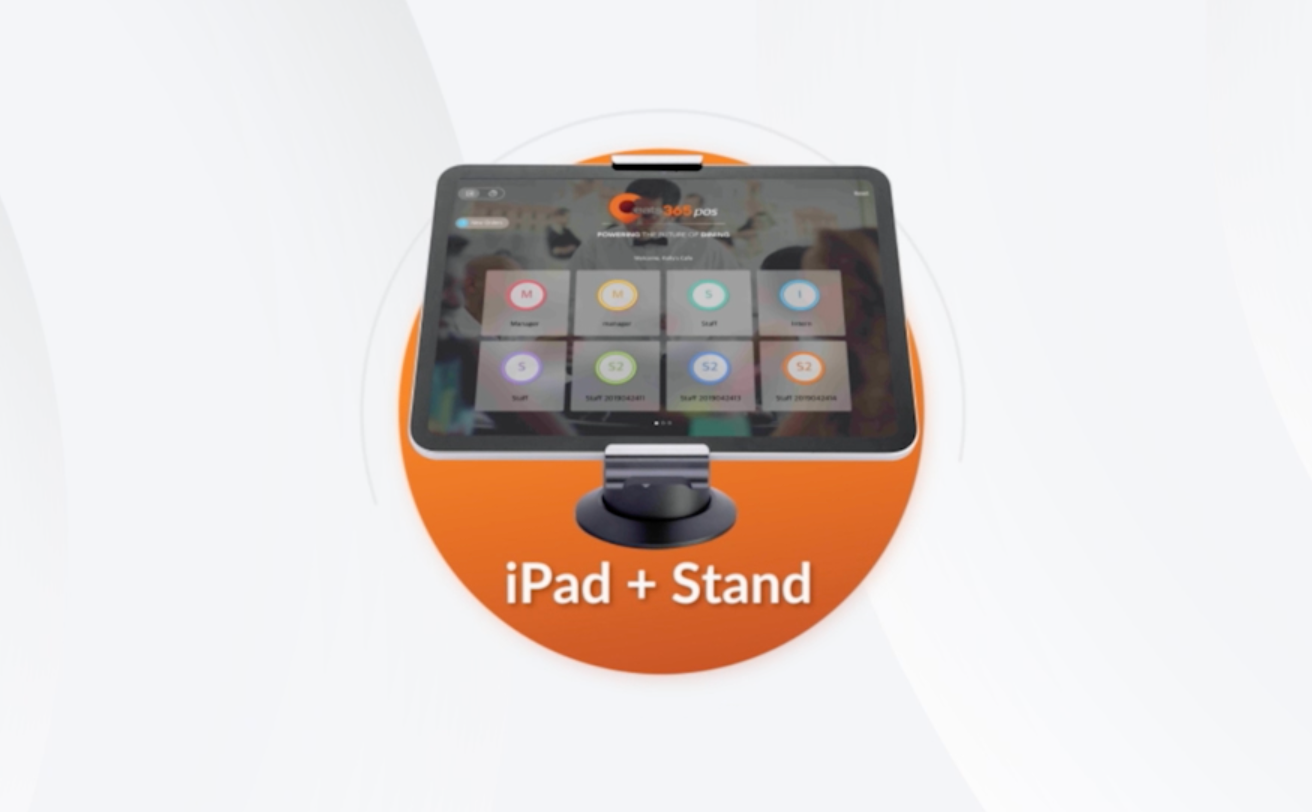
The Eats365 POS on your iPad can work on both wireless and wired Ethernet connections. For further instructions, refer to Connect an iPad to the network.

Delete

Tip: It’s recommended to use an iPad Stand with your iPad, for convenience. For recommended iPad Stands, refer to iPad Point of Sale & Secure Stands.
Delete

5. Set up a printer

Connect your printer to the network switch using an Ethernet cable. Refer to your printer’s user manual or contact the manufacturer for steps on how to set up your printer.
Delete

Tip: It’s recommended to have at least one Thermal Printer to print receipts and one Dot Matrix Printer to manage Kitchen Tickets.

Delete

6. Connect a Cash Drawer to the receipt printer

Refer to the Cash Drawer’s user manual or contact the manufacturer for steps on how to set up the Cash Drawer. 

Once set up, you can set the Cash Drawer to open automatically whenever a cash payment is made. To do this, connect the Cash Drawer to the receipt printer using an Ethernet cable.

Delete

7. Link a printer to the POS

Once your printer is set up and connected to the network, pair the printer to the POS. For further instructions, refer to Scan and pair a printer.

Delete

8. Manage printer configurations

You can set your printer to handle multiple jobs. For a list of different printer configurations, refer to the list below:

  • Configure a receipt printer with cash drawer
  • Configure a receipt printer for tables
  • Configure a receipt printer to print Shift Report
  • Configure Kitchen Printers for each Kitchen Station
  • Configure Kitchen Printer to print expeditor list
Delete
set up hardware connect devices internet connect to wifi router network connect cash drawer to internet

Was this article helpful?

Yes
No
Give feedback about this article

Related Articles

  • Connect an iPad to a network
  • List of compatible devices
  • Scan and pair a printer
  • Set up and install the Eats365 POS app
            • Products
              • POS
              • mPOS
              • Eats365 Biz
              • Eats365 Marketplace
              • Branded Online Store
              • Kitchen Display System
              • Expedite Display
              • Scan-to-Order (BYOD)
              • Self-Service Kiosk
              • PhotoMenu
              • Queue Kiosk
              • Dynamic Digital Menu
              • Queue Display
              • Pickup Display
              • Customer Facing Display
            • Solutions
              • Online Ordering
              • Contactless Dining
              • Front of House
              • Guest Retention
              • Back of House
              • Back Office (Store End)
              • Multi-brand/Location Management (Enterprise)
              • Paperless Operation Experience
              • Payment
            • Restaurant Types
              • Quick Service Restaurant
              • Full Service Restaurant
              • Bars
              • Food Court
              • Cloud Kitchen
              • Food Retail
              • Self-service Restaurant
              • Enterprise
              • All-You-Can Eat (Buffet)
            • Resources
              • Eats365 Knowledge Base
              • Blog
              • Supported Hardware
            • Company
              • About Us
              • Success Stories
              • Referrals
            • Get In Touch
            • Contact Us
              • Eats365, Inc.
              • info@eats365.com
              • www.eats365pos.com
        • Contact Us
          • Eats365, Inc.
          • info@eats365.com
          • www.eats365pos.com
        • Get In Touch
          • Apple Mobility Partner
            twitter facebook eats365 linkedin
        • eats365
          © 2023 Eats365 Incorporated. All rights reserved.
Expand