Dine-In Settings
Table of Contents
Set up Dine-In settings (Full Service)
Learn how to configure your full service restaurant’s Dine-In workflow and settings on the Eats365 POS app or on the Merchant Portal.
"Dine-In" settings contain useful settings that you can configure to tailor various aspects of your dine-in operations, such as table management, order processing, and payment workflows, to align with your specific preferences and operational needs.
In this article, you’ll learn how to manage your restaurant’s Dine-In workflow and settings on the Eats365 POS and the Merchant Portal.
Set up Dine-In settings
To configure your Dine-In settings, follow the steps below:
Eats365 POS
- Log in to the Eats365 POS.
- At the top left, tap Settings
 .
. - Under "Settings," tap Dine-In.
- Set up your preferred Dine-In settings.
- At the top right, tap Save to confirm.
Below is the list of settings that you can set up and manage on the POS:
General
Dine-In Overtime Reminder
When enabled, the POS displays a progress bar that provides restaurant staff easy visibility into a table’s turn time progress or the table’s elapsed time, depending on your configured preferences, along with an overtime indicator.
To learn more about Dine-In Overtime Reminder, refer to Configure Dining Time settings.
Suggested Tip
Set a suggested tip amount.
DeleteWorkflow Settings
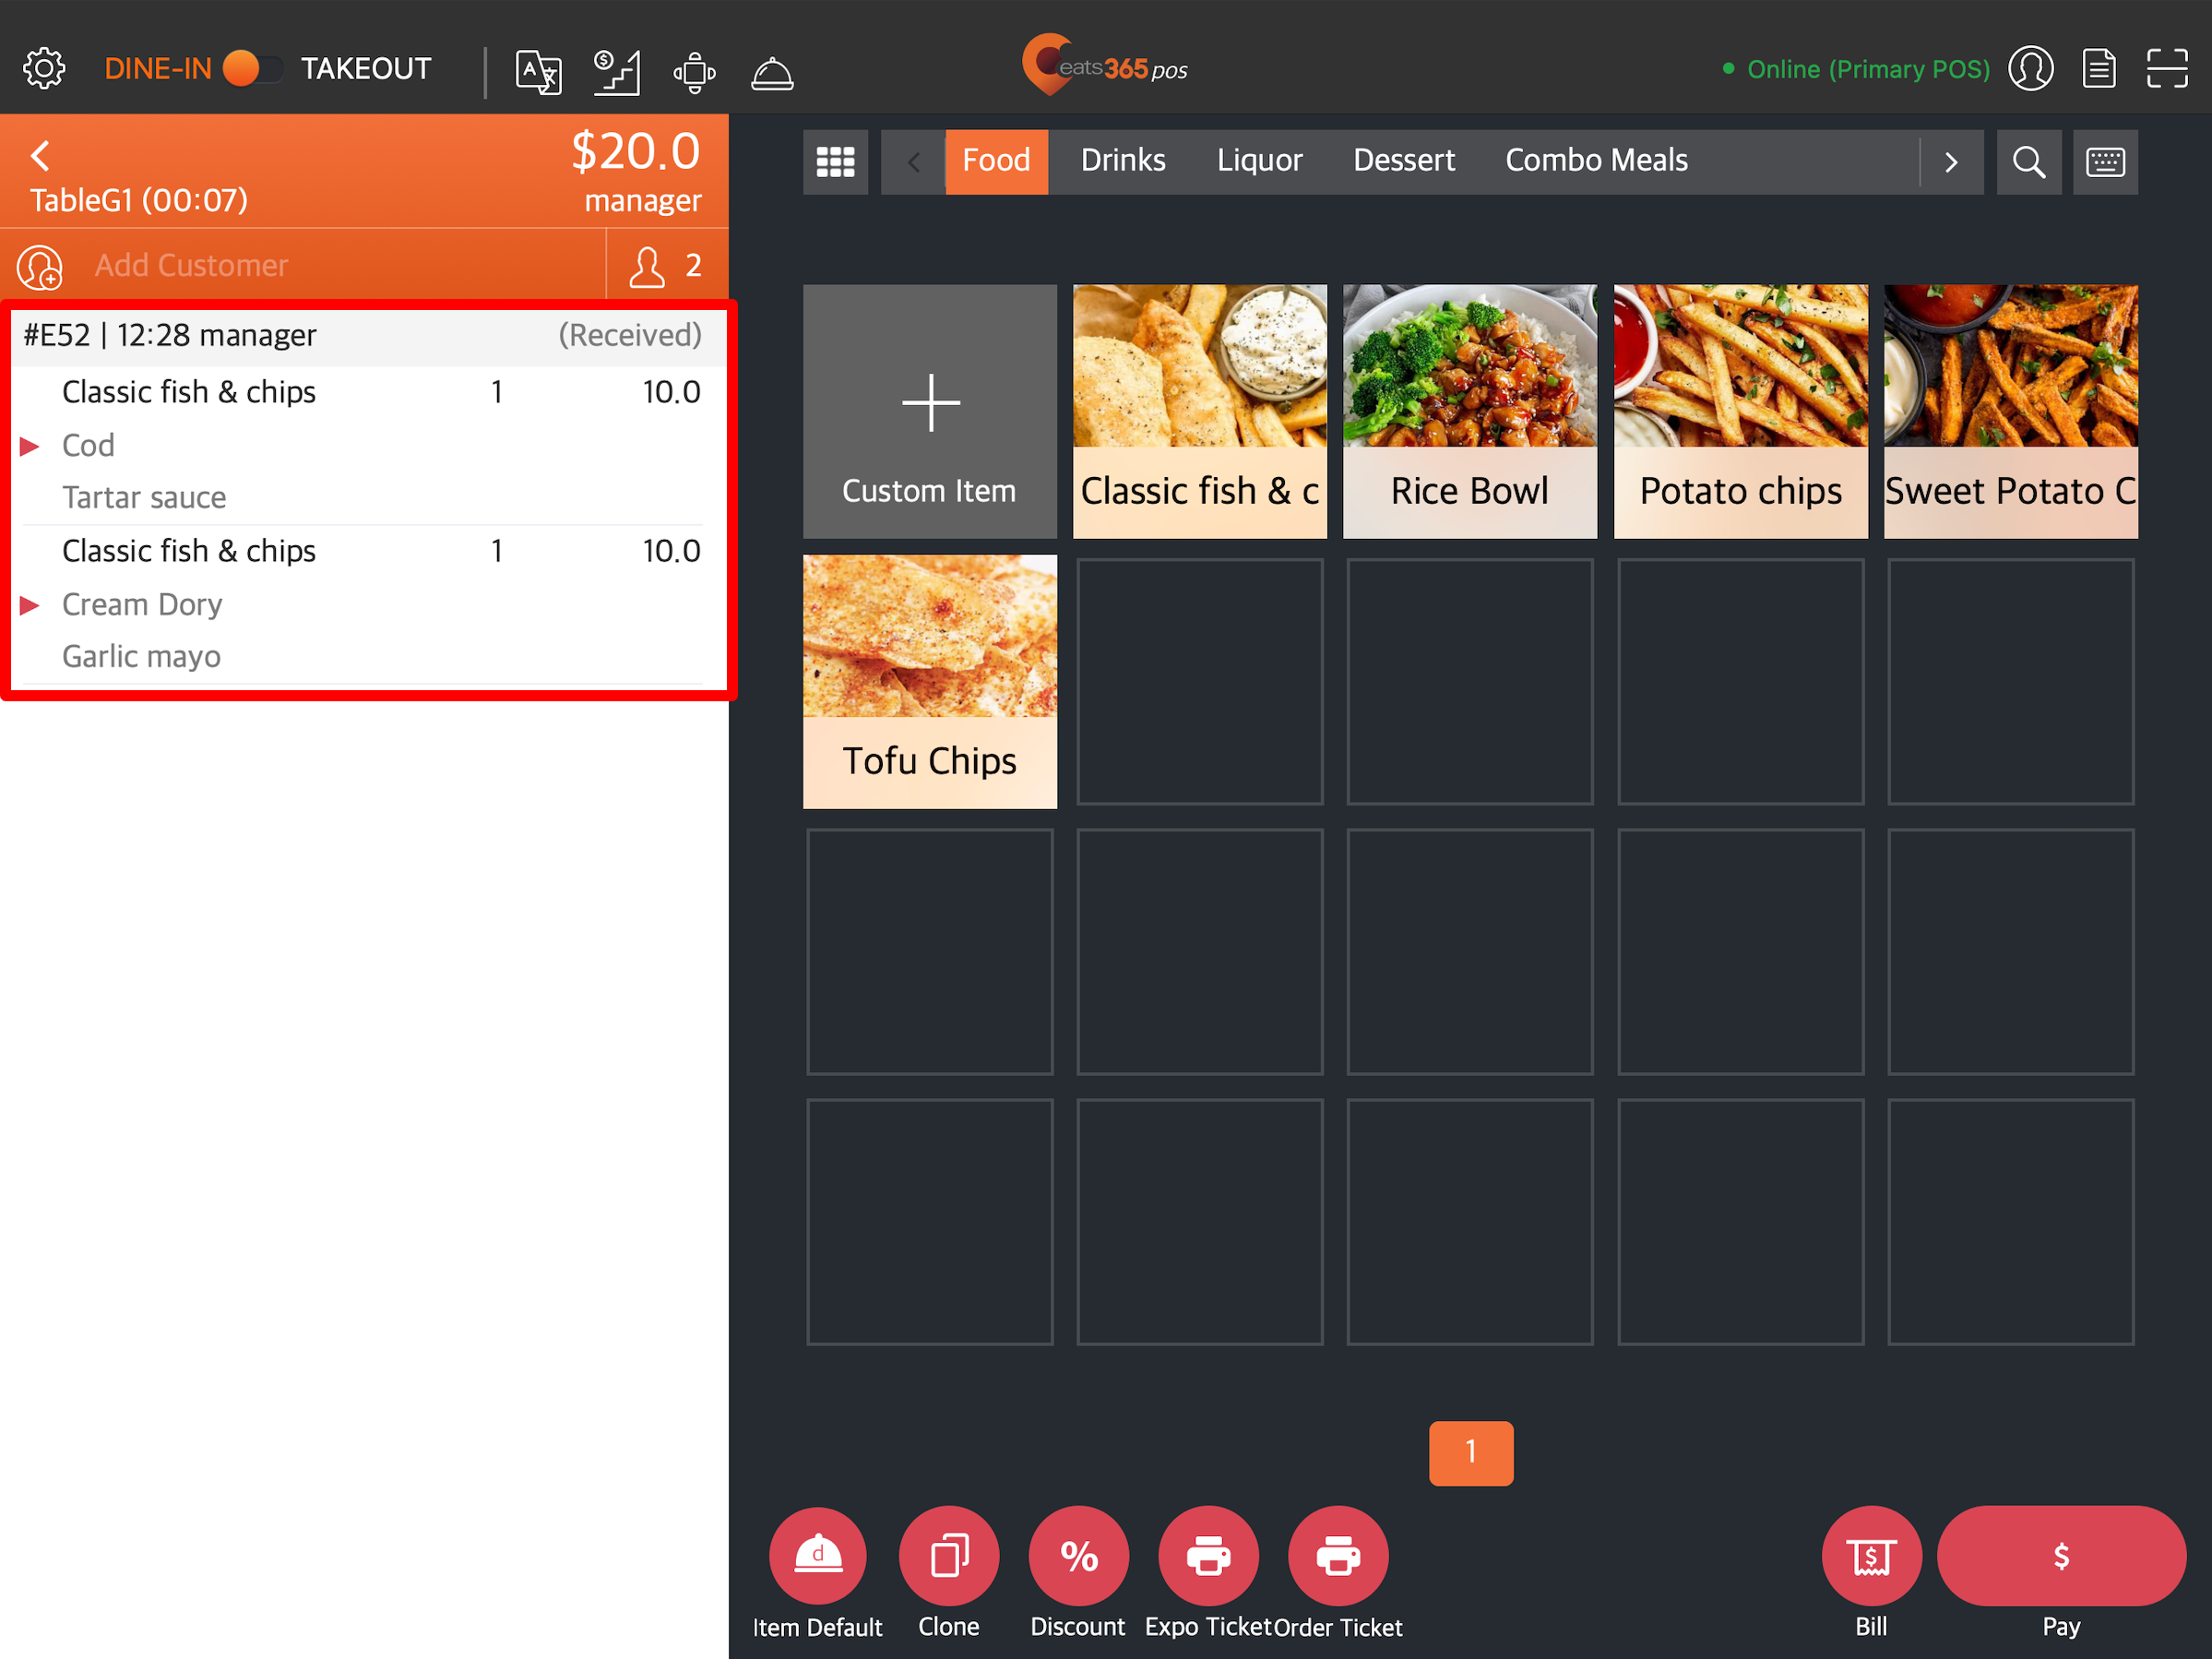
Order View
Set the Default Order View.
-
Display by Order - All items will be displayed on the order list.
-
Display by Seat - Items on an order will be displayed after selecting a seat number.
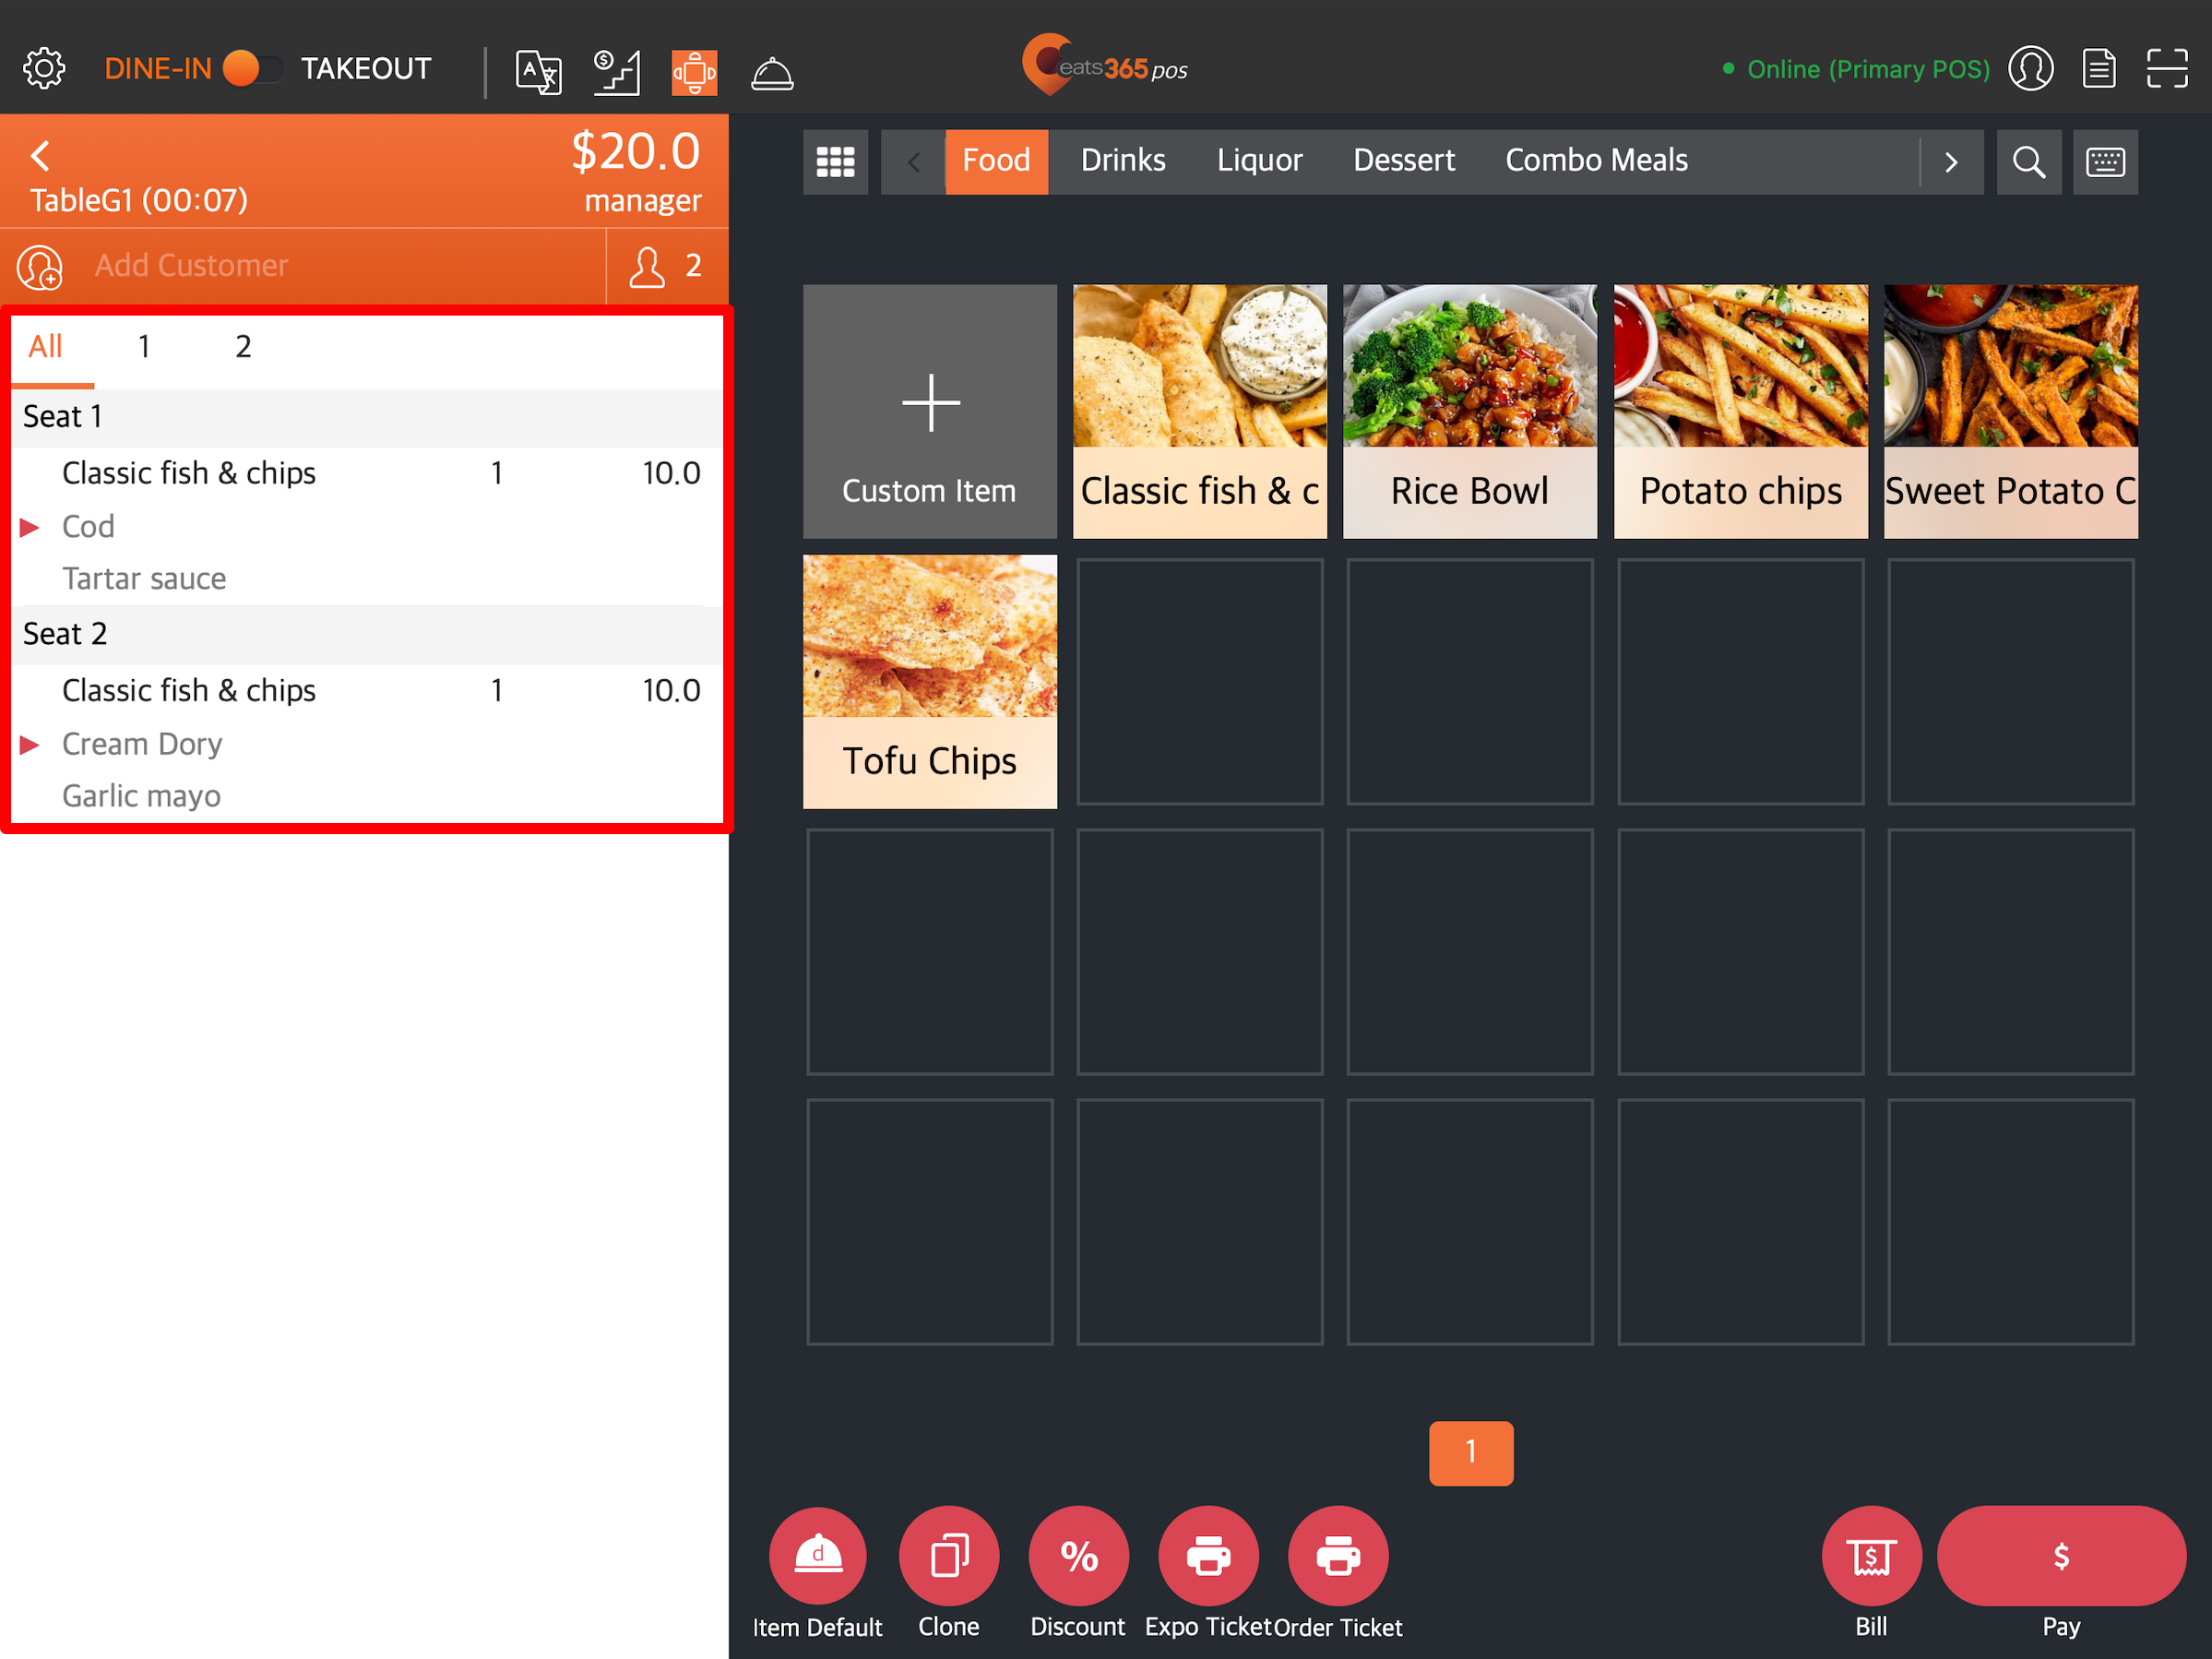
Table Sharing
Allow Table Sharing
When enabled, different groups of customers can share the same table.
Table Sharing Mode
Set the default Table Sharing mode.
- Share Table - When selected, orders from different customer groups display the same table number on their bill.
- Split Table - When selected, orders from different customer groups display split table numbers on their bill.
Clear Table
Clear Table after Order is Paid
When enabled, the POS automatically clears the table after the order is paid. If this setting is disabled, the table turns green after the order is paid, indicating a clean-up is needed.
![]()
Return Home
Return Home after Payment Processing
When enabled, the POS automatically returns to the Table Map screen after payment. If you turn this setting off, the POS stays at the payment screen so you can perform other actions, like making a tip and printing a receipt.
Order Payment
Require Payment when Placing Order
When enabled, all orders automatically require payment. This setting disables the Confirm button on the POS.
Order
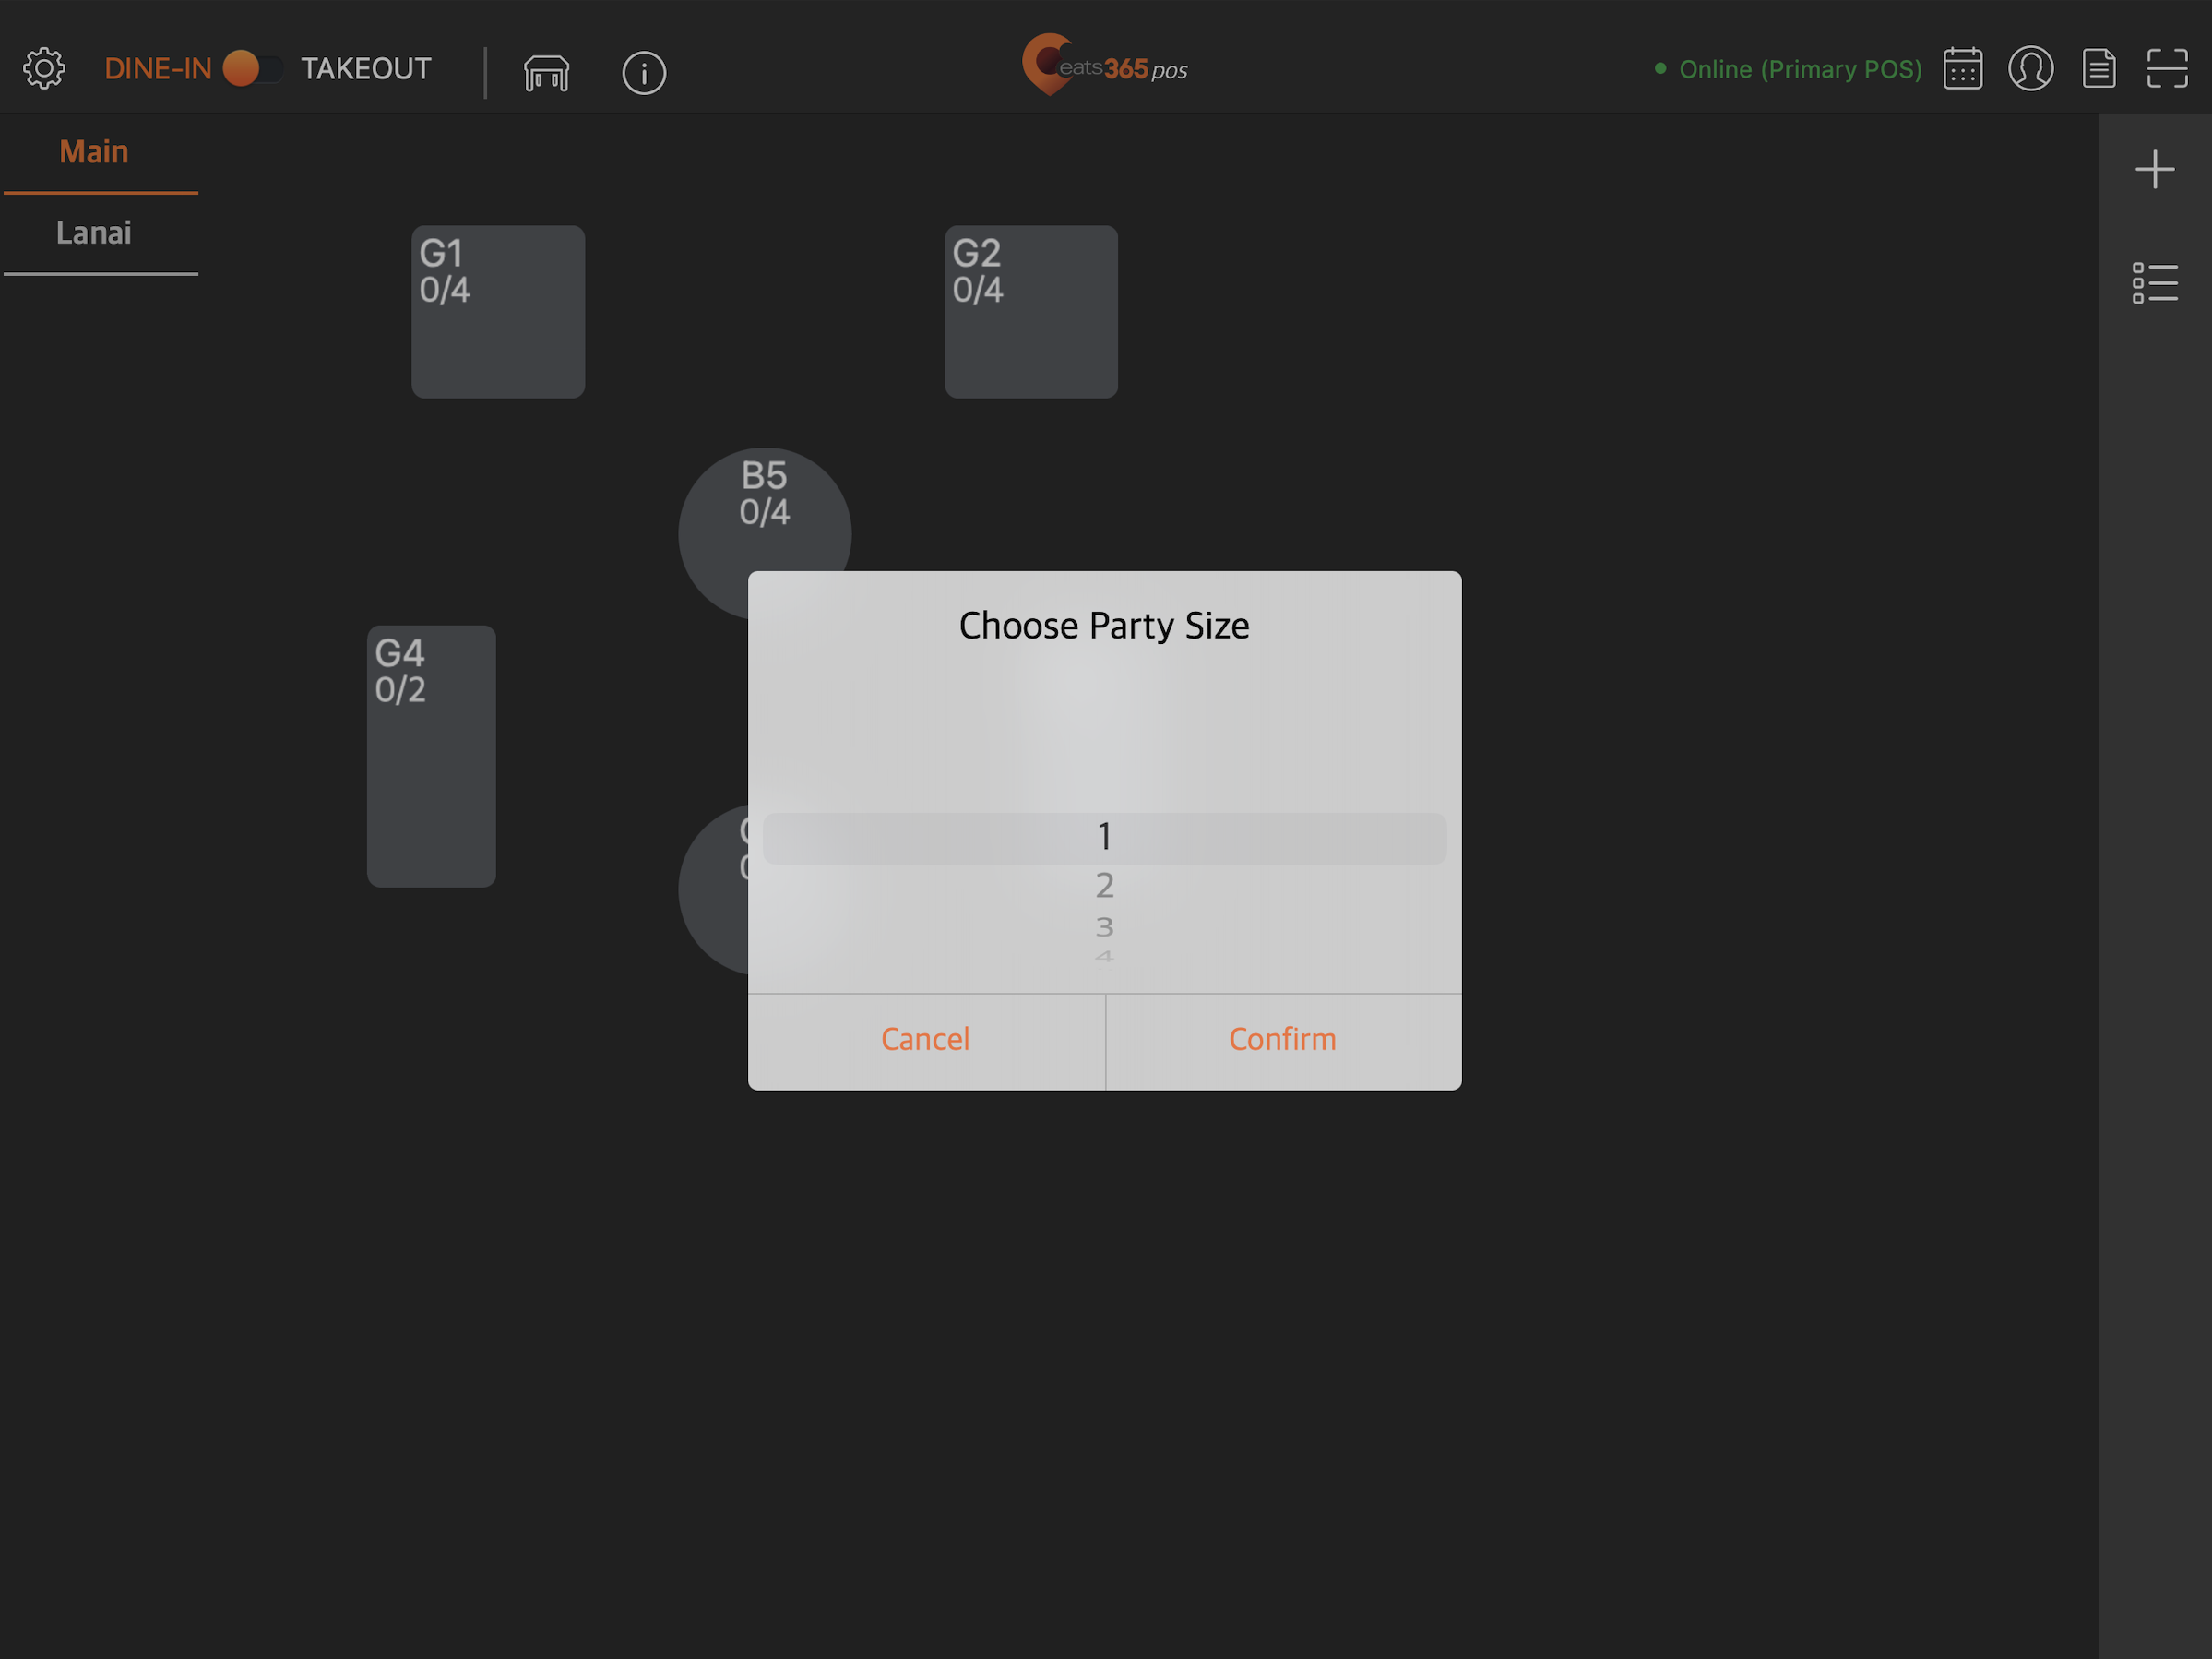
Force Enter Party Size
When enabled, you are required to enter a party size in the POS before taking an order.
Auto Add Item
Auto Add Items when Open Check
When enabled, you can set which items will be automatically added to every open check. For example, in a bar setting, you could configure the system to include a complimentary bowl of peanuts with every order.
Order Lock
"Order Lock" allows you to lock an order while an order is being placed or after a bill has been issued to the customer.
Lock Behavior when Issuing Bill
- Ask - A prompt appears on the POS if you want to lock the order after issuing a bill.
- Auto - The order will be automatically locked after issuing a bill.
- No action - Select if you don’t want the order to be locked after issuing a bill.
Lock Order when Placing Order
When enabled, you won’t be able to add items to an order from another POS while an order is being placed.
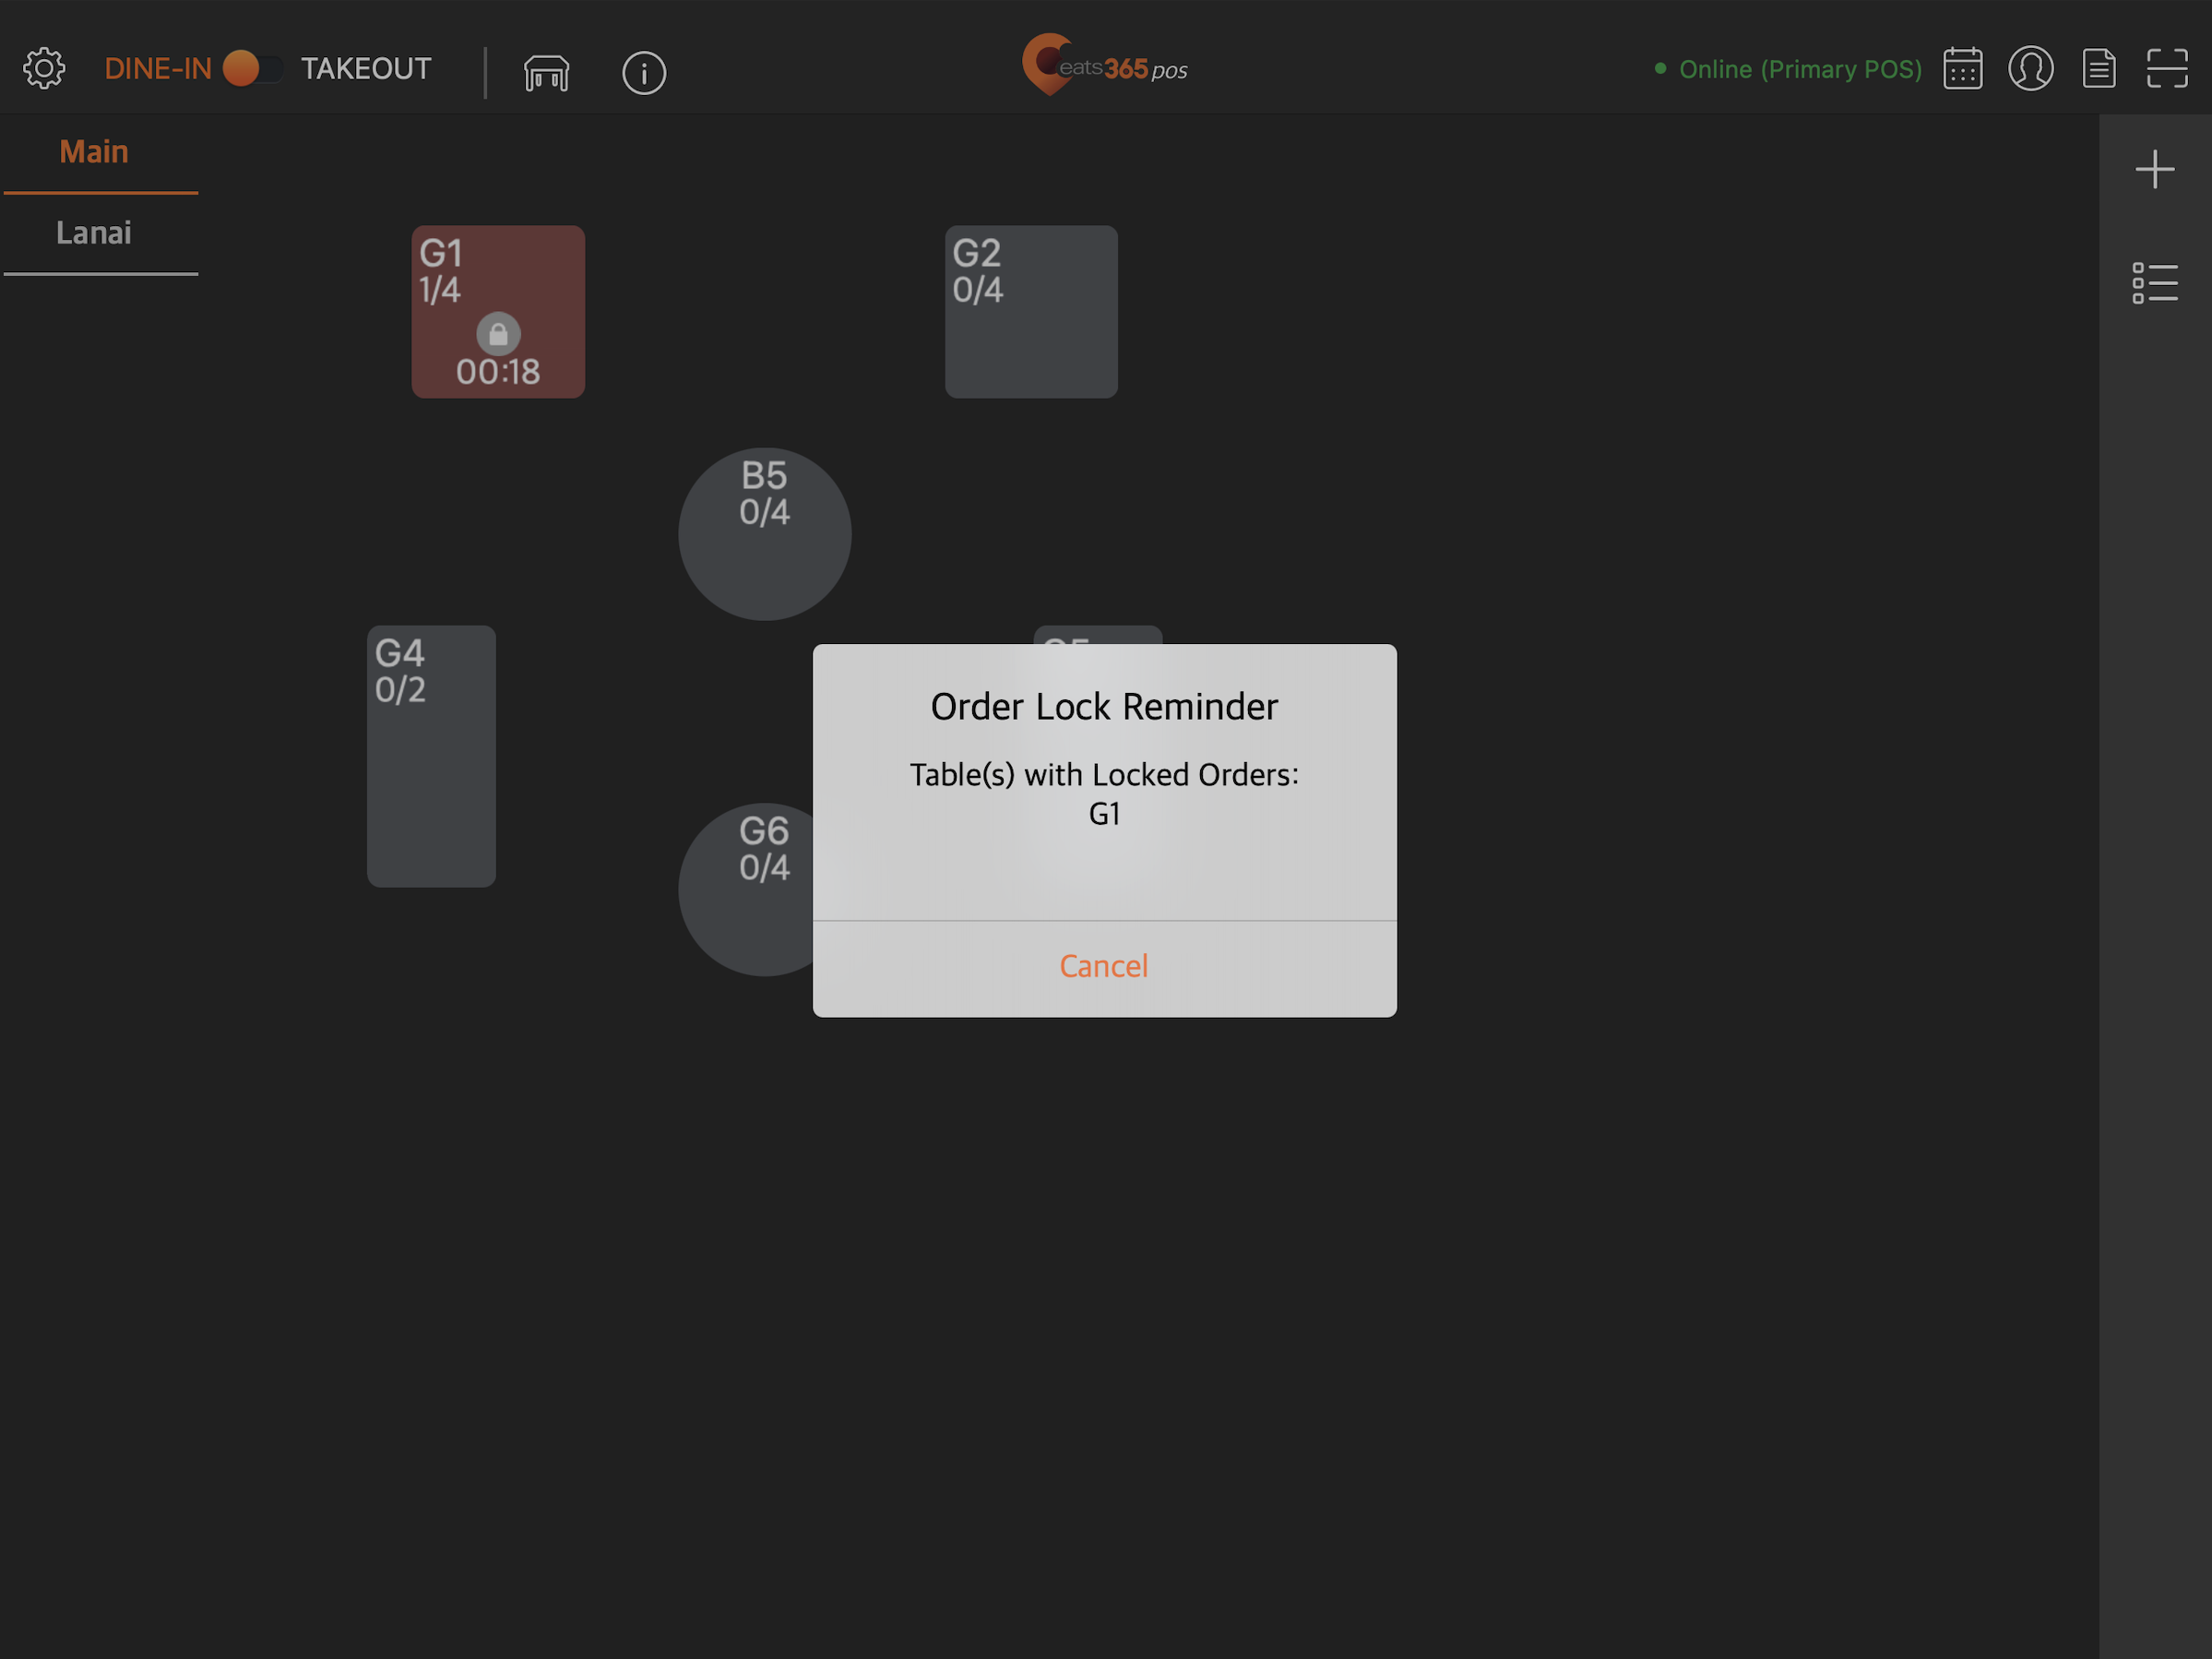
Lock Order Alert
When enabled, an alert appears to show which orders are locked. You can set the alert to show up after a set period. For example, if you set the "Order Lock Alert Time" to “10,” the lock order alert will appear on the POS every 10 minutes.
All You Can Eat Menu
All You Can Eat Menu Operation Mode
When enabled, the POS switches to "All You Can Eat Operation Mode." All You Can Eat Menu items will be hidden unless the set All You Can Eat Menu item is added to the order. When disabled, all items including those intended for All You Can Eat Menu only will appear on the order-taking screen. For more information about setting up an All You Can Eat Menu, refer to Create an All You Can Eat Menu.
Enable Time Gap Between Order
When enabled, you can set the duration that customers need to wait before they can order again. You can set the "Time Gap Between Order" to zero if you want the customers to be able to order anytime.
POS Orders Affect Time Gap Calculation
When enabled, the time gap count starts from the last order on the POS. If you don’t want POS orders to trigger the time gap function, turn this setting off.
Time Gap Affects POS
By default, the time gap you set for your All You Can Eat Menu only affects orders placed on Scan to Order and PhotoMenu. When this setting is enabled, the time gap also applies to orders placed on the POS.
Dining Time Calculation
Choose how you want to calculate the start of dining time:
- Seated Time - Allows the system to count the order creation from the POS as the start of dining time.
- Customer Ordering Time - Allows the system to count the first order placed from online applications, such as Scan to Order and PhotoMenu, as the start of dining time.
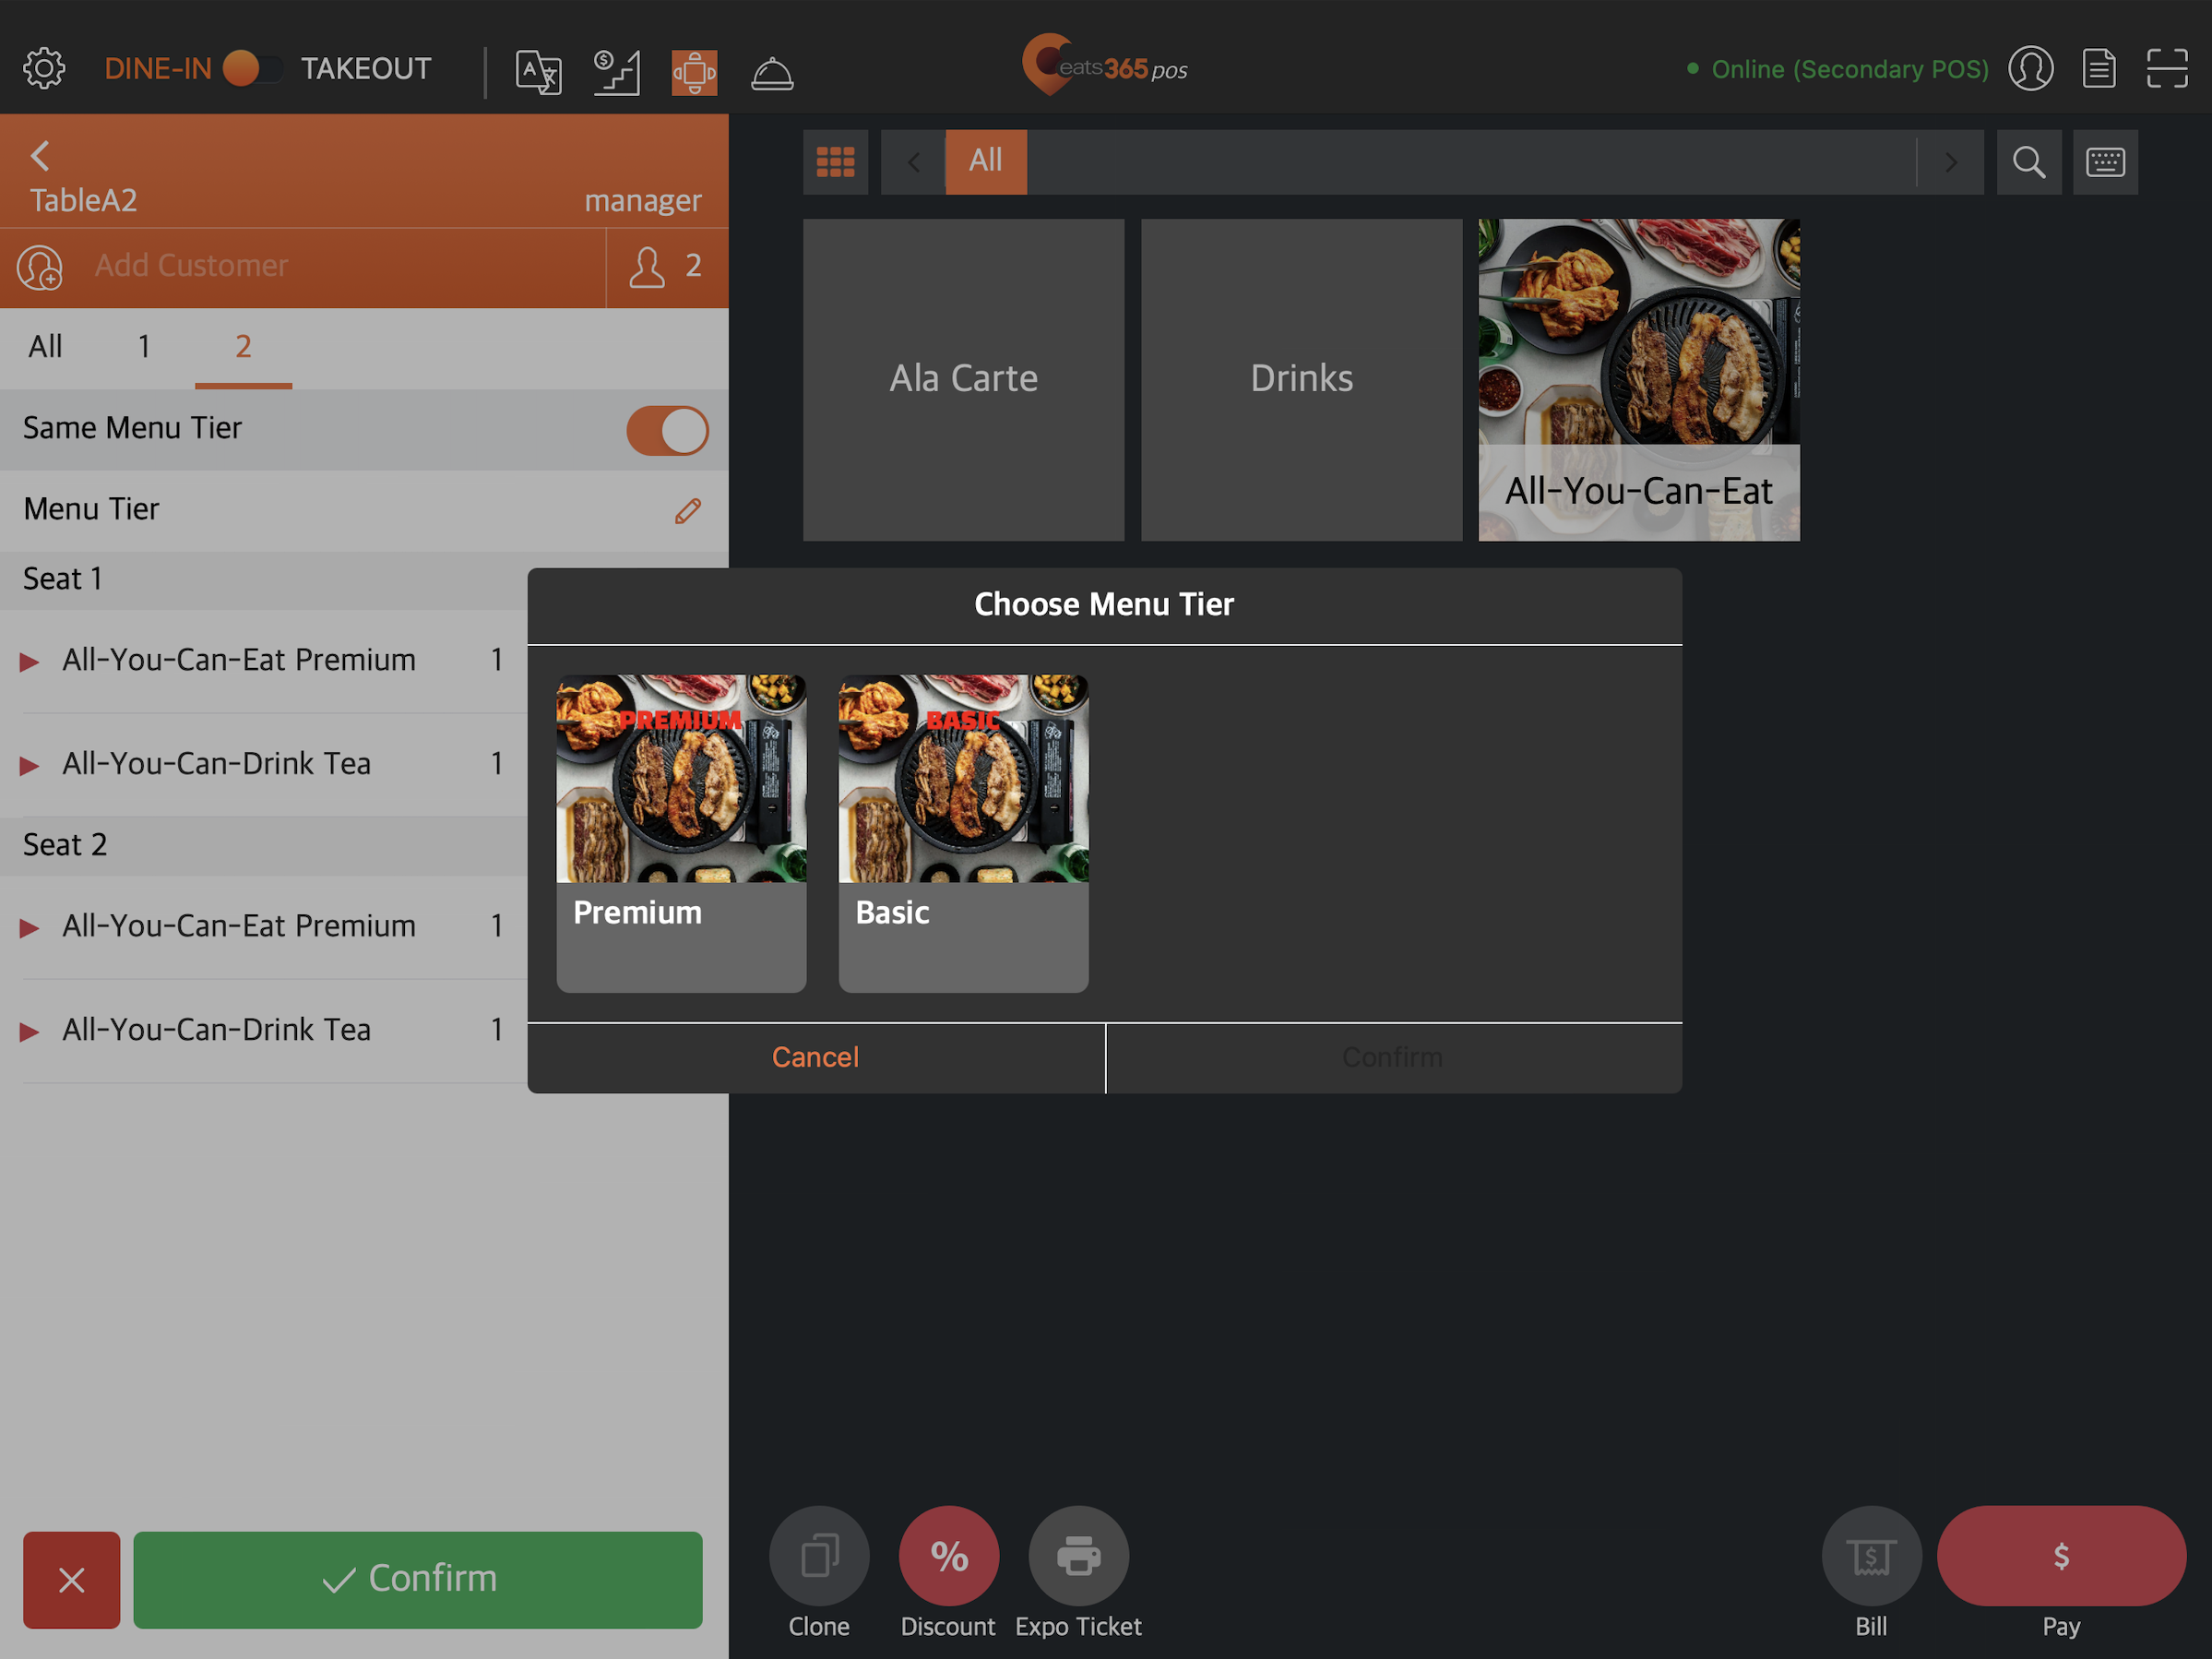
Enforce Same All You Can Eat Menu Tier in Same Order
When enabled, you can choose to restrict customers from ordering All You Can Eat Menu items included in a different tier. If an item isn’t included in the currently selected tier, the POS disables that item.
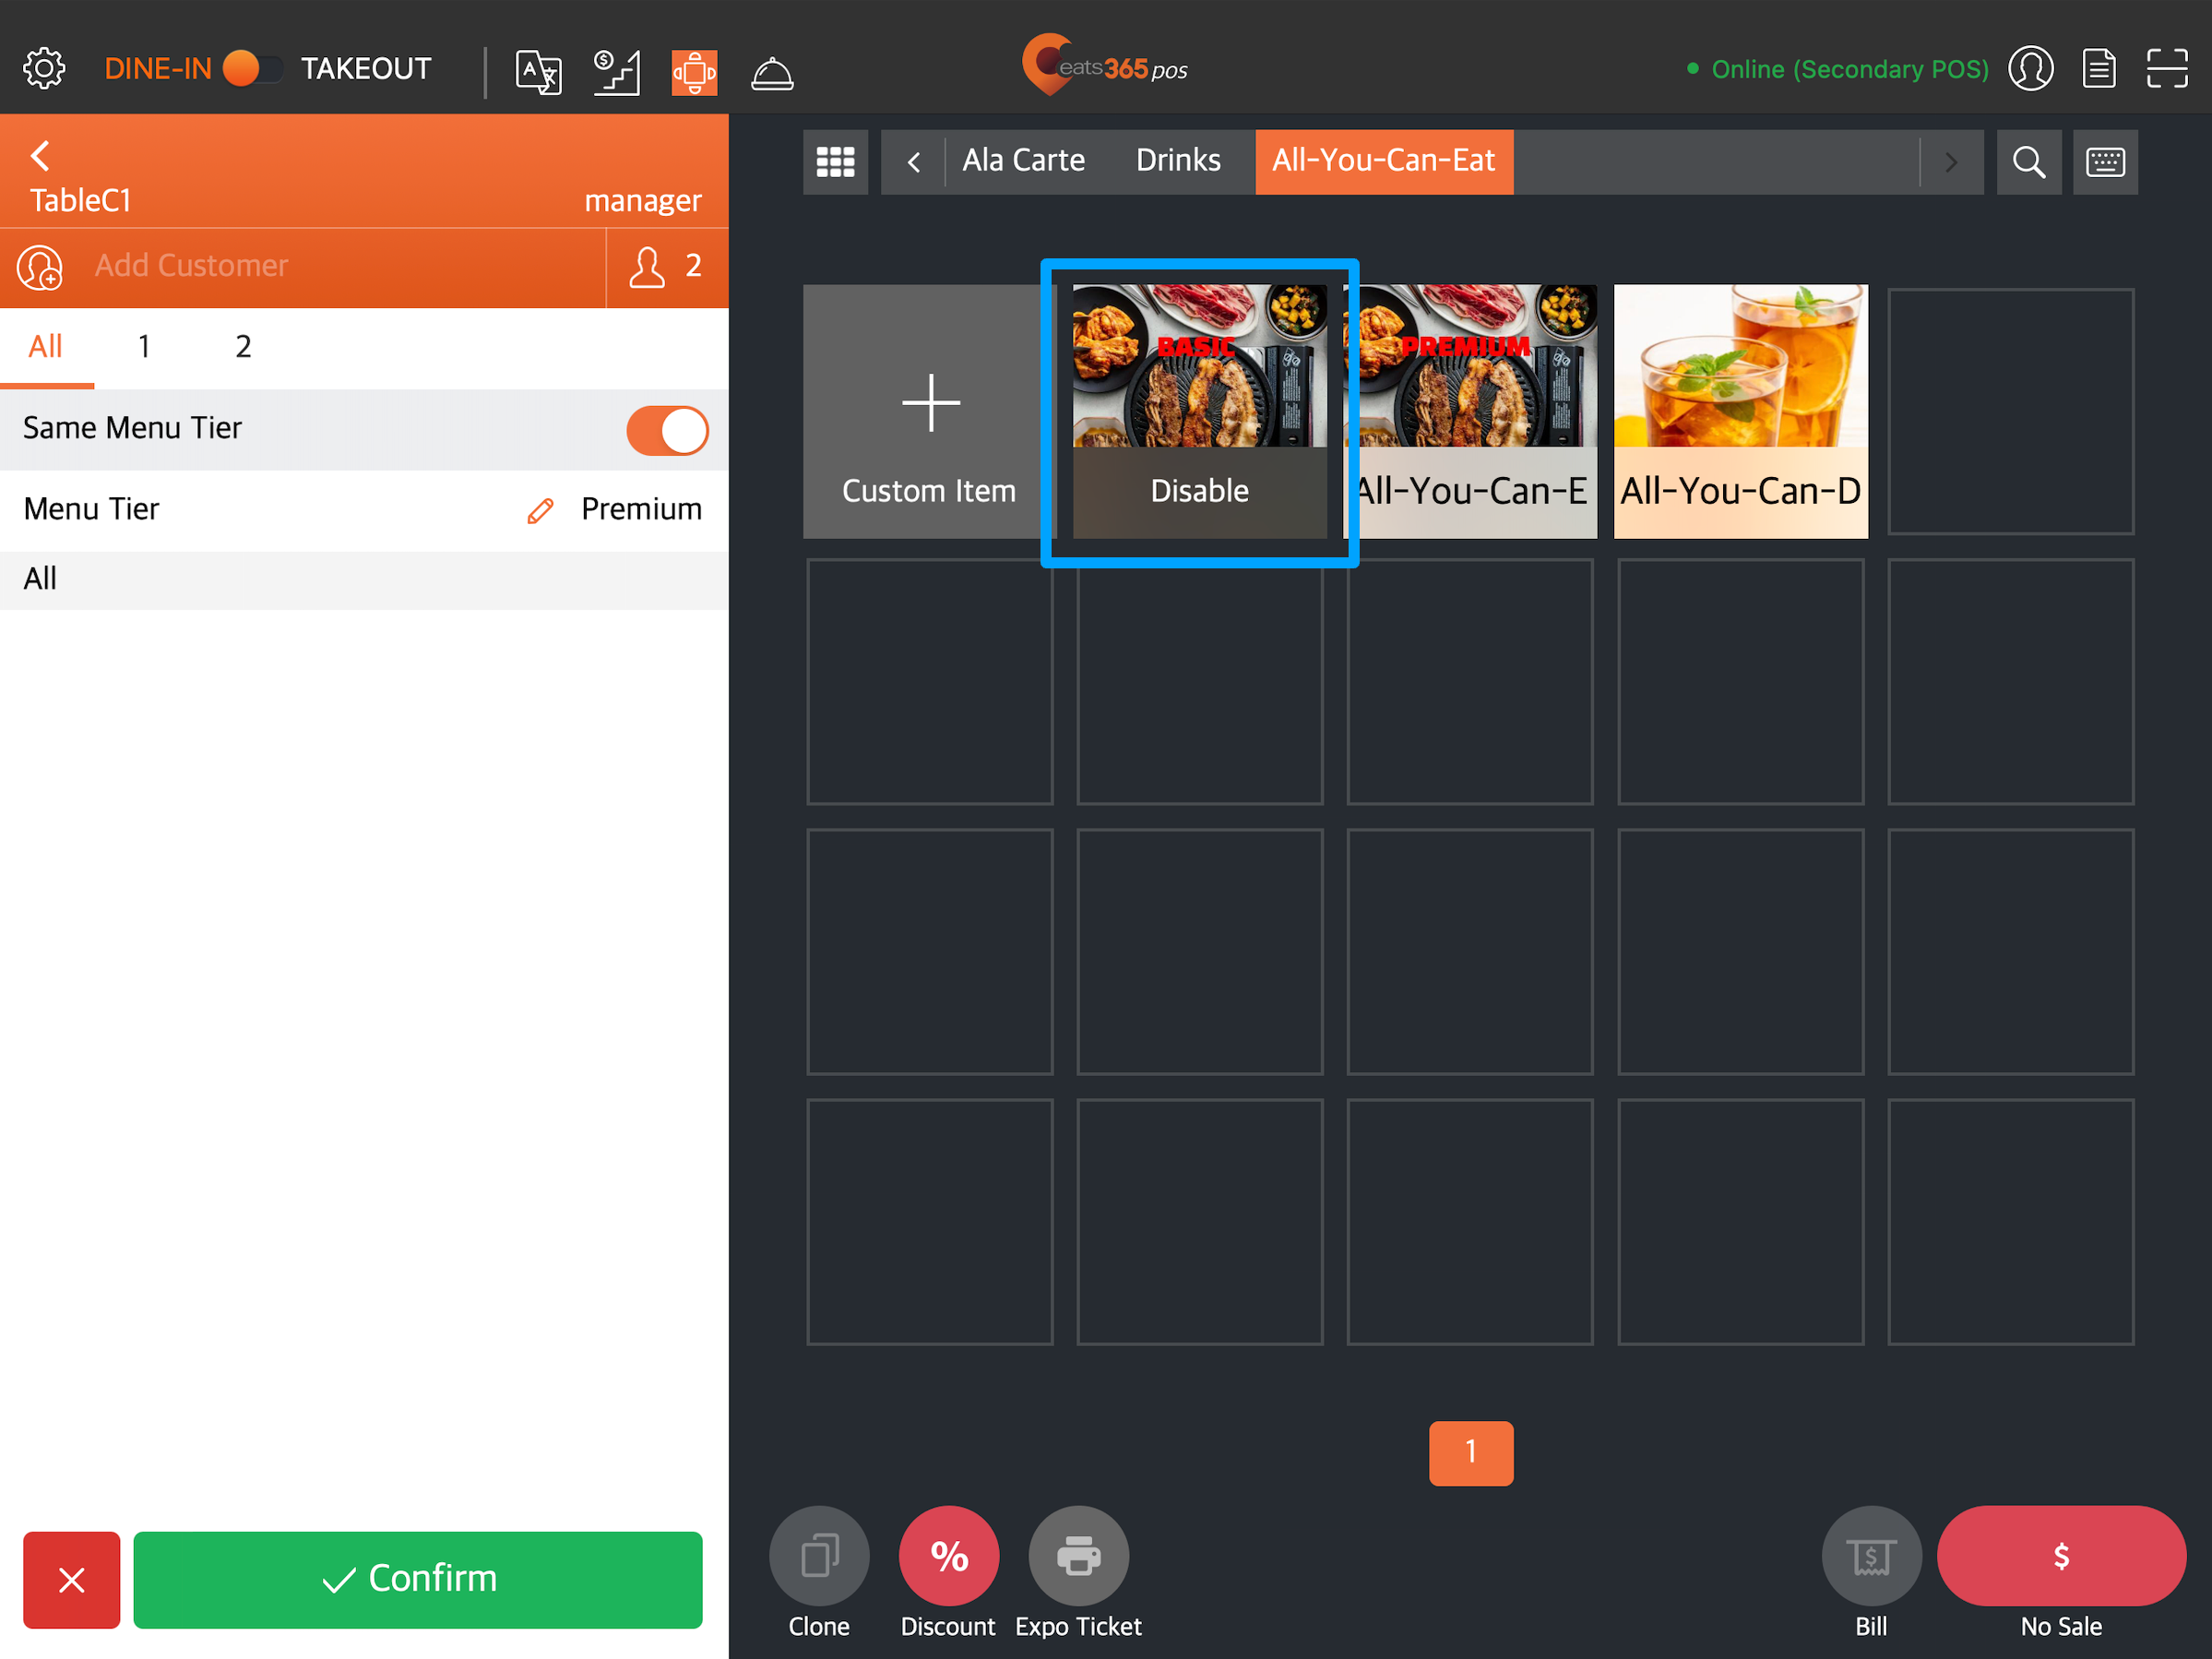
Prompt to Select Menu Tier
When enabled, staff will be prompted to select a tier upon enabling "Same Menu Tier" on the order-taking screen.
User App Settings
Allow User App to Place Dine-In Order
When enabled, users can place dine-in orders from the Eats365 User App.
DeleteMerchant Portal (Classic Theme)
- Log in to the Merchant Portal.
- On the left panel, click on Restaurant Settings. Then, select Dine-In.
- Set up your preferred Dine-In settings.
- At the top right, click on Save to confirm.
Below is the list of settings that you can set up and manage on the Merchant Portal:
General
Overtime Reminder
When enabled, the POS displays a progress bar that provides restaurant staff easy visibility into a table’s turn time progress or the table’s elapsed time, depending on your configured preferences, along with an overtime indicator.
To learn more about Dine-In Overtime Reminder, refer to Configure Dining Time settings.
Suggested Tip
Set a suggested tip amount.
DeleteWorkflow Settings
Order View
Set the default order view.
-
Display by Order - All items will be displayed on the order list.
-
Display by Seat - Items on an order will be displayed after selecting a seat number.
Table Sharing
Enable Table Sharing
When enabled, different groups of customers can share the same table.
Table Sharing Mode
 is enabled.
Set the default Table Sharing mode.
- Share Table - When selected, orders from different customer groups display the same table number on their bill.
- Split Table - When selected, orders from different customer groups display split table numbers on their bill.
Clear Table
Clear Table after Order is Paid
When enabled, the POS automatically clears the table after the order is paid. If this setting is disabled, the table turns green after the order is paid, indicating a clean-up is needed.
![]()
Return Home
Return Home after Payment Processing
When enabled, the POS automatically returns to the Table Map screen after payment. If you turn this setting off, the POS stays at the payment screen so you can perform other actions, like making a tip and printing a receipt.
Order Payment
Require Payment when Placing Order
When enabled, all orders automatically require payment. This setting disables the Confirm button on the POS.
Print Payment QR Code on Bill
When enabled, a QR Code that customers can scan to pay for their order is printed on the bill.
Play Sound Track upon Self Checkout Complete
When enabled, the POS will play a voiced audio alert to let staff know that a particular table has settled their bill using the Self Checkout feature.
Order
Force Enter Party Size
When enabled, you are required to enter a party size in the POS before taking an order.
Auto Add Item
Auto Add Items when Open Check
When enabled, you can set which items will be automatically added. For example, in a bar setting, you could configure the system to include a complimentary bowl of peanuts with every order.
Order Lock
Order Lock allows you to lock an order while an order is being placed or after a bill has been issued to the customer.
Lock Behavior when Issuing Bill
- Ask - A prompt appears on the POS if you want to lock the order after issuing a bill.
- Auto - The order will be automatically locked after issuing a bill.
- No action - Select if you don’t want the order to be locked after issuing a bill.
Lock Order when Placing Order
When enabled, you won’t be able to add items to an order from another POS while an order is being placed.
Enable Lock Order Alert
When enabled, an alert appears to show which orders are locked. You can set the alert to show up after a set period. For example, if you set the Order Lock Alert Time to “10,” the Lock Order Alert will appear on the POS every 10 minutes.
All You Can Eat Menu
All You Can Eat Menu Operation Mode
When enabled, the POS switches to All You Can Eat Operation Mode. All You Can Eat Menu items will be hidden unless the set All You Can Eat Menu Item is added to the order. When disabled, all items including those intended for All You Can Eat Menu only will appear on the order-taking screen. For more information about setting up an All You Can Eat Menu, refer to Create an All You Can Eat Menu.
Enable Time Gap Between Order
When enabled, you can set the duration that customers need to wait before they can order again. You can set the Time Gap Between Order to zero if you want the customers to be able to order anytime.
POS Orders Affect Time Gap Calculation
When enabled, the Time Gap count starts from the last order on the POS. If you don’t want POS orders to trigger the Time Gap function, turn this setting off.
Time Gap Affects POS
By default, the Time Gap you set for your All You Can Eat Menu only affects orders placed on Scan to Order and PhotoMenu. When this setting is enabled, the Time Gap also applies to orders placed on the POS.
Dining Time Calculation
Choose how you want to calculate the start of dining time:
- Order Creation Time / Seated Time - allows you to count order creation time as the start of dining time.
- First Order from Online Applications except POS & mPOS - allows you to count the first order placed from online applications, such as Scan to Order and PhotoMenu, as the start of dining time.
Scan to Order
For information on how to configure scan to order settings, refer to Configure Scan to Order settings (Full Service).
DeleteMerchant Portal 2.0
- Log in to the Merchant Portal.
- On the left panel, click on Restaurant Settings.
- Click on Dine-In. Then, select the Dine-In setting that you want to access.
Note: A drop-down list shows the three main settings you can configure which include "General," "Workflow," and "Scan to Order." - Set up your preferred Dine-In settings.
- At the top right, click on Save to confirm.
Below is the list of settings that you can set up and manage on the Merchant Portal:
General
Overtime Reminder
When enabled, the POS displays a progress bar that provides restaurant staff easy visibility into a table’s turn time progress or the table’s elapsed time, depending on your configured preferences, along with an overtime indicator.
To learn more about Dine-In Overtime Reminder, refer to Configure Dining Time settings.
Suggested Tip
Set a suggested tip amount.
DeleteWorkflow Settings
Order View
Set the default order view.
-
Display by Order - All items will be displayed on the order list.
-
Display by Seat - Items on an order will be displayed after selecting a seat number.
Table Sharing
Enable Table Sharing
When enabled, different groups of customers can share the same table.
Table Sharing Mode
Set the default Table Sharing mode.
- Share Table - When selected, orders from different customer groups display the same table number on their bill.
- Split Table - When selected, orders from different customer groups display split table numbers on their bill.
Clear Table
Clear Table after Order is Paid
When enabled, the POS automatically clears the table after the order is paid. If this setting is disabled, the table turns green after the order is paid, indicating a clean-up is needed.
![]()
Return Home
Return Home after Payment Processing
When enabled, the POS automatically returns to the Table Map screen after payment. If you turn the setting off, the POS stays at the payment screen so you can perform other actions, like making a tip and printing a receipt.
Order Payment
Require Payment when Placing Order
When enabled, all orders automatically require payment. This setting disables the Confirm button on the POS.
Print Payment QR Code on Bill
When enabled, a QR Code that customers can scan to pay for their order is printed on the bill.
Play Sound Track upon Self Checkout Complete
When enabled, the POS will play a voiced audio alert to let staff know that a particular table has settled their bill using the Self Checkout feature.
Others
Prompt for Party Size Input
When enabled, you are required to enter a party size in the POS before taking an order.
Auto Add Item
Auto Add Items when Open Check
When enabled, you can set which items will be automatically added to every open check. For example, in a bar setting, you could configure the system to include a complimentary bowl of peanuts with every order.
Lock Order
"Lock Order" allows you to lock an order while an order is being placed or after a bill has been issued to the customer.
When Printing Bill
- Ask to Lock Order - A prompt appears on the POS if you want to lock the order after issuing a bill.
- Auto Lock Order- The order will be automatically locked after issuing a bill.
- Take No Action - Select if you don’t want the order to be locked after issuing a bill.
Lock Order when Placing Order
When enabled, you won’t be able to add items to an order from another POS while an order is being placed.
Enable Lock Order Alert
When enabled, an alert appears to show which orders are locked. You can set the alert to show up after a set period. For example, if you set the "Order Lock Alert Time" to “10,” the lock order alert will appear on the POS every 10 minutes.
All You Can Eat Menu
All You Can Eat Menu Operation Mode
When enabled, the POS switches to "All You Can Eat Operation Mode." All You Can Eat Menu items will be hidden unless the set All You Can Eat Menu Item is added to the order. When disabled, all items including those intended for All You Can Eat Menu only will appear on the order-taking screen. For more information about setting up an All You Can Eat Menu, refer to Create an All You Can Eat Menu.
Enable Time Gap Between Order
When enabled, you can set the duration that customers need to wait before they can order again. You can set the "Time Gap Between Order" to zero if you want the customers to be able to order anytime.
POS Orders Affect Time Gap Calculation
When enabled, the time gap count starts from the last order on the POS. If you don’t want POS orders to trigger the time gap function, turn this setting off.
Time Gap Affects POS
By default, the time gap you set for your All You Can Eat Menu only affects orders placed on Scan to Order. When this setting is enabled, the time gap also applies to orders placed on the POS.
Dining Time Calculation
Choose how you want to calculate the start of dining time:
- Order Creation Time - Allows the system to count the order creation from the POS as the start of dining time.
- First Online Ordering Time - Allows the system to count the first order placed from online applications, such as Scan to Order or PhotoMenu, as the start of dining time.
Enforce Same All You Can Eat Menu Tier in Same Order
When enabled, you can choose to restrict customers from ordering All You Can Eat Menu items included in a different tier. If an item isn’t included in the currently selected tier, the POS disables that item.
Prompt to Select Menu Tier
When enabled, staff will be prompted to select a tier upon enabling "Same Menu Tier" on the order-taking screen.
Scan to Order
For information on how to configure scan to order settings, refer to Configure Scan to Order settings (Full Service).