Eats365 Products
 Merchant Guide
 Modules
 Membership
 Integrations
 Hardware
 Staff Operations
 Roles & Permissions
 Payments
 Reports
 What’s New
 Release Notes
 Troubleshooting
 Simulators
 Glossary
 Troubleshooter
 System Status
Menu Setup
Table of Contents
Set up and manage Product and Sub Product Type
Learn how to create and manage Product Types and Sub Product Types to classify items on the Eats365 POS or the Merchant Portal.
Product Type allows you to define the type of item that you add to your menu. Assigning a Product Type helps identify what classification the item belongs to.
Sub Product Type allows you to add another item type layer that you can add to your menu. Adding a Sub Product Type helps create multiple classifications for a particular Product Type in your menu.
In this article, you’ll learn how to create, edit, and delete a Product Type and Sub Product Type.
Add a Product Type
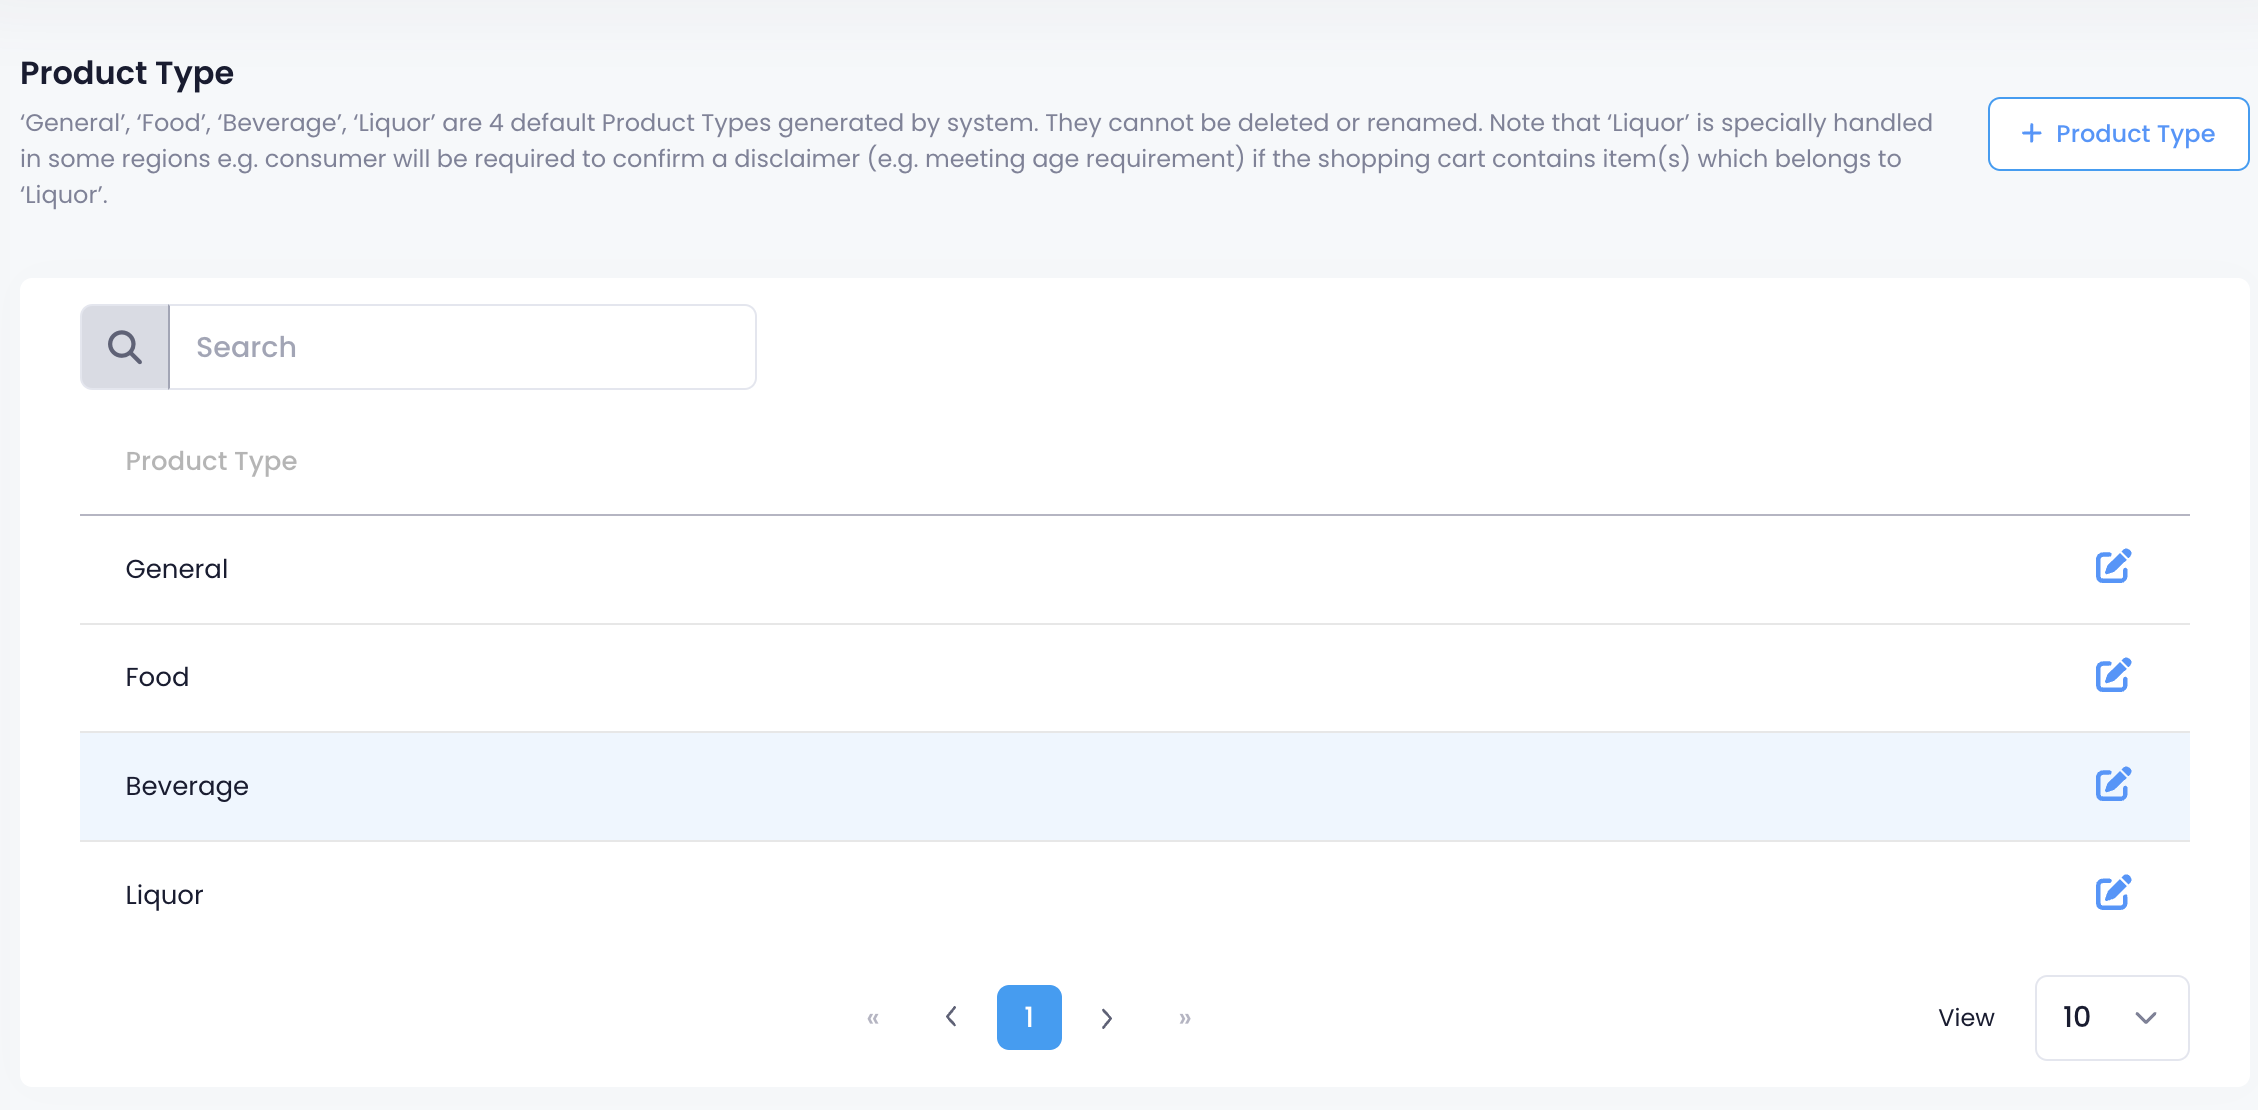
By default, there are four Product Type presets that you can choose from in Eats365 POS, namely: General, Food, Beverage, and Liquor.
To create a Product Type, follow the steps below:
Eats365 POS
- Log in to the Eats365 POS.
- At the top left, tap Settings
 .
. - Under General, tap Menu Setup, then select Product Type.
- At the top right, tap Add Product Type.

- Select the Product Type language.
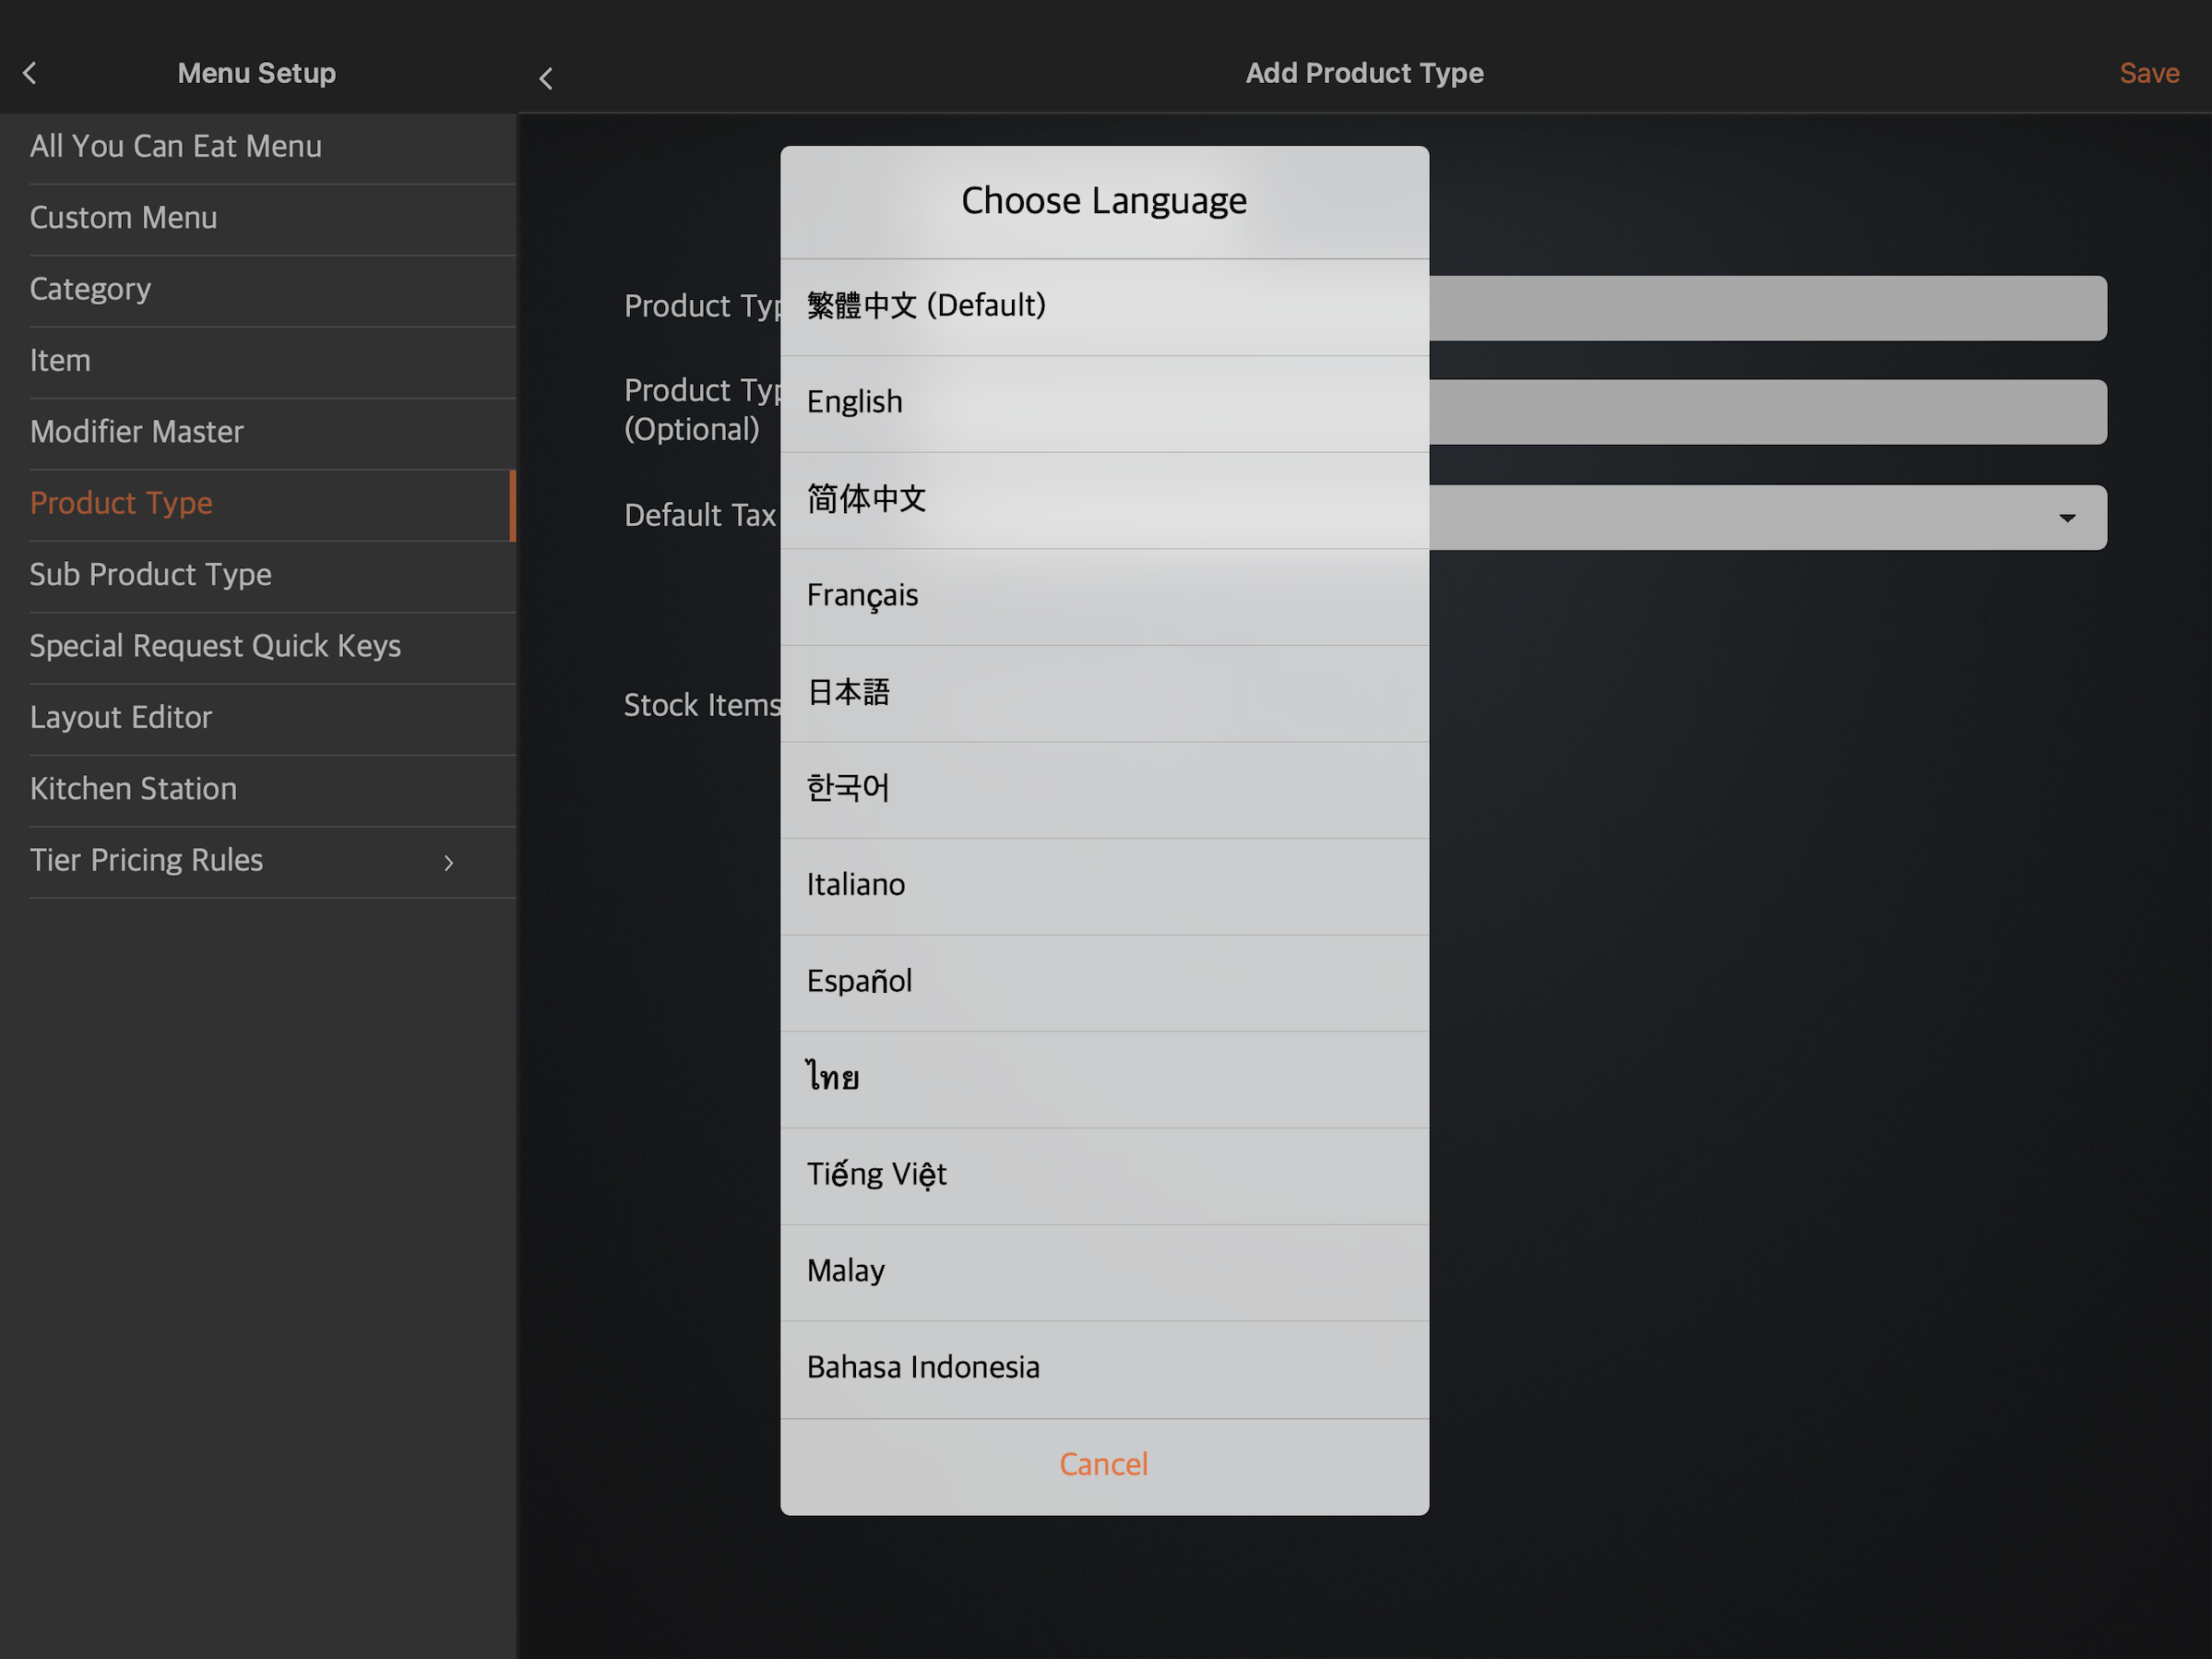 Note: You must enter a default name for the Product Type. The name becomes available in whatever language the POS app is using. For multi-language menus, after selecting a default language, tap the language drop-down list and select your preferred language. Then, enter the alternate name in that language.
 - Enter your preferred Product Type Name, Product Type Code (Optional), and the Default Tax Group, if applicable.
Note: The "Product Type Code" is a unique identifier that allows third-party integration partners to recognize and map an item's assigned Product Type within their own systems. - At the top right, tap Save to confirm.
Merchant Portal (Classic Theme)
- Log in to the Merchant Portal.
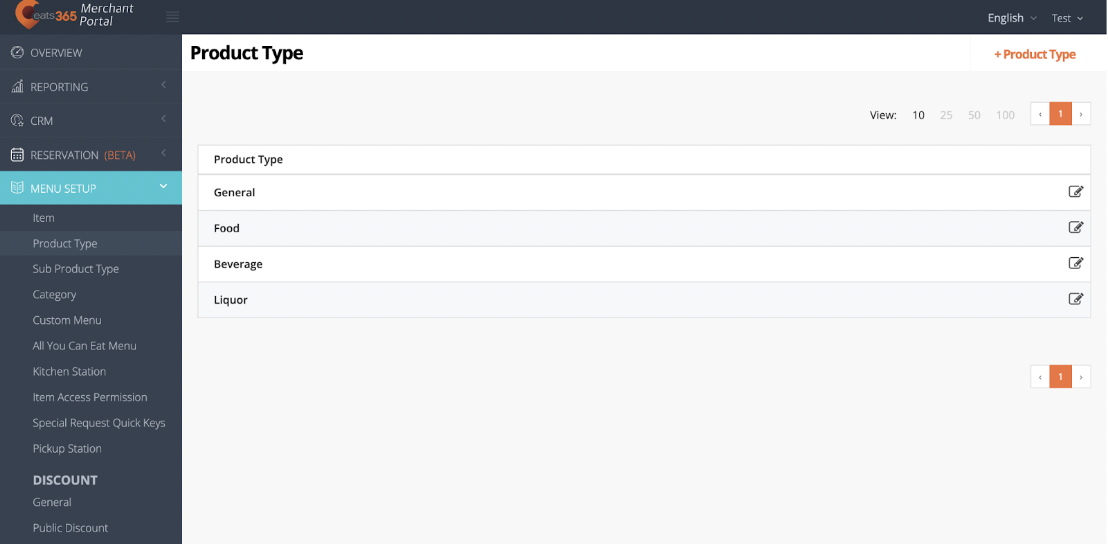
- On the left panel, click on Menu Setup. Then, select Product Type.
- At the top right, click on +Product Type.
- Select the Product Type language.
 Note: You must enter a default name for the Product Type. The name becomes available in whatever language the POS app is using. For multi-language menus, after selecting a default language, tap the language drop-down list and select your preferred language. Then, enter the alternate name in that language.
 - Enter your preferred Product Type Name, Product Type Code, and the Default Tax Group, if applicable.
Note: The "Product Type Code" is a unique identifier that allows third-party integration partners to recognize and map an item's assigned Product Type within their own systems. - Click on Save to confirm.
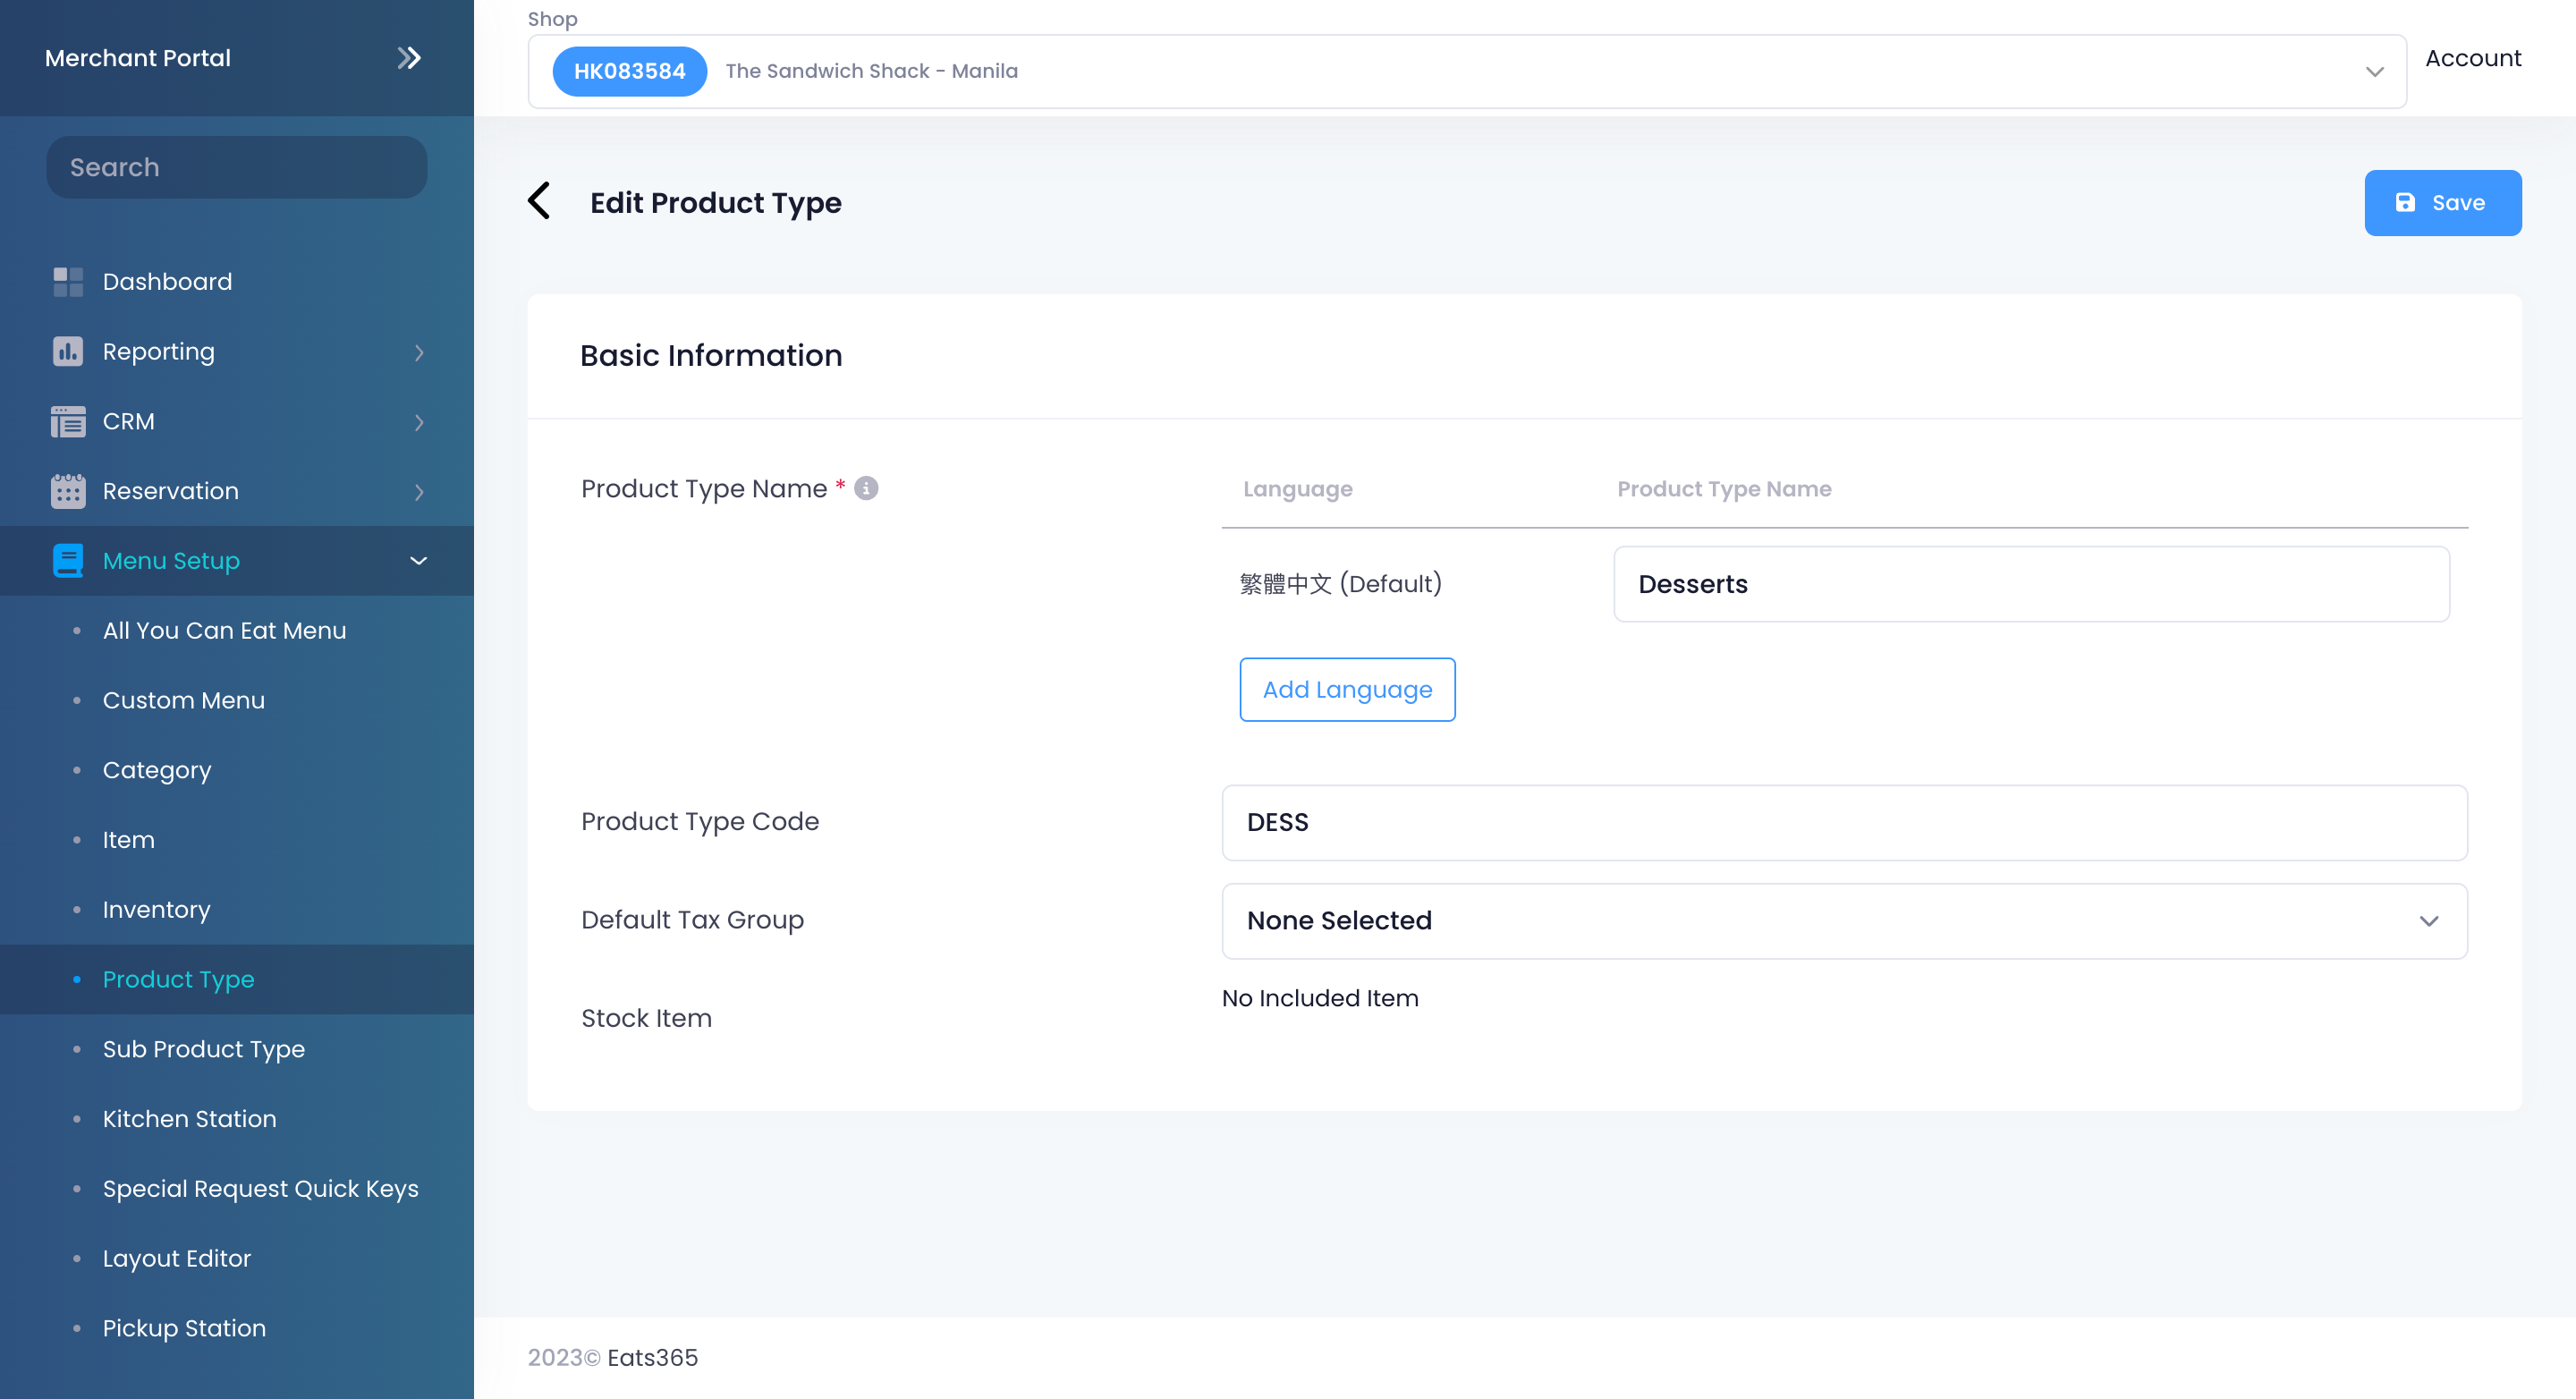
Merchant Portal 2.0
- Log in to the Merchant Portal.
- On the left panel, click on Menu Setup. Then, select Product Type.
- At the top right, click on +Product Type.
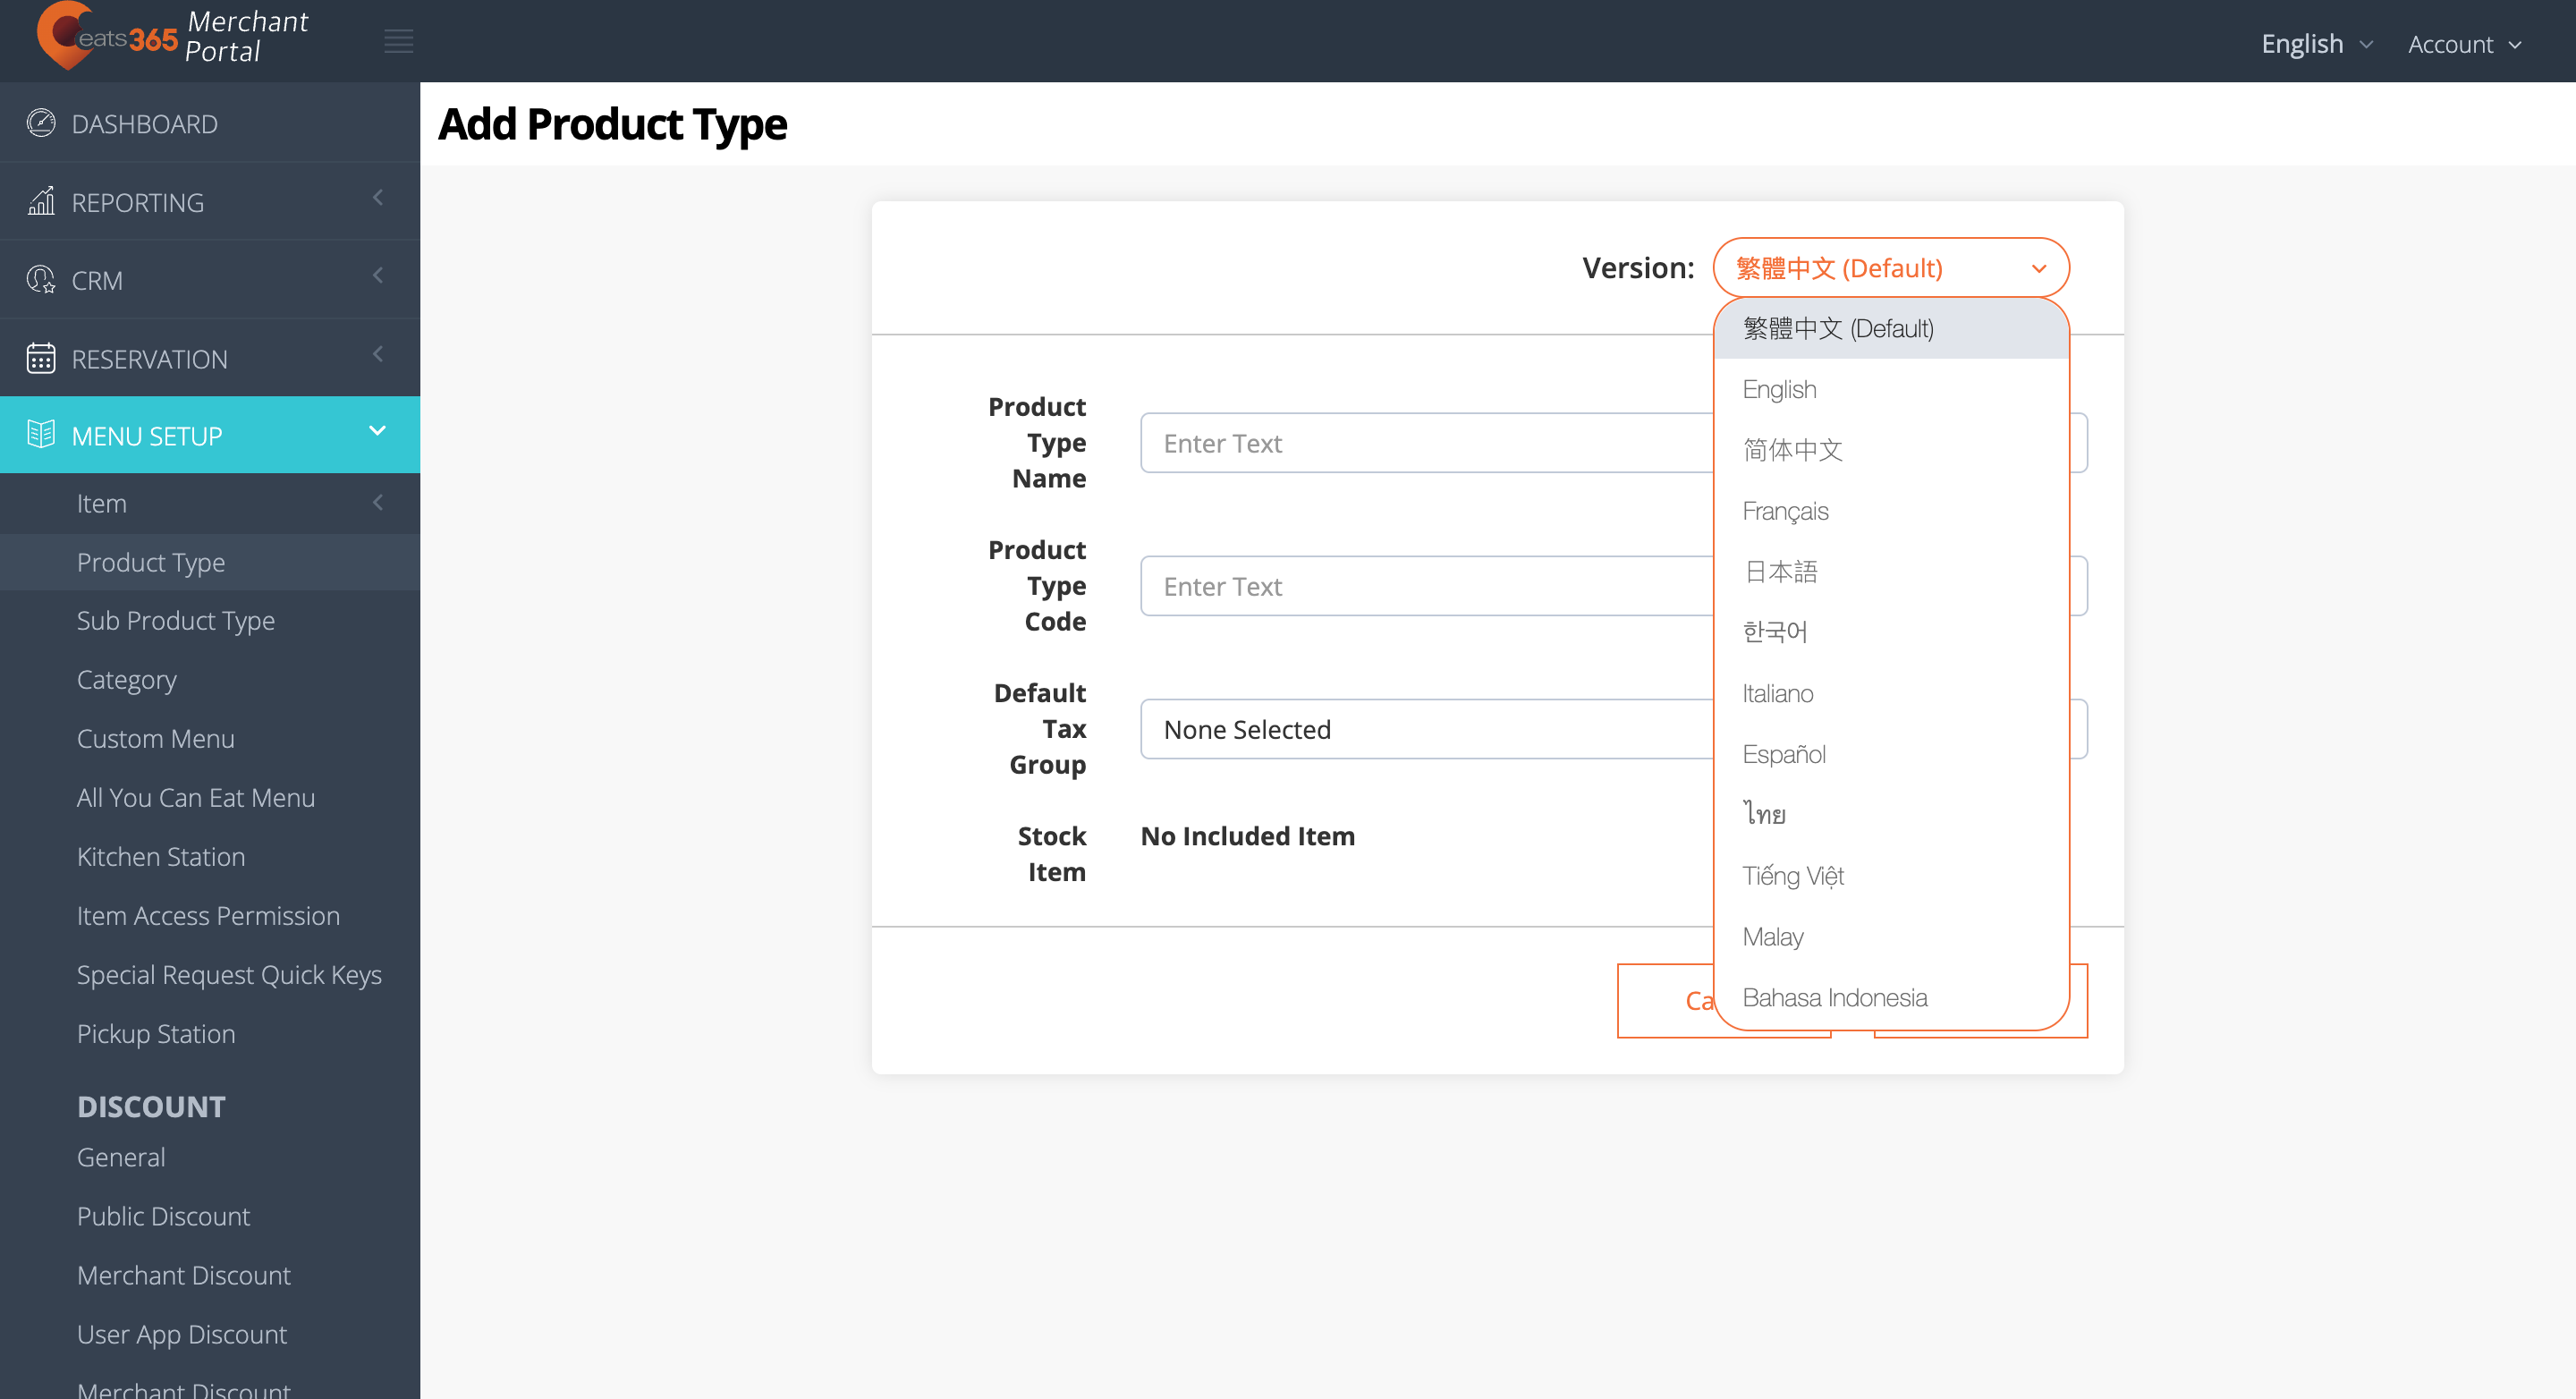
- Enter the Product Type Name per language.
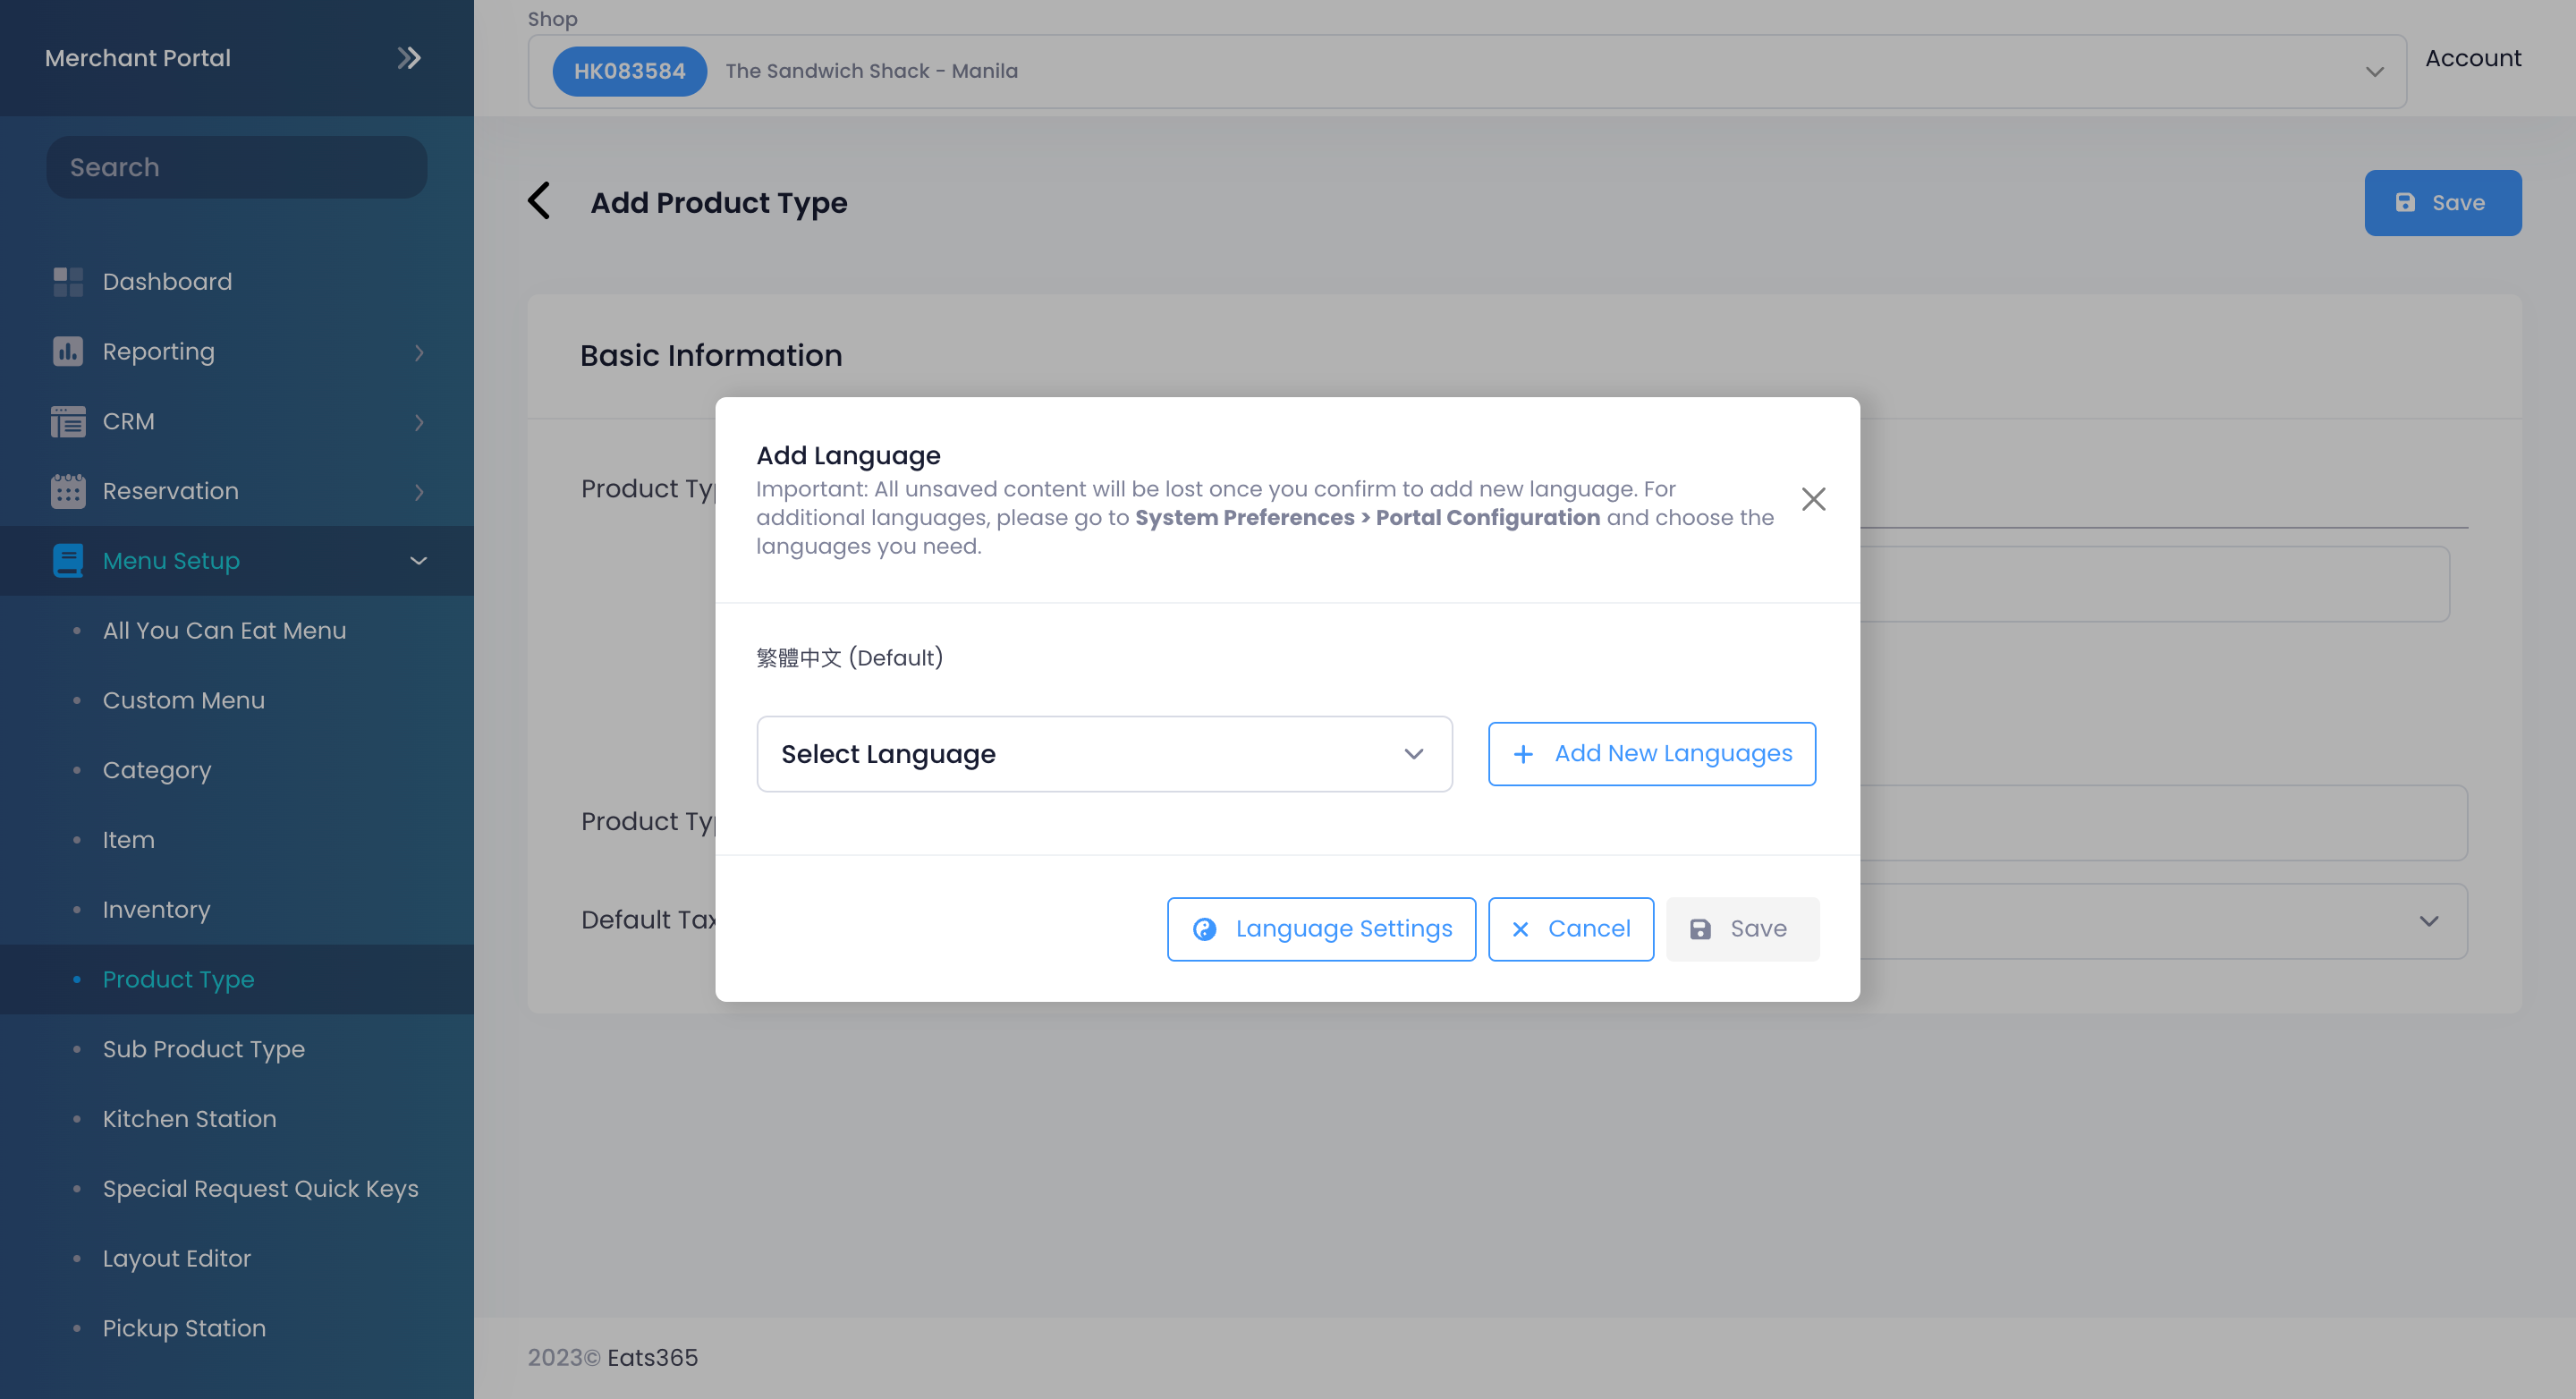 Note: You must enter a default name for the Product Type. The name becomes available in whatever language the POS app is using. To add more languages, click on Add Language.
 - Enter the Product Type Code and the Default Tax Group, if applicable.
Note: The "Product Type Code" is a unique identifier that allows third-party integration partners to recognize and map an item's assigned Product Type within their own systems. - Click on Save to confirm.
Manage a Product Type
Edit a Product Type
To modify a Product Type, follow the steps below:
Eats365 POS
- Log in to the Eats365 POS.
- At the top left, tap Settings .
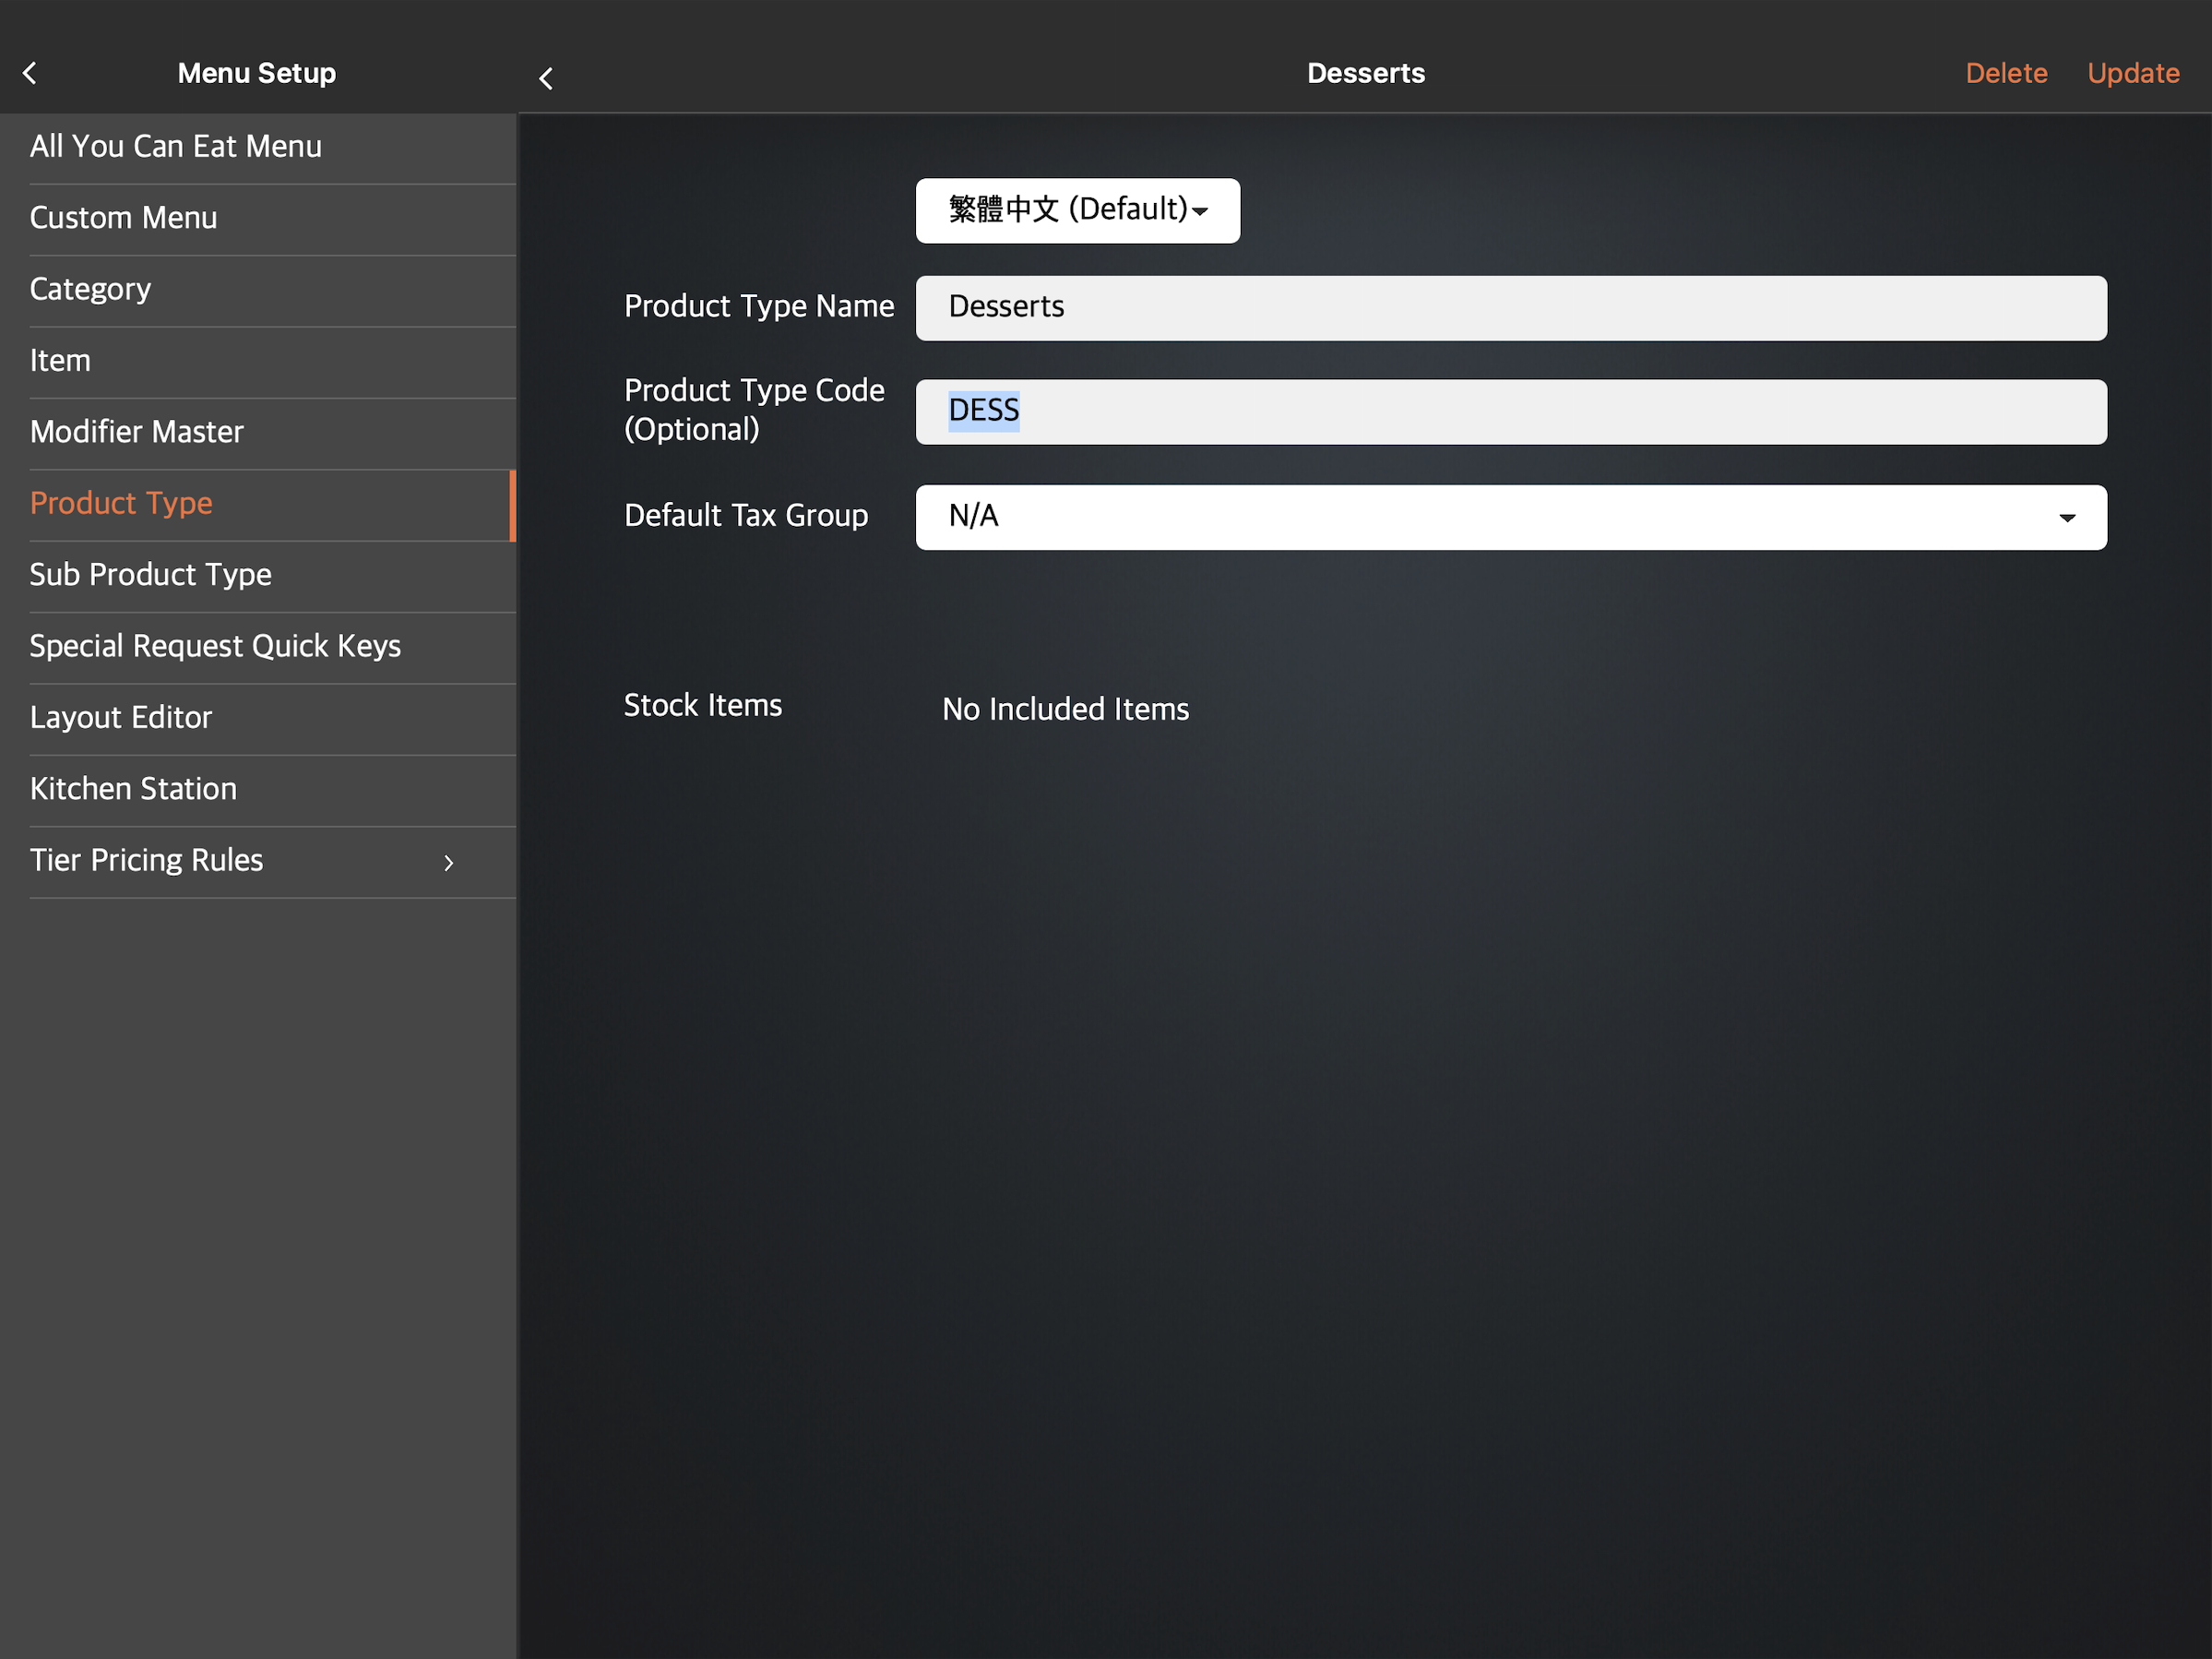
- Under General, tap Menu Setup, then select Product Type.
- Tap the Product Type that you want to edit. You can also tap the three-dots menu
 , then tap Edit
  .
. - Update the Product Type Name, Product Type Code (Optional), and the Default Tax Group.
Note: The "Product Type Code" is a unique identifier that allows third-party integration partners to recognize and map an item's assigned Product Type within their own systems. - At the top right, tap Update to confirm.
Merchant Portal (Classic Theme)
- Log in to the Merchant Portal.
- On the left panel, click on Menu Setup. Then, select Product Type.
- Next to the Product Type that you want to edit, click on the Edit .
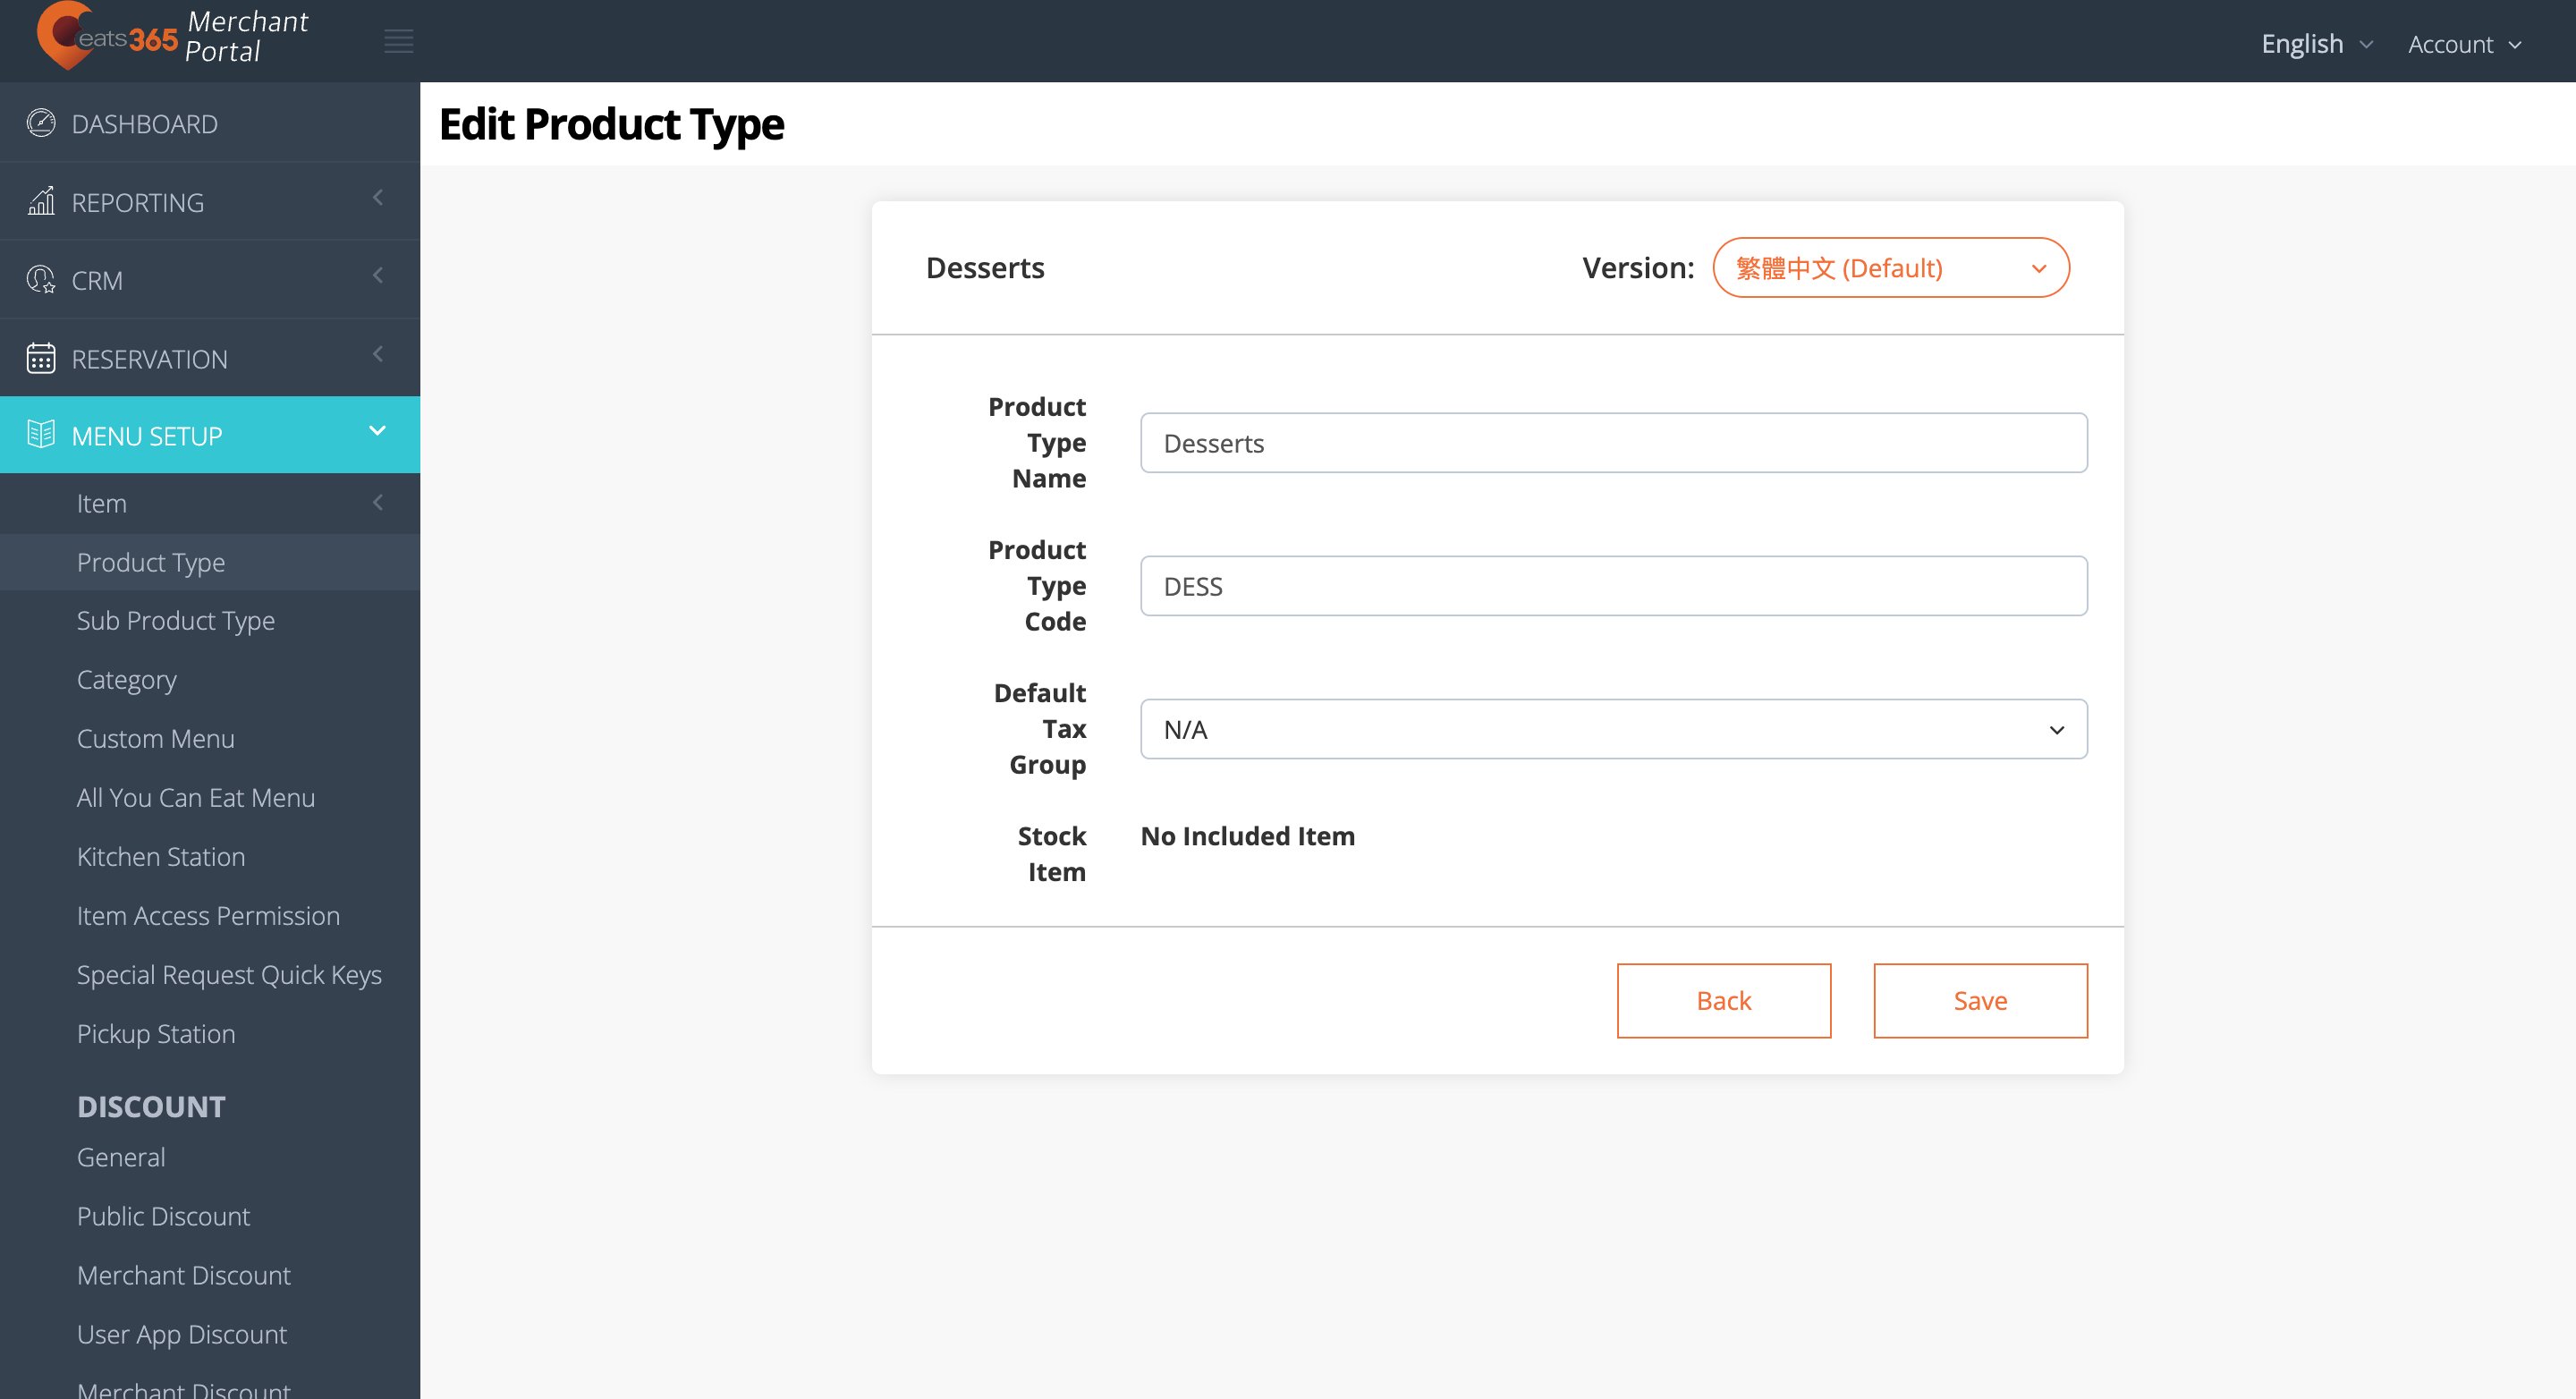
- Update the Product Type Name, Product Type Code, and the Default Tax Group.
Note: The "Product Type Code" is a unique identifier that allows third-party integration partners to recognize and map an item's assigned Product Type within their own systems. - Click on Save to confirm.
Merchant Portal 2.0
- Log in to the Merchant Portal.
- On the left panel, click on Menu Setup, Then, select Product Type.
- Next to the Product Type that you want to edit, click on Edit
 .
. - Update the Product Type Name, Product Type Code, and the Default Tax Group.
Note: The "Product Type Code" is a unique identifier that allows third-party integration partners to recognize and map an item's assigned Product Type within their own systems. - Click on Save to confirm.
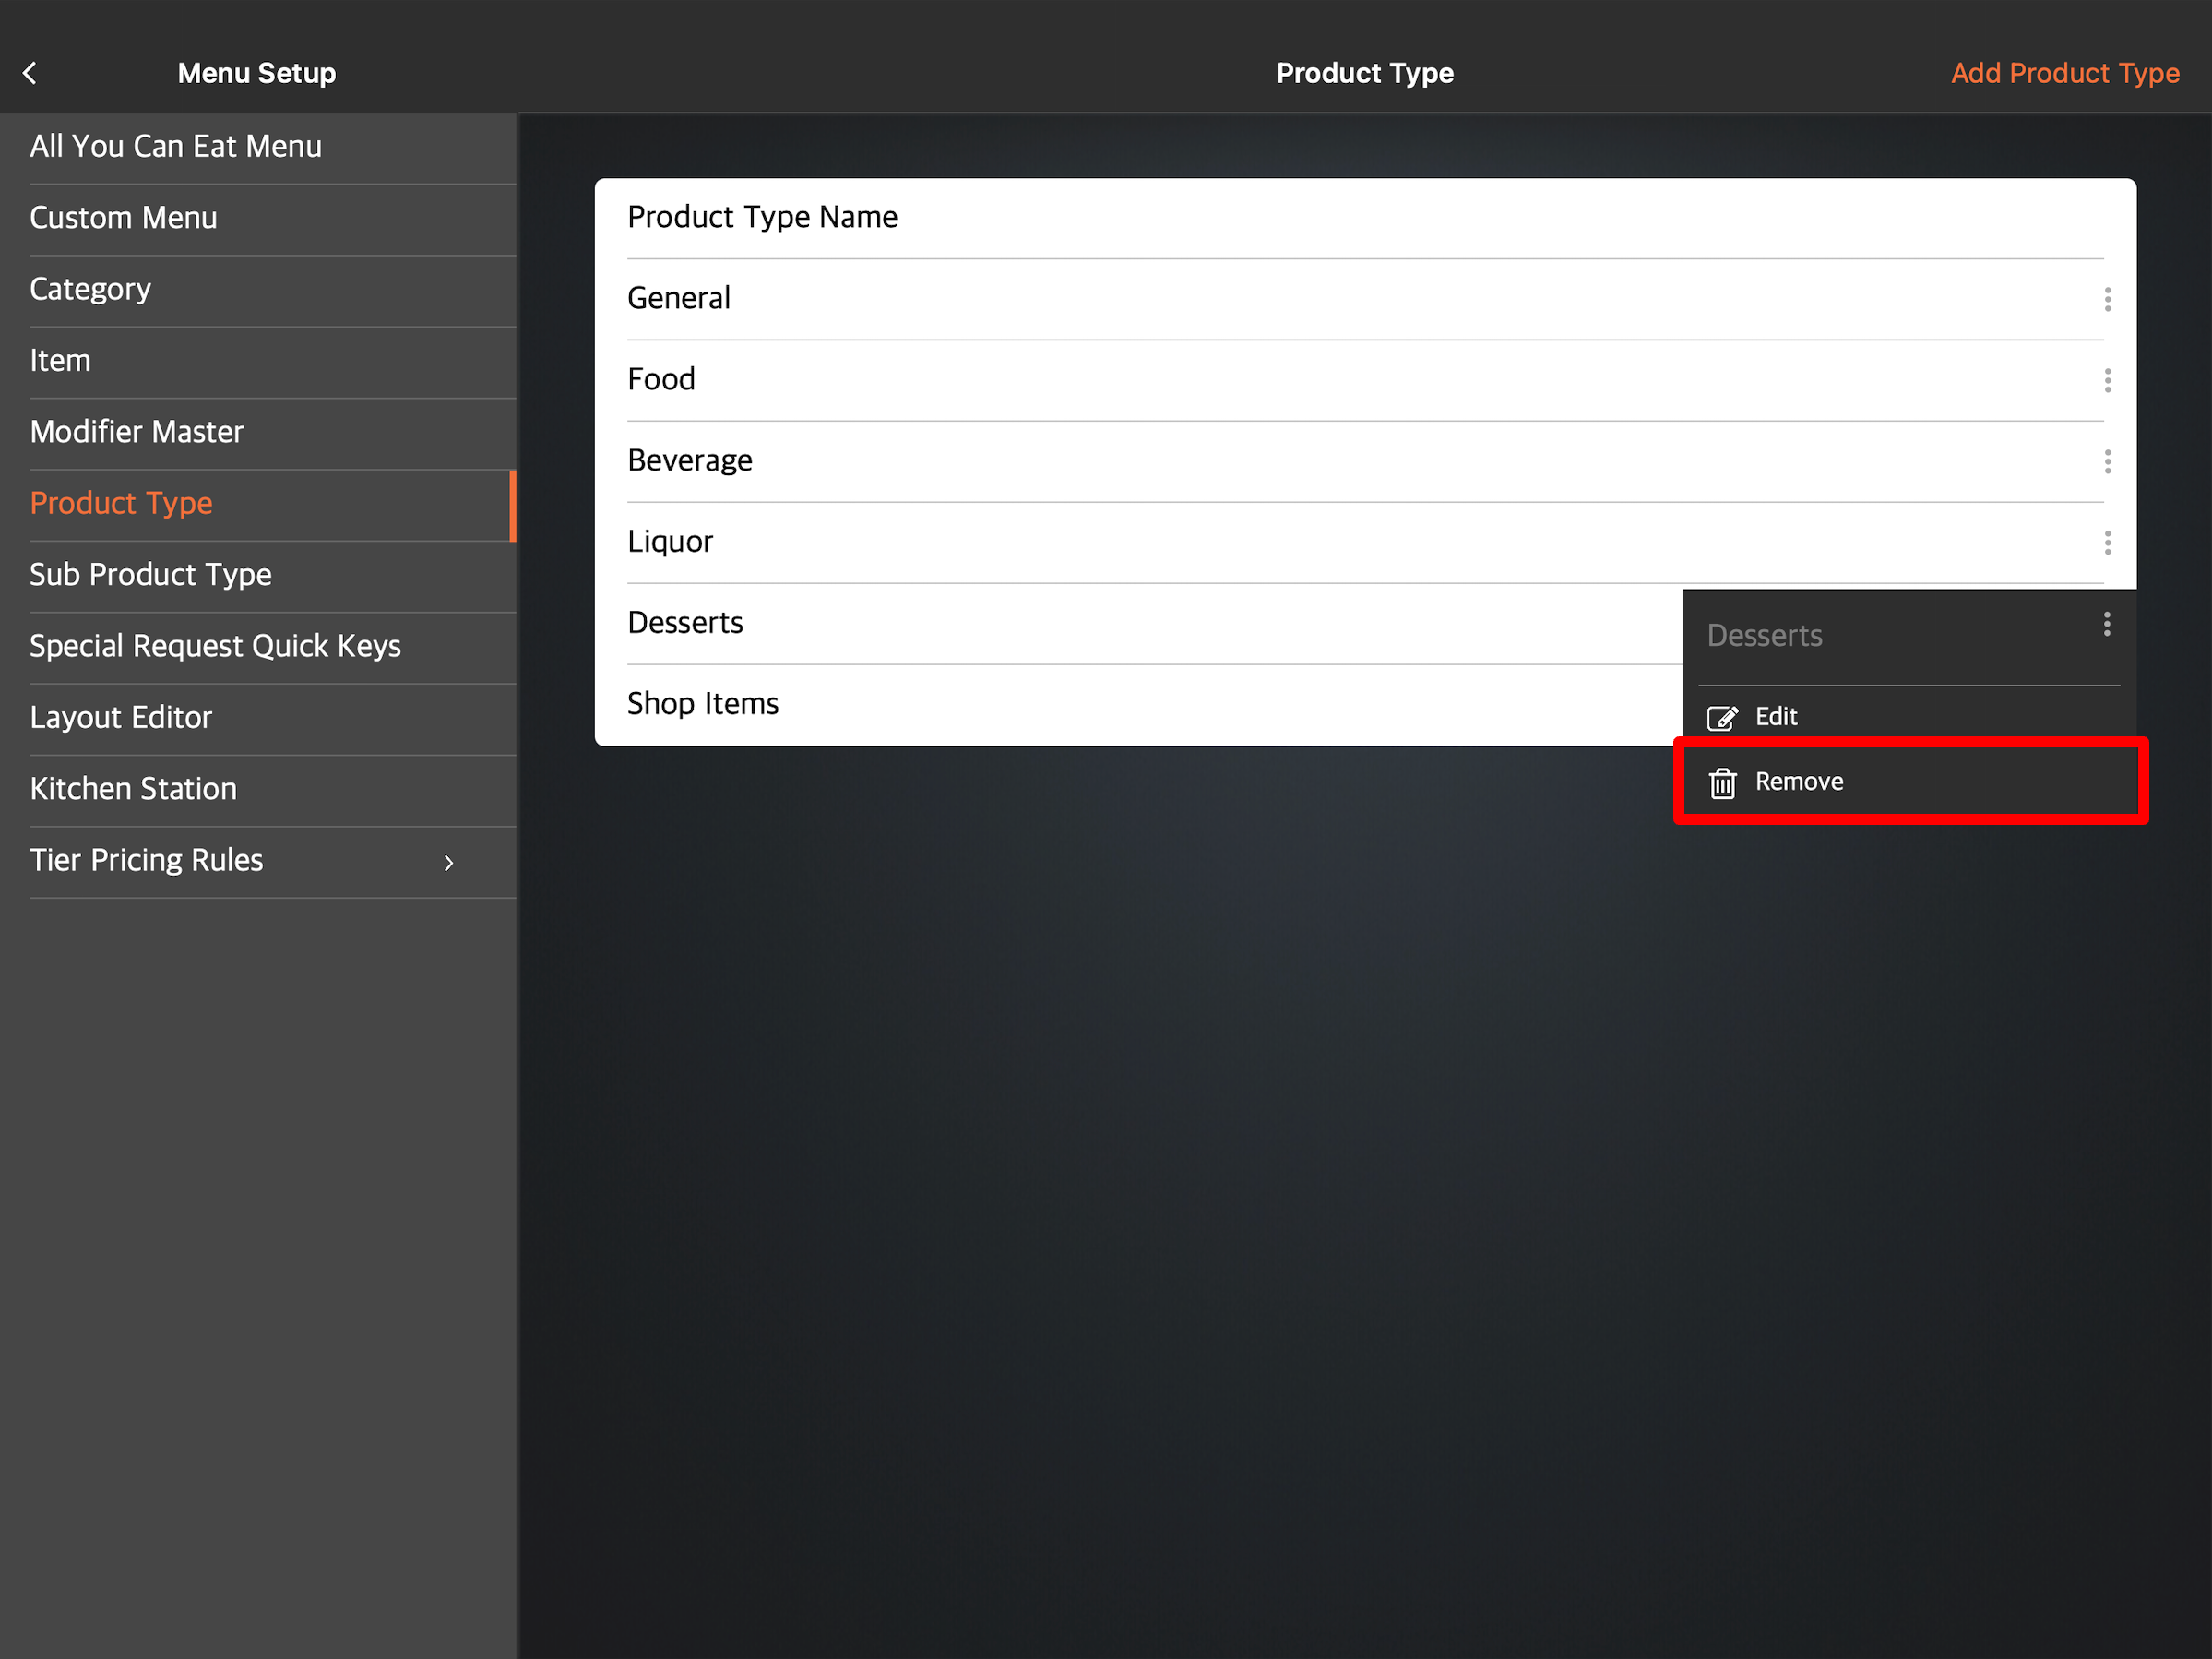
Delete a Product Type
To remove a Product Type, follow the steps below:
Eats365 POS
- Log in to the Eats365 POS.
- At the top left, tap Settings .
- Under General, tap Menu Setup, then select Product Type.
- There are two ways to delete a Product Type:
- Tap the Product Type that you want to delete, then at the top right, tap Delete. A prompt appears to confirm if you want to delete the Product Type.
- Next to the Product Type that you want to delete, tap the three-dots menu, then tap Remove. A prompt appears to confirm if you want to delete the Product Type.
- Tap Delete to confirm.
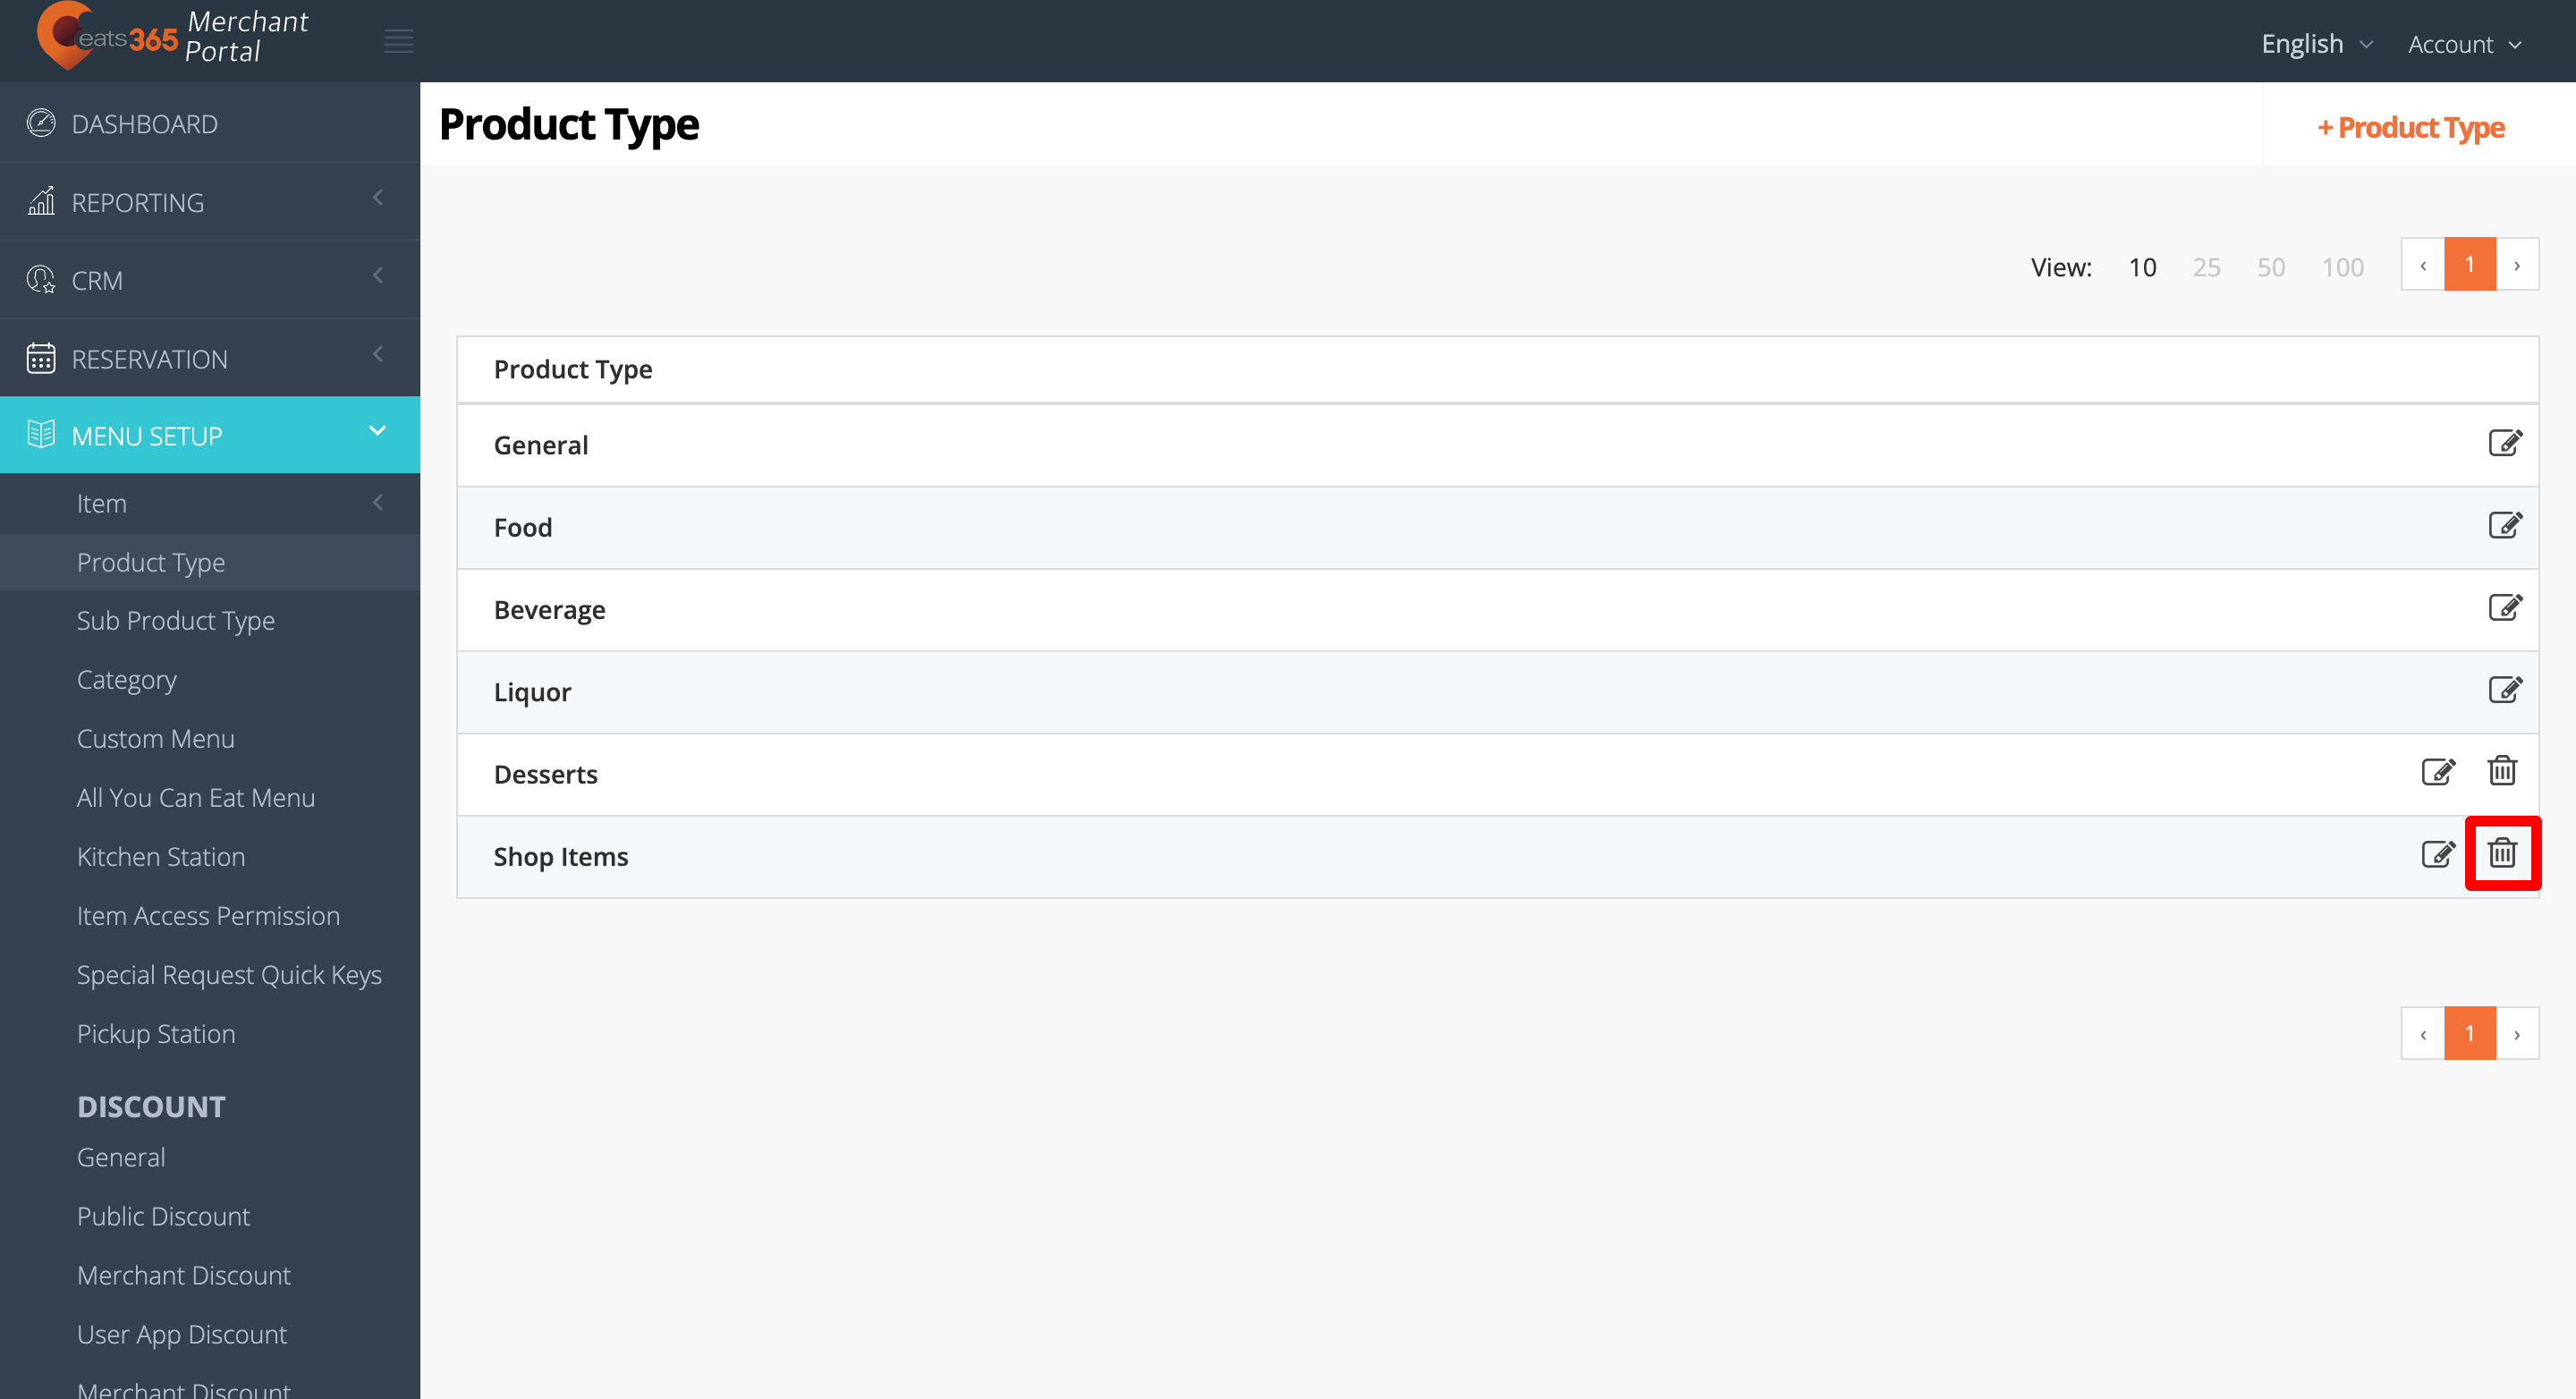
Merchant Portal (Classic Theme)
- Log in to the Merchant Portal.
- On the left panel, click on Menu Setup. Then, select Product Type.
- Next to the Product Type that you want to delete, click on Delete
 . Then, click on Confirm.
Note: Preset Product Types won’t have the delete icon next to them.
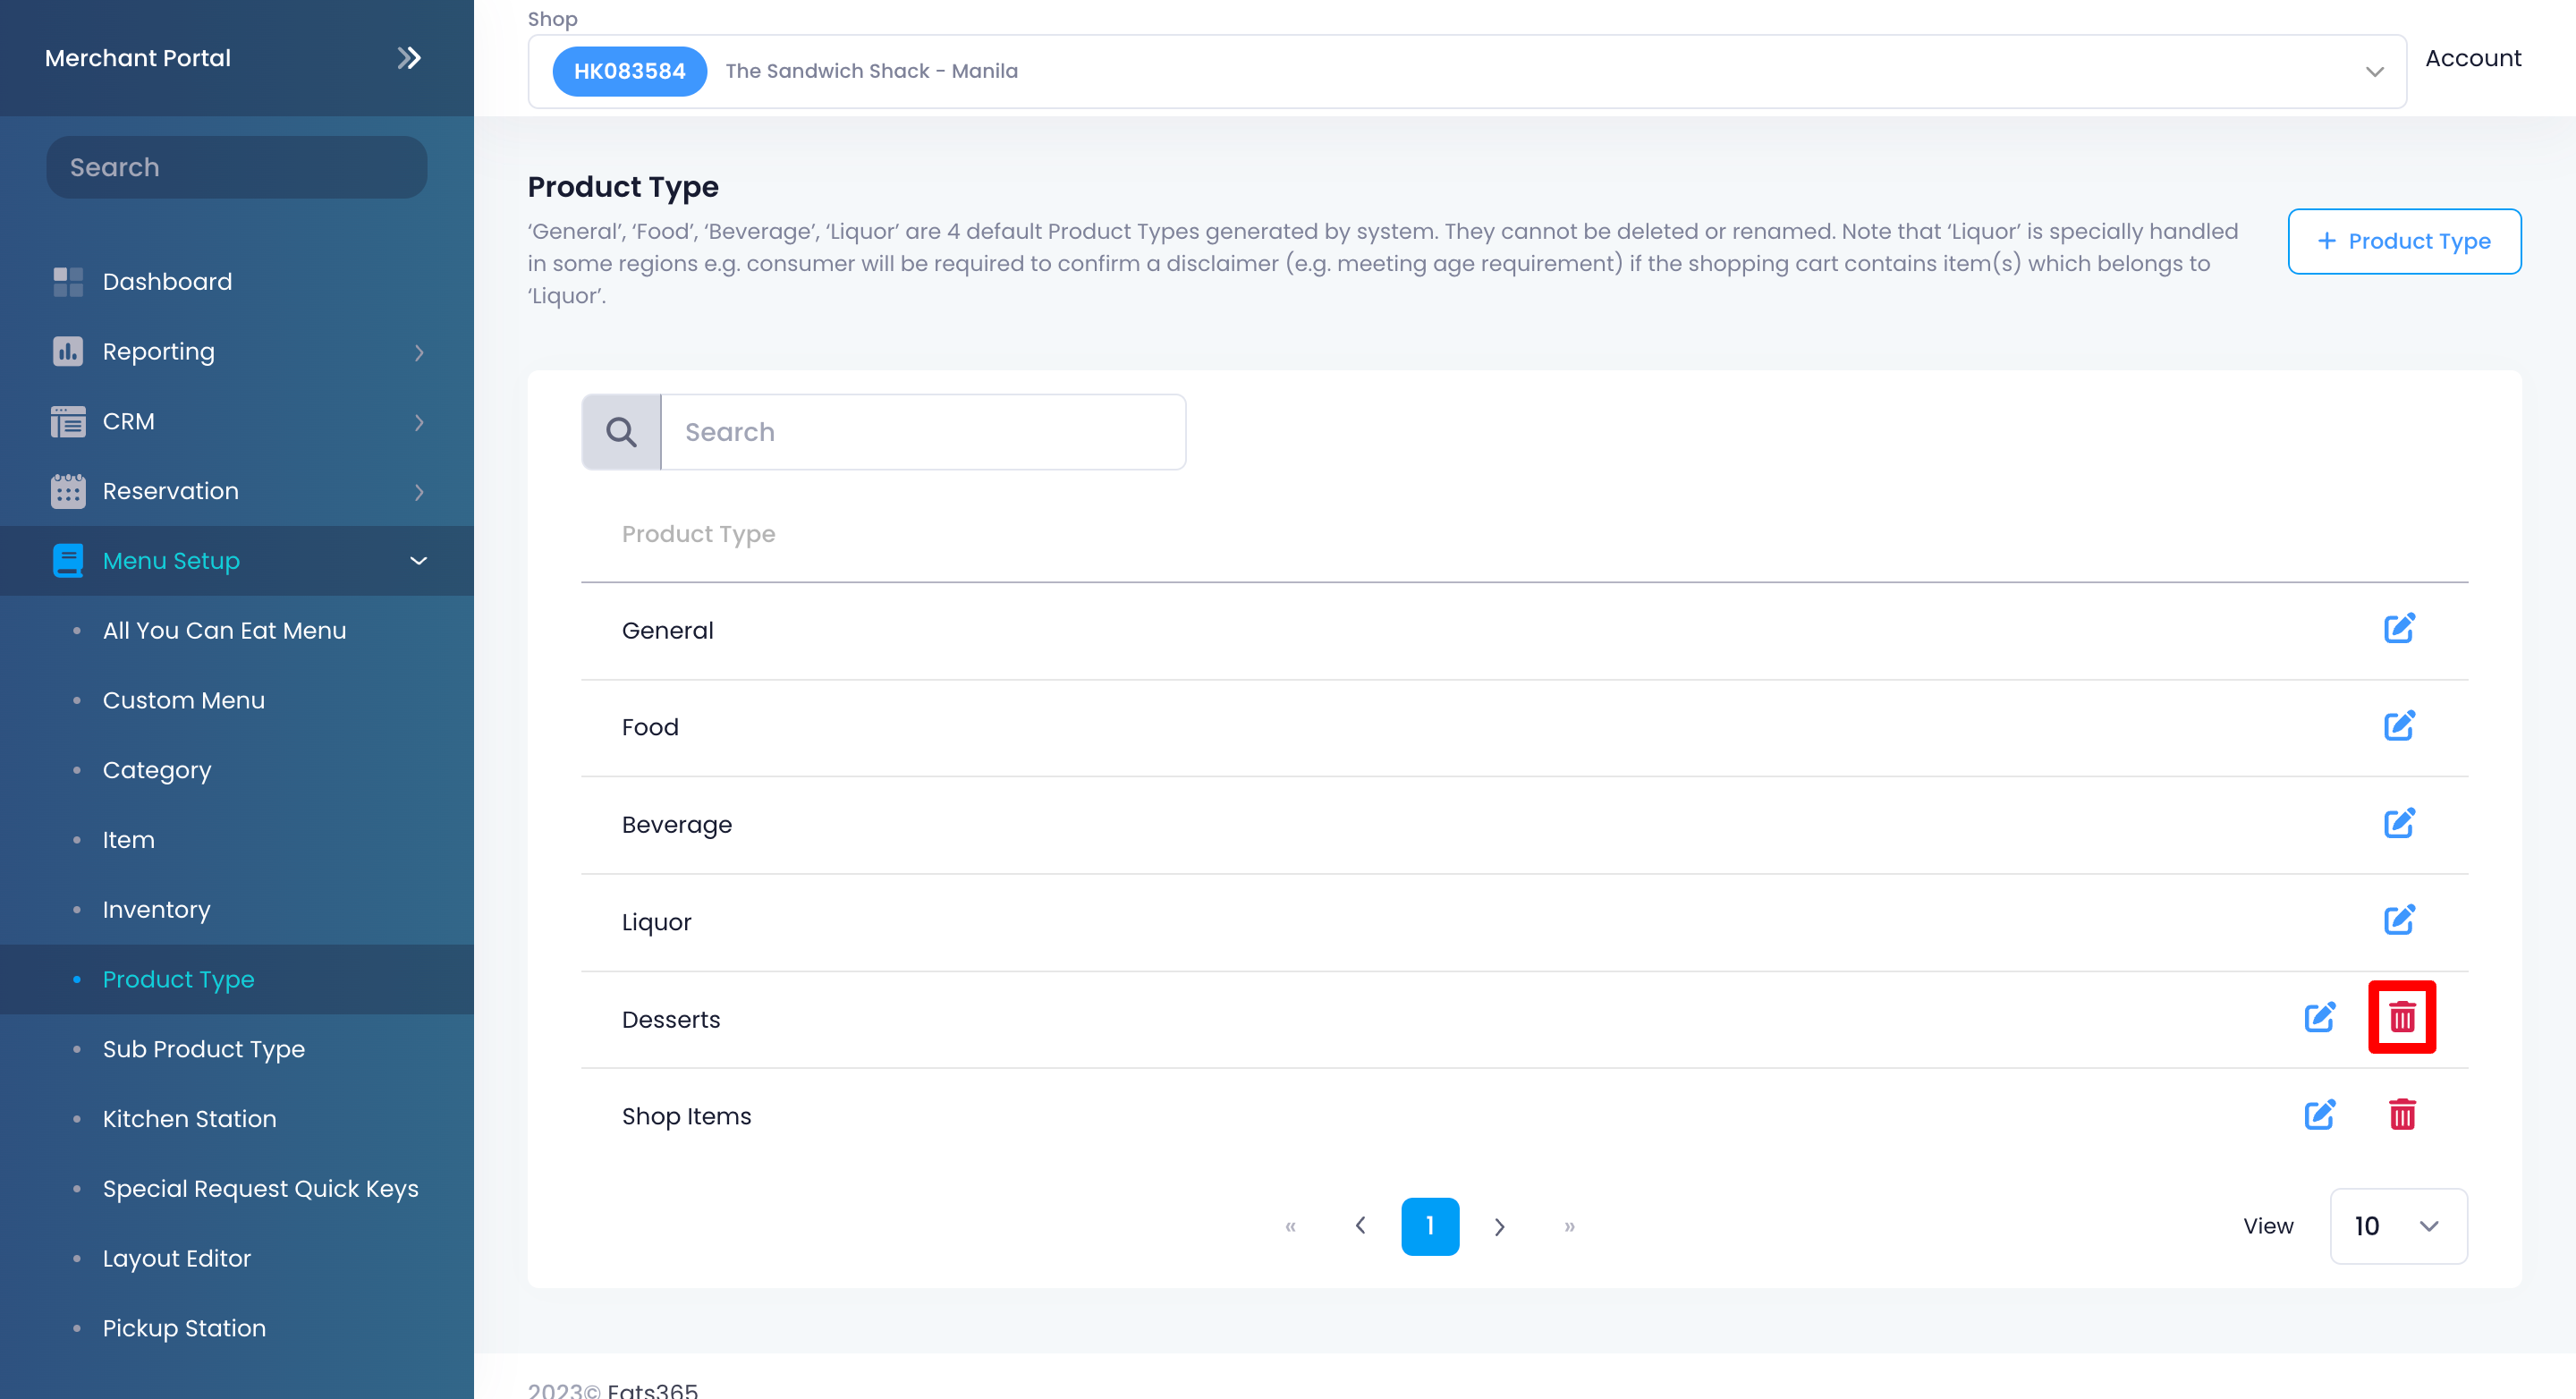
Merchant Portal 2.0
- Log in to the Merchant Portal.
- On the left panel, click on Menu Setup. Then, select Product Type.
- Next to the Product Type that you want to delete, click on Delete
 . Then, click on Confirm.
Note: Preset Product Types won’t have the delete icon next to them.
Add a Sub Product Type
To create a Sub Product Type, follow the steps below:
Eats365 POS
- Log in to the Eats365 POS.
- At the top left, tap Settings .
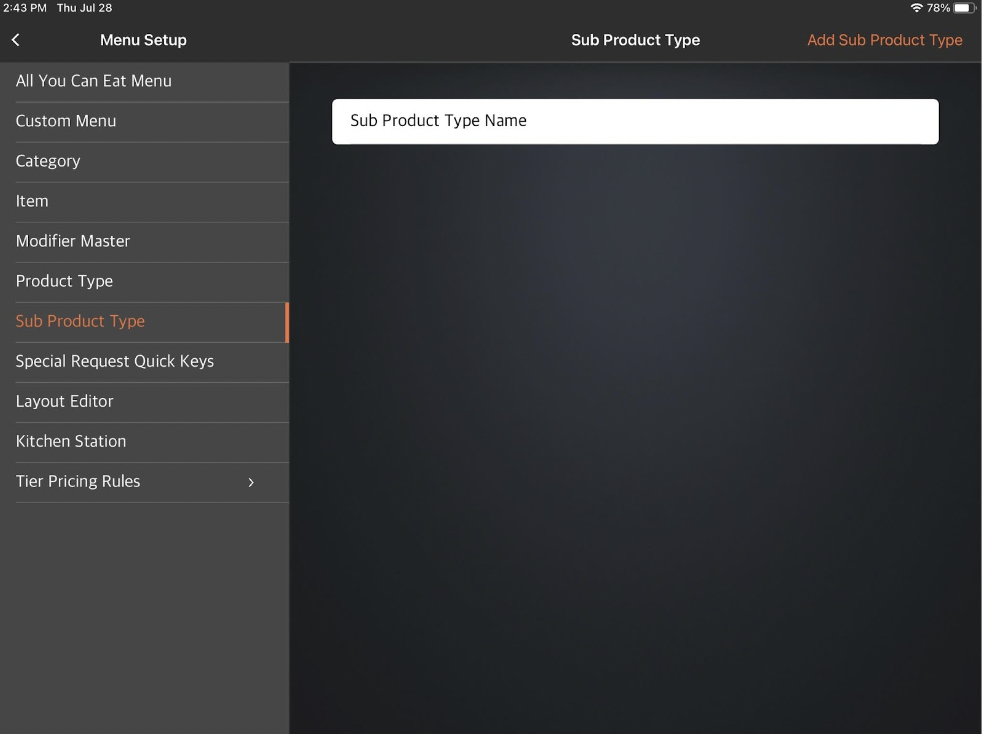
- Under General, tap Menu Setup, then select Sub Product Type.
- At the top right, tap Add Sub Product Type.
- Select the Sub Product Type language.
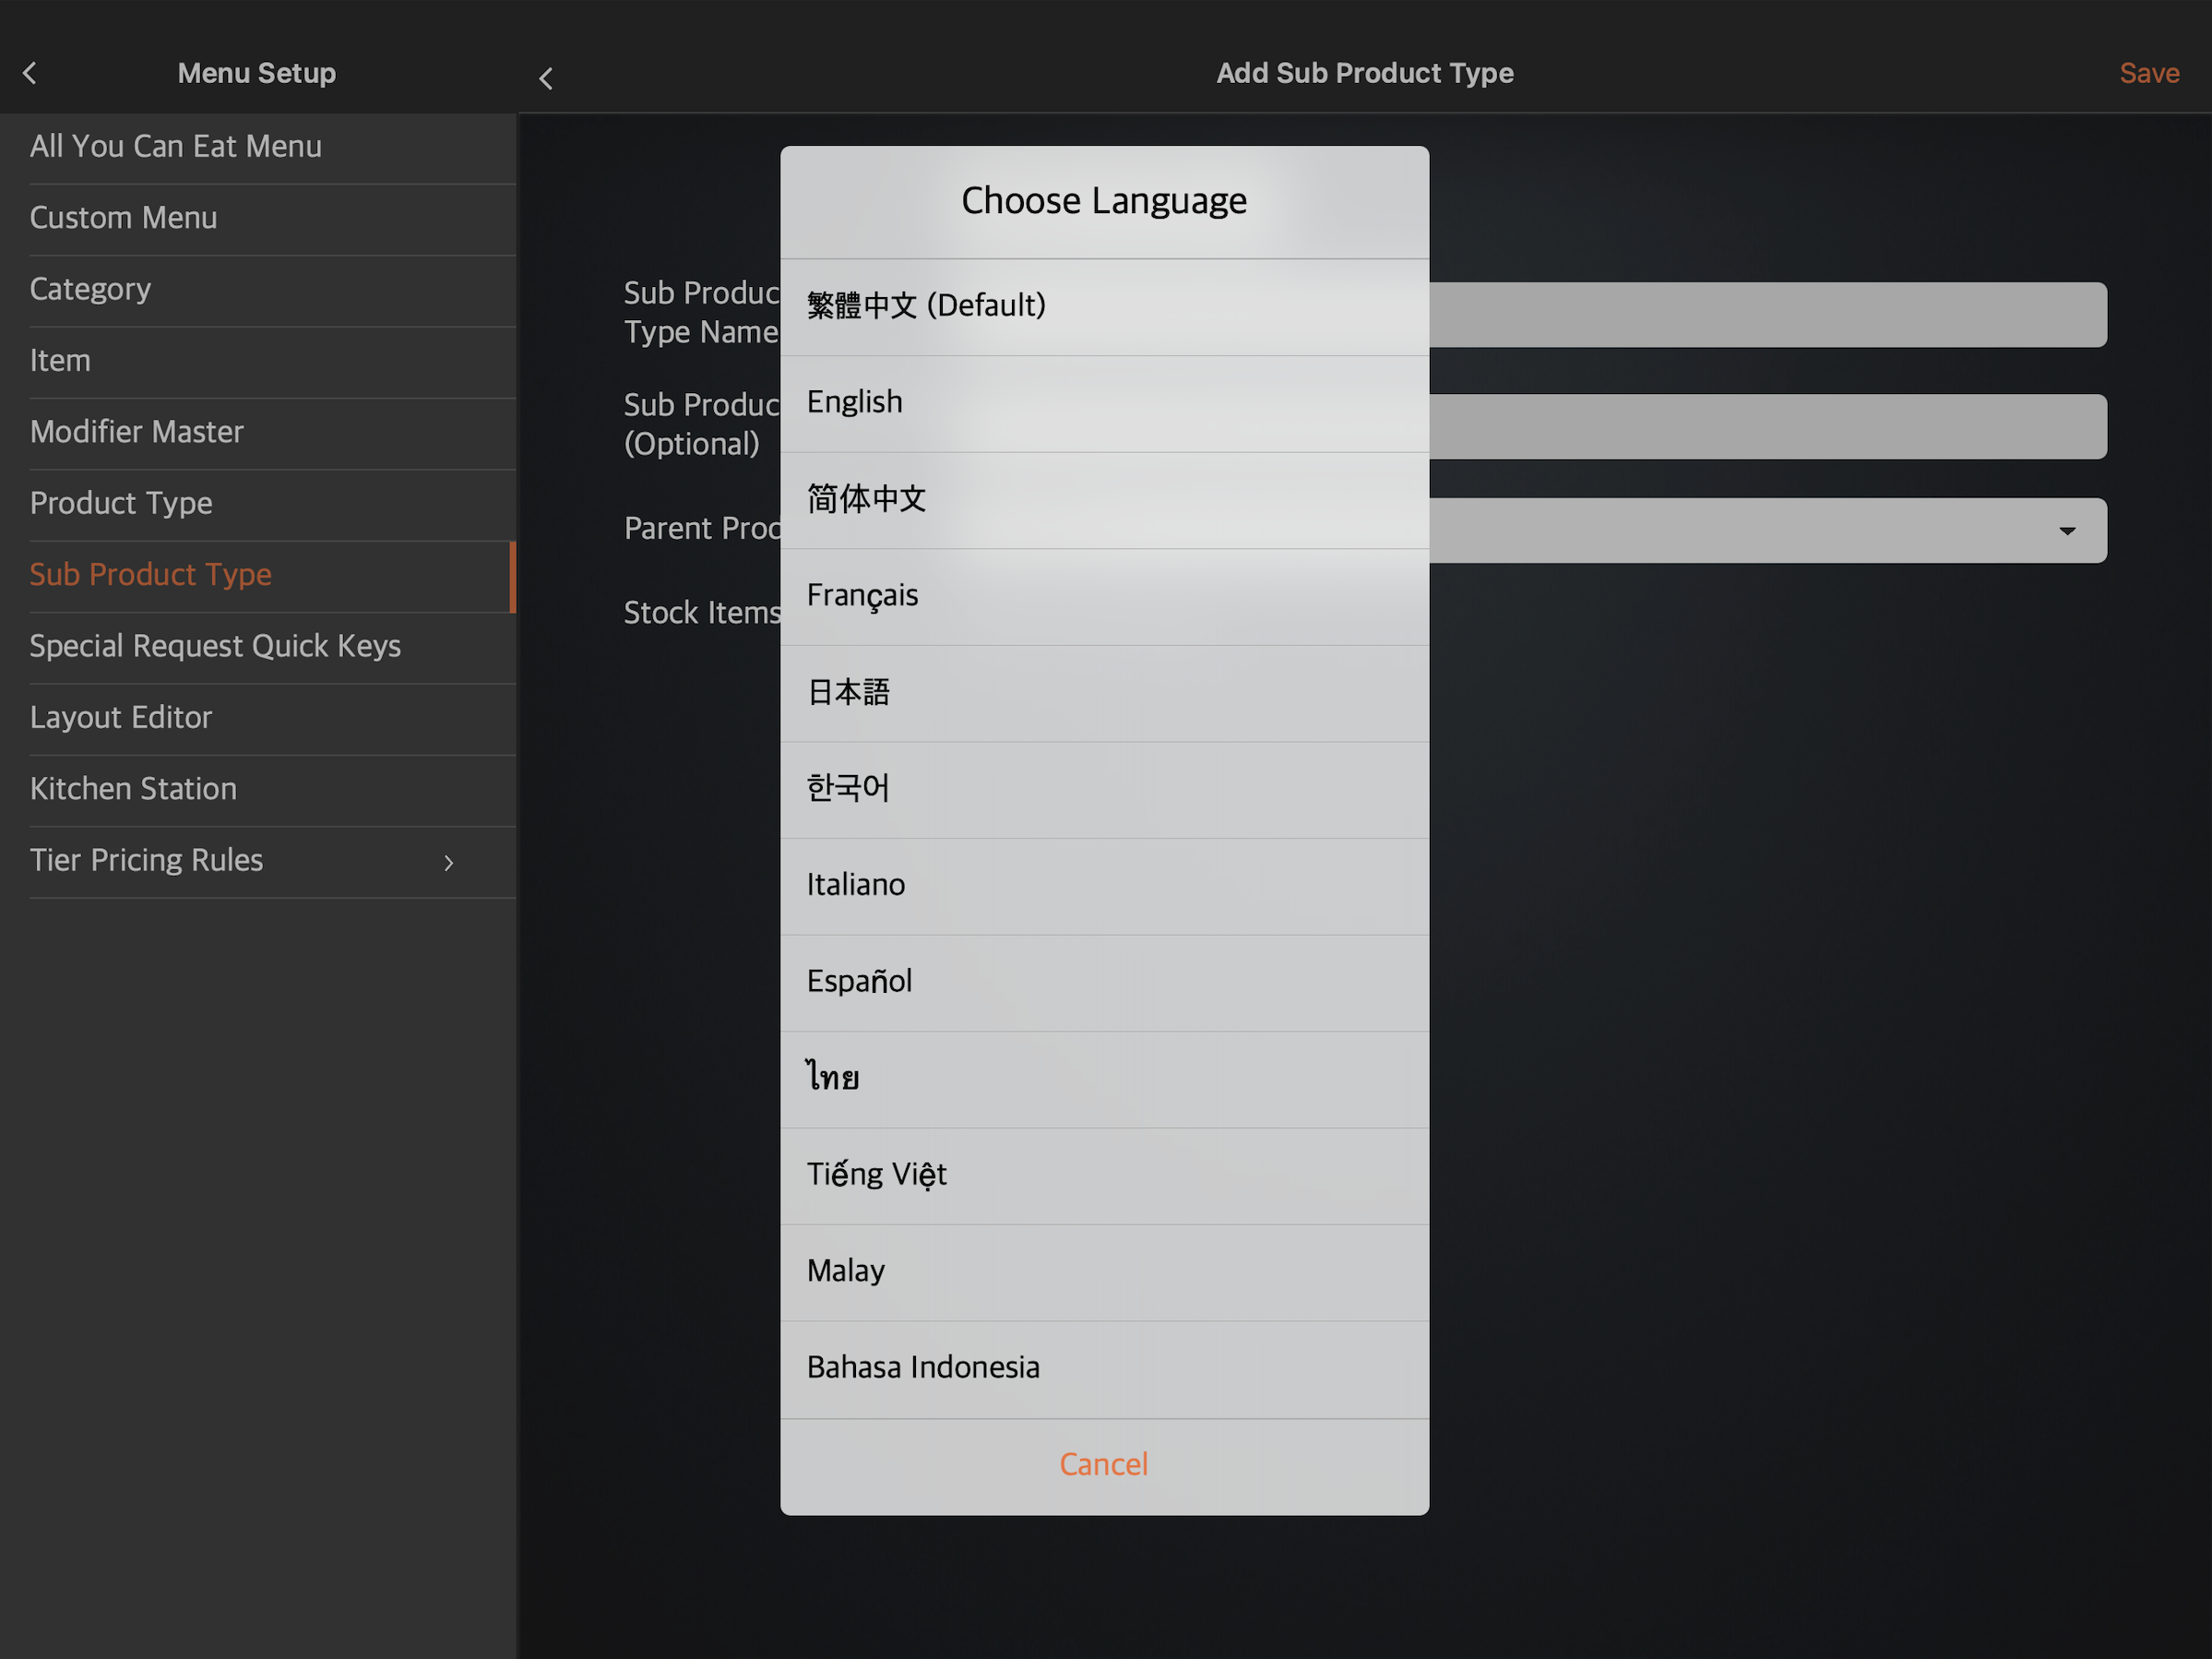 Note: You must enter a default name for the Sub Product Type. The name becomes available in whatever language the POS app is using. For multi-language menus, after selecting a default language, tap the language drop-down list and select your preferred language. Then, enter the alternate name in that language.
 - Enter your preferred Sub Product Type Name and Sub Product Type Code (Optional).
Note: The "Sub Product Type Code" is a unique identifier that allows third-party integration partners to recognize and map an item's assigned Product Type within their own systems. - Select the Parent Product Type that the Sub Product Type belongs to.
- At the top right, tap Save to confirm.
Merchant Portal (Classic Theme)
- Log in to the Merchant Portal.
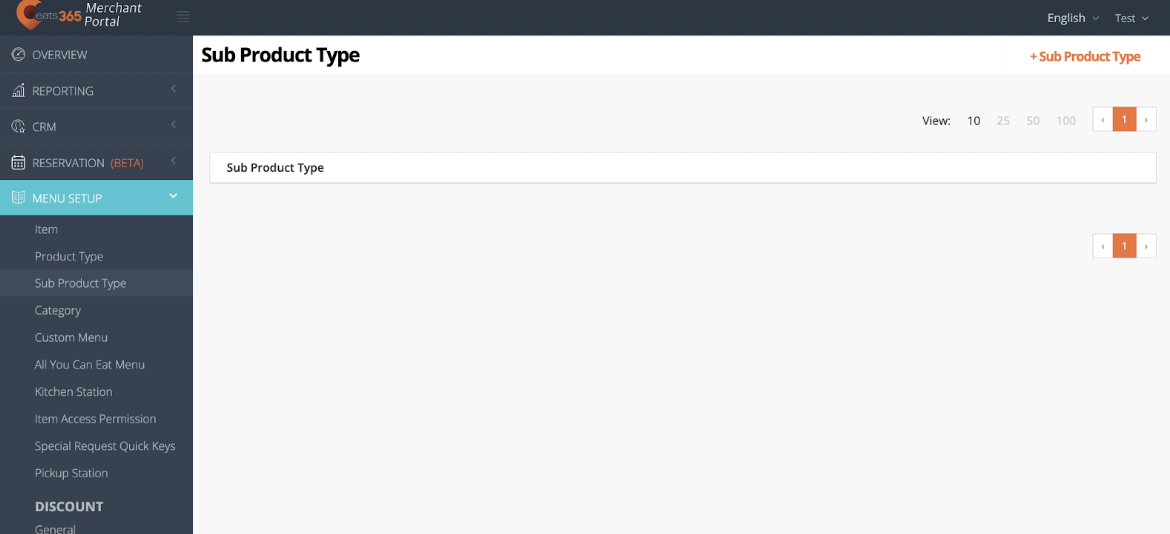
- On the left panel, click on Menu Setup. Then, select Sub Product Type.
- At the top right, click on + Sub Product Type.
- Select the Sub Product Type language.
 Note: You must enter a default name for the Sub Product Type. The name becomes available in whatever language the POS app is using. For multi-language menus, after selecting a default language, tap the language drop-down list and select your preferred language. Then, enter the alternate name in that language.
 - Enter your preferred Sub Product Type Name and Sub Product Type Code.
Note: The "Sub Product Type Code" is a unique identifier that allows third-party integration partners to recognize and map an item's assigned Product Type within their own systems. - Select the parent Product Type that the Sub Product Type belongs to.
- Click on Save to confirm.
Merchant Portal 2.0
- Log in to the Merchant Portal.
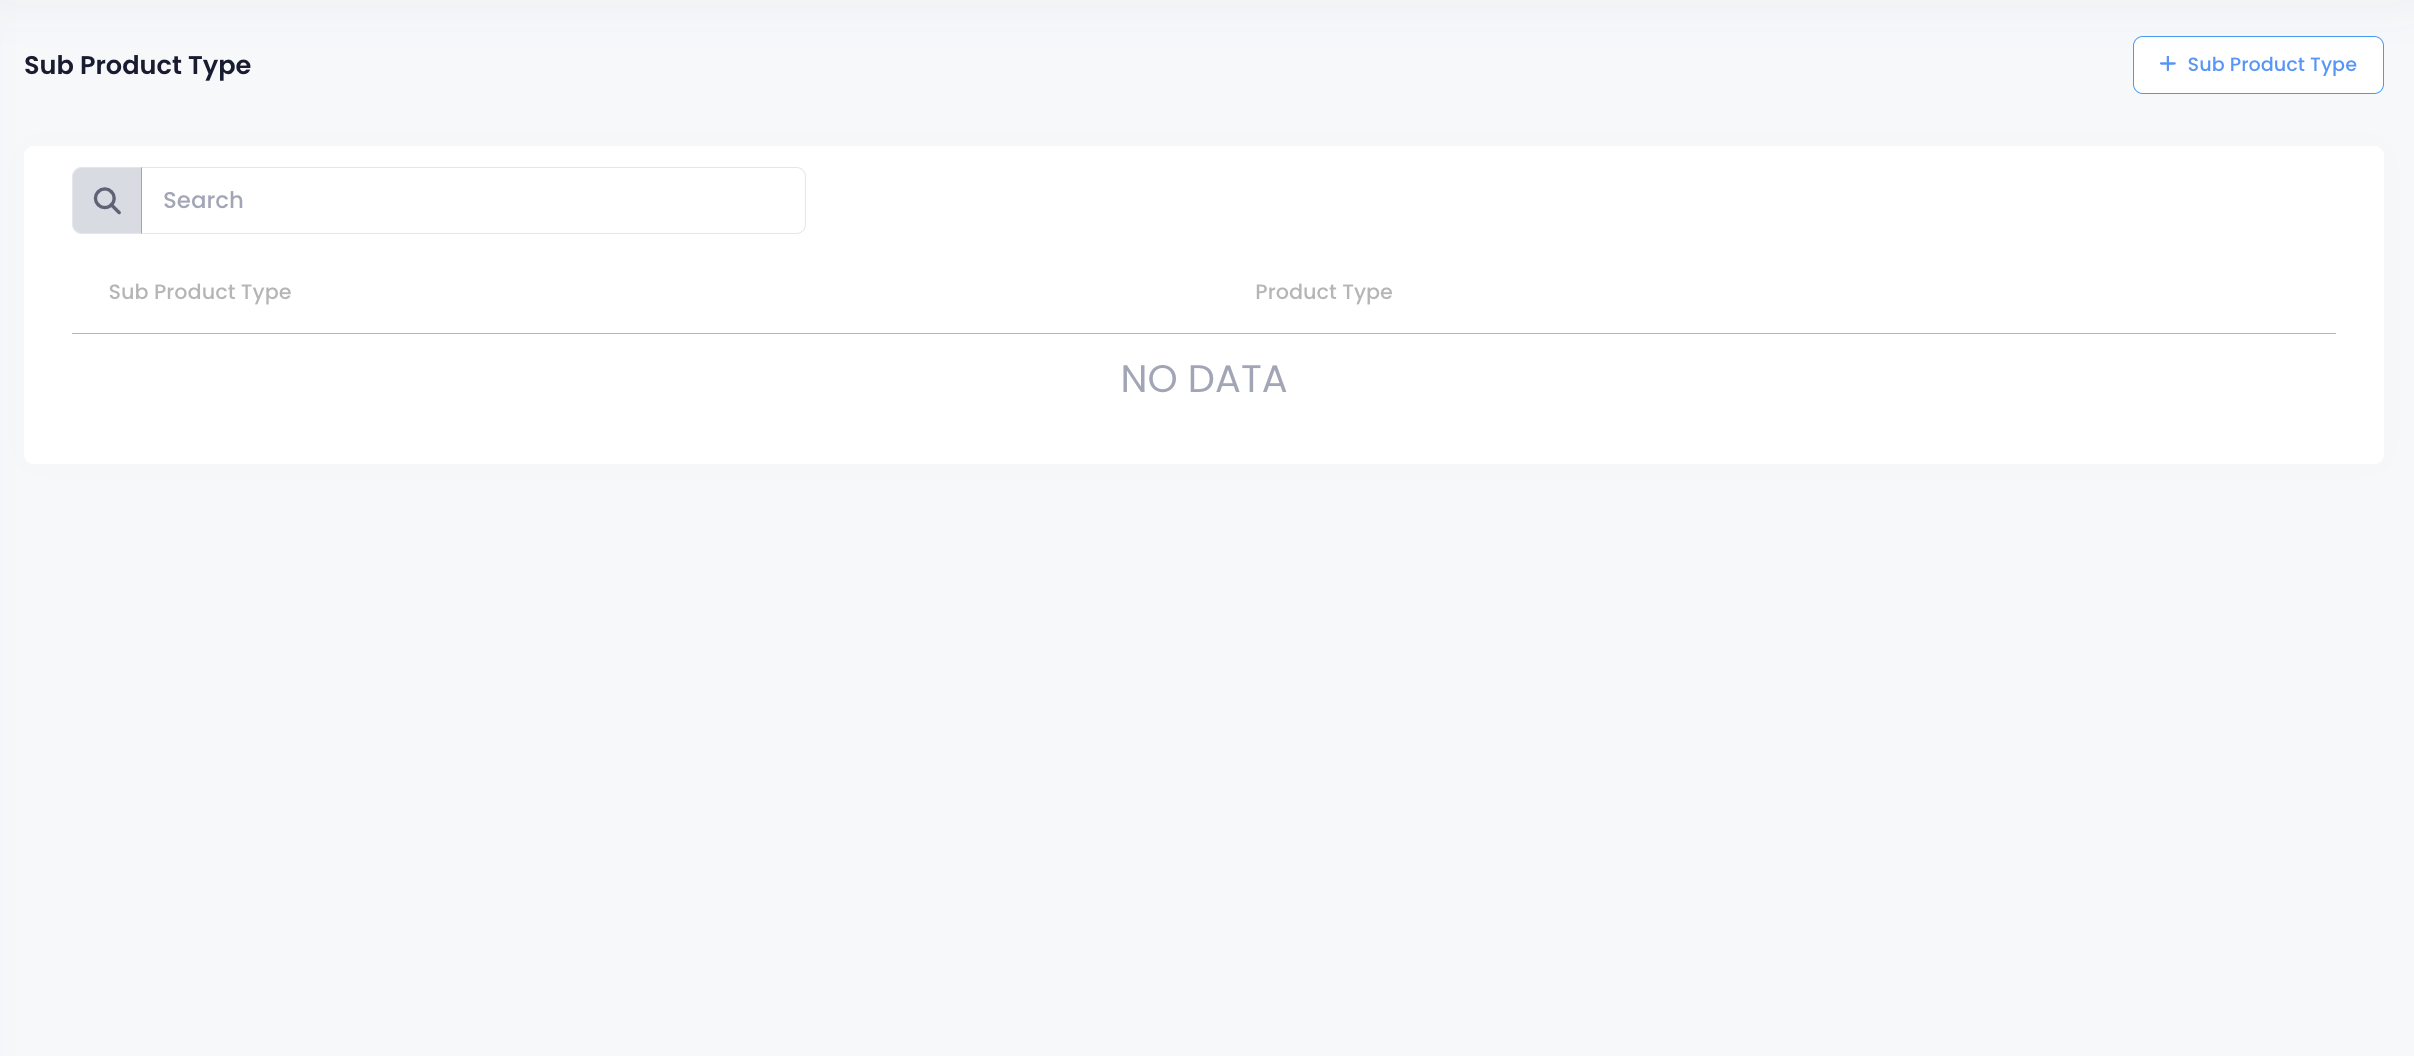
- On the left panel, click on Menu Setup. Then, select Sub Product Type.
- At the top right, click on +Sub Product Type.
- Enter the Sub Product Type Name per language.
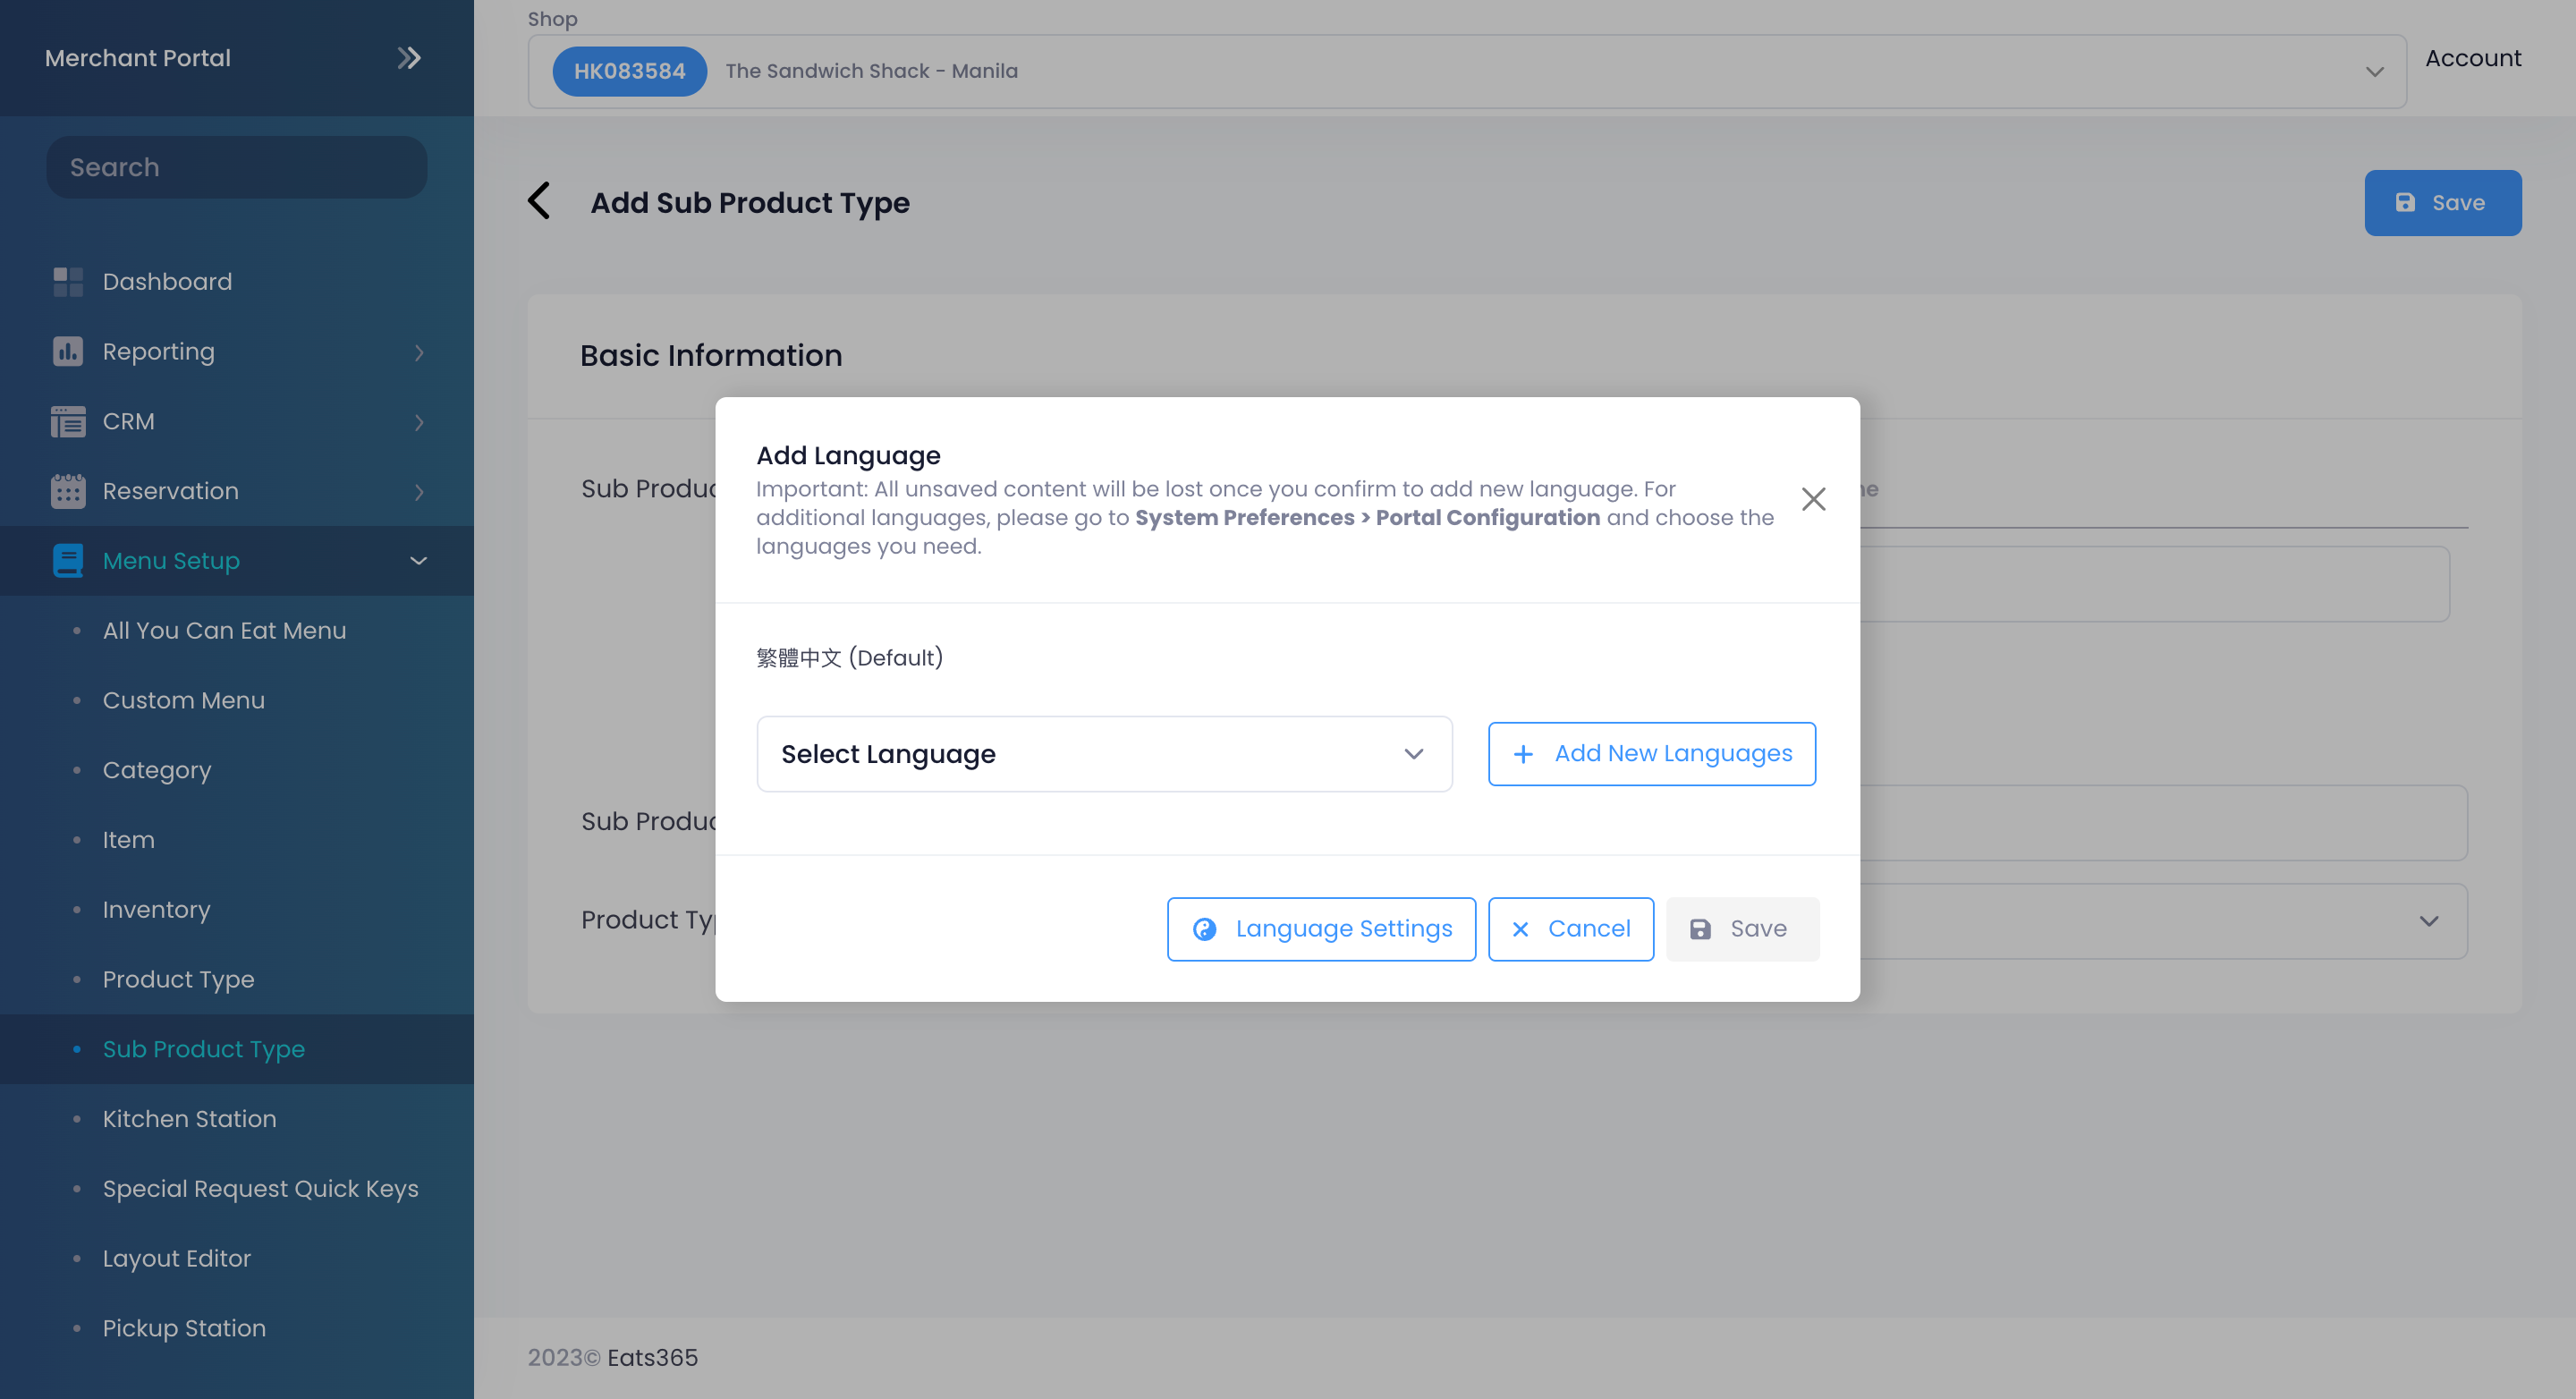 Note: You must enter a default name for the Sub Product Type. The name becomes available in whatever language the POS app is using. To add more languages, click on Add Language.
 - Enter the Sub Product Type Code.
Note: The "Sub Product Type Code" is a unique identifier that allows third-party integration partners to recognize and map an item's assigned Product Type within their own systems. - Select the parent Product Type that the Sub Product Type belongs to.
- Click on Save to confirm.
Manage a Sub Product Type
Edit a Sub Product Type
To modify a Sub Product Type, follow the steps below:
Eats365 POS
- Log in to the Eats365 POS.
- At the top left, tap Settings .
- Under General, tap Menu Setup, then select Sub Product Type.
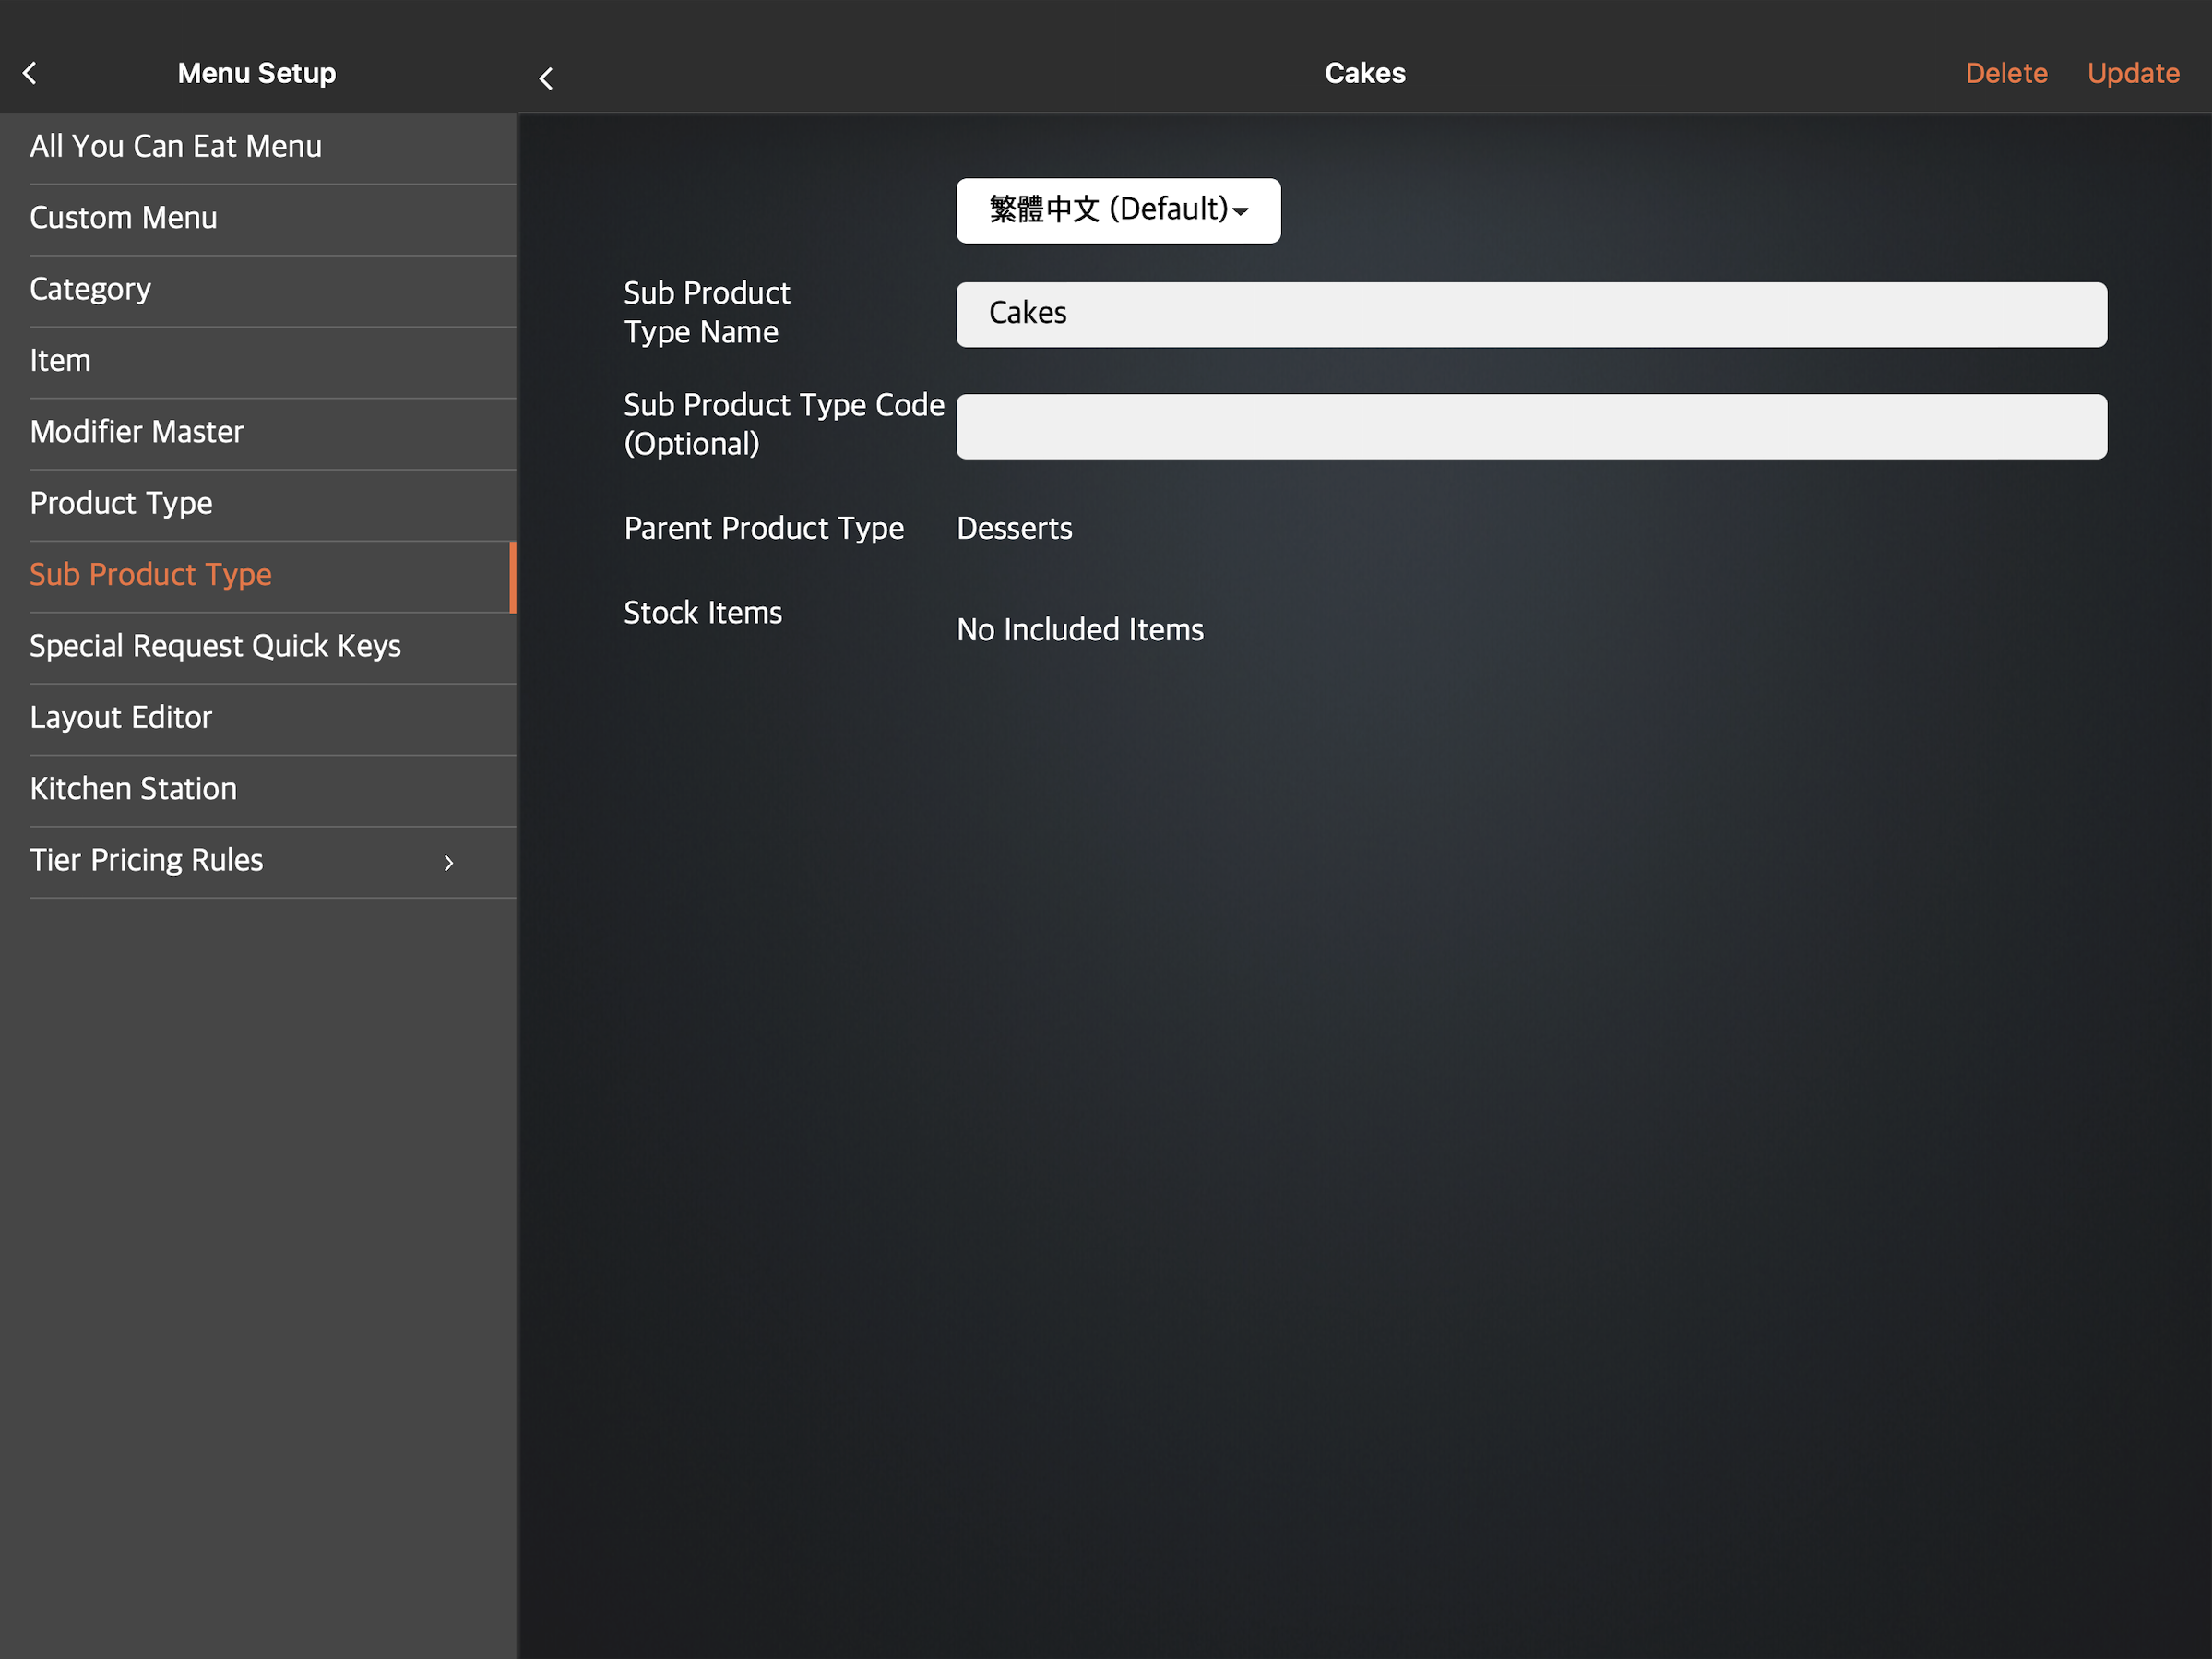
- Tap the Sub Product Type that you want to edit. You can also tap the three-dots menu, then tap Edit .
- Update your preferred Sub Product Type Name and Sub Product Type Code (Optional), and the Parent Product Type that the Sub Product belongs to.
Note: The "Sub Product Type Code" is a unique identifier that allows third-party integration partners to recognize and map an item's assigned Product Type within their own systems. - At the top right, tap Update to confirm.
Merchant Portal (Classic Theme)
- Log in to the Merchant Portal.
- On the left panel, click on Menu Setup. Then, select Sub Product Type.
- Next to the Sub Product Type you want to edit, click on Edit .
- Update your preferred Sub Product Type Name and Sub Product Type Code, and the Product Type that the Sub Product belongs to.
Note: The "Sub Product Type Code" is a unique identifier that allows third-party integration partners to recognize and map an item's assigned Product Type within their own systems. - Click on Save to confirm.
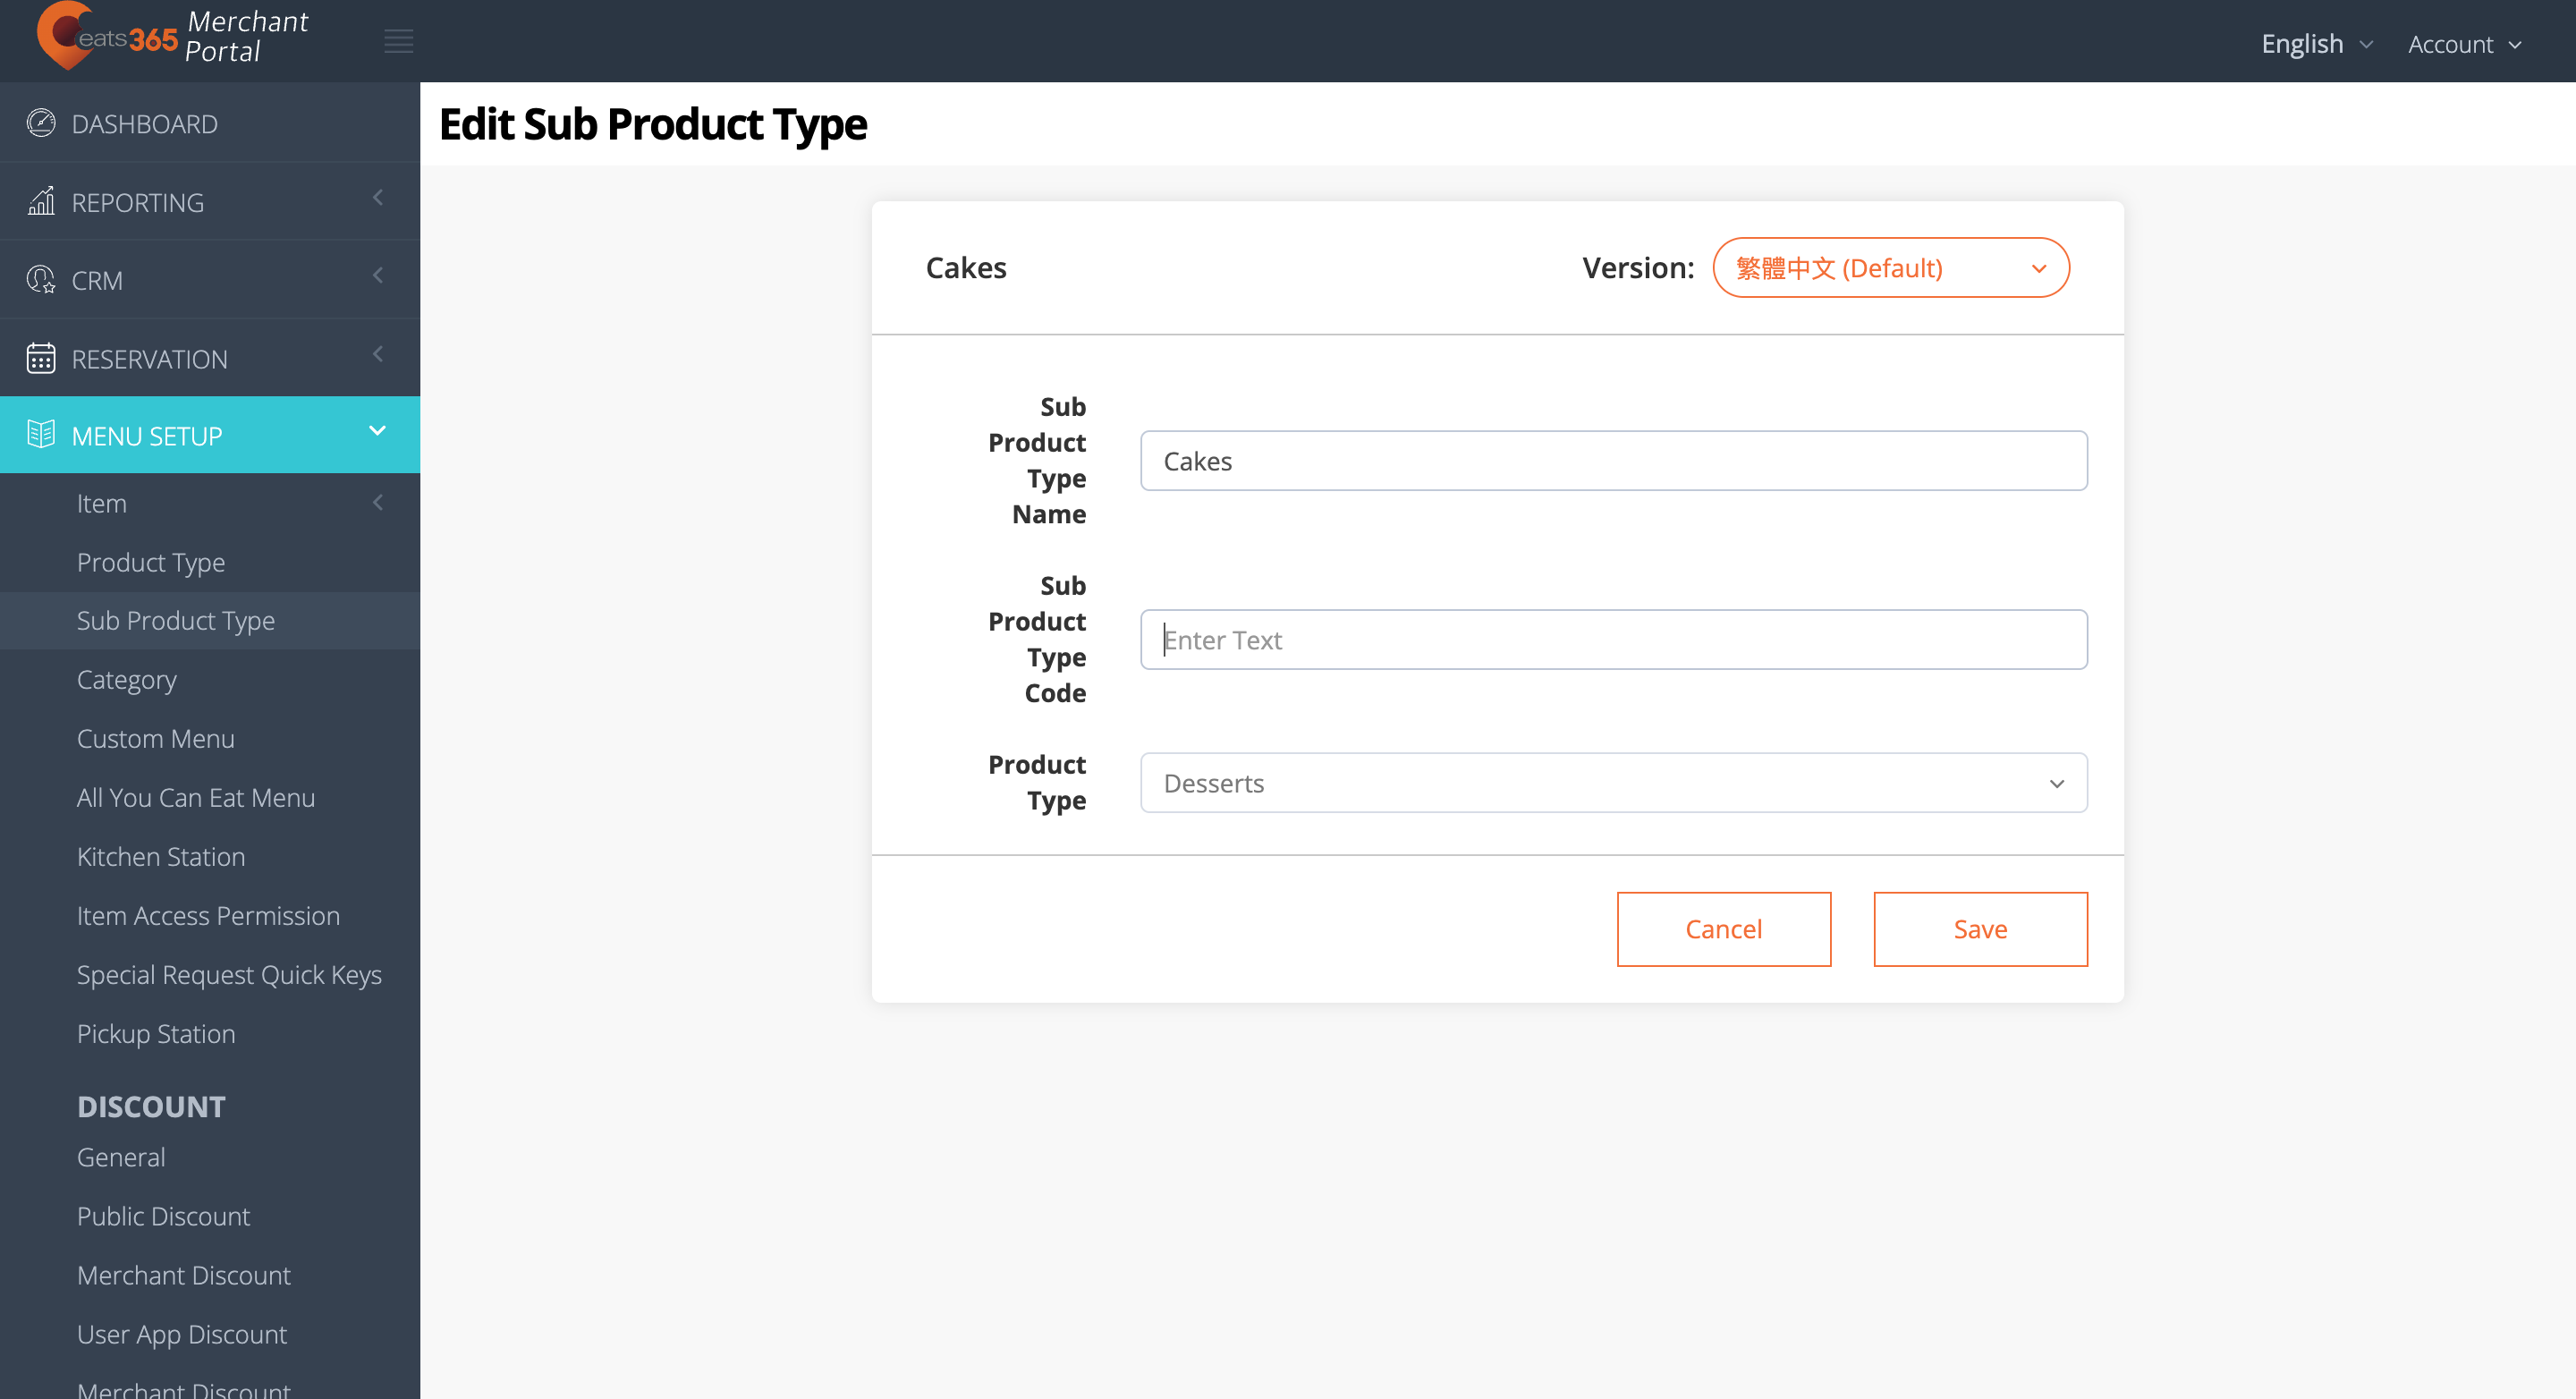
Merchant Portal 2.0
- Log in to the Merchant Portal.
- On the left panel, click on Menu Setup, then select Sub Product Type.
- Next to the Sub Product Type you want to edit, click on Edit.
- Update your preferred Sub Product Type Name, Sub Product Type Code, and the Product Type that the Sub Product belongs to.
Note: The "Sub Product Type Code" is a unique identifier that allows third-party integration partners to recognize and map an item's assigned Product Type within their own systems. - Click on Save to confirm.

Delete a Sub Product Type
To remove a Sub Product Type, follow the steps below:
Eats365 POS
- Log in to the Eats365 POS.
- At the top left, tap Settings .
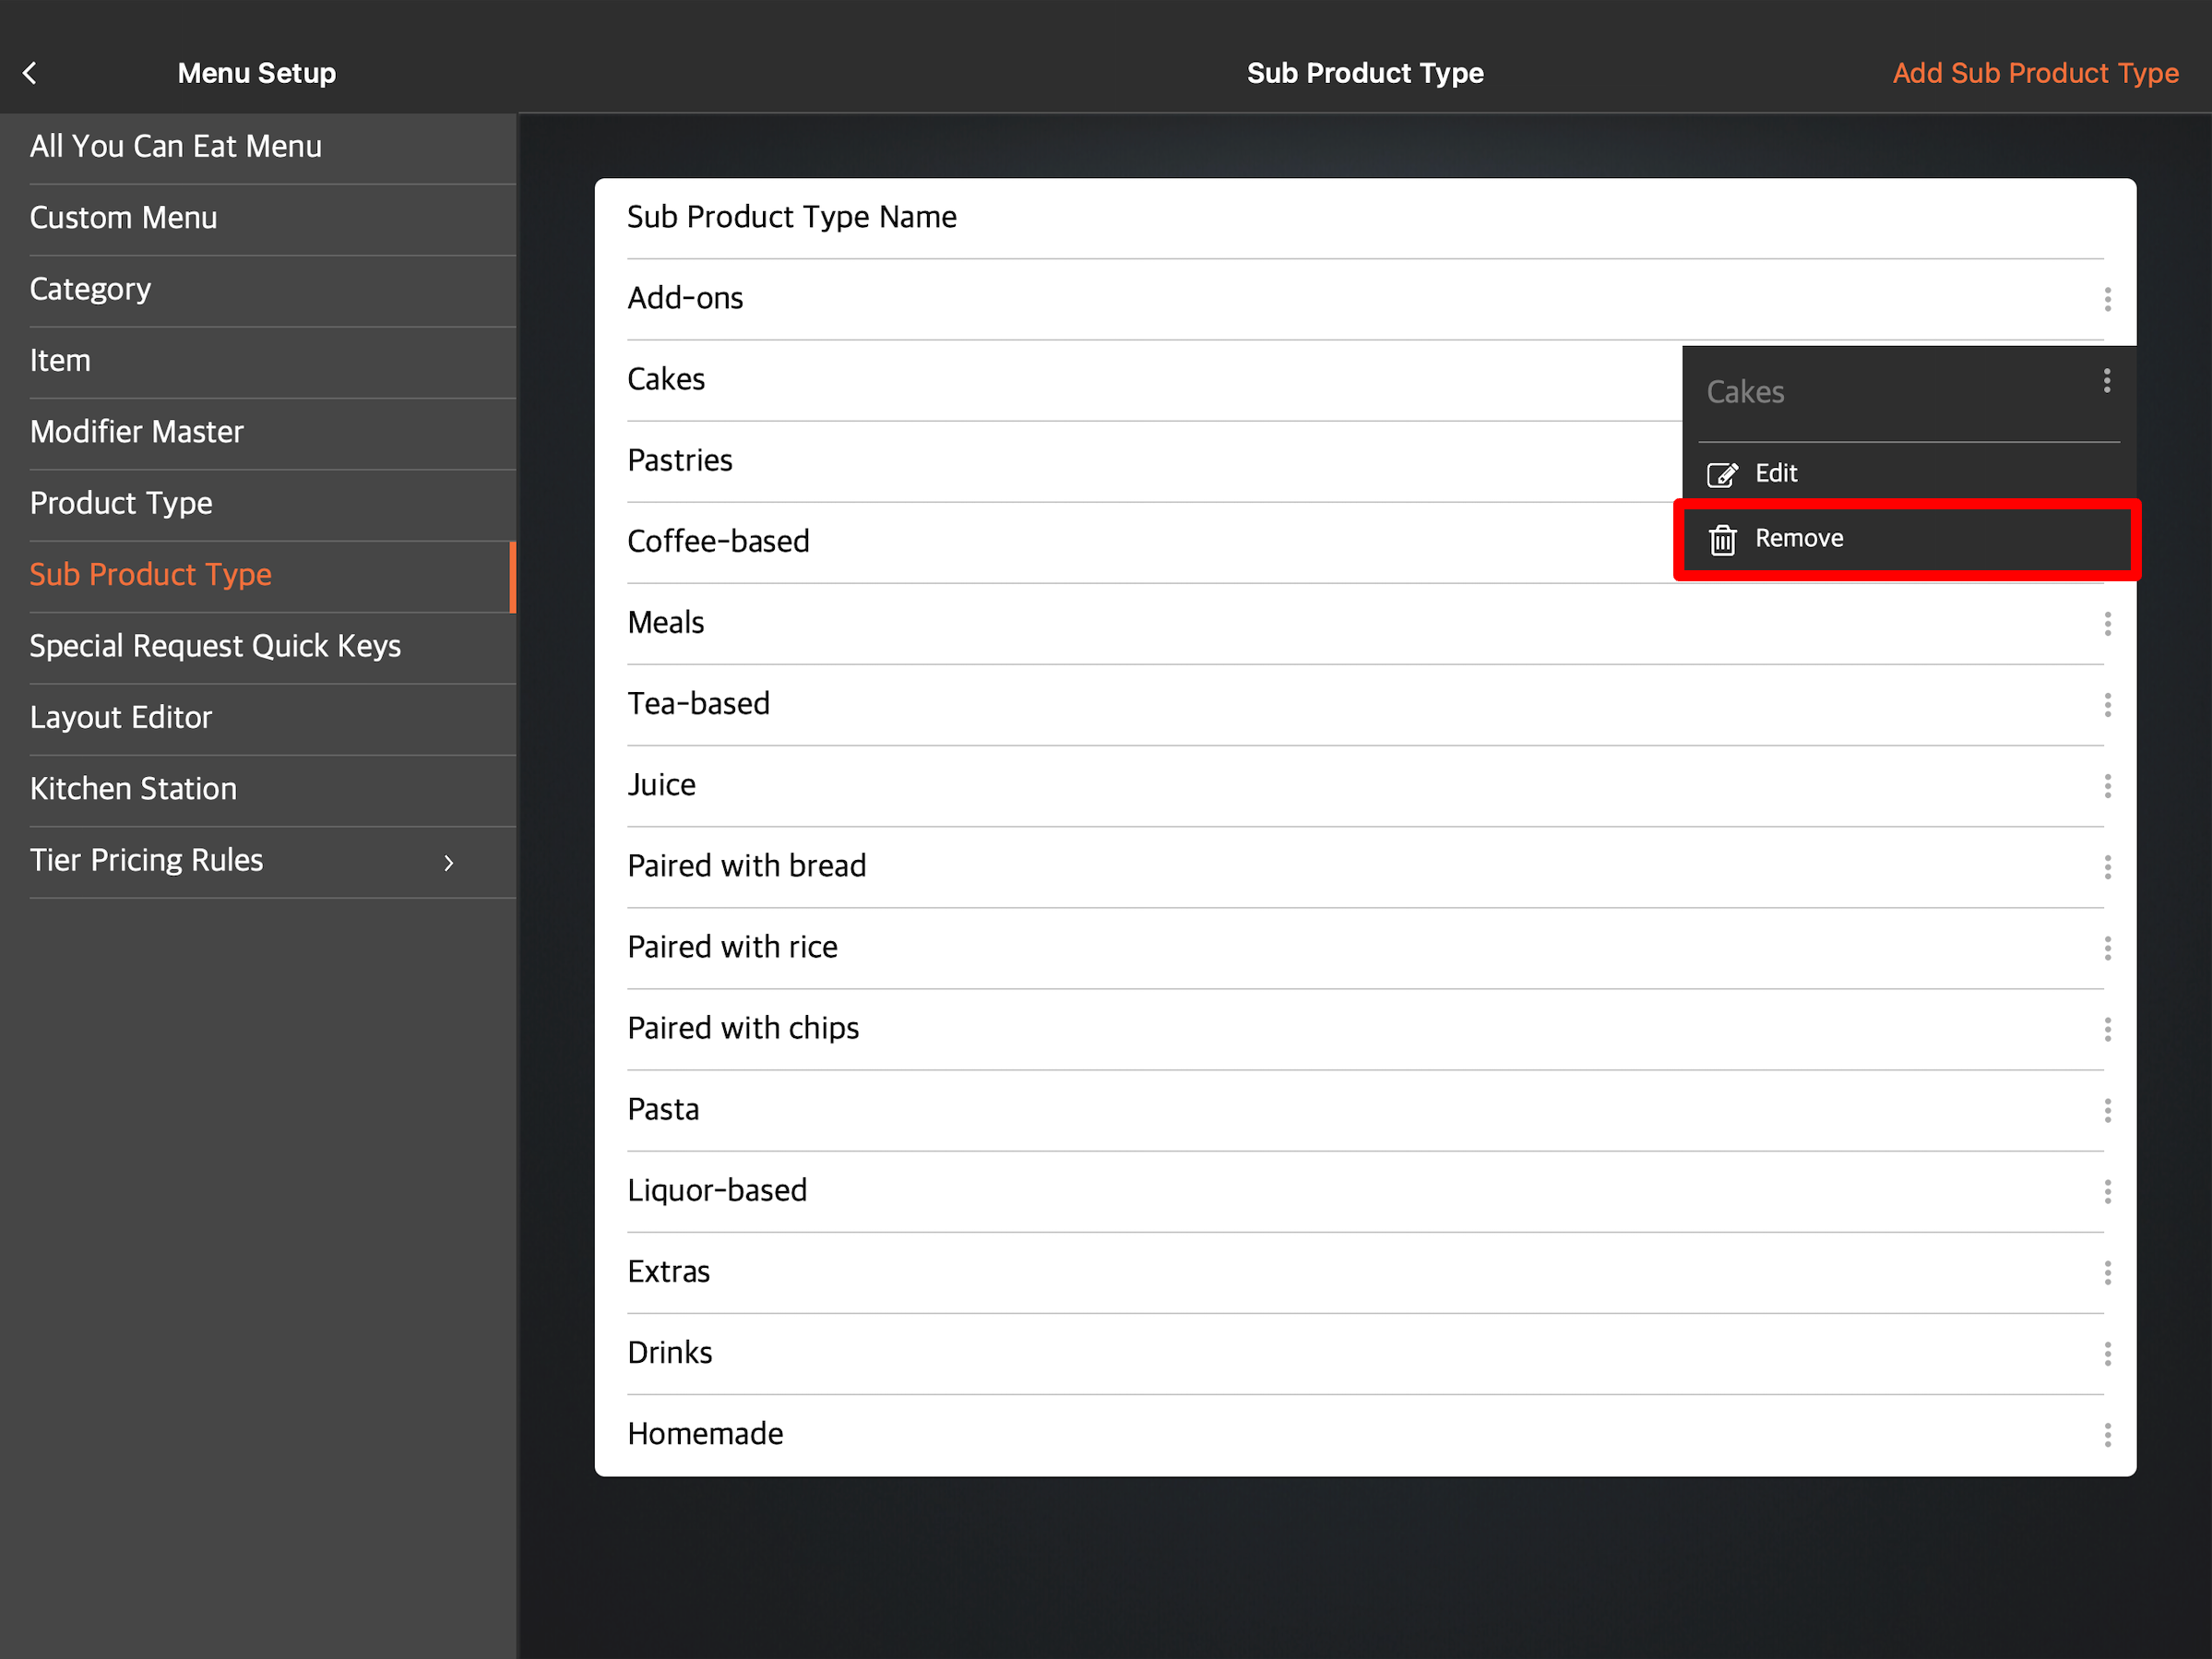
- Under General, tap Menu Setup, then select Sub Product Type.
- There are two ways to delete a Sub Product Type:
- Tap the Sub Product Type that you want to delete, then at the top right, tap Delete. A prompt appears to confirm if you want to delete the Sub Product Type.
- Next to the Sub Product Type that you want to delete, tap the three-dots menu, then tap Remove. A prompt appears to confirm if you want to delete the Sub Product Type.
- Tap Delete to confirm.
Merchant Portal (Classic Theme)
- Log in to the Merchant Portal.
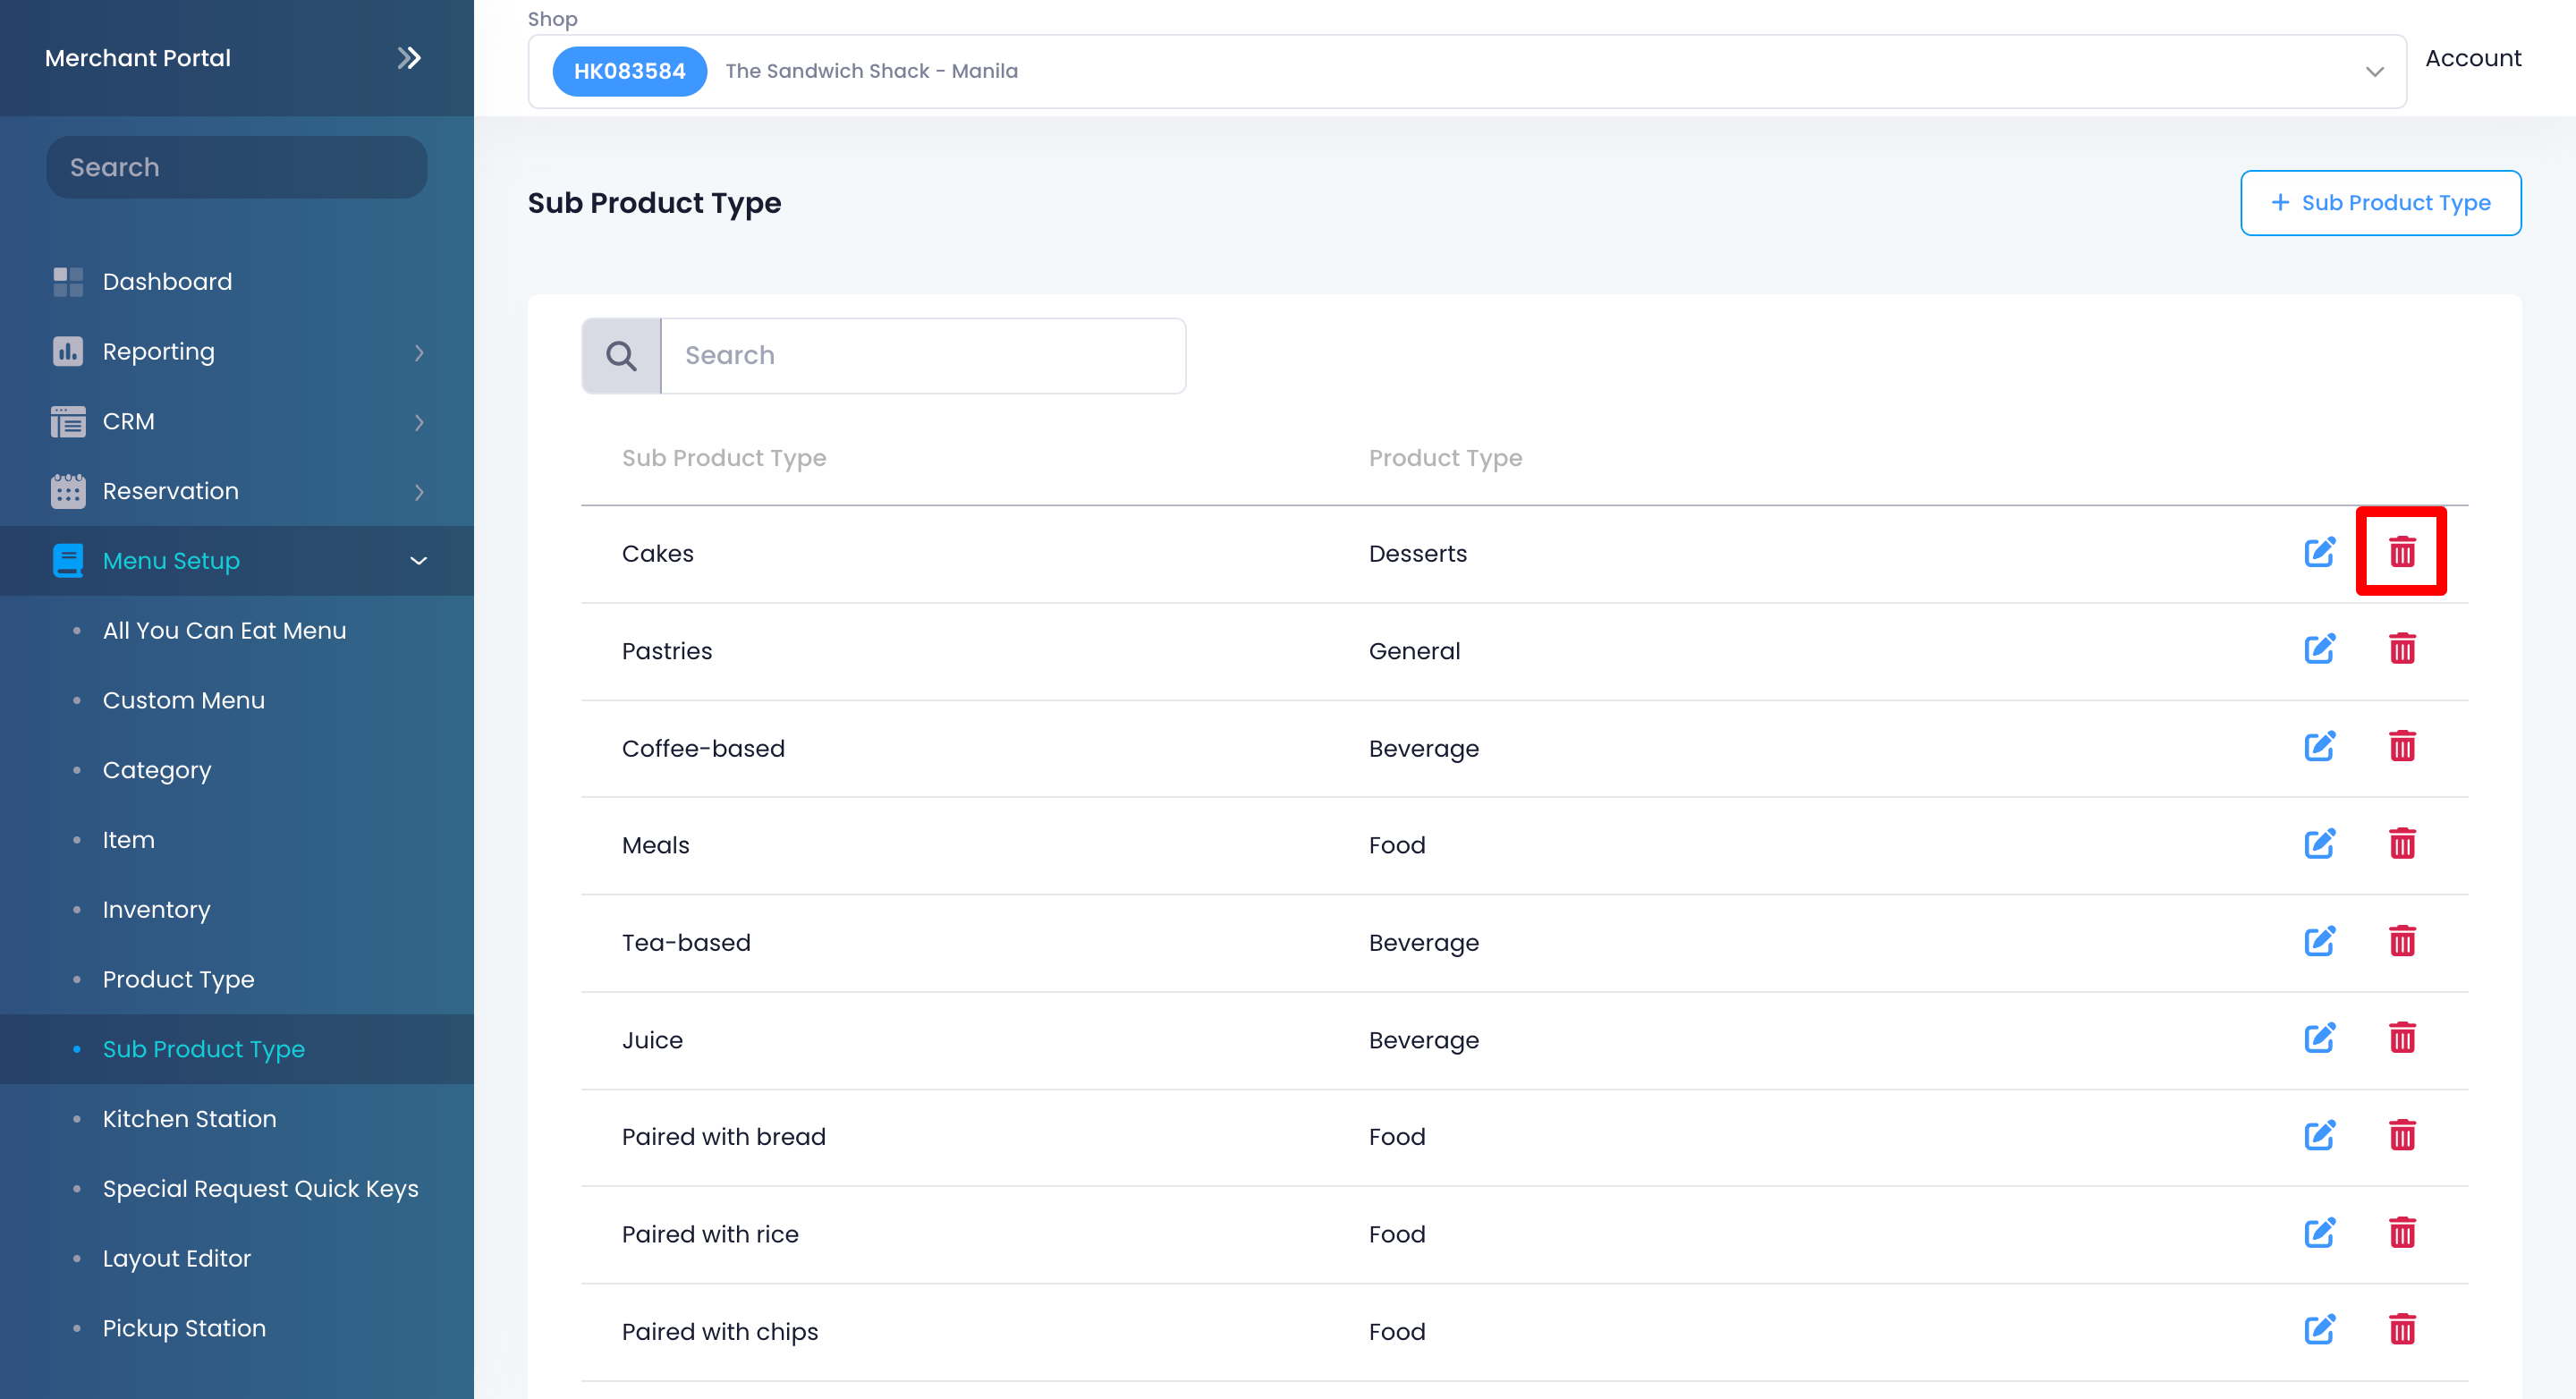
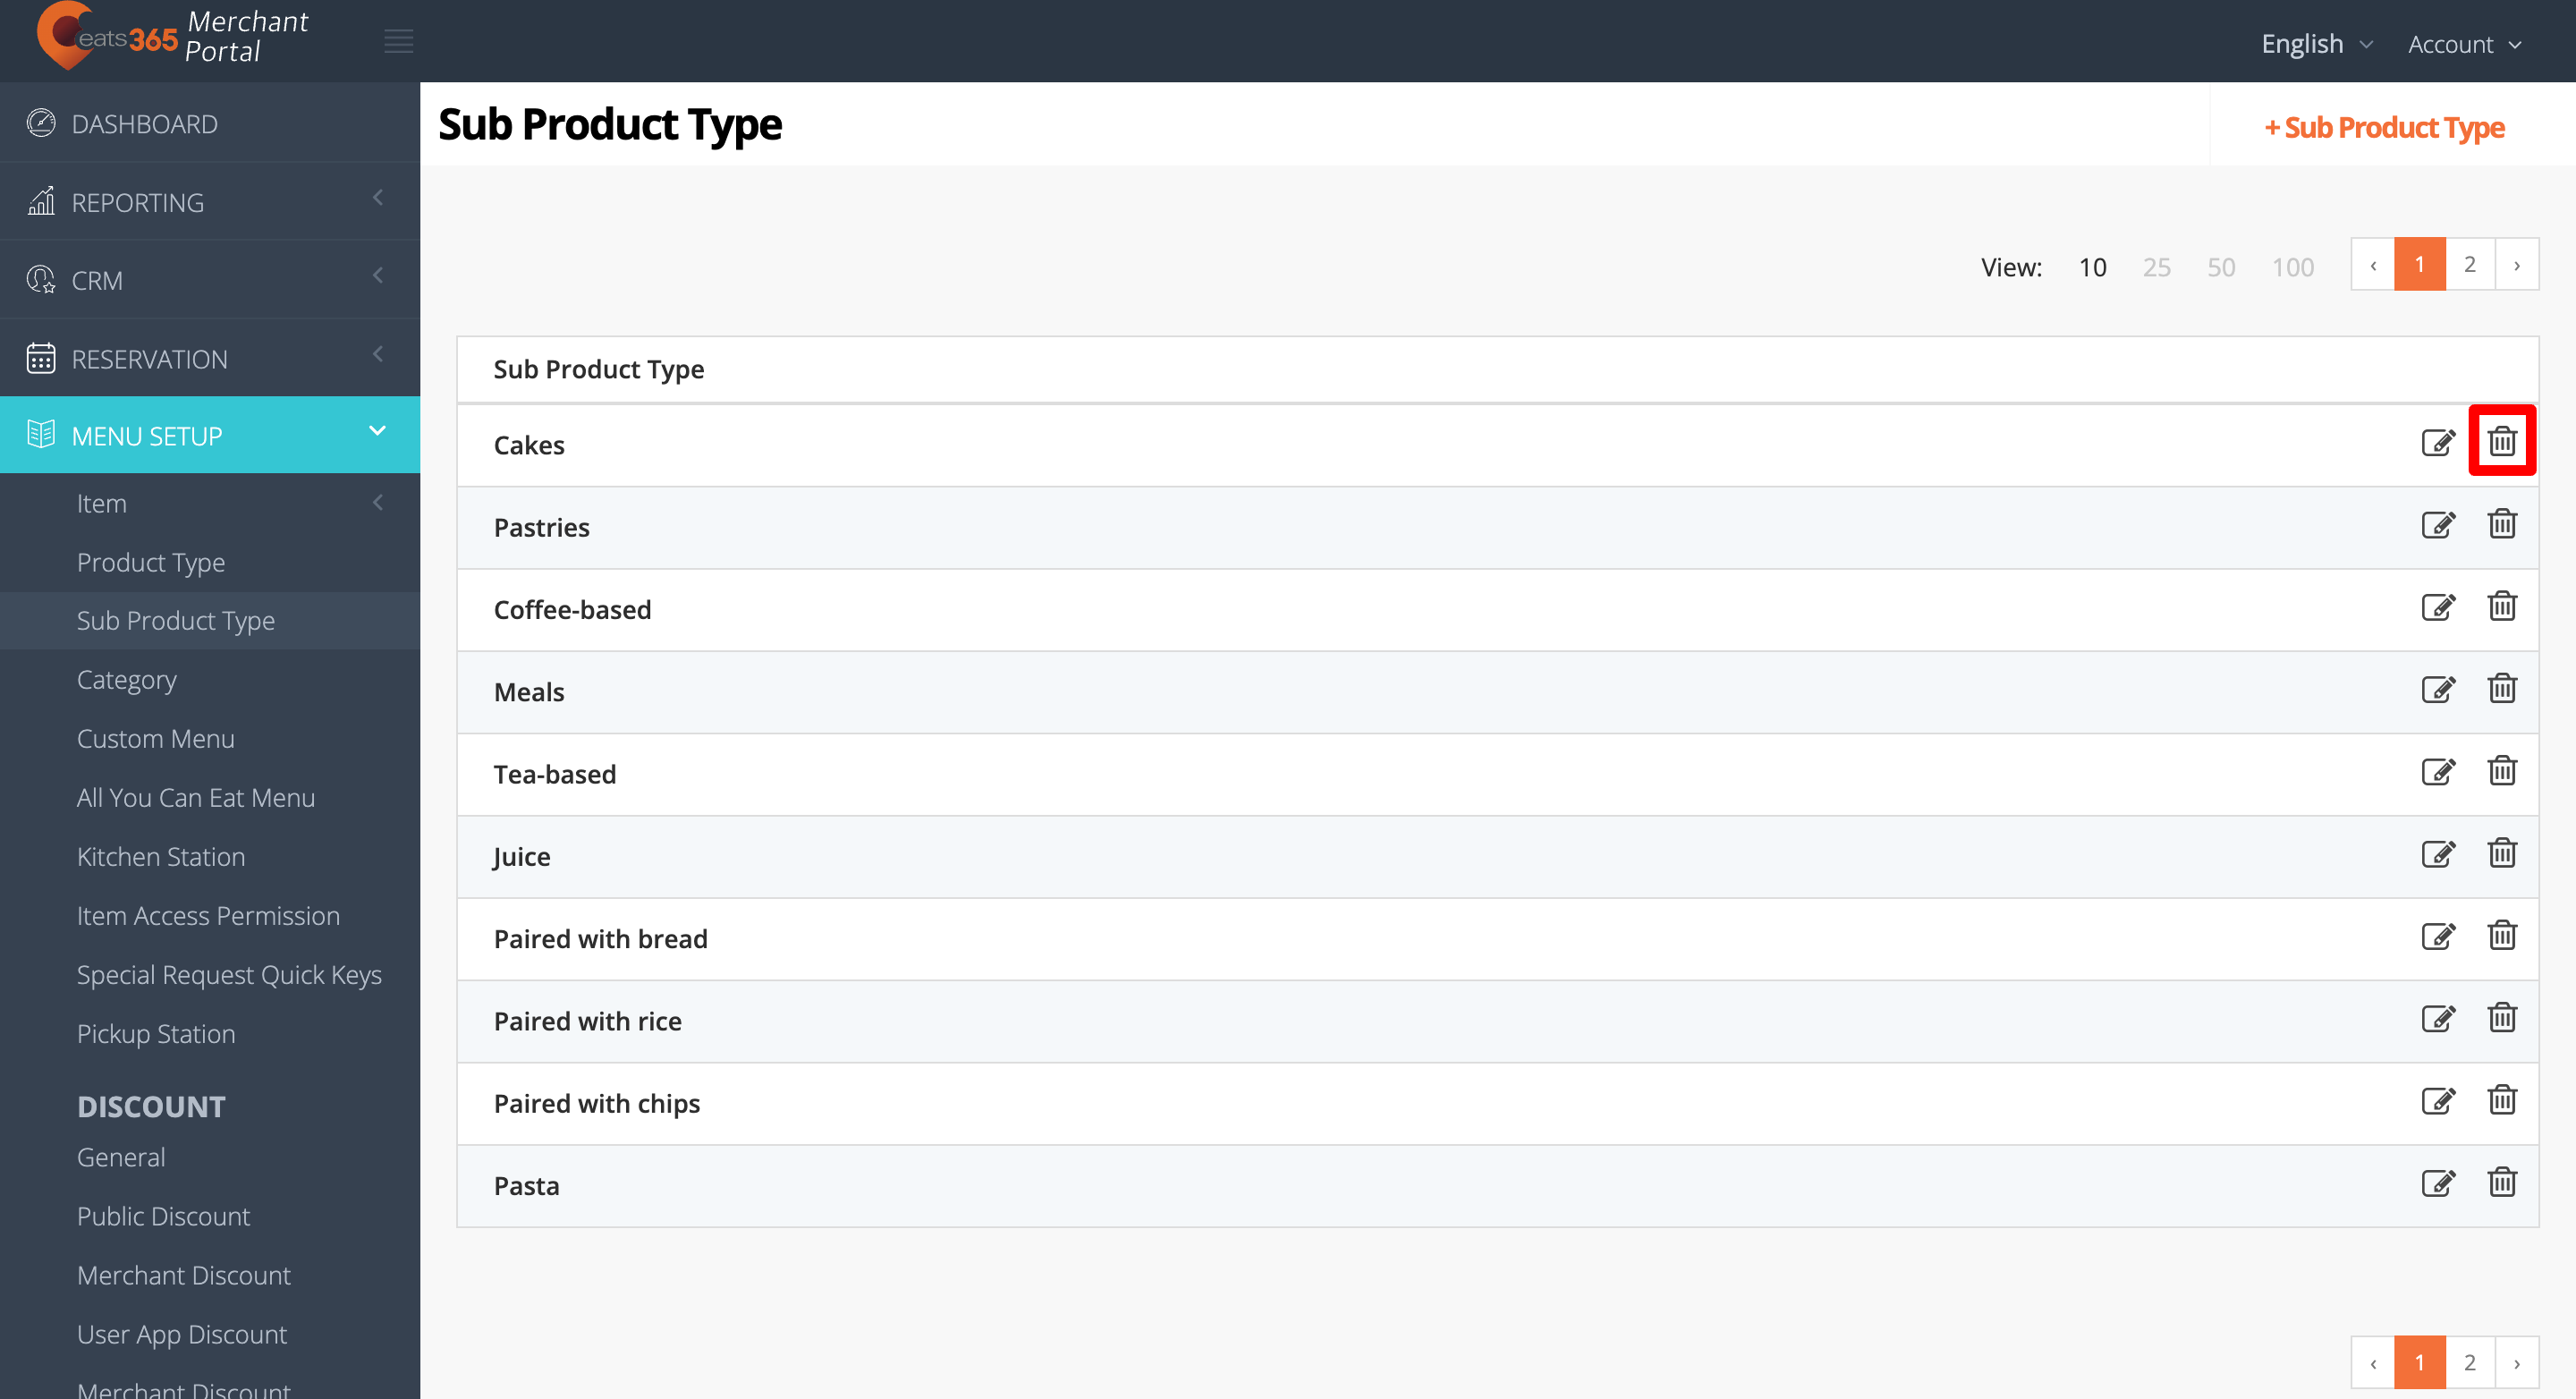
- On the left panel, click on Menu Setup, then select Sub Product Type.
- Next to the Sub Product Type that you want to delete, click on Delete .
Merchant Portal 2.0
- Log in to the Merchant Portal.
- On the left panel, click on Menu Setup, then select Sub Product Type.
- Next to the Sub Product Type that you want to delete, click on Delete. Then, click on Confirm.