 Eats365 Products
 Merchant Guide
 Modules
 Membership
 Integrations
 Hardware
 Staff Operations
 Roles & Permissions
 Payments
 Reports
 What’s New
 Release Notes
 Troubleshooting
 Simulators
 Glossary
 Troubleshooter
 System Status
Menu Setup
Table of Contents
Set up and manage Modifier Presets
Learn how to create modifier presets that can be added to menu items using the Merchant Portal.
The Modifier Preset feature lets you create a template of modifier options that can be easily applied to menu items. You can import this modifier template to an item and adjust the options as needed. Alternatively, you can apply shared modifiers to multiple items, allowing you to update the modifier options for all of them simultaneously.
In this article, you’ll learn how to create and manage modifier presets that can be applied to menu items.
To learn how to create and add modifier presets to items, Set up and manage Modifiers.
Types of Modifier Presets
There are two types of modifier presets you can create:
- Shared Modifier
- Modifier Template
Shared Modifier
A Shared Modifier is a modifier preset that can be used by multiple menu items simultaneously. When you update a shared modifier, the changes automatically apply to all items using that modifier, ensuring consistency across your menu. Updates to shared modifiers must be done through the Modifier Preset settings.
Modifier Template
A Modifier Template is a modifier preset that you can import to items and modify accordingly. Once a modifier template has been added to an item, it will appear as a regular modifier that can be edited and deleted.
Create a Modifier Template
To add a modifier template, follow the steps below:
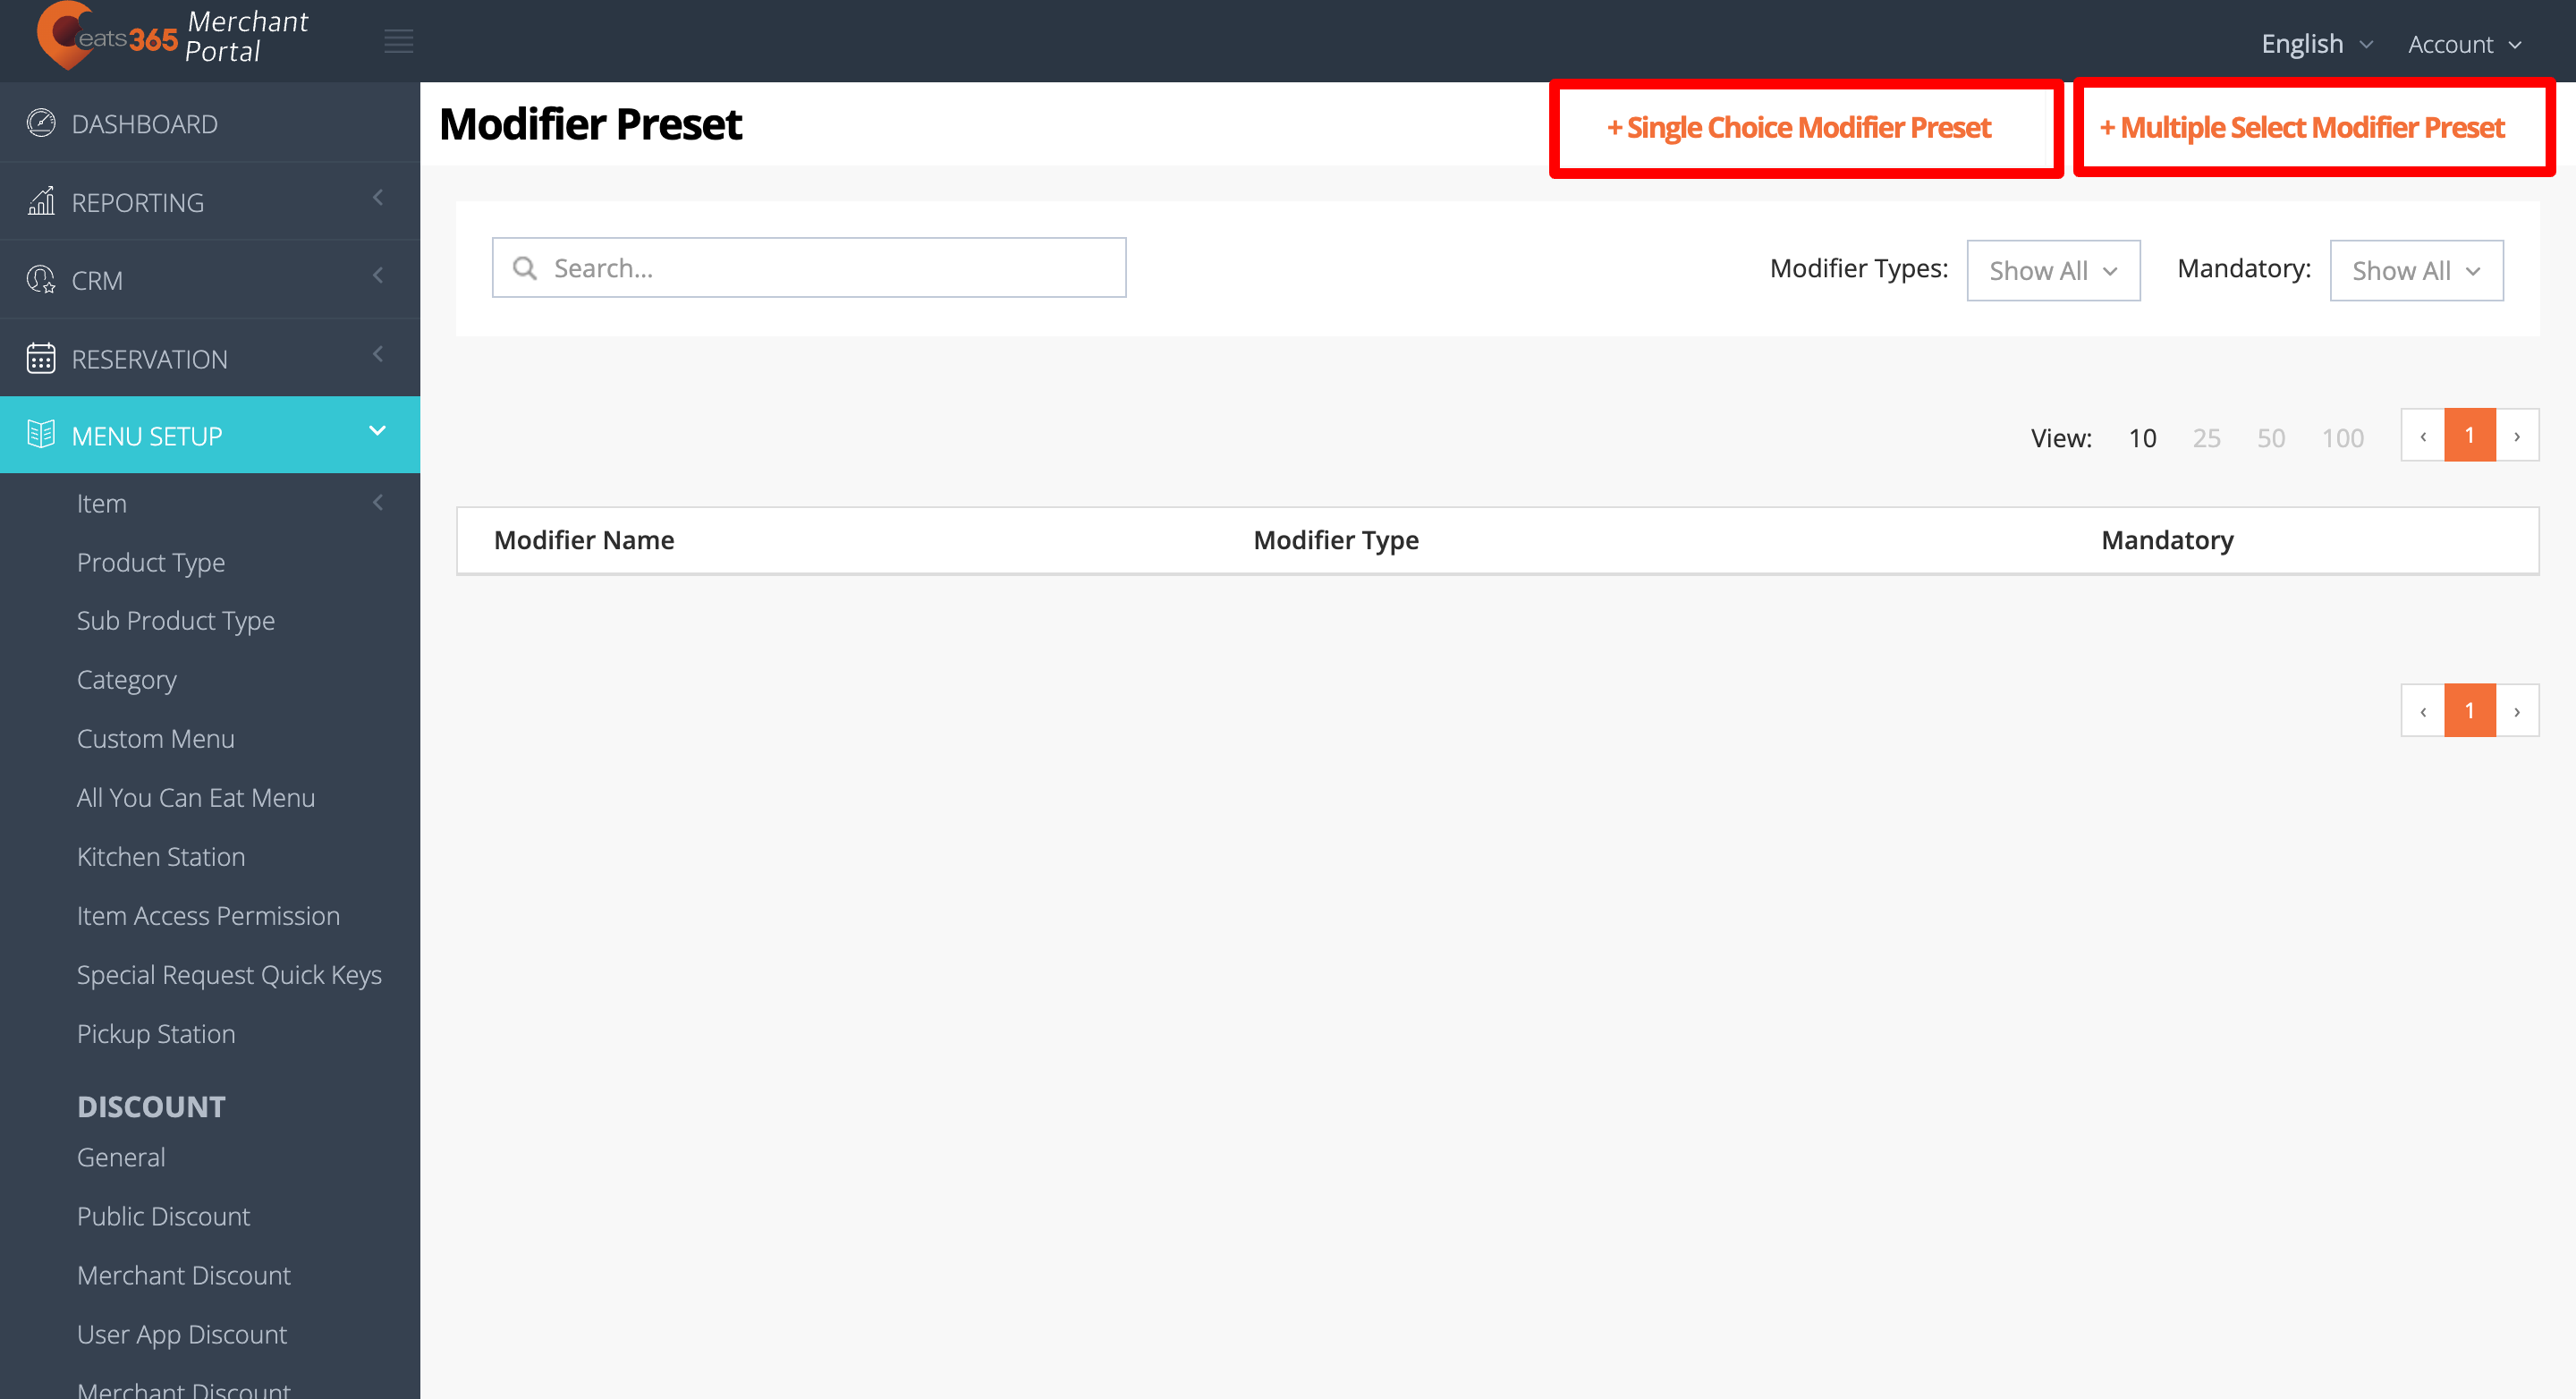
Merchant Portal (Classic Theme)
- Log in to the Merchant Portal.
- On the left panel, click on Menu Setup.
- Under “Modifiers,” click on Modifier Preset.
- At the top, choose the type of modifier template you want to create. Select Single Choice Modifier Preset or Multiple Select Modifier Preset.
- Select the modifier language.
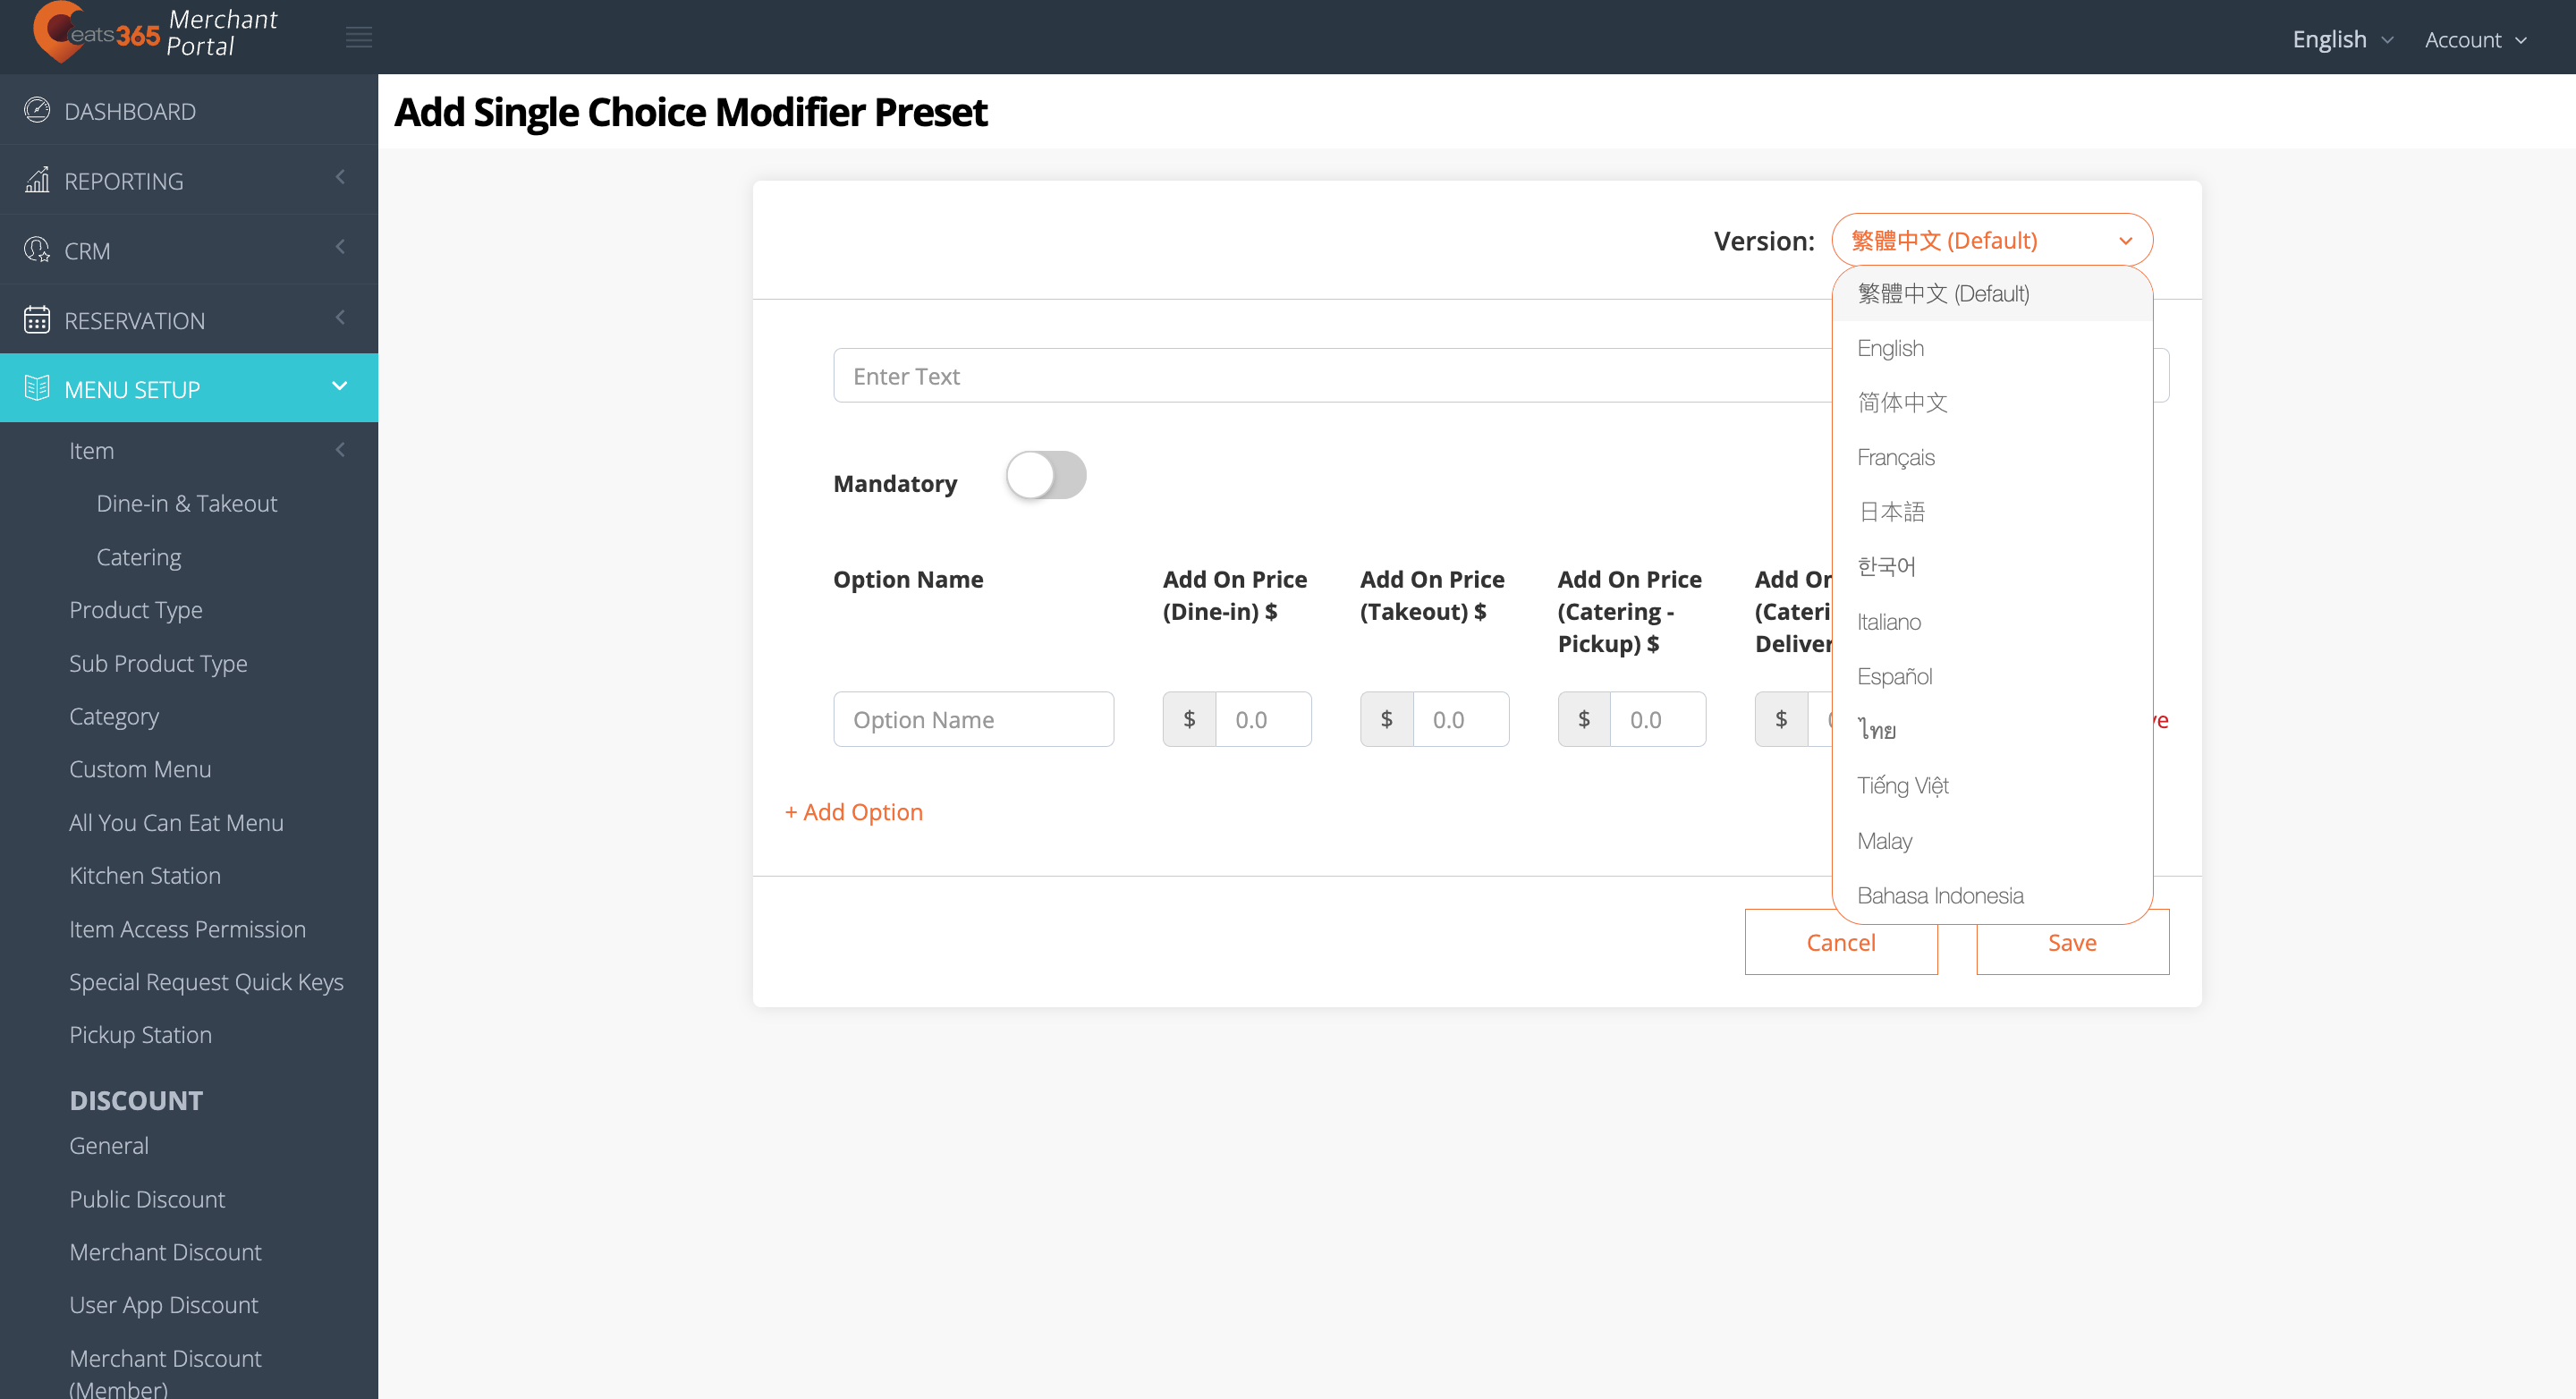 Note: You must enter a default name for the modifier. The name becomes available in whatever language the POS app is using. For multi-language menus, after selecting a default language, click on the language drop-down list and select your preferred language. Then, enter the alternate name in that language.
 - On the blank field, enter a name for the modifier. For example, if you are creating a Single Choice modifier template for drink sizes, you can enter “Drink Sizes.”
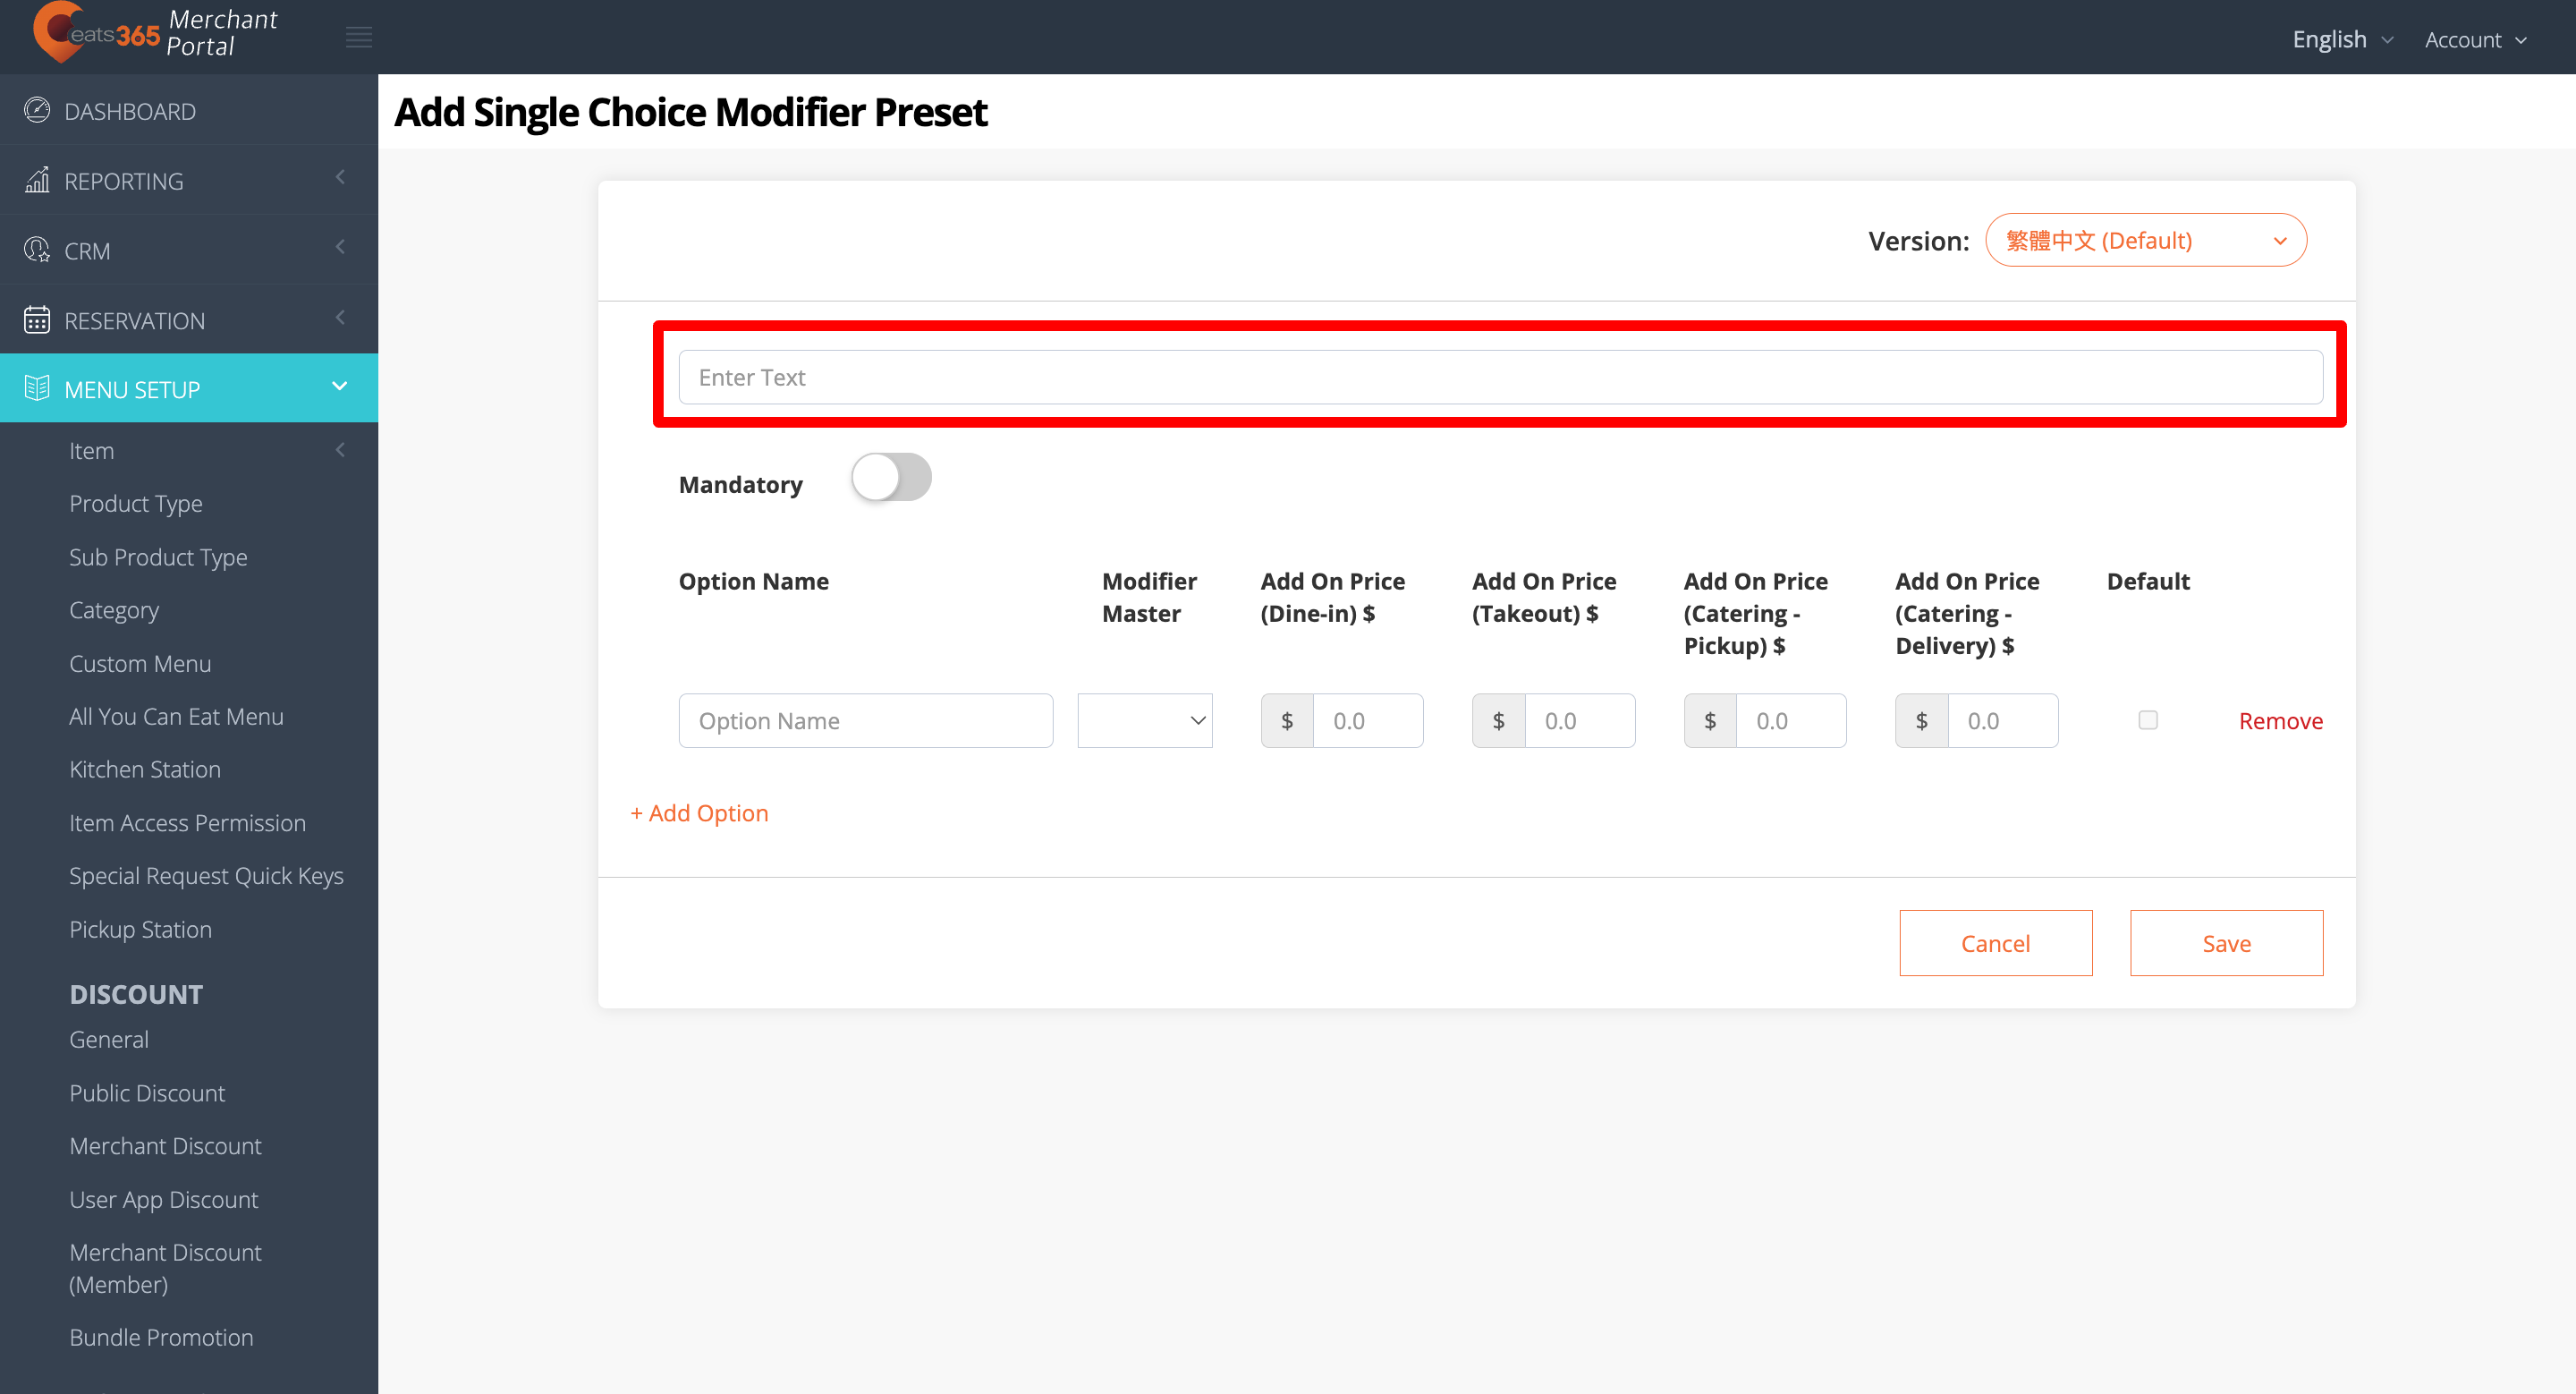
- Enter the details for the modifier template.
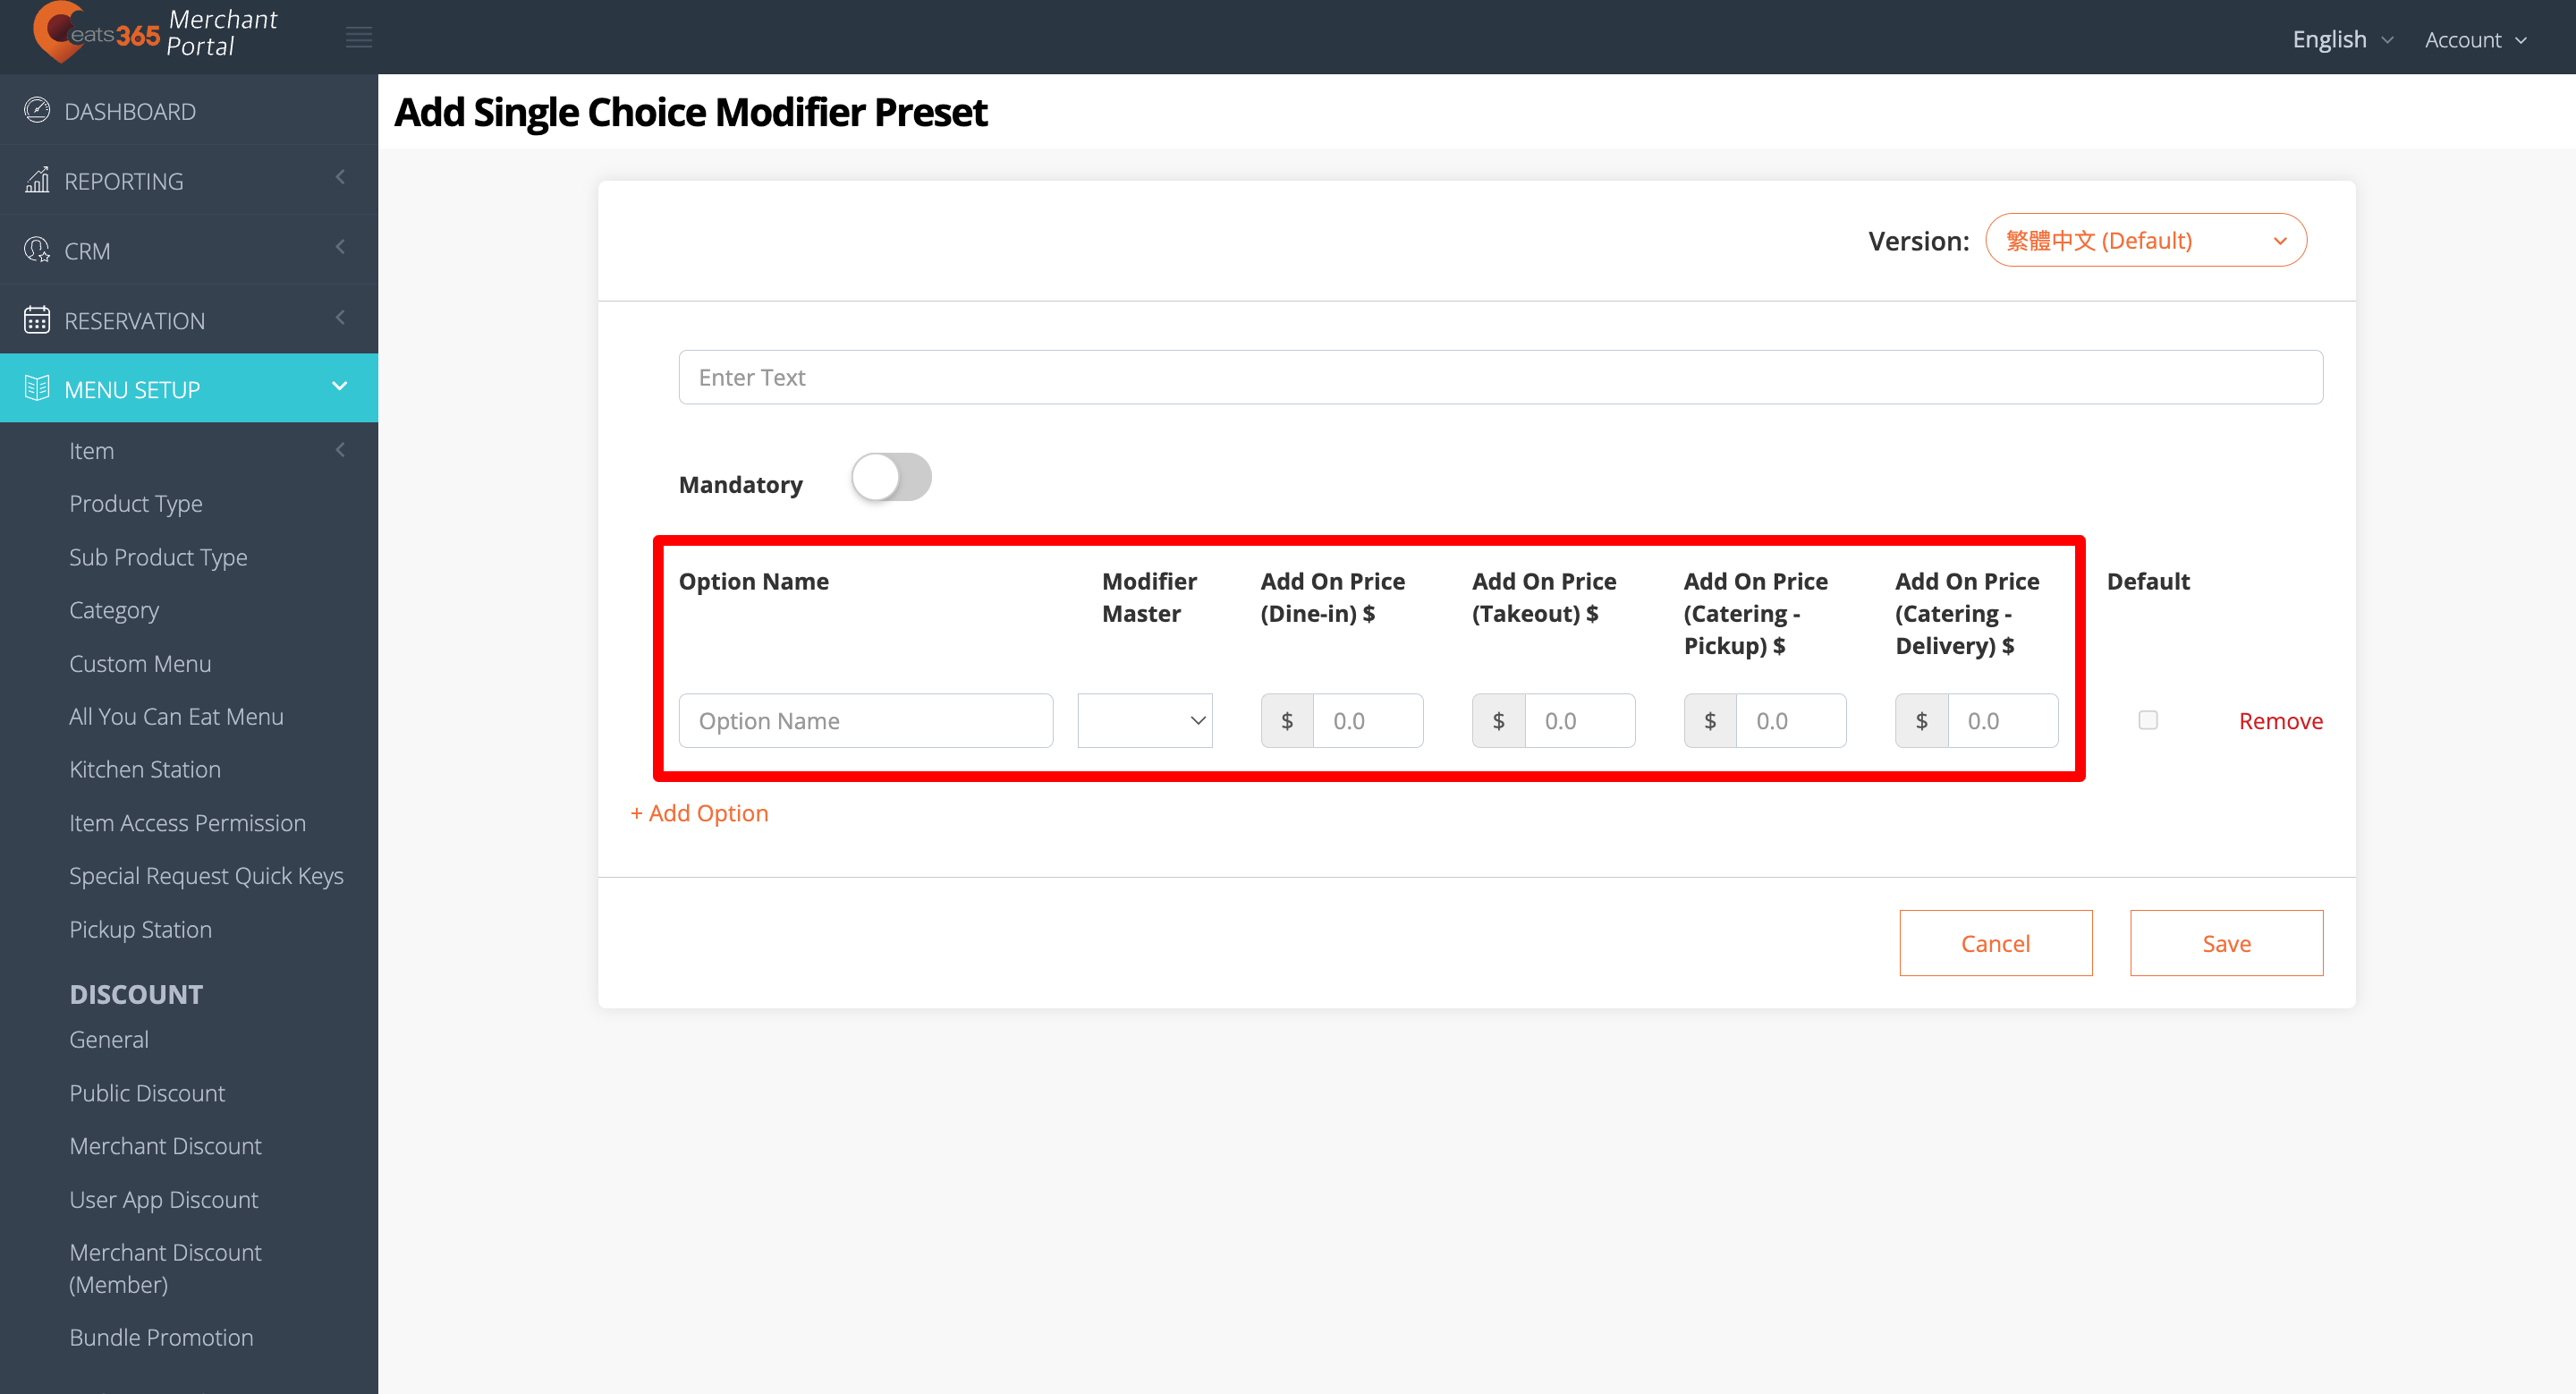
- To add another option, select Add Option.
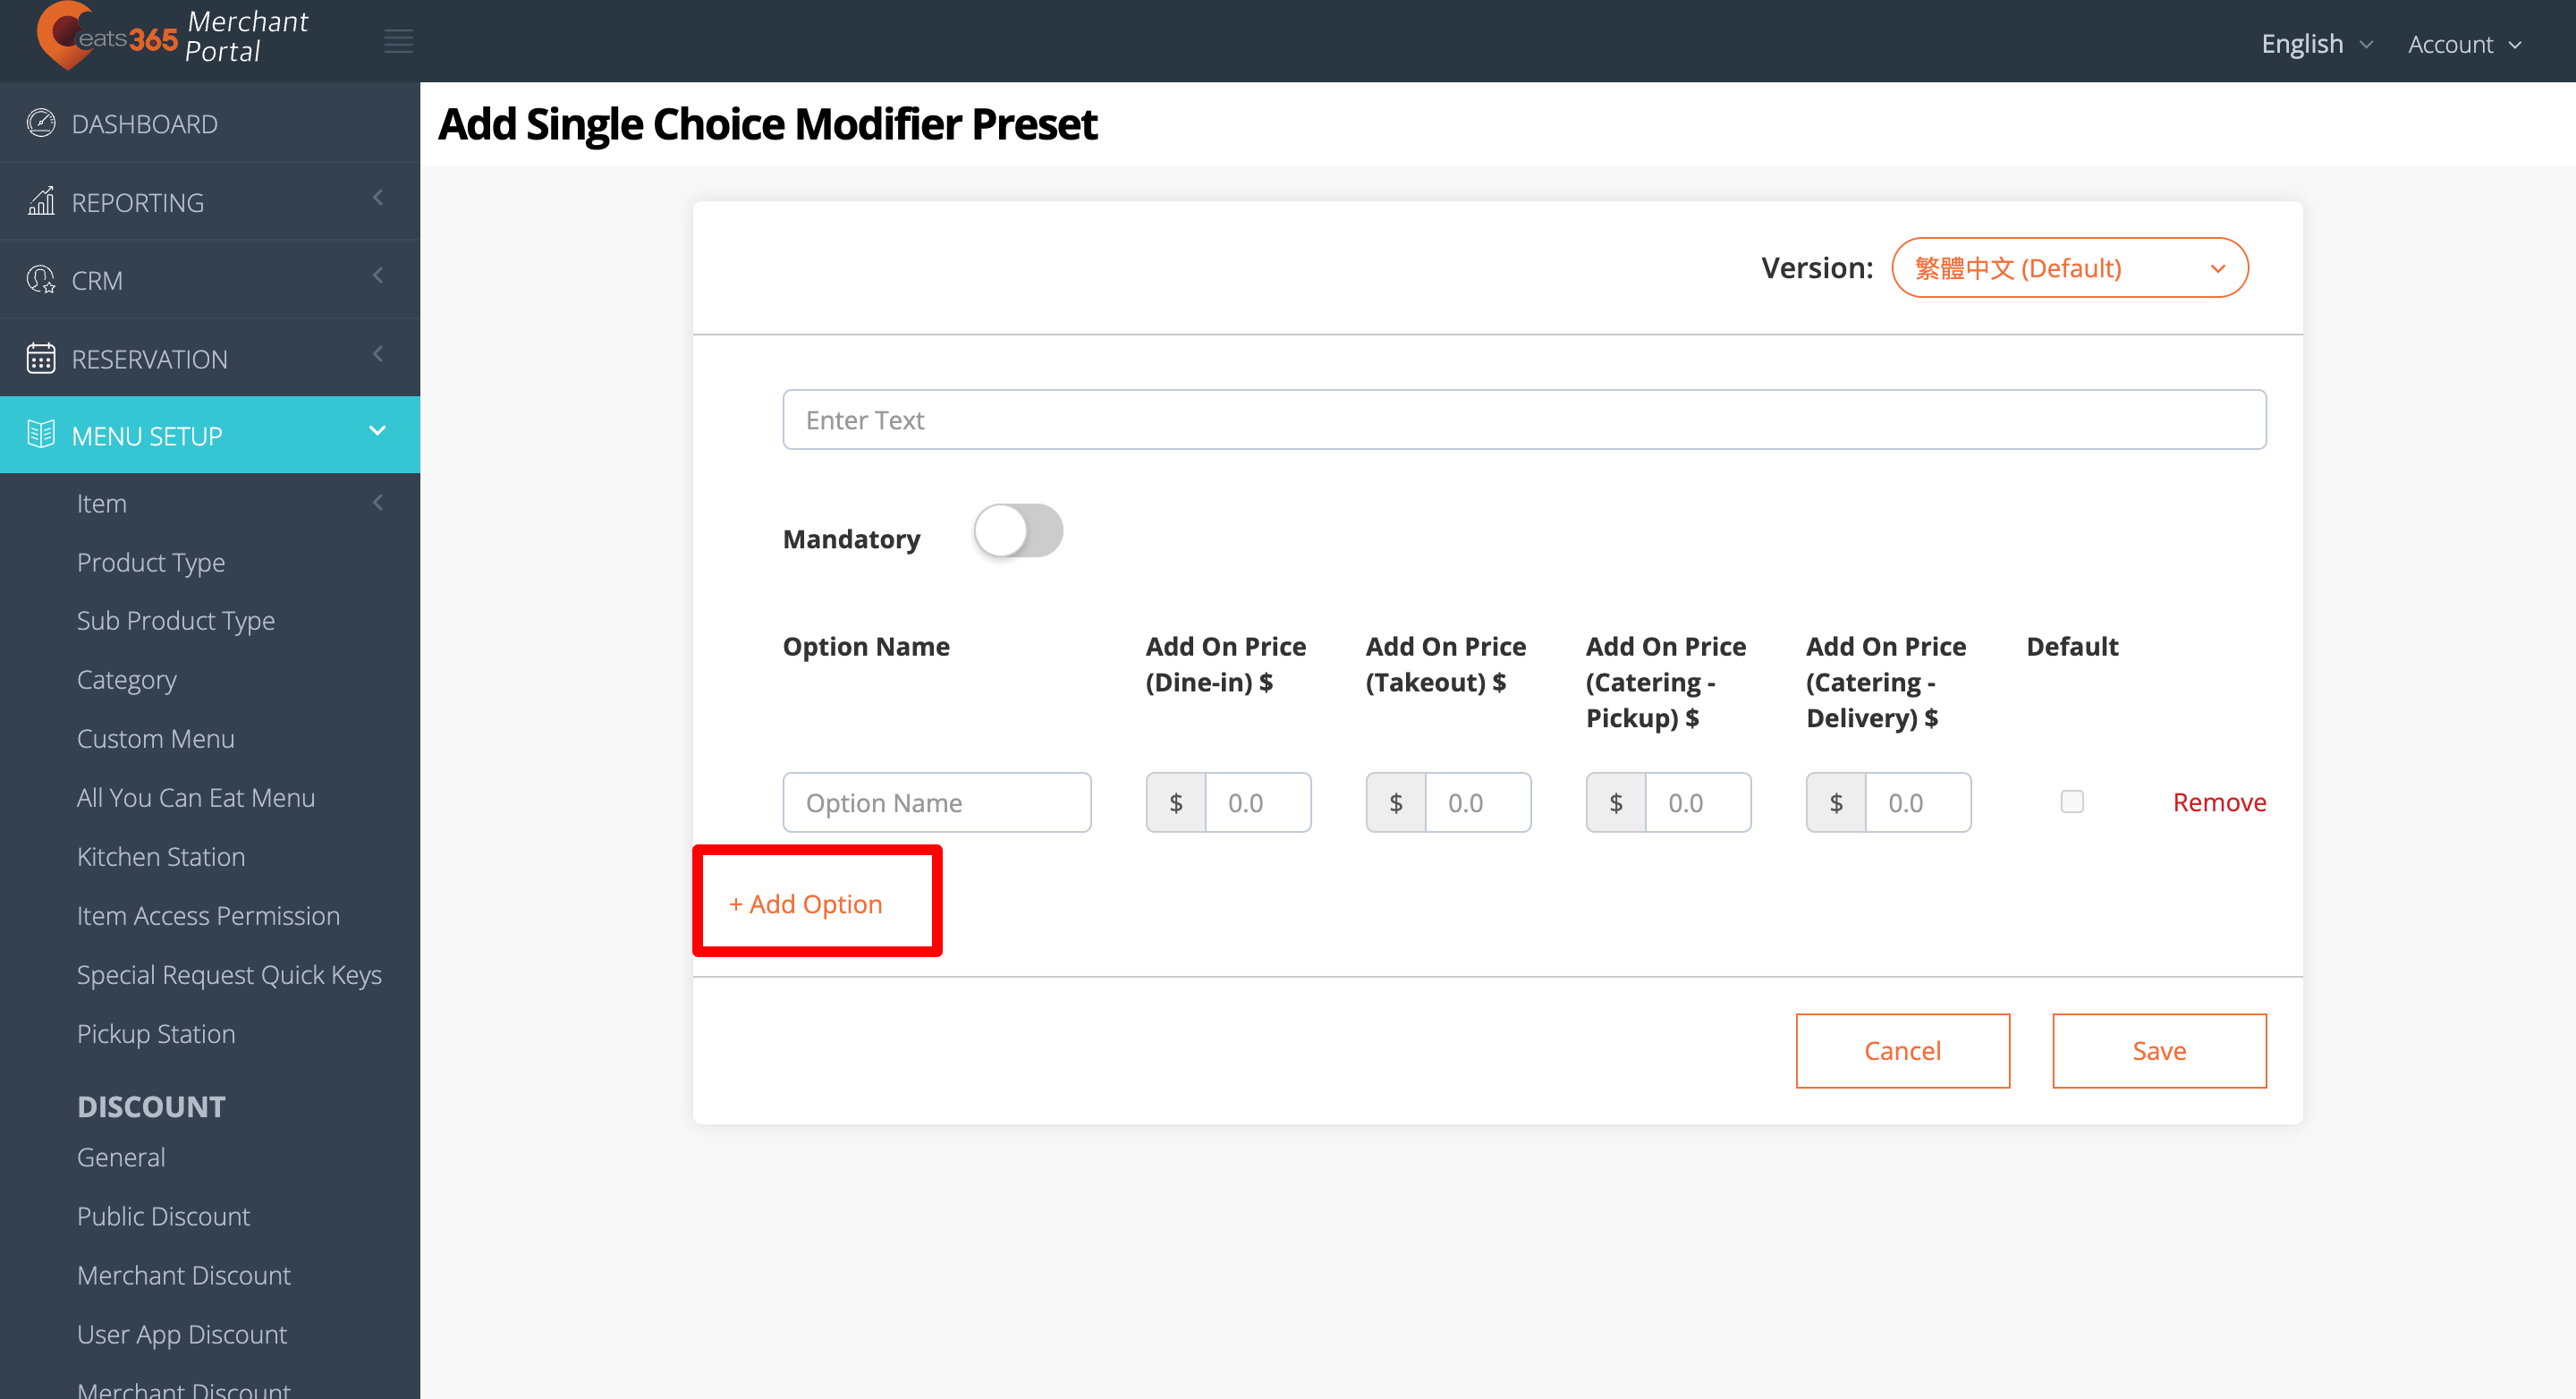
- Additional settings:
- Single Choice Modifier Preset: If you want to have a default option for the modifier, turn on Mandatory
 . Then, next to the option that you want to set as the default option, click on the check box
  .
.
- Multiple Select modifier Preset: To create option limits for the modifier, set the number under “Selection Minimum,” “Maximum,” and “Max Allowed” to your preferred limit.
Note: To set the minimum selection, you must turn on Mandatory first.
- Single Choice Modifier Preset: If you want to have a default option for the modifier, turn on Mandatory
- Click on Save to confirm.
Merchant Portal 2.0
- Log in to the Merchant Portal.
- On the left panel, click on Menu Setup.
- Click on Modifiers. Then, select Modifier Preset.
- At the top, choose the type of Modifier Preset you want to create. Select Single Choice Modifier Template or Multiple Select Modifier Template.

- Enter a name for the modifier per language. For example, if you are creating a Single Choice modifier template for drink sizes, you can enter “Drink Sizes.”
Note: Languages become available if you've set up different languages in the Item settings. To add more languages, click on +Languages.
- Enter the details for the modifier template.
Note: Once the modifier details have been filled out, a new entry automatically appears to add another option.
- Additional settings:
- Single Choice modifier Preset: If you want to have a default option for the modifier, turn on Mandatory
 . Then, next to the option that you want to set as the default option, toggle Default .
- Multiple Select modifier Preset: To create option limits for the modifier, enable Mandatory and set the number under “Min,” “Max,” and “Max Allowed” selection to your preferred limit.

- To track modifier inventory, under “Inventory Consumption,” select a modifier master from the drop-down list. For more information about creating a Modifier Master, refer to Set up and manage Modifier Masters.

- Single Choice modifier Preset: If you want to have a default option for the modifier, turn on Mandatory
- Click on Save to confirm.
Create a Shared Modifier
A Shared Modifier is a type of modifier preset that can be applied to menu items so you can easily update the modifiers across multiple items simultaneously. When a shared modifier is applied to an item, you won’t be able to make changes to the modifier from the Item settings. Updates to shared modifiers must be done through the Modifier Preset settings.
To add a shared modifier, follow the steps below:
- Log in to the Merchant Portal.
- On the left panel, click on Menu Setup.
- Click on Modifiers. Then, select Modifier Preset.
- Click on the Shared Modifiers tab.
- At the top, choose the type of Shared Modifier you want to create. Select Single Choice Shared Modifier or Multiple Select Shared Modifier.

- Enter a name for the modifier per language. For example, if you are creating a Single Choice shared modifier for drink sizes, you can enter “Drink Sizes.”
Note: Languages become available if you've set up different languages in the Item settings. To add more languages, click on +Languages.
- Enter the details for the Shared Modifier.
Note: Once the modifier details have been filled out, a new entry automatically appears to add another option.
- Additional settings:
- Single Choice Shared Modifier: If you want to have a default option for the modifier, turn on Mandatory . Then, next to the option that you want to set as the default option, toggle Default on.

- Multiple Select Shared Modifier: To create option limits for the modifier, enable Mandatory and set the number under “Min,” “Max,” and “Max Allowed” selection to your preferred limit.

- To track modifier inventory, under “Inventory Consumption,” select a modifier master from the drop-down list. For more information about creating a Modifier Master, refer to Set up and manage Modifier Masters.

- Single Choice Shared Modifier: If you want to have a default option for the modifier, turn on Mandatory
- To apply the shared modifier to an item, click on the Applied Items tab. Then, select the items where you want the shared modifier to apply.

- Click on Save to confirm.
Create a copy of Modifier Presets
To duplicate a modifier preset, follow the steps below:
- Log in to the Merchant Portal.
- On the left panel, click on Menu Setup.
- Click on Modifiers, then select Modifier Preset.
- Select if you’re cloning a Modifier Template or a Shared Modifier.
- Select the modifier preset that you want to make a copy of. Next to the modifier preset, click on Copy
 .
.
- Toggle on the modifier preset settings you’d like to copy for the duplicate:
-
Modifier Template
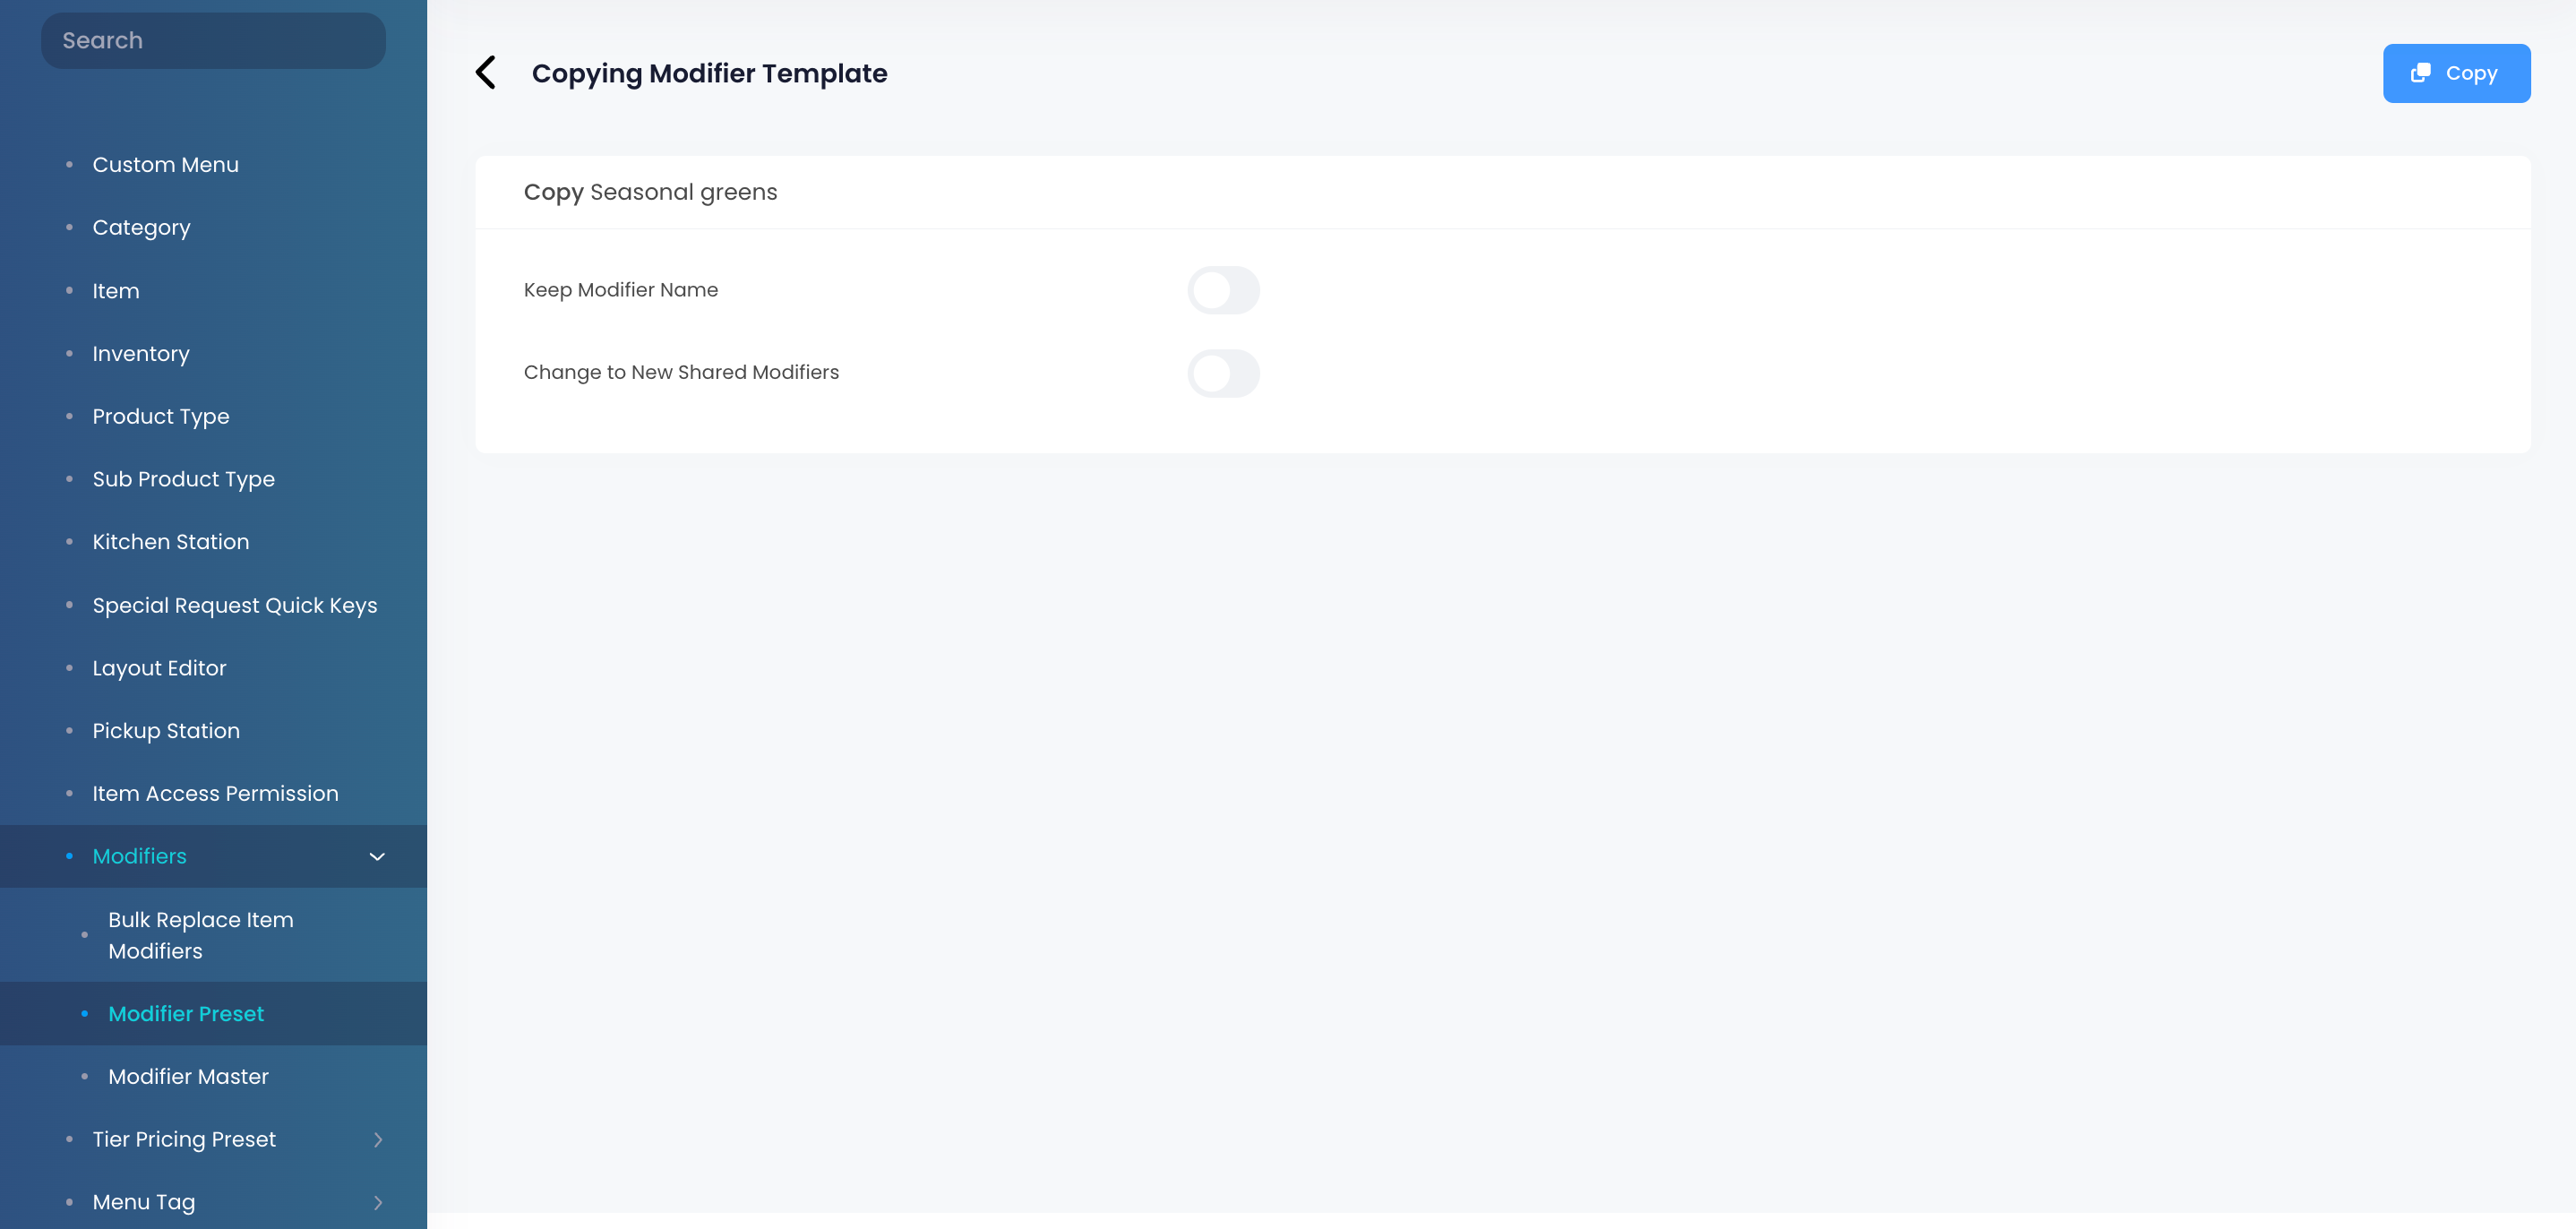
- Keep Modifier Name - Retains the name of the modifier template that you made a copy of.
- Change to New Shared Modifiers - Creates a shared modifier version of the modifier template.
-
Shared Modifiers
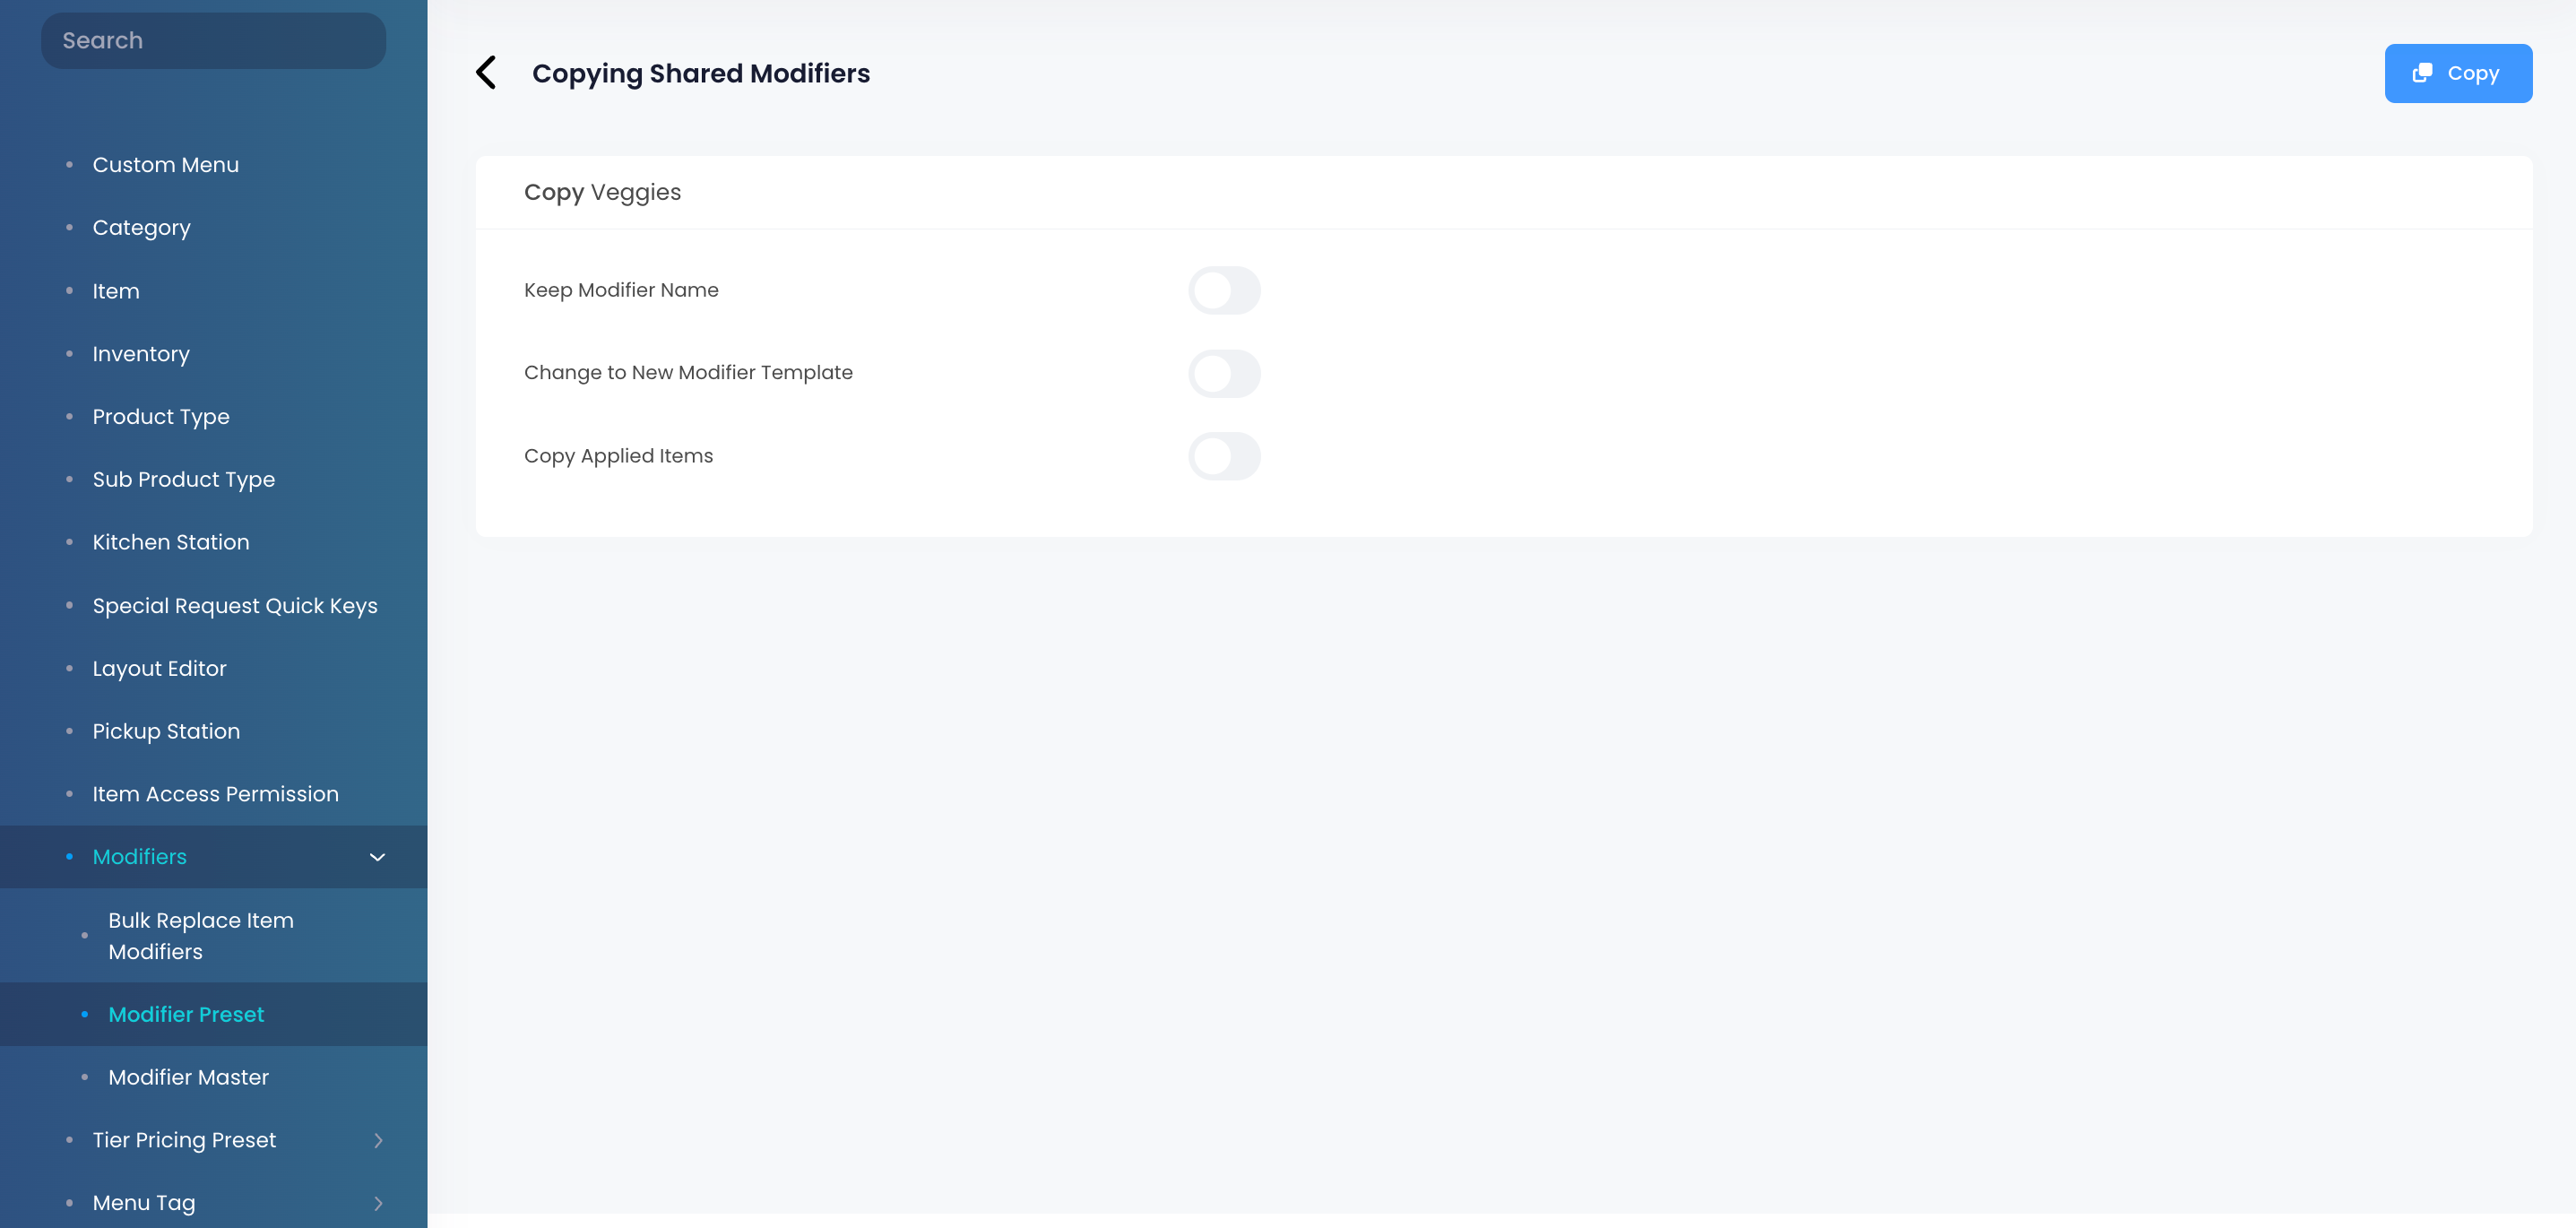
- Keep Modifier Name - Retains the name of the shared modifier that you made a copy of.
- Change to New Modifier Template - Creates a modifier template version of the shared modifier.
- Copy Applied Items - Applies the new shared modifier to the same items as the shared modifier that you made a copy of.
-
Modifier Template
- Click on Save to confirm.
Manage modifiers
Edit Modifier Presets
To modify a modifier preset, follow the steps below:
Merchant Portal (Classic Theme)
- Log in to the Merchant Portal.
- On the left panel, click on Menu Setup.
- Under “Modifiers,” click on Modifier Preset.
- Select the modifier template that you want to edit. Next to the modifier preset, click on Edit
 .
.
- Update the modifier preset.
- Click on Save to confirm.
Merchant Portal 2.0
- Log in to the Merchant Portal.
- On the left panel, click on Menu Setup.
- Click on Modifiers, then select Modifier Preset.
- Under the Modifier Template or Shared Modifiers tab, select the modifier preset that you want to edit. Next to the modifier preset, click on Edit
 .
.
- Update the modifier preset.
- Click on Save to confirm.
Delete Modifier Presets
To remove a modifier preset, follow the steps below:
Merchant Portal (Classic Theme)
- Log in to the Merchant Portal.
- On the left panel, click on Menu Setup.
- Under “Modifiers,” click on Modifier Preset.
- Select the modifier template that you want to delete. There are two ways to delete a modifier template:
- Next to the modifier template that you want to delete, click on Delete
 . Then, click on Confirm.
- Next to the modifier template that you want to delete, click on Edit . At the bottom, click on Delete. Then, click on Confirm.
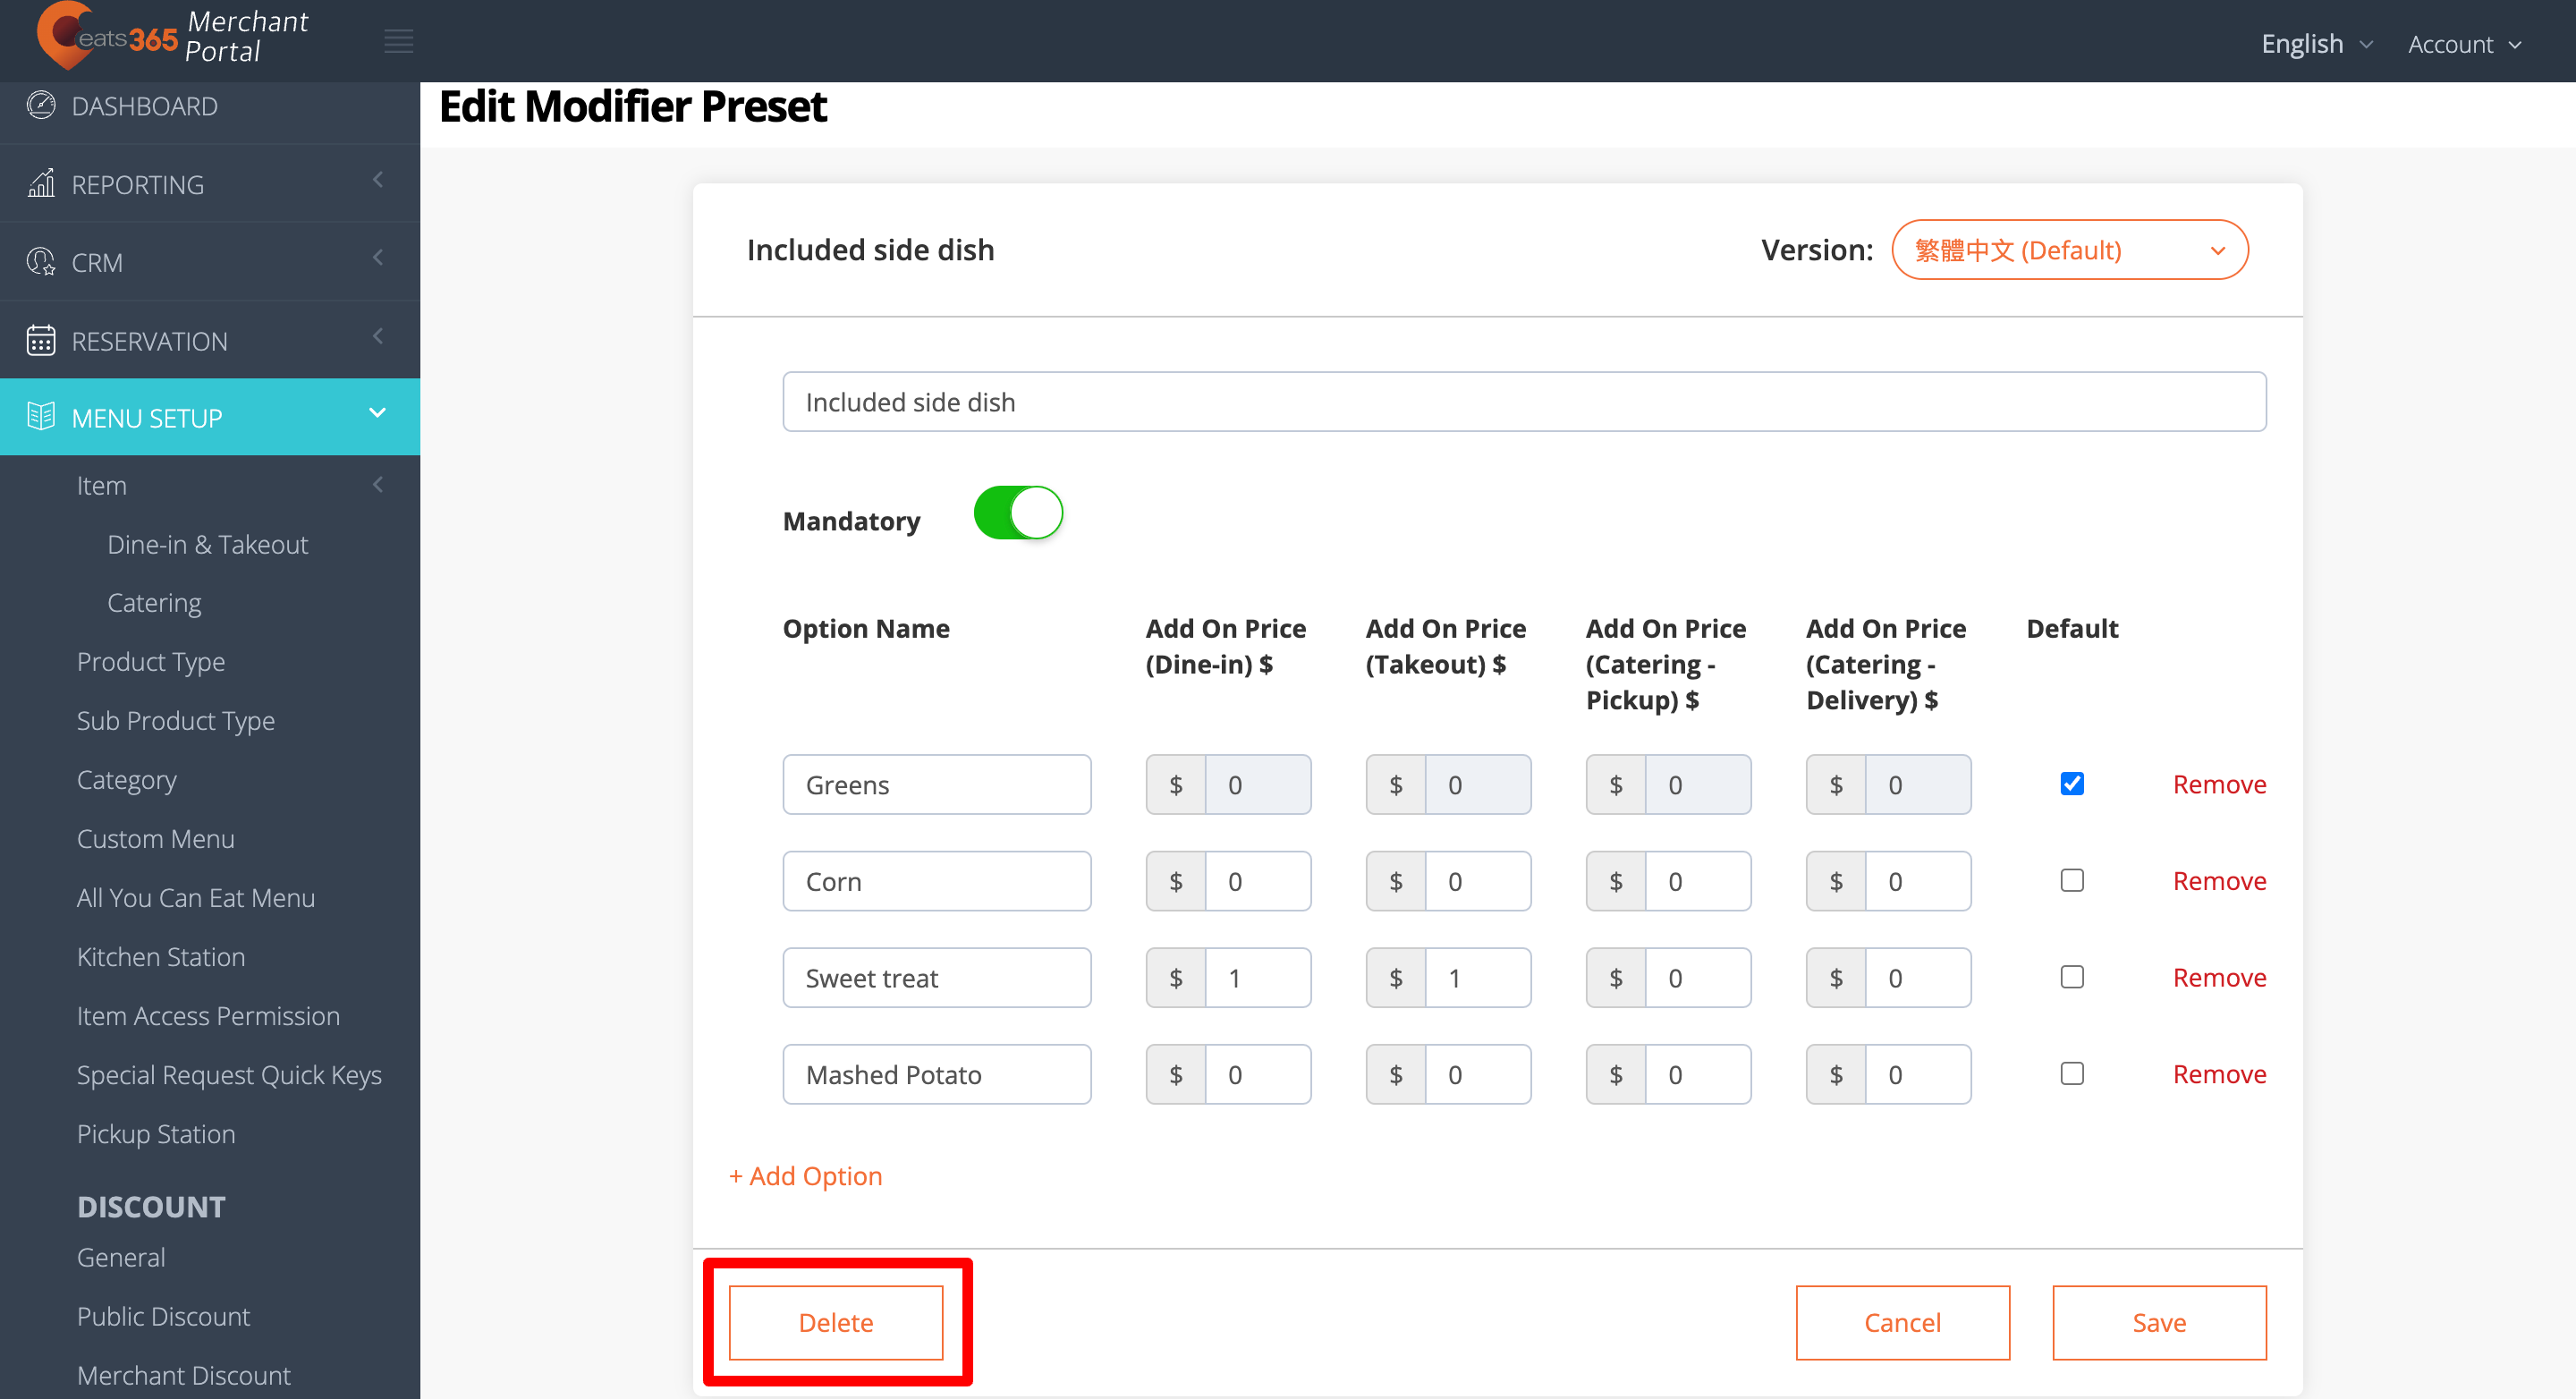
- Next to the modifier template that you want to delete, click on Delete
- If you want to delete an option from the modifier template, select the option that you want to delete. Then, next to the option, click on Remove.
- Click on Save to confirm.
Merchant Portal 2.0
- Log in to the Merchant Portal.
- On the left panel, click on Menu Setup.
- Select Modifiers, then click on Modifier Preset.
- Under the Modifier Template or Shared Modifiers tab, next to the modifier preset that you want to delete, click on Delete
 . Then, click on Confirm.
-
If you want to delete an option from the modifier preset, next to the modifier preset that you want to delete, click on Edit . On the option you want to delete, click on Remove
 .
.
- Click on Save to confirm.