 Eats365 Products
 Merchant Guide
 Modules
 Membership
 Integrations
 Hardware
 Staff Operations
 Roles & Permissions
 Payments
 Reports
 What’s New
 Release Notes
 Troubleshooting
 Simulators
 Glossary
 Troubleshooter
 System Status
Scan to Order
Table of Contents
Configure Scan to Order settings (Food Court)
Learn how to enable Scan to Order for Food Court restaurants and configure its settings on the Merchant Portal.
The Scan to Order feature allows customers to view your restaurant’s menu items and place dine-in orders using their own mobile devices, such as phones or tablets.
In this article, you’ll learn how to enable Scan to Order for dine-in orders and configure its settings to your preference.
Configure Scan to Order settings
Enable Scan to Order
To allow customers to place dine-in orders through Scan to Order, follow the steps below:
Merchant Portal (Classic Theme)
- Log in to the Merchant Portal.
- On the left panel, click on Restaurant Settings. Then, click on Dine-In.
- Click on Scan to Order.
- Turn on Allow to Place Dine-in Order
 .
. - Configure Scan to Order settings.
- At the top right, click on Save to confirm.
You can configure the following settings:
Minimum Charge
Enter the minimum charge required to place an order.
Auto Accept Paid Order
Enable this setting to automatically accept paid orders.
Estimated Time (mins)
Enter the estimated finishing time for the order.
DeleteMerchant Portal 2.0
- Log in to the Merchant Portal.
- On the left panel, click on Restaurant Settings. Then, click on Dine-In.
- Click on Scan to Order.
- Turn on Allow to Place Dine-in Order
 .
. - Configure Scan to Order settings.
- At the top right, click on Save to confirm.
You can configure the following settings:
Minimum Charge
Enter the minimum charge required to place an order.
Auto Accept Paid Order
Enable this setting to automatically accept paid orders.
Estimated Time (mins)
Enter the estimated finishing time for the order.
DeleteEnable Pre-order
To allow customers to place pre-orders through Scan to Order, follow the steps below:
Merchant Portal (Classic Theme)
- Log in to the Merchant Portal.
- On the left panel, click on Restaurant Settings. Then, click on Dine-In.
- Click on Scan to Order.
- Under "User App Pre-order," turn on Allow User App to Pre-order .
- Configure Scan to Order pre-order settings.
- At the top right, click on Save to confirm.
You can configure the following settings:
Earliest Minutes Allowed
Set the earliest time when customers can schedule their pre-order. For example, if you set the Earliest Minutes Allowed to “60,” customers can schedule pre-orders 60 minutes or 1 hour from the current time. If the current time is 8:30 AM, the earliest time that customer can schedule their order is 9:30 AM.
Interval on Selection (mins)
Set the interval to determine how far apart the available time slots should be. For example, if you choose an interval of 60 minutes, customers can select a time slot with an interval of 60 minutes or 1 hour. The available time slots show up as 12:00, 13:00, 14:00, and so on.
Earliest Order Time
Set the earliest time when customers can place pre-orders.
Last Order Time
Set the latest time when customers can place pre-orders. For example, if you set the latest order time to 17:00, customers won’t be able to place pre-orders beyond the set time.
DeleteMerchant Portal 2.0
- Log in to the Merchant Portal.
- On the left panel, click on Restaurant Settings. Then, click on Dine-In.
- Click on Scan to Order.
- Under "Pre-order," turn on Allow Same Operation Period Pre-order .
- Configure Scan to Order pre-order settings.
- At the top right, click on Save to confirm.
You can configure the following settings:
Earliest Minutes Allowed
Set the earliest time when customers can schedule their pre-order. For example, if you set the Earliest Minutes Allowed to “60,” customers can schedule pre-orders 60 minutes or 1 hour from the current time. If the current time is 8:30 AM, the earliest time that customer can schedule their order is 9:30 AM.
Interval on Selection (mins)
Set the interval to determine how far apart the available time slots should be. For example, if you choose an interval of 60 minutes, customers can select a time slot with an interval of 60 minutes or 1 hour. The available time slots show up as 12:00, 13:00, 14:00, and so on.
Earliest Order Time
Set the earliest time when customers can place pre-orders.
Last Order Time
Set the latest time when customers can place pre-orders. For example, if you set the latest order time to 17:00, customers won’t be able to place pre-orders beyond the set time.
DeleteEnable Custom Field
"Custom Field" allows you to add a field on the checkout page of the Branded Online Store that can either require customers to input required information or display custom information such as table numbers.
To create a custom field, follow the steps below:
Merchant Portal (Classic Theme)
- Log in to the Merchant Portal.
- On the left panel, click on Restaurant Settings. Then, click on Dine-In.
- Click on Scan to Order.
- Under "Customization," turn on Enable Custom Field .
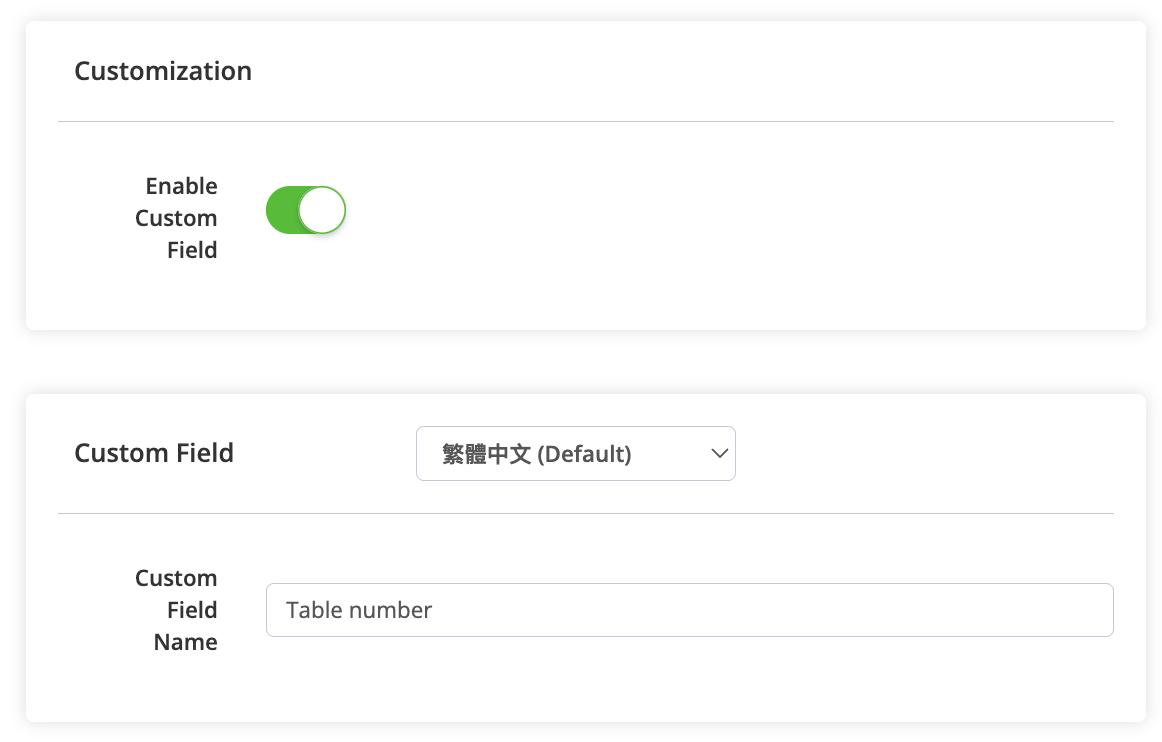
- Under "Custom Field," enter the field name that will appear on the Branded Online Store.
- At the top right, click on Save to confirm.
Merchant Portal 2.0
- Log in to the Merchant Portal.
- On the left panel, click on Restaurant Settings. Then, click on Dine-In.
- Click on Scan to Order.
- Under "Customization," turn on Enable Custom Field .
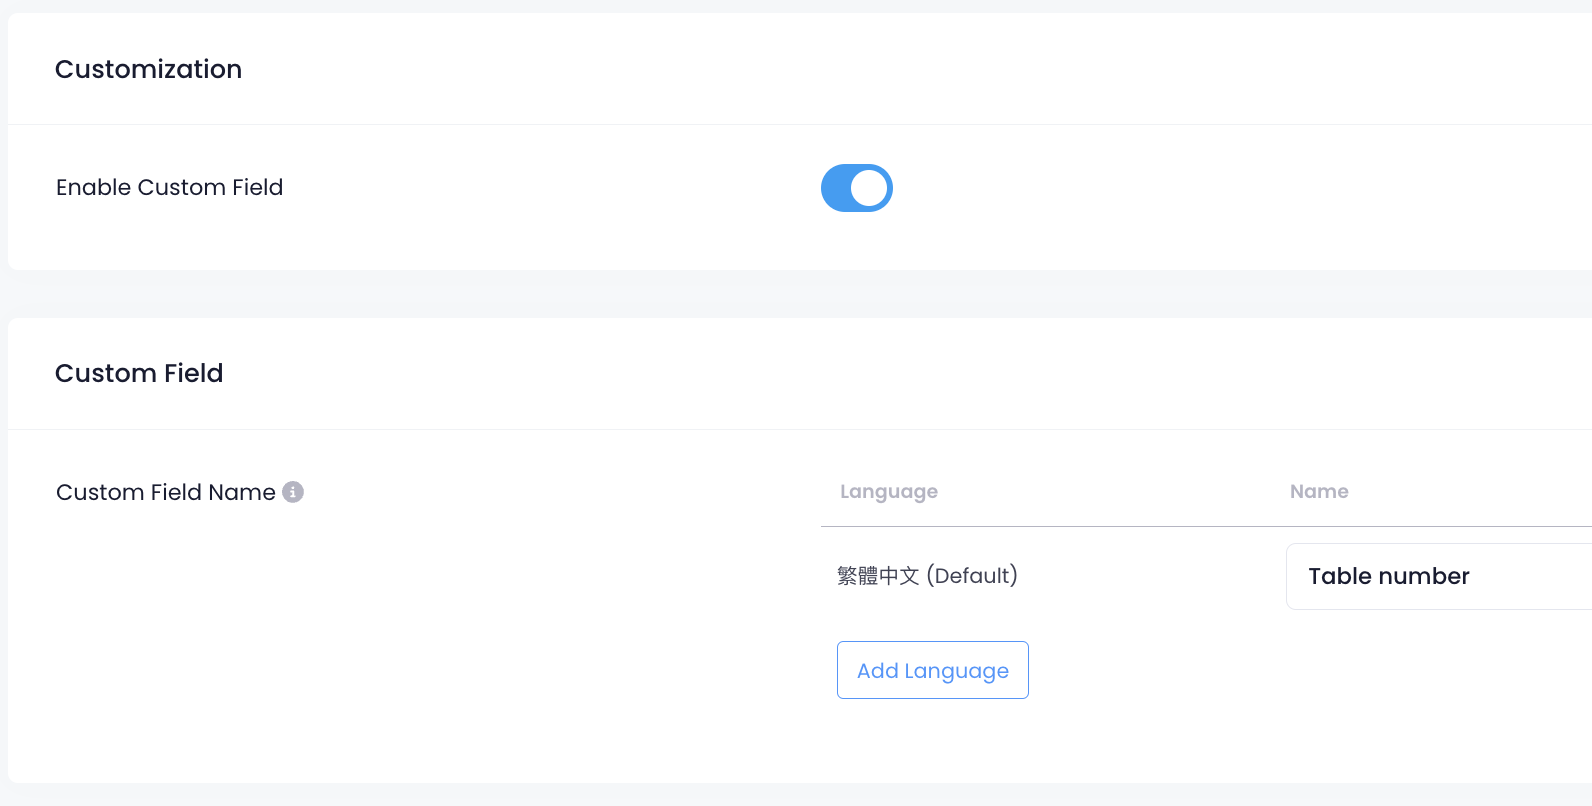
- Under "Custom Field," enter the field name that will appear on the Branded Online Store.
- At the top right, click on Save to confirm.
Note:- Once Custom Field is enabled, customers can enter the required information on the checkout page of the Branded Online Store.
- If a static QR Code is enabled and a check name is created on the restaurant’s OEM Group settings, the check name will appear on the custom field instead, and the custom field won’t be editable.
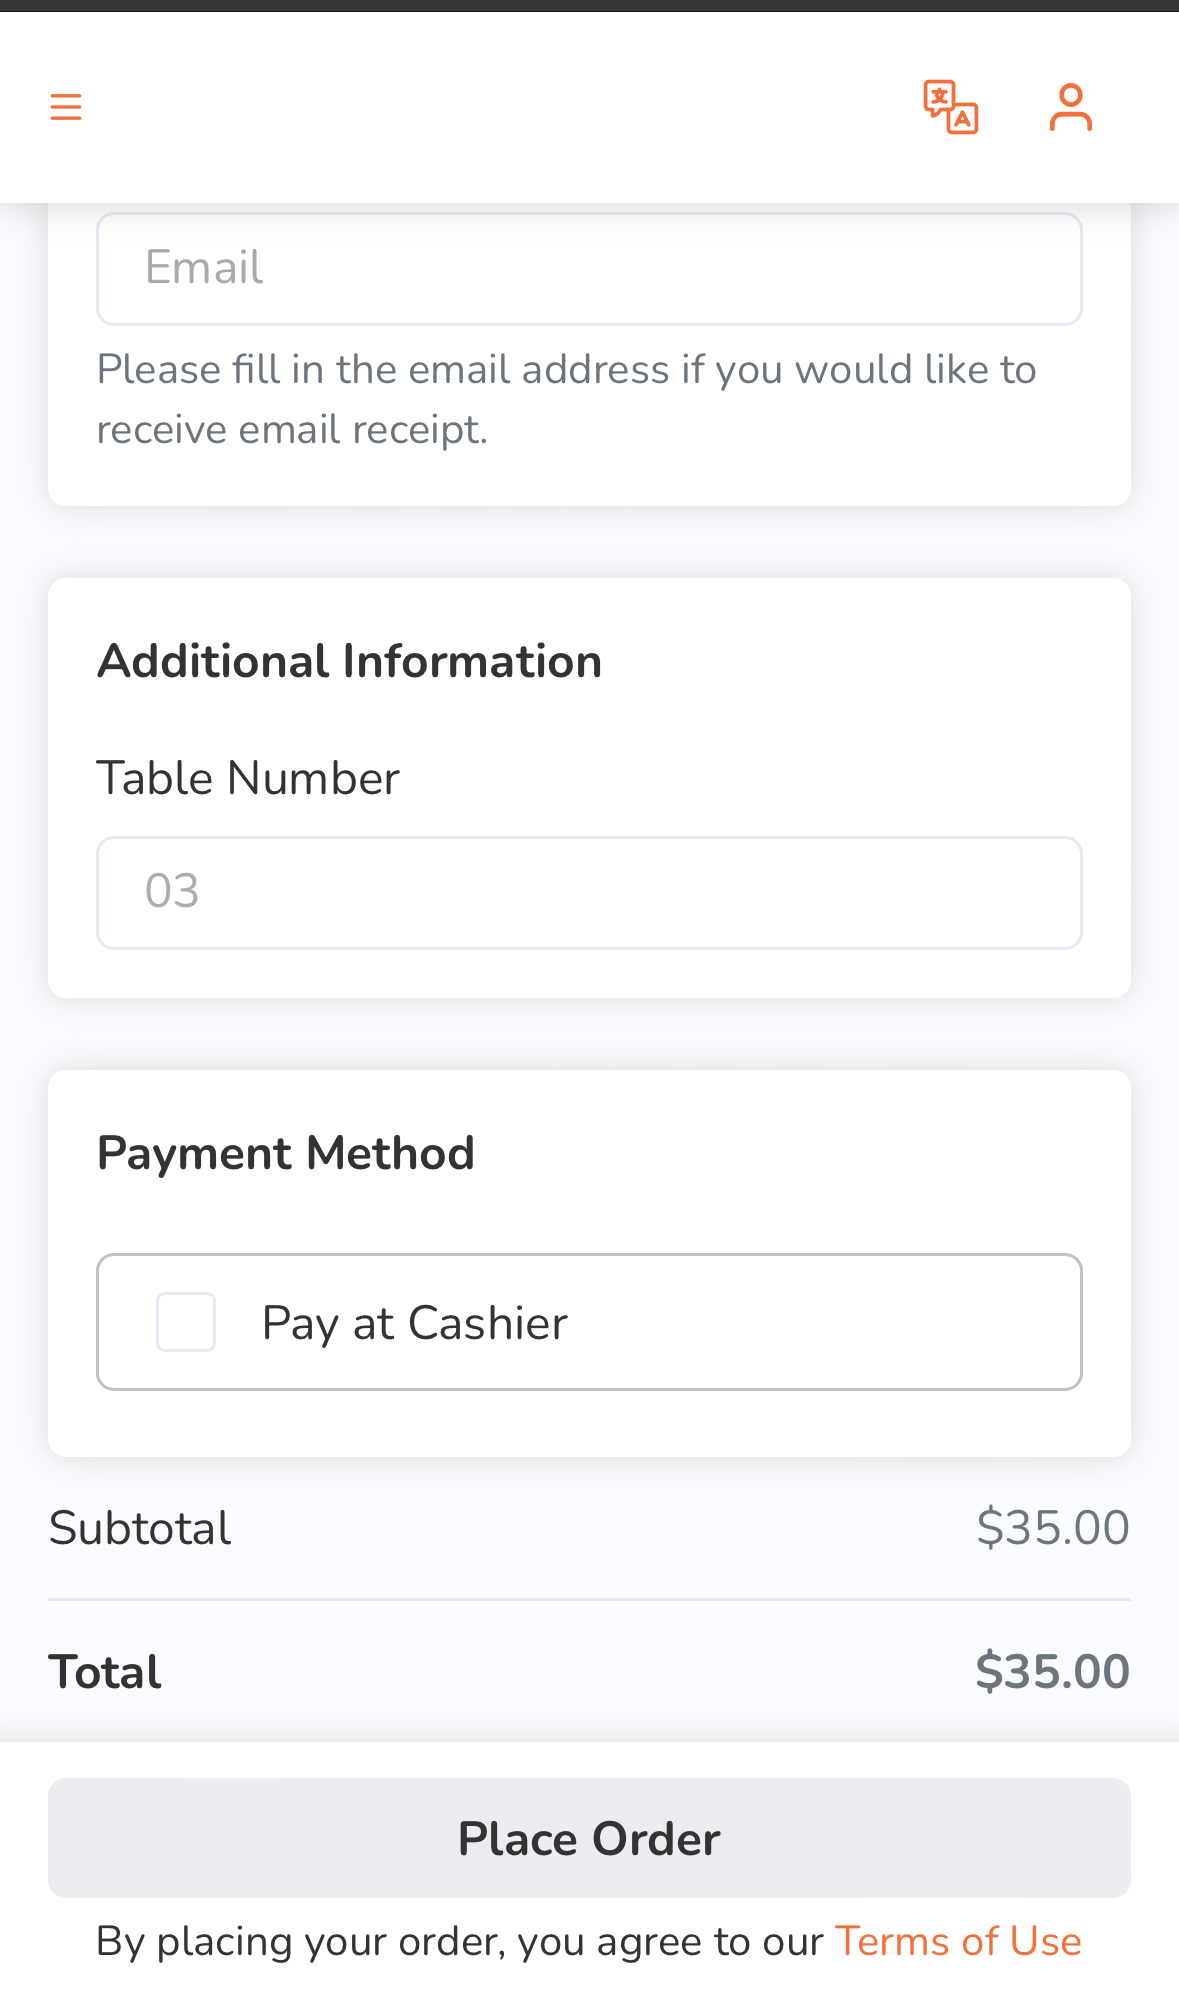
- Once Custom Field is enabled, customers can enter the required information on the checkout page of the Branded Online Store.
Enable Suggested Tip
Suggested tip allows you to display tip options on the Branded Online Store.
To display tip options, follow the steps below:
- Log in to the Merchant Portal.
- On the left panel, click on Restaurant Settings. Then, click on Dine-In.
- Click on Scan to Order.
- Under "Suggested Tip," turn on Enable Suggested Tip .
- At the top right, click on Save to confirm.