Set up and Installation
Contact Us
If you still have questions or prefer to get help directly from an agent, please submit a request.
We’ll get back to you as soon as possible.
- Explore Eats365 products
- Set up and Installation
- Menu Setup
- Set up and manage a Category (Full Service)
- Set up and manage a Category (Quick Serve)
- Set up and manage a Category (Food Court)
- Set up and manage Product and Sub Product Type
- Set up and manage a Single Item (Full Service)
- Set up and manage a Single Item (Quick Serve)
- Set up and manage a Single Item (Food Court)
- Set up and manage a Combo Item (Full Service)
- Set up and manage a Combo Item (Quick Serve)
- Set up and manage a Combo Item (Food Court)
- Set up and manage Catering Items
- Set up and manage a Custom Menu
- Set up a tax-inclusive menu
- Set up and manage Modifiers
- Set up and manage Modifier Masters
- Set up and manage Modifier Presets
- Set up and manage Tier Pricing Rules
- Allocate item sales to different sales categories
- Set up and manage a Kitchen Station
- Set up a Pickup Station
- Set up a Pickup Station (Food Court)
- Customize the menu layout
- Set up and manage Special Request Quick Keys
- Set up and manage Menu Tags
- View and manage Inventory
- Table Map Setup
- Restaurant Settings
- Dine-In Settings
- Takeout Settings
- Catering settings
- Queuing Settings
- System Preferences
- Manage General Preferences
- Manage System Preferences (Full Service)
- Manage System Preferences (Quick Serve)
- Manage System Preferences (Food Court)
- Set up and manage Ordering Quantity Limit
- Modify Action Button options
- Set up a Revenue Center
- Enable Sequential Order Number
- Configure Audit Log settings
- Device Management
- Set a primary POS
- Reset the Eats365 POS
- Update the Eats365 POS
- Change POS device name
- Configure POS to sign out automatically
- Maintain restaurant operations using Offline Mode
- Configure POS login preferences
- Available features when in Offline Mode
- Create a home screen shortcut for the Merchant Portal
- Account Management
- Reservation
- Import Tools
- Time Sheets
- Menu Template
- Scan to Order
- All You Can Eat Menu
- Food Court Settings
Connect an iPad to a network
Learn how to connect a supported iPad device to a network.
Important
If your iPad is connected to LAN with an Apple adapter (Lightning Camera Kit), please do not update to iOS 16.5. It contains a severe bug that will cause your iPad to stop charging while using the adapter. If you are connecting via Wi-Fi or USB-C type adapters, you can safely disregard this message.
A reliable network ensures that your iPad POS devices, printers, and modules can communicate with each other without any issues. A stable internet connection also helps process hassle-free credit card transactions and seamless cloud syncing to help you run your restaurant smoothly.
You can connect a compatible iPad to a network through a wired or wireless connection. It’s recommended to use a wired connection to have a stable and consistent connection to the router at all times.
For more information about networks, refer to Types of internet networks.
Wired
To connect an iPad to a network, follow the steps below:
- Plug in the adapter to the iPad’s Lightning or USB-C port.
- Plug an Ethernet cable into the Ethernet adapter.
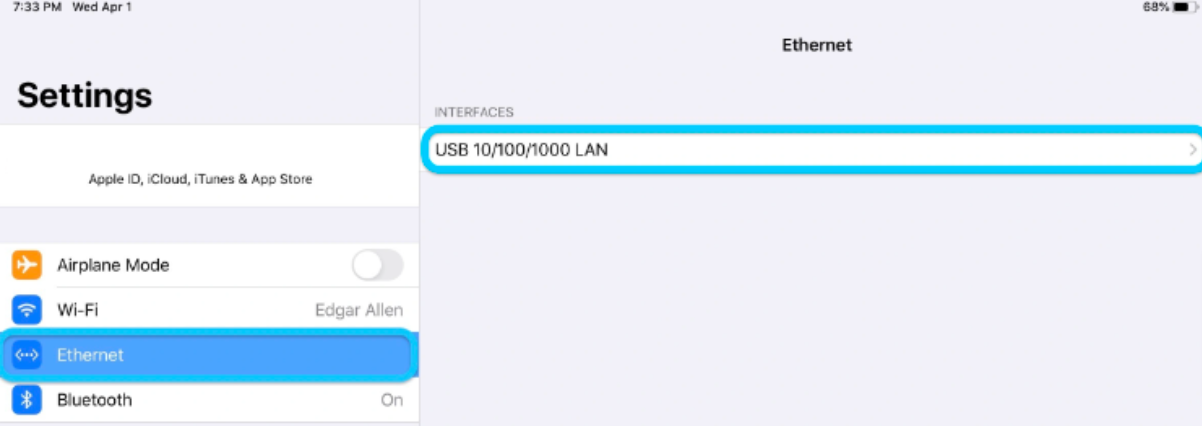
- To verify that your Ethernet connection is working, open your iPad's Settings
 , then tap Ethernet. If the connection is successful, you'll find your Ethernet information.

 .
.
Wireless
To connect your iPad to a Wi-Fi network, follow the steps below:
- From your iPad’s home screen, tap the Settings app
 , then choose Wi-Fi.
 - Turn on Wi-Fi
 . The iPad scans for all available Wi-Fi networks.
 - Tap the name of the Wi-Fi network that you want to join.
- Enter the Wi-Fi password, then tap Join.
Note: If you don't know the Wi-Fi network password, contact your administrator.
After you join the network, you'll find a blue check mark  next to the network and the connected Wi-Fi icon
  at the top right corner of your iPad’s display.
 Eats365 Products
 Merchant Guide
 Modules
 Membership
 Integrations
 Hardware
 Staff Operations
 Roles & Permissions
 Payments
 Reports
 What’s New
 Release Notes
 Troubleshooting
 Simulators
 Glossary
 Troubleshooter
 System Status