 Eats365 Products
 Merchant Guide
 Modules
 Membership
 Integrations
 Hardware
 Staff Operations
 Roles & Permissions
 Payments
 Reports
 What’s New
 Release Notes
 Troubleshooting
 Simulators
 Glossary
 Troubleshooter
 System Status
System Preferences
Table of Contents
Manage System Preferences (Quick Serve)
Learn how to configure system preferences for quick serve restaurants on the Eats365 POS or on the Merchant Portal.
In this article, you’ll learn how to configure your system preferences to manage the different settings for your restaurant.
Configure System Preferences
To change your restaurant’s System Preferences, follow the steps below:
Eats365 POS
- Log in to the Eats365 POS.
- At the top left, tap Settings
 .
. - Under "Advanced Settings," tap System Preferences.
- To enable your preferred setting, toggle the switch
 next to the setting that you want to turn on.
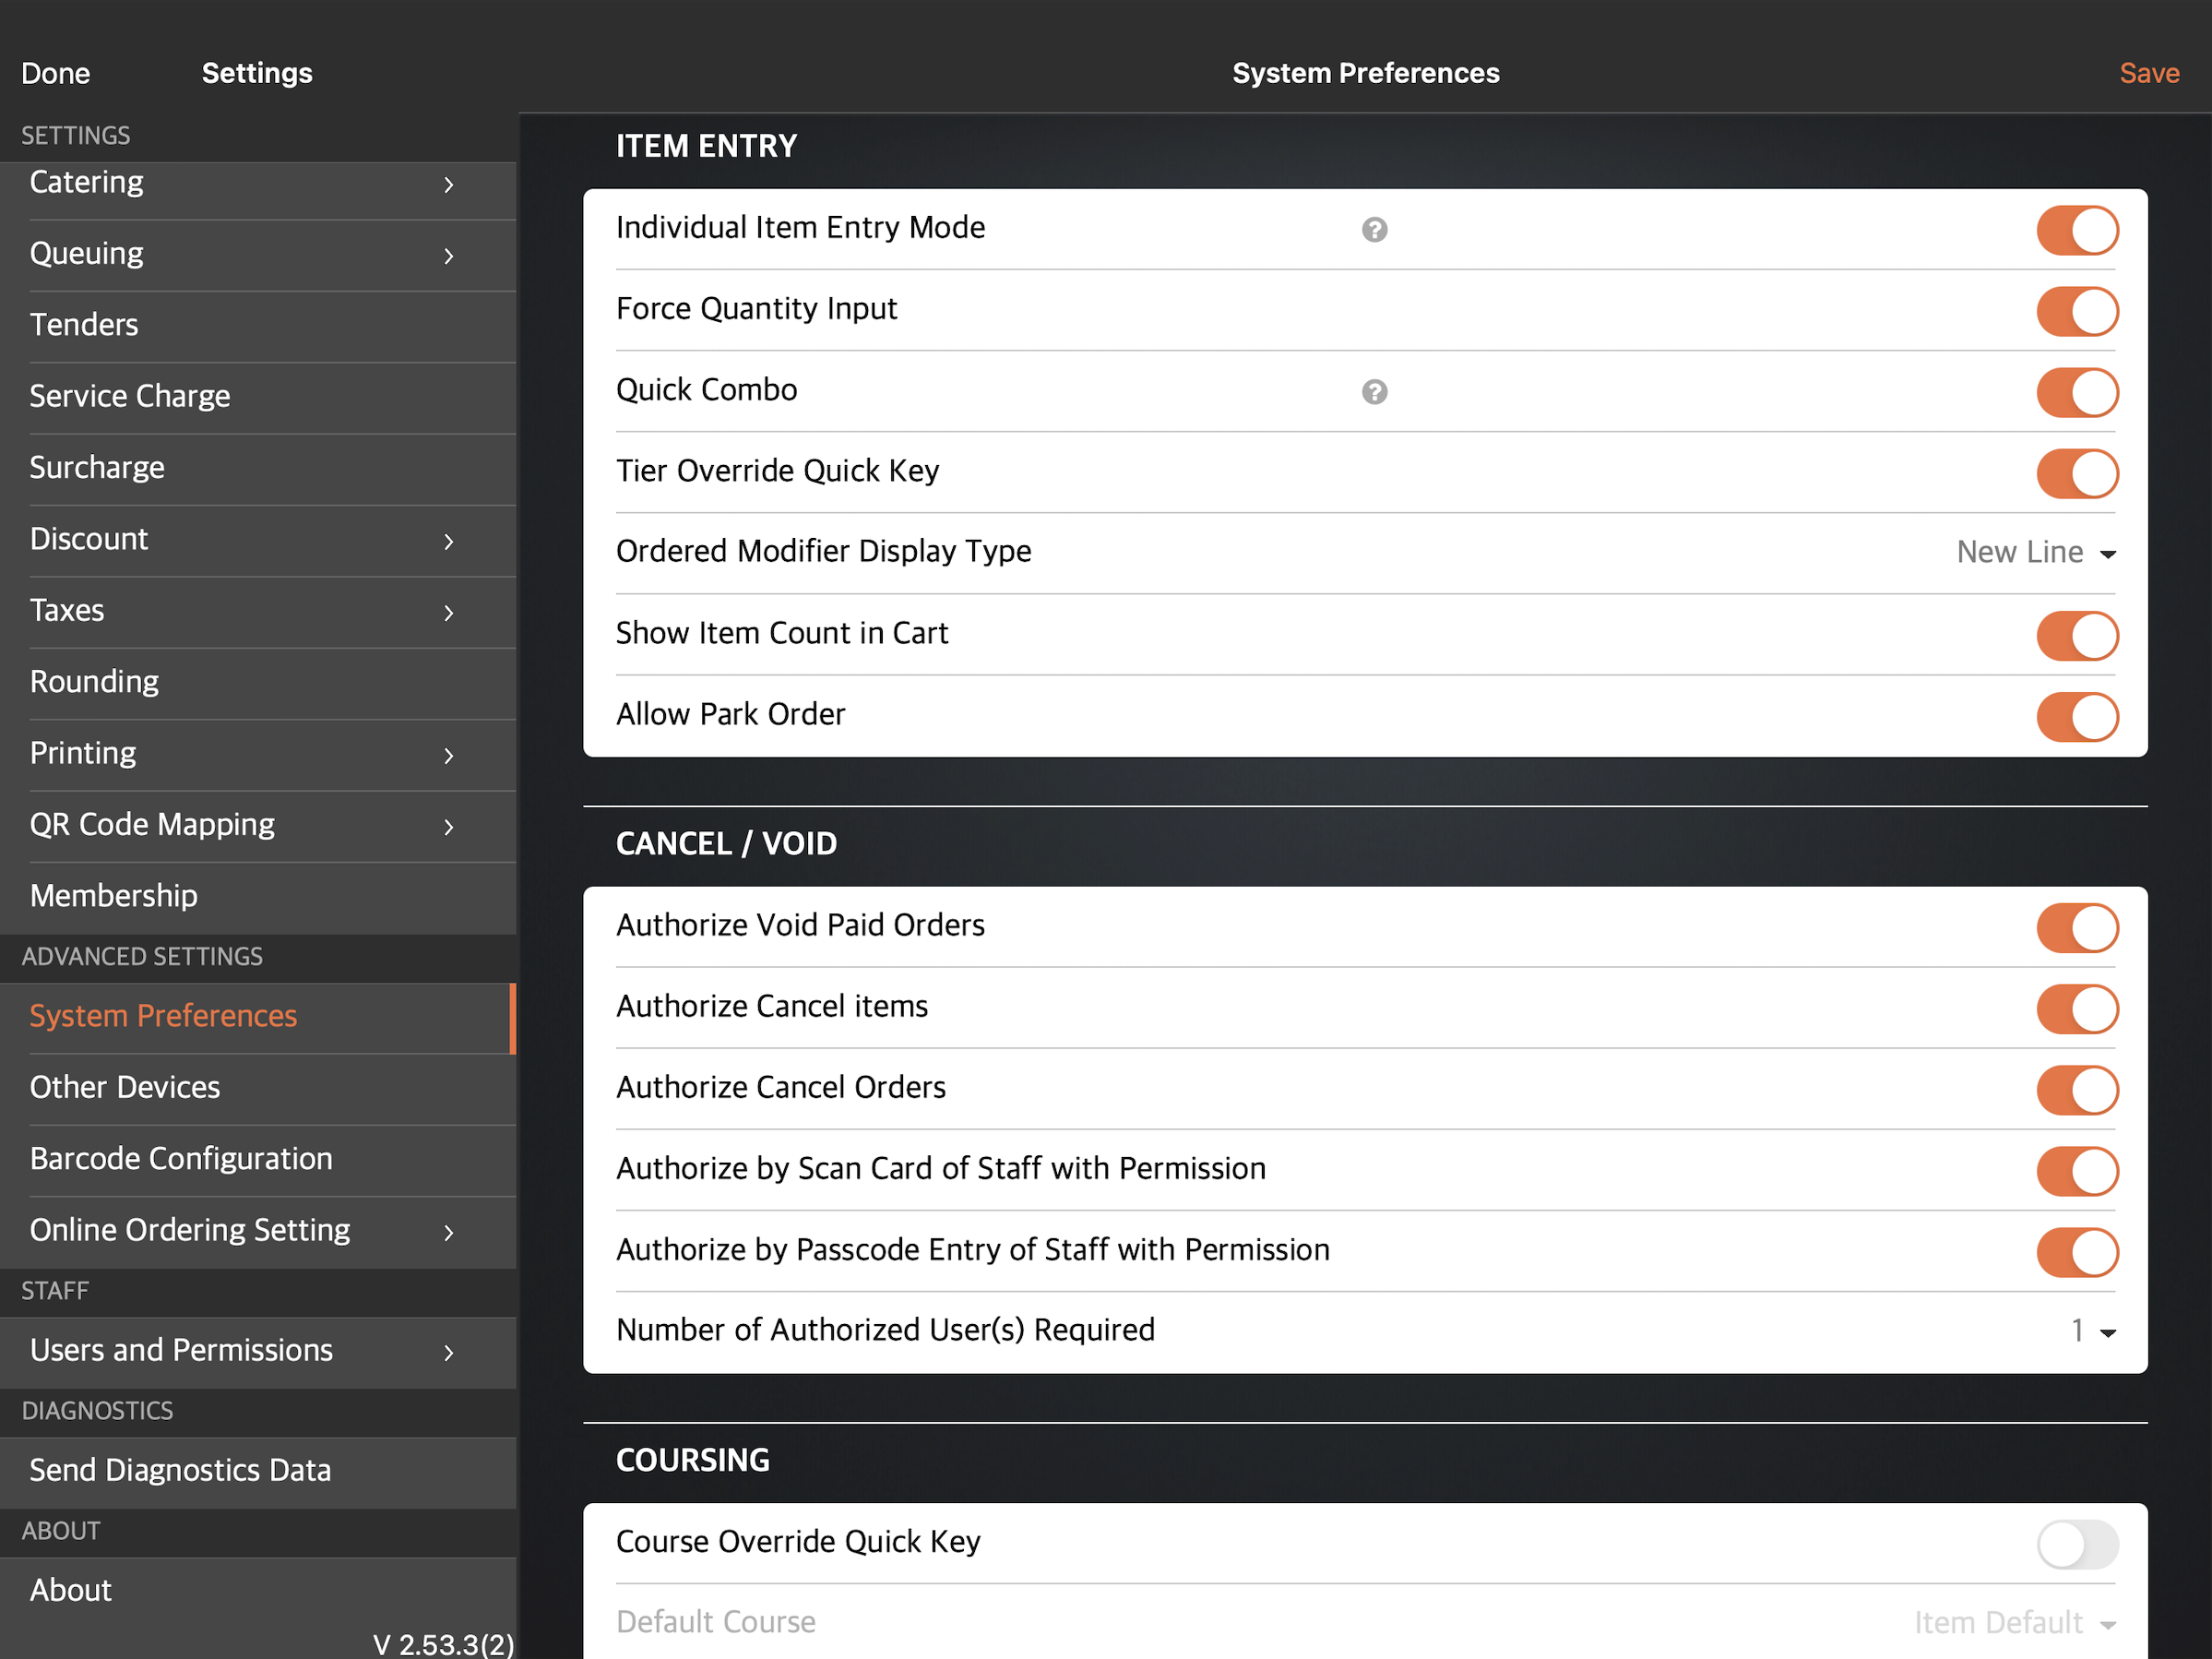
- At the top right, tap Save to confirm.
You can toggle the following options to set as a system preference:
Item Entry
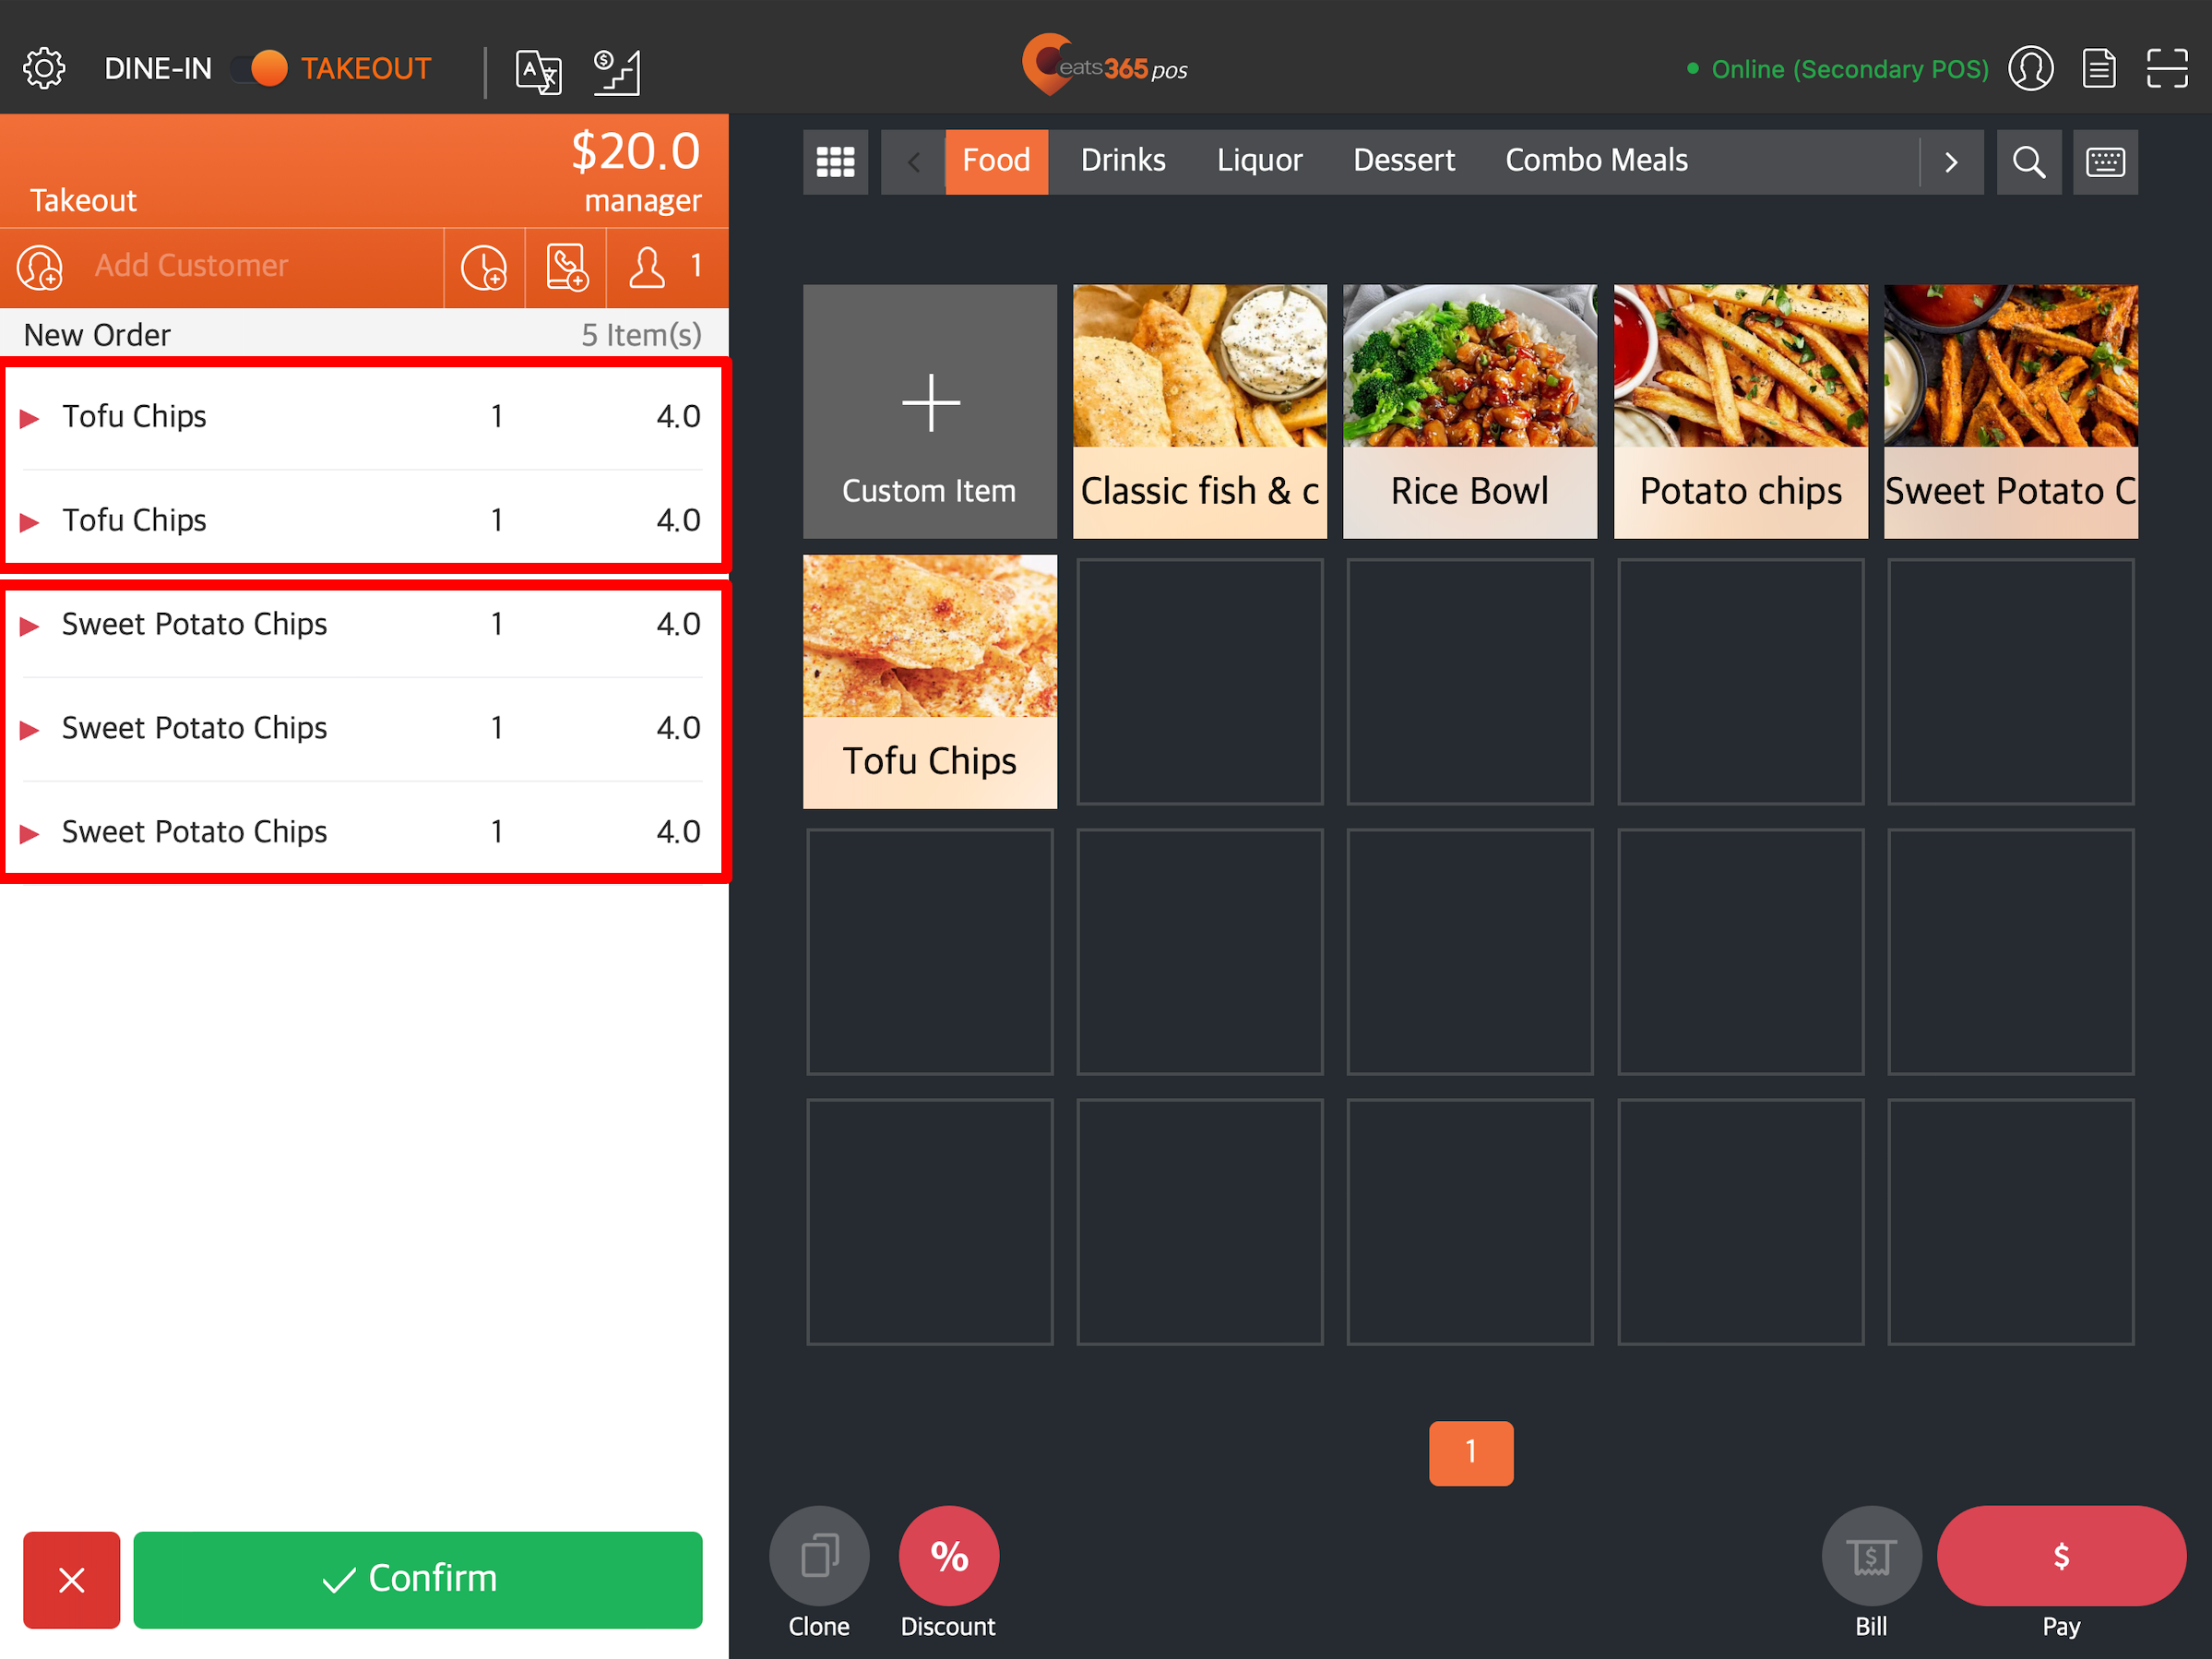
Individual Item Entry Mode
When enabled, you can enter items with multiple quantities in separate rows.
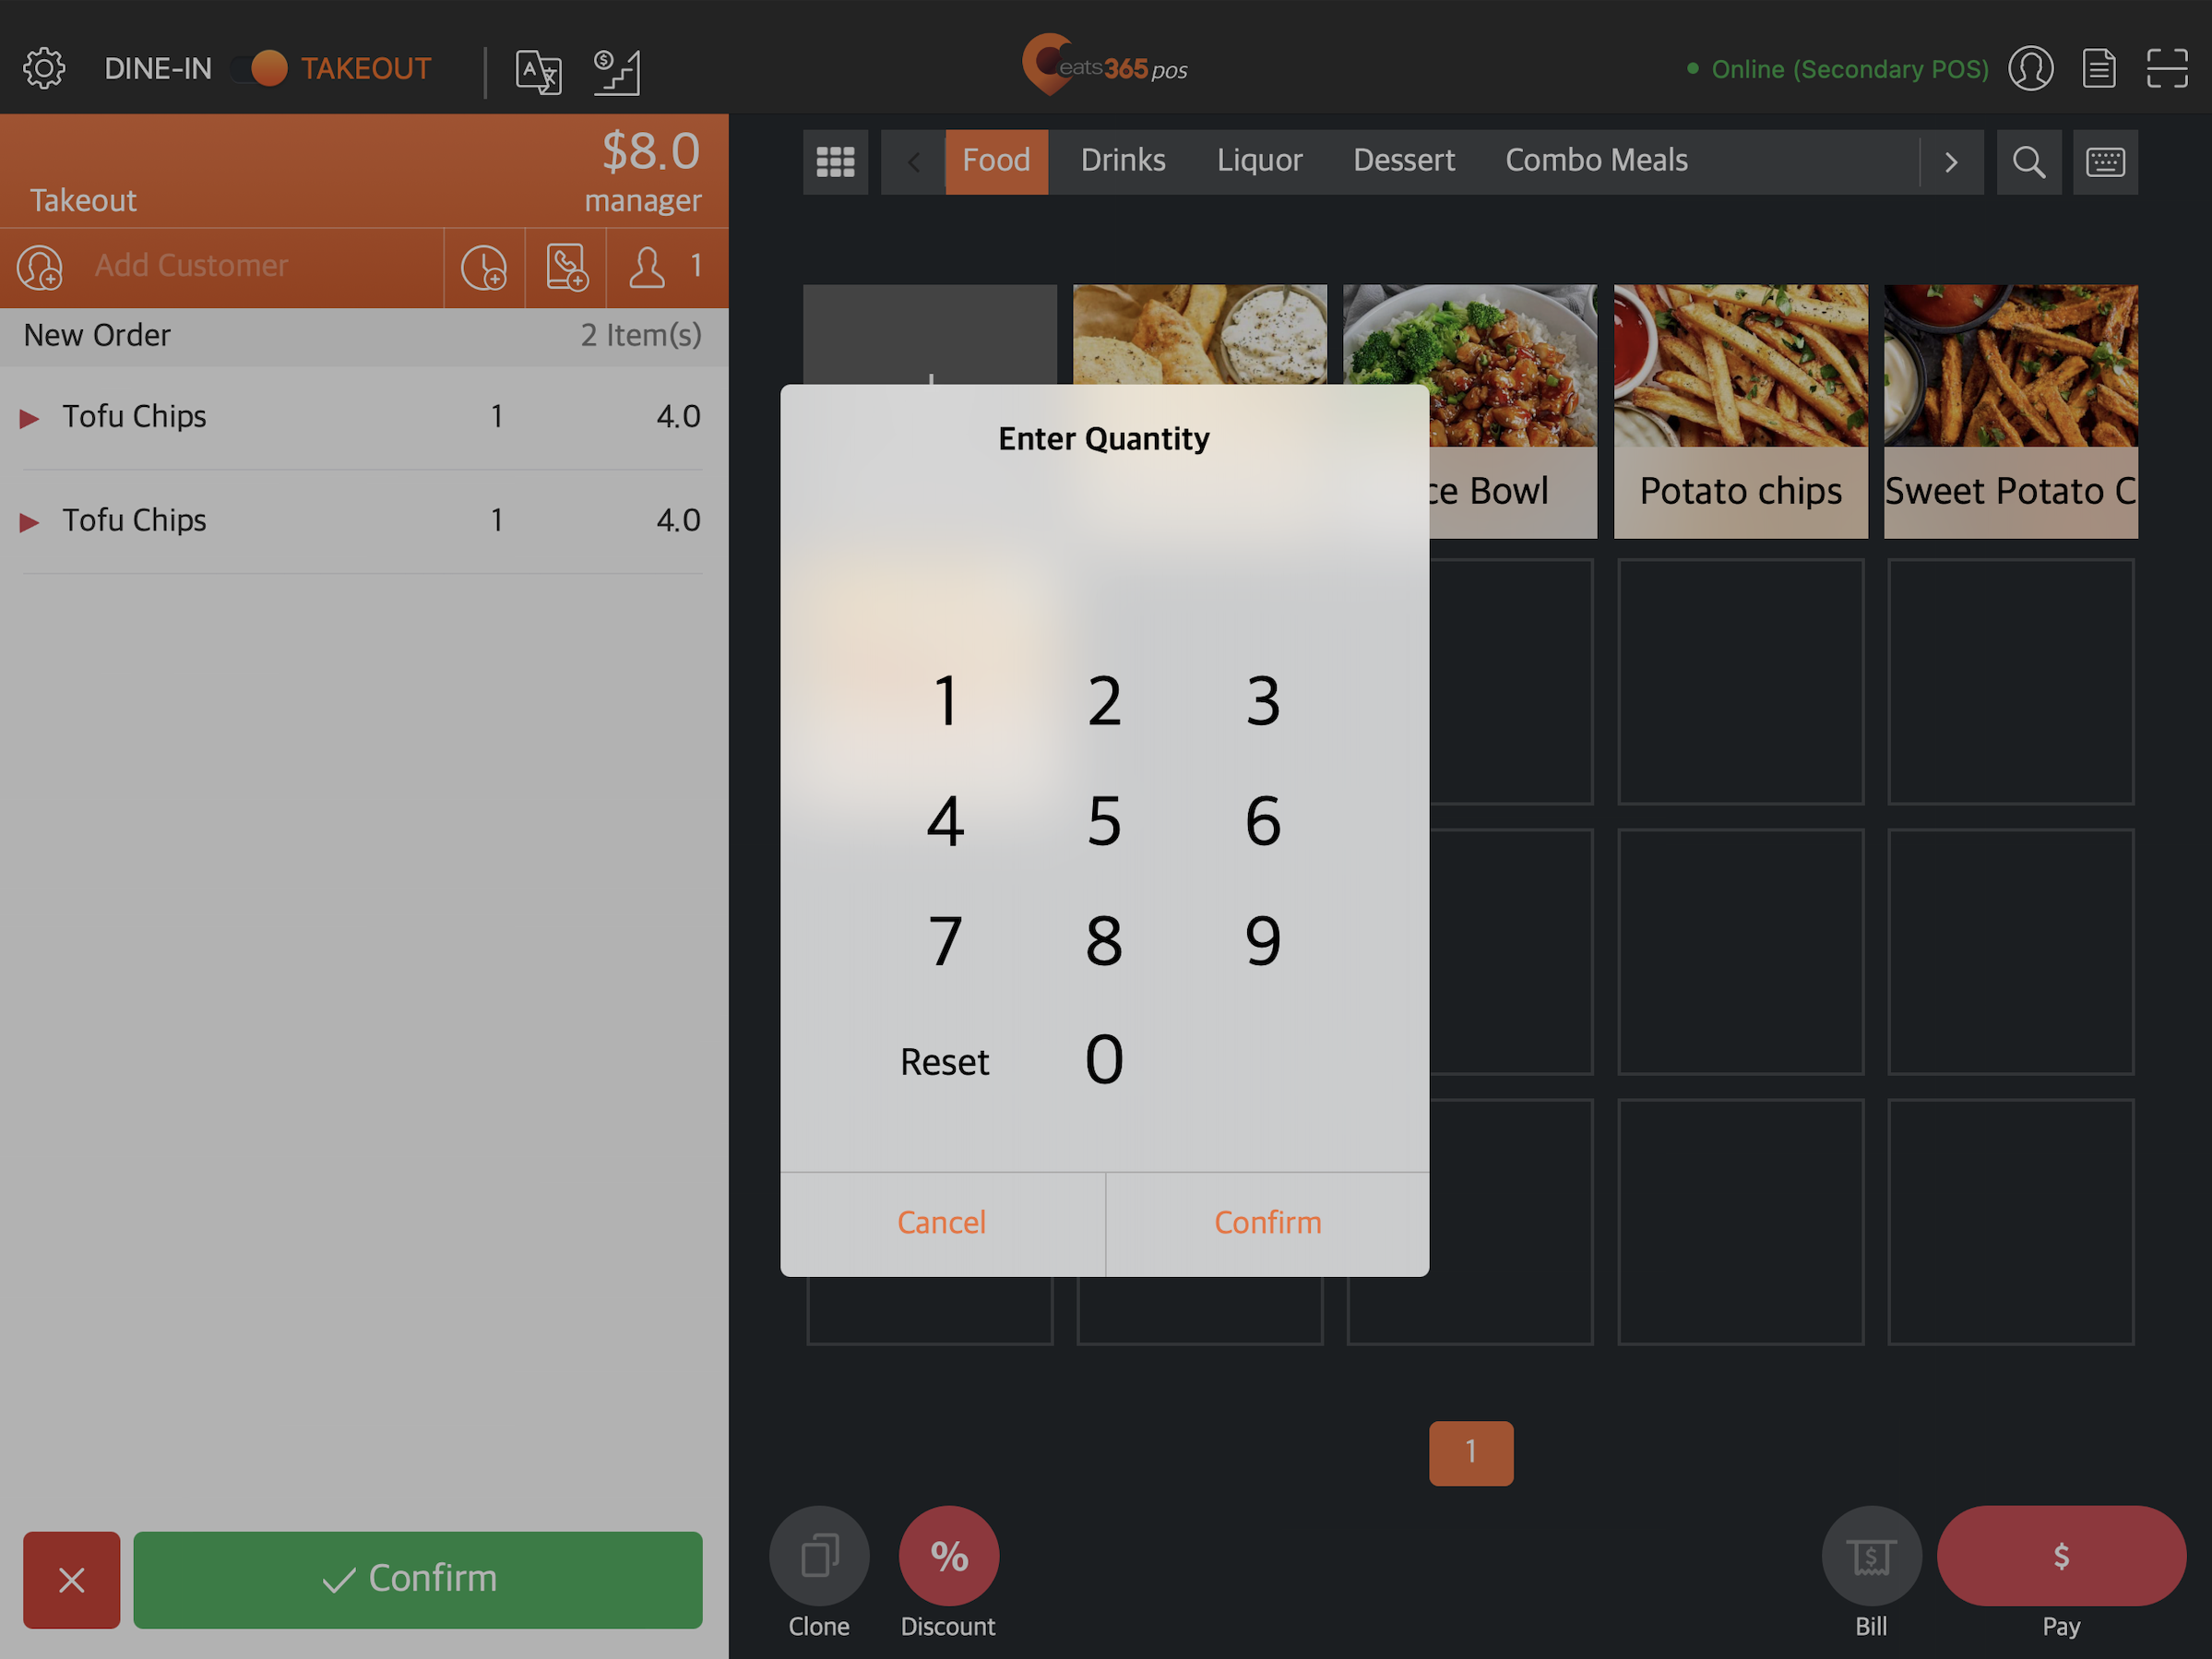
Force Quantity Input
When enabled, a keypad is displayed on the screen whenever you select a menu item that doesn’t have any modifiers. You must enter the desired item quantity in order to add the item to the order.
Quick Combo
When this feature is enabled, the system automatically evaluates newly added single items to determine whether they can be grouped into an existing combo order.
Tier Override Quick Key
Adds a quick key  on the order-taking screen that allows you to change the tier prices on the spot.

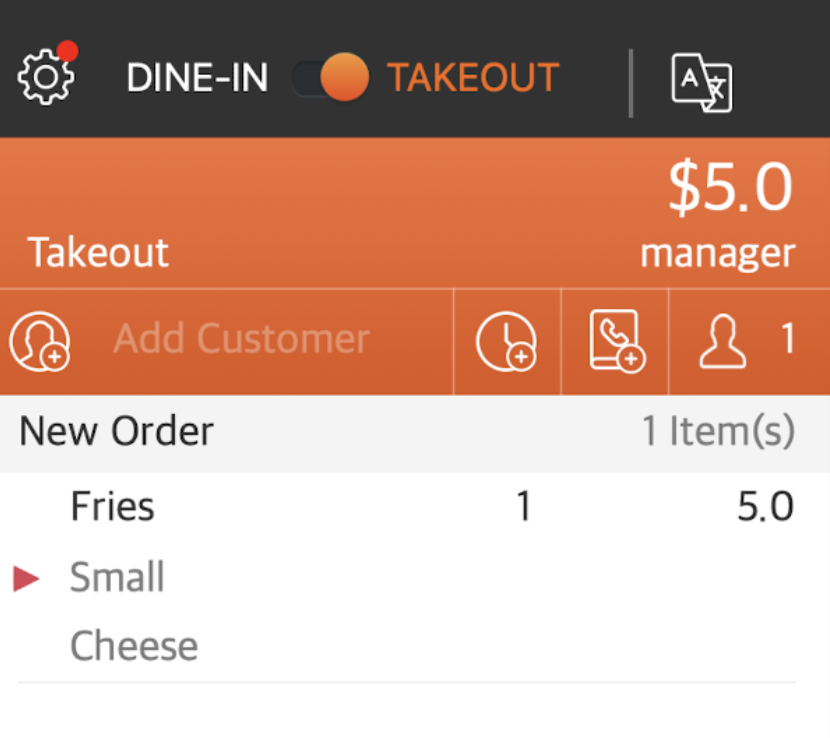
Ordered Modifier Display Type
Choose from the following display types:
- New Line - Shows ordered modifiers in separate rows.
- Continuous - Shows ordered modifiers in a single line.
| New Line | Continuous |
 |
 |
Show Item Count in Cart
Shows the total item count in the cart.

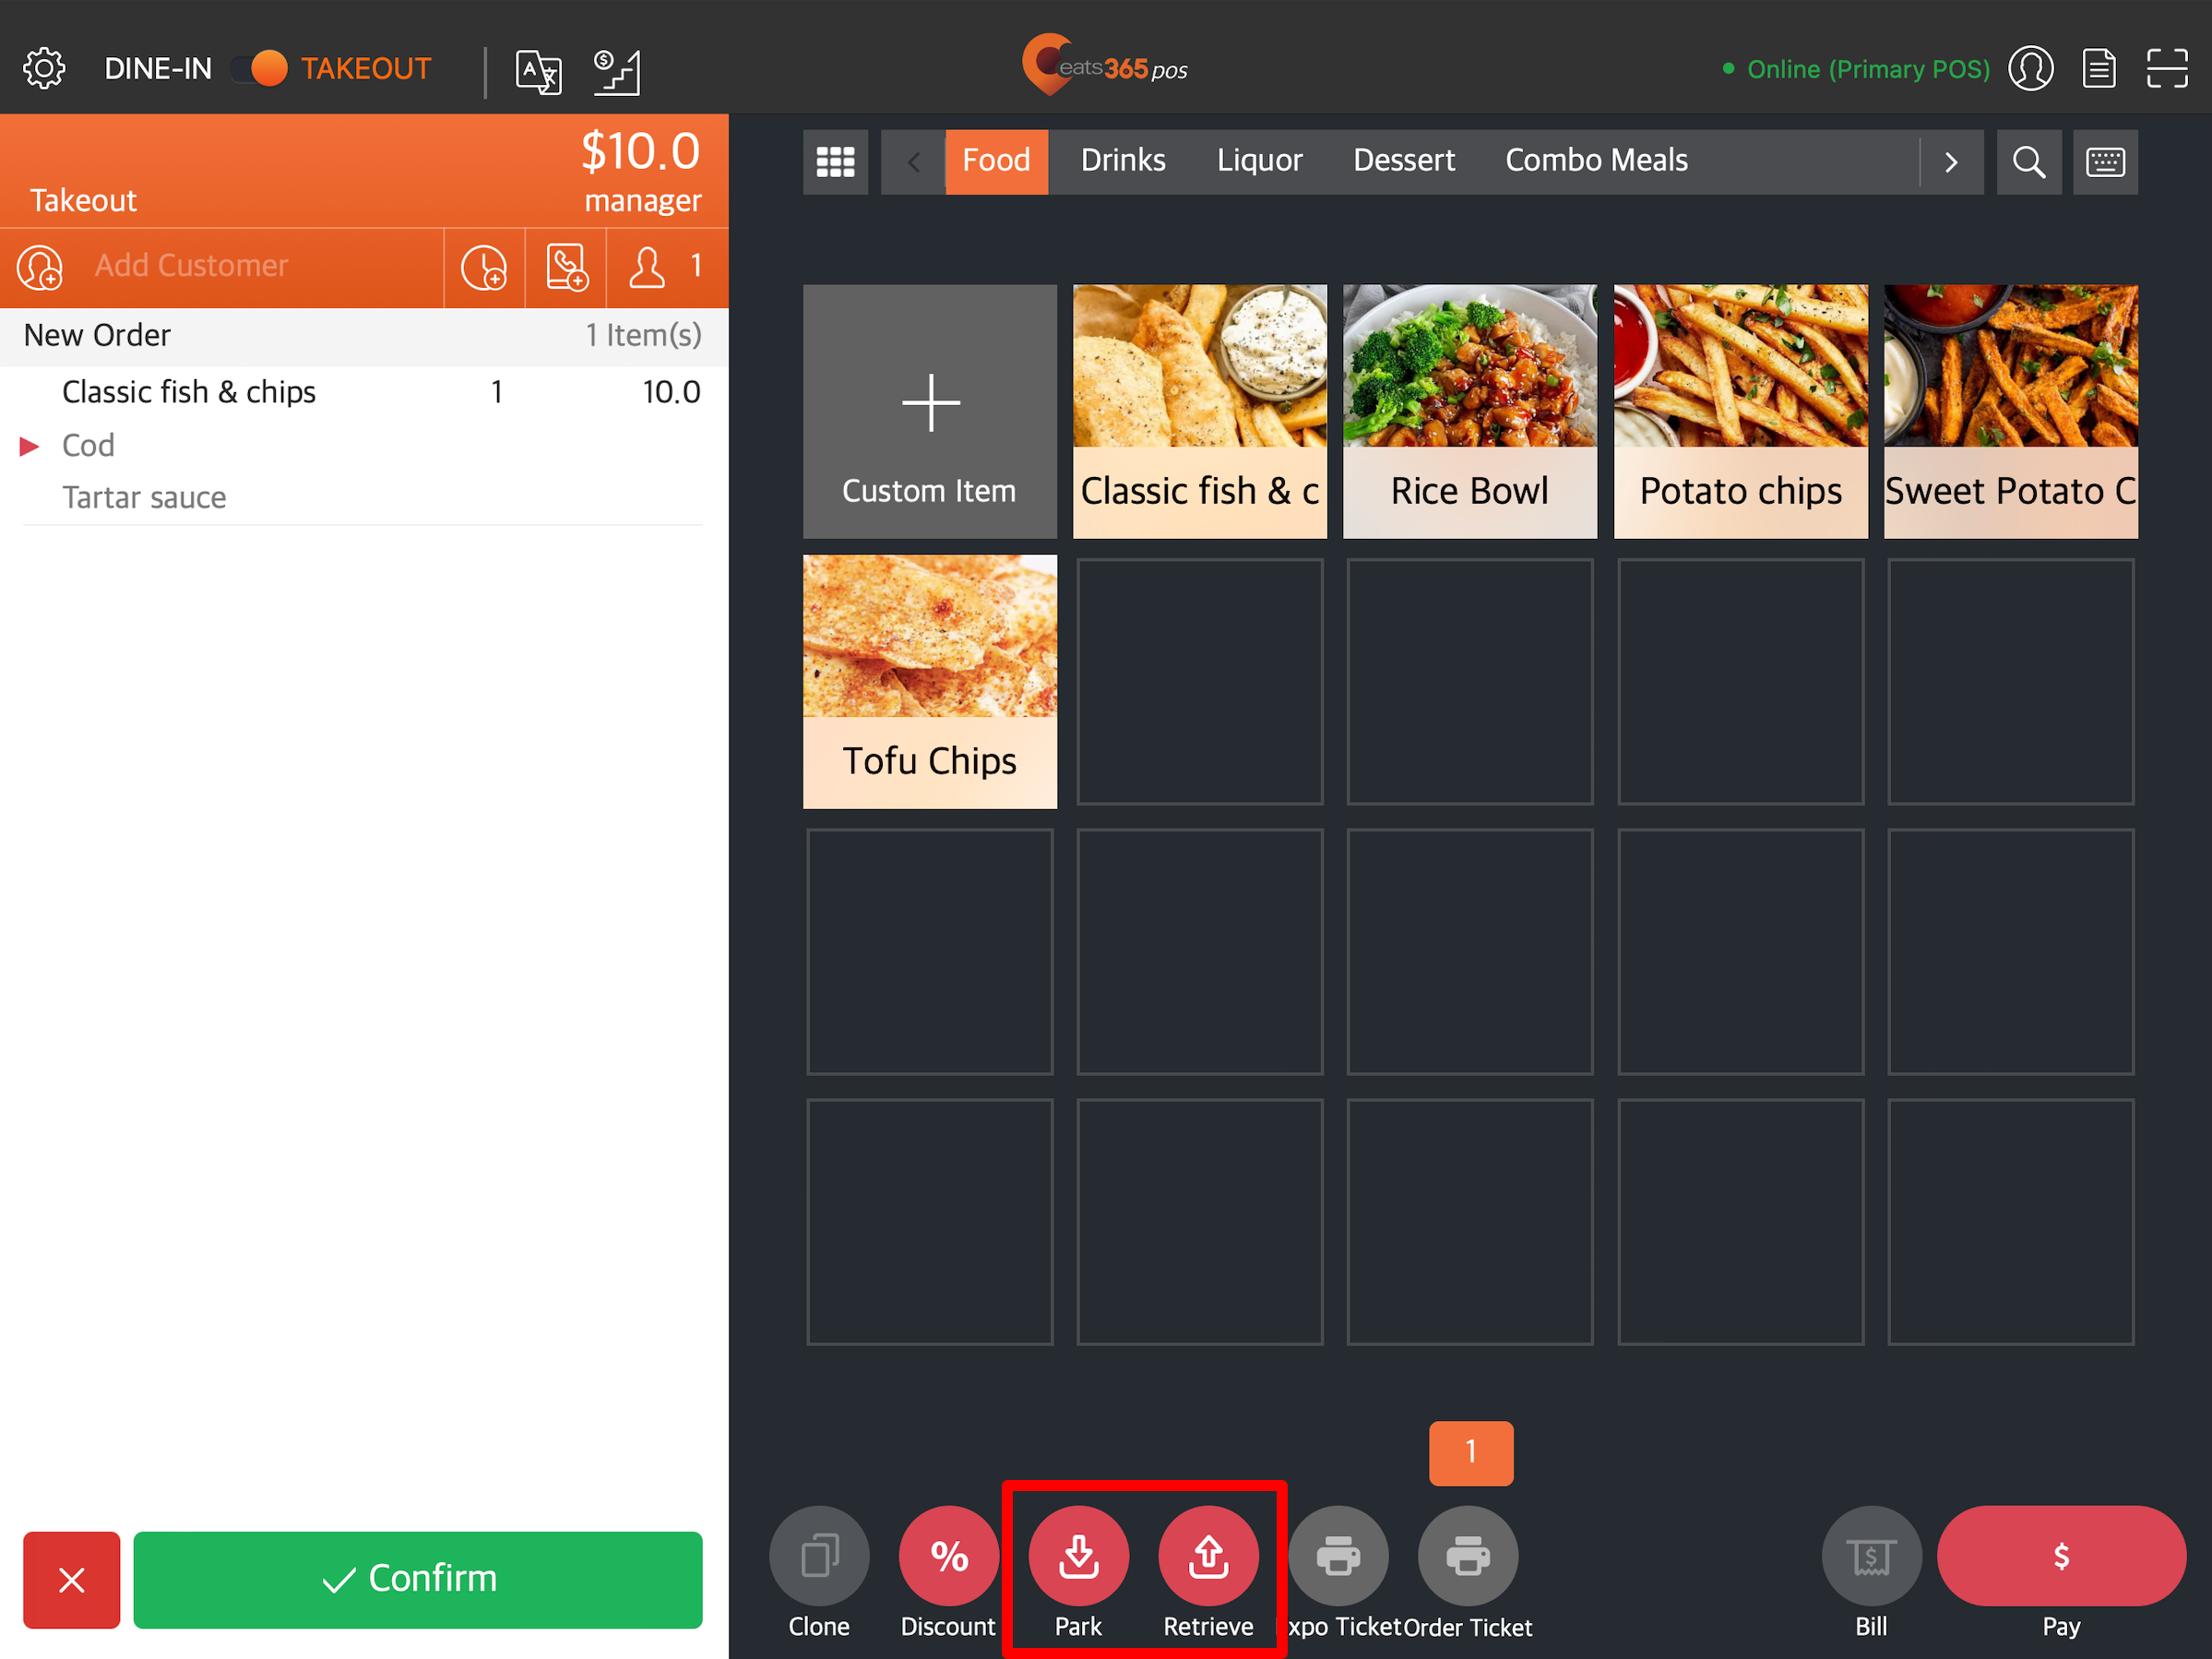
Allow Park Order
When enabled, you can park orders that haven’t been confirmed yet and retrieve them to process later.
Auto Select Next Combo Option
When enabled, the screen automatically scrolls down to the next item included in the combo option after selecting an option.
Cancel/Void
Authorize Void Paid Orders
Allows staff, whose access level doesn’t include permissions to void paid orders, to void an order with the required approval from an authorized staff member.
Authorize Cancel items
Allows staff, whose access level doesn’t include permissions to cancel items, to process cancellation of items with required approval from an authorized staff member.
Authorize Cancel orders
Allows staff, whose access level doesn’t include permissions to cancel orders, to process cancellation of orders with required approval from an authorized staff member.
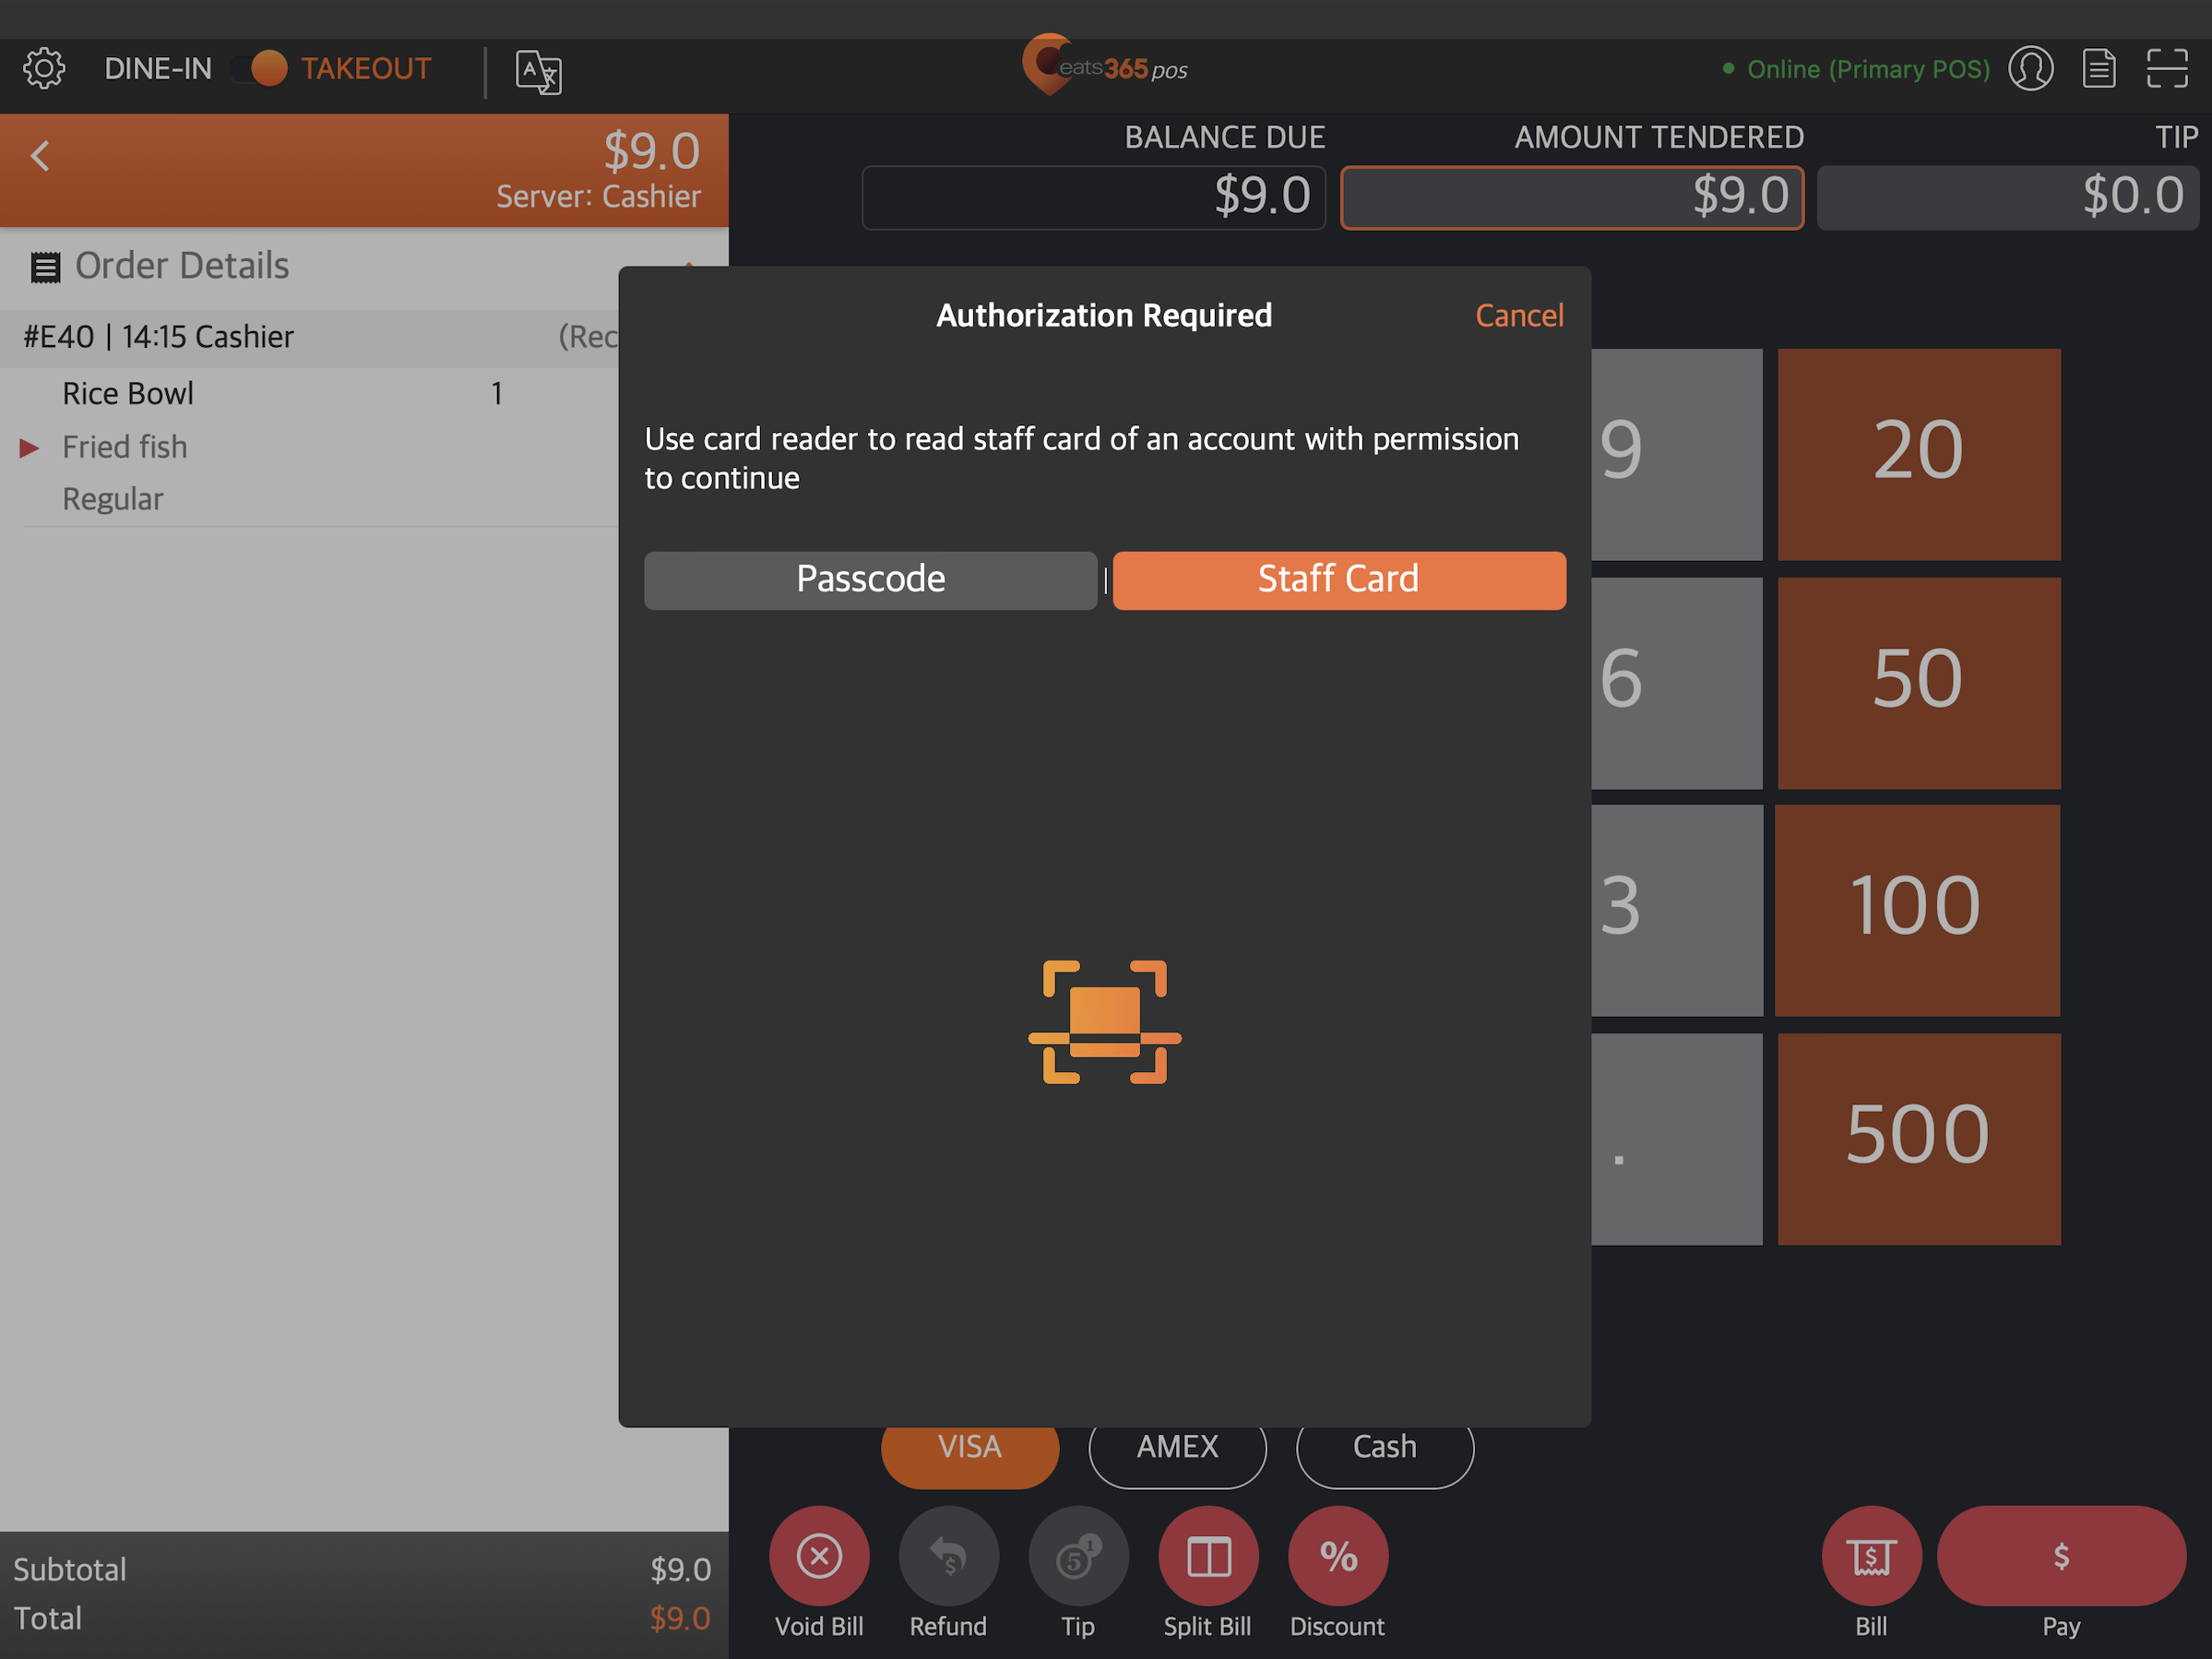
Authorize by Scan Card of Staff with Permission
Allows authorized staff members to approve voiding paid orders and canceling items and orders by scanning their card.
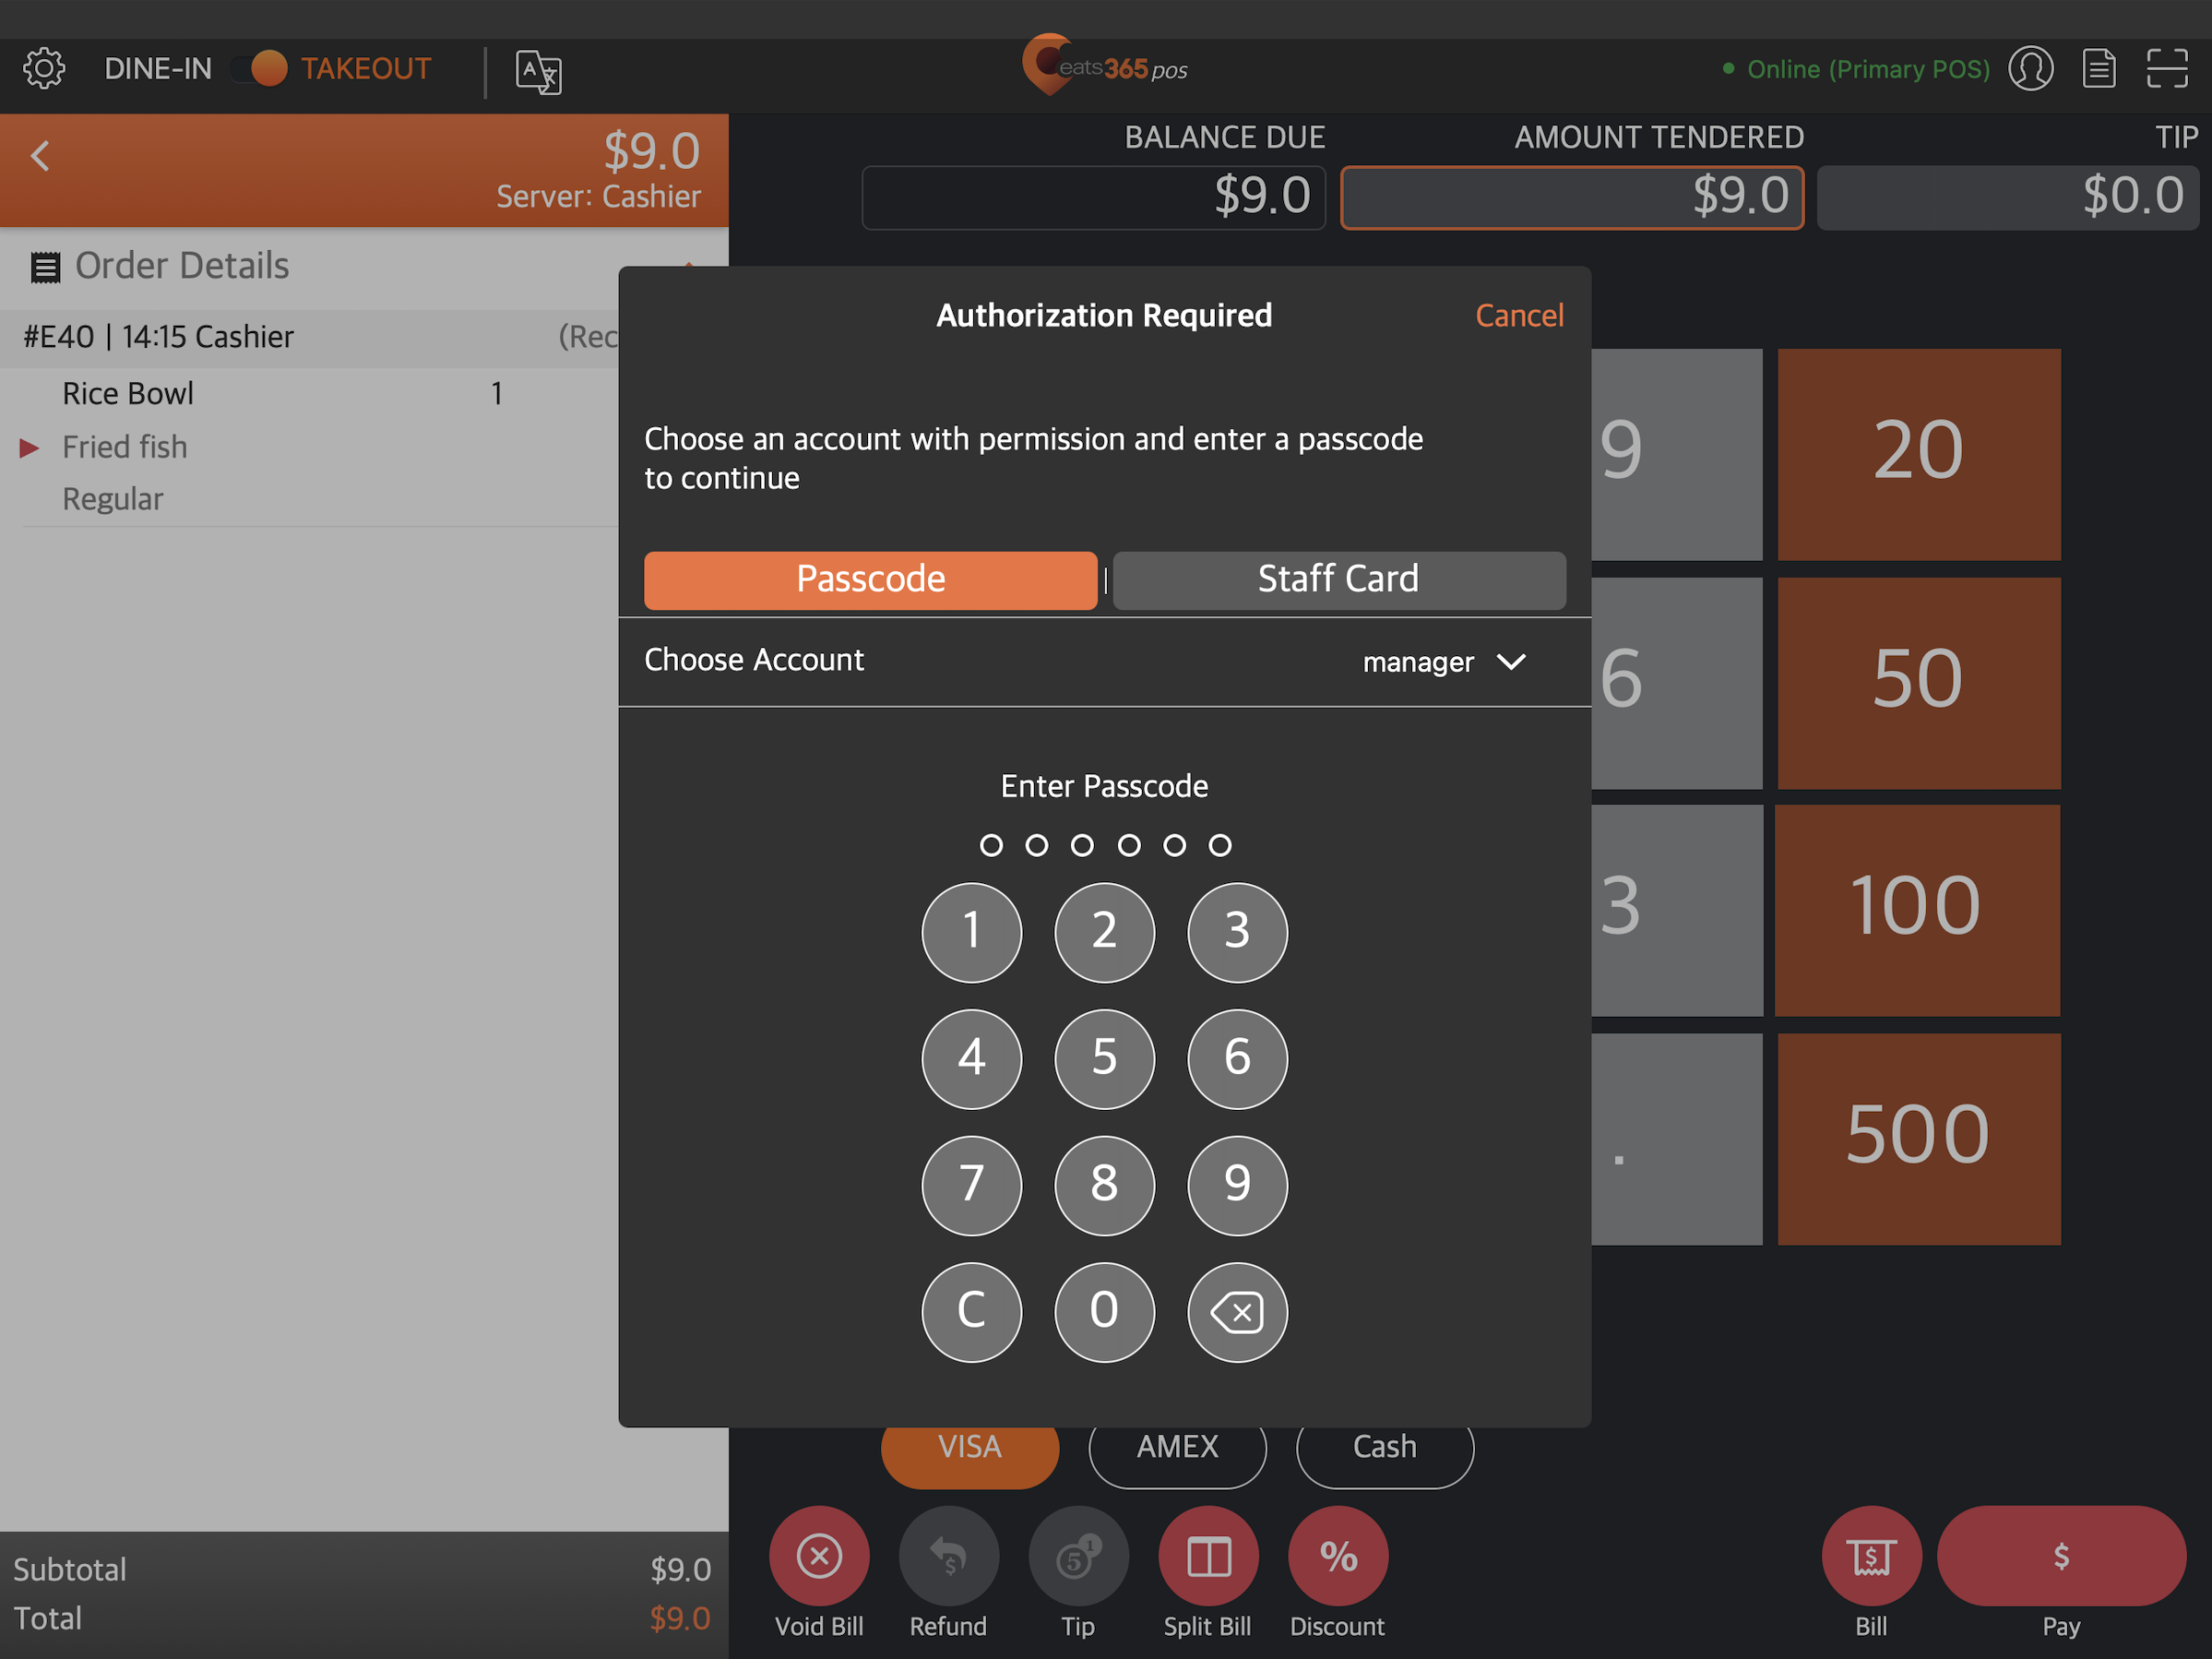
Authorize by Passcode Entry of Staff with Permission
Allows authorized staff members to approve voiding paid orders and canceling items and orders by entering their passcode.
Number of Authorized User(s) Required
Sets the number of authorized users needed to validate a void or cancel action.
Example:
- If the number of required authorized users is set to "1" and an unauthorized staff member voids an order, the POS will ask for one authorized user to validate the action. If set to "2," then the POS will require two authorized users.
- If the number of required authorized users is set to "1" and an authorized staff member voids an order, the POS will recognize the user as authorized and will proceed with the action without requiring additional validation.
- If the number of required authorized users is set to "2" and an authorized staff member voids an order, the POS will ask for another authorized user to validate the action.
Fire/Hold
Fire Dine-in Items by Default
Fires dine-in items once an order is confirmed.
Fire Takeout Items by Default
Fires takeout items once an order is confirmed.
Require Check Name
Allows you to assign a check name to an order. The check name appears on printed tickets, receipts, and transaction reports.
- Receipts and tickets

- Transaction report

When enabled, the following options become available:
-
Require Takeout Order Check Name - requires a name to be set for a check for takeout orders.

-
Optional Takeout Order Check Name - retains the option to set a name for a check for takeout orders but sets the requirement as optional.
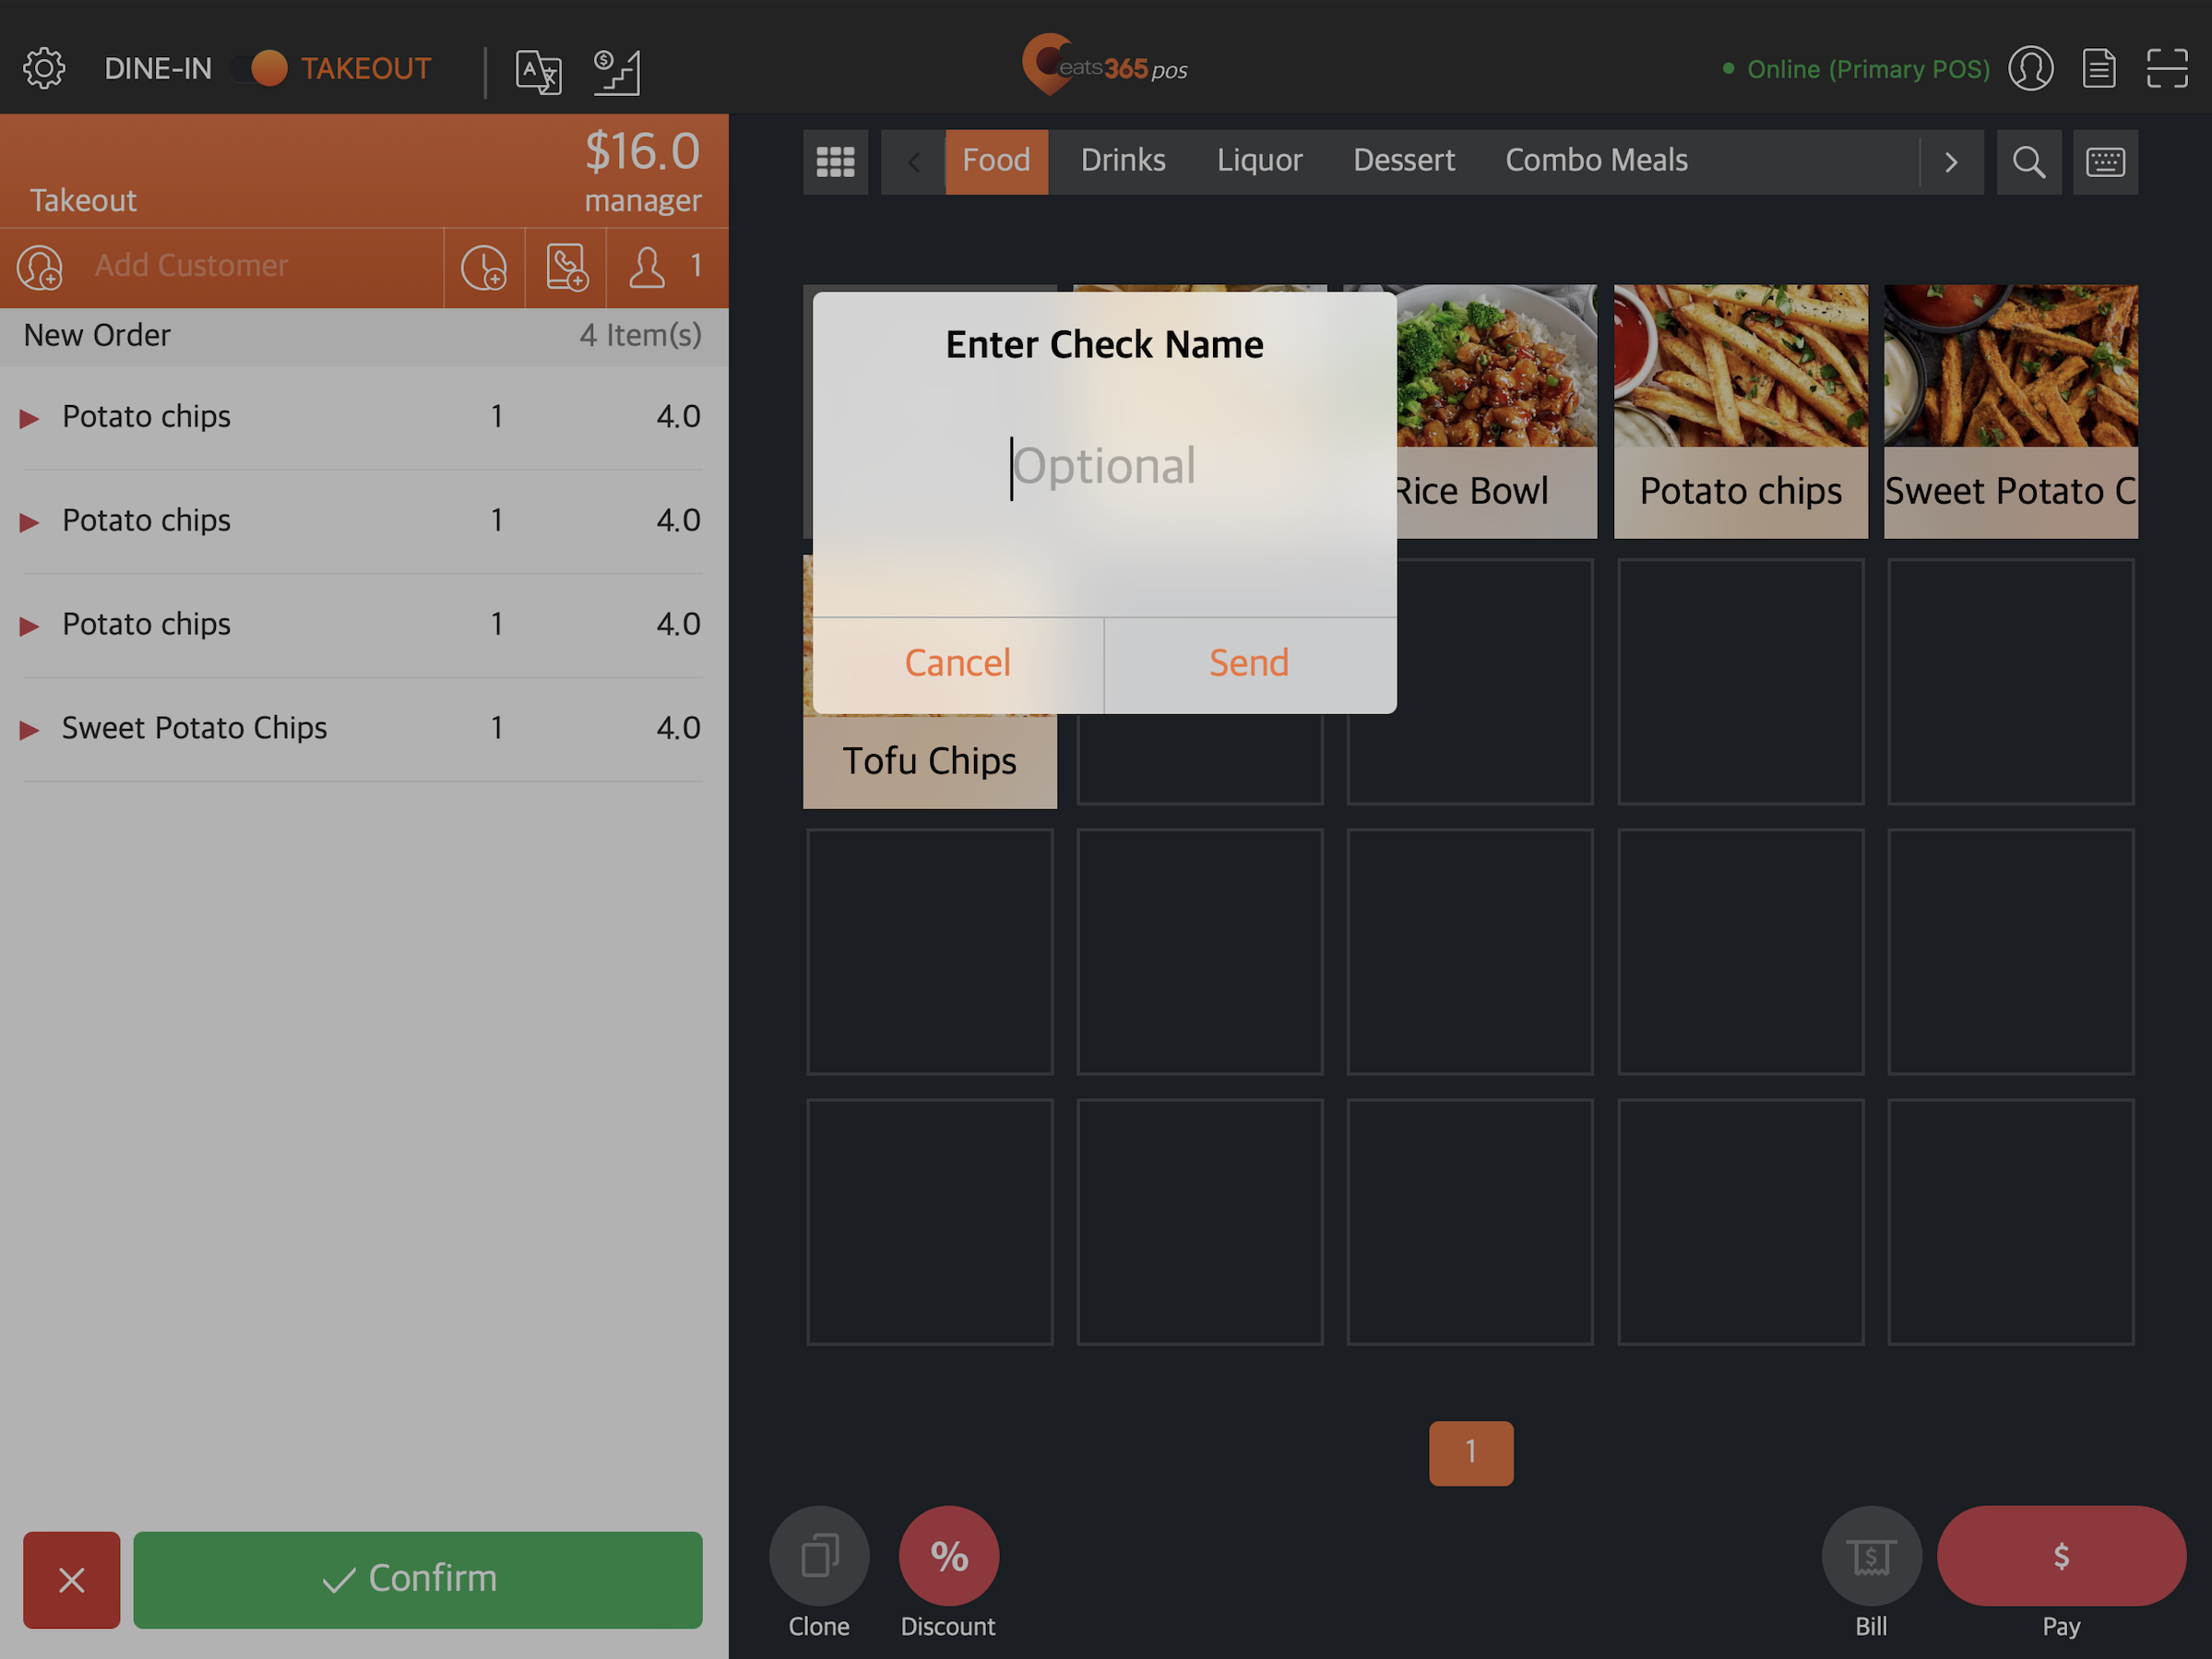
- Require Dine-in Order Check Name - requires a name to be set for a check for dine-in orders.
- Optional Dine-in Order Check Name - retains the option to set a name for a check for dine-in orders but sets the requirement as optional.
Customize Printing Options when Clone Orders
When enabled, you can choose which tickets you'd like to print for the cloned order. This allows you to save on costs by only printing the necessary tickets for cloned orders.

Audit Log
Cancel Item Reason
Turn this setting on to enable the following options:
- Cancel Item Request Input Message - Allows you to enter a reason why an item is being canceled.
- Preset Reasons - Allows you to create pre-made reasons that you can easily select when an item is canceled.
Reject Order Reason
Turn this setting on to enable the following options:
- Reject Order Request Input Message - Allows you to enter a reason why an item is being rejected.
- Preset Reasons - Allows you to create pre-made reasons that you can easily select when an order is rejected.
Void Order Reason
Turn this setting on to enable the following options:
- Void Order Request Input Message - Allows you to enter a reason why an order is being void.
- Preset Reasons - Allows you to create pre-made reasons that you can easily select when an order is void.
Refund Item Reason
Turn this setting on to enable the following options:
- Refund Item Request Input Message - Allows you to enter a reason why an item is being refunded.
- Preset Reasons - Allows you to create pre-made reasons that you can easily select when an item is refunded.
Discount Reason
Turn this setting on to enable the following options:
- Discount Request Input Message - Allows you to enter a reason why an order is being sold at a discount.
- Preset Reasons - Allows you to create pre-made reasons that you can easily select when an order is sold at a discounted price.
Preset Pay In Reason
Allows you to add a pre-made "Pay In" reason when enabled.
Preset Payout Reason
Allows you to add a pre-made "Payout" reason when enabled.
Preset Drop Reason
Allows you to add a pre-made "Drop" reason when enabled.
Preset Purchase Reason
Allows you to add a pre-made "Purchase" reason when enabled.
DeletePayment
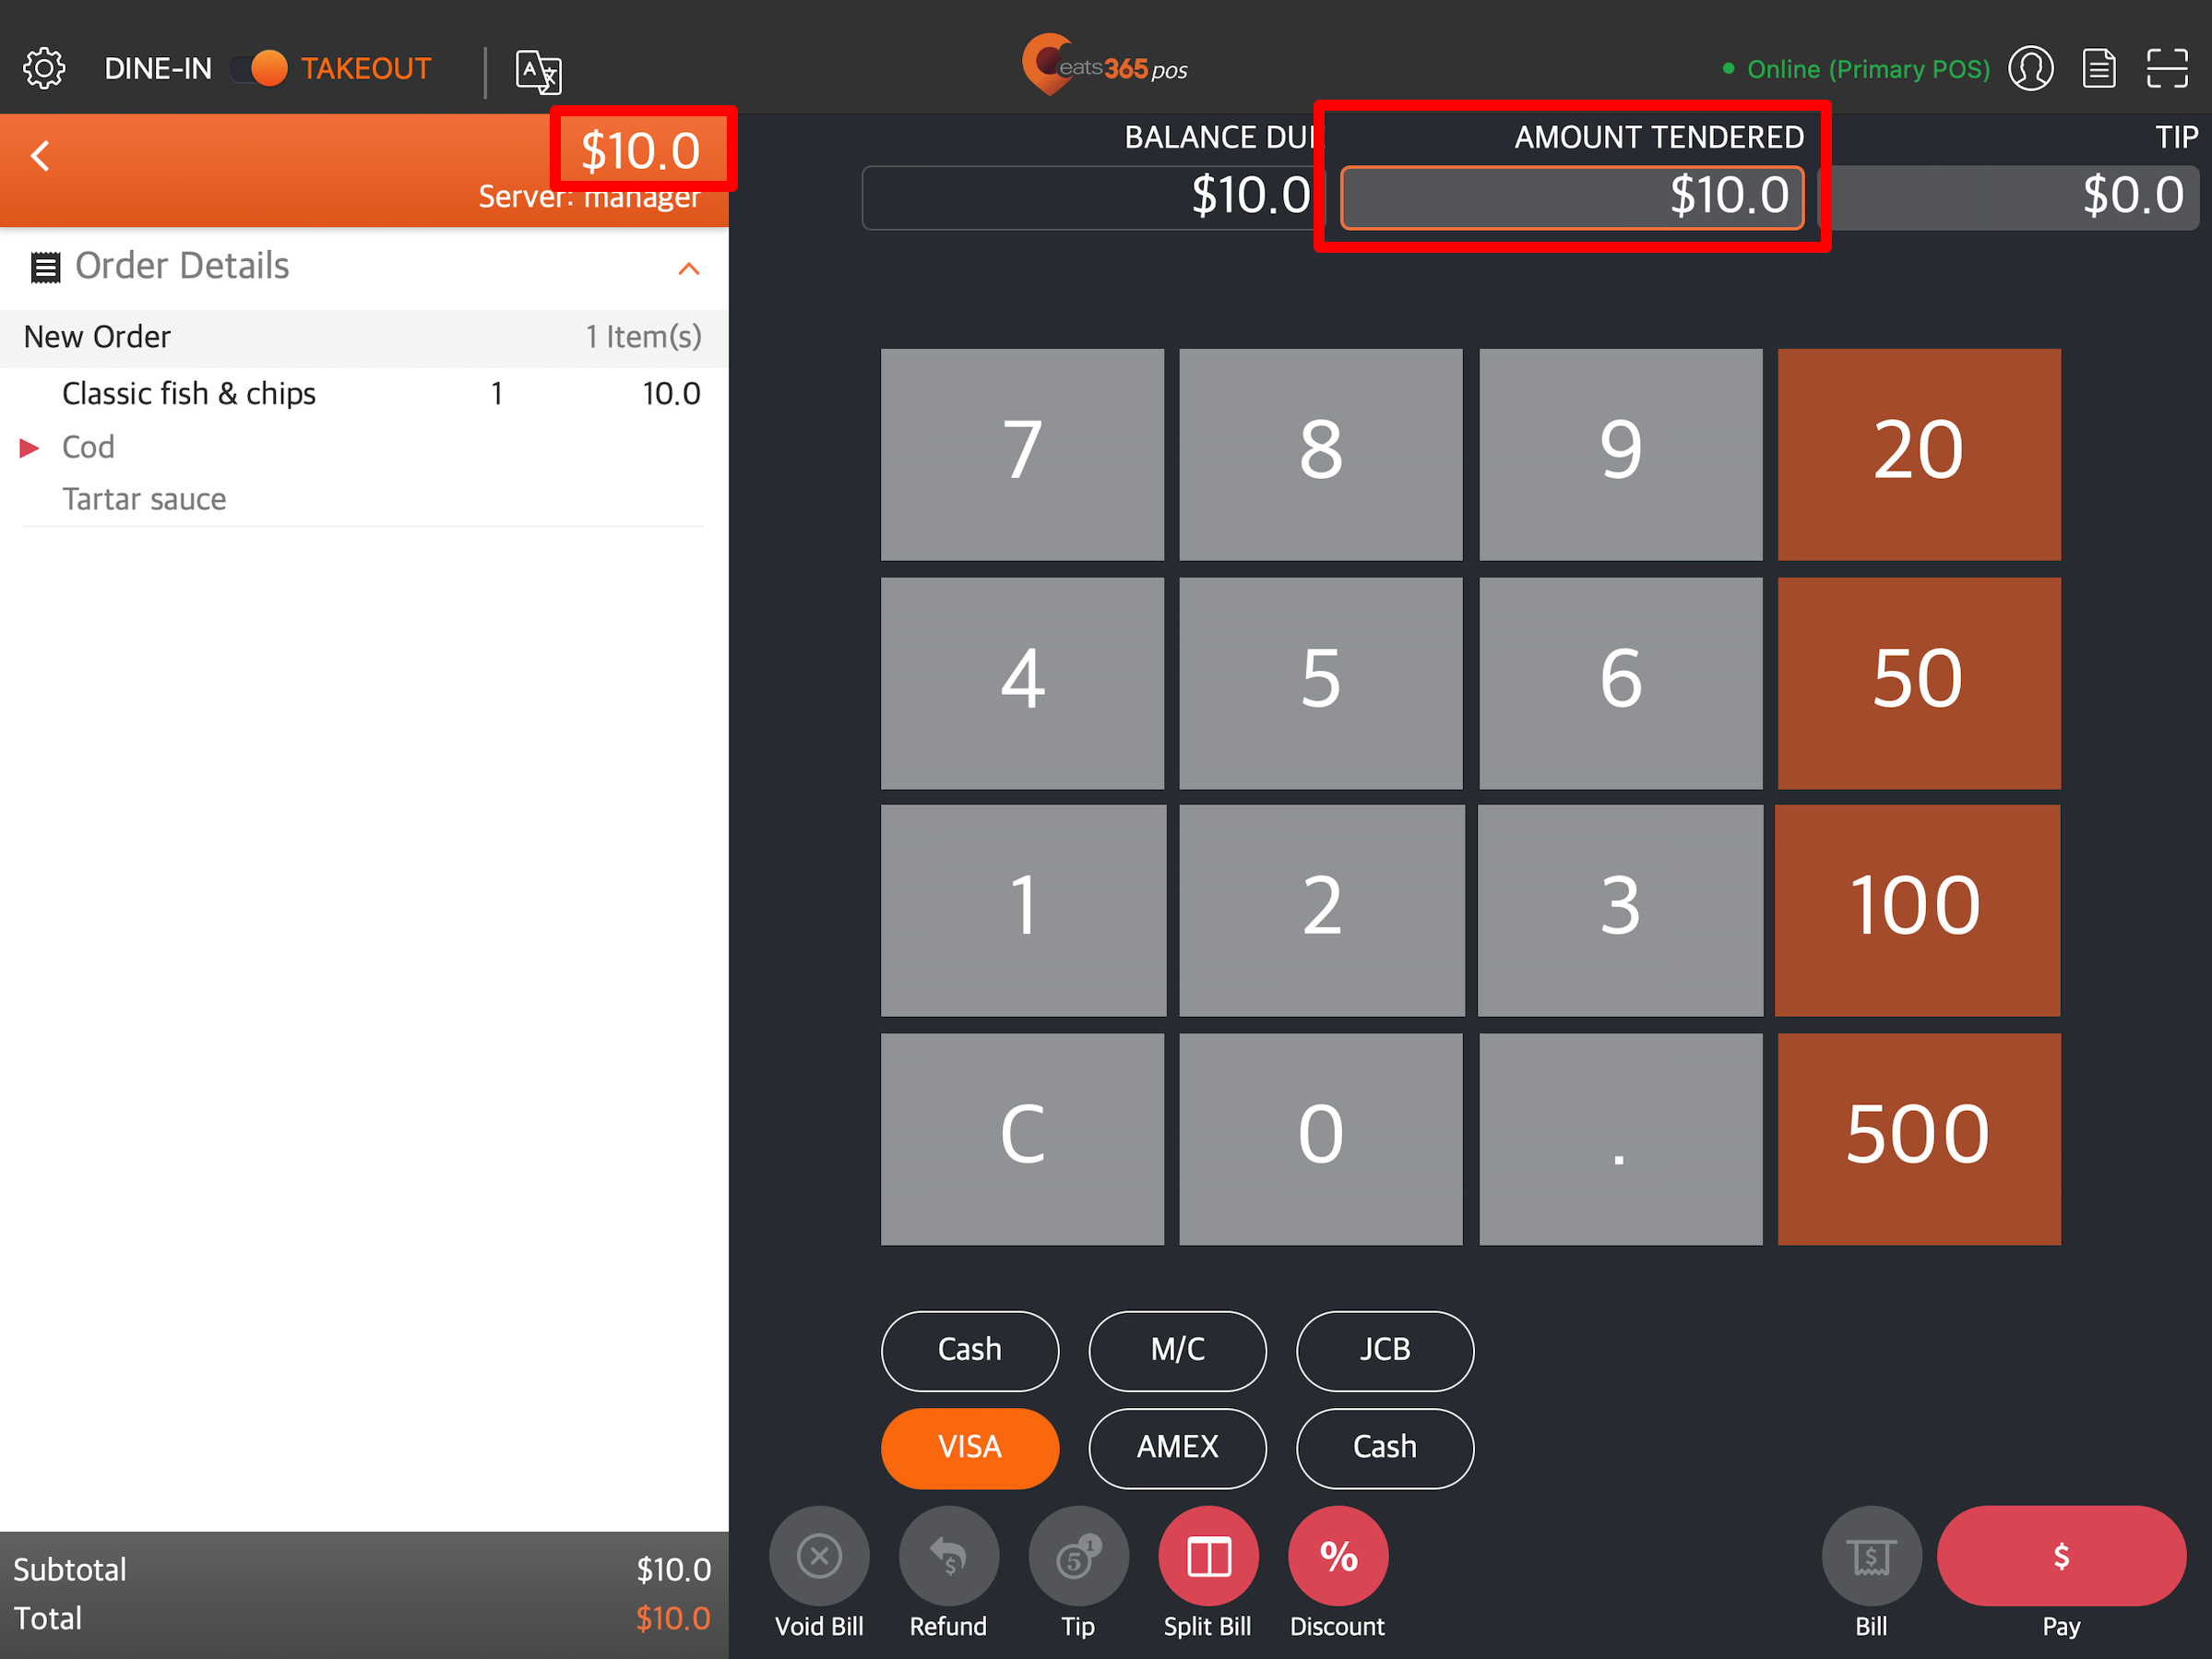
Auto Fill Amount Tendered
Auto fills the "Amount Tendered" on the payment screen.
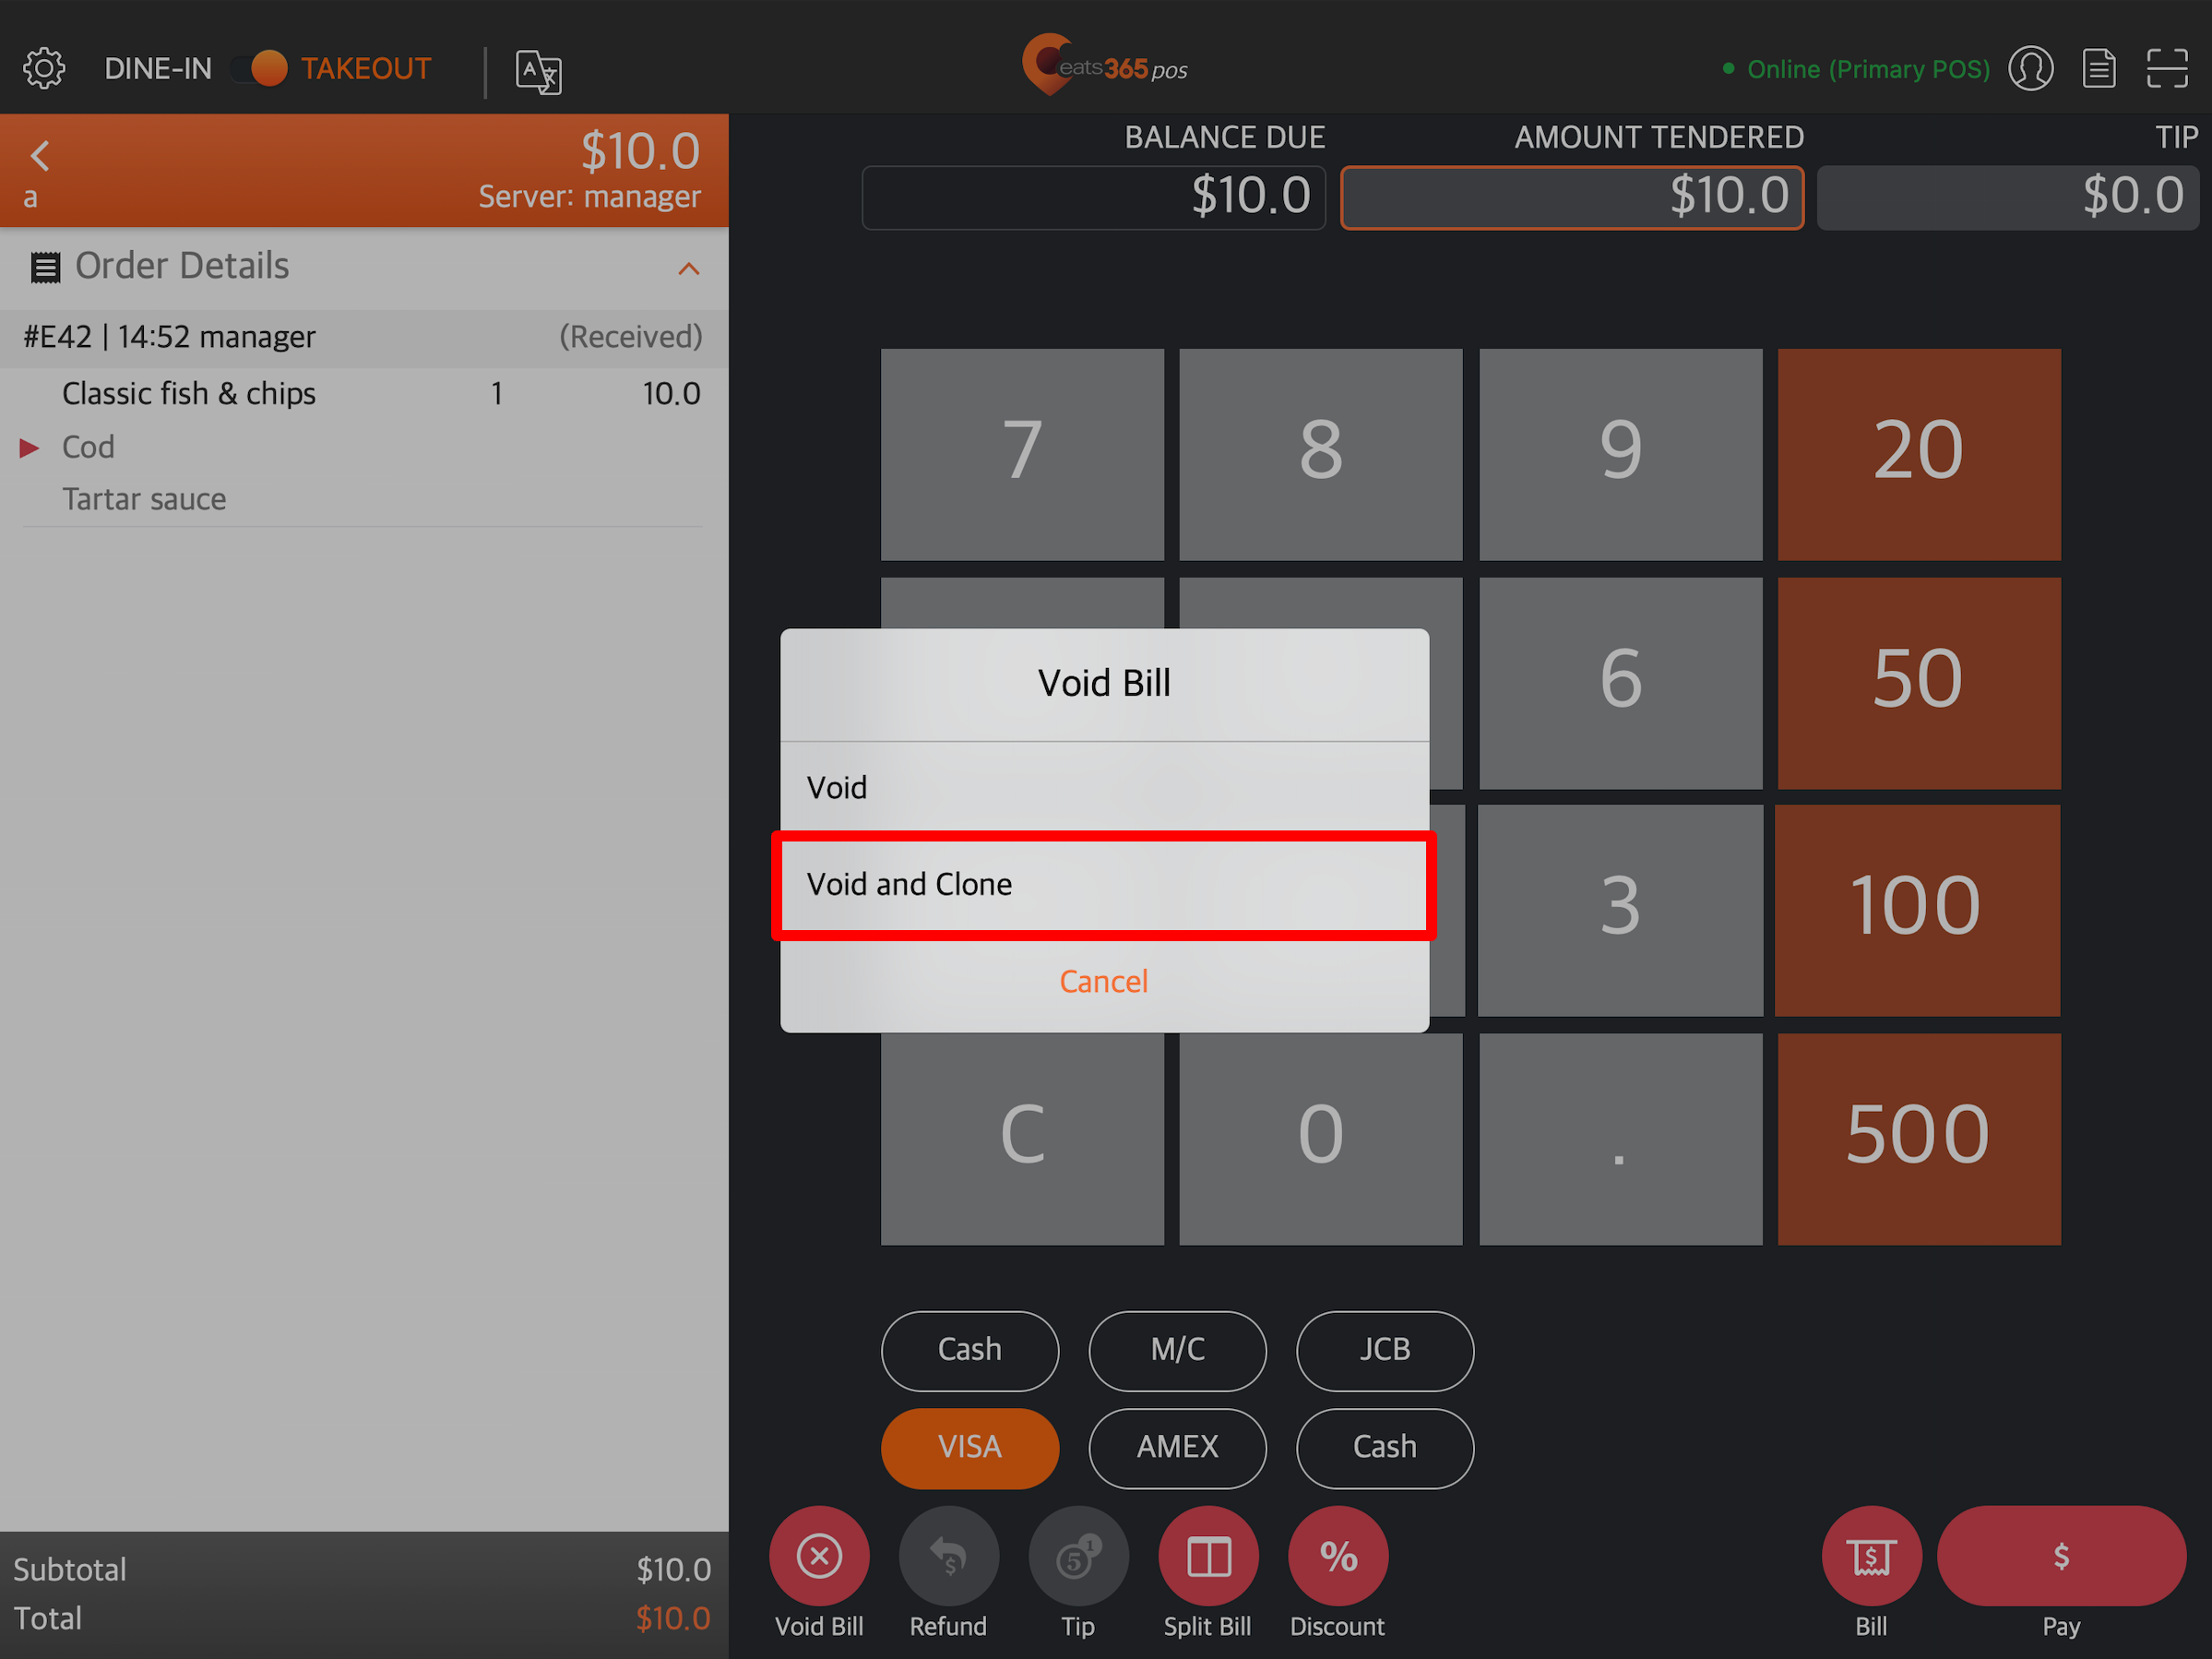
Enable ‘Void and Clone’ Function when Void Order
Allows you to use the "Void and Clone" function when an order is void.
Split Check
Enable Split Check
Enable this setting to show the "Split Check" function on the payment screen.
Enable Split by Amount
Enable this setting to allow splitting of check of by amount.
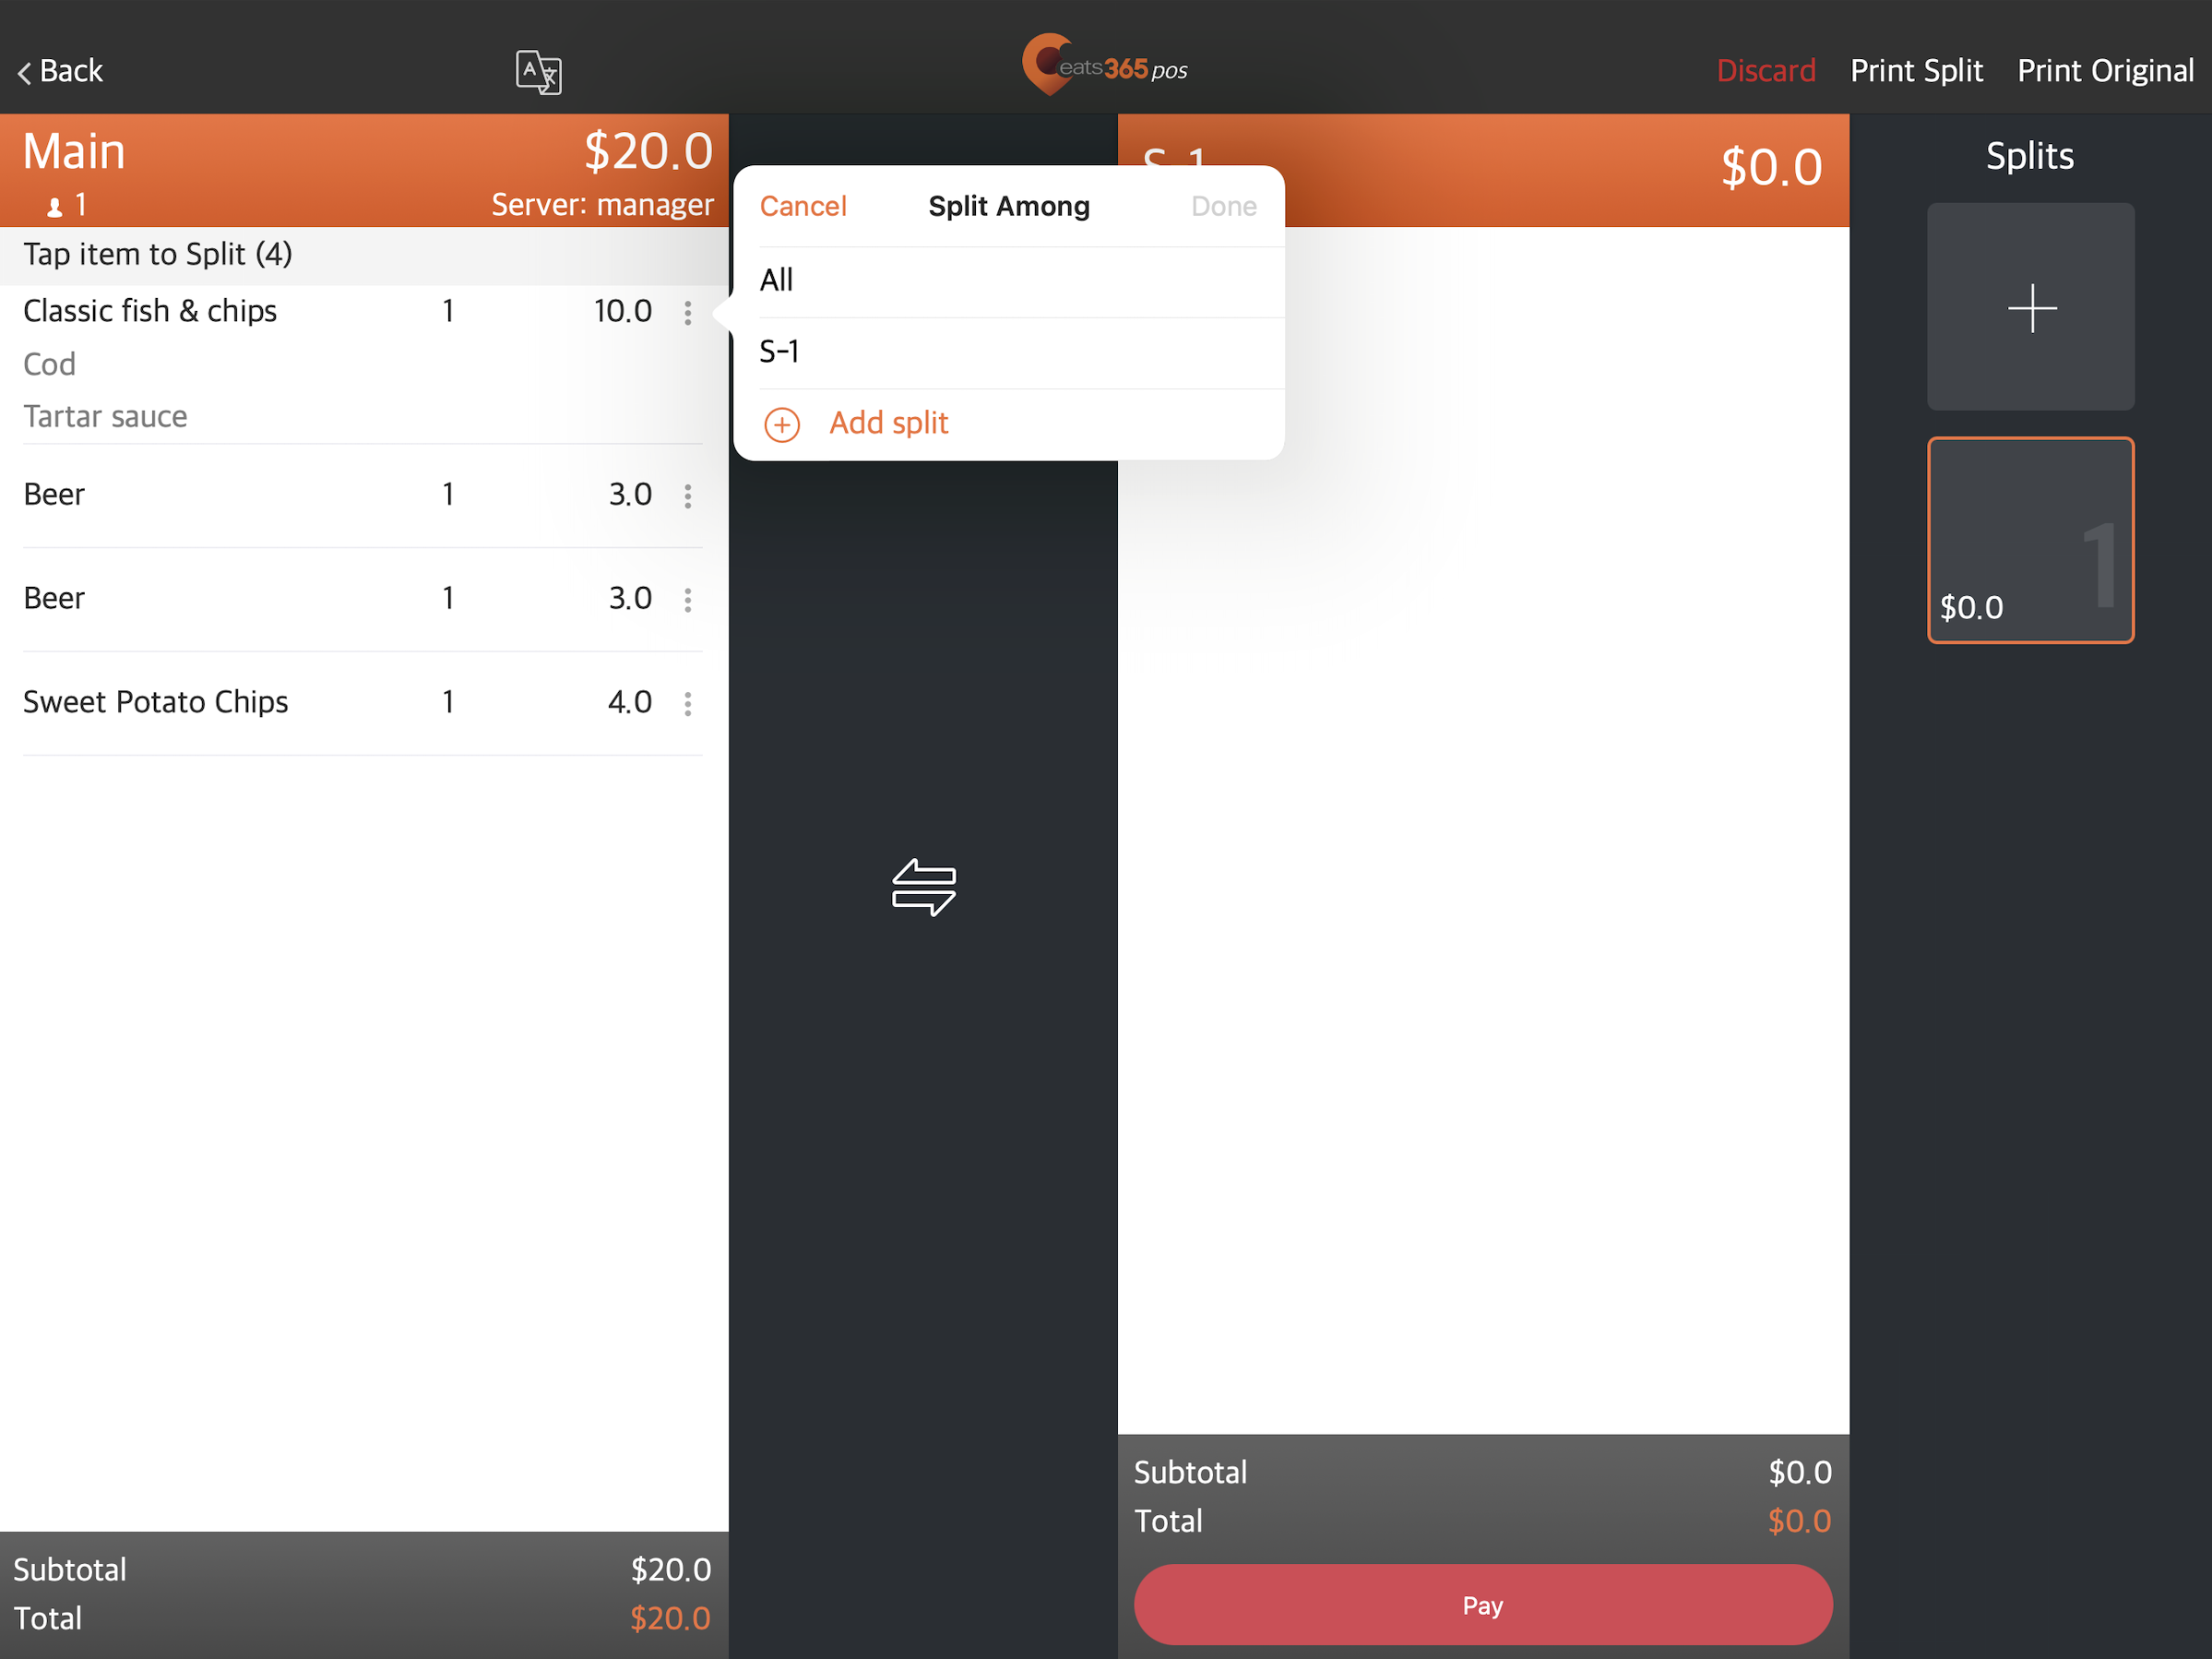
Enable Split by Item
Enable this setting to allow splitting of check by item.
When Split by Item, enable Split Among Bills
When enabled, the system evenly splits the particular item among chosen bills.
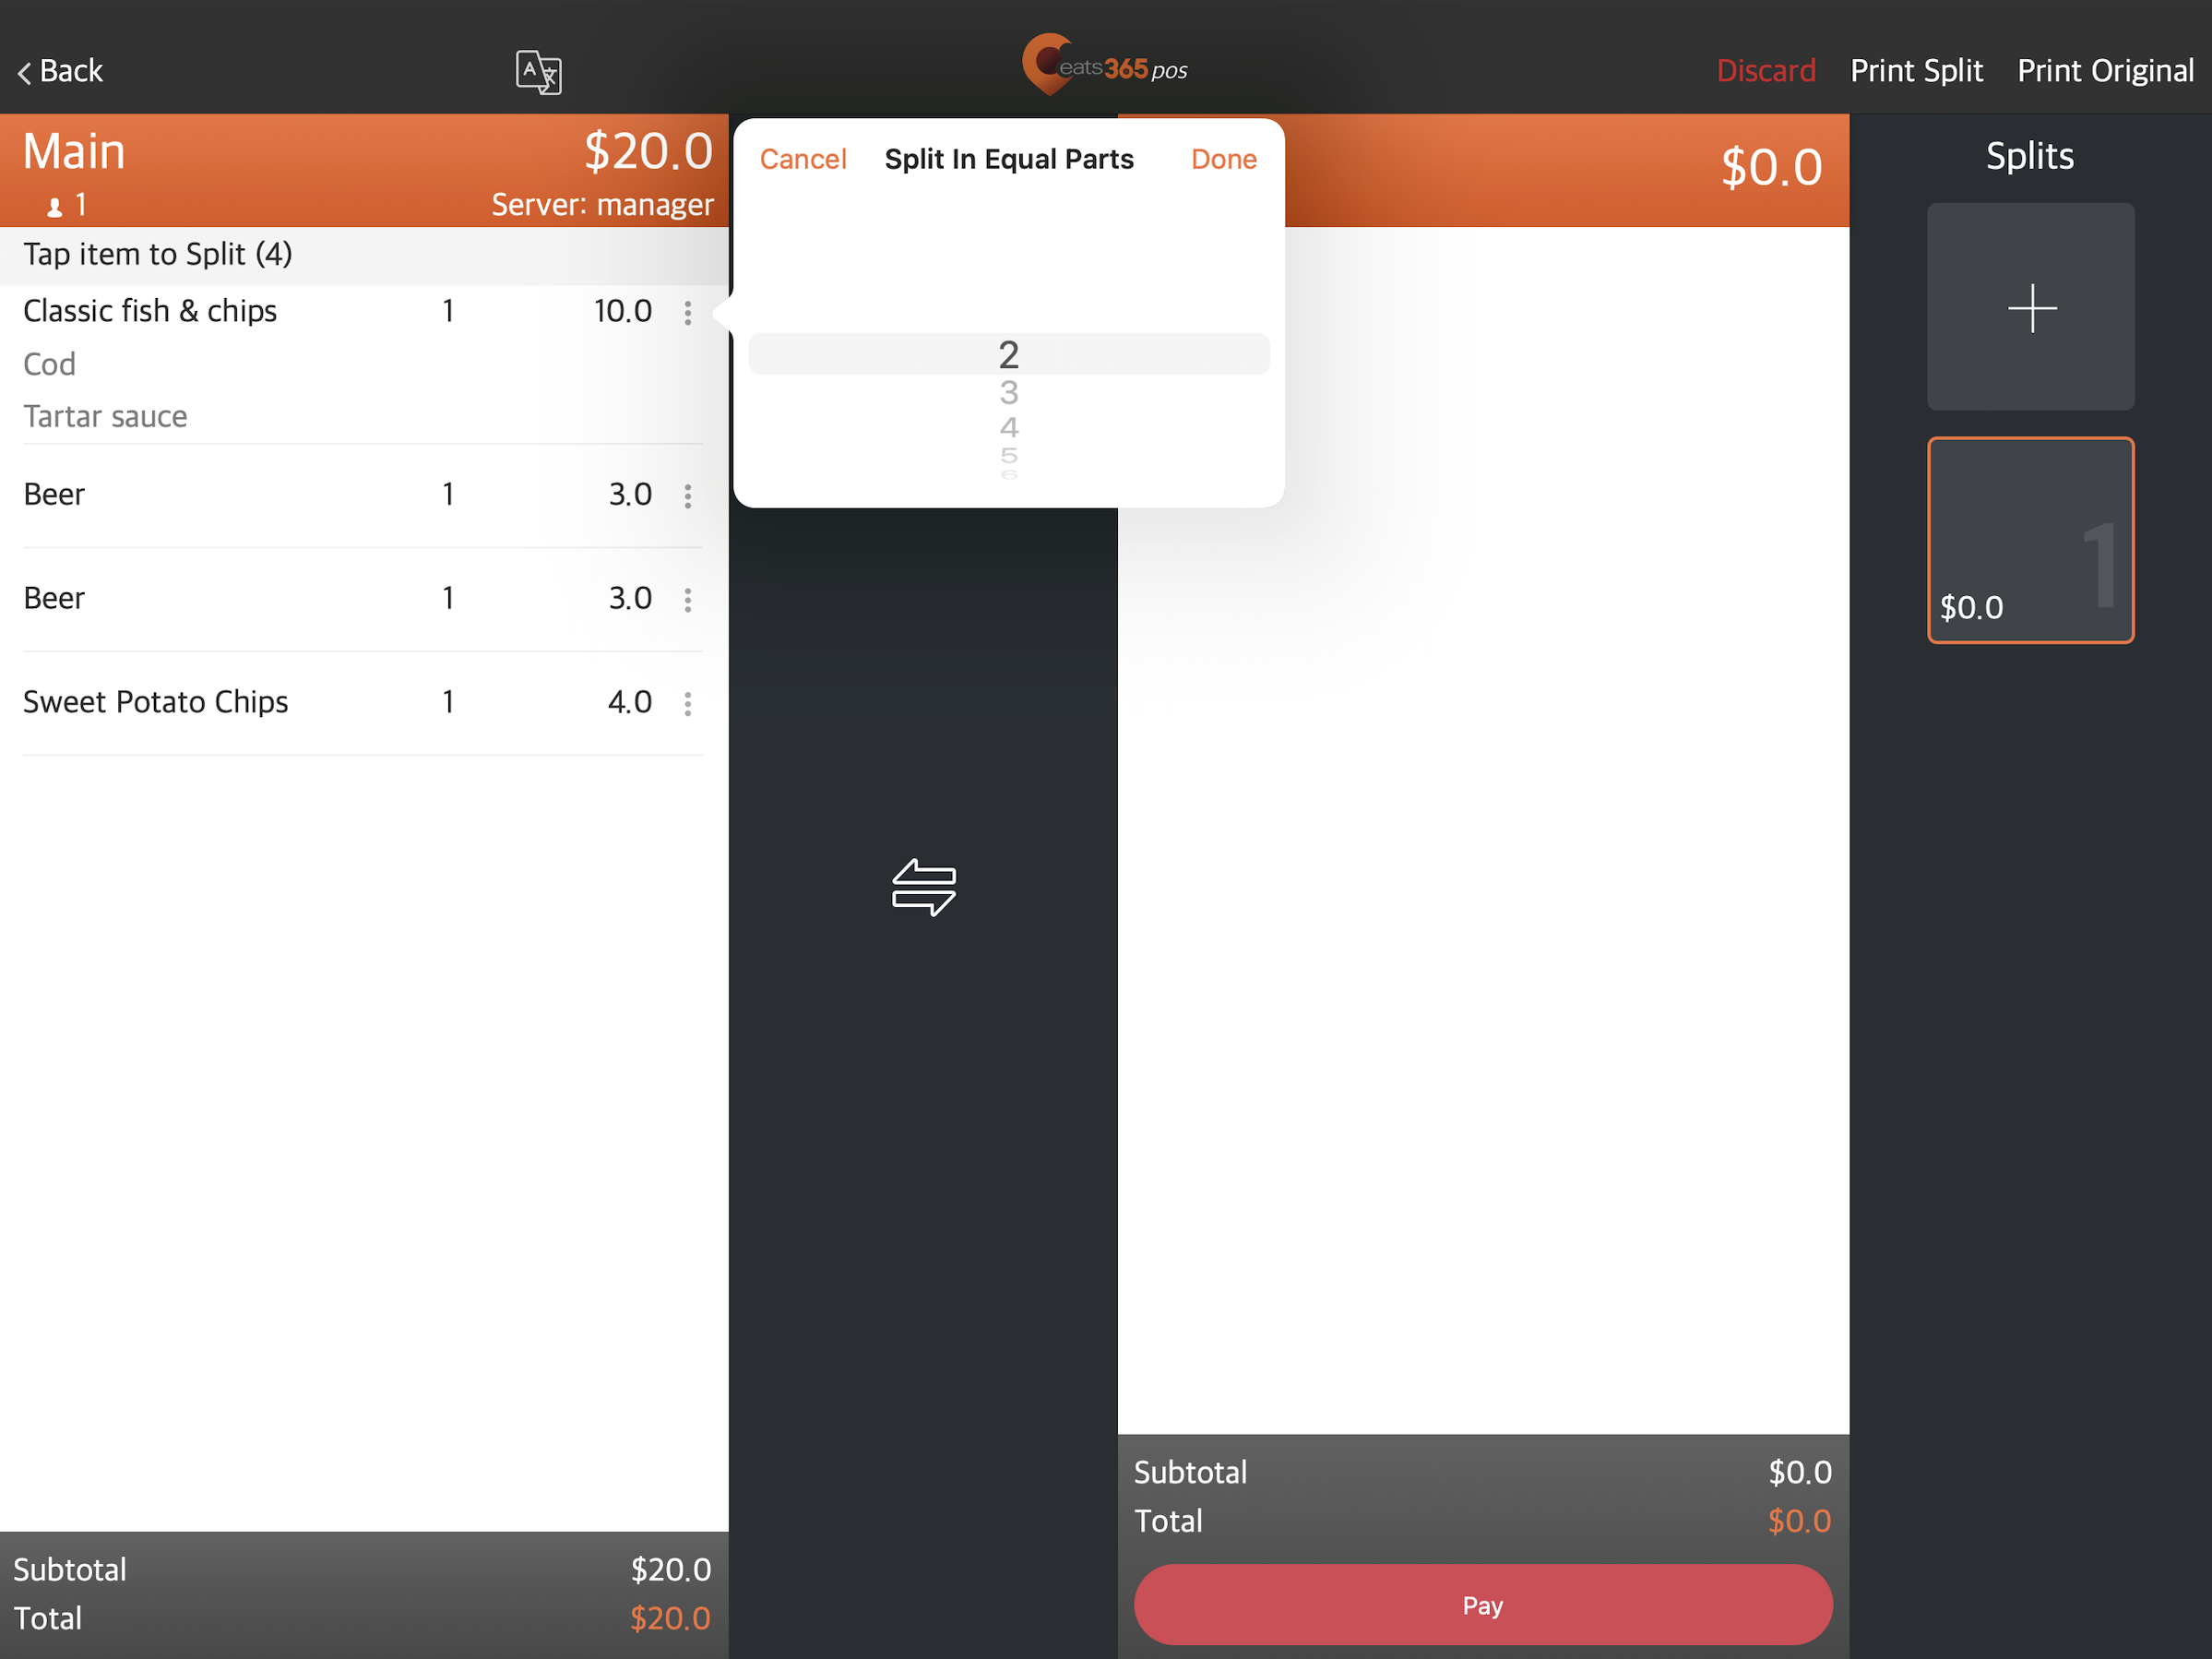
When Split by Item, enable Split in Equal Parts
When enabled, the system evenly splits the particular item into parts, based on the specific quantity, for further allocation.
Custom Menu & Menu Category
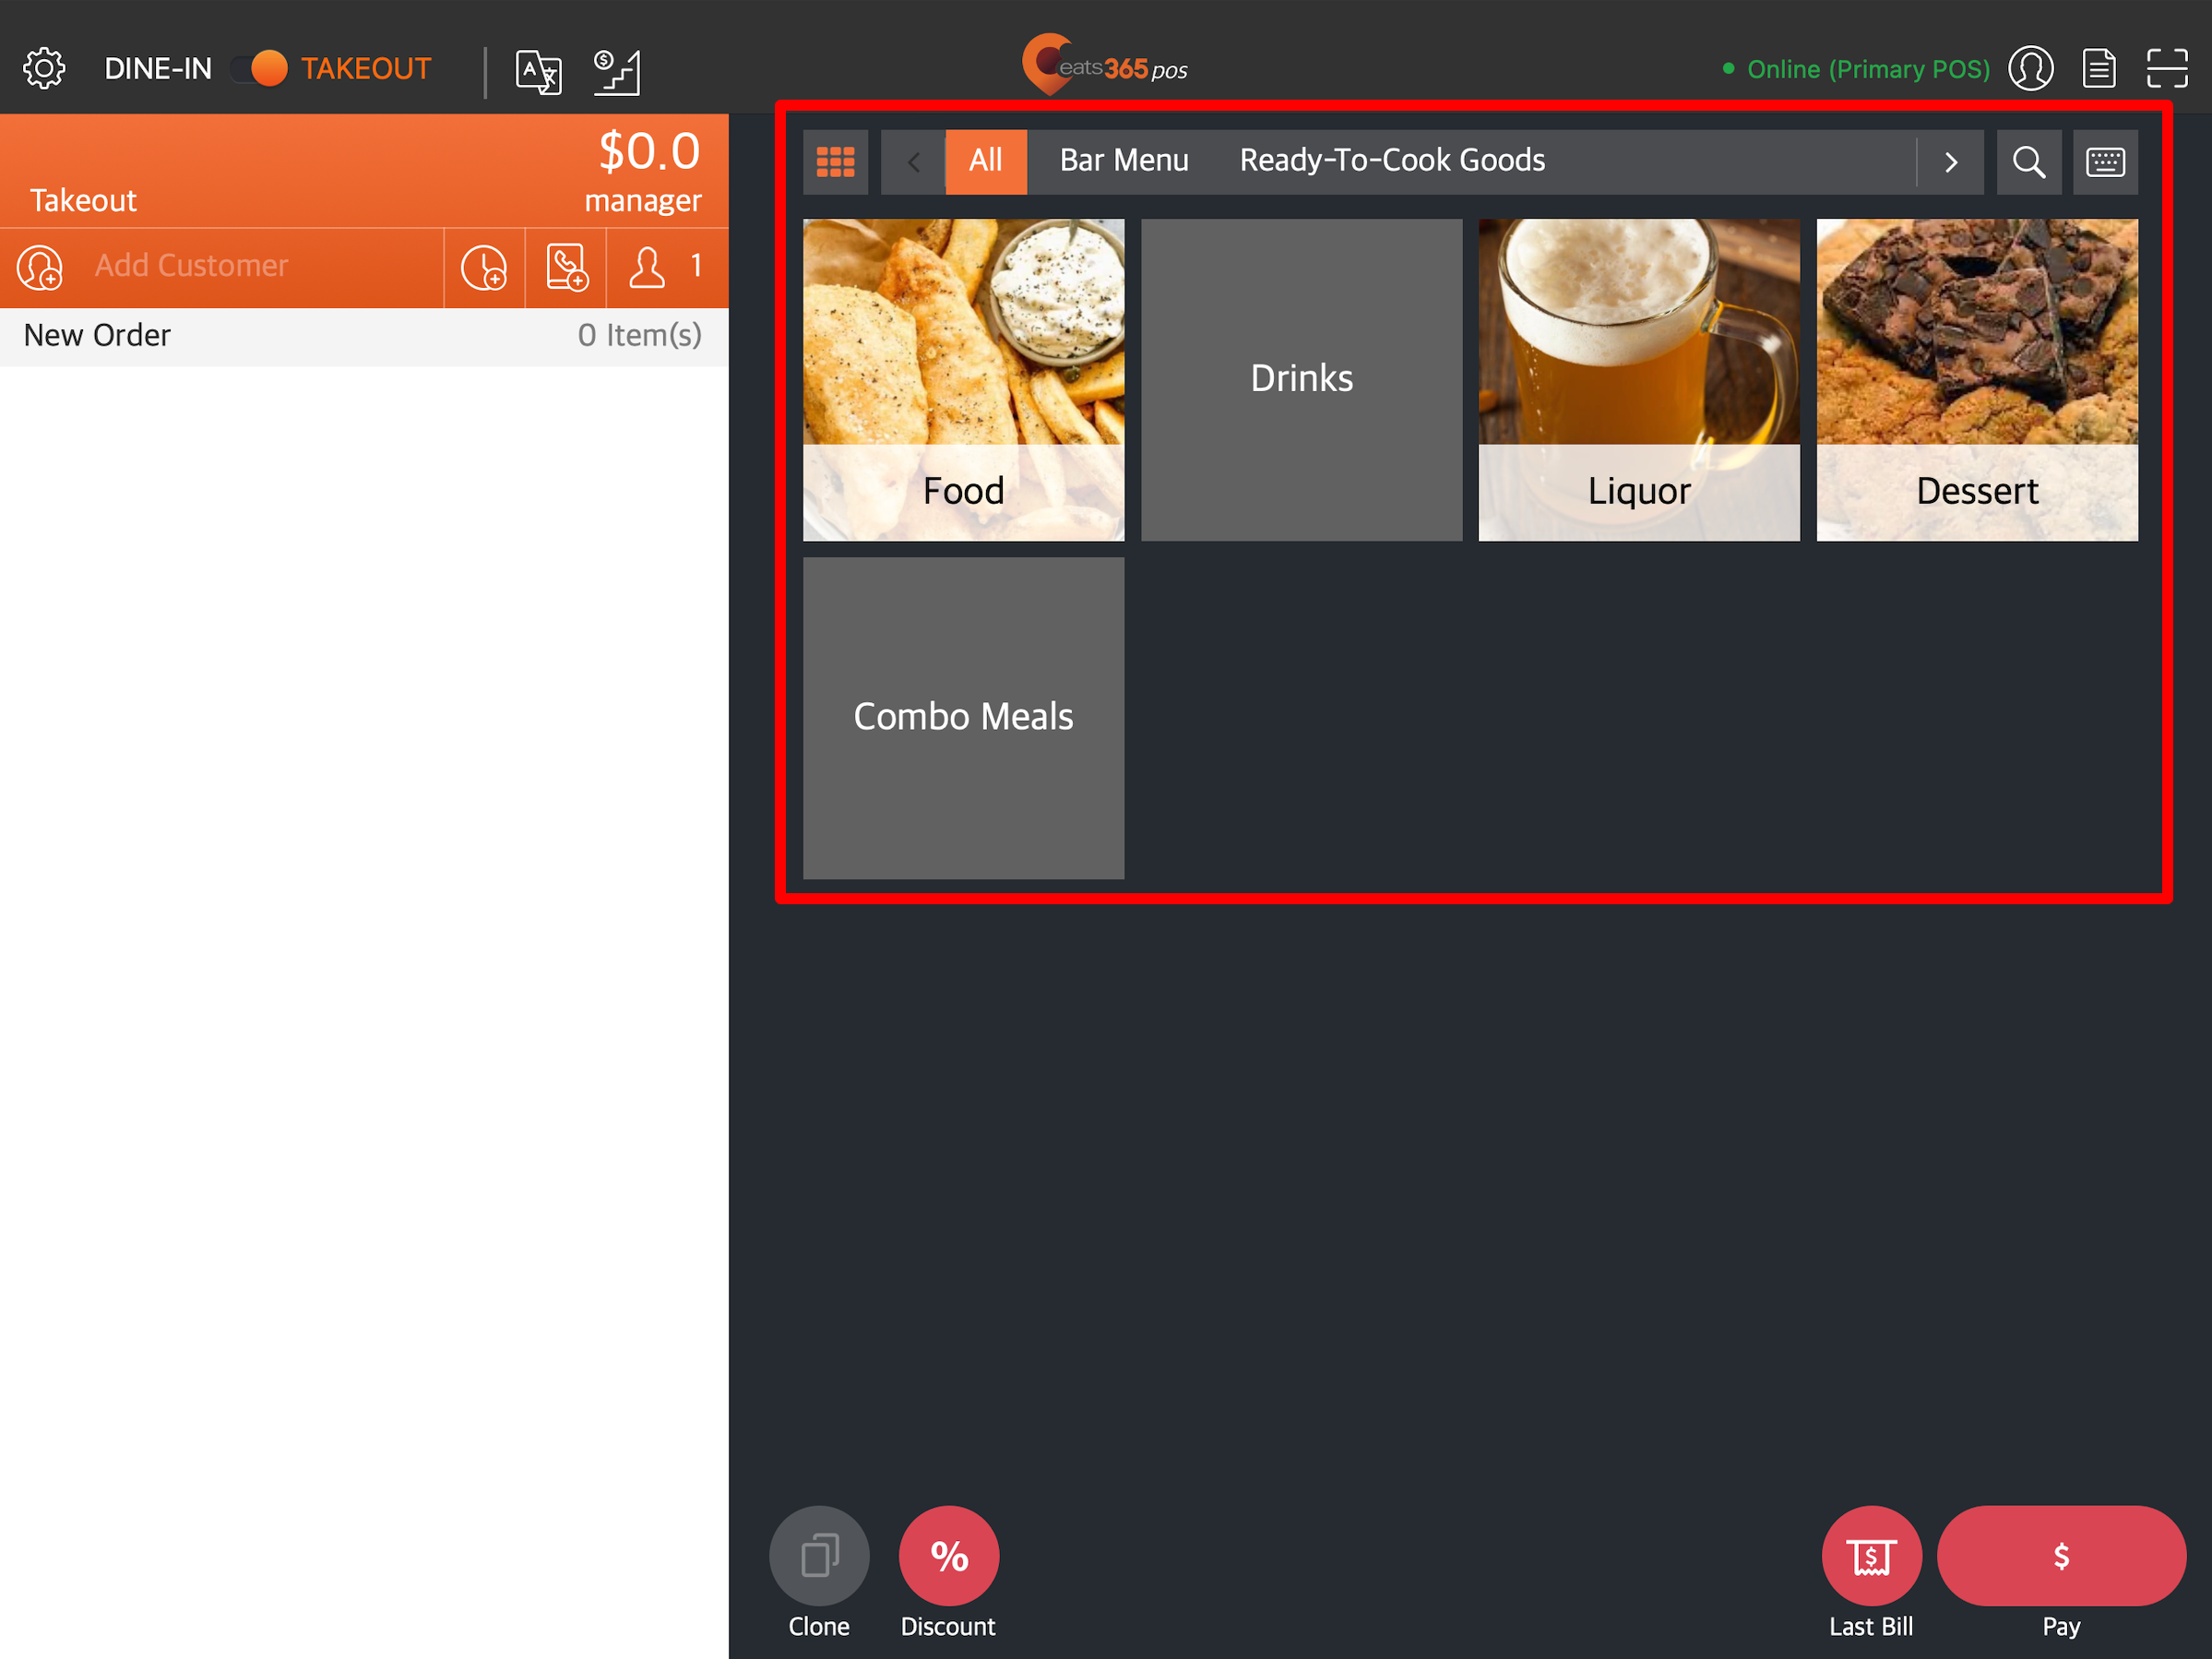
Show Custom Menu Bar and Menu Category by Default
When enabled, the "Custom Menu" bar and "Menu Category" will be the default screen for order-taking.
Hide “All” button in Custom Menu Bar by Default
Hides the All  button from the "Custom Menu" bar.
Auto Return After Menu Item Selection
Auto returns to the main category selection screen once a menu item is selected.
DeleteOrder
Calculating Product Price Type
Sets when a product price type is calculated. Choose from the following:
- Current Time
- Parent Order Time
Remind Staff to Add Member to Order
When enabled, a pop-up notification appears to remind staff to add the member to an order upon order creation.
Remove Discounts with Unfulfilled Conditions
Select how you want to remove discounts with unfulfilled conditions from the order-taking screen. You can choose from the following options:
-
Auto Remove - If the condition set on a discount becomes unfulfilled, the discount is automatically removed from the order-taking screen.

-
Ask Everytime - If the condition set on a discount becomes unfulfilled, the discount amount is automatically removed from the order, however, you must delete the discount manually to remove it from the order-taking screen.

Auto Sign Out
When enabled, you can set all POS terminals in your restaurant to sign out automatically after being idle for a period of time, after processing an order, or after completing a payment.
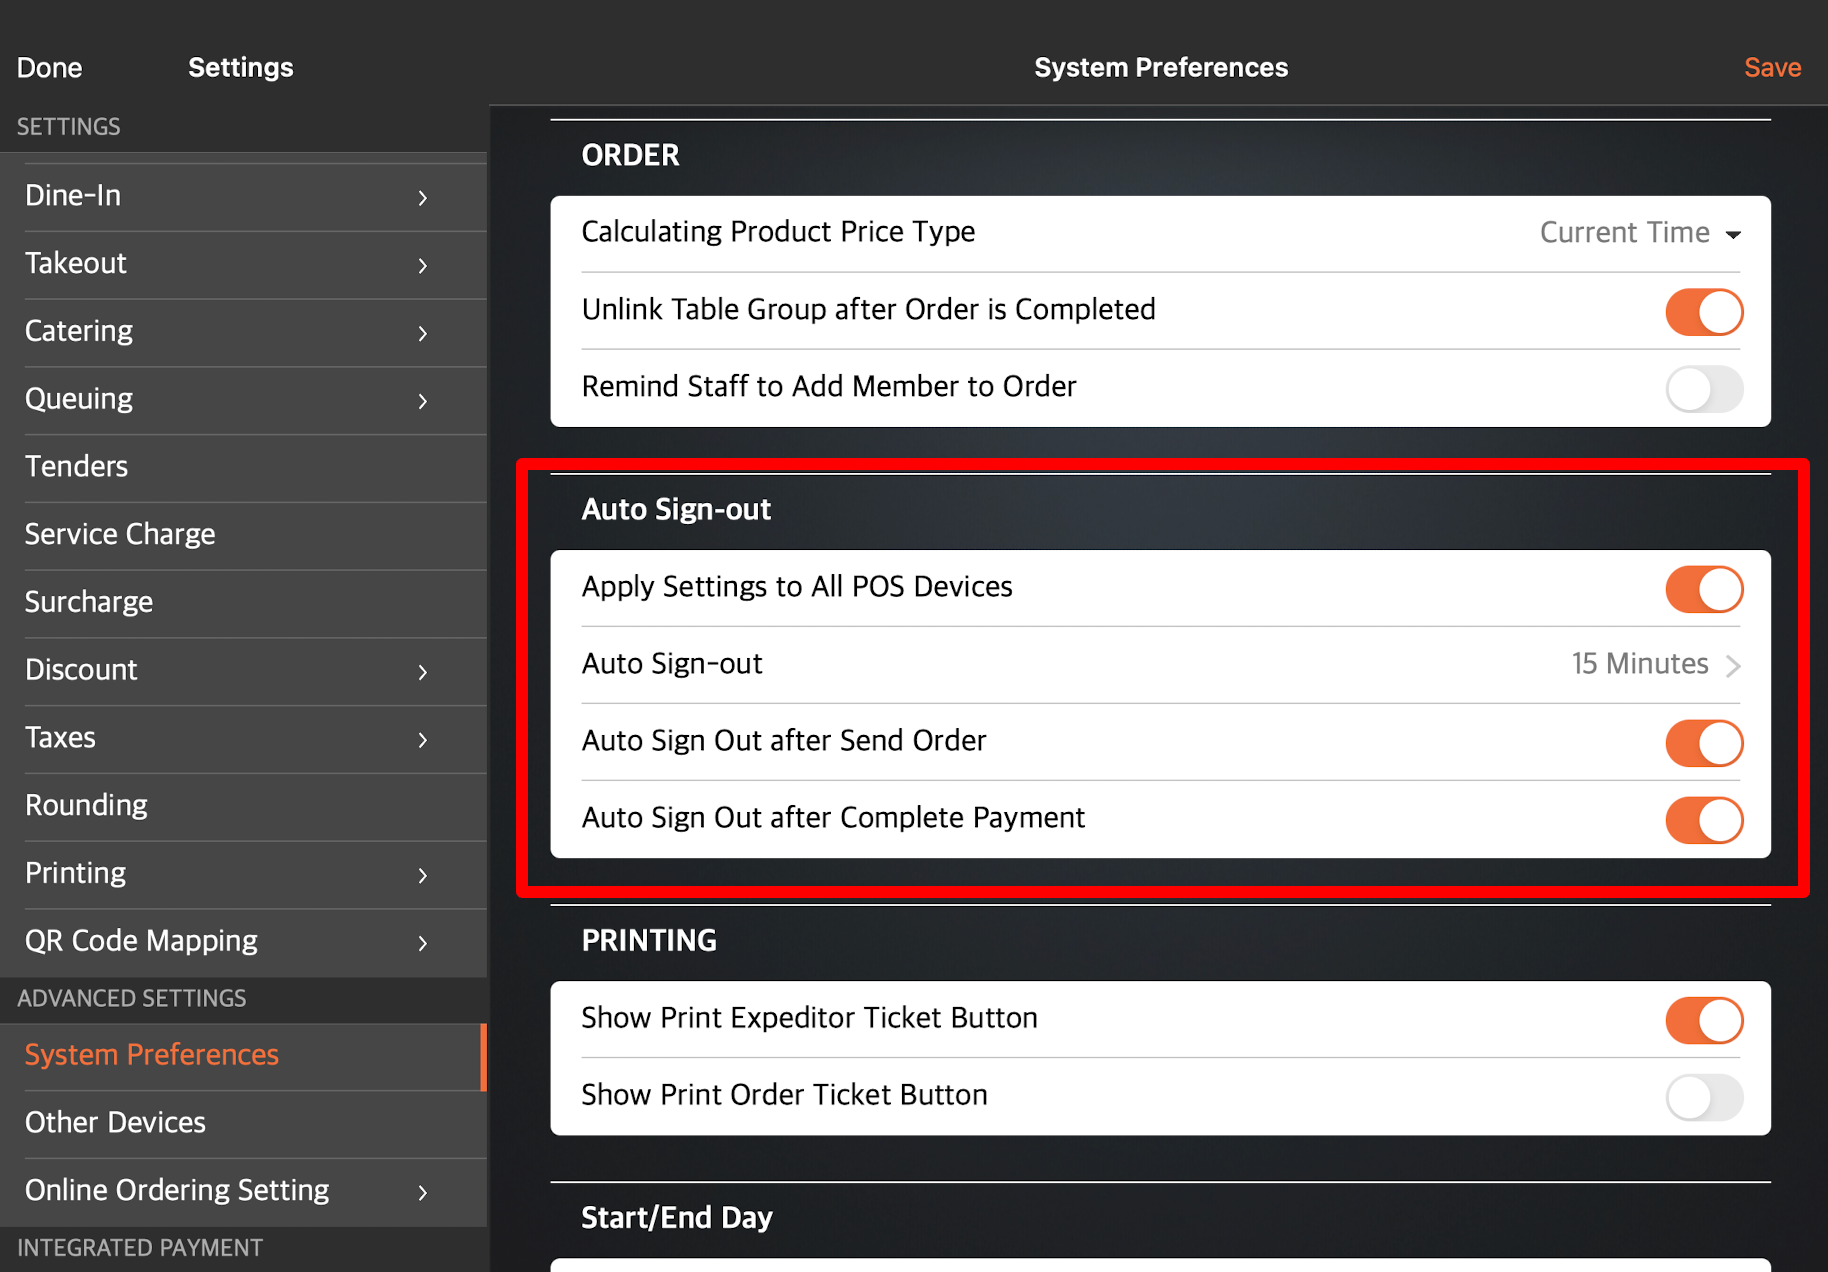
To learn how to set "Auto Sign Out" preferences for all POS terminals in your restaurant, refer to Configure POS to sign out automatically.
DeleteNotification
Apply Settings to All POS Devices
When enabled, you can configure how notifications are displayed for all POS devices.
Notification Display Style
Select how notifications appear on the POS. You can choose from the following options:
-
Notification Icons

-
Notification Banner

Printing
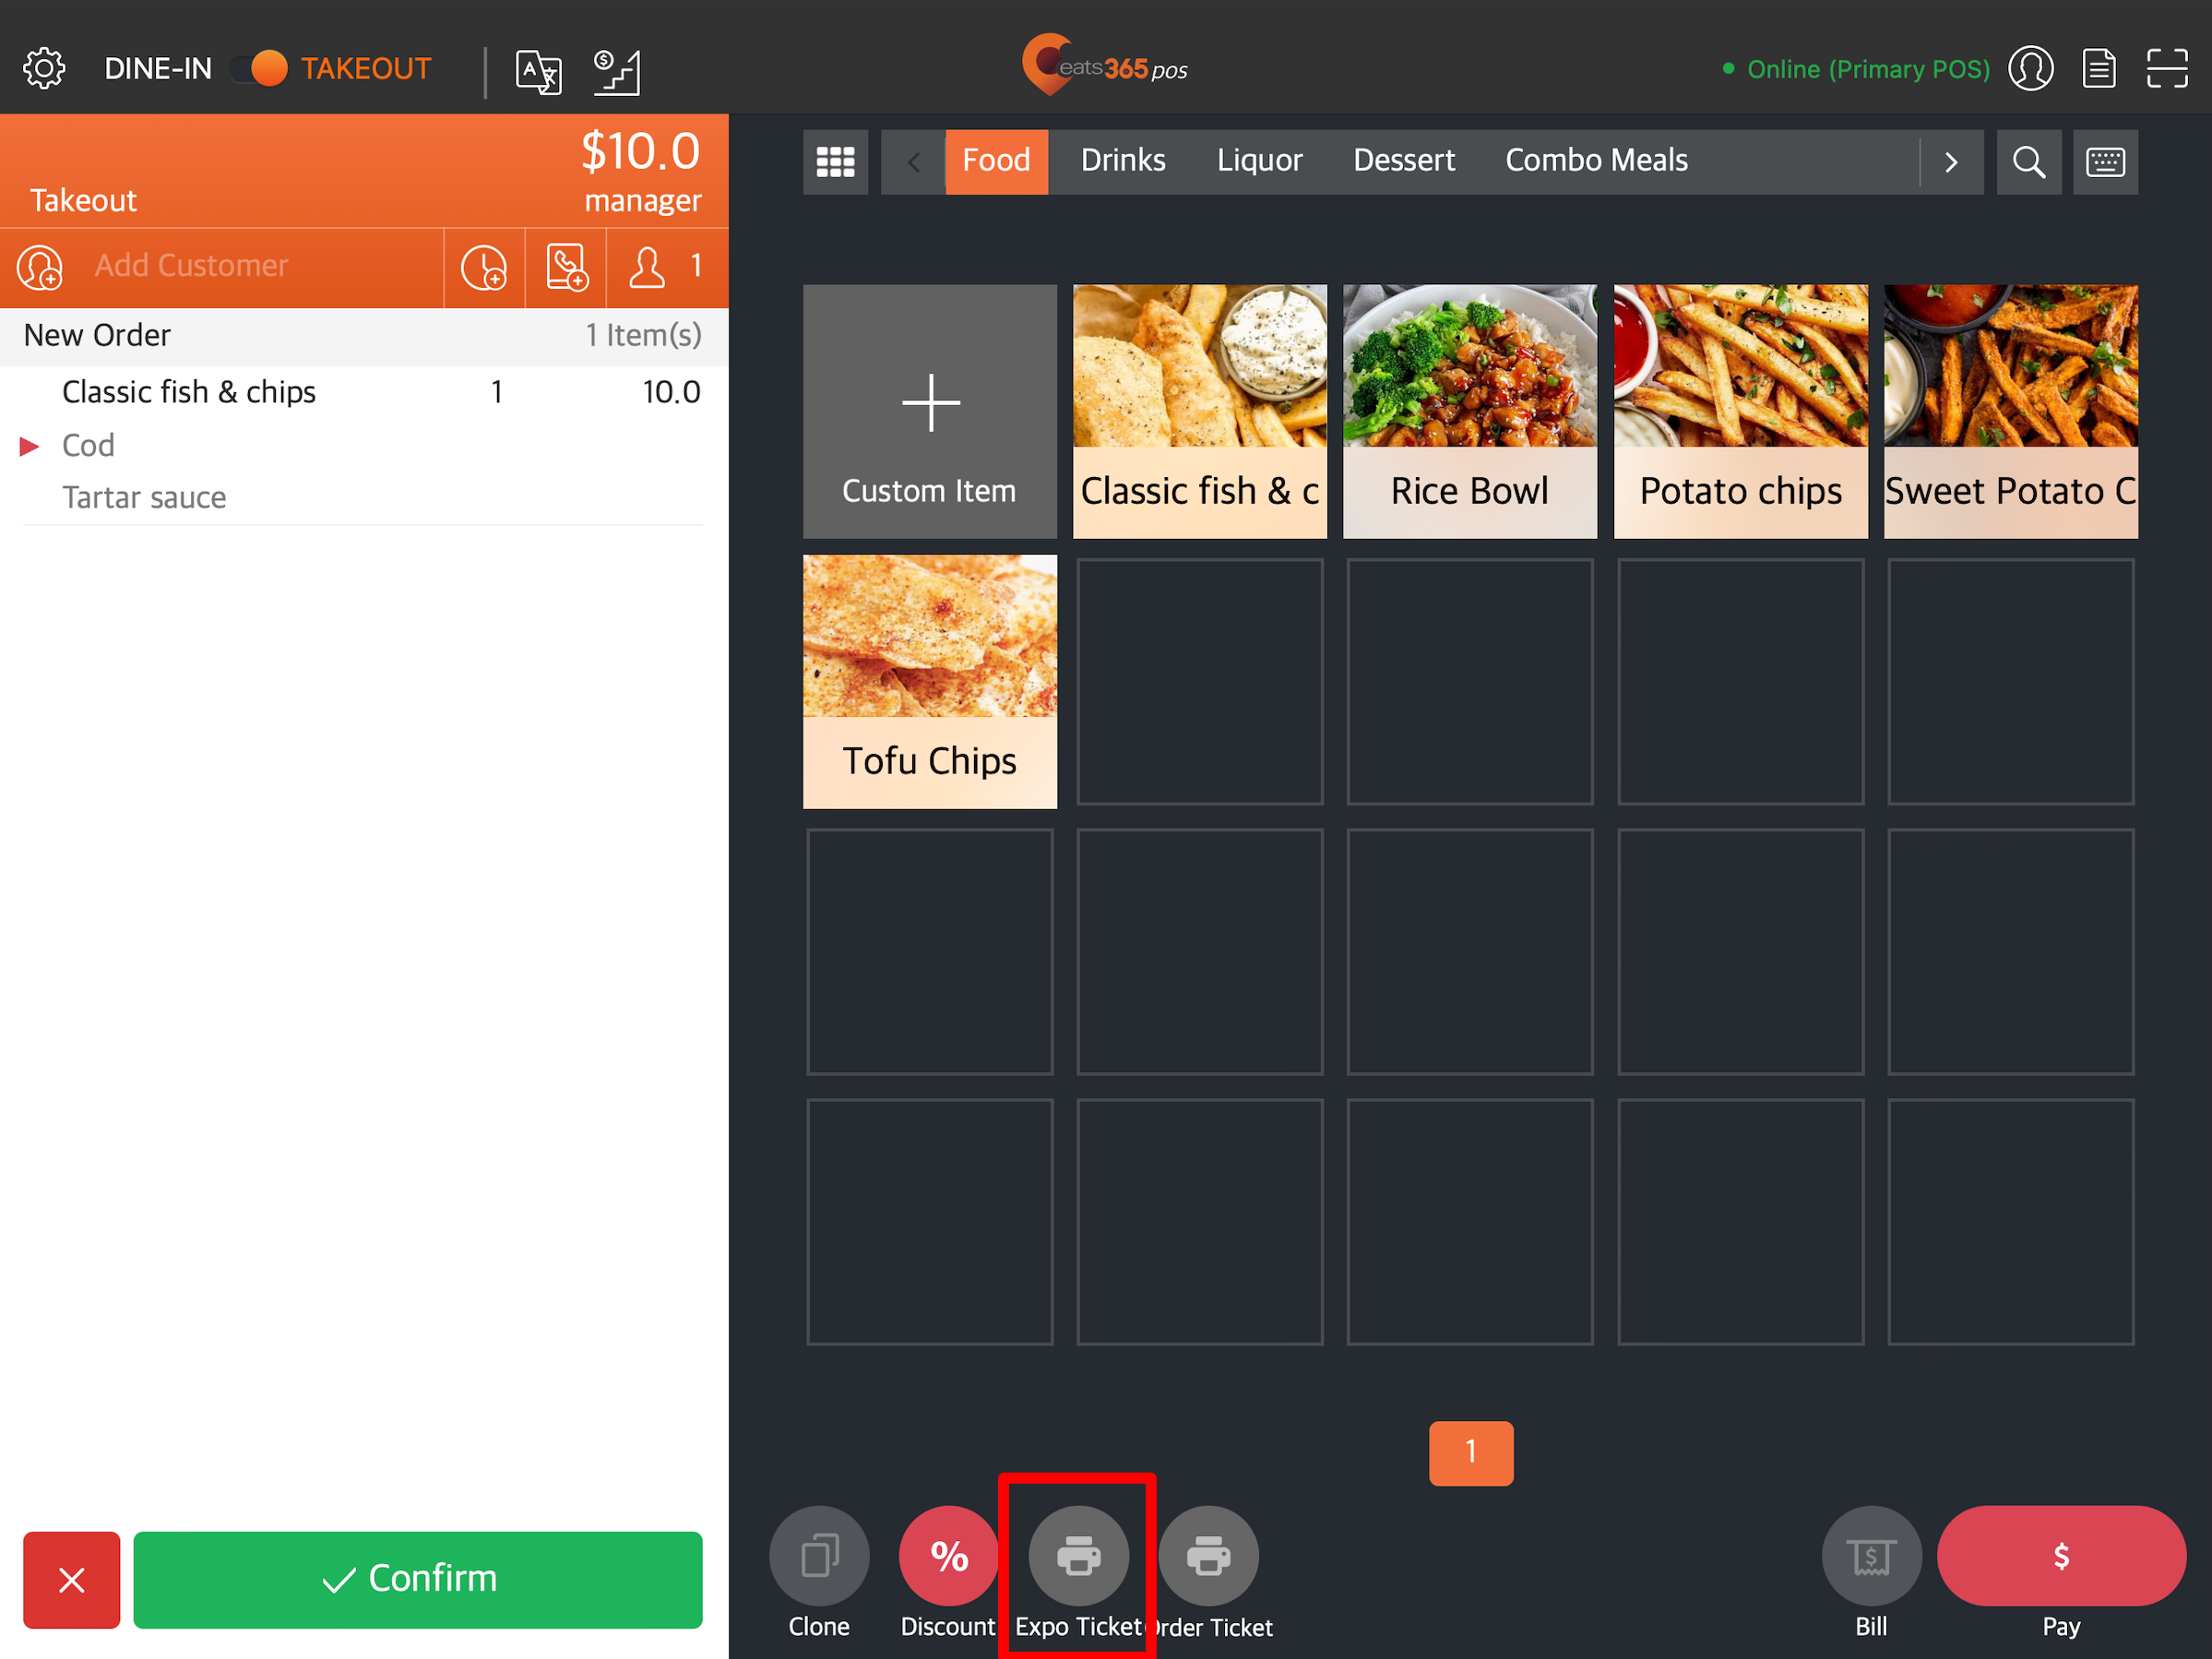
Show Print Expeditor Ticket Button
Shows the "Print Expeditor Ticket" button on the order-taking screen.
Show Print Order Ticket Button
Shows the "Print Order Ticket" button on the order-taking screen.

Daily Closing Report Settings
Customize how sales information appear on the Daily Closing Report. You can configure the following information to display or hide them from the Daily Closing Report:
Sales Summary
- Show Sales by Sales Period
- Show Non Sales Summary
Tender Summary
- Show Breakdown by Tender Type
- Show Audit Trail
- Show VoidOrder List
Order Type Summary
- Show Dine-In Summary
- Show Takeout Summary
- Show Catering Summary
- Show Others Summary
Gratuity & Fees
- Show Gratuity & Fees
Sales Items Summary
- Show Sales by Menu Item
- Show Sales by Single Item
- Show Sales by Product Type
- Show Revenue Center
Discount Summary
- Show Discounts
Show Number Separator
Include a number separator (comma) in between every three digits.
| Enabled | Disabled |
 |
 |
Reconciliation Report Settings
Show Number Separator
Include a number separator (comma) in between every three digits.
| Enabled | Disabled |
 |
 |
Shift Report Settings
Customize how sales information appear on the Shift Report. You can configure the following information to display or hide them from the Shift Report:
Sales Summary
- Show Sales by Sales Period
- Show Non Sales Summary
Till Amount
- Show Pay In and Payout Breakdown
Tender Summary
- Show Breakdown by Tender Type
- Show Audit Trail
- Show VoidOrder List
Order Type Summary
- Show Dine-In Summary
- Show Takeout Summary
- Show Catering Summary
- Show Others Summary
Gratuity & Fees
- Show Gratuity & Fees
Sales Items Summary
- Show Sales by Menu Item
- Show Sales by Single Item
- Show Sales by Product Type
Discount Summary
- Show Discounts
Show Number Separator
Include a number separator (comma) in between every three digits.
| Enabled | Disabled |
 |
 |
Other Settings
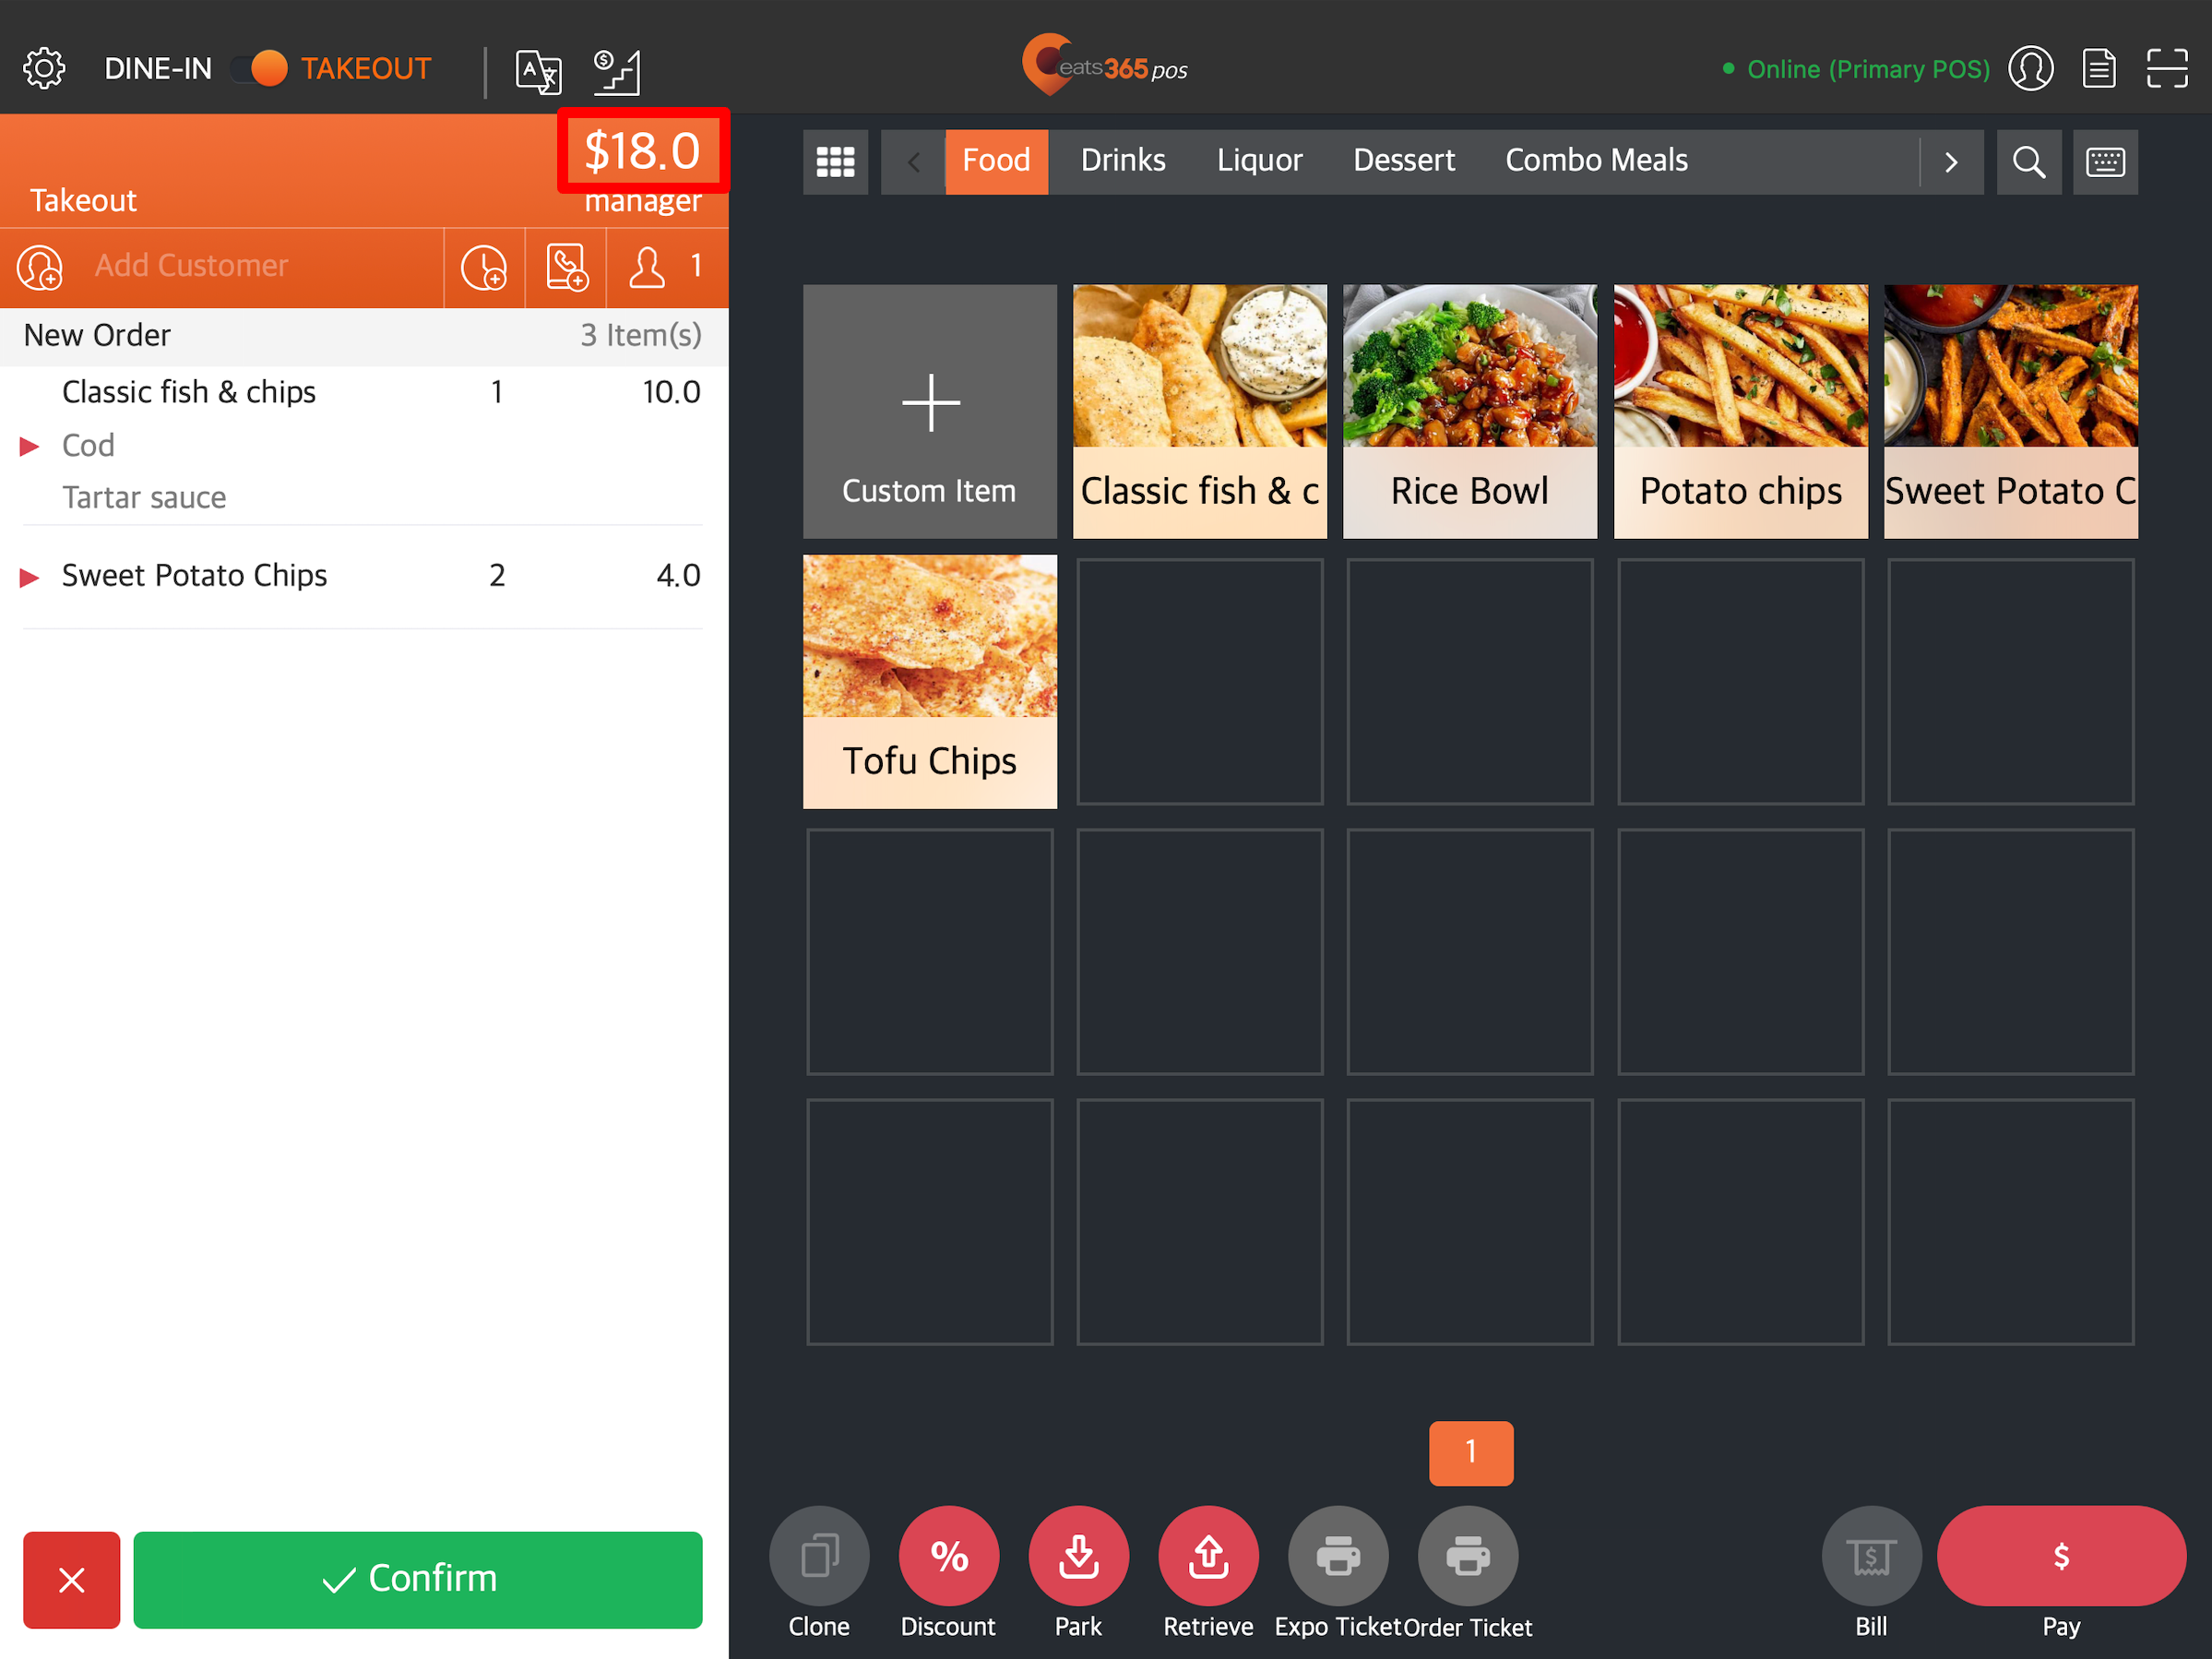
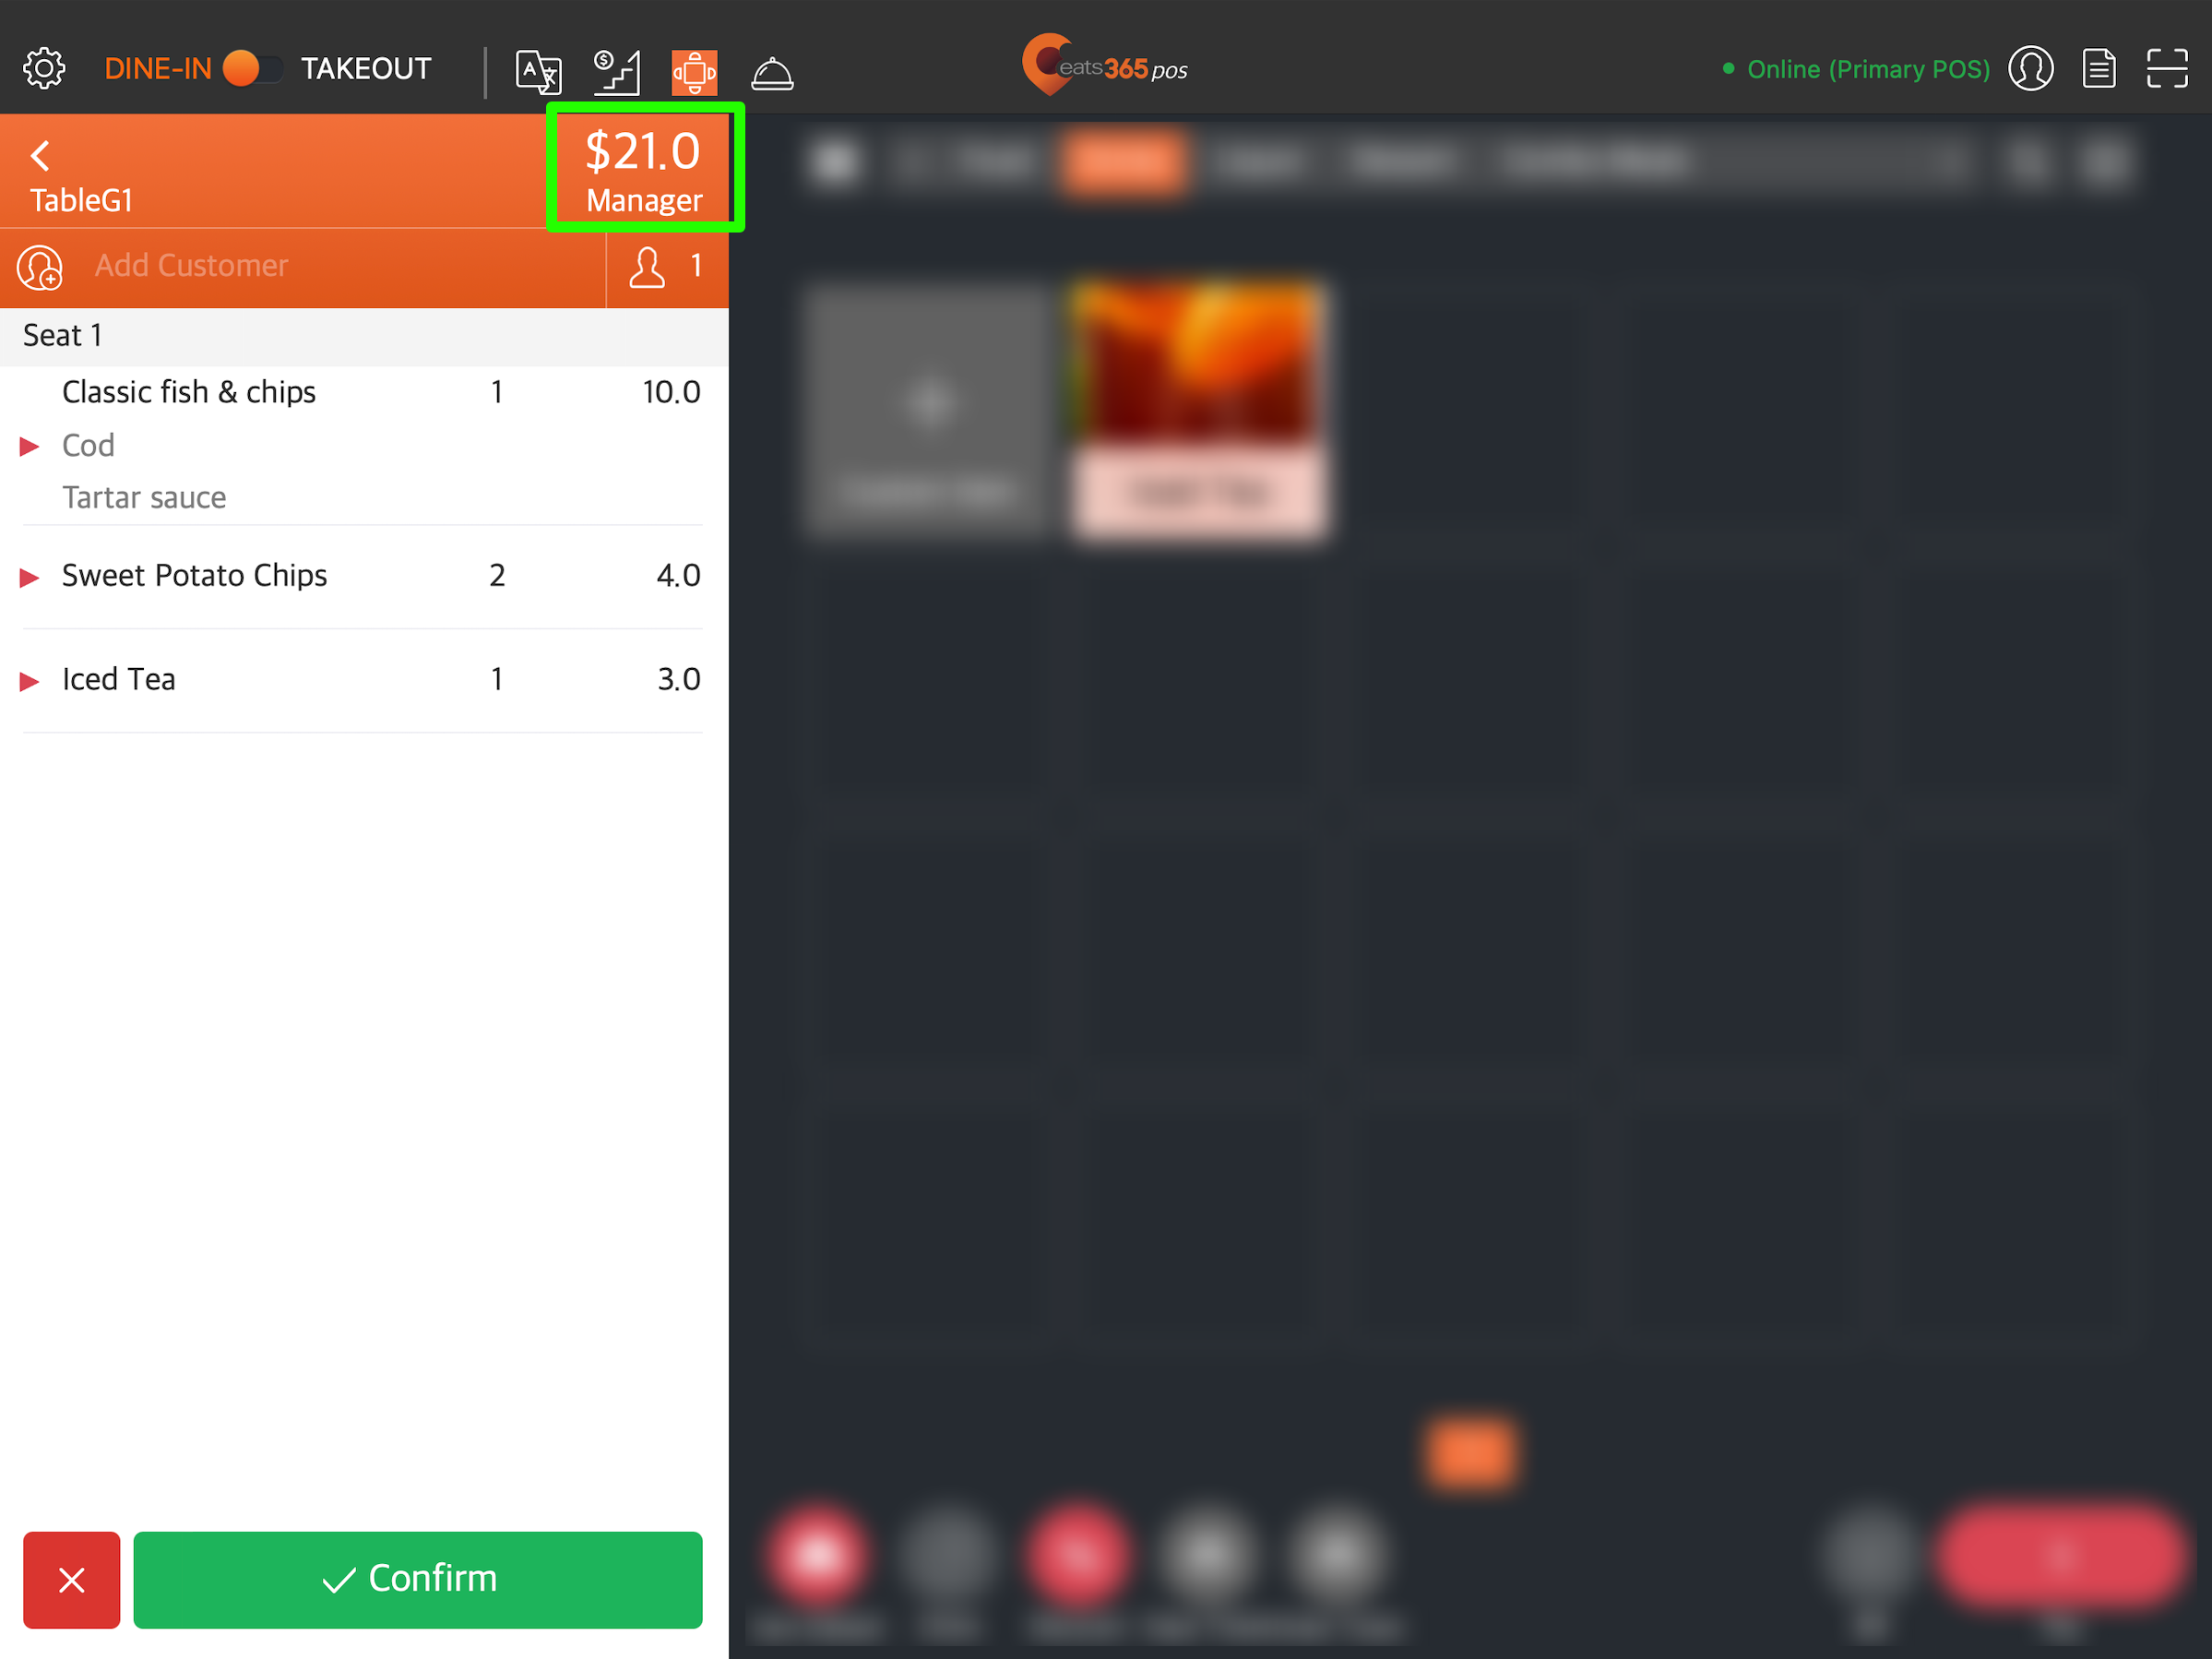
Show Order Price in Ordering Screen
Displays the total price on the order-taking screen.
 .
.
Order Price
Allows you to choose whether to show the order’s "subtotal" or "total" amount on the order-taking screen. By default, the subtotal is shown on the order-taking screen.
 .
.
Order Remarks
Shows order remarks.
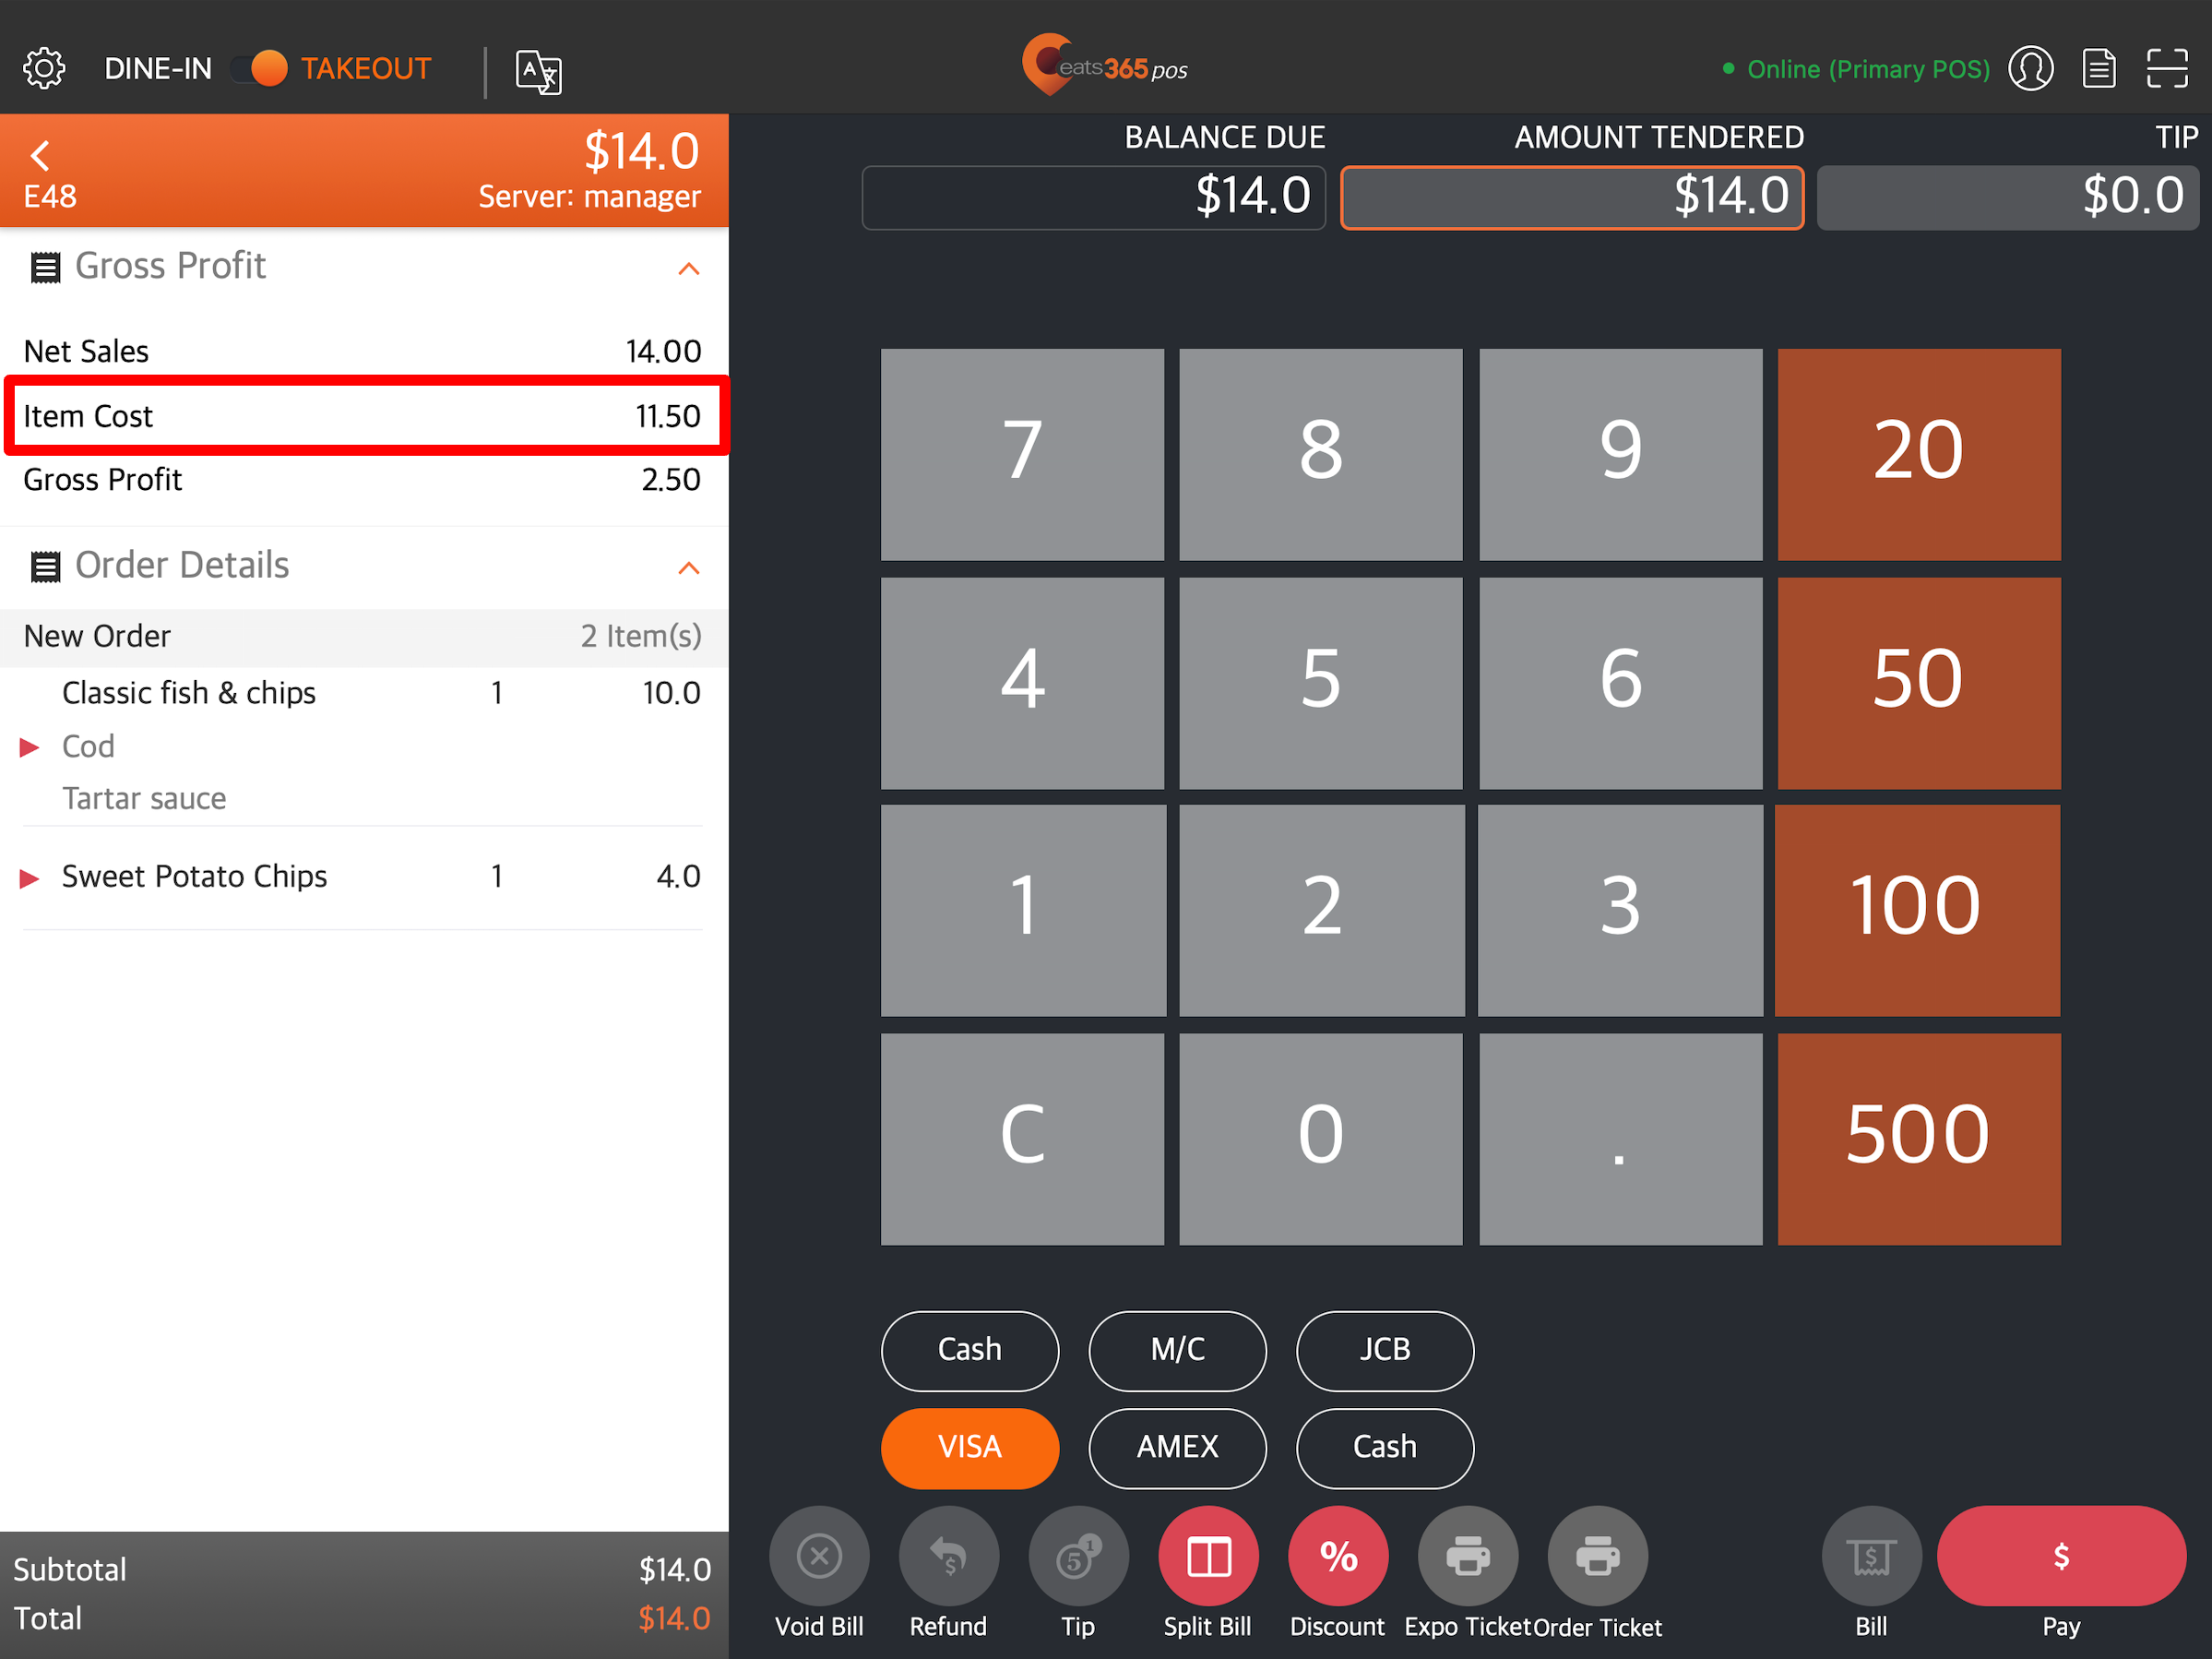
Show Cost of Item
Shows the item cost on the payment screen.
Edit Open Amount Item Cost
Allows you to edit an open amount item cost.
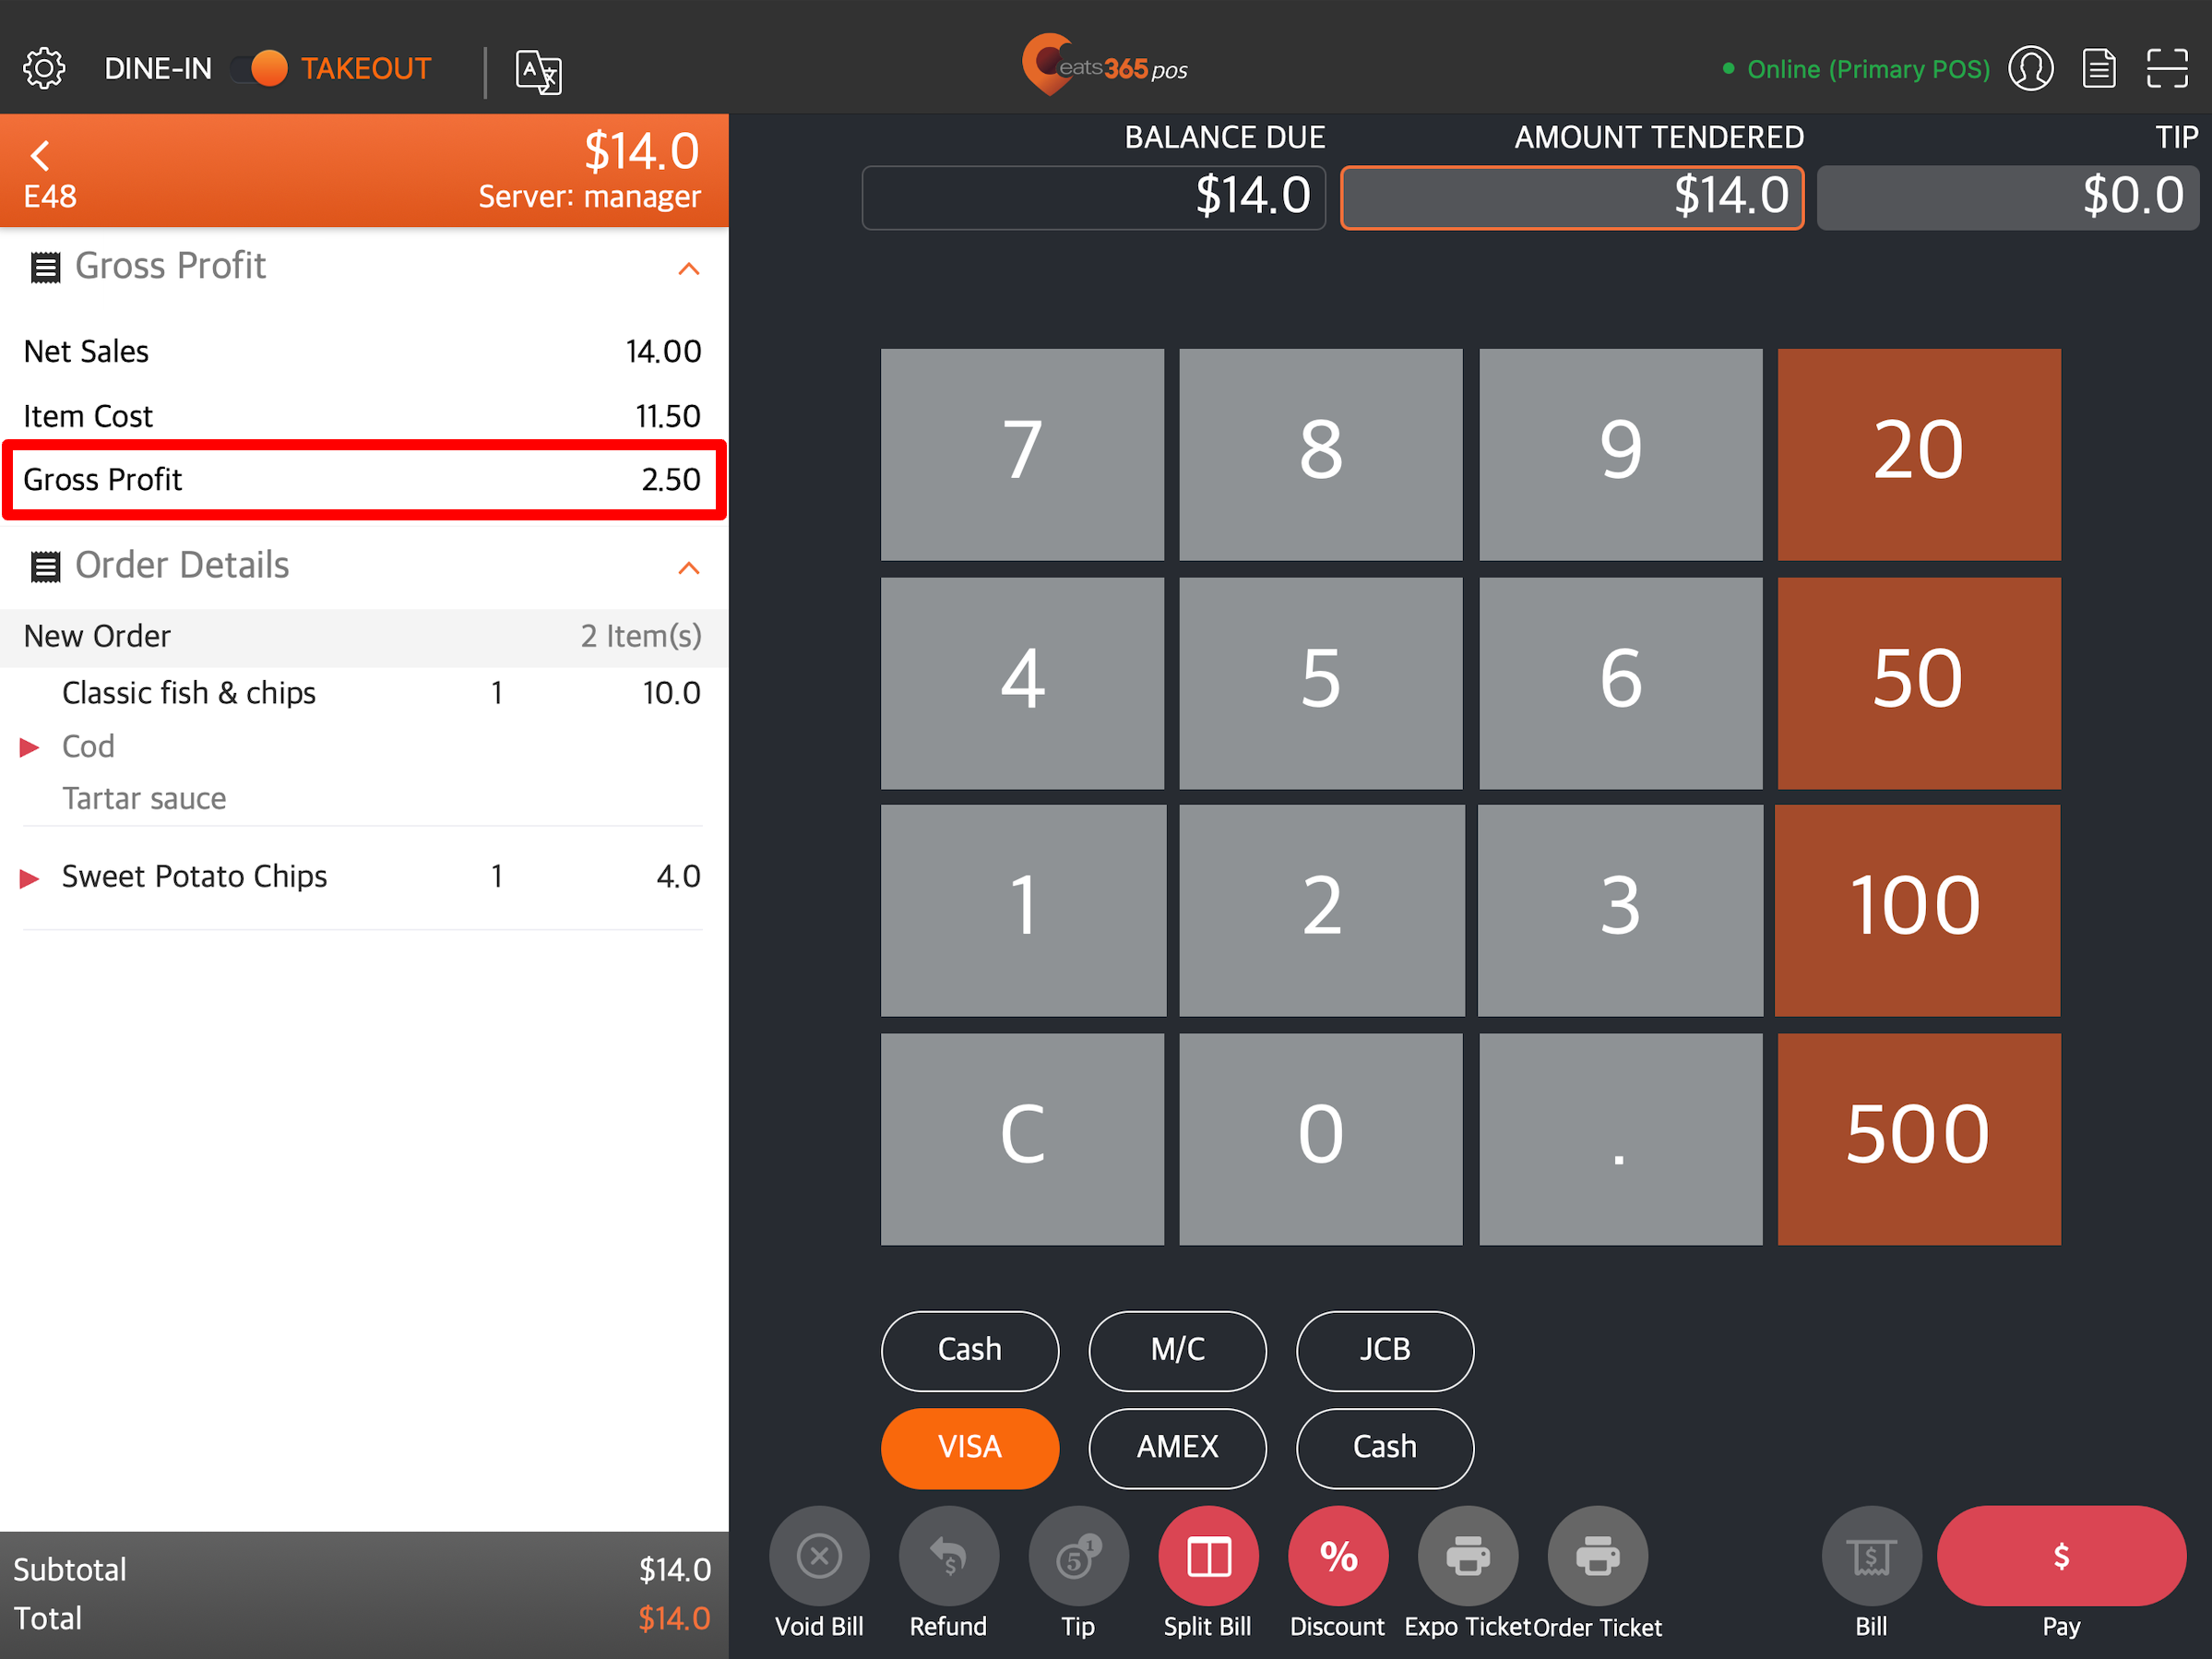
Show Gross Profit of Order
Shows the gross profit of the order on the payment screen.
Show Quick Key for Transfer Item
Shows the action button for transferring an item.
![]()
Show Tax Rate
Shows the tax rate on receipts, reports, and other instances where tax information is indicated.

Service Call
Allows you to create, edit, or delete service calls.
Delete
Clock In/Out Settings
Require Photo
Requires a photo whenever a staff member signs in and out on the POS.
DeleteScanning Settings
Scanning on Ordering Page
Sets the scanning type as "Receipt and Item Code" or "Loyalty Card."
Scanning Device Type
Allows you to choose the type of scanning device for your POS. You may choose from the following options:
- Scanner
- Camera
- Camera + Scanner
Hide Scan Coupon Button
If you are using a third-party CRM system, this setting allows you to hide the "Scan Coupon" button from the member’s coupon page.
DeleteItem Display Sequence
Sequence
Changes the display order of your item categories. You may choose from the following options:
- System default - Items are displayed in the order that they are added on the POS.
- Custom - Items are displayed according to your defined sequence of categories.
Follow Items Sequence under each Category
When enabled, the items are displayed according to your defined item sequence under each category. You can rearrange the sequence from the Item settings. Disable this setting to display items according to the sequence you ring in the items on the POS.
DeleteItem Action Button Sequence
Change Sequence
When enabled, this setting allows you to create, edit, or delete action button sequences.
Available Action Button sequences:
- Select
- Edit
- Fire
- Hold
- Change Course
- Change Seat
- Special Request
- Reprint
- Rush
- Transfer
- Reorder
- Comps
- Discount
- Allow Discount
- No Discount
- Waive SC
- Require SC
- Delete
- Reprint Course
- Delay Fire
- Don't Fire
- Waive Surcharge
- Require Surcharge
Merchant Portal
- Log in to the Merchant Portal.
- On the left panel, click on Advanced Settings, then click on System Preferences.
- Select one of the following:
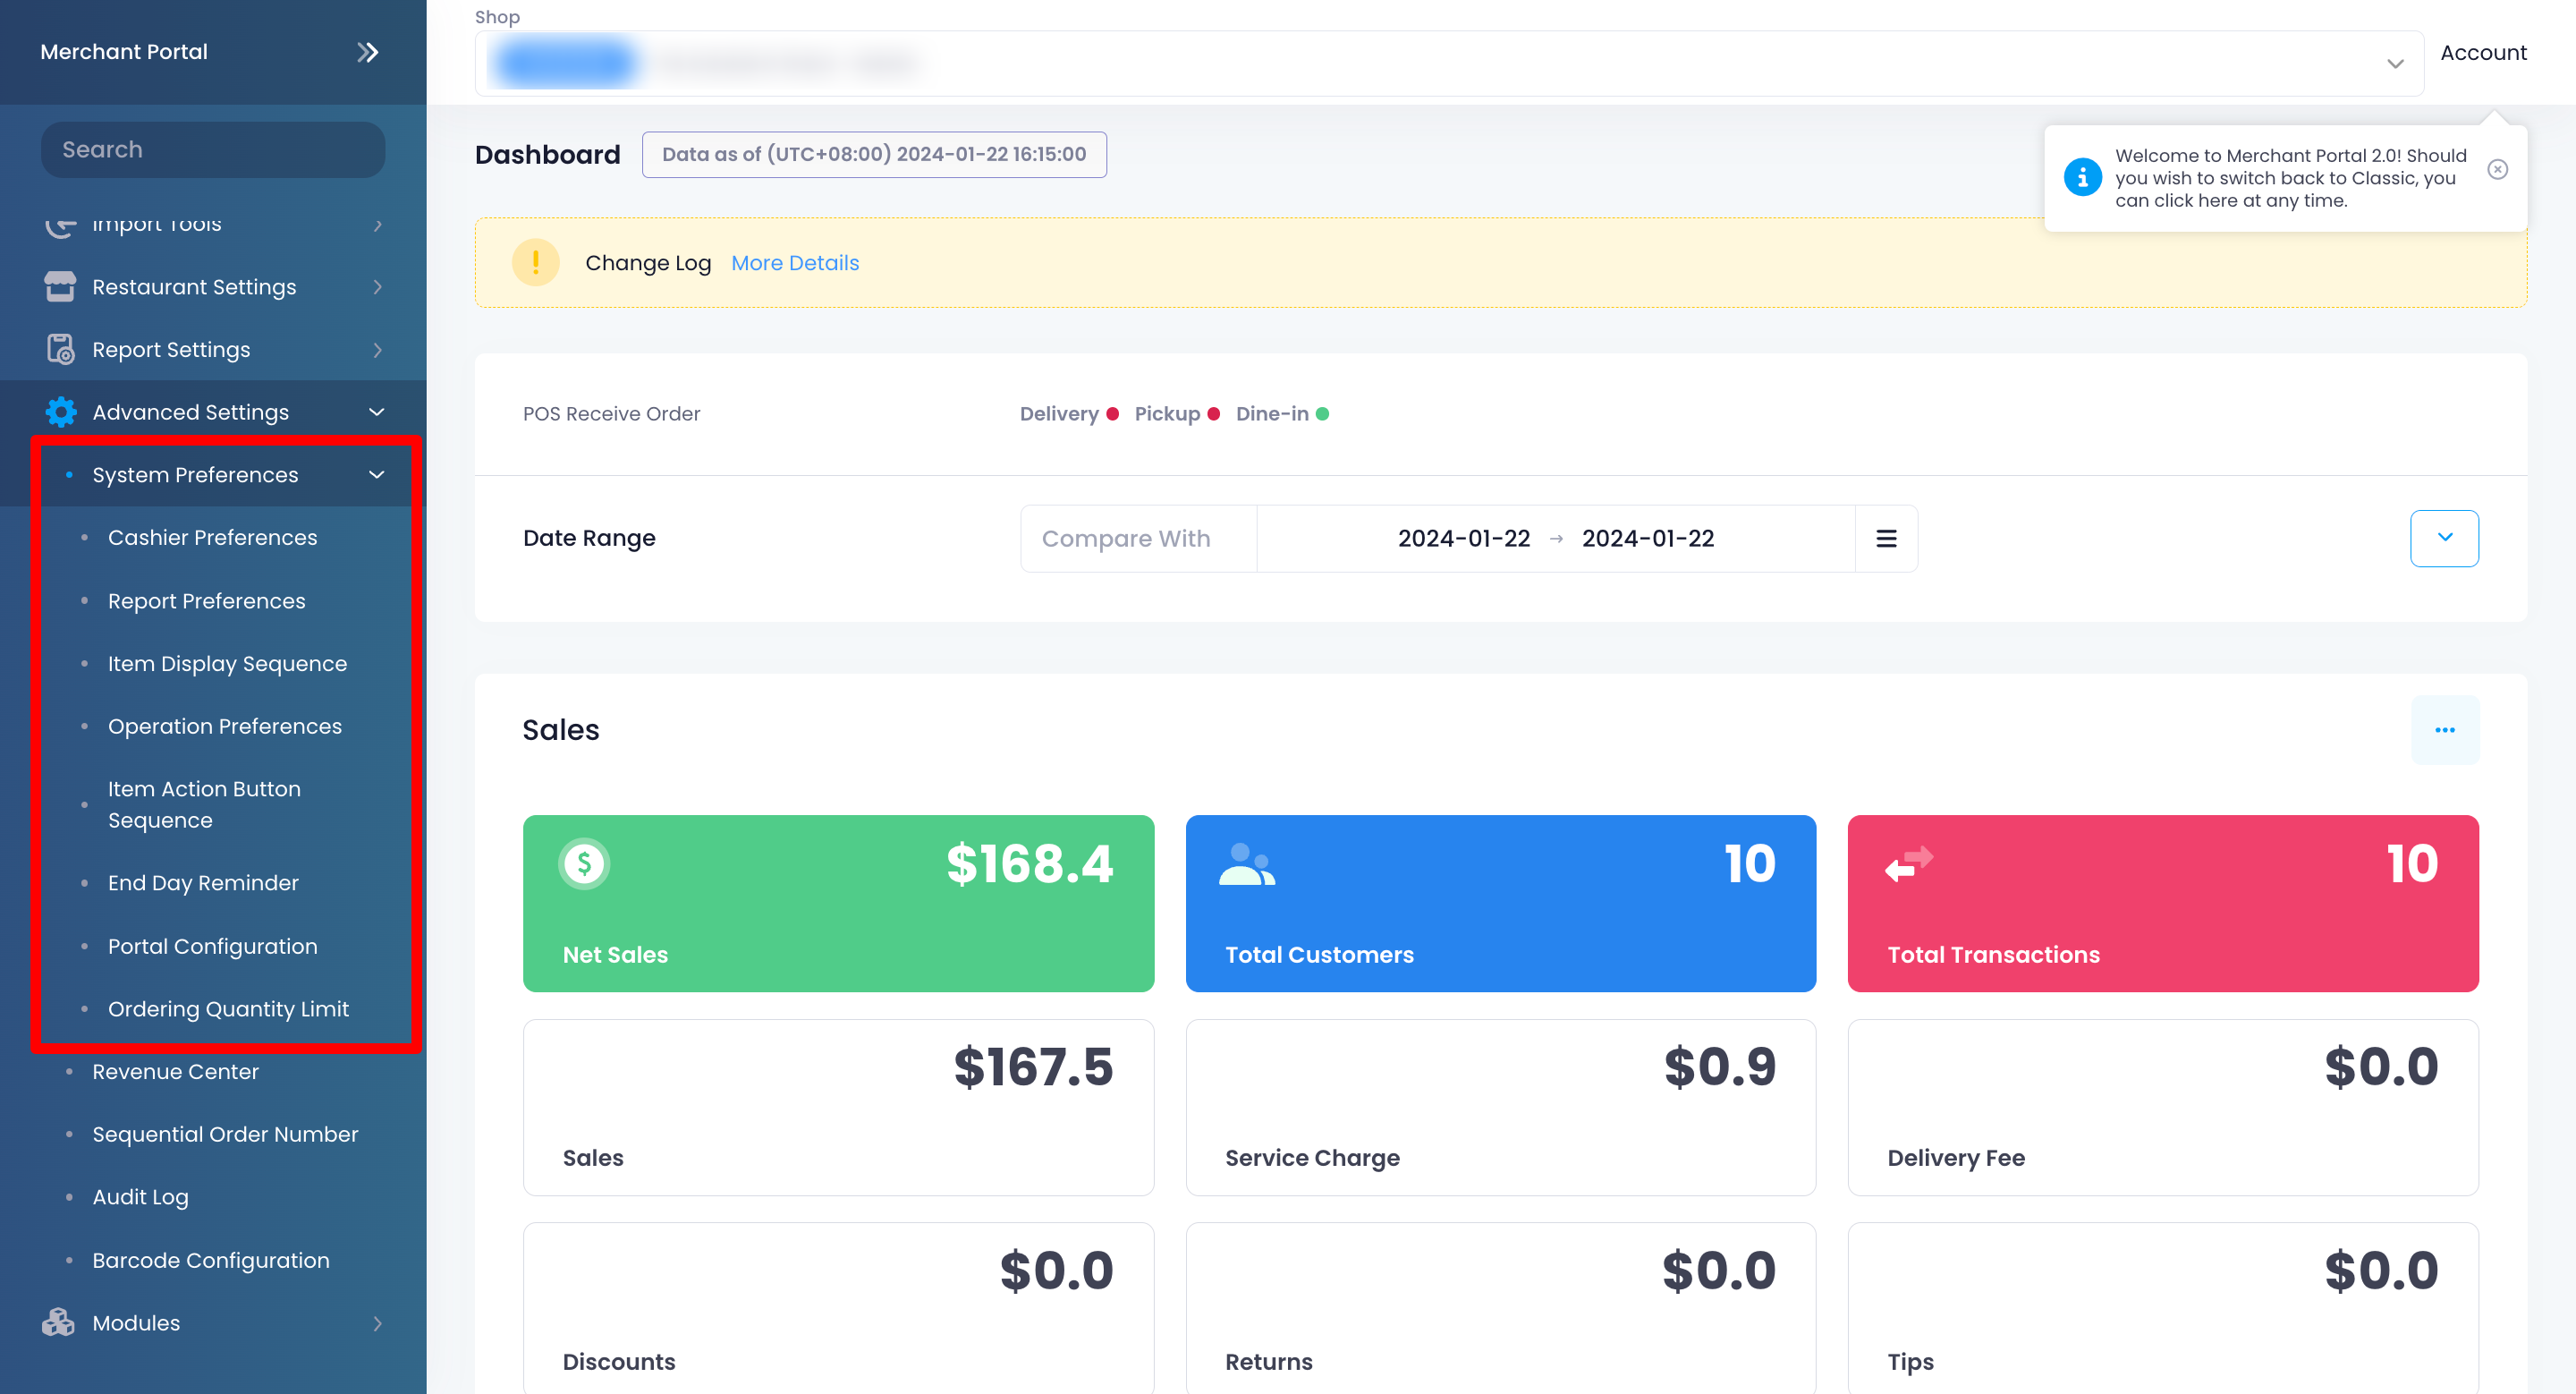
- Cashier Preferences
- Report Preferences
- Item Display Sequence
- Operation Preferences
- Item Action Button Sequence
- End Day Reminder
- Portal Configuration
- Ordering Quantity Limit
- To enable your preferred settings, toggle the switch
 next to the setting that you want to turn on.
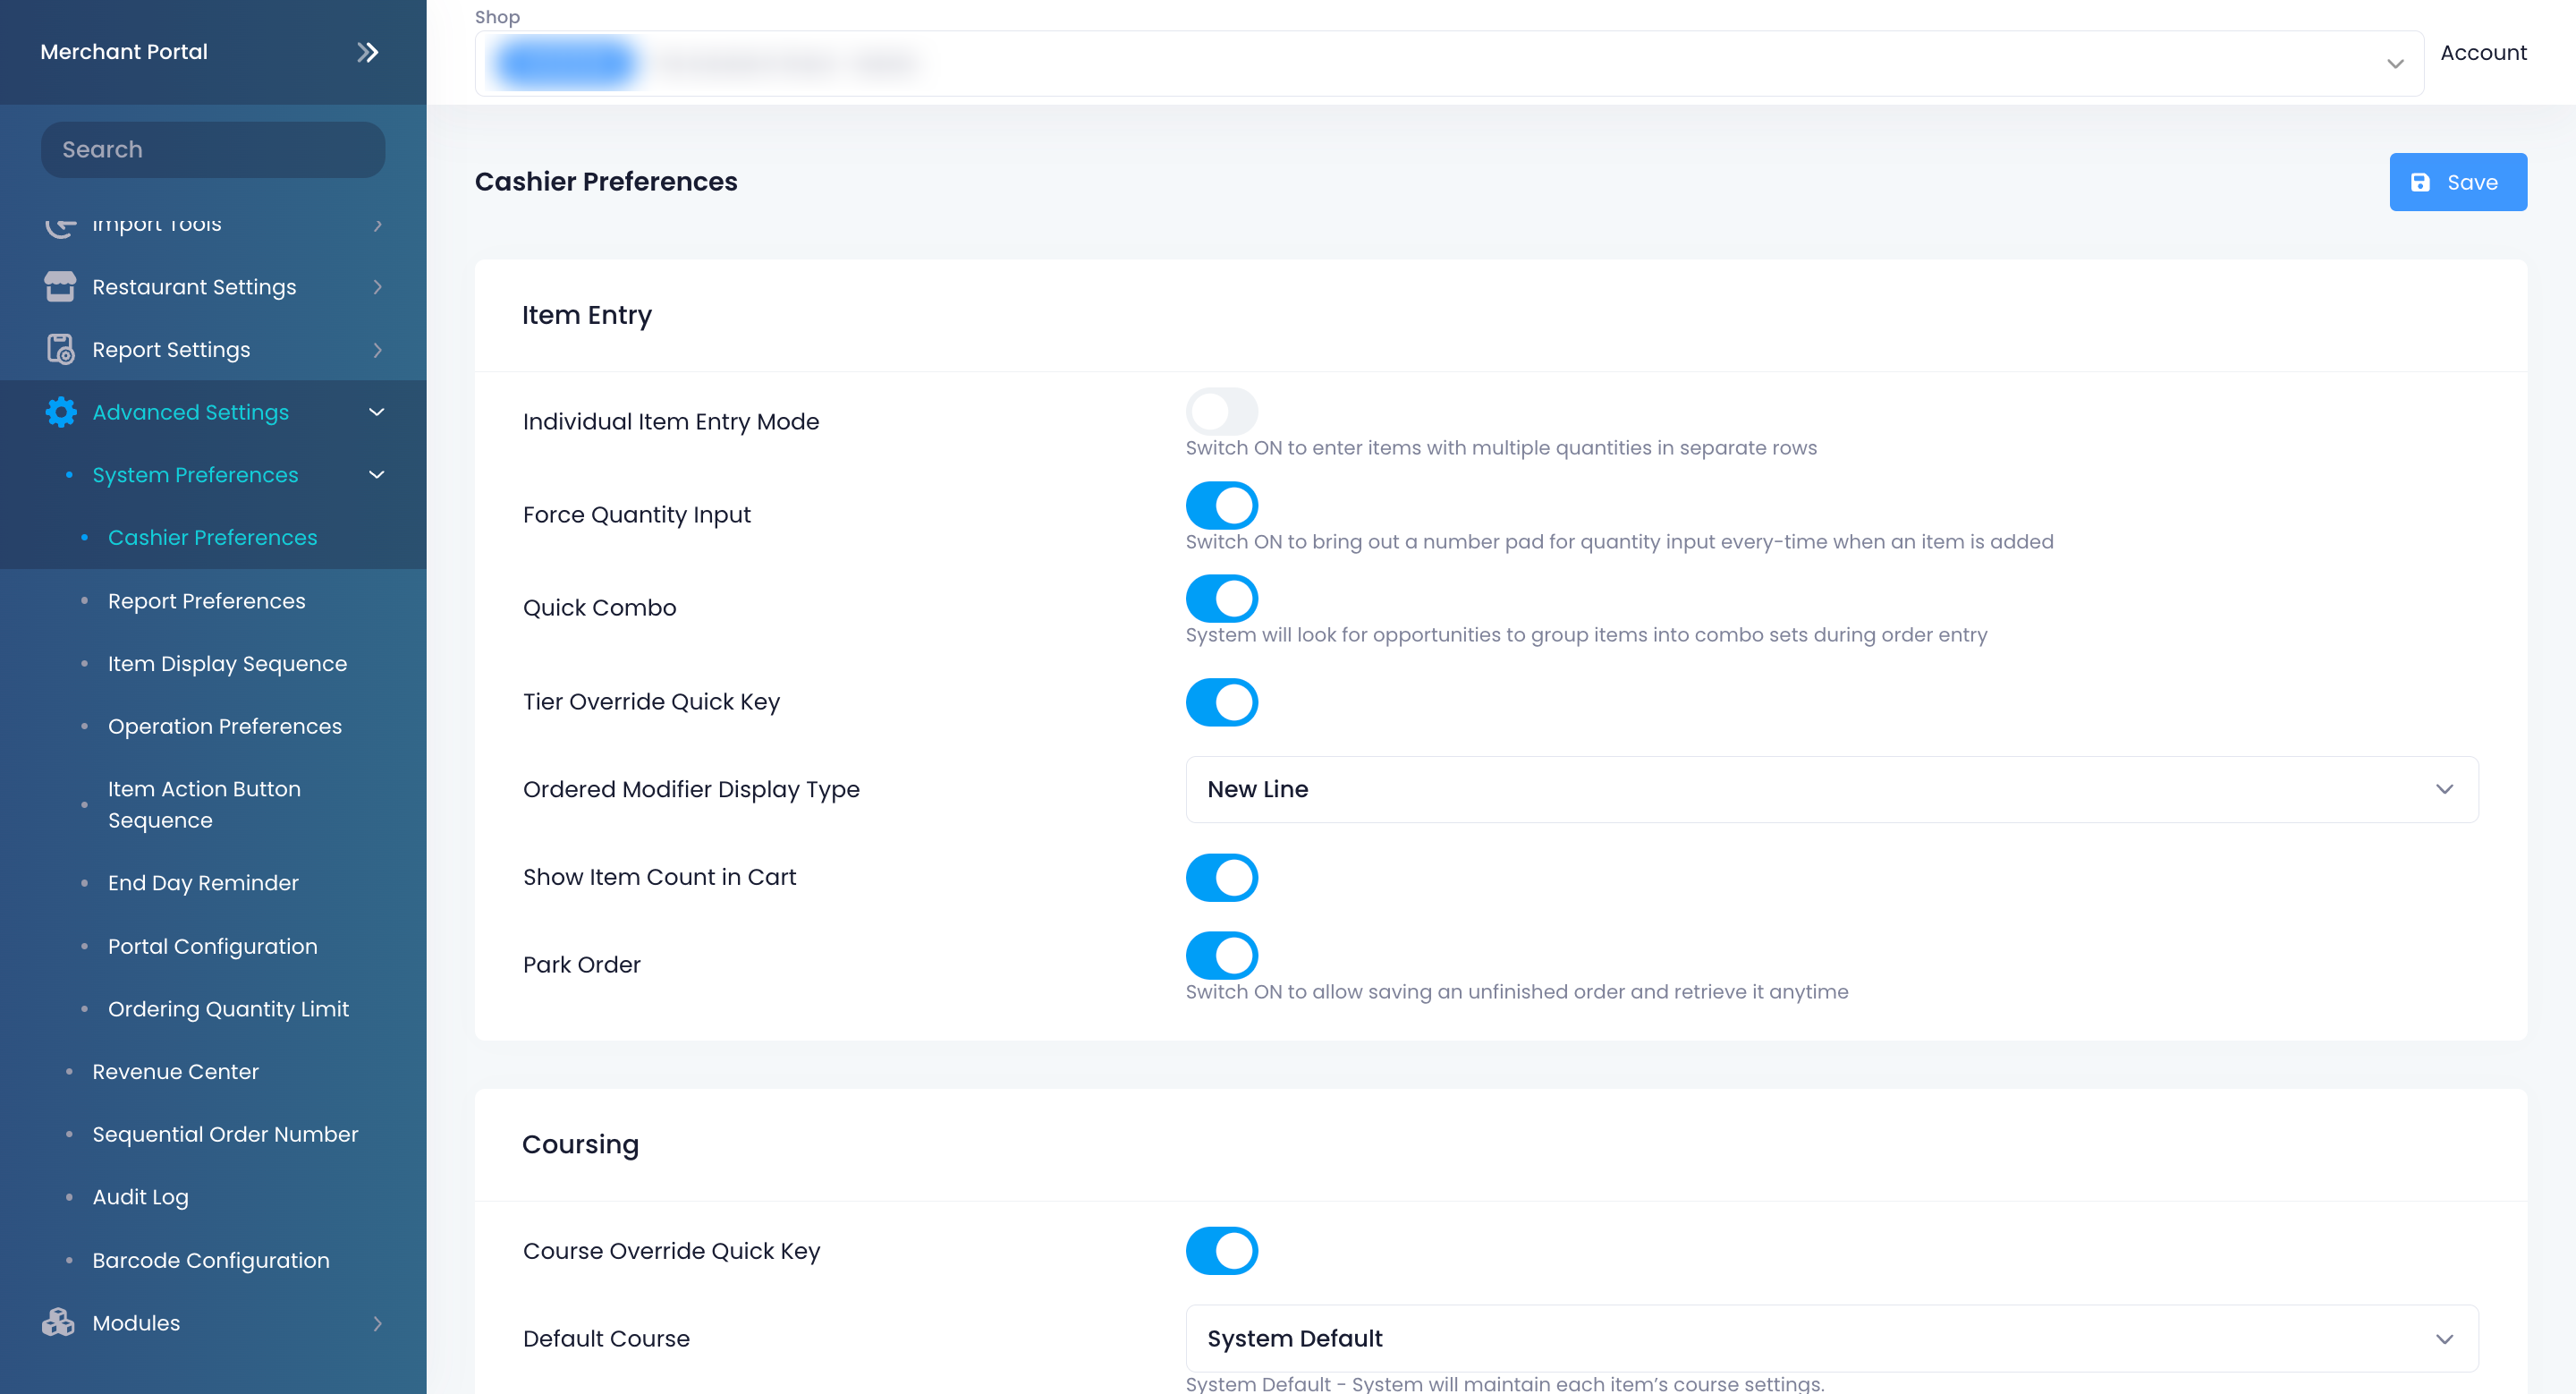
- At the top right, click on Save to confirm.
Cashier Preferences
Item Entry
Individual Item Entry Mode
When enabled, you can enter items with multiple quantities in separate rows.
Force Quantity Input
When enabled, a keypad is displayed on the screen whenever you select a menu item that doesn’t have any modifiers. You must enter the desired item quantity in order to add the item to the order.
Quick Combo
When this feature is enabled, the system automatically evaluates newly added single items to determine whether they can be grouped into an existing combo order.
Tier Override Quick Key
Adds a quick key on the order-taking screen that allows you to change the tier prices on the spot.
Ordered Modifier Display Type
Choose from the following display types:
- New Line - Shows ordered modifiers in separate rows.
- Continuous - Shows ordered modifiers in a single line.
Show Item Count in Cart
Shows the total item count in the cart.
Park Order
When enabled, you can park orders that haven’t been confirmed yet and retrieve them to process later.
Auto Select Next Combo Option
When enabled, the screen automatically scrolls down to the next item included in the combo option after selecting an option.
Priced by Period
Period Price Used During Add On Orders
Sets the period price used for add-on orders. Choose from the following options:
- According to Order Time - If an item is set up to have a different price depending on the time of the day, the system will use the "Ordering Time" to calculate the item price for add-on orders.
- According to Order Creation Time - Even if an item is set up to have a different price depending on the time of the day, the system will still use the "Order Creation Time" to calculate item price for add-on orders.
Fire/Hold
Fire Dine-in Items by Default
Fires dine-in items once an order is confirmed.
Fire Takeout Items by Default
Fires takeout items once an order is confirmed.
Require Check Name
When enabled, the following options become available:
- Require Check Name for Dine In Order - requires a name to be set for a check for dine-in orders.
- Check Name for Dine in Order is Optional - retains the option to set a name for a check for dine-in orders but sets the requirement as optional.
- Require Check Name For Takeout Order - requires a name to be set for a check for takeout orders.
- Check Name for Takeout Order is Optional - retains the option to set a name for a check for takeout orders but sets the requirement as optional.
Payment
Auto Fill Amount Tendered
Auto fills the "Amount Tendered" on the payment screen.
Enable ‘Void and Clone’ Function when Void Order
Allows you to use the "Void and Clone" function when an order is void.
Split Check
Enable Split Check
Enable this setting to show the "Split Check" function on the payment screen.
Enable Split by Amount
Enable this setting to allow splitting of check of by amount.
Enable Split by Item
Enable this setting to allow splitting of check by item.
When Split by Item, enable Split Among Bills
When enabled, the system evenly splits the particular item among chosen bills.
When Split by Item, enable Split in Equal Parts
When enabled, the system evenly splits the particular item into parts, based on the specific quantity, for further allocation.
Custom Menu & Menu Category
Show Custom Menu Bar and Menu Category by Default
When enabled, the "Custom Menu" bar and "Menu Category" will be the default screen for order-taking.
Hide “All” button in Custom Menu Bar by Default
Hides the “All” button in the "Custom Menu" bar.
Auto Return after Menu Item Selection
Auto returns to the main category selection screen once a menu item is selected.
Order
Force Enter Party Size
Requires staff to enter a party size in the POS before taking an order.
Remind Staff to Add Member to Order
When enabled, a pop-up notification appears to remind staff to add the member to the order upon order creation.
Remove Discounts with Unfulfilled Conditions
Select how you want to remove discounts with unfulfilled conditions from the order-taking screen. You can choose from the following options:
-
Auto Remove - If the condition set on a discount becomes unfulfilled, the discount is automatically removed from the order-taking screen.
-
Ask Everytime - If the condition set on a discount becomes unfulfilled, the discount amount is automatically removed from the order, however, you must delete the discount manually to remove it from the order-taking screen.
Menu Layout Editor
Apply Settings to All POS Devices
Enable this setting to apply the menu layout configuration to all POS devices. Once enabled, an "Override Setting" toggle will appear in the Layout Editor settings on individual POS terminals, allowing you to apply a different configuration to specific devices if needed.
Font Size
Adjust the item name's font size to make it appear smaller or larger on the POS. Font size options include S, M, L, and XL.
Display Item Image
Enable this setting to display item images on the order-taking screen.
Allow 2-line Text
Note: This feature is available when "Display Item Image" is enabled.
Enable this setting to display item names in two rows.
Auto Sign Out
When enabled, you can set all POS terminals in your restaurant to sign out automatically after being idle for a period of time, after processing an order, or after completing a payment.
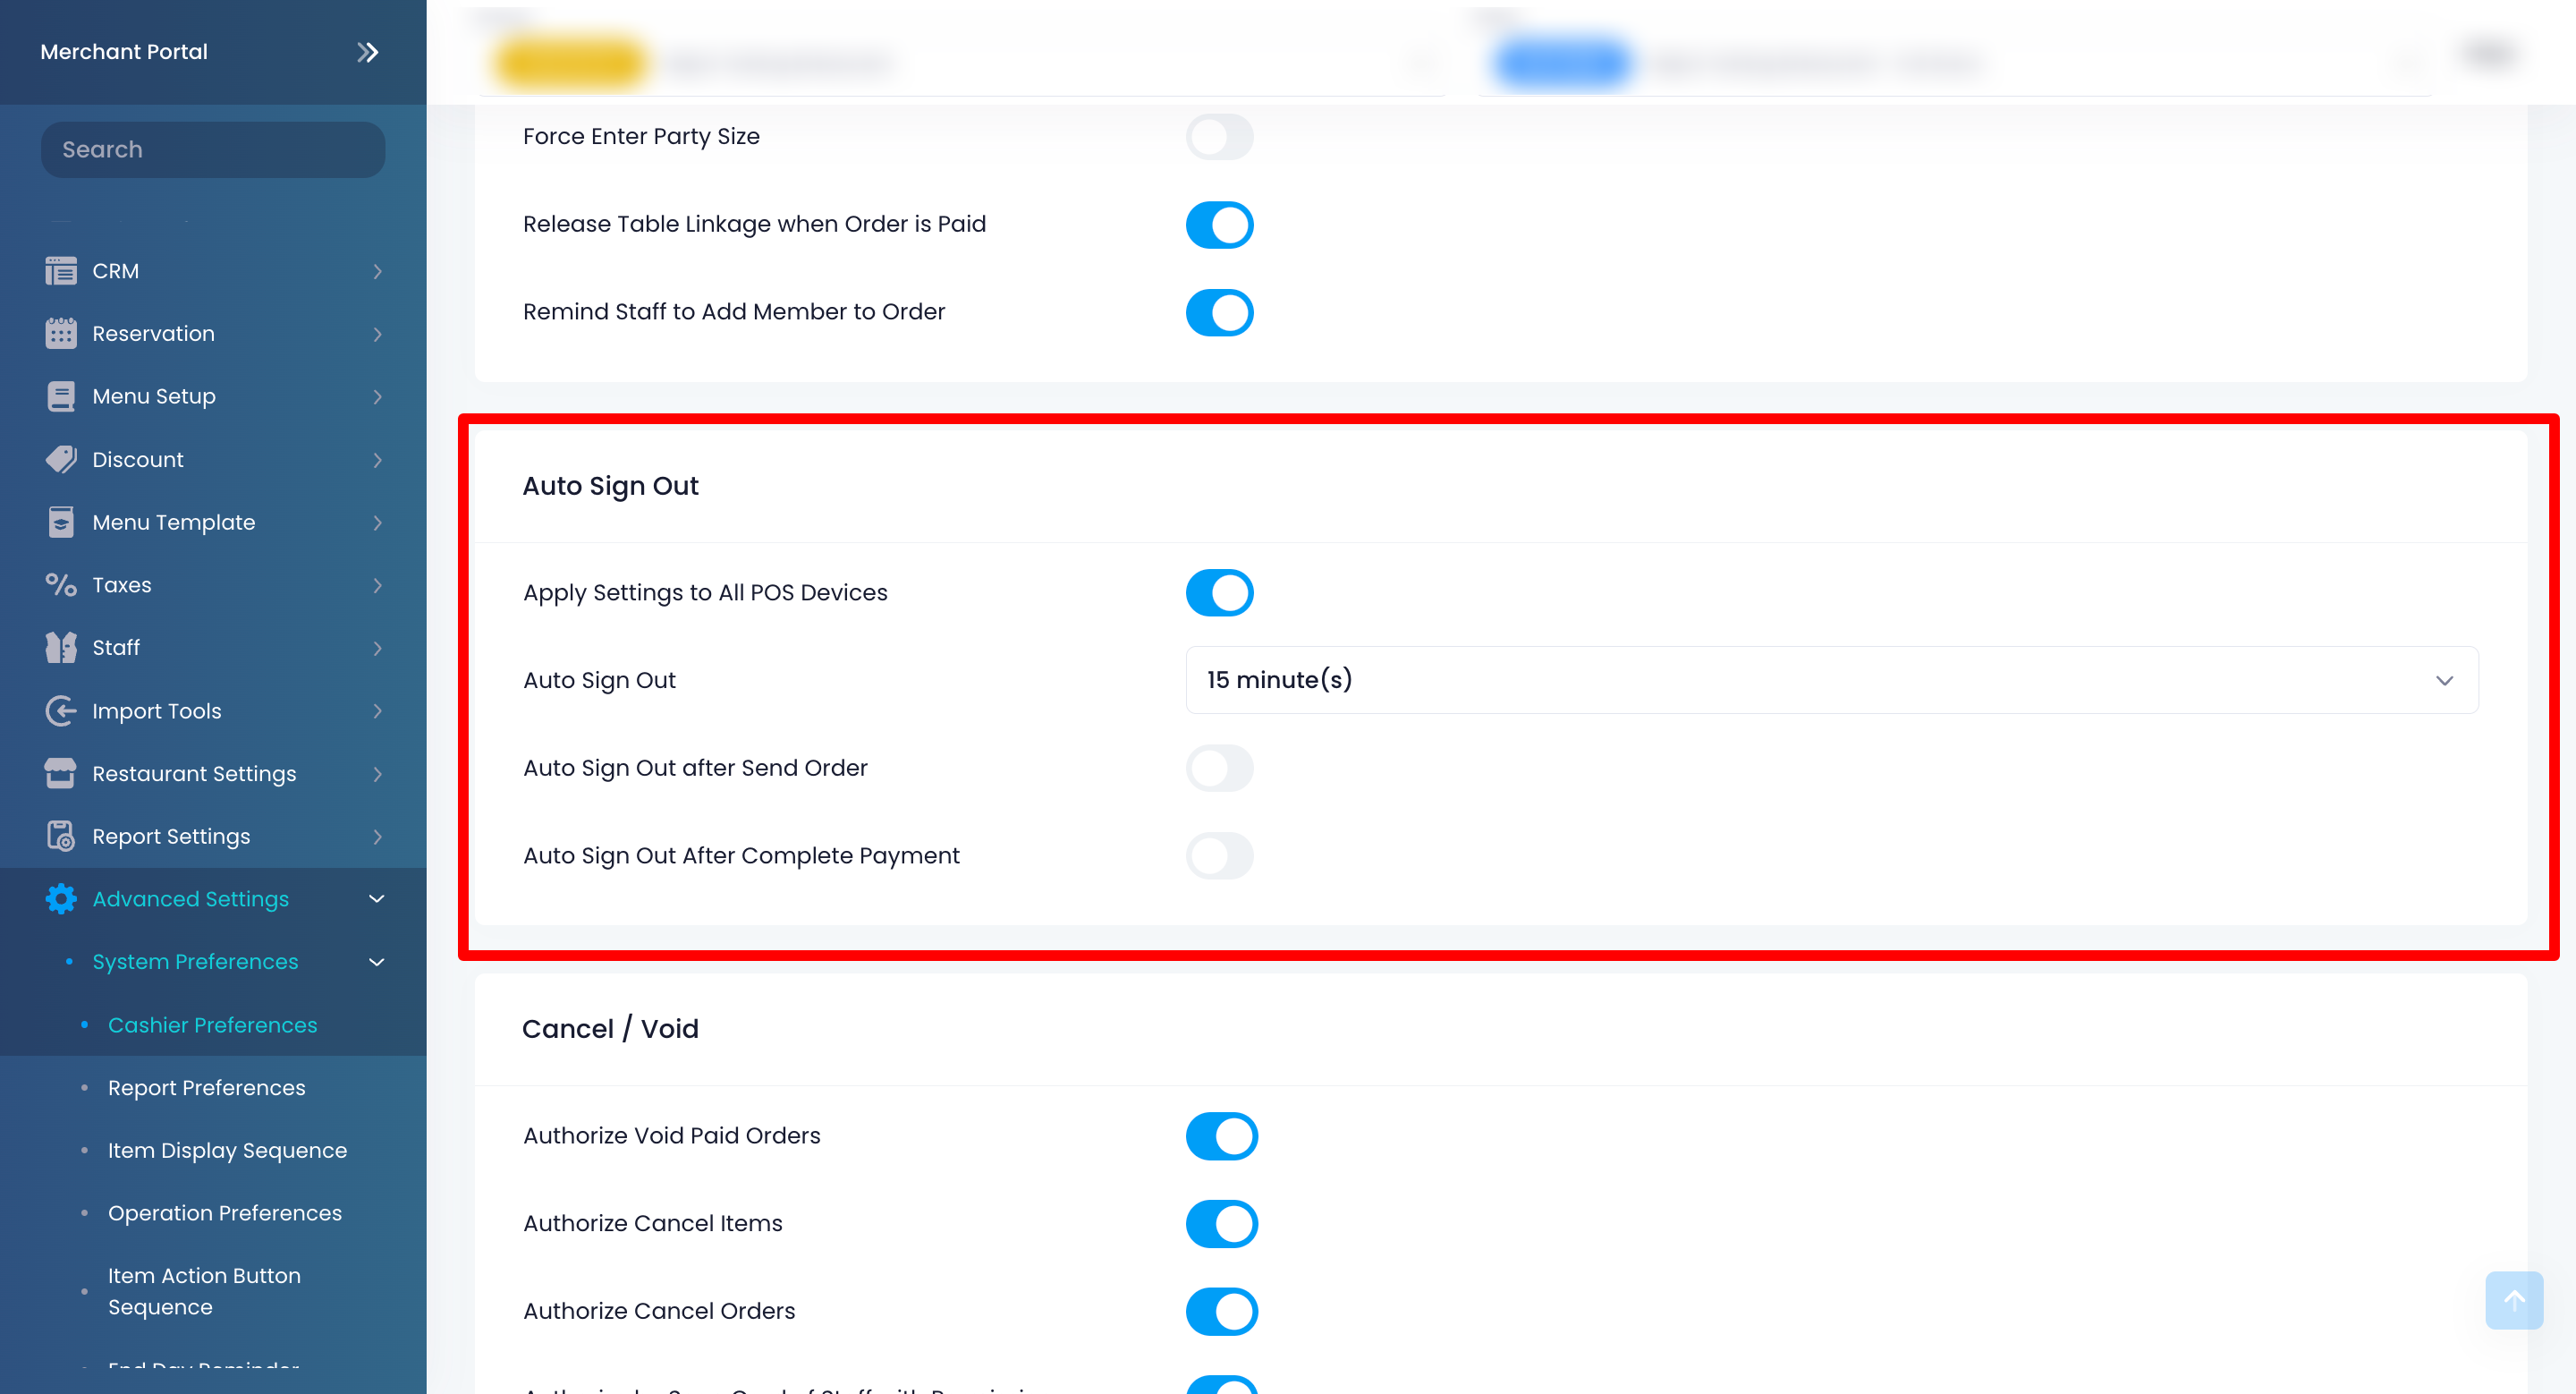
To learn how to set "Auto Sign Out" preferences for all POS terminals in your restaurant, refer to Configure POS to sign out automatically.
Sign In and Clock In/Out Method
POS Default Sign In and Clock In/Out Method
Select how staff logs in to the POS. You can choose from the following options:
- Account and Password - Allows staff to log in to the POS using a registered account and passcode.
- PIN Code - Allows staff to log in using a PIN code.
Notification
Apply Settings to All POS Devices
When enabled, you can configure how notifications are displayed for all POS devices.
Notification Display Style
Select how notifications appear on the POS. You can choose from the following options:
-
Notification Icons
-
Notification Banner
Cancel/Void
Authorize Void Paid Orders
Allows staff, whose access level doesn’t include permissions to void paid orders, to void an order with the required approval from an authorized staff member.
Authorize Cancel Items
Allows staff, whose access level doesn’t include permissions to cancel items, to process cancellation of items with required approval from an authorized staff member.
Authorize Cancel Orders
Allows staff, whose access level doesn’t include permissions to cancel orders, to process cancellation of orders with required approval from an authorized staff member.
Authorize by Scan Card of Staff with Permission
Allows authorized staff members to approve voiding paid orders and canceling items and orders by scanning their card.
Authorize by Passcode Entry of Staff with Permission
Allows authorized staff members to approve voiding paid orders and canceling items and orders by entering their passcode.
Number of Authorized User(s) required
Sets the number of authorized users needed to validate a void or cancel action.
Example:
- If the number of required authorized users is set to "1" and an unauthorized staff member voids an order, the POS will ask for one authorized user to validate the action. If set to "2," then the POS will require two authorized users.
- If the number of required authorized users is set to "1" and an authorized staff member voids an order, the POS will recognize the user as authorized and will proceed with the action without requiring additional validation.
- If the number of required authorized users is set to "2" and an authorized staff member voids an order, the POS will ask for another authorized user to validate the action.
Customize Printing Options when Cancel / Void Orders
When enabled, you can choose which tickets you'd like to print for the cloned order. This allows you to save on costs by only printing the necessary tickets for cloned orders.
Printing
Show Print Expeditor Ticket Button
Shows the "Print Expeditor Ticket" button on the order taking screen.
Show Print Order Ticket Button
Shows the "Print Order Ticket" button on the order-taking screen.
Other Settings
Show Order Price in Ordering Screen
Displays the total price on the order-taking screen.
Order Price
Allows you to choose whether to show the order’s "subtotal" or "total" amount on the order-taking screen. By default, the subtotal is shown on the order-taking screen.
Order Remarks
Shows order remarks.
Show Cost of Item
Shows the item cost on the payment screen.
Edit Cost for Open Amount Items
Allows you to edit an open amount item cost.
Show Gross Profit of Order
Shows the gross profit of the order on the payment screen.
Show Quick Key for Transfer Item
Shows the action button for transferring an item.
Show Tax Rate
Shows the tax rate on receipts, reports, and other instances where tax information is indicated.
Hide Maximum Allowed Quantity for Modifier Options and Combo Options
Allows you to indicate only the required minimum quantity for modifier (Multiple Select) and combo options on customer-facing modules. This is useful for modifier and combo options without quantity limits.
Refer to Set up and manage Modifiers and Set up and manage a Combo Item to learn how to update the option quantity.
| When enabled | When disabled |
 |
 |
Order Number Prefix Type
Sets the "Order Number Prefix Type" as "Letter" or "Number."
Clock In/Out Settings
Require Photo
Requires a photo whenever a staff member signs in and out on the POS.
CRM Loyalty
Repeat items when repeating CRM order
Adds on an item when a CRM order is repeated.
Scanning on Ordering Page
Scanning Type
Sets the scanning type as "Receipt and Product Code (SKU)" or "Loyalty Card."
Scanning Settings
Scanning Device
Allows you to choose the type of scanning device for your POS. You may choose from the following options:
- Scanner
- Camera
- Camera + Scanner
Hide Scan Coupon Button
If you are using a third-party CRM system, this setting allows you to hide the "Scan Coupon" button from the member’s coupon page.
DeleteReport Preferences
Daily Closing Report Settings
Customize how sales information appear on the Daily Closing Report. You can configure the following information to display or hide them from the Daily Closing Report:
Sales Summary
- Show Sales by Sales Period
- Show Non Sales Summary
Tender Summary
- Show Breakdown by Tender Type
- Show Audit Trail
- Show Return Order List
Order Type Summary
- Show Dine-In Summary
- Show Takeout Summary
- Show Catering Summary
- Show Others Summary
Gratuity & Fees
- Show Gratuity & Fees
Sales Items Summary
- Show Sales by Menu Item
- Show Sales by Single Item
- Show Sales by Product Type
- Show Revenue Center
Discount Summary
- Show Discounts
General
- Show Number Separator - Include a number separator (comma) in between every three digits.
| When enabled | When disabled |
|
|
Shift Report Settings
Customize how sales information appear on the Shift Report. You can configure the following information to display or hide them from the Shift Report:
Sales Summary
- Show Sales by Sales Period
- Show Non Sales Summary
Till Amount
- Show Pay In and Payout Breakdown
Tender Summary
- Show Breakdown by Tender Type
- Show Audit Trail
- Show Return Order List
Order Type Summary
- Show Dine-In Summary
- Show Takeout Summary
- Show Catering Summary
- Show Others Summary
Gratuity & Fees
- Show Gratuity & Fees
Sales Items Summary
- Show Sales by Menu Item
- Show Sales by Single Item
- Show Sales by Product Type
Discount Summary
- Show Discounts
General
- Show Number Separator - Include a number separator (comma) in between every three digits.
| Enabled | Disabled |
|
|
Item Display Sequence
Item Display Sequence
Changes the sequence of your item categories. You may choose from the following options:
- System default - Items are displayed in the order that they are added on the POS.
- Custom - Items are displayed according to your defined sequence of categories.
Follow Items Sequence under each Category
When enabled, the items are displayed according to your defined item sequence under each category. You can rearrange the sequence from the Item settings. Disable this setting to display items according to the sequence you ring in the items on the POS.
Manage Sequence
Reorder the sequence of categories.
DeleteOperation Preferences
Default Loyalty System Provider
Sets the default loyalty system provider.
Party Size Input
Select if you want to enter the party size by the number of patrons or by age group.
- by Number of Patrons - When selected, the party size will be based on the number of people in the group. You can input the party size by scrolling through the numbers on the screen, or by entering the party size using the on-screen keypad.
- by Age Group - When selected, the party size will require the selection of each person’s age group. To display age group options on the POS, select from the available preset options.
Prompt to Input Party Size by Age Group when Seated by 3rd Party TMS
Depending on the integration, the third-party Table Management System (TMS) may not pass age group information to the Eats365 system. Turn on this setting to prompt POS users to fill in the party size by age group.
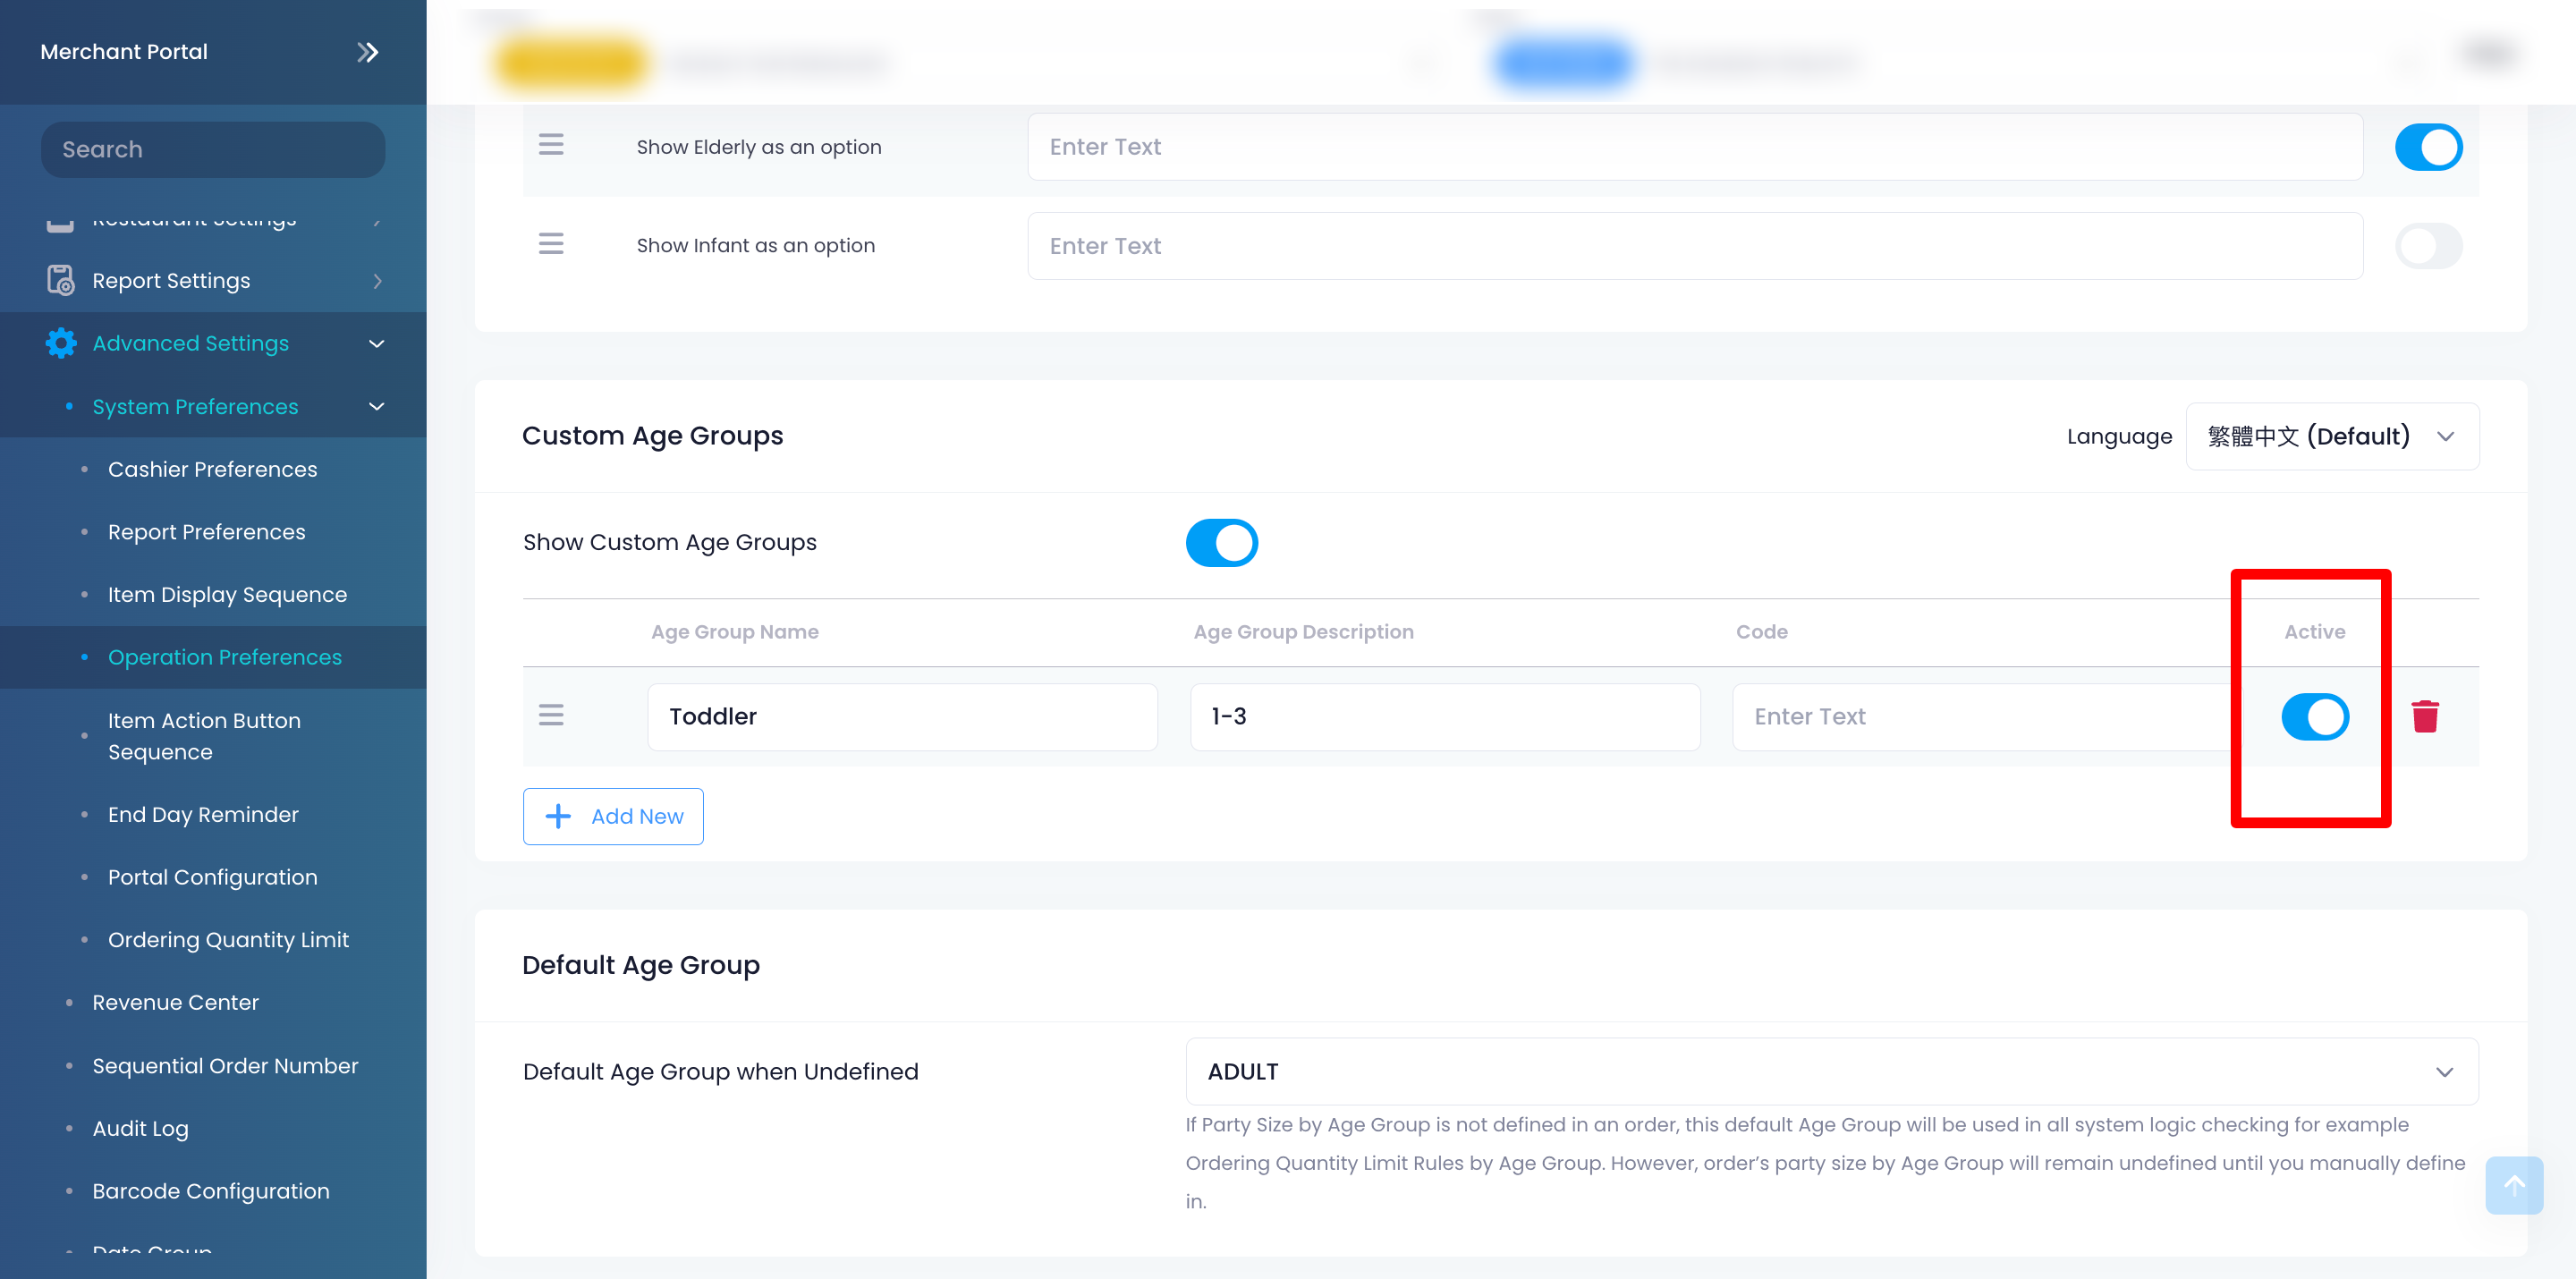
Custom Age Groups
Allows you to create custom age groups which would show up on the age group options upon entering the party size on the POS. To add a custom age group, click on Add New. Then, enter the "Age Group Name," "Description," and "Code."
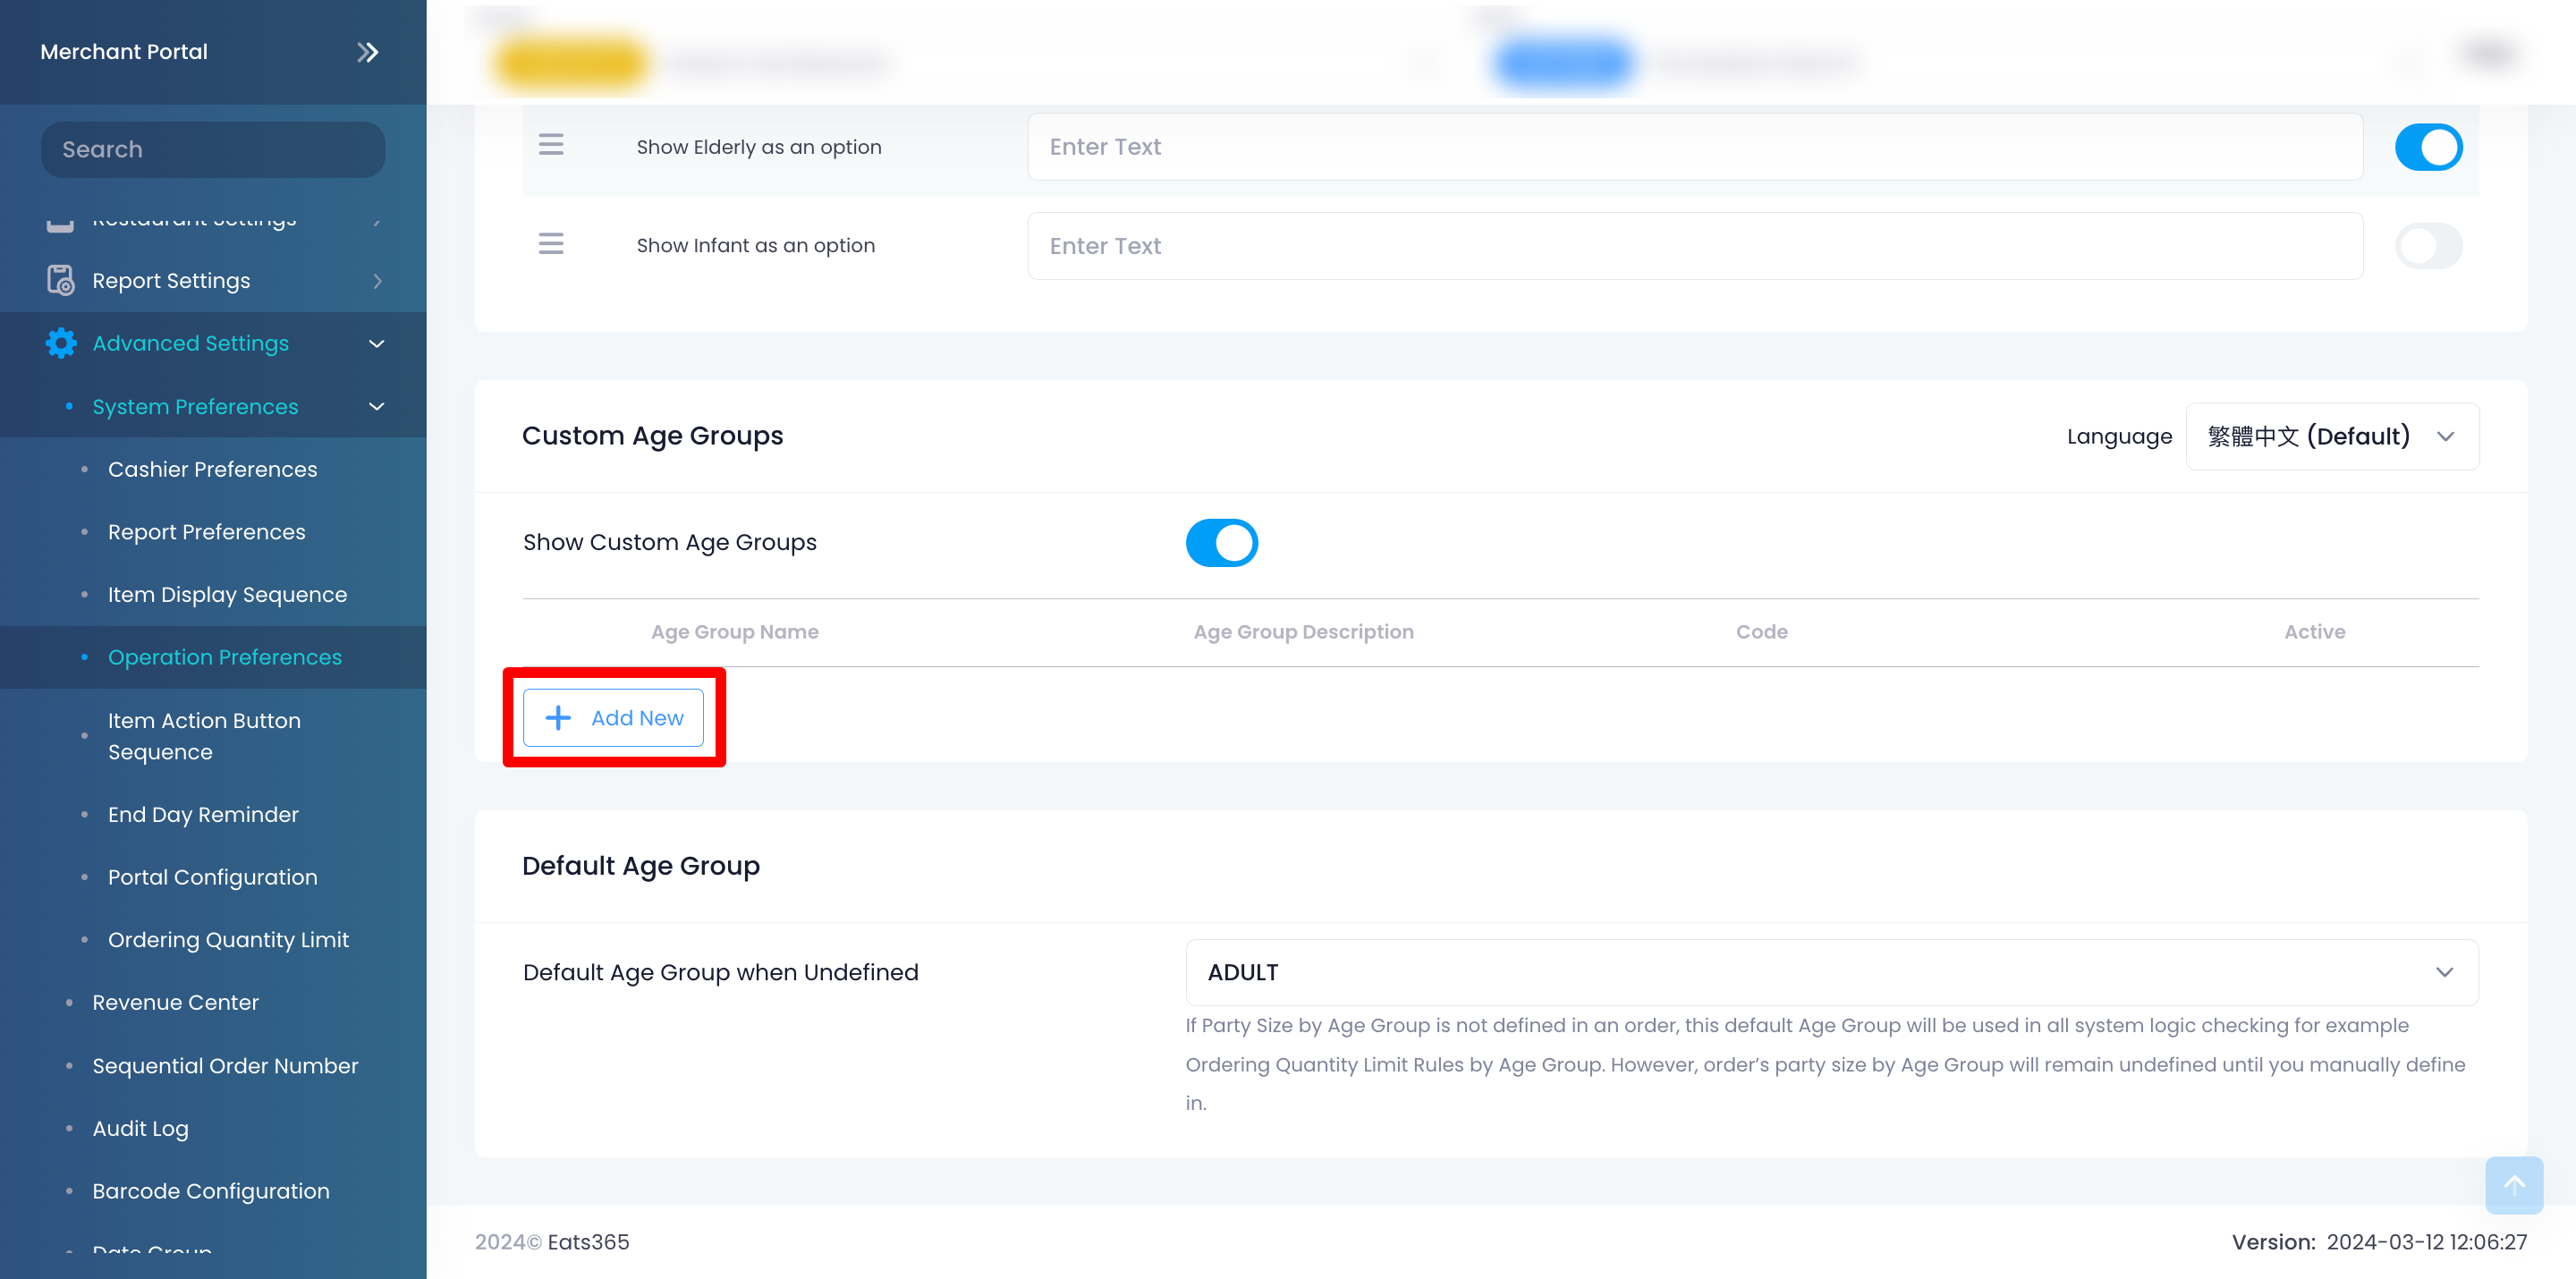
To show the Custom Age Group on the list of options, under "Active," toggle on the switch.
Default Age Group
If the party size by age group is not defined in an order, the default age group will be used in all system logic checking. For example, for "Ordering Quantity Limit" rules "by Age Group," if no age group has been selected, the restriction will apply to the set default age group.
Order Preparation Time
Adaptive Order Preparation Time
Enable this setting to allow the system to calculate the estimated waiting time for orders during peak hours, based on real-time statistics. The system will display the estimated waiting time and number of orders ahead on the Branded Online Store.

 a
a
License Expiry Reminder
Allows you to choose whether you receive reminders about your POS license expiration. If “Never” is selected, the POS will not display the reminder.
DeleteItem Action Button Sequence
Item Action Button Sequence
Allows you to create, edit, or delete action button sequences when enabled.
Available Action Button sequences:
- Select
- Edit
- Fire
- Hold
- Change Course
- Change Seat
- Special Request
- Reprint
- Rush
- Transfer
- Reorder
- Comps
- Discount
- Allow Discount
- No Discount
- Waive SC
- Require SC
- Delete
- Reprint Course
- Delay Fire
- Don't Fire
- Waive Surcharge
- Require Surcharge
Ordering Quantity Limit
Allows you to limit the quantity of specific items allowed per order. For more information about setting up a quantity limit, refer to Set up and manage Ordering Quantity Limit.
Delete