 Eats365 Products
 Merchant Guide
 Modules
 Membership
 Integrations
 Hardware
 Staff Operations
 Roles & Permissions
 Payments
 Reports
 What’s New
 Release Notes
 Troubleshooting
 Simulators
 Glossary
 Troubleshooter
 System Status
All You Can Eat Menu
Table of Contents
Configure general All You Can Eat Menu settings
Learn how to change the settings of your restaurant’s All You Can Eat service in the Eats365 POS app or on the Merchant Portal.
Configure your All You Can Eat Menu settings to optimize your operations and customize the Eats365 POS’s behavior based on your restaurant’s needs.
This article focuses on configuring general All You Can Eat Menu settings that apply to all relevant modules including the POS, PhotoMenu, and Scan to Order. For information on configuring settings for a specific All You Can Eat Menu, creating menu items, and learning about how the feature works, refer to the following articles:
| Setup | |
| Operations |
Before you start
- All You Can Eat ordering can be performed on various Eats365 modules. You’ll need a separate license for each module you intend to use:
- Eats365 POS: If only staff can place All You Can Eat orders using the POS, no additional license is required.
-
Scan to Order (Bring Your Own Device): If you want to allow customers to place All You Can Eat orders using their mobile devices, your restaurant must have a Branded Online Store and a BYOD license to set up an All You Can Eat Menu.
- You must set up Scan to Order settings from the Merchant Portal. For more information, refer to Configure Scan to Order settings.
- Eats365 PhotoMenu: If you want to allow customers to place All You Can Eat orders using a digital menu, you may affix a PhotoMenu to a table or hand out a PhotoMenu to dining customers as needed. Each PhotoMenu device requires its own PhotoMenu license.
- All You Can Eat settings configured from “Dine-in settings” apply to all modules unless stated otherwise. To configure settings specific to an All You Can Eat Menu, refer to Create an All You Can Eat Menu.
- The PhotoMenu follows the configured settings for the specific All You Can Eat Menu you’ve created, including "Dining Time," "Cut-off Time," "Time Gap Between Order," and "Item Quantity Limit" settings. To configure settings specific to an All You Can Eat Menu, refer to Create an All You Can Eat Menu.
- All You Can Eat Menu is only available for dine-in orders in Full Service restaurants.
Configure general All You Can Eat Menu settings
To configure the All You Can Eat Menu settings that apply to all modules, follow the steps below:
Eats365 POS
- Log in to the Eats365 POS.
- At the top left, tap Settings
 .
. - Under “Settings,” tap Dine-In.
- Tap Workflow Settings.
- Under “All You Can Eat Menu,” configure the All You Can Eat menu to your preferred settings.
- At the top right, tap Save to confirm.
Below are the list of settings you can configure:
All You Can Eat Menu Operation Mode
Enable this setting to switch the POS to All You Can Eat Operation Mode. Once enabled, All You Can Eat Menu items will be hidden unless the set representing item for the All You Can Eat Menu is added to the order. For more information, refer to Create an All You Can Eat Menu.
When disabled, all items including those intended for All You Can Eat Menu only, will appear on the order-taking screen.
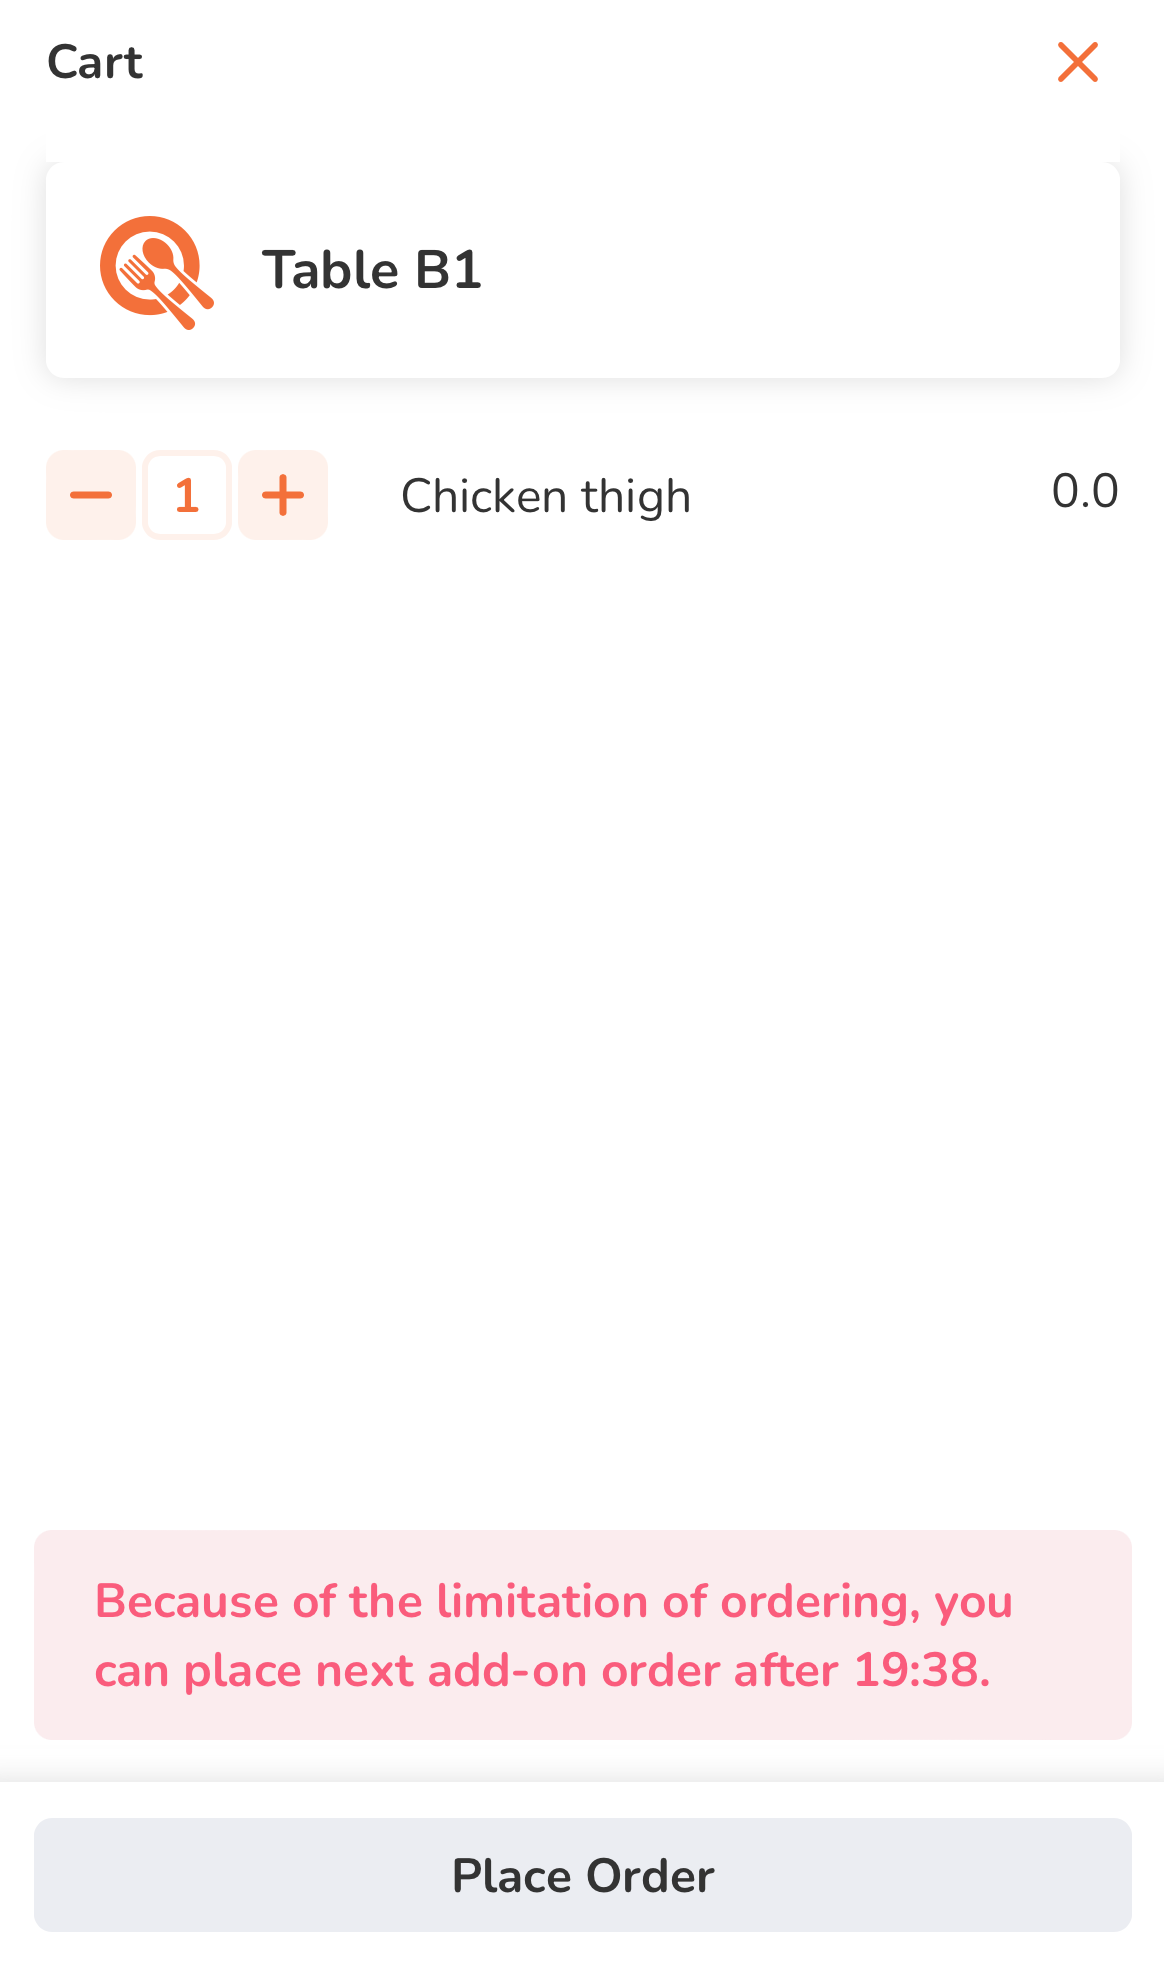
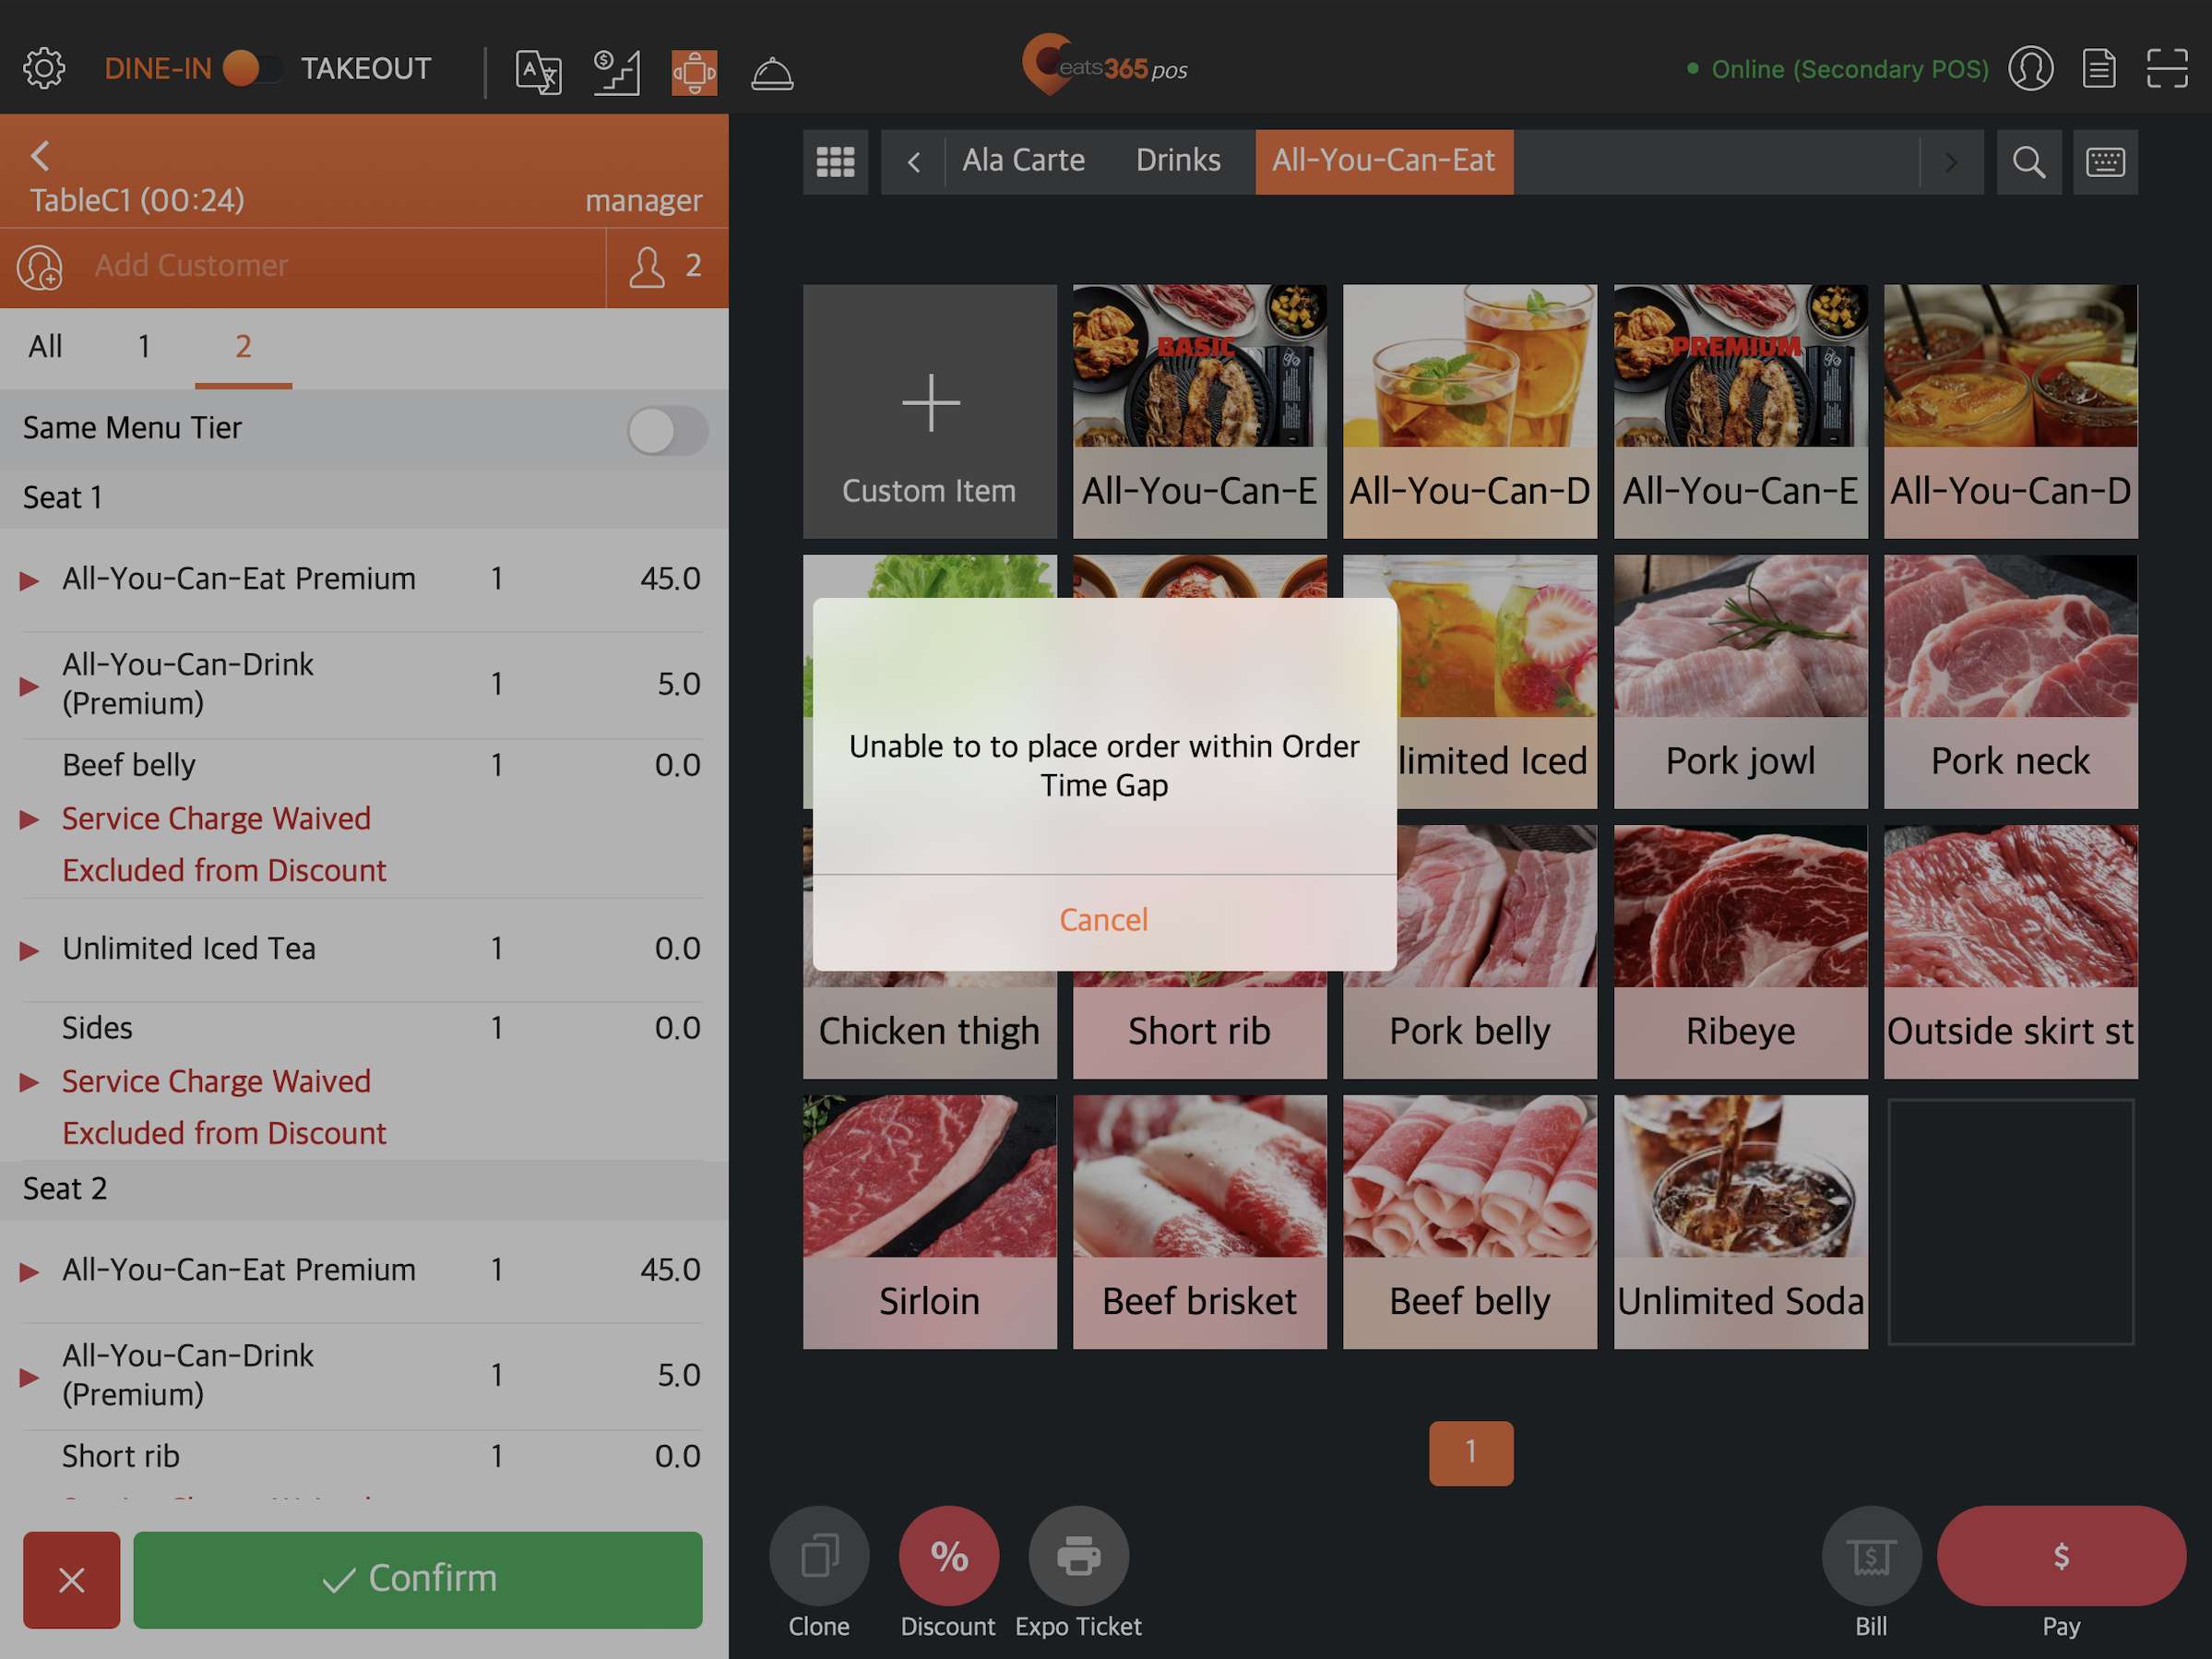
Enable Time Gap Between Order
Enable this setting to set the duration customers must wait before they can place another order. You can set the “Time Gap Between Order” to zero if you want customers to be able to order anytime.
POS Orders Affect Time Gap Calculation
Enable this setting to start the time gap count from the last order on the POS. If you don’t want POS orders to trigger the Time Gap function, turn this setting off.
Time Gap Affects POS
By default, the Time Gap you set for your All You Can Eat Menu only affects orders placed on Scan to Order and PhotoMenu. Enable this setting to apply the Time Gap to orders placed on the POS.
Dining Time Calculation
Choose how you want to calculate the start of dining time:
-
Seated Time - Allows the system to count the order creation from the POS as the start of dining time.

-
Customer Ordering Time - Allows the system to count the first order placed from online applications, such as Scan to Order or PhotoMenu, as the start of dining time..
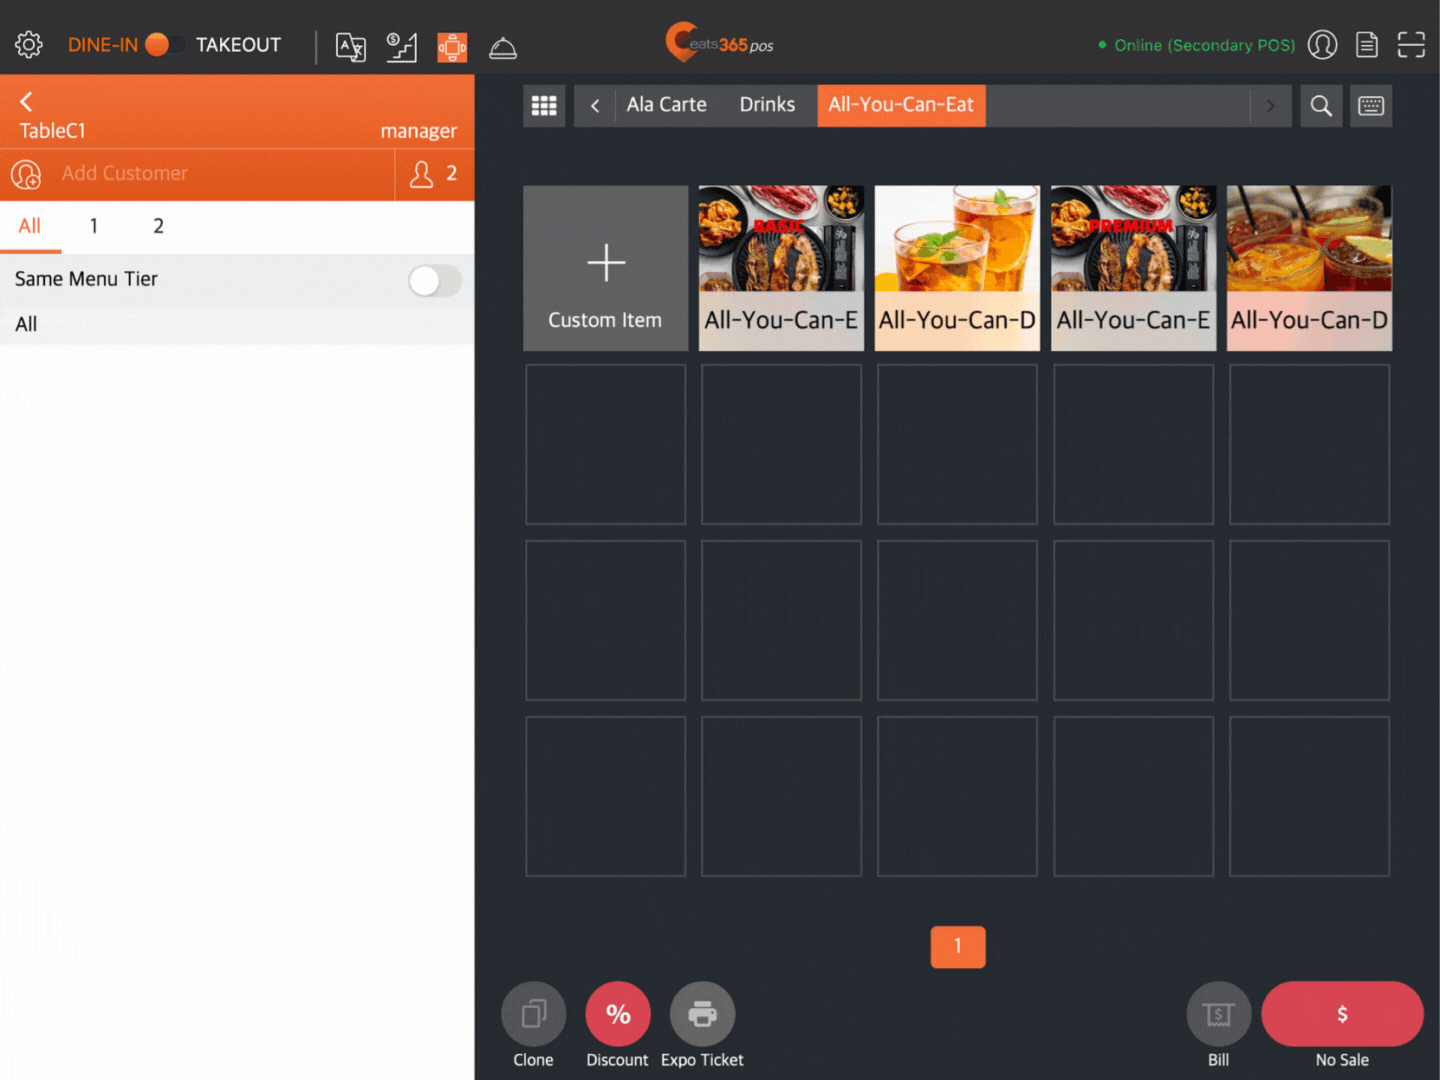
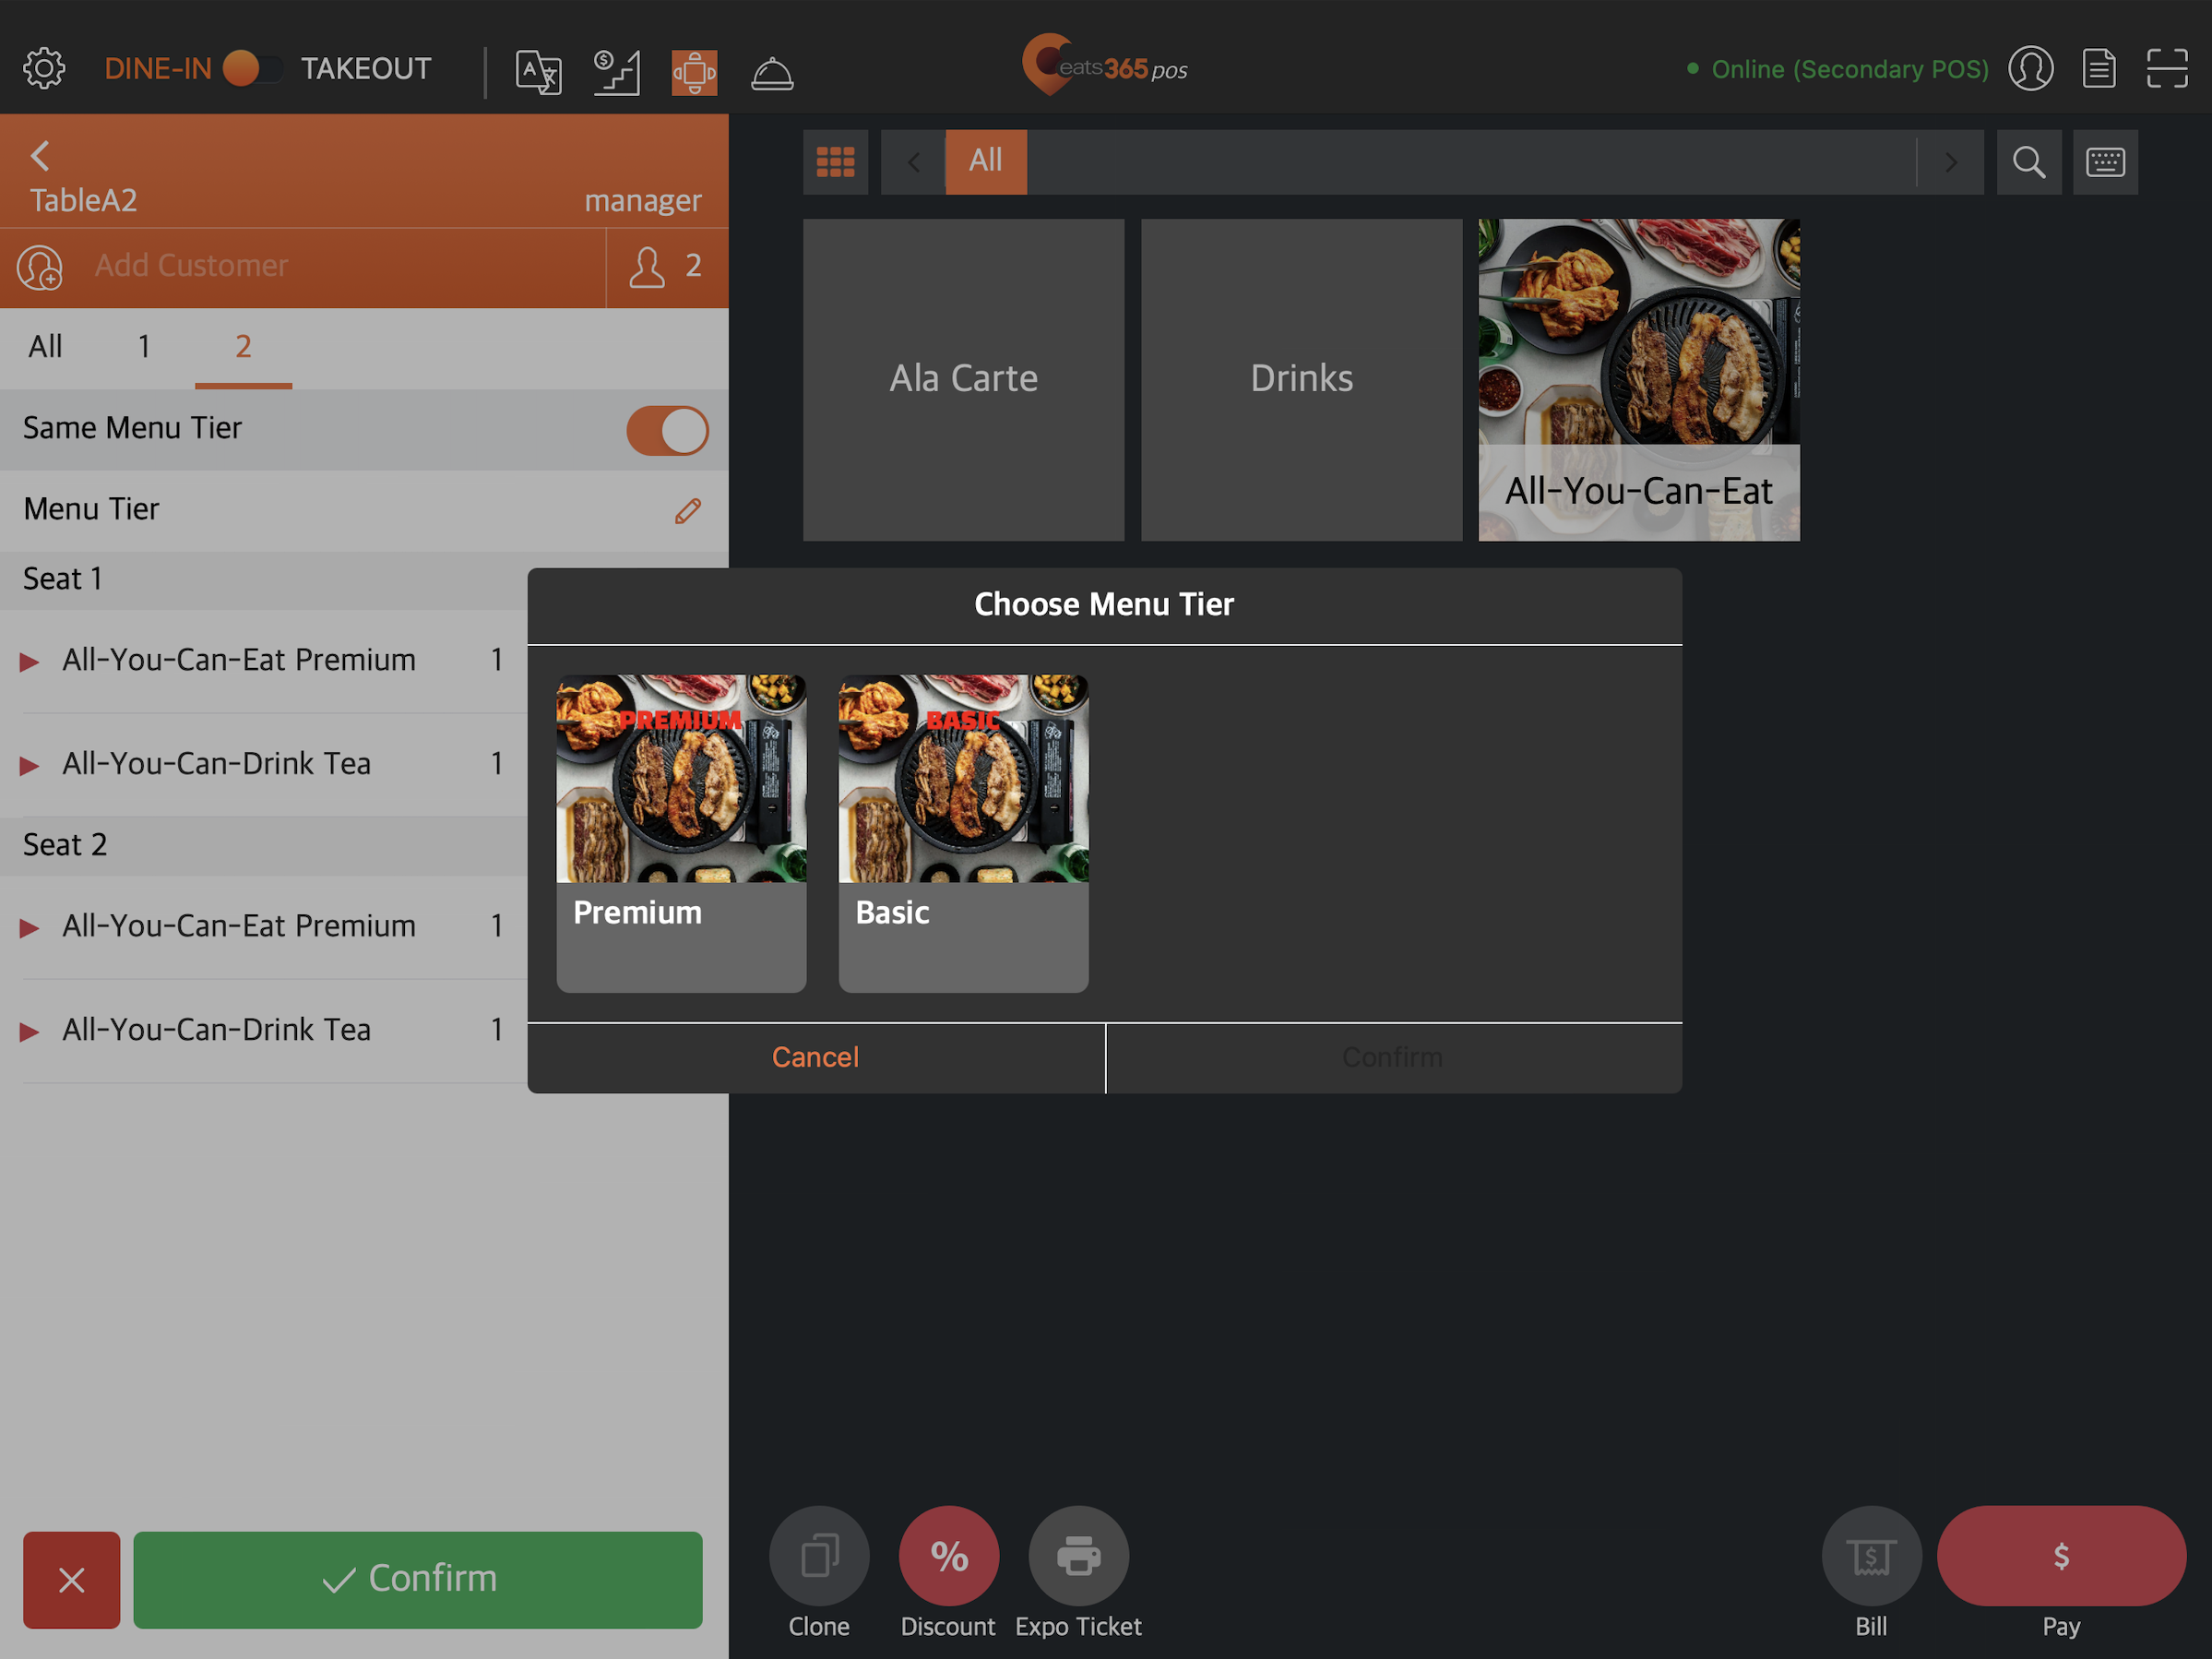
Enforce Same All You Can Eat Menu Tier in Same Order
Enable this setting to restrict customers from ordering All You Can Eat Menu items included in a different tier. If an item isn’t included in the currently selected tier, the POS disables that item on the order-taking screen.
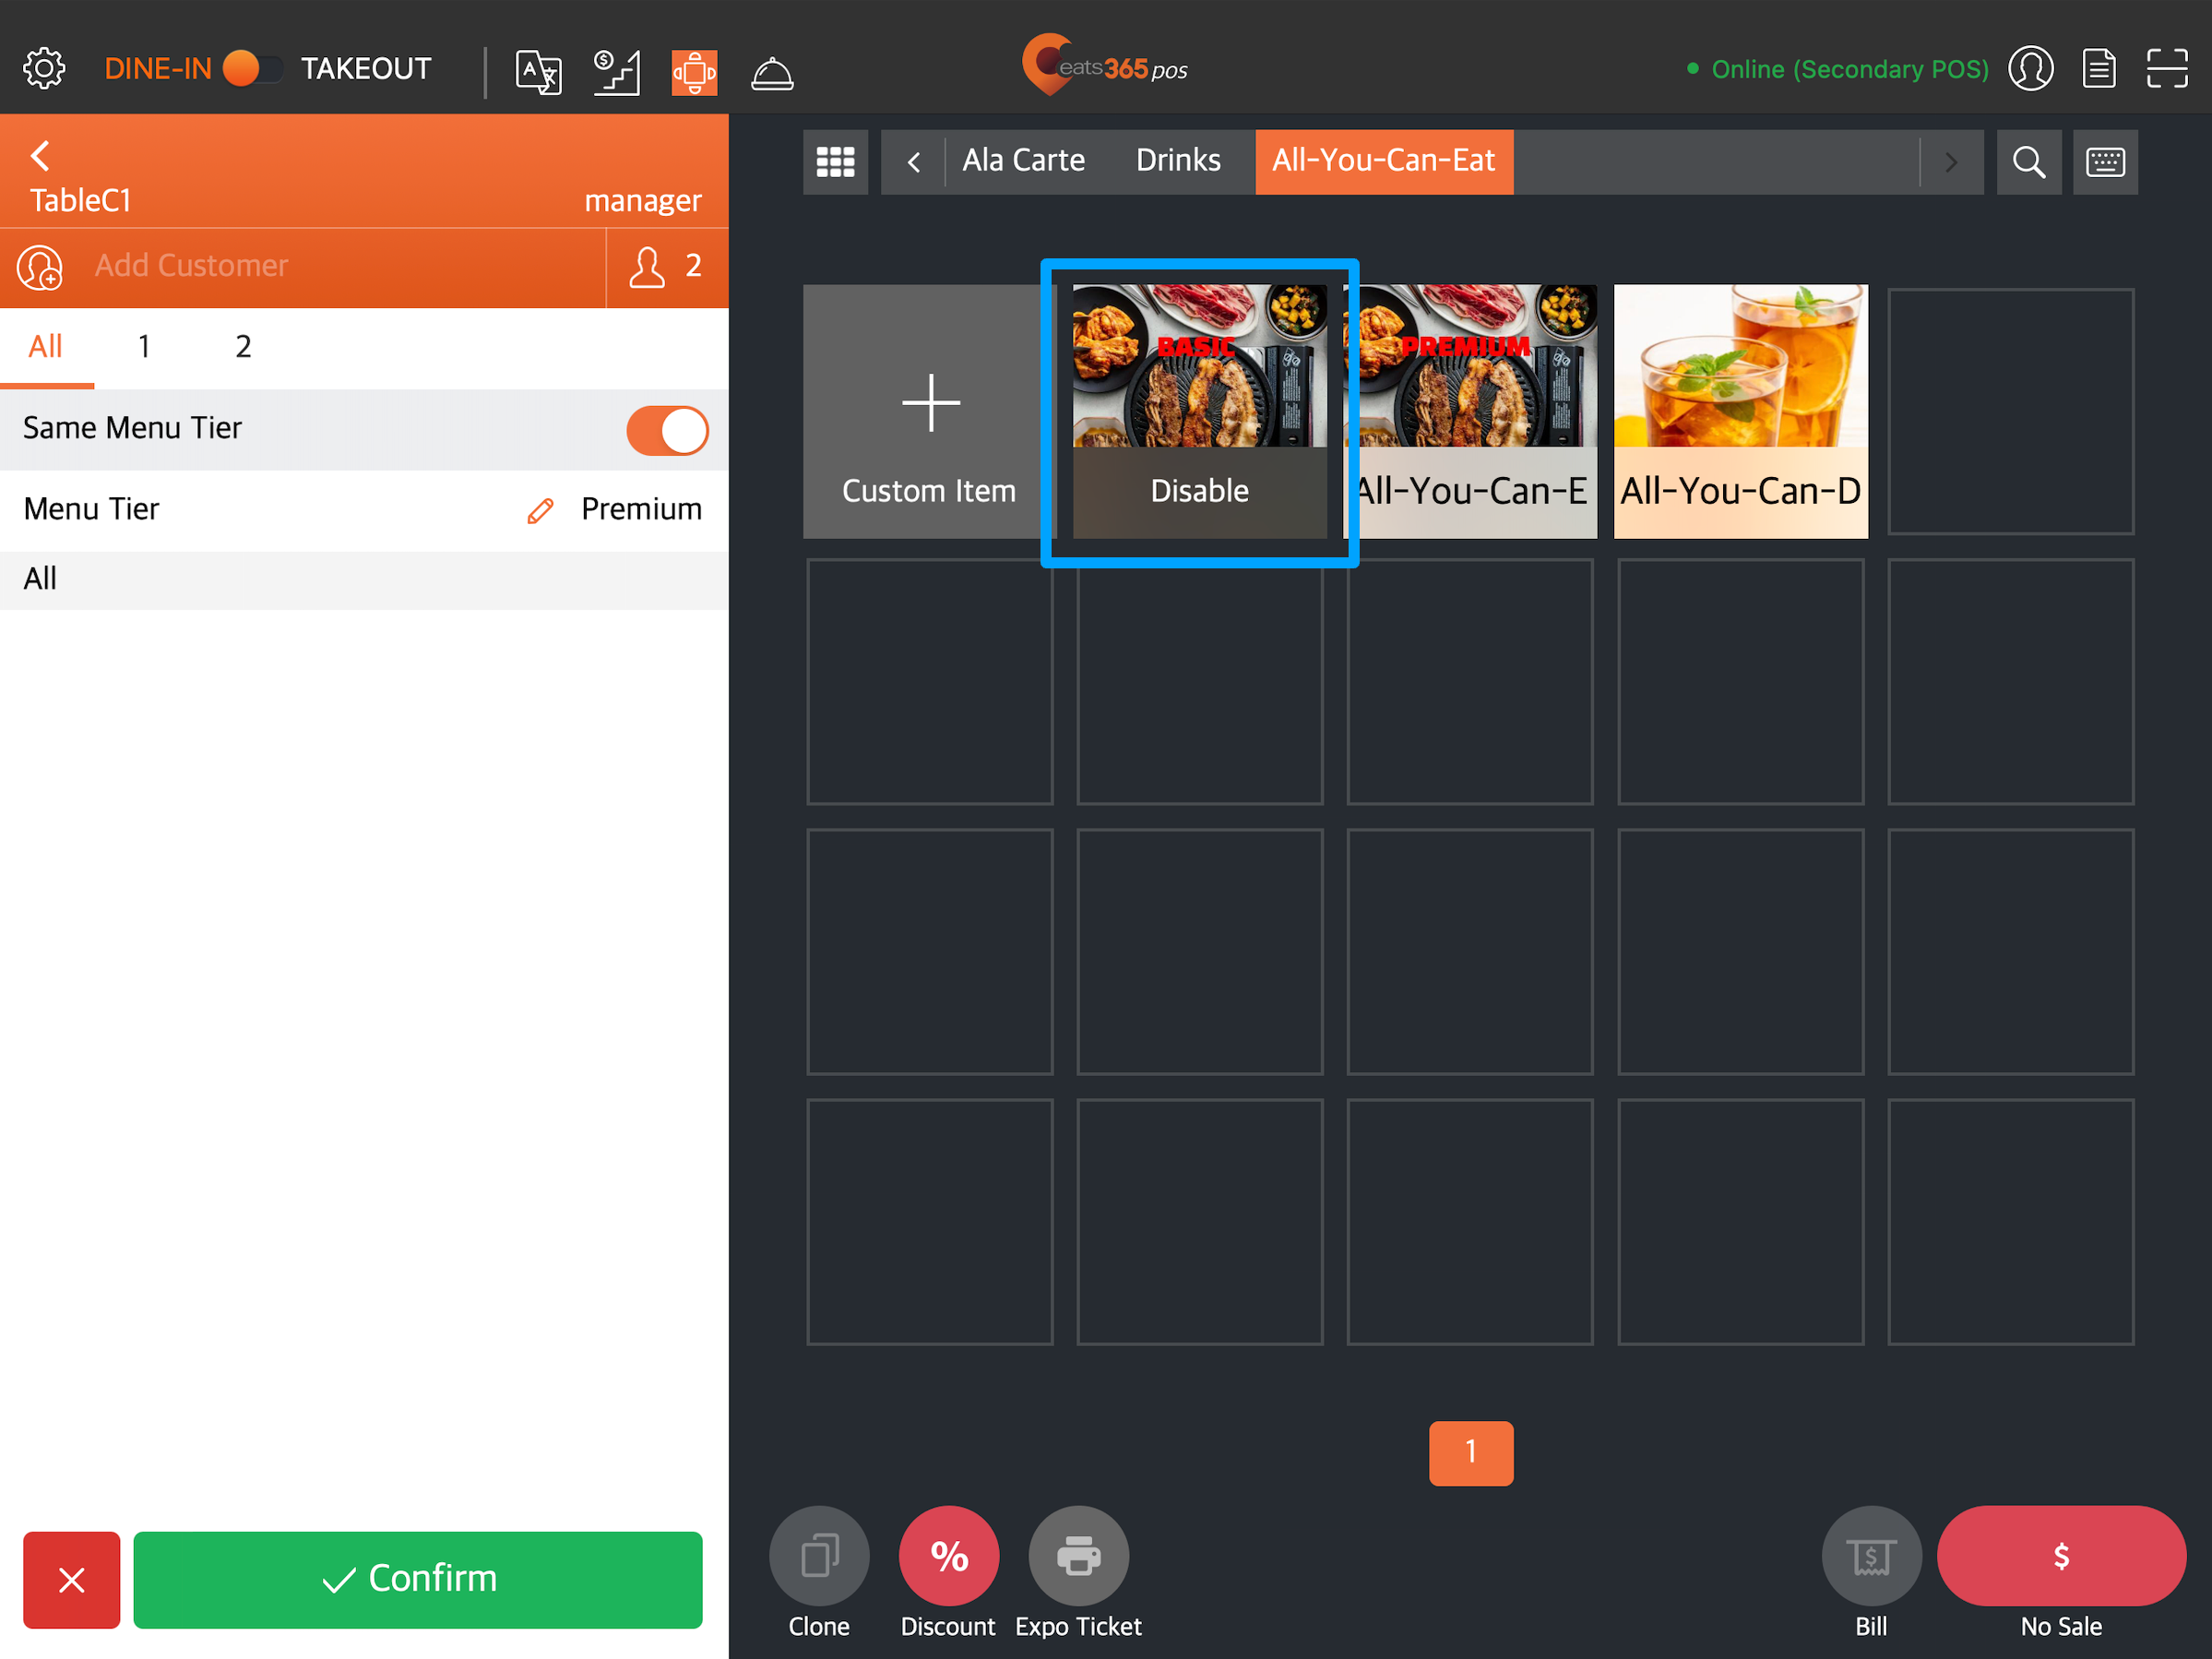
Prompt to Select Menu Tier
Enable this setting to prompt staff to select a tier upon enabling “Same Menu Tier” on the order-taking screen.
Merchant Portal (Classic Theme)
- Log in to the Merchant Portal.
- On the left panel, click on Restaurant Settings. Then, click on Dine-In.
- Click on the Workflow tab.
- Under “All You Can Eat Menu”, configure the All You Can Eat Menu to your preferred settings.
- At the top right, click on Save to confirm.
Below are the list of settings you can configure:
All You Can Eat Menu Operation Mode
Enable this setting to switch the POS to All You Can Eat Operation Mode. Once enabled, All You Can Eat Menu items will be hidden unless the set representing item for the All You Can Eat Menu is added to the order. For more information, refer to Create an All You Can Eat Menu.
When disabled, all items including those intended for All You Can Eat Menu only, will appear on the order-taking screen.
Enable Time Gap Between Order
Enable this setting to set the duration customers must wait before they can place another order. You can set the “Time Gap Between Order” to zero if you want customers to be able to order anytime.
POS Orders Affect Time Gap Calculation
Enable this setting to start the time gap count from the last order on the POS. If you don’t want POS orders to trigger the Time Gap function, turn this setting off.
Time Gap Affects POS
By default, the Time Gap you set for your All You Can Eat Menu only affects orders placed on Scan to Order and PhotoMenu. Enable this setting to apply the Time Gap to orders placed on the POS.
Dining Time Calculation
Choose how you want to calculate the start of dining time:
- Order Creation Time / Seated Time - Allows the system to count the order creation from the POS as the start of dining time.
- First Order from Online Applications except POS & mPOS - Allows the system to count the first order placed from online applications, such as Scan to Order or PhotoMenu, as the start of dining time.
Merchant Portal 2.0
- Log in to the Merchant Portal.
- On the left panel, click on Restaurant Settings. Then, click on Dine-In.
- Click on Workflow.
- Under “All You Can Eat Menu,” configure the All You Can Eat Menu to your preferred settings.
- At the top right, click on Save to confirm.
Below are the list of settings you can configure:
All You Can Eat Menu Operation Mode
Enable this setting to switch the POS to All You Can Eat Operation Mode. Once enabled, All You Can Eat Menu items will be hidden unless the set representing item for the All You Can Eat Menu is added to the order. For more information, refer to Create an All You Can Eat Menu.
When disabled, all items including those intended for All You Can Eat Menu only, will appear on the order-taking screen.
Enable Time Gap Between Order
Enable this setting to set the duration customers must wait before they can place another order. You can set the “Time Gap Between Order” to zero if you want customers to be able to order anytime.

POS Orders Affect Time Gap Calculation
Enable this setting to start the time gap count from the last order on the POS. If you don’t want POS orders to trigger the Time Gap function, turn this setting off.
Time Gap Affects POS
By default, the Time Gap you set for your All You Can Eat Menu only affects orders placed on Scan to Order and PhotoMenu. Enable this setting to apply the Time Gap to orders placed on the POS.
Dining Time Calculation
Choose how you want to calculate the start of dining time:
-
Order Creation Time - Allows the system to count the order creation from the POS as the start of dining time.
-
First Online Ordering Time - Allows the system to count the first order placed from online applications, such as Scan to Order or PhotoMenu, as the start of dining time.
Enforce Same All You Can Eat Menu Tier in Same Order
Enable this setting to restrict customers from ordering All You Can Eat Menu items included in a different tier. If an item isn’t included in the currently selected tier, the POS disables that item on the order-taking screen.
Prompt to Select Menu Tier
Enable this setting to prompt staff to select a tier upon enabling “Same Menu Tier” on the order-taking screen.