Eats365 Products
 Merchant Guide
 Modules
 Membership
 Integrations
 Hardware
 Staff Operations
 Roles & Permissions
 Payments
 Reports
 What’s New
 Release Notes
 Troubleshooting
 Simulators
 Glossary
 Troubleshooter
 System Status
Order Handling
Table of Contents
Set up and manage Courses
Learn how to create and manage Courses on the Eats365 POS.
Meal Coursing enables you to set up menu items in a way that they’re served at specific times during a meal, making it perfect for various dining experiences like fixed-price menus (prix fixe) menus, table service, and more.
In this article, you’ll learn how to create and manage courses, and how to void orders.
Before you begin
You can configure Eats365 POS settings to optimize how you operate item courses. Consider enabling the following settings in your POS app:
| Setting |
Setting location |
|
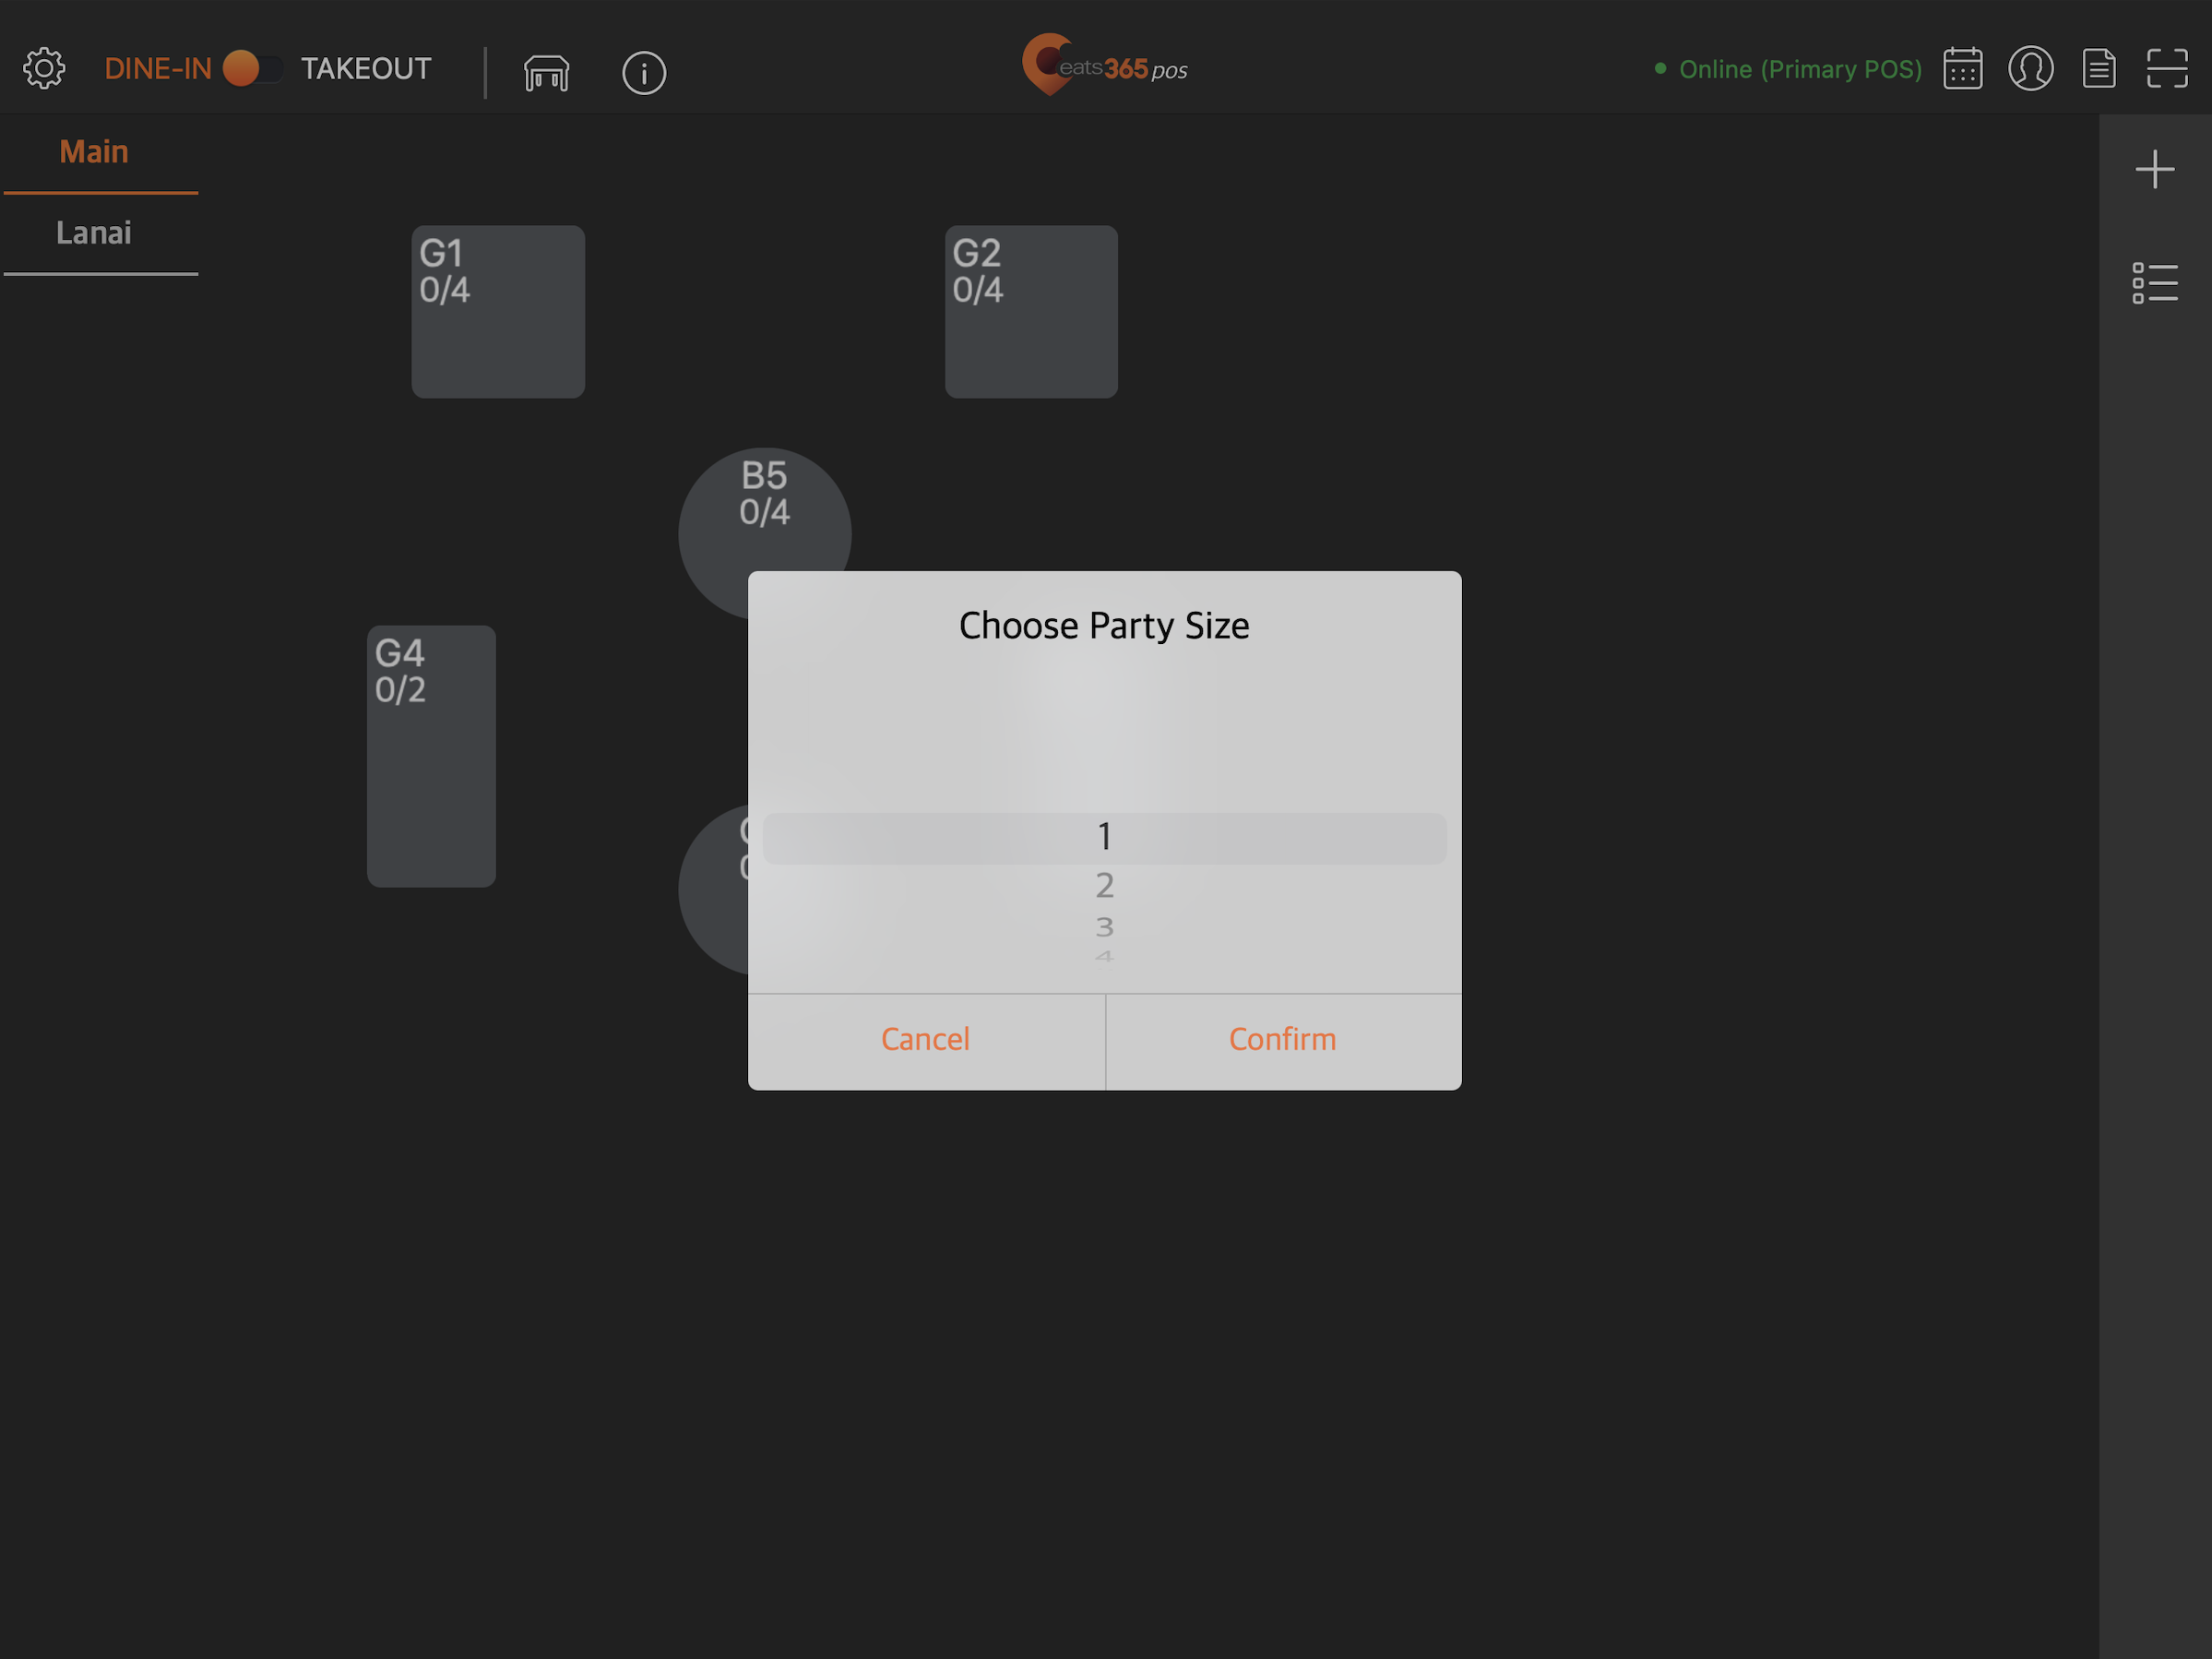
Force Enter Party Size Displays a prompt that requires you to enter the number of customers. |
|
|
Display by Seat Displays the option to associate specific seats to different orders by default. |
|
|
Course Override Quick Key Displays the option to change courses at the bottom of the order-taking screen. It also allows the POS to override the set course for Items and assign a default course for all Items. Tip: If course presets are not being used at an item level, it’s recommended to set the default to Instant. |
|
|
Prep Tickets Sends a print job request to print prep tickets once an order is confirmed. |
|
|
Auto Fire Course Automatically sends a course to the kitchen after a set time |
|
Create a course by category or by item
Courses are set up in the Menu Setup settings. You can assign courses to categories or individual menu items. If a course default is assigned to a category, items belonging to that category adopts the same course default. Courses can be modified anytime in the order-taking screen.
Create a course by category
To set a course by category, follow the steps below:
- Log in to the Eats365 POS.
- At the top left, tap Settings
 .
. - Under General, tap Menu Setup, then select Category.
- If you have an existing category, tap an existing category. Otherwise, to create a new category, tap Add Category.
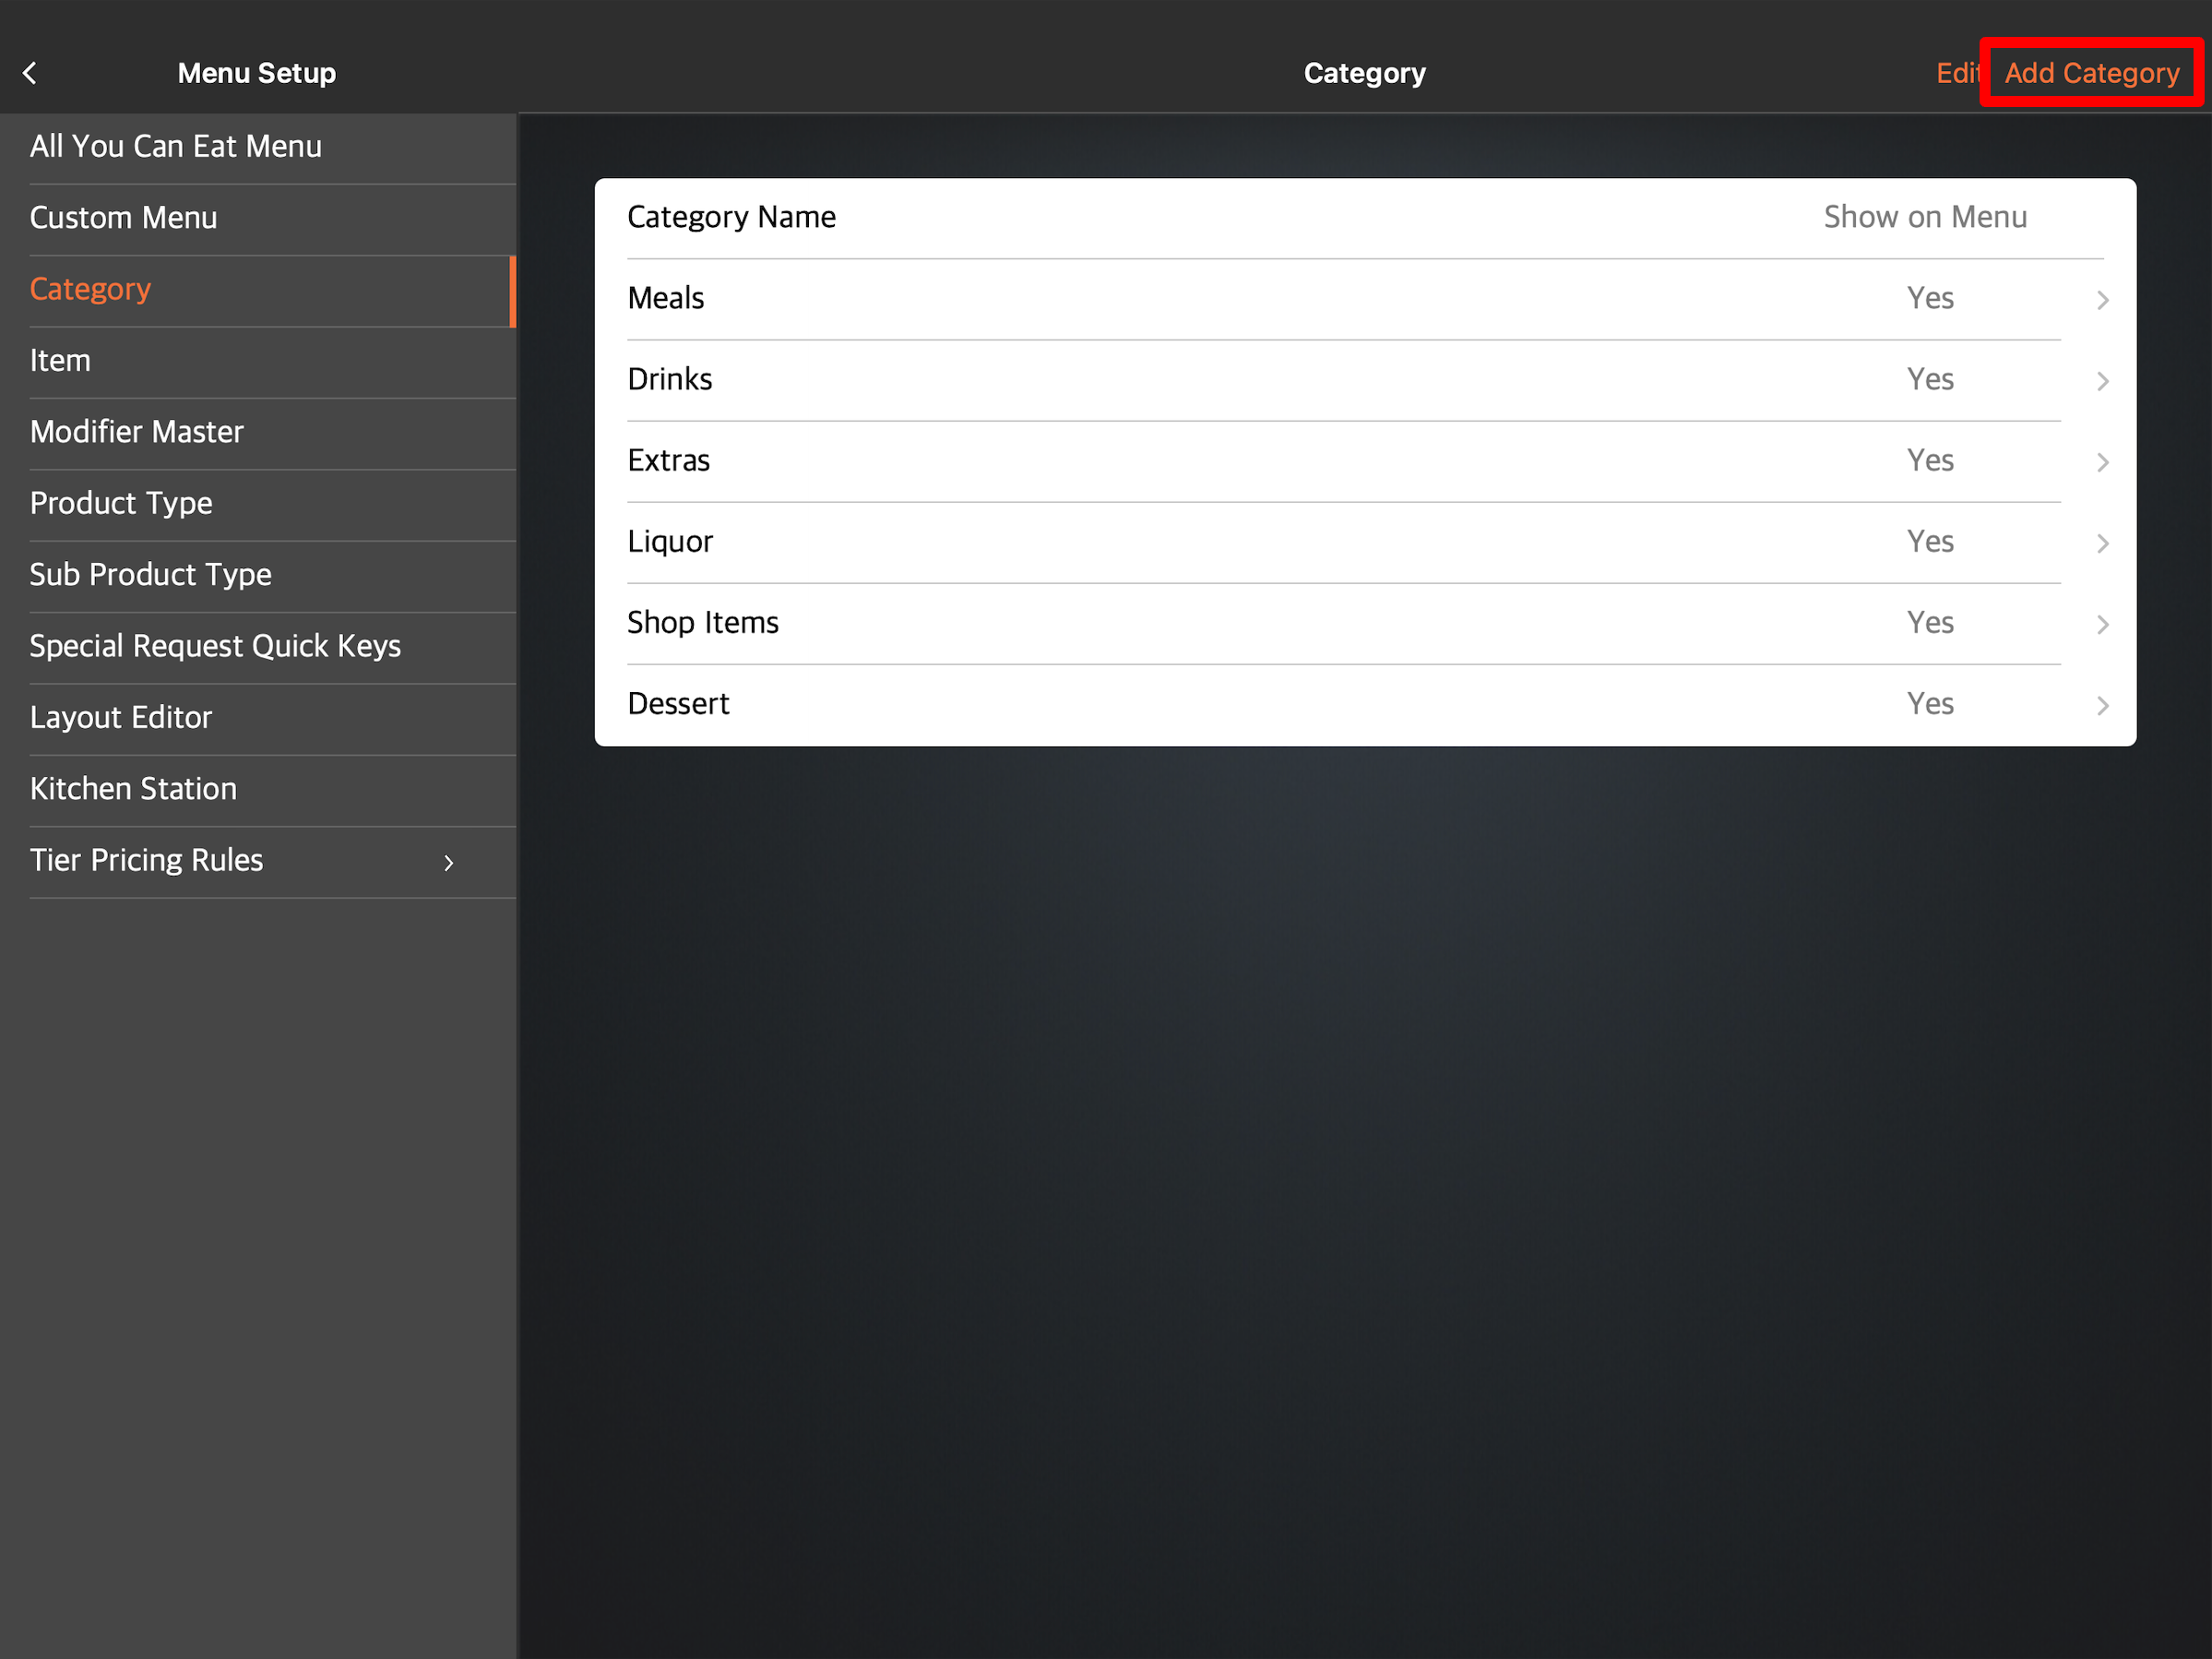
- Next to Course, tap the drop-down menu and assign a default course for the category.
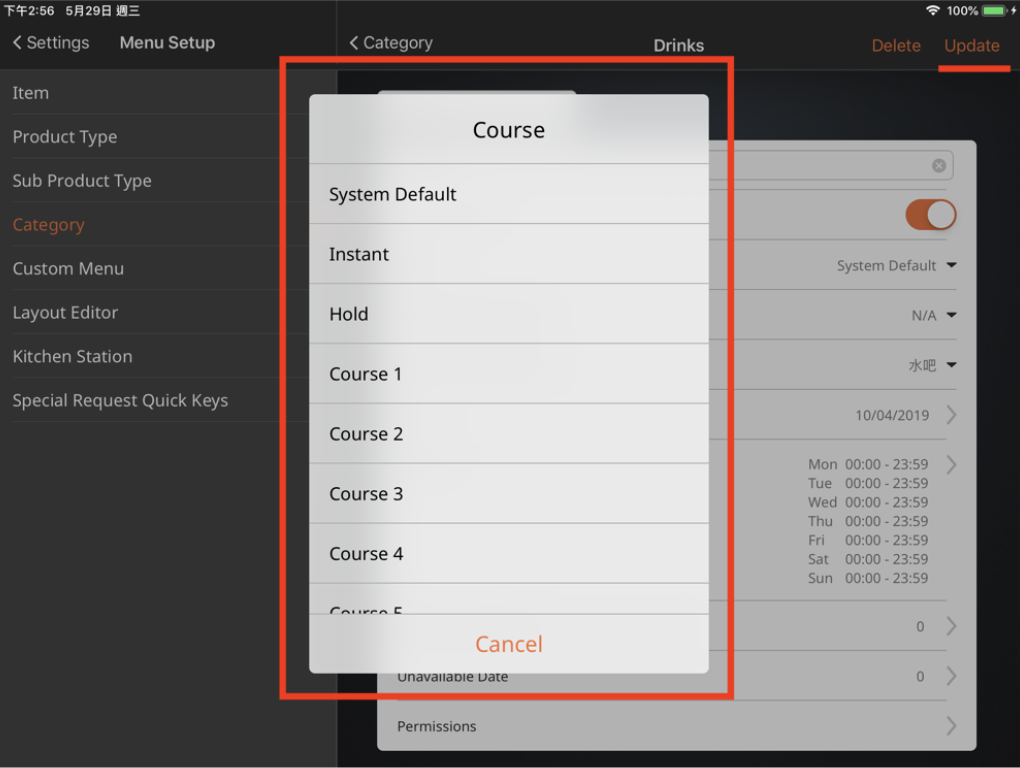
- If you’re adding a course to an existing category, tap Update. Otherwise, tap Save to create a new category.
Create a course by menu item
To set a course by menu item, follow the steps below:
- Log in to the Eats365 POS.
- At the top left, tap Settings .
- Under General, tap Menu Setup, then select Item.
- If you have an existing menu item, tap an existing item. Otherwise, to create a new item, tap Add Item.

- Next to Course, tap the drop-down menu and assign a default course for the item.
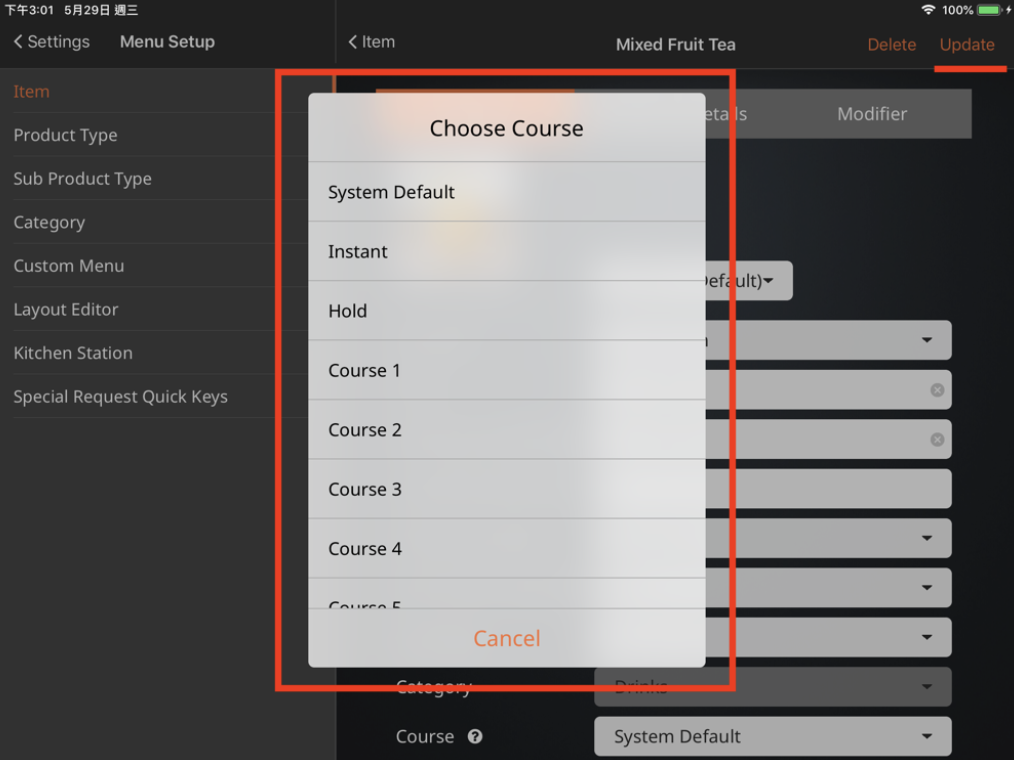
- If you’re adding a course to an existing menu item, Tap Update. Otherwise, tap Save to create a new item.
Assign courses while taking orders
To assign courses directly from the order-taking screen, follow the steps below:
- On the table map screen, select an available table, then enter the party size.
- Before taking an order, make sure that the seat you’re taking the order for is selected.
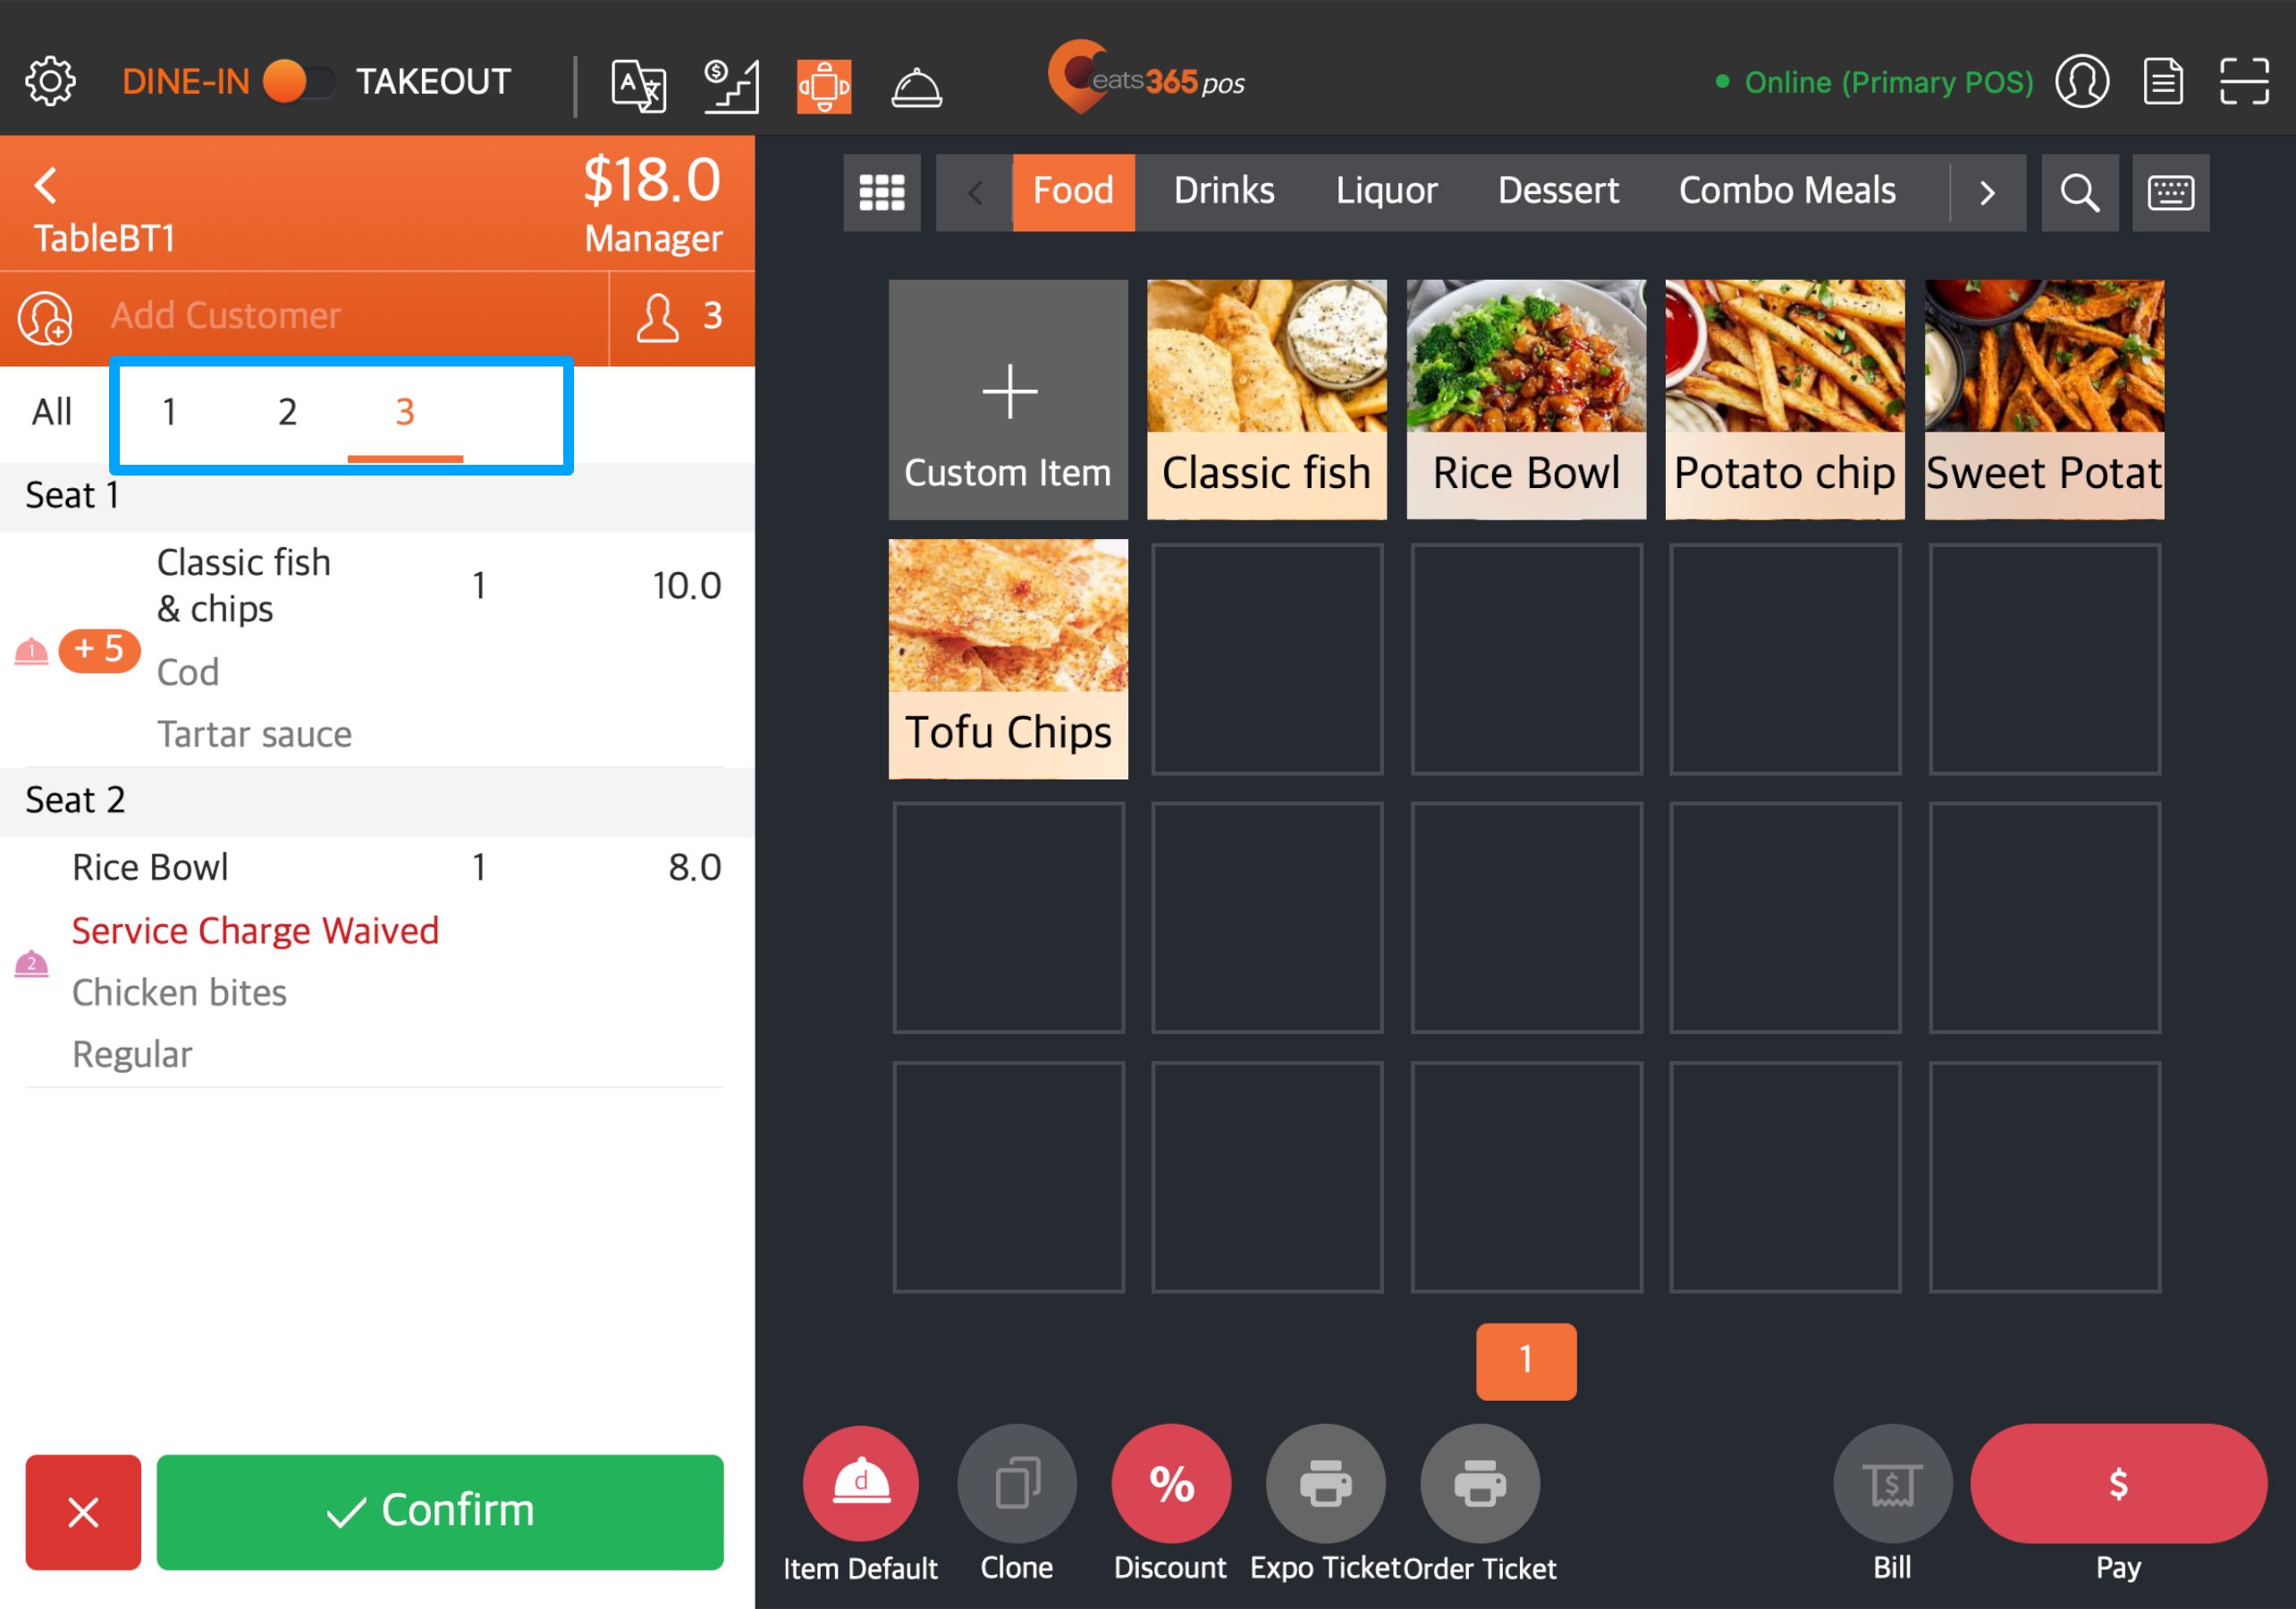
- At the bottom, tap the Course Override Quick Key
 to specify which course the order is going to be assigned to.
Note: The Course Override Quick Key is a dynamic icon and can change depending on the current selected course. It is generally located at the bottom of the order-taking screen.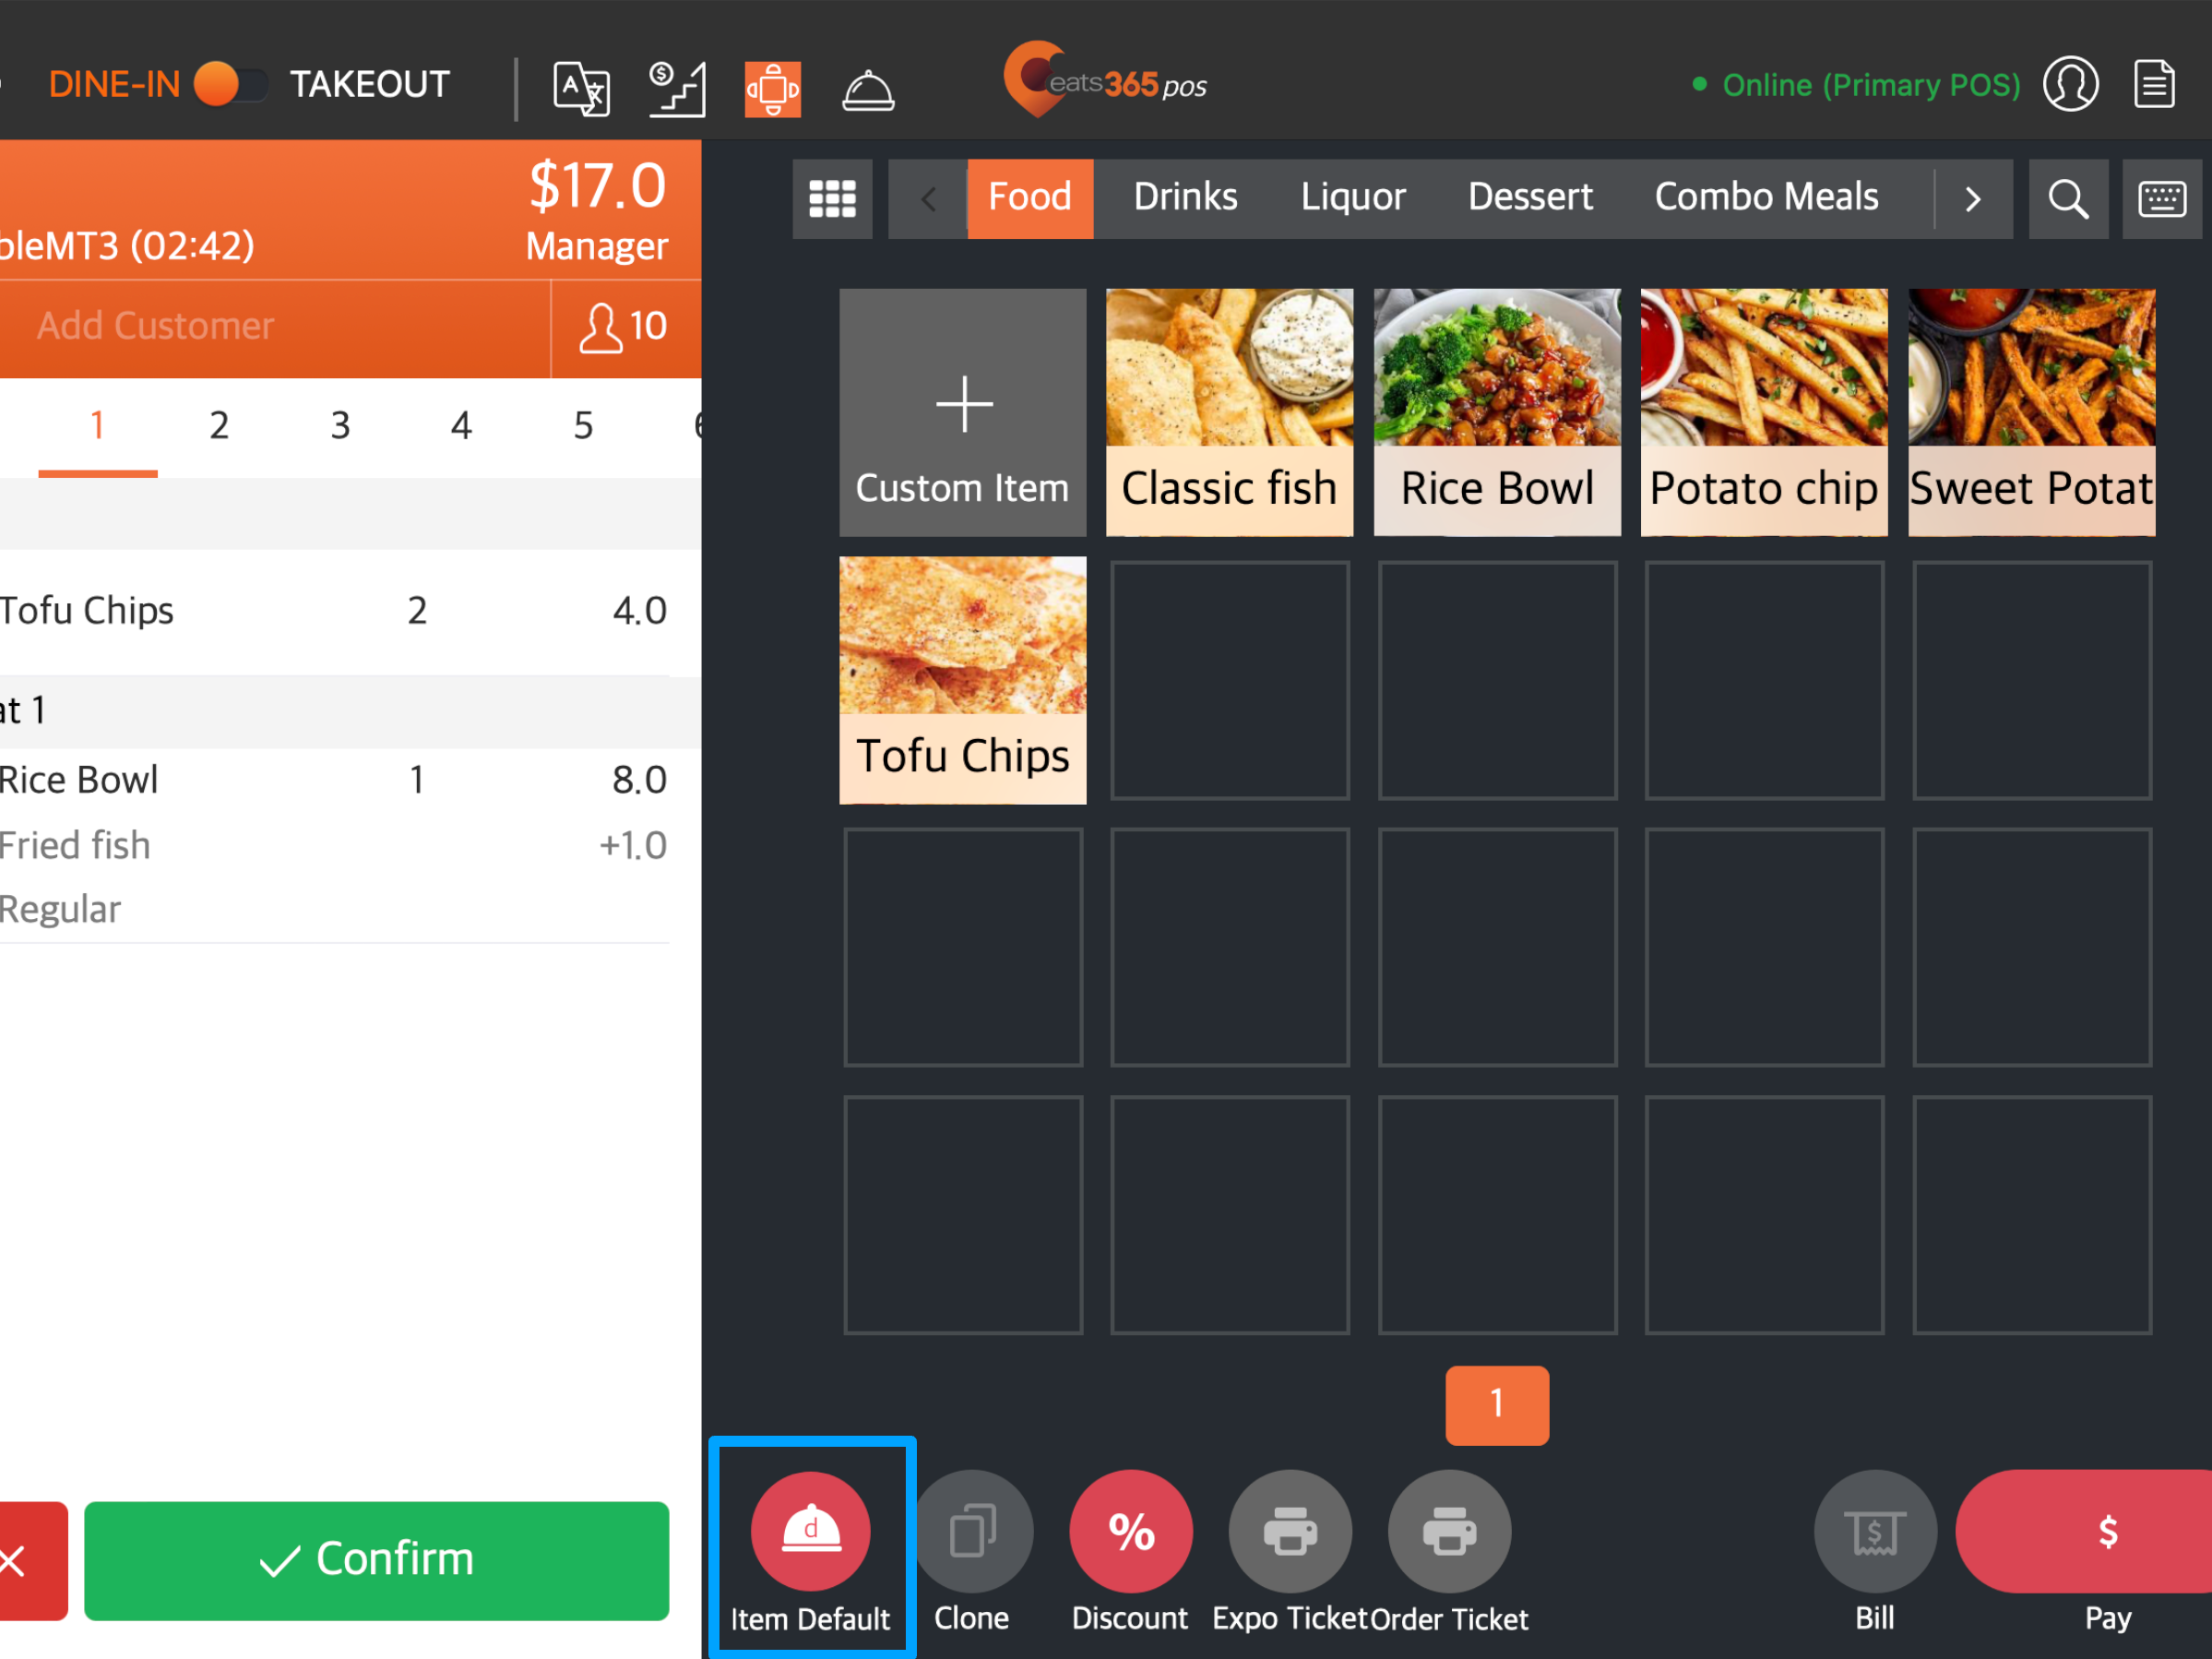
Tip: Tapping the Course Override Quick Key changes the course to the next course in the sequence. Press and hold the Course Override Quick Key to display all available course options. - Repeat the steps until all seats have made their orders for each course.
- Tap Confirm to fire the first course.
Once an order has been confirmed, Prep Tickets are sent to the relevant Kitchen Printers to notify the chefs to prepare the ordered items.
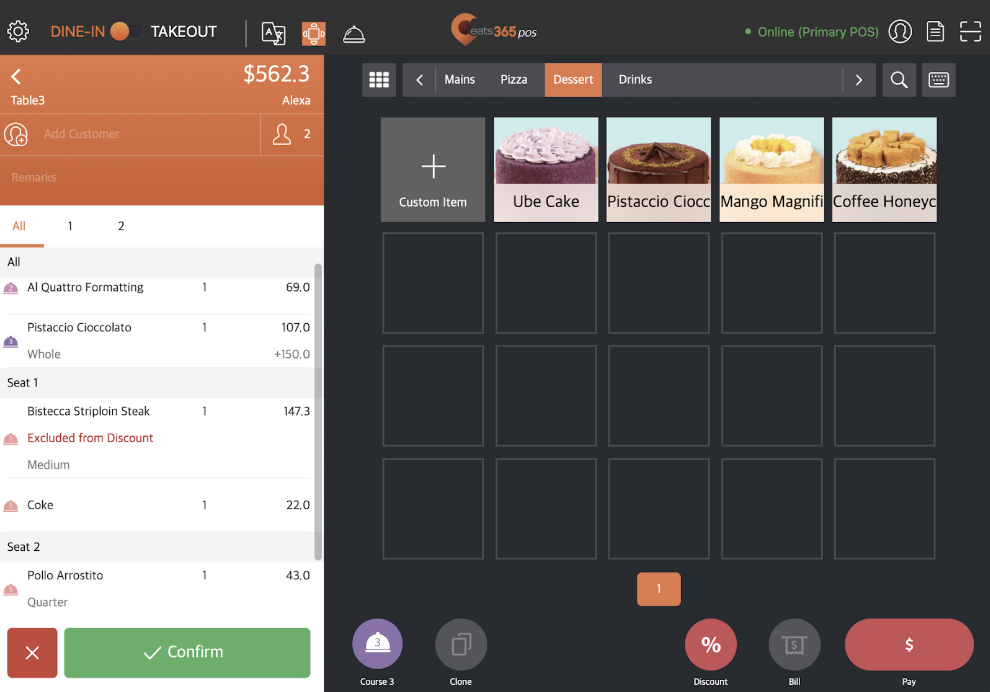
Manage tables with coursed orders
Additional actions can still be performed once a coursed meal has been confirmed. You can use the Course overview to view and manage active courses or Action Buttons to use additional functions.
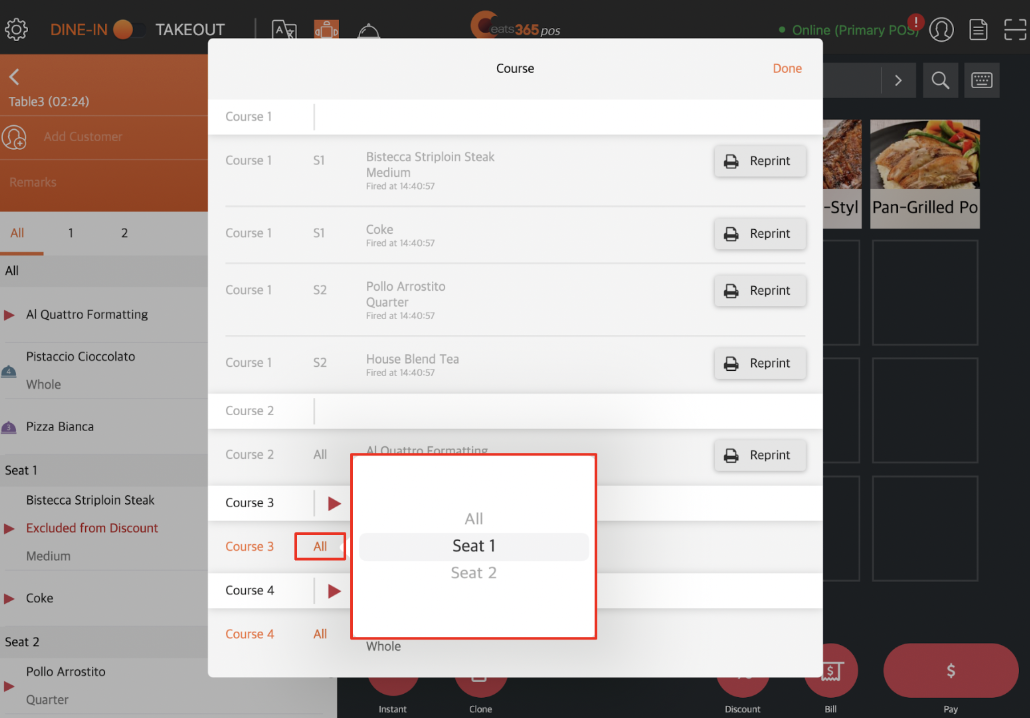
Course Overview
To display all active courses, at the top of the order-taking screen, tap Courses  . The following options can be modified:
Reprint
Sends a reprint request to the Kitchen Printer.
Coursing
Changes the course of a confirmed order.
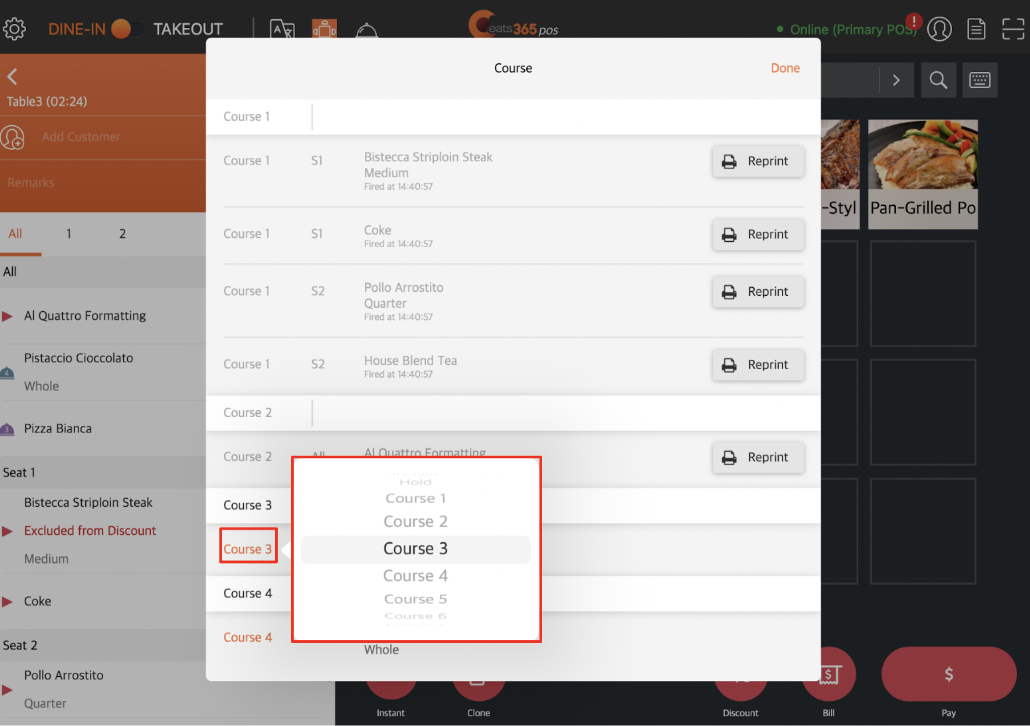
Seating
Changes the seat that’s associated with an order.
Fire
Fires the course.
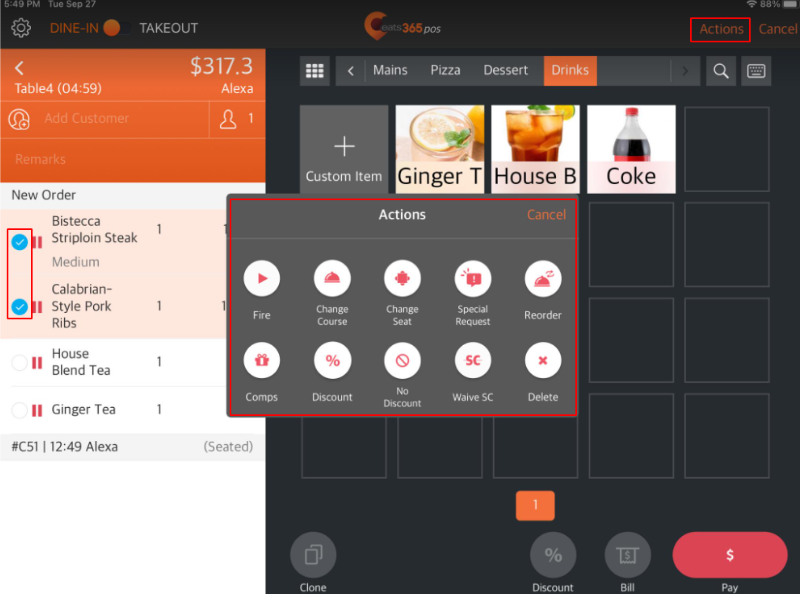
Action Button functions
To display Action Buttons, on the order-taking screen, tap an ordered item. The available Action Buttons are displayed to the right of the item.
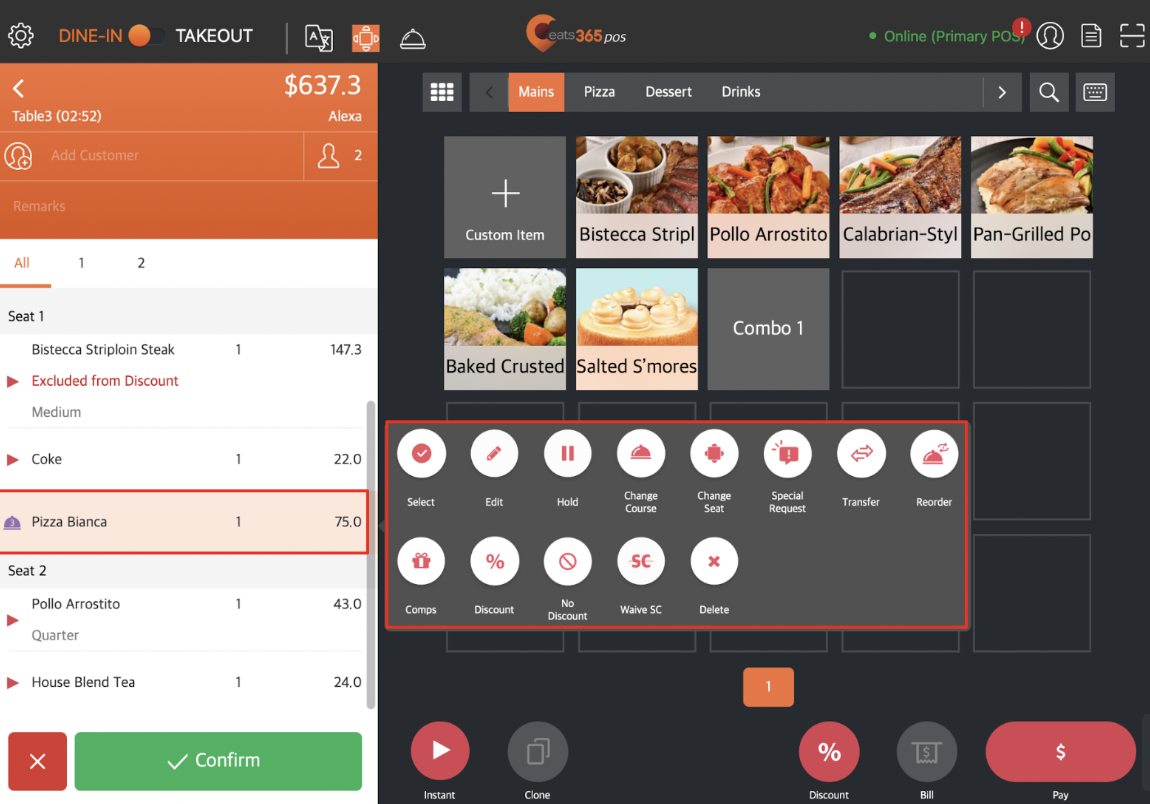
Action Button options
The following are the available Action Buttons:
Change Course 
Sets the Item Course to Instant, Hold, or a different course number.
Change Seat 
Changes the seat that’s associated with an order.
Comps 
Sets the selected item as complimentary.
Delete 
Deletes the item from the order.
Discount 
Applies a discount to the selected item. You can set the discount to a specific amount or a percentage.
Edit 
Allows you to modify an item.
Fire  / Hold
Select whether to immediately fire the item or put the item on hold.
No Discount 
Excludes an item from any available discount.
Reorder 
Adds another order instance for the item chosen.
Reprint 
Reprints the order and send it to the Kitchen Station.
Require SC 
Sets the order to require a service charge.
Rush 
Tags the selected order as rush.
Select 
Selects multiple items in the order to use bulk actions. Once multiple items are selected, at the top right, tap Actions to perform bulk actions.
Special Request 
Adds or removes any special request for an item.
Transfer 
Moves a customer to a different table.
Waive SC 
Waives any service charge.
Delay Fire 
Shows quick keys that you can use to set the delay duration for firing a course.
Reprint Course
Reprint the selected course and send it to the Kitchen Station.
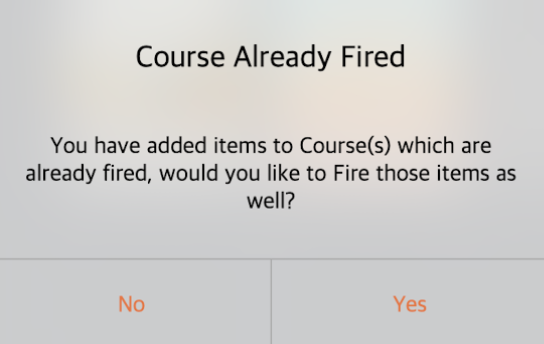
DeleteAdd additional items
If a customer orders more items while they have an existing course underway, a prompt asks whether you’d like to fire the new order immediately or place it on hold.
If you select Yes, the order is fired immediately. Alternatively, if you choose No, the new order is placed on hold, and you can manually fire the item.
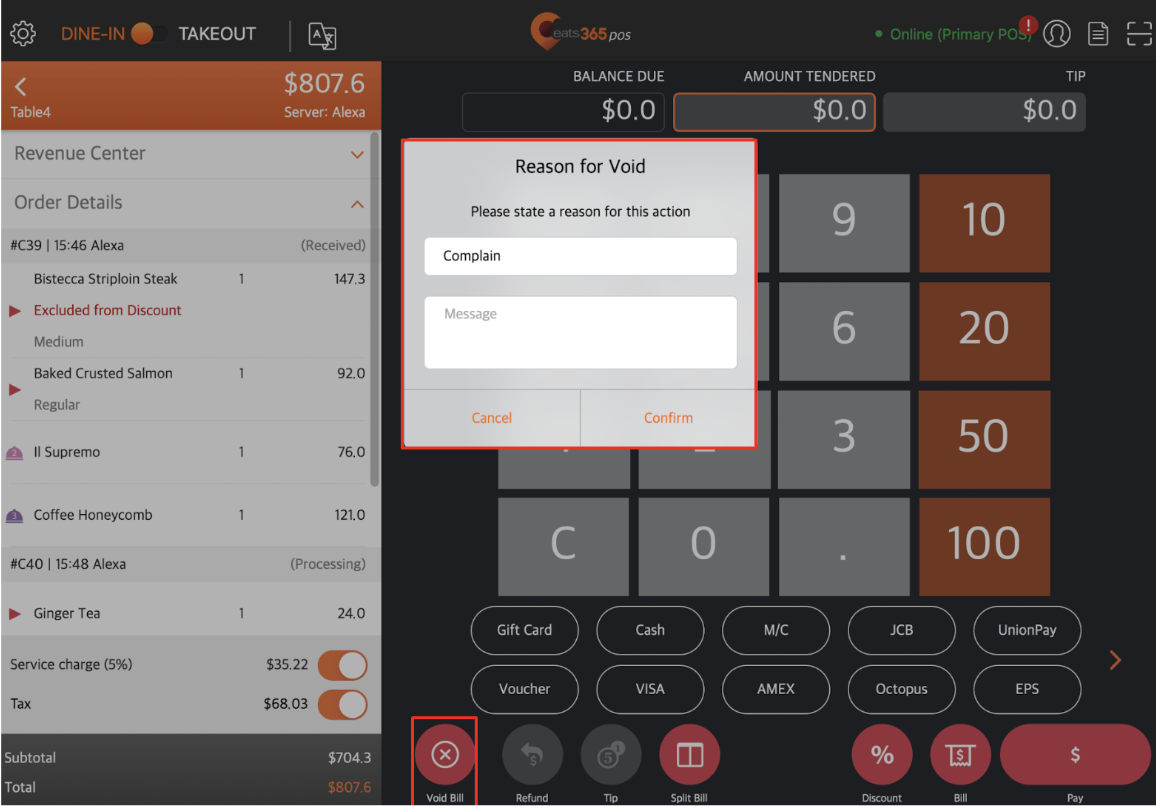
Void orders
Orders can be void for a number of reasons. It’s also recommended to require a reason whenever a void is performed.
Enable Void Reasons
To require a reason for void orders, follow the steps below:
- Log in to the Eats365 POS.
- At the top left, tap Settings .
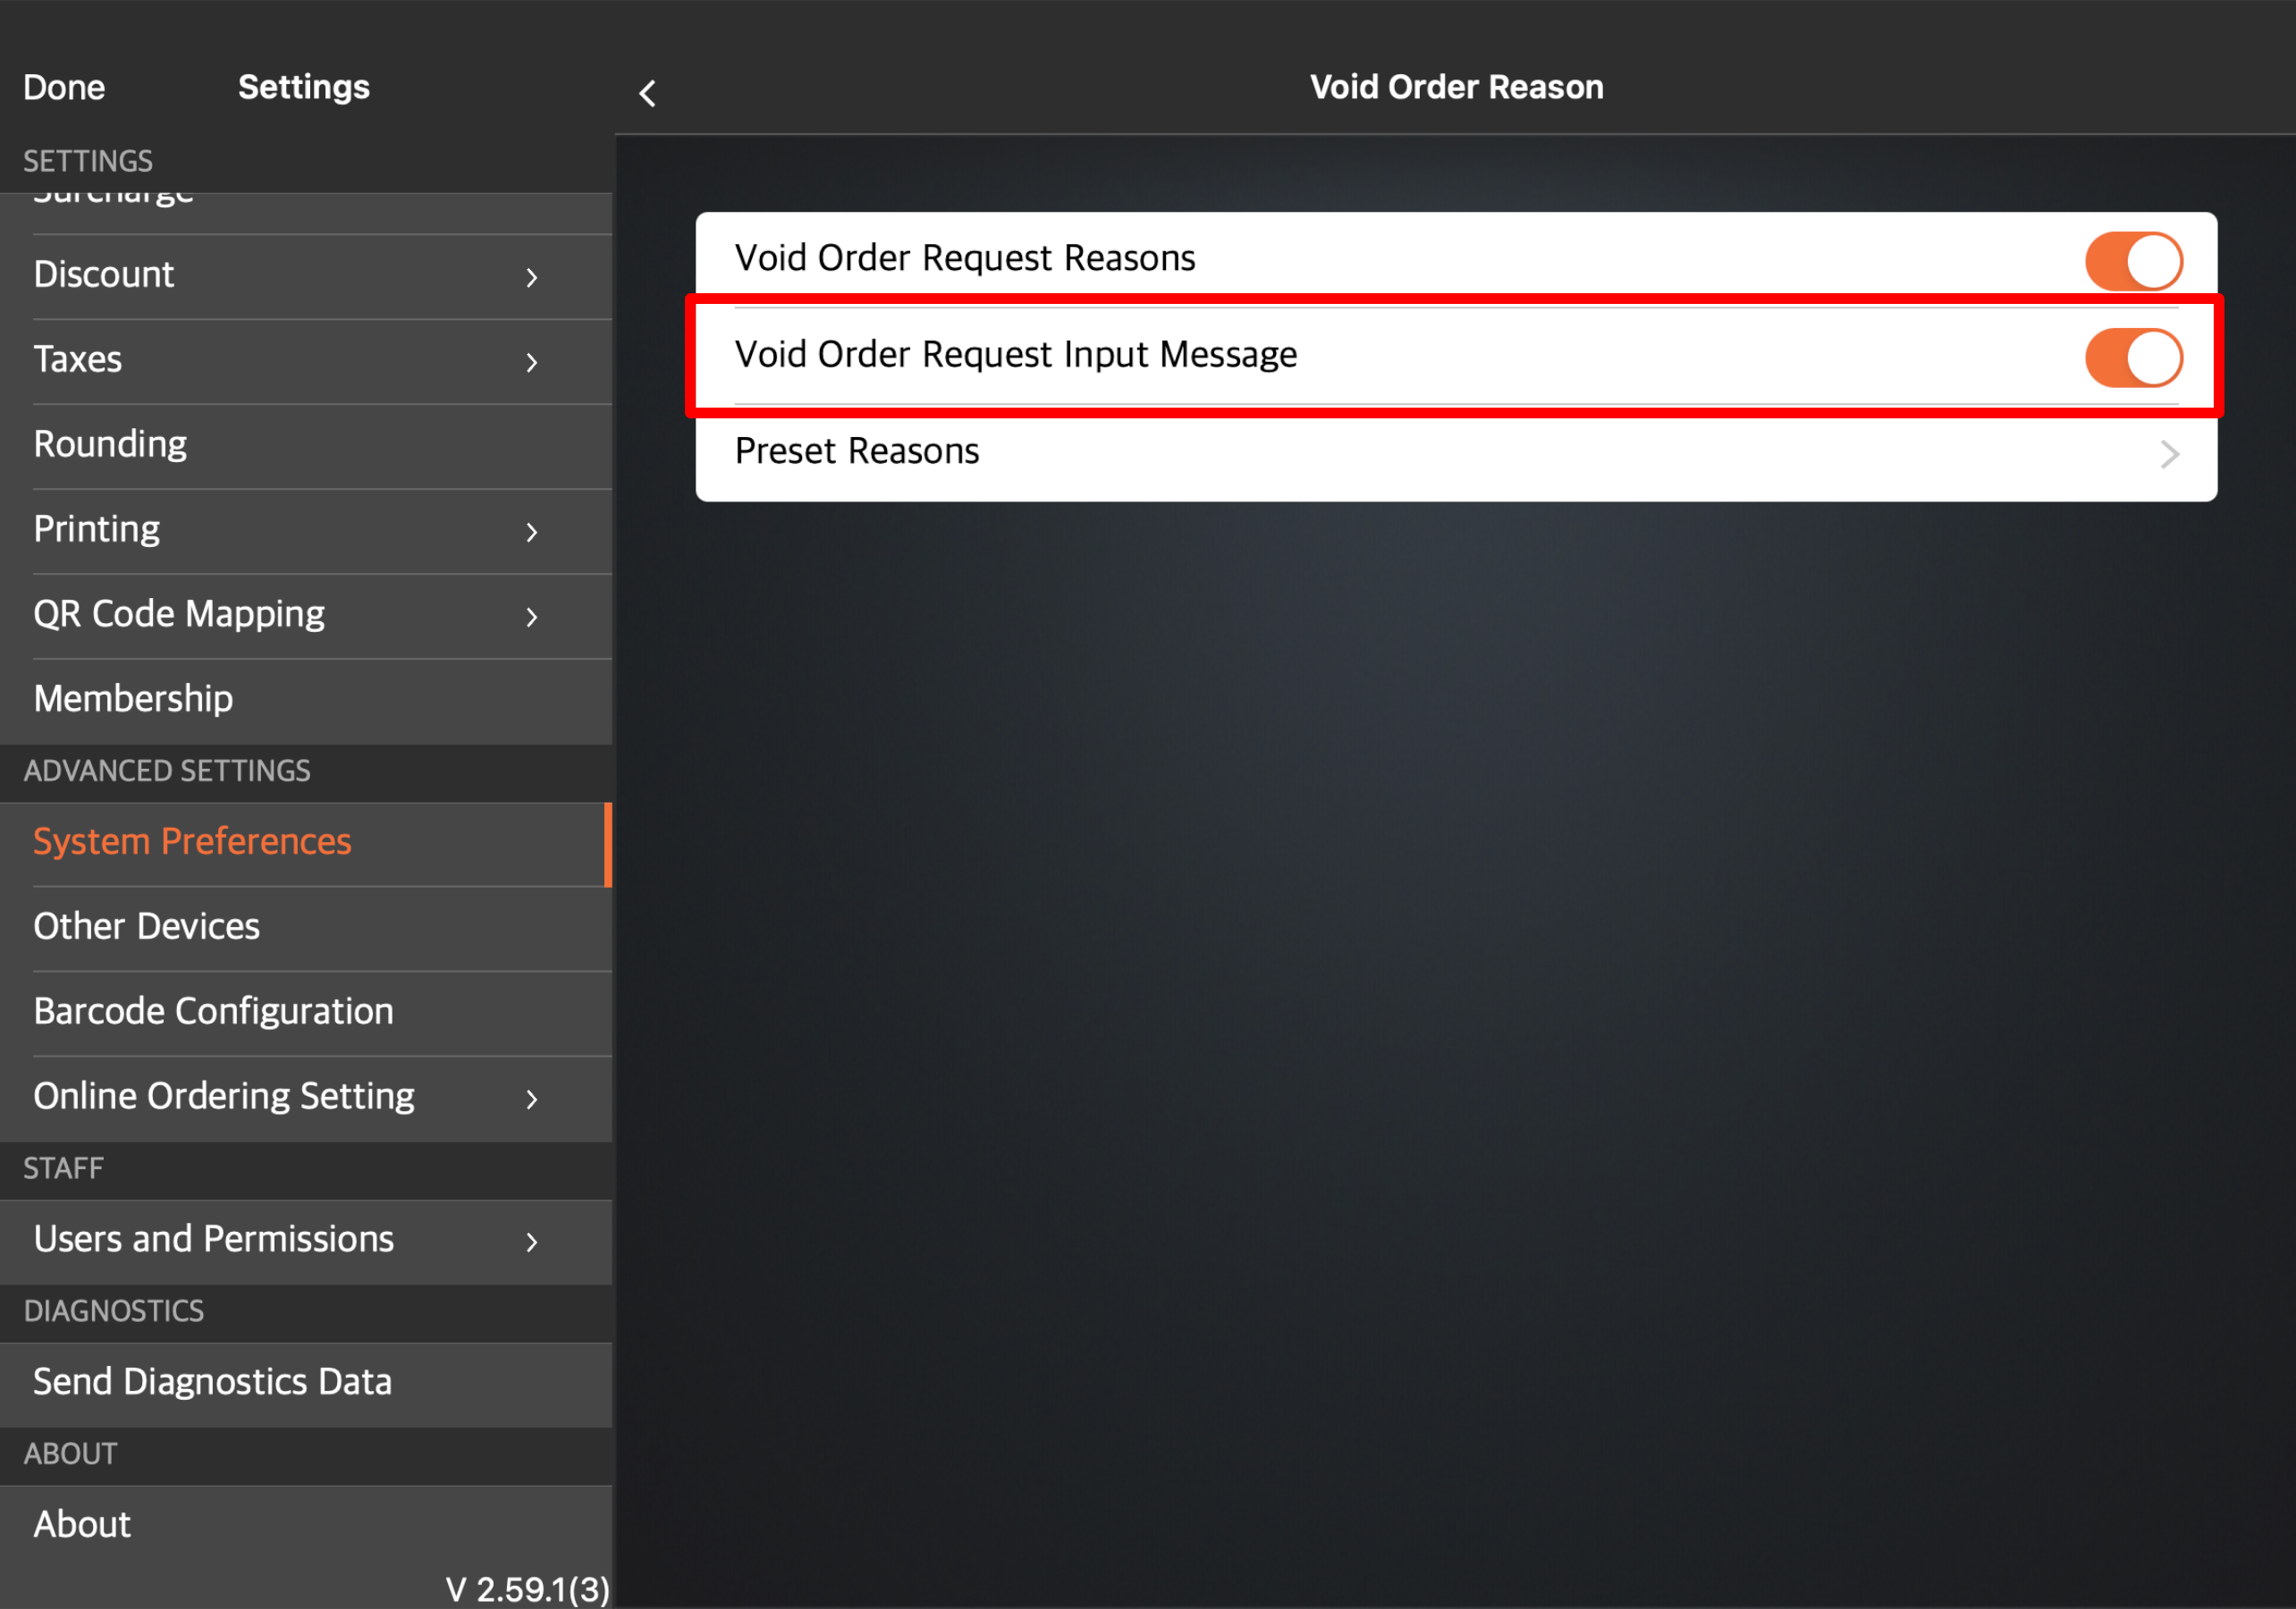
- Under Advanced Settings, tap System Preferences.
- Under Audit Log, tap Preset Void Order Reason, then turn on Void Order Request Reasons
 .
.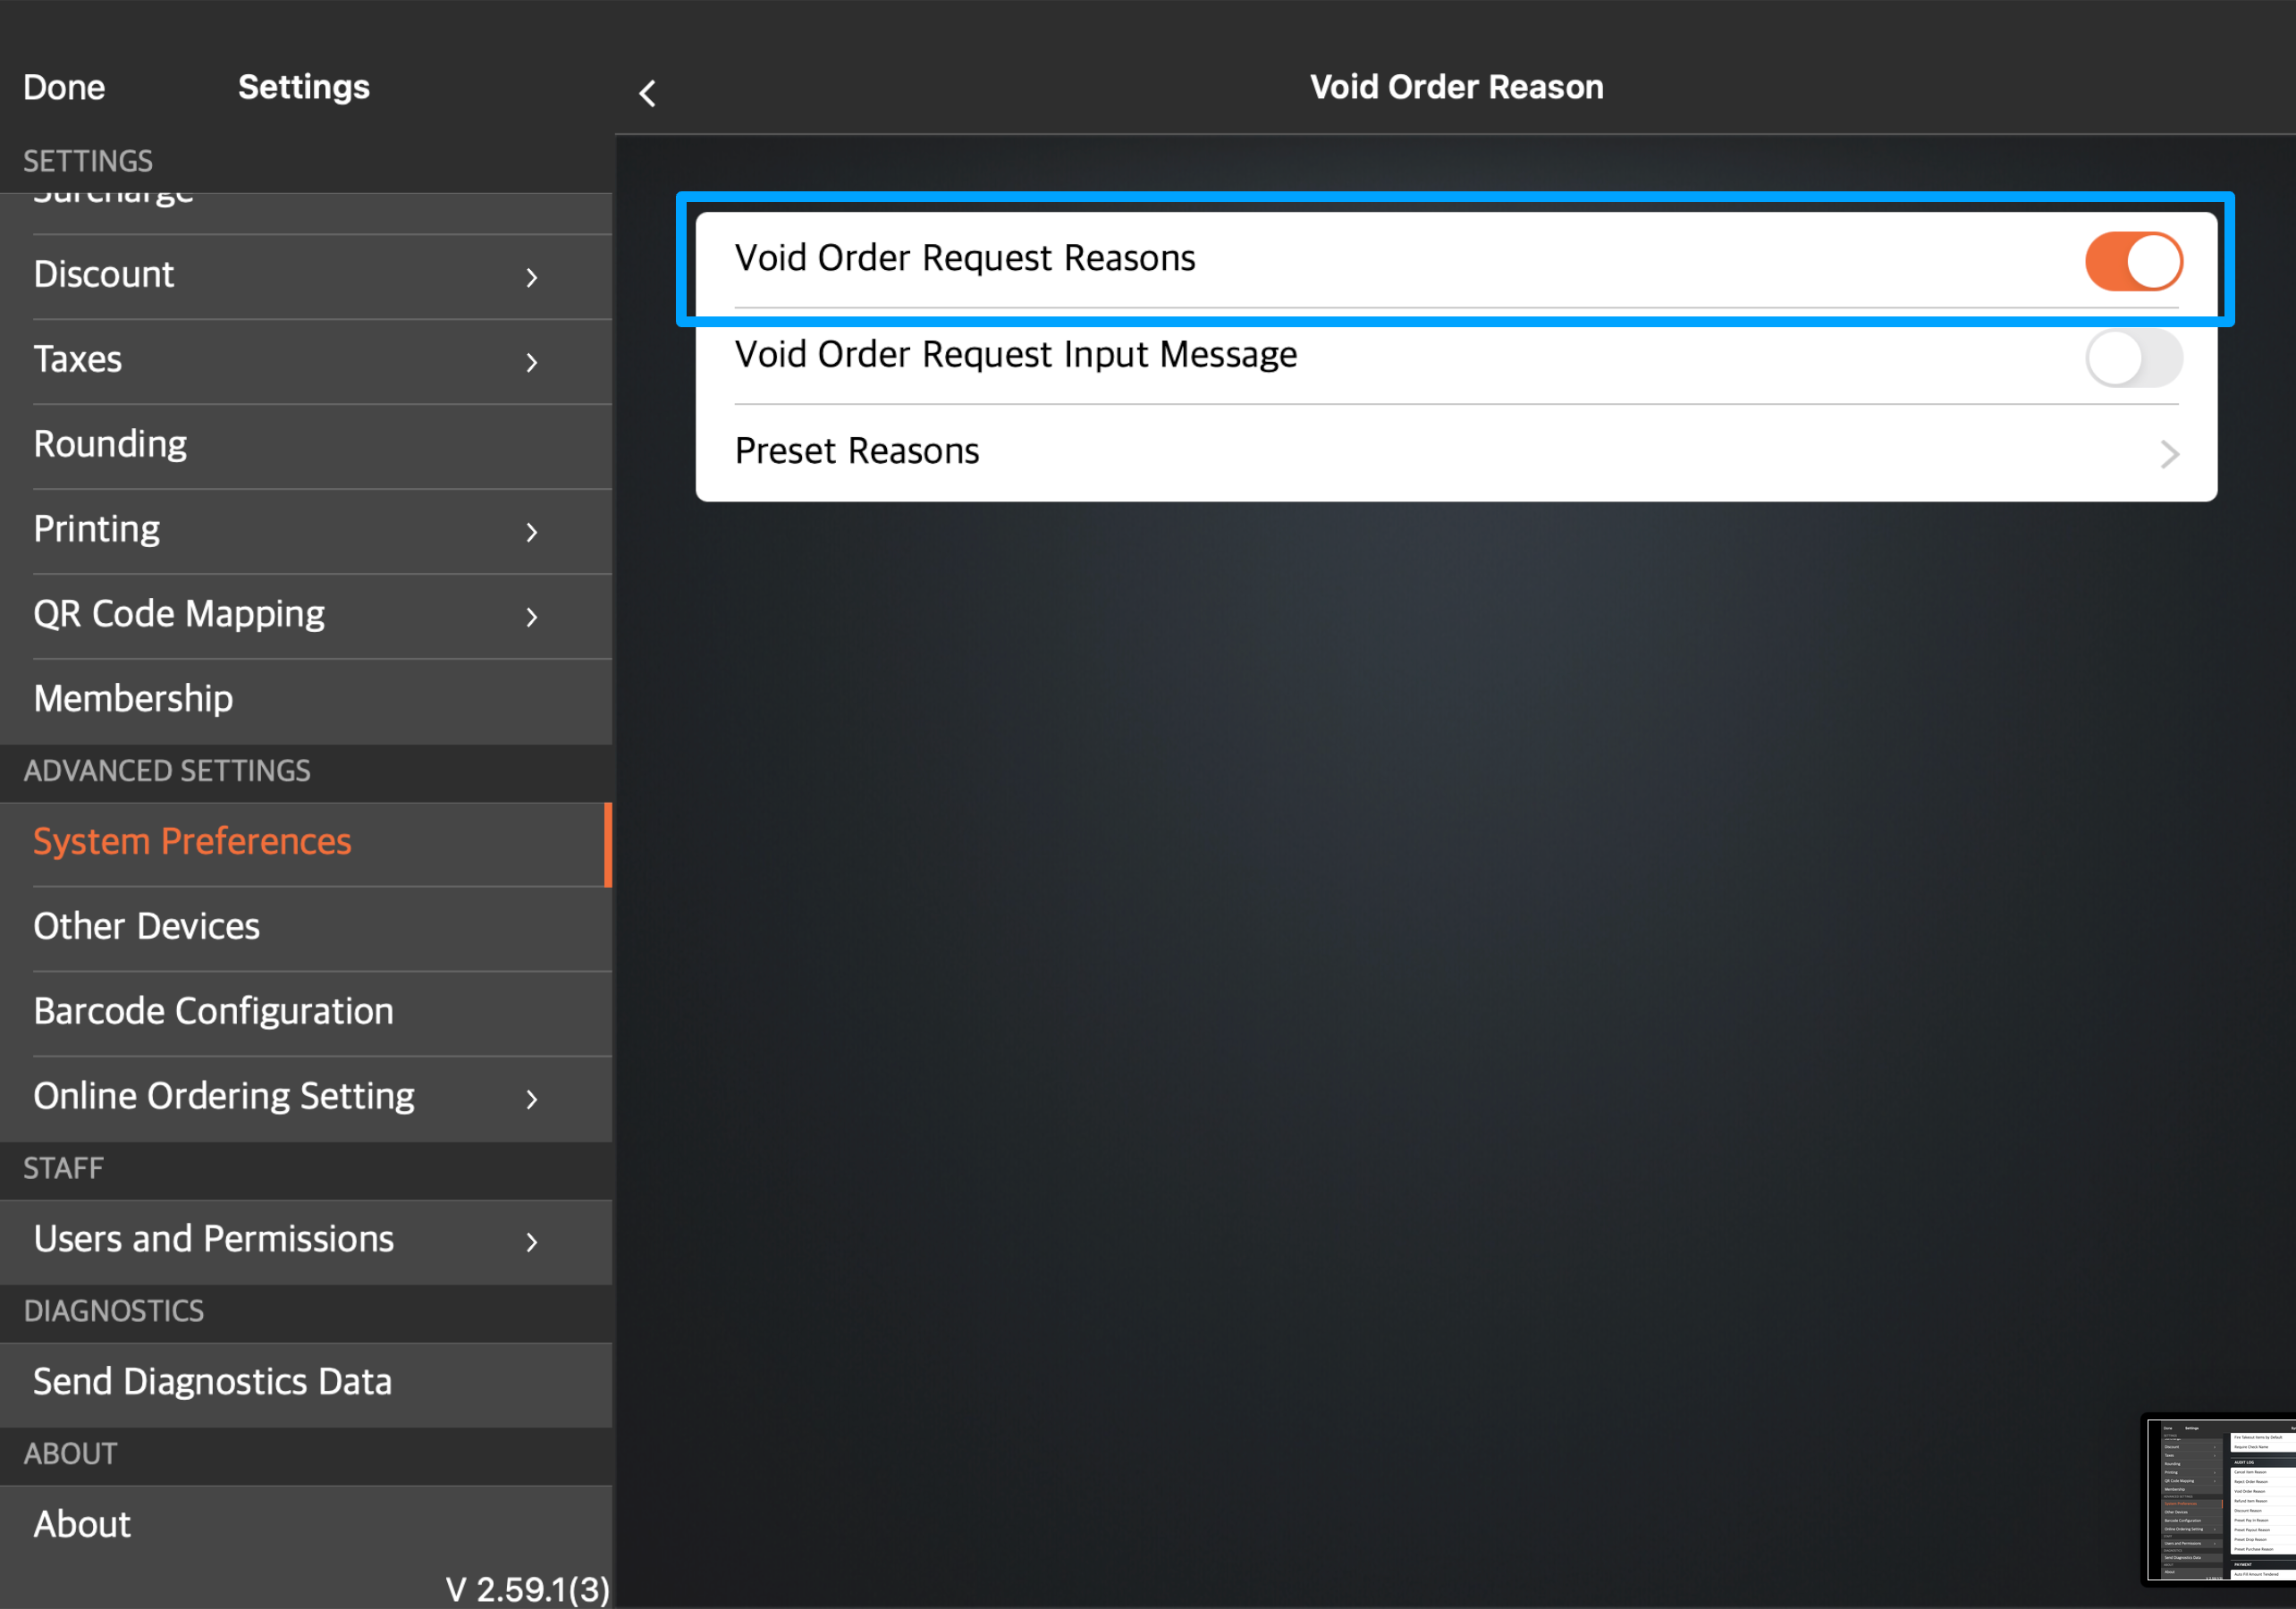
- (Optional) To create Preset Void Reasons, turn on Void Order Request Input Message, then tap Preset Reasons. At the top right, tap Add Reason, then enter your preferred preset reason. Go back to the previous screen once done.
- Tap Save to confirm.
Void an order
To perform a void for an order, open the payments screen, tap Void Bill, and then enter the reason for the void request. Tap Confirm to complete the transaction.