 Eats365 Products
 Merchant Guide
 Modules
 Membership
 Integrations
 Hardware
 Staff Operations
 Roles & Permissions
 Payments
 Reports
 What’s New
 Release Notes
 Troubleshooting
 Simulators
 Glossary
 Troubleshooter
 System Status
eSignage
Table of Contents
Configure eSignage settings (tvOS)
Learn how to customize layouts, display modes, and operational behaviors for your tvOS-based eSignage system.
Changing the eSignage allows you to customize on-screen layouts and display workflows to suit your business needs, such as promoting daily specials, displaying order pickup instructions, or showing queue information.
In this article, you’ll learn how to configure the eSignage (tvOS) to your preferred settings.
Change individual eSignage settings
To change specific settings on an eSignage, follow the steps below:
Eats365 POS
- Log in to the Eats365 POS.
- At the top right, tap Settings
 .
. - Under "General," tap Device Pairing
 e-Signage.
 - Next to "Mode of Operation," select the type of information that would appear on the eSignage.
-
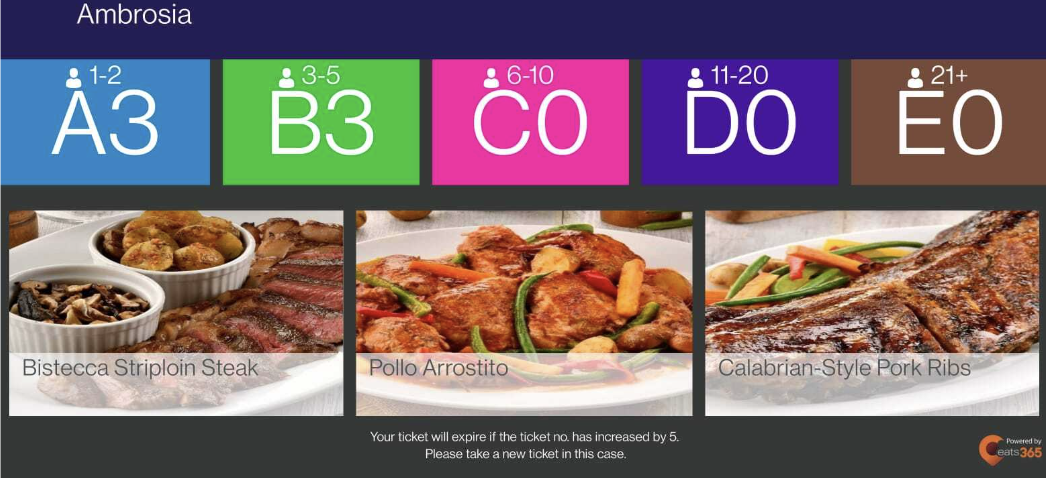
Queue Kiosk - Displays queue information.
-
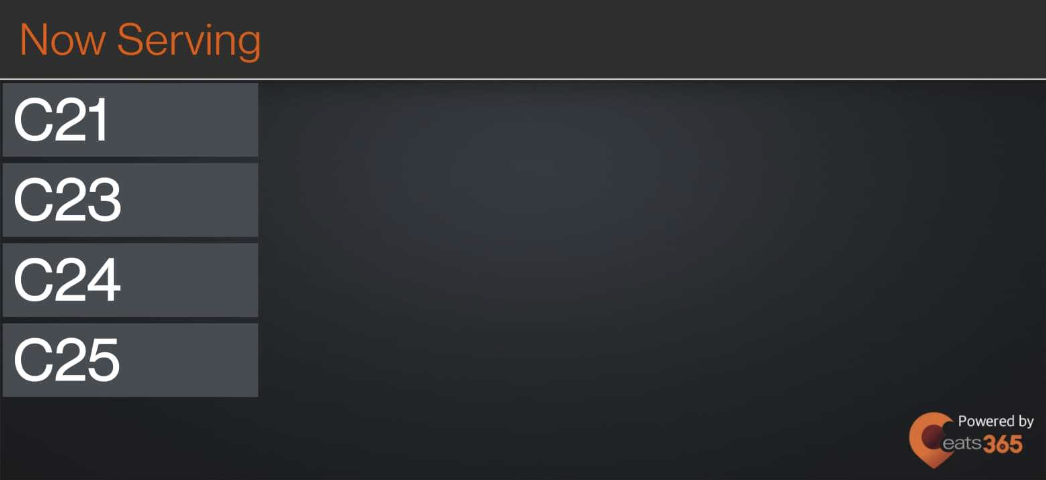
Pickup Display - Displays orders that are ready for pickup.
-
Queue Kiosk - Displays queue information.
- Configure the settings based on your preferences.
- At the top right, tap Save.
You can change the following options based on your selected mode of operation for the eSignage:
Pickup Display

Display Vertically
Enable this setting to display content vertically.
Pickup Counter
Select the counter where the pickup display will be used.
Show Pickup Counter Name
Enable this setting to display the pickup counter name on the pickup display.
| Enabled | Disabled |
 |
 |
Split Screen
Enable this setting to use half of the screen to display promotional media.
Number of Rows
Select the number of rows to display on the screen.
Number of Columns
Select the number of columns to display on the screen.
Order# Appear Time
Set how many seconds the order number appears on the screen.
Language
Choose the default display language.
DeleteQueue Kiosk

Display Vertically
Enable this setting to display content vertically.
Language
Choose the default display language.
DeleteMerchant Portal
- Log in to the Merchant Portal.
- On the left panel, click on ModuleseSignageLicense.
- Next to the device that you want to configure, click on Edit
 .
. - Next to "Mode of Operation," select the type of information that would appear on the eSignage.
-
Queuing System - Displays queue information.
-
Order Pickup Display - Displays orders that are ready for pickup.
-
Digital Board System - Displays custom uploaded content on media promotion. For more information on how to create media promotion, refer to Set up and manage Media Promotion.
Note: The Digital Board mode isn't supported on the Android eSignage.
-
Queuing System - Displays queue information.
- Configure the settings based on your preferences.
- At the top right, click on Save.
You can change the following options based on your selected mode of operation for the eSignage:
Pickup Display
Version
Select the theme that you want to use on the pickup display. You can choose from the following:
- Legacy
-
2.0
Note: Version 2.0 is currently only supported on the tvOS eSignage version 1.7 or later.
Depending on the theme you choose, some settings may not be available. Use the guide below on the settings available on the selected theme:
Legacy settings

Pickup Counter
Select the counter where the pickup display will be used.
Show Pickup Counter Name
Enable this setting to display the pickup counter name on the pickup display.
| Enabled | Disabled |
|
|
Skin
Select the lighting mode you want to use on the pickup display. You can choose from the following:
-
Dark

-
Light

Dimension
Select the orientation you want to use to show orders on the pickup display. You can choose from the following:
-
Horizontal - Displays content horizontally.

-
Vertical - Displays content vertically.
Note: This feature isn't supported on the Android eSignage.
Split Screen
Enable this setting to use half of the screen to display promotional media.
| Enabled | Disabled |
|
|
Number of Rows
Select the number of rows to display on the screen.
Number of Columns
Select the number of columns to display on the screen.
Order# Appear Time
Set how many seconds the order number appears on the screen.
Language
Choose the eSignage’s default display language.
2.0 settings

Filter by
-
Pickup Counter(s) - Display orders from multiple pickup counters. For more information on how to configure the pickup display to display orders from multiple counters, refer to Show orders from multiple pickup counters on a pickup display.
-
Order Sources - Display orders from different order sources. For more information on how to configure the pickup display to display orders from different order sources, refer to Show orders from multiple food delivery platforms on a pickup display.

Dimension
Select the orientation you want to use to show orders on the pickup display. You can choose from the following:
-
Horizontal - Displays content horizontally.
-
Vertical - Displays content vertically.
Note: This feature isn't supported on the Android eSignage.
Show Pickup Counter Name
Enable this setting to display the pickup counter name on the pickup display.
| Enabled | Disabled |
|
|
Split Screen
Enable this setting to use half of the screen to display promotional media.
| Enabled | Disabled |
|
|
Order# Appear Time
Set how many seconds the order number appears on the screen.
Language
Choose the eSignage’s default display language.
DeleteQueuing System

Skin
Select the lighting mode you want to use on the pickup display. You can choose from the following:
- Dark
- Light
Dimension
Select the orientation you want to use to show orders on the pickup display. You can choose from the following:
- Horizontal - Displays content horizontally.
-
Vertical - Displays content vertically.
Note: This feature isn't supported on the Android eSignage.
Show Ticket Expiry Message
Control whether you want the ticket expiry message to appear on the eSignage.
| Enabled | Disabled |
Ticket expiry message appears on the screen (Default). |
Ticket expiry message won't be displayed on the screen. |


Language
Choose the default display language.
DeleteDigital Board System
For information on how to use the Digital Board System mode, refer to the article on how to show custom content on the eSignage.
Language
Choose the default display language.
DeleteChange shared eSignage settings
"Shared Settings" control the behavior of all paired eSignage devices. Any changes you make within Shared Settings will automatically apply across all paired eSignage devices.
To change the eSignage shared settings, follow the steps below:

- Log in to the Merchant Portal.
- On the left panel, click on ModuleseSignageShared Settings.
- Under "Message to Customers," enter a custom message inside the text box.
Note: The custom message will be displayed on the eSignage. - At the top right, click on Save to confirm.
To learn how to create custom order sources, refer to Show orders from multiple food delivery platforms on a pickup display.